

Results 1,641 to 1,650 of 8348
 210Likes
Thread Information
Users Browsing this Thread
There are currently 1 users browsing this thread. (0 members and 1 guests)
 LinkBack URL
 About LinkBacks
-
02-02-2012, 08:04 AM #1641Senior Member


- Join Date
- May 2007
- Location
- South West Florida (Behind friendly lines but still in Occupied Territory)
- Posts
- 117,696
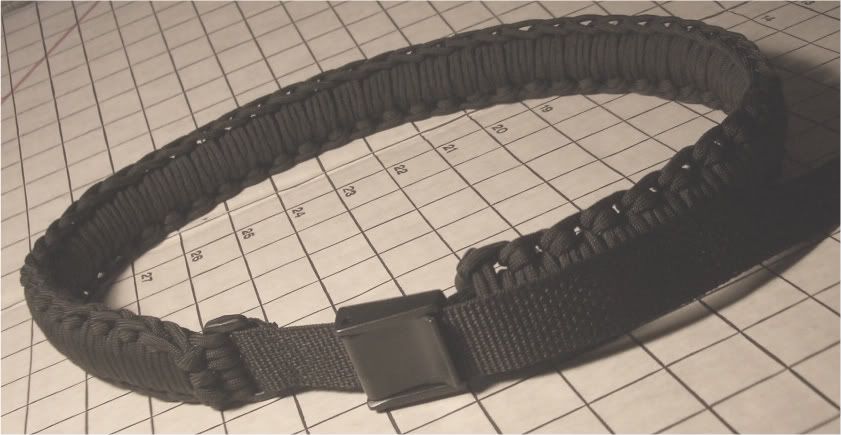
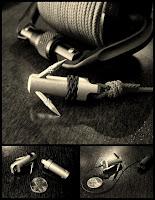
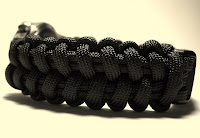
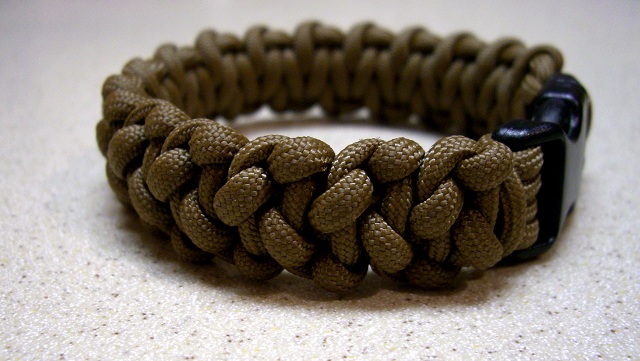
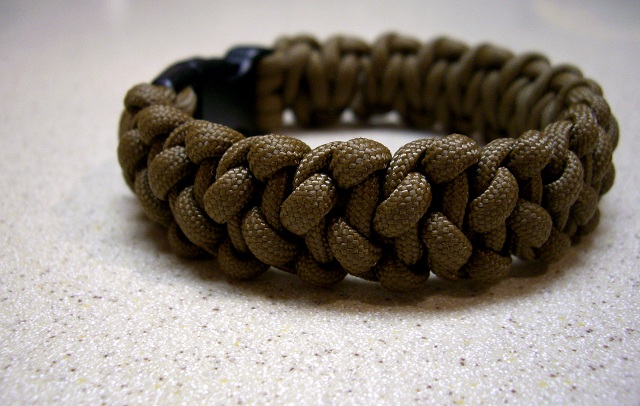
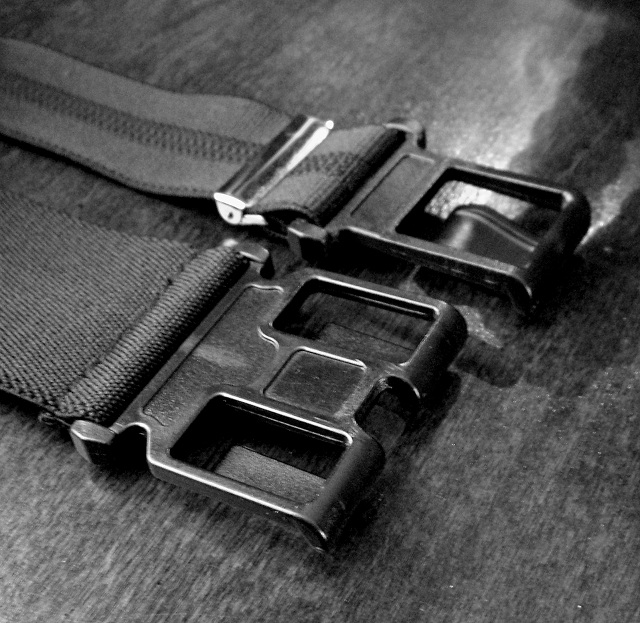
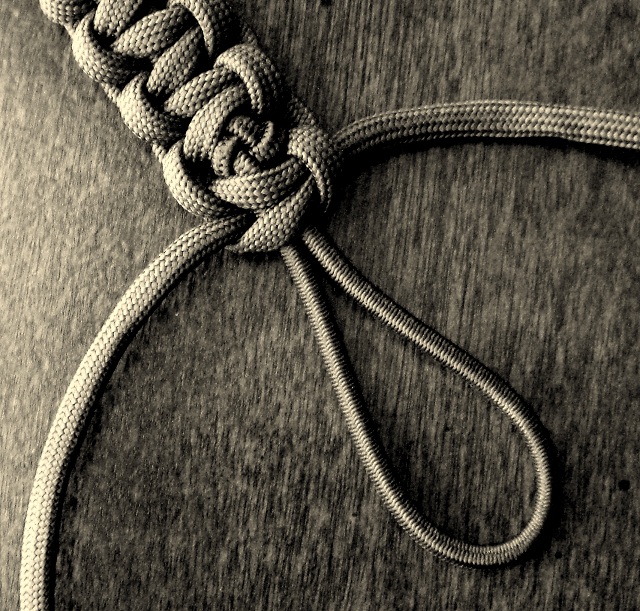
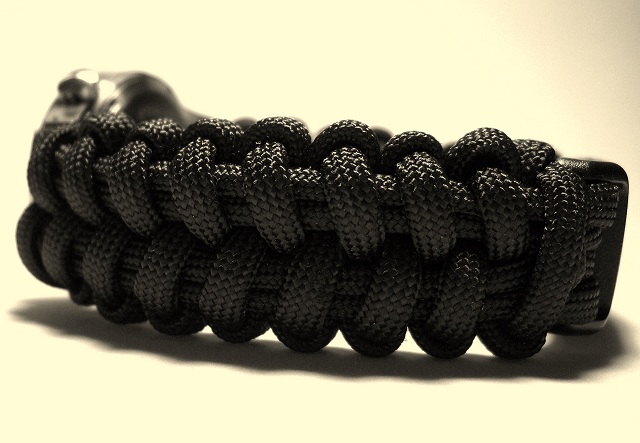
Parachute Cord (paracord) Survival Belt
Friday, August 7, 2009
I've been working on this idea which is an expansion of the paracord survival bracelet. The idea is for an accessory that one can wear which can quickly unravel to provide the useful cordage in cases of emergency. The average bracelet is made using approximately 15 to 20 feet of parachute cord. The perferred stuff is the Type III or 550 cord. This versatile cord has a breaking strength of 550 lbs.
I thought...wait...in an emergancy, you might not have time to sit around and unravel a bracelet. Also, 20 feet or cord is nice, but seems like if you were in a survival situation, you would want much more cord. I read one hiking page that recommended you carry 50 ft of 550 cord in your backpack. I came up with the idea in my mind to make an easily unwoven belt. That lead me to do some research. I came across Stromdrane's Blog which is a great source of inspiration. He lead me to the Slatt's Rescue Knot. Stromdrane did point out that the knot was very fustrating I and agree completely. Using this basic knot, I've created two different types of belts in two different sizes for a total of three different types of belts. Confused? Take a look below.
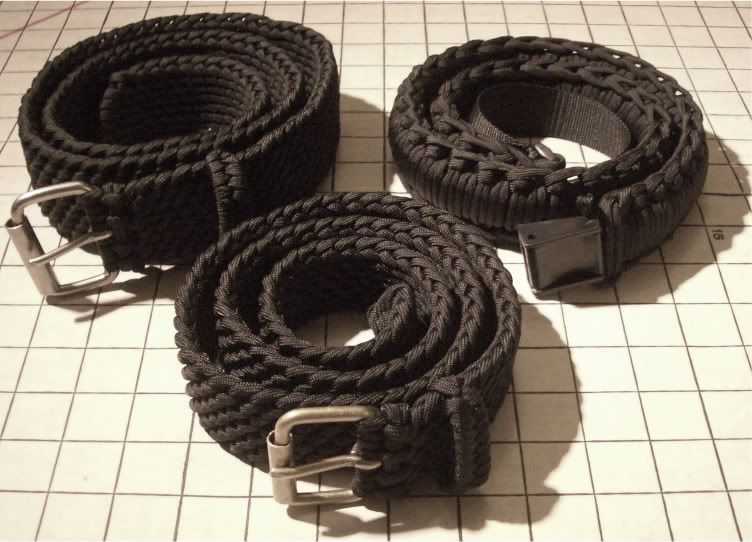
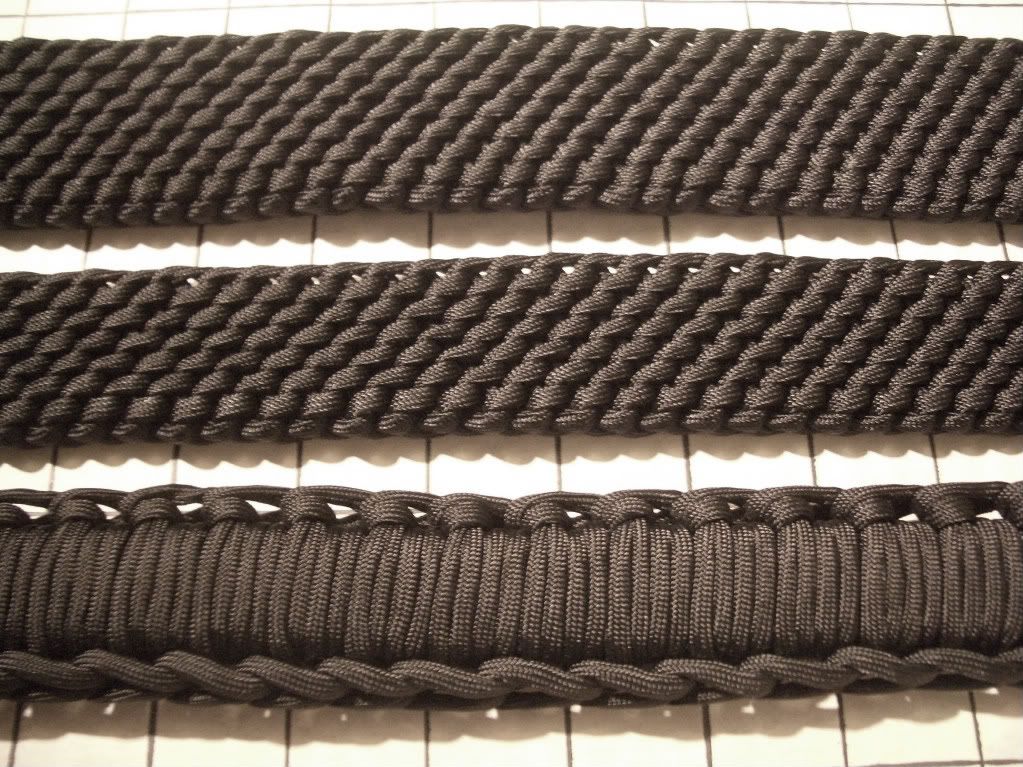
The top two rows are Slatt style belts in 1.5" and 1.25". The third row is a hybrid creation which I will discuss below.
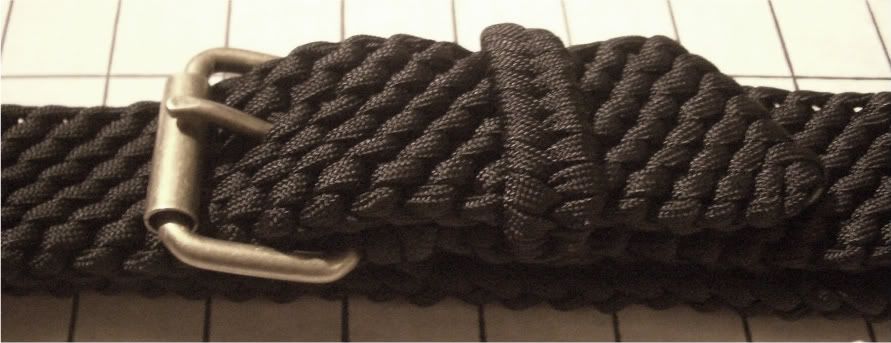
The Slatt style belts are implementations of the Slatt's Rescue Belt, but with some differences. I've added a steel buckle, a quick release system which I installed on all the belts, and a paracord belt keeper which falls off cleanly as the belt is disassembled.
I currently have access to three different finished on the buckle.
 From left to right it's antique brass, pewter, and then chrome.
Now let's talk about the hybrid belt.
I call it a hybrid belt because the core fo this belt is a Slatts Rescue knot. I found that when using 1 inch plastic hardware, the Slatts type of belt only allowed me to weave less than 40 ft before I reached the length I needed. To solve this problem I worked out an overpleat wrap that allowed me to use all 100 ft to make a usable belt. Also, this belt uses plastic hardware and nylon webbing which allows to belt to be adjustable. The buckles that I chose on this belt are cambuckles.
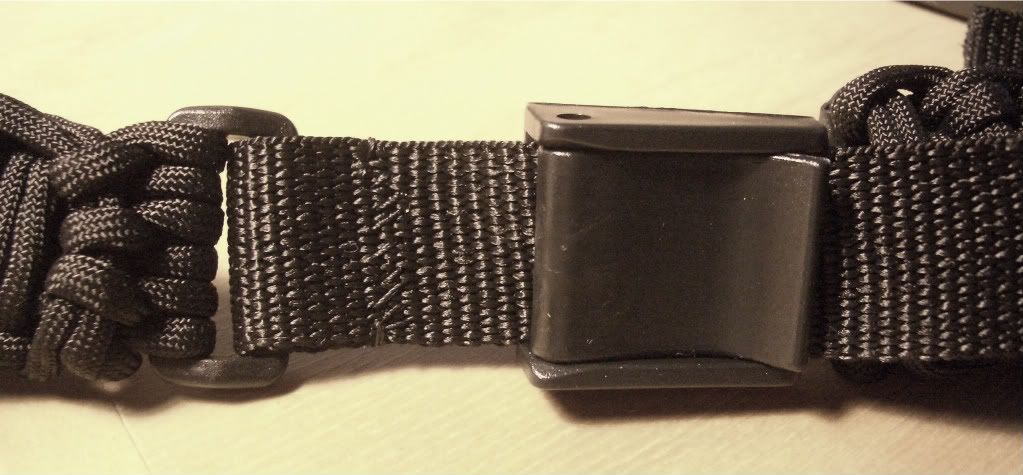
They can be made with side release buckles also.
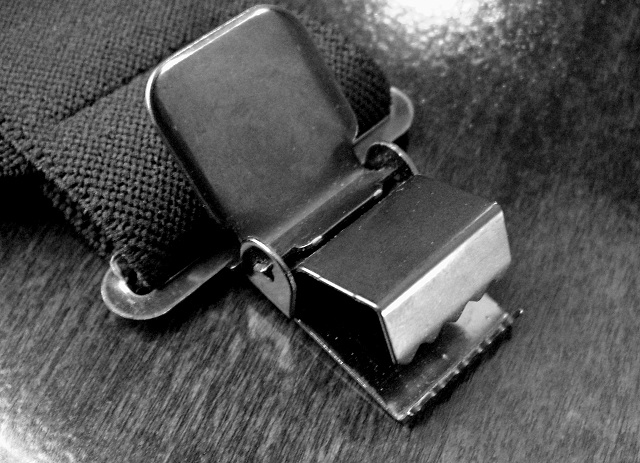
Now the quick release mechanism I was talking about.
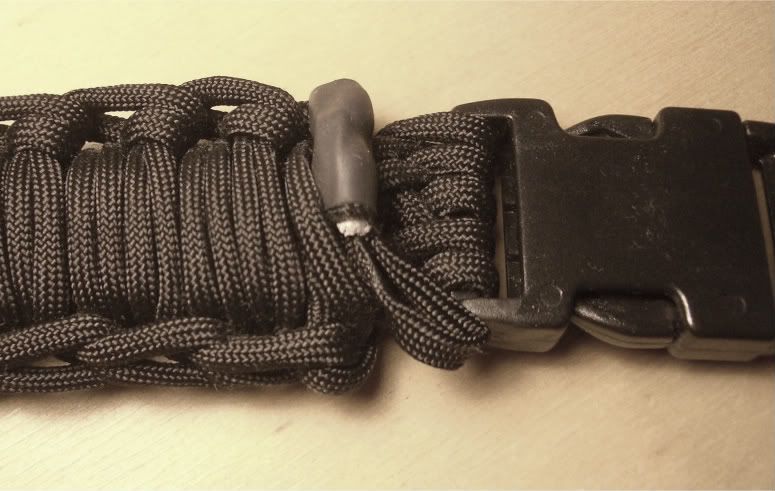
The belt is ended with a small loop of gutted paracord. The whole thing is secured with heat shrink tubing. The connection is designed that only a very strong can free the paracord. One strong pull of the loop, the entire belt will become 100ft of 550 paracord.
If you are interested in buying a belt, they are $50 + shipping. All belts are handmade by me and custom orders are encouraged (makes sure the belt is correct length). If you want a custom color, I need at least two orders in the color before I can justify the cost of buying the paracord. Email me at card1shark@gmail.com and we'll get that process rolling.
CardShark's Crafts: Parachute Cord (paracord) Survival BeltJoin our efforts to Secure America's Borders and End Illegal Immigration by Joining ALIPAC's E-Mail Alerts network (CLICK HERE)
-
02-02-2012, 08:06 AM #1642Senior Member
- Join Date
- May 2007
- Location
- South West Florida (Behind friendly lines but still in Occupied Territory)
- Posts
- 117,696
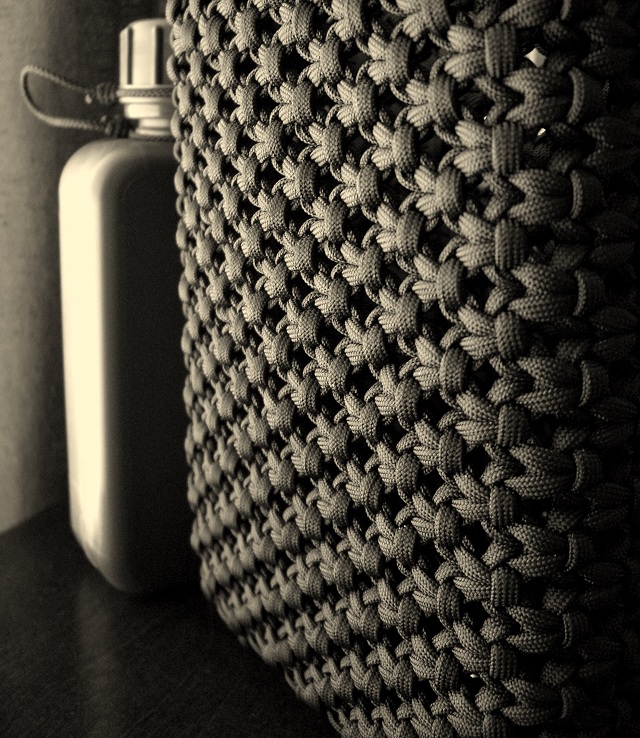
Paracord Canteen Cover... Click on the Photos to enlarge the image
 After working on this project off and on for several days, I've finally finished. I ended up using over 200 feet of paracord for the finished cover/pouch, for the 1L Flat Pack Canteen from County Comm, tied mostly with basic square knotting/macrame type knot work.
I wasn't following any tutorial, so this was a good bit of trial and error on how much paracord I actually needed, and especially finishing up the bottom side. I tried using hitching and weaving, but just couldn't get anything to work to my satisfaction, so settled on sewing the bottom side ends together. And although the bottom side is not flat, it'll still stand upright, and the needle/thread work is secure.
I used a length of tether cord to attach the canteen cap to the canteen, with scaffold knots/loops to prevent loss.
 I had no idea of how much cord I'd need at the start, so after making a loop around the canteen with a few feet of cord and holding it with a cord lock, I started cutting 10 foot lengths of paracord and cow/ring hitching them onto the loop to fill up the space all the way around. I ended up with 36 strands/72 working ends, for around 365 feet of paracord to start with. That left me with using around 6 feet of each 10 foot strand for the way I completed the cover. Other finishing methods would have used more cord.
Using alternating square knots, like I'd done with paracord belts and a guitar strap several years ago, I worked my way horizontally around the canteen. I wanted the 8 inch height of the canteen covered, but you could make it shorter, or possibly longer to close the top, maybe using velcro, fashioning a flap, or sewing in a zipper. The knot work is tight, making for a stiff but still flexible form, so the pouch could be used to carry other items besides the canteen.
My hands sometimes bother me and cramp up, so I took frequent breaks with this project, also being careful to avoid blisters that you can sometimes get with tightening a lot of paracord square knots. I have no idea how much time I actually spent on this project, but there's definitely a lot of hours in this one. I used an adjustable shoulder strap from my Spec-Ops Pack-Rat with the cover, adding about 12 feet of paracord, with a Solomon bar/Portuguese sinnet/cobra stitch, for a wider shoulder pad, knotted over it.
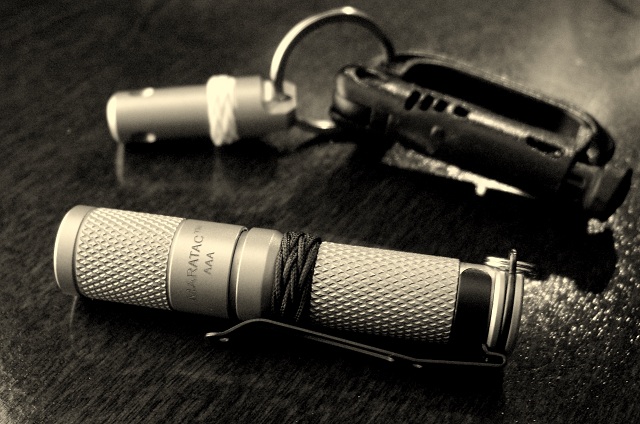
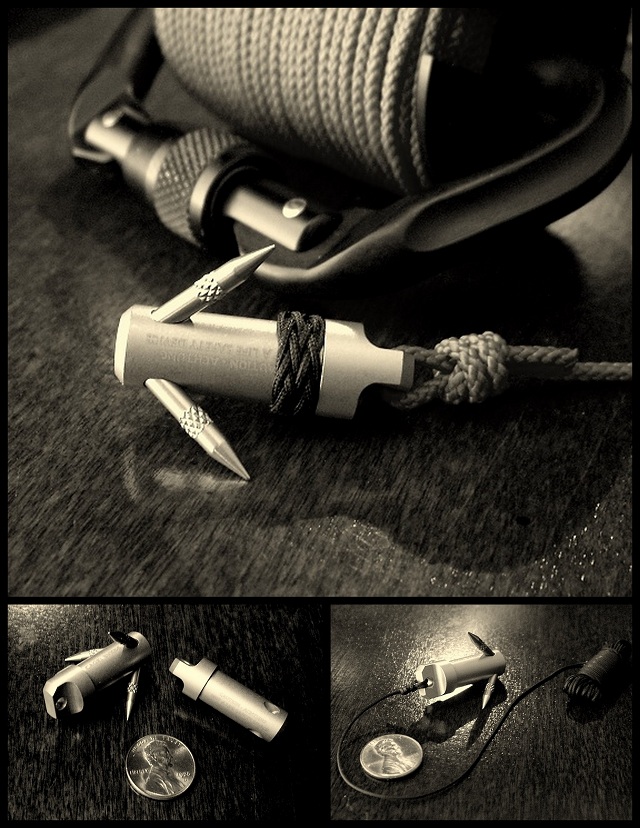
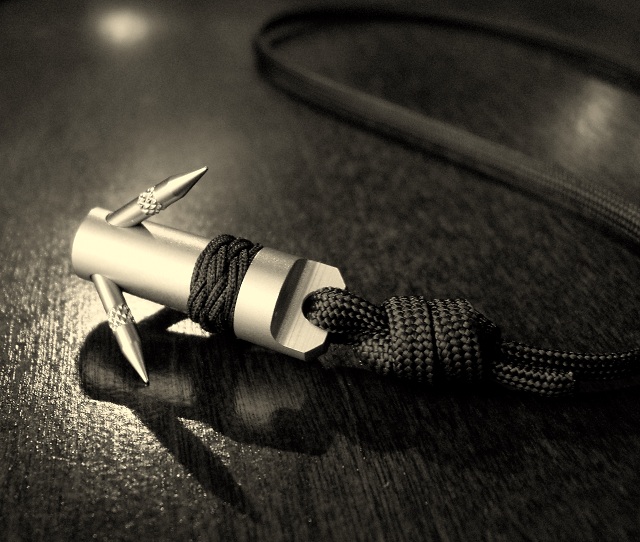
 Along with the canteen, I also got some new Pico Grappling Hooks and a Maratac Stainless Steel AAA Flashlight, that both fit neatly on a keyring. I added a few gaucho knots with 0.9mm cord on them. The knurling on the the light is great for easy one handed operation, and I'd say this is the nicest quality/built AAA LED flashlight I've owned.
 The grappling hooks were made for use by soldiers in the field, to snag trip wires and IED detonation cords, but any good scout or civilian could certainly find them useful to retrieve items that might be out of reach otherwise. If you hadn't seen them before, you now know you need one your EDC key ring! I have another on a split ring and attached to a Drop-Line Rapid Line Deployment System. My deviant side can't help but imagine a cat 'o nine tails fitted with lots of the little grappling hooks, ouch...
Stormdrane's Blog: Paracord Canteen Cover...Last edited by AirborneSapper7; 02-02-2012 at 08:19 AM.
Join our efforts to Secure America's Borders and End Illegal Immigration by Joining ALIPAC's E-Mail Alerts network (CLICK HERE)
-
02-02-2012, 08:11 AM #1643Senior Member
- Join Date
- May 2007
- Location
- South West Florida (Behind friendly lines but still in Occupied Territory)
- Posts
- 117,696
Cobbled Solomon Bar Paracord Bracelet... Click on the Photos to enlarge the image
JD of TIAT put up another instructional video yesterday, for tying the Cobbled Solomon Bar, as a bracelet with knot and loop closure. I gave it a try this morning with a single length of coyote brown paracord and a 5/8" contoured/curved side release buckle.

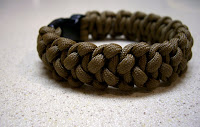 The video shows it tied with two paracord colors, 6.5 ft of each, and used a knot and loop closure. I tied mine with a single strand, starting with 16 ft to be on the safe side, and attached it to a 5/8 inch curved/contoured side release buckle, as I would at the start of a regular Solomon bar/Portuguese sinnet/cobra stitch type bracelet.
I added an inch to my wrist size when I set up before I started tying, but in the end that made for a loose fit, so I would just tie it the same as my wrist size in the future. You may get different results depending on how loose/tight you tie it yourself...

I tucked/trimmed the ends to finish, using about 11.5 ft of the 16 ft that I started with. One working end was considerably shorter than the other at the finish, one 8 inch length and one 3 ft 10 inch length, so one working strand was used more than the other. Overestimating what I'd need at the start let me finish without running out of cord, but uneven ending strand lengths may still be something to figure out in the future, starting somewhere off center when first attaching the paracord to the buckle, to eliminate wasted excess cord...
 With a contoured/curved buckle, you decide which side you want facing out when you start tying, since each side looks different. If you use a flat buckle, it won't matter since it will be reversible, like it is with the knot/loop version.
And a lanyard with navy blue and orange paracord with swivel clip, both sides shown...
Stormdrane's Blog: Cobbled Solomon Bar Paracord Bracelet...Last edited by AirborneSapper7; 02-02-2012 at 08:19 AM.
Join our efforts to Secure America's Borders and End Illegal Immigration by Joining ALIPAC's E-Mail Alerts network (CLICK HERE)
-
02-02-2012, 08:11 AM #1644Senior Member
- Join Date
- May 2007
- Location
- South West Florida (Behind friendly lines but still in Occupied Territory)
- Posts
- 117,696
Join our efforts to Secure America's Borders and End Illegal Immigration by Joining ALIPAC's E-Mail Alerts network (CLICK HERE)
-
02-02-2012, 08:13 AM #1645Senior Member
- Join Date
- May 2007
- Location
- South West Florida (Behind friendly lines but still in Occupied Territory)
- Posts
- 117,696
Paracord suspenders... Click on the Photos to enlarge the image
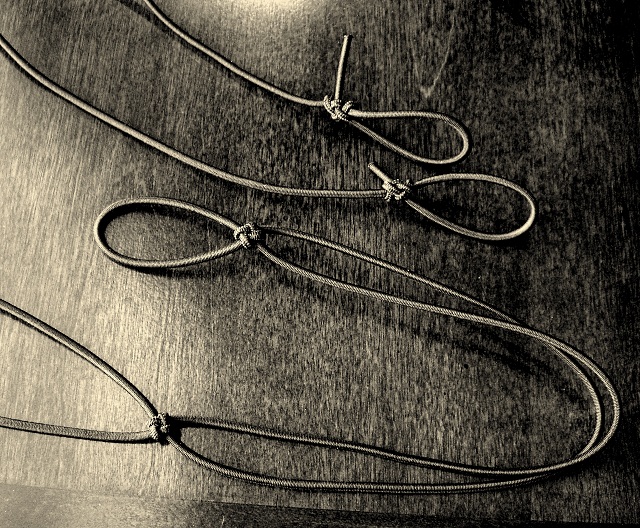
This is one of those projects that's been on the 'to do' list for a long time. Just a simple three point attachment version of suspenders, non-adjustable and made to fit me. I used shock cord for the core, Flat Gate Clips from County Comm for the attachments to clip to my pant's belt loops, and then knotting over the shock cord with paracord, tying the Solomon bar/Portuguese sinnet/cobra stitch.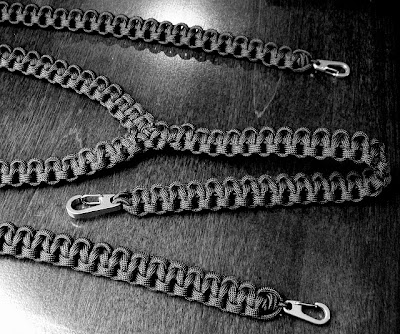
I started with about 10 feet of shock cord, looping the center of that length onto one flat gate clip, measuring about a foot down with both cord ends to tie a cross knot, splitting up the two cords and measuring about three feet down each, tying a scaffold knot to each of two more flat gate clips.
 I had about a 60 ft length of black paracord that I cut in half, then used each to tie Solomon bars around each of the two single lengths of shock cord to where they meet at the Chinese crown knot. I had just enough paracord left at this point to make a couple more knots on the other side of the crown knot, tucking/pulling end strands under the knot work. I used another 12 ft length of paracord to tie a Solomon bar from the third flat gate clip up to where I ran out of cord with the other strands, then tucked the excess under the knot work to finish. If I'd had more paracord available, I would have started with a 100 ft long hank, cutting that in half, then once the two shoulder straps were covered, I would of had plenty to continue down around the single back length of shock cord.

Since these are not adjustable, I made a guesstimate with the single section from the back and the two shoulder straps down the front, with all the flat gate clips attaching to the belt loops of the pants I wear, and where the pants fit around me as I wear them. The shock cord allows the suspenders to stretch(old example video link I made with Solomon bar over shock cord) when sitting, standing, bending, and moving about. If you were to just use paracord alone, you'd likely find the suspenders uncomfortable to use without any give in them. I've found a good fit with just enough tension in the cord to keep the shoulder straps in place while standing, but not too much or you'll find the back attachment pulling your pants up to the point of giving yourself an uncomfortable wedgie...
 The initial fit is good, but I'll have to see how they do over time. I have other suspenders that I occasionally wear to help keep my britches up, with a three point belt attachment Perry type suspenders, and a two point side clip type from Duluth Trading Company.
Suspender clip attachments come in a variety of styles, shapes, and sizes, but generally have wide attachments for use with elastic webbing. You may find some out there that can be cannibalized for use with making your own paracord suspenders...

You could try knotting directly over/around elastic suspenders, anchoring the paracord at the attachments at start and finish, similar to knotting over bag/pack/gear handles, but I haven't tried it with my suspenders, so I dunno if it'd work out or not. Another possibility is to make loops on the ends of the shock cord, to fit over your belt, instead of using attachments.
Some folks wear either a belt or suspenders, but when I wear suspenders, I use them along with a belt, worn over a tucked in t-shirt and underneath a button down shirt with straight hem that's meant to be worn untucked.
There's a thread on the DIY Tactical forums with some neat ideas of using side release buckles and webbing loops instead of the metal grip clips with low-profile suspenders.
 A few more photos of another pair of shock cord suspenders with fixed loops instead of attachments, to use with a belt. Started with a 2" loop and cross knot, down a foot then another cross knot, and finishing with a pair of broach knots for the shoulder straps. The other couple of photos show starting the knotting from the broach knot ends and ending at the other side of the cross knot, with the end strands to be tucked under the knot work with hemostats...
 When making your own suspenders, to figure out your shoulder strap length for the shock cord, put on pants and attach the back part of your shock cord suspenders(loop or attachments), then pull each of the shoulder pieces over your shoulders down to where they'll either attach to your pants or belt, and decide the strap length on the tension you want, taking into account what attachment you'll use, then add the attachment or loops on the strap ends. You're left to choose what type of paracord knot work you want to tie over it
Stormdrane's Blog: Paracord suspenders...Last edited by AirborneSapper7; 02-02-2012 at 08:18 AM.
Join our efforts to Secure America's Borders and End Illegal Immigration by Joining ALIPAC's E-Mail Alerts network (CLICK HERE)
-
02-02-2012, 08:15 AM #1646Senior Member
- Join Date
- May 2007
- Location
- South West Florida (Behind friendly lines but still in Occupied Territory)
- Posts
- 117,696
Stormdrane's Blog
Welcome to my blog. Here I've posted photos of my hobby and share some ideas on things I've learned to make using decorative and useful knots. If you want to learn, there are informative links throughout the blog for books and online learning resources. If you have trouble figuring a knot out, have patience and keep trying. Click 'Older Posts' at the bottom of the last post on each page or search the 'Archive' for more.
Links worth a visit, in mostly alphabetical order:- * Strength for Service
- * Animated Knots by Grog
- * Andy's World of Knots
- * A.G. Russell Knives
- * American Diabetes Association
- * American Knife & Tool Institute (AKTI)
- * Astronomy Picture of the Day
- * Atwood Rope MFG
- * Absaroka Western Designs
- * ball bearings - ToolSupply
- * Barry Brown
- * berkeley point
- * Bladeforums
- * BladeOps
- * BLADEREVIEWS.com
- * Blood Sugar 101
- * Blue Smoke and BBQ
- * Books on knots...
- * BoondoggleMan.com
- * Bound_For_Cory
- * CandlePower Forums
- * Cardshark's Crafts
- * Celtic Button Knot
- * Chinese Knotting
- * Colby Knot and Tool
- * ComLax Crosslace cord
- * Congress.org
- * Constrictor knot
- * Cool Glow Stuff!
- * County Comm
- * Crazy4 Money Clips
- * creative and decorative ropework by Nick Hill
- * Creative Designworks - side release buckles - snap hooks - swivel clips
- * Cultura Marinara
- * CUrchin Knot
- * deano42
- * Des Pawson
- * devilchasnme
- * DIY TACTICAL
- * donb knots
- * DudeCraft
- * Duluth Trading Co.
- * EarthSky
- * EDC Depot
- * EDC Forums - Every Day Carry
- * Emergency Essentials
- * Enchanting Beads
- * Everyday Carry
- * Felinevet on EDC Source
- * FireSteel.com
- * Fix My Blinds - small diameter cord for knot work
- * Flashlight News
- * Flickr photo slideshow
- * Folsom's Knots
- * Frayed Knot Arts
- * FullContactGEEK
- * Fusion Knots Forum
- * Going Gear
- * Going Prepared Forum
- * GPJ Rope - mini blind cord
- * Grant Cunningham
- * Gun & Game
- * Hand-Crafted Knot Jewelry
- * Home On the Range
- * HORAN KNIVES
- * Ian's Shoelace Site
- * Innovative Ropework
- * instructables
- * International Guild of Knot Tyers
- * It's Knot Art
- * ITW Nexus
- * JerzeeDevil Forums
- * Joe's Knots
- * Ken's chain sinnet paracord bracelet tutorial
- * Knives and Lanyards
- * knoopenzo
- * Knot Heads World Wide
- * Knotical's Blog
- * Knots on the Web
- * knottool.com
- * Knotty Sean
- * knotworkn
- * Ladder Rack Knot
- * Leatherworker.net
- * Lighthound
- * LoopyLacer's Knot-Tying and Tatting Blog
- * Machine woven parachute cord braided belts
- * Make a rope rug
- * Making Rope with a Hand Drill - Tutorial
- * MIL-SPEC MONKEY
- * Modern Combative Systems
- * Monkey's Fist knot video tutorial
- * More Than Fish & Hammocks
- * More Than Knots
- * mowfugger - braided nylon cord
- * Multitool.org
- * Nomad Of Soul
- * Non snagging lanyard loop tutorial
- * Notable Knot Index
- * Nothing to see here, move along.
- * One Bag
- * Ornamental Knots
- * P-38 Can Opener
- * Pale Horse Fighters
- * Paracord Bracelet - without buckle
- * Paracord bracelet with a buckle
- * Paracord D-guard - Bad Mojo
- * Paracord D-guard for a fixed blade
- * Paracord Lanyard Project
- * Paracord Survival/Rescue Belt
- * Paracord watchband with a buckle
- * Paracord Water Bottle Holder Tutorial
- * Paracord wrist lanyard
- * 550 Paracord Headquarters
- * 550 Paracord Place
- * peacefuljeffrey's wide-pouch paracord sling tutorial
- * Pineapple Knot Forum
- * Planet Pocket Tool - Peter Atwood
- * PodCacher
- * Psalm 91 Bandana
- * R&W Rope Warehouse
- * rabsknots
- * Rants of an Angry Dwarf
- * Remembrances: 89th ID WW2
- * Rogue Turtle - knots and nets
- * Sailor's Bracelet
- * Sailor's Cross Knot Tutorial
- * say uncle
- * Skullsville
- * Slatts Rescue Belt
- * Slinging.org
- * Spartan Helmet Bead
- * Spyderco Forums
- * Stormdrane's photos on Xanga
- * Stormdrane's YouTube Videos
- * Strength for Service
- * Supply Captain - 550 paracord - shock cord - accessory paracord
- * Survival Outdoor Skills
- * Survival Topics
- * Swiss Bianco
- * Tahoe to Whitney
- * the gadgeteer
- * The Knot Knut
- * The Mother of All Maritime Links
- * The Paracordist
- * The Rasch Outdoor Chronicles
- * Three Strand Matthew Walker Knot
- * Tied In Knotz
- * Titanium money clip
- * TOMKNOTS
- * Trident
- * Triple Aught Design(TAD Gear)
- * Turk's Head knot
- * TurksHead54's Knotting Page
- * Two Strand Matthew Walker Knot
- * TyingItAllTogether
- * Unique Ropecraft
- * United Methodist Men / Blog
- * Useful Rope Knots
- * Walking Staffs
- * Wide paracord bracelet tutorial
- * Woods Monkey
- * Woven paracord bracelet/watchband tutorial
- * Zombie Squad
Stormdrane's BlogJoin our efforts to Secure America's Borders and End Illegal Immigration by Joining ALIPAC's E-Mail Alerts network (CLICK HERE)
-
02-02-2012, 08:18 AM #1647Senior Member
- Join Date
- May 2007
- Location
- South West Florida (Behind friendly lines but still in Occupied Territory)
- Posts
- 117,696
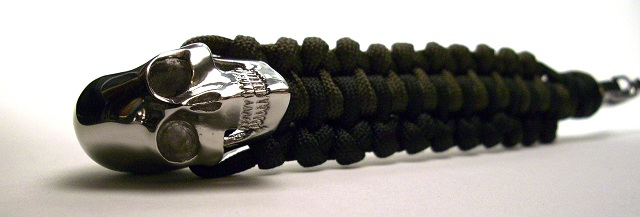
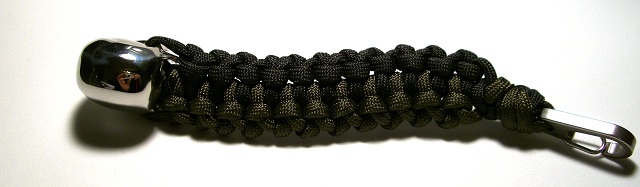
A hard head and a little backbone... Click on the Photos to enlarge the image
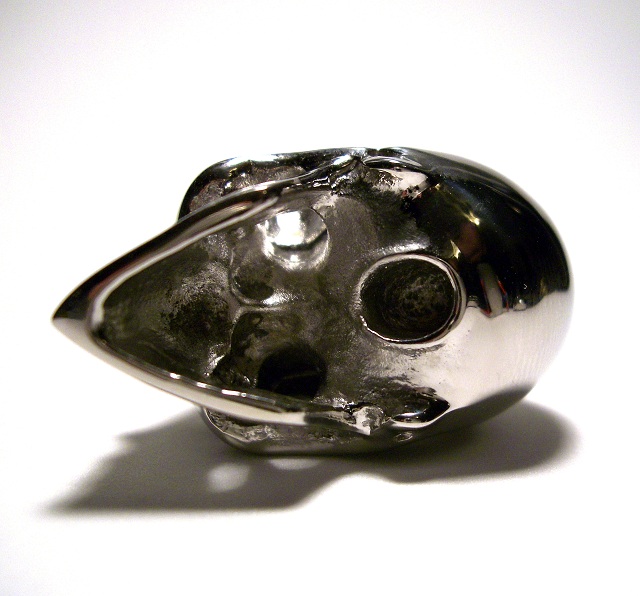
 This hefty Titan Stainless Steel Skull got a Backbone Bar added to it, using black and olive drab paracord, with a large Flat Gate Clip for attachment to a key ring or belt loop. A couple of the end strands go around the clip and are tied in a double wall knot around all four strands, then trim and tuck the ends to finish.

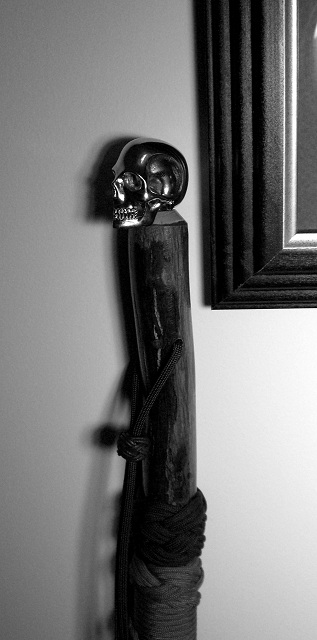
 The skull is large enough to use as a paperweight on it's own, although I prefer it with some knot work for lanyards/fobs, and I even tried one out to top a walking staff/cane. When I get around to it, I'll add some glow-in-the-dark powder and epoxy to the eye sockets.
 With a bit of epoxy in the divot on the underside of the skull and then placed over a screw that's still partially exposed above a cane/staff, it looks to work ok. Just for decorative use though, as I think if it was used to clobber someone, it might end up getting launched instead.
Someone else may know of a more secure way to mount the skulls on a walking staff/stick/cane, maybe carving the top of the staff to fit the underside of the skull along with a screw/bolt and epoxy...
I've tried a couple of knot work attachments with the skull on the staff, with paracord going though the skull and then down through the staff lanyard hole in a loop, then weaving or headhunter knots around the staff, but haven't found one I really like yet...
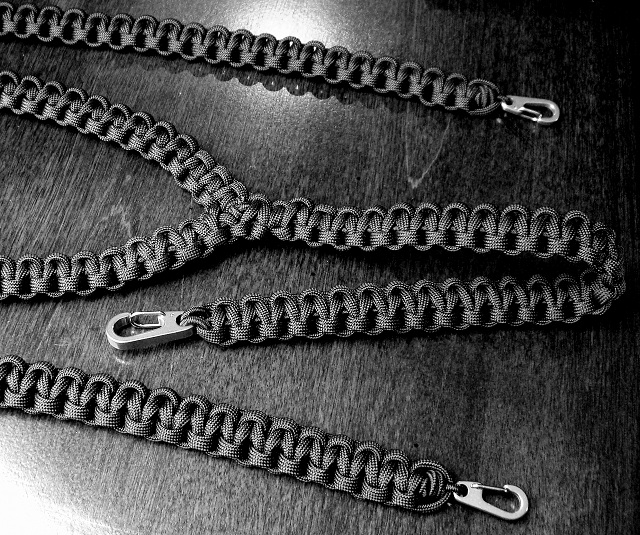
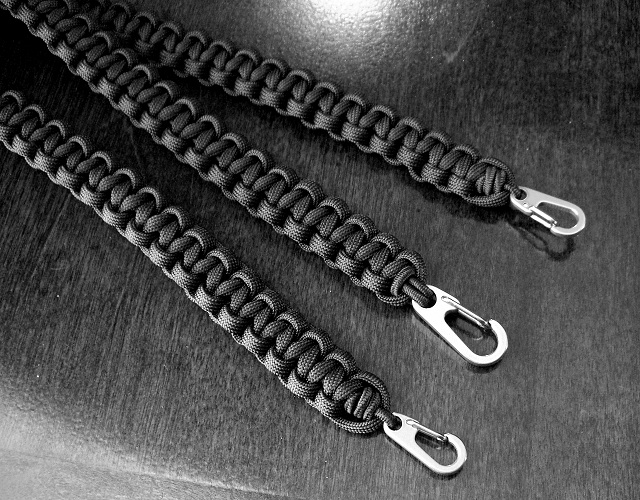
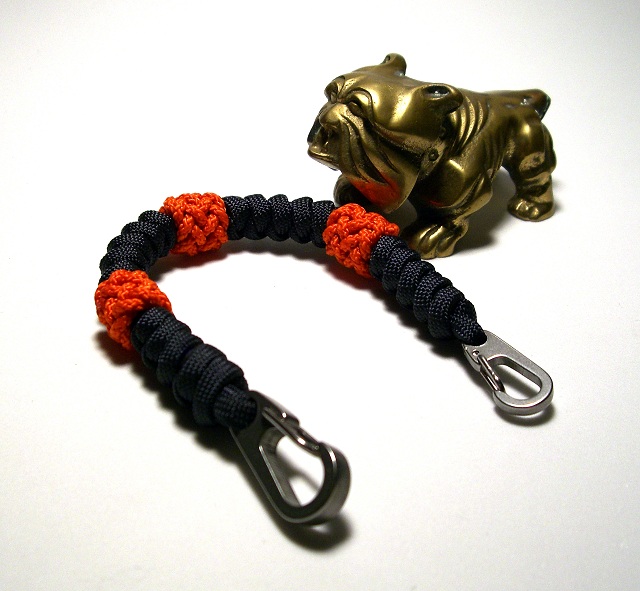
 I used large and medium clips on a wall knot paracord lanyard(navy blue), with a few spaced out Gaucho knots tied with orange Tether Cord. This one's for clipping to a key ring, pocket knife, flashlight, etc. with the other end attached to a belt loop...
Stormdrane's Blog: A hard head and a little backbone...Last edited by AirborneSapper7; 02-02-2012 at 08:21 AM.
Join our efforts to Secure America's Borders and End Illegal Immigration by Joining ALIPAC's E-Mail Alerts network (CLICK HERE)
-
02-02-2012, 08:23 AM #1648Senior Member
- Join Date
- May 2007
- Location
- South West Florida (Behind friendly lines but still in Occupied Territory)
- Posts
- 117,696
Keeping track of time... Click on the Photos to enlarge the image
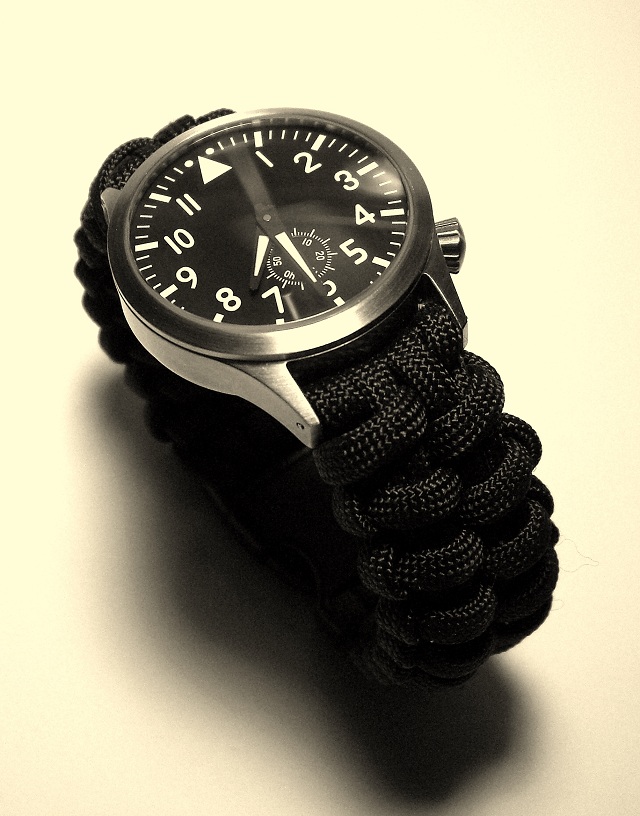
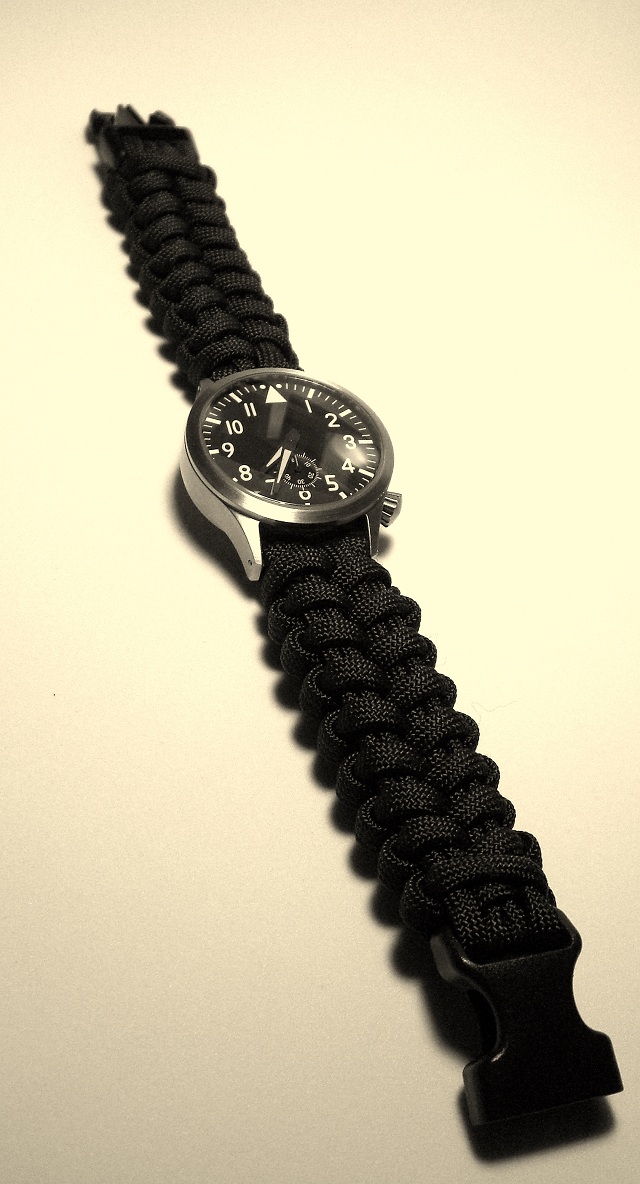
 The last paracord watchband that I tied, was using JD of TIAT's 'Stitched Solomon Bar', and I liked that pattern so much, that I used it again with my Maratac Mid Pilot Automatic Watch from County Comm.
The differences in this watchband version and the previous one, are a four strand core that's paired off and knotted around, and it's made in two sections, so no strands run across the underside of the watch.

 Each section of paracord was tied between the watch pins and one half of the 5/8" side release buckle. So sizing is in three measurements, of each of the two paracord sections and the space between the watch pins across the back side of the watch.
I started with a six foot length of paracord for each side of the band, and ended up using between 10 and 11 of those 12 feet of paracord in the end.
I tucked the end strands into the knot work on the underside of the band to finish, and they can be further secured with sewing needle and thread, melting, or a drop of super glue.
Stormdrane's Blog: Keeping track of time...
Join our efforts to Secure America's Borders and End Illegal Immigration by Joining ALIPAC's E-Mail Alerts network (CLICK HERE)
-
02-02-2012, 08:26 AM #1649Senior Member
- Join Date
- May 2007
- Location
- South West Florida (Behind friendly lines but still in Occupied Territory)
- Posts
- 117,696
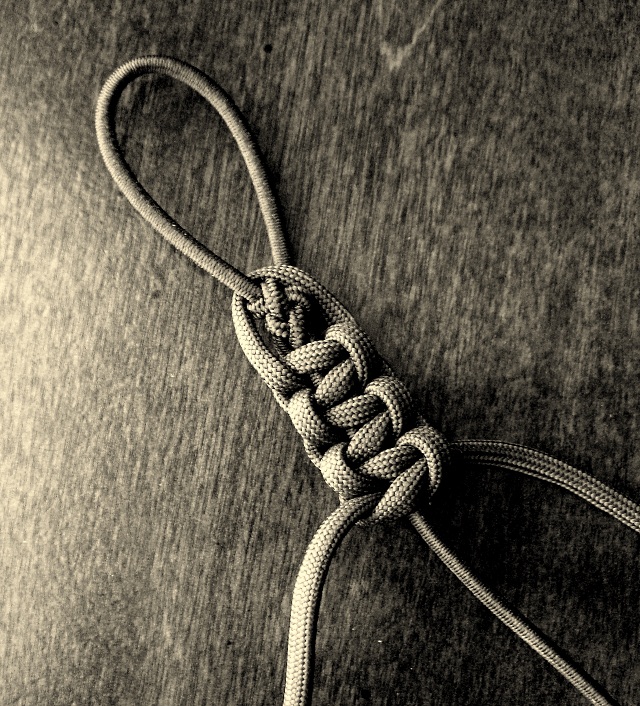
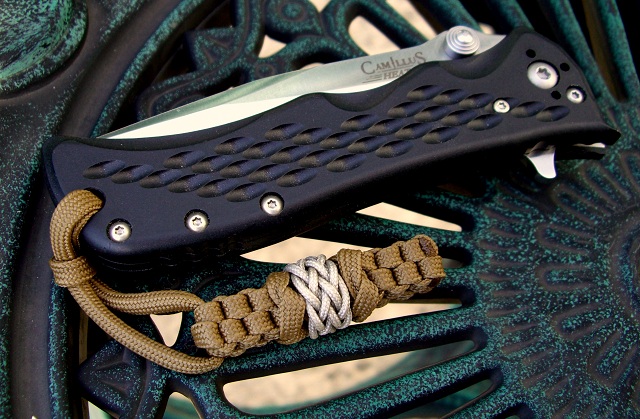
Walls go up, Crowns go down, Gaucho between flanked Spanish rings... Click on the Photos to enlarge the image
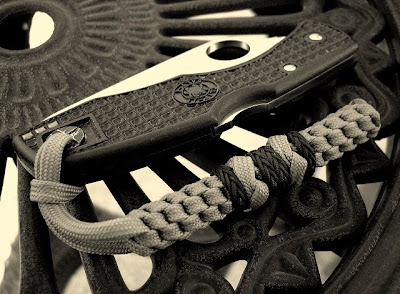 Coyote brown paracord in a round crown sinnet pocket knife lanyard/fob, with a couple of wall knots down the length. A 3 pass Gaucho knot in the center and a pair of 3 pass Spanish ring knots out to the sides, using black 0.9mm cord.
I used my copy of Bruce Grant's 'Encyclopedia of Rawhide and Leather Braiding' as a reference for the Gaucho and Spanish ring knots.
And another with a square crown sinnet and 2 pass Gaucho knot around the center with 1.4mm cord. The unseen center paracord section has round crowns tied, that the Gaucho knot was tied over.
The pocket knives shown are my Spyderco Salt I and Camillus Heat
Stormdrane's Blog: Walls go up, Crowns go down, Gaucho between flanked Spanish rings...Join our efforts to Secure America's Borders and End Illegal Immigration by Joining ALIPAC's E-Mail Alerts network (CLICK HERE)
-
02-02-2012, 08:28 AM #1650Senior Member
- Join Date
- May 2007
- Location
- South West Florida (Behind friendly lines but still in Occupied Territory)
- Posts
- 117,696
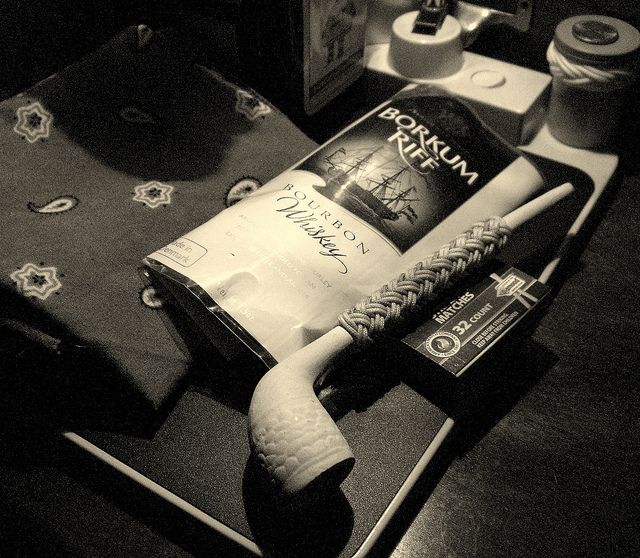
Clay pipes and pineapples... Click on the Photos to enlarge the image
A long pineapple knot tied with tan and gray 1.4mm cord, over a clay pipe, that my dad gave me years ago. I thought he might have bought it at a Civil War reenactment, historical site gift shop, museum, or such, but when asked, he said it came from a tobacco shop in the mall, probably a Tinder Box.
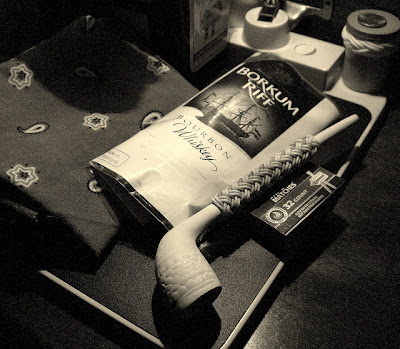
Besides being one of the greatest smelling places with all the tobacco and cigars, the Tinder Box shops also had(guess they still do but haven't been to one in years) display cases with lighters, pocket knives, intricately carved chess sets, and other assorted gadgets, gear, and accessories.
The cord for the pineapple knot, worked into the long 4 bight turk's head knot, is just slightly darker than the base knot, so it doesn't show so well in the photo as it does in hand...
Stormdrane's Blog: Clay pipes and pineapples...
Join our efforts to Secure America's Borders and End Illegal Immigration by Joining ALIPAC's E-Mail Alerts network (CLICK HERE)


 Reply With Quote


Oklahoma House passes bill making illegal immigration a state...
04-19-2024, 05:14 AM in illegal immigration News Stories & Reports