

Results 1,791 to 1,800 of 11483
 226Likes
LinkBacks (?)
-
12-26-2016, 11:32 AM
-
09-02-2016, 05:39 PM
-
whole garden made with pallets!! Love it!! | Pallets | Pinterest | Pallets, Pallets Garden and Wooden Pallets
Refback This thread03-06-2016, 11:30 AM -
10-20-2015, 05:29 PM
-
06-12-2015, 08:00 PM
-
02-26-2015, 01:58 PM
-
01-05-2015, 04:13 PM
-
12-19-2014, 10:19 AM
-
EMERGENCY: HUGE FEMA PANDEMIC EXERCISE IN USA IN NOVEMBER, INTERNET SHUT DOWN PART OF EXERCISE | Prepare4Survival
Refback This thread12-03-2014, 10:39 PM -
Off Grid World ? Ugly Duckling Shipping Container Home Built by Artist Is a Beautiful Swan on the Inside
Refback This thread11-25-2014, 03:10 PM -
11-17-2014, 10:59 PM
-
11-13-2014, 11:18 AM
-
11-09-2014, 02:54 PM
-
10-28-2014, 11:38 PM
-
10-26-2014, 05:54 AM
-
10-16-2014, 11:28 AM
-
10-03-2014, 01:25 PM
-
10-02-2014, 09:16 PM
-
09-26-2014, 07:00 PM
-
09-26-2014, 01:56 PM
-
09-19-2014, 04:46 PM
-
09-13-2014, 05:49 AM
-
09-05-2014, 01:52 PM
-
09-01-2014, 09:39 AM
-
08-30-2014, 06:29 PM
-
08-10-2014, 06:29 AM
-
08-04-2014, 05:07 PM
-
07-23-2014, 11:14 AM
-
New Evidence on Expiration Dates | Medical Preparedness | Doom and Bloom (TM) | Doom and Bloom (TM)
Refback This thread07-22-2014, 10:10 AM -
07-18-2014, 08:37 PM
-
07-15-2014, 04:57 PM
-
07-11-2014, 01:40 AM
-
04-22-2014, 11:14 AM
-
04-18-2014, 12:57 PM
-
04-18-2014, 10:10 AM
-
04-14-2014, 12:18 AM
-
04-12-2014, 02:28 AM
-
03-02-2014, 11:43 PM
-
12-24-2013, 11:59 PM
-
12-07-2013, 11:04 PM
-
kitchen | Cob
Refback This thread11-25-2013, 03:24 PM -
10-22-2013, 10:25 PM
-
Apple Pie Braid | Sweets
Refback This thread09-26-2013, 07:58 AM -
09-02-2013, 04:44 PM
-
5 Reasons Why You May have to Bug Out Even Though You Don’t Want to | The Apartment Prepper's Blog
Refback This thread08-23-2013, 03:20 PM -
06-27-2013, 06:30 AM
-
06-23-2013, 08:11 PM
-
06-17-2013, 11:21 PM
-
05-24-2013, 05:06 PM
-
To Eat / BASIC LIST / SUGGESTED ITEMS FOR LONG TERM SURVIVAL - Page 275 - ALIPAC
Refback This thread05-01-2013, 03:49 AM
Thread Information
Users Browsing this Thread
There are currently 1 users browsing this thread. (0 members and 1 guests)
 LinkBack URL
 About LinkBacks
-
03-15-2012, 04:13 AM #1791Senior Member


- Join Date
- May 2007
- Location
- South West Florida (Behind friendly lines but still in Occupied Territory)
- Posts
- 117,087
Why Are Millions Of Americans Preparing For Doomsday?
March 13th, 2012
101 comments
 All over America, there are millions of Americans that are quietly preparing for doomsday.
They are turning spare rooms into long-term food storage pantries, they are planting survival gardens, they are converting their homes over to alternative sources of energy, they are taking self-defense courses and they are stocking up on just about anything you can imagine. They are called "preppers", and their numbers have absolutely exploded in recent years.
In fact, you might be living next door to one and never even realize it. According to a recent Daily Mail article, there are approximately 3 million preppers in the United States today. Others believe that the true number is significantly higher than that. This movement has become so popular that there are now even television shows being done about preppers.
The most popular is probably "Doomsday Preppers" on the National Geographic Channel. This movement is still growing and is not going to go away any time soon. In fact, as the world continues to become even more unstable it is likely that a lot more Americans will find themselves becoming preppers in the years ahead.
So what exactly are all these people so concerned about? Exactly why are there millions of Americans that are feverishly preparing for doomsday?
Well, the truth is that you will never find two preppers that are exactly alike. Some are deeply concerned about the potential for natural disasters and believe that we are now entering into a time when there will be catastrophic earth changes. Other preppers believe that terrorism is the most significant threat to our way of life. Killer pandemics, an EMP attack, World War III, martial law, solar megastorms, asteroid strikes and societal chaos are some of the other things that some preppers are worried about.
Of course an economic collapse is one of the biggest concerns for preppers, and without a doubt the U.S. economy is deeply troubled. A collapse of the financial system would change all of our lives permanently.
But it isn't just preppers that are concerned about these things.
A recent survey conducted by National Geographic asked Americans the following question....
"Which of the following, if any, do you think might happen in the United States in the next 25 years? Please choose all that apply."
These were the results....
Significant Earthquake 64%
Significant Hurricane 63%
Terrorist Attack 55%
Financial Collapse 51%
Significant Blackout 37%
Pandemic, Such as From a Super-Virus 29%
Nuclear Fallout 14%
None of These 13%
Obviously there are a whole lot of people out there that feel as though we are heading for some really bad stuff.
So if hard times are coming, why not prepare for them?
After all, none of us want to end up like the poor people of New Orleans in the aftermath of Hurricane Katrina. Large numbers of people were herded into the Superdome and food and water ran out really fast. There was rampant looting of stores and people were shooting each other in the streets. It was mass chaos.
The following is what one Australian blogger experienced while staying in the Superdome during Hurricane Katrina....
Last night was horrendous. I heard shouting, and drinks machines being smashed. There’s no sanitation and it’s so smelly. My hair is greasy and I feel a wreck. There are crack alleys among the maze of corridors. The lights are broken in the loos which, as well as being disgusting, have become dangerous, so we now only go as a big group.As an article in the New York Times from that time period detailed, food and water were in very short supply and those cramped into the Superdome were rapidly becoming impatient....
More people are arriving, and the dome is like a refugee camp. I see two soldiers carrying a corpse and we hear there are more dead in the basement.
Desperation was in the air. Danielle Shelby tugged at a reporter's arm. "I have a handicapped daughter," she said. "She's over there with her wheelchair. She's hot. We don't have any water. I'm afraid she's going to have a seizure."Later on in that same article, we are told that there were fights, rapes and at least one suicide in the Superdome during that time....
Others crowded around. "I've been in the food line twice, and every time I get to the front they tell me they don't have any left," said Juanita McFerrin, 80.
It got worse. Ms. Rousell recalled hearing a loud bang Tuesday afternoon as the body of a man slapped the concrete at the edge of the football field in a fatal suicidal plunge, after he apparently learned that his home had been destroyed. Others told of fights that broke out in food lines, and of a husband and wife who slugged each other in a wild argument.To get an even better idea of what life in New Orleans was like in the aftermath of Hurricane Katrina, just check out this video.
Several residents said they had heard of children being raped, though it was not clear whether anyone reported such incidents to the authorities, and no officials could be found who could confirm the accounts.
Within just a few days food, water and supplies started pouring into New Orleans and things started slowly getting back to normal, but imagine what things would look like in this country if we had to deal with a national disaster that stretched on for months or even years?
Many preppers are not taking any chances. Many are absolutely determined to be able to take care of their families and friends no matter what the years ahead may bring.
ABC News recently profiled one prepper named Tim Ralston....
Tim Ralston, a married father of two from Arizona, is one such "prepper."Some preppers are going to the extreme and are spending huge amounts of money on their prepping.
"There's a lot of different things that could happen," Ralston said. "For me, I look at prepping as kind of like insurance. You have car insurance, health insurance, life insurance."
Call it Apocalypse insurance. Ralston turned his family's two-car garage into a staging area. Inside is a trailer, which he keeps packed and ready to go at all times, stockpiles of freeze-dried food, including cartons of canned chicken with a shelf life of 15 years, survival gear, such as a system for purifying polluted water, first aid kits and lots of weapons and ammunition. His son has his own AK-47.
CNN recently profiled one Australian prepper that has spent about $350,000 preparing for doomsday....
Bast has spent about $5,000 on stockpiles of food and water, and $11,000 on equipment including gas cookers, generators, batteries, water purifiers and solar power. He also purchased roughly an acre of land that's a 75-minute drive from Melbourne and 1,500 feet above sea level (in order to stay high and dry in case of a flood or tsunami). He has built a house there, as well as a bunker to serve as his "safe spot" in the event of an emergency. Together, the land, buildings and bunker have cost him a total of about $330,000.But the truth is that prepping does not have to be expensive.
He's also spent $10,000 on an 8-year old Toyota HiLux pickup truck to drive to his safe spot.
The key is to start by focusing on the five basics....
1) Food
2) Water
3) Shelter
4) Energy
5) Self-Defense
There are some practical things that just about anyone can do even if you don't have a lot of money.
For example, when you go to the store try to pick up a few extra items that are on sale and add them to your supplies. If you rotate your food supplies, they won't go bad.
In addition, just about anyone can plant a garden. Often fruits and vegetables are some of the most expensive items at the grocery store, and so growing a garden can end up saving you a lot of money.
Get educated. There are dozens of prepper websites out there where you can get an education in prepping for free. The following are a few examples of some of the excellent prepper websites that are out there today....
*Survival Blog
*American Preppers Network
*The Survival Mom
*SHTFPlan.com
*Prepper Website
*Survival 4 Christians
*Backdoor Survival
*Off Grid Survival
The truth is that our world is becoming increasingly unstable in a whole bunch of different ways and we all need to learn how to prepare for the difficult years ahead.
As the economy continues to fall apart, America is going to become a very heartless place. You don't want to be caught in the middle of societal chaos without a plan.
None of us should be relying on the government to save us when things hit the fan. We all saw what happened after Hurricane Katrina. Those that were depending on the government were deeply disappointed.
We should all try to become as independent of the system as we can, because the system is failing. In the years ahead there might not be anybody to help you and your family, so you need to be working hard right now to ensure that you and your family will be taken care of.
Yes, as you may have guessed by now, I am a prepper too. My wife and I moved to an entirely different state and totally changed our lifestyle to prepare for what is coming.
Hopefully this article will inspire many more Americans to prepare for what is coming. A great economic collapse is on the horizon and time is rapidly running out.

Help Make A Difference By Sharing These Articles On Facebook, Twitter And Elsewhere:
Why Are Millions Of Americans Preparing For Doomsday?
Join our efforts to Secure America's Borders and End Illegal Immigration by Joining ALIPAC's E-Mail Alerts network (CLICK HERE)
-
03-15-2012, 11:34 PM #1792Senior Member
- Join Date
- May 2007
- Location
- South West Florida (Behind friendly lines but still in Occupied Territory)
- Posts
- 117,087
Research: Pineapple Enzyme Kills Cancer Without Killing You
Post date:
Saturday, December 24th 2011 at 11:00 am
by Sayer Ji
Every once in a while a study pops up on the National Library of Medicine's bibliographic database known as MEDLINE that not only confirms the therapeutic relevance of natural substances in cancer treatment, but blows the conventional approach out of the water.
Published in 2007 in the journal Planta Medica, researchers found that an enzyme extracted from pineapple stems known as bromelain was superior to the chemo-agent 5-fluorauracil in treating cancer in the animal model. The researchers stated:
"This antitumoral effect [bromelain] was superior to that of 5-FU [5-fluorouracil], whose survival index was approximately 263 %, relative to the untreated control." [view entire study]
What is so remarkable about this research is that 5-FU has been used as a cancer treatment for nearly 40 years, and has been relatively unsuccessful due to its less than perfect selectivity at killing cancer, often killing and/or irreversibly damaging healthy cells and tissue, as well.
As a highly toxic, fluoride-bound form of the nucleic acid uracil, a normal component of RNA, the drug is supposed to work by tricking more rapidly dividing cells -- which include both cancer and healthy intestinal, hair follicle, and immune cells -- into taking it up, thereby inhibiting (read: poisoning) RNA replication enzymes and RNA synthesis.
The material safety data sheet (MSDS) for 5-FU states:
The dose at which 50% of the animals given the drug die is 115mg/kg, or the equivalent of 7.8 grams for a 150 lb adult human.
Keep in mind that a 7.5 gram dose of 5-FU, which is the weight of 3 pennies, would kill 50% of the humans given it. Bromelain's MSDS, on the other hand, states the LD50 to be 10,000 mg/kg, or the equivalent 1.5 lbs of bromelain for a 150lb adult, which means it is 3 orders of magnitude safer!
How then, can something as innocuous as the enzyme from the stem/core of a pineapple be superior to a drug that millions of cancers patients over the past 40 years have placed their hopes of recovery on, as well as exchanging billions of dollars for?
There is a well-known effect associated with a wide range of natural compounds called "selective cytotoxicity," whereby they are able to induce programmed cell death (the graceful self-disassembly known as apoptosis) within the cancer cells, while leaving healthy cells and tissue unharmed. No FDA-approved chemotherapy drug on the market today has this indispensable property (because chemicals don't have behave like natural compounds), which is why cancer treatment is still in the dark ages, often destroying the quality of life, and accelerating the death of those who undergo it, often unwittingly. When a person dies following conventional cancer treatment it is all too easy to "blame the victim" and simply write that patient's cancer off as "chemo-resistant," or "exceptionally aggressive," when in fact the non-selective nature of the chemotoxic agent is what ultimately lead to their death.
Keep in mind that bromelain, like all natural substances, will never receive FDA drug approval. Capital, at the present time, does not flow into the development of non-patentable (i.e. non-profitable) cancer therapies, even if they work, are safe and extremely affordable. This is simply the nature of the beast.
Until we compel our government to utilize our tax dollars to invest in this type of research, there will be no level playing field in cancer treatment, or any treatment offered through the conventional medical establishment, for that matter. Or, some of us may decide to take our health into our own hands, and use the research, already freely available on possible natural cancer treatment, to inform our treatment decisions without the guidance of the modern day equivalent of the "priest" of the body, the conventional oncologist, who increasingly fills the description of an "applied pharmacologist/toxicologist" - nothing more, nothing less.
To view additional research on the potential therapeutic properties of bromelain in over 30 health conditions, visit the open source, natural medical resource page on bromelain here.
Disclaimer: This article is not intended to provide medical advice, diagnosis or treatment. Views expressed here do not necessarily reflect those of GreenMedInfo or its staff.
Research: Pineapple Enzyme Kills Cancer Without Killing You | GreenMedInfo | Blog entry | Natural Medicine | Alternative Medicine | Integrative Medicine | Consumer AdvocacyJoin our efforts to Secure America's Borders and End Illegal Immigration by Joining ALIPAC's E-Mail Alerts network (CLICK HERE)
-
03-17-2012, 12:58 AM #1793Senior Member
- Join Date
- May 2007
- Location
- South West Florida (Behind friendly lines but still in Occupied Territory)
- Posts
- 117,087
16 SHTF Barter Items to Stockpile
Debt Reckoning
March 15th, 2012
www.DebtReckoning.com
Comments (311)
The following article has been generously contributed by Tyler of Debt Reckoning – Get out of debt, build wealth, and get on with life.
Every good survivalist has a stockpile of things he or she recognizes their family may need to survive a natural or man-made disaster. However, many people forget the value of maintaining a barter store as well.
If things hit the fan, particularly in an economic collapse where the dollar is nearly worthless, a number of non-monetary goods will be more valuable than a fistful of dollar bills.
It’s also important to recognize that we can’t possibly store enough of every item to account for every scenario for an indefinite period of time. However, what we can do is have some items on hand to barter with neighbors to plug gaps in our preparations.
Imagine a neighbor with a large garden and some chickens trading a half dozen eggs and some squash for a box of ammo, or a small bottle of Vodka.
Consider stocking up on the following items, even if you have no plans to use them yourself, for their potential barter value.
16 Things to Stockpile with High Barter Value
Cigarettes. I hate smoking, and can’t stand being around anyone that smokes. Having said that, I recognize that in a SHTF situation many others will be cut off from their access to cigarettes, so there is plenty of barter potential.
Soap. Bars of soap, and even those little cleaning napkins/wipes that you get at the BBQ restaurants could be very valuable in a SHTF scenario. Ever see “The Book of Eli?”
Bullets. Obviously, it’s a good idea to have a decent store of ammo representing all calibers of the weapons you own. However, it is also a good idea to store extra ammo in common calibers (9mm, .22, .38, 12-guage shells, etc.) as a potential barter. After all, a gun without ammo is just an inacurate throwing object.
Alcohol. Alcohol could serve a variety of purposes in a SHTF situation. It is valuable as a potential bartering commodity, and it also has medicinal uses. Did you know Vodka is a great home remedy to counteract the reaction to poison ivy?
MREs. More portable and easier to barter than larger 5-gallon buckets, or even #10 cans of dried foods, MREs are great to have on hand for bartering. Keep a variety of flavors and different kinds of foods because you could be holding something that could complete a meal for a hungry person.
Silver Coins. Keep in mind this doesn’t necessarily mean only silver dollars with a full ounce of silver, but even older, less expensive coins with a high silver component (the 1964 Kennedy half-dollar, for example).
Detergent. Don’t think people are interested in bartering detergent? Check out the story about the recent rash of detergent thefts across the country. Apparently, Tide detergent on the black market is now referred to as “liquid gold.” Interesting.
Water bottles. To someone in bad need of water, a water bottle could be worth its weight in gold. Remember the rule of threes: you can live three minutes without air, three days without water, and three weeks without food. Store accordingly.
Matches and lighters. A box of matches is relatively inexpensive, but for someone needing to build a fire a pack of matches or a lighter could be very valuable. Be sure these are stored safely, and if they are not waterproof make them so by storing in a watertight container.
Sugar. My grandfather used to tell stories of things that were in limited supply in the Great Depression. Sugar was something he often mentioned. Imagine how easily you could win over a sweet-tooth with the promise of a bag of sugar in exchange for something you are short on.
Toilet paper. This one is rather self-explanatory, isn’t it? Sure, there are substitutes for Charmin, but who wants to keep using leaves when paper feels so much better.
Water Filters/Purifiers. Water purification drops and filters could mean the difference in offering family members treated water or potentially harmful, bacteria-infested water. Who’d be willing to trade for that?
Bleach. May be used to disinfect water, or keep living quarters and soiled clothing sanitized.
Batteries. Can be used to power up flashlights, radios, and other electronic devices.
Candles. Emergency candles would be a great barter item for those in need of providing some light to their living quarters without electricity.
What other items would you add to your barter store?
Contributed by Debt Reckoning. Hat tip The Daily Crux.
16 SHTF Barter Items to Stockpile
Join our efforts to Secure America's Borders and End Illegal Immigration by Joining ALIPAC's E-Mail Alerts network (CLICK HERE)
-
03-19-2012, 05:52 PM #1794Senior Member
- Join Date
- May 2007
- Location
- South West Florida (Behind friendly lines but still in Occupied Territory)
- Posts
- 117,087
Join our efforts to Secure America's Borders and End Illegal Immigration by Joining ALIPAC's E-Mail Alerts network (CLICK HERE)
-
03-19-2012, 06:17 PM #1795Senior Member
- Join Date
- May 2007
- Location
- South West Florida (Behind friendly lines but still in Occupied Territory)
- Posts
- 117,087
Tune Up Your Gun Handling
March 19, 2012 by Karl Rehn
 All the photos taken to show these examples were done using a handgun with a training barrel or other non-firearm props, to ensure that no gun safety rules were broken.USCONCEALEDCARRY.COM
Over the past 20 years, I’ve taught everything from National Rifle Association Basic Pistol to Texas Concealed Handgun Licensing to Defensive Pistol Skills to students with a wide range of skill, experience and prior training.
As a competition shooter and customer of commercial ranges, I’ve had the opportunity to observe good, bad and ugly gun-handling habits. That experience has led me to accept an inconvenient truth about gun owners: Every gun owner believes that his or her gun handling is safe, regardless of how good or bad that gun handling is.
This is an example of illusory superiority: a cognitive bias that causes people to overestimate their positive qualities and abilities and to underestimate their negative qualities, relative to others. It’s also known as the Lake Wobegon effect, because none of us believe we are below average.
That means, of course, that none of the discussion that follows applies to you, but you probably know someone who would benefit from this article. What separates a gun owner from a “shooter” is how you handle your gun during the 99 percent of the time you aren’t shooting it. Strive to be a “shooter” and ensure that your gun handling is safe 100 percent of the time.
Most gun owners can recite either the NRA’s Three Rules of Gun Safety or Jeff Cooper’s Four Rules, and they will claim (even as they violate one or more rules) that they obey those rules all the time. My observation is that while the absolute gun safety rules are common to all situations, their interpretation varies widely, particularly with regard to gun handling at commercial shooting ranges and less formal situations.
Most of them occur because the person handling the gun does not fully grasp the concept of “safe direction” and incorrectly believes that there is an “It’s OK; it’s unloaded” exemption.
In addition to basic gun safely rules, there are fundamental rules of range etiquette, such as only handling guns at the designated firing line, and stopping all shooting immediately if a cease fire is called. Those who have shot only in informal situations or at poorly supervised ranges often are unaware of these range etiquette policies.
What to do when you encounter one of the Terrible Twelve at a range or a gun shop? As they are in the act of committing one of these gun handling sins, ask them, “Would you be willing to fire a shot out of that gun, pointed where it is right now?”
Hopefully they will answer “No.” Then ask, “Then why are you pointing it in that direction?” If enough people start correcting others on these errors, perhaps we can indeed, all be above average in our safe gun handling skills.
NRA Three Rules
- Always keep the muzzle pointed in a safe direction
- Always keep your finger off the trigger until ready to shoot.
- Always keep guns unloaded until ready to use.
- All guns are always loaded. Even if they are not, treat them as if they are.
- Never let the muzzle cover anything you are not willing to destroy. (For those who insist that this particular gun is unloaded, see Rule 1.)
- Keep your finger off the trigger until your sights are on the target. (This is the Golden Rule. Its violation is directly responsible for about 60 percent of inadvertent discharges.)
- Identify your target and what is behind it. Never shoot at anything that you have not positively identified.
SOURCES: www.USConcealedCarry.com, NRA Gun Safety Rules, Jeff Cooper’s Commentaries, April 2003.
–Karl Rehn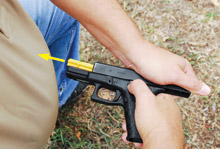 The Gut Racker This error most commonly occurs when the shooter rotates the pistol in his hand to be able to more easily lock the slide back. One solution to this problem is to insert an empty magazine and pull the slide back to engage the slide lock, instead of putting the gun in this clearly unsafe position.
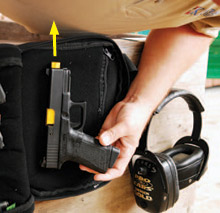 The Spinner This error typically occurs when the gun is carried in a rectangular case that gives no indication as to which direction the gun is pointed inside the case. The simple fix for this is to mark one end of the case as the muzzle end, and be consistent about always placing the gun in the case facing that direction.
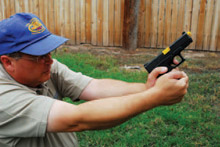 The Cowboy This practice is unsafe at all ranges except those which are fully baffled to block extremely high shots, and even in that situation, it’s clearly a case of pointing a gun in a direction that is not the intended target.
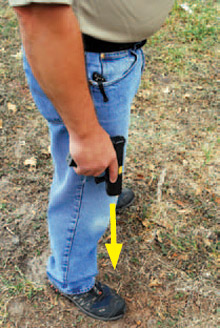 The Dangle This is also known as the “my gun is heavy” position and occurs when the person holding the gun gets mentally or physically fatigued, and simply lets the gun drop. Would you be willing to fire a loaded gun from that position? If not, then it’s unsafe. How to avoid this? Holster the gun or set it down on a downrange table or bench.
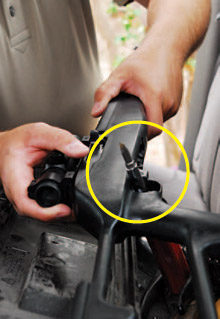 The Cheapskate Last year, a shooter in Houston was shot in the leg and suffered serious injury when a range customer took an uncased rifle out of his vehicle. The trigger of the rifle snagged on something in the vehicle, causing the loaded, off-safe rifle to fire. How to avoid this? Carry your guns in cases, bags, boxes, holsters — something that covers the trigger guard of the gun.
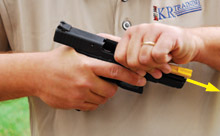 The Side Racker This is why the dividers between stalls at indoor ranges are bulletproof. As I heard one range user say to a side racker, “If it’s OK for you to point your loaded gun at me, that means it’s OK for me to point my loaded gun at you, right?” If you physically cannot rack the slide without using this technique, the solution is simple: Turn your lower body 90 degrees so that your muzzle is pointed downrange, and not at the person next to you.
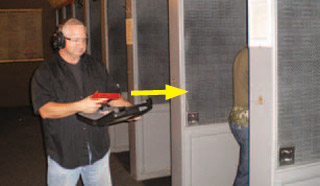 The Lone (Up) Ranger Don’t handle your gun when you are behind the firing line. If you are on the firing line, don’t handle your gun when shooters are downrange resetting targets. Is it possible to handle your gun behind the firing line and keep it pointed in a safe direction? Maybe, but unless you are under attack, there’s no reason to violate range etiquette rules.
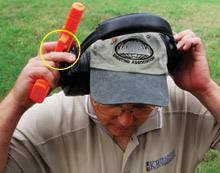 The Muff This often occurs immediately after the user has already fired one shot without hearing protection, and they reach to adjust their earmuffs, loaded gun in hand, pointed at the sky. Would you be willing to fire a loaded gun from that position? If not, then it’s unsafe. How to avoid this? Holster the gun or make it safe and set it down on a downrange table or bench.
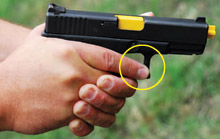 The Trigger Guardian The trigger guardian will insist that their finger is “off the trigger.” Technically it is. But when the finger is placed in that position, it’s extremely easy for the finger to get to the trigger, should the shooter be startled or bumped. Some argue that it’s tactically important to have the finger that extra quarter-inch closer to the trigger, resting on the trigger guard and not on the slide, because they believe that it makes them faster to the first shot.Nowhere in the shooting world does speed matter more than at the IPSC Grand Master level, where multi-day matches are sometimes decided by fractions of a second. If that marginal change in trigger finger position made a measurable difference in speed, one would expect that the top shooters would use that technique. They don’t, and I state that as a Master class shooter who has taken courses from, practiced with, and RO’d top level shooters.
 The Palm Shooter The disassembly procedure for a Glock handgun requires that two levers be pressed down, one on each side of the frame, and the trigger pulled to release the slide. Unfortunately, one technique that many shooters adopt for this procedure places the muzzle pointed into his palm. There are multiple firsthand accounts documented online (including photos of the resulting injury) of shooters putting holes in their hands as a result of failing to remove the round in the chamber before pulling the trigger.
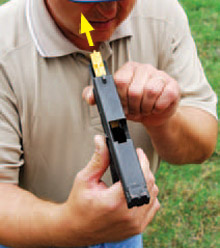 The Barrel Looker This usually occurs after a malfunction has occurred, and the shooter is trying to determine whether the barrel is blocked or the chamber is fouled. Unfortunately, this method requires the shooter to point the gun in an unsafe direction. Safe alternatives include removing the barrel from the slide before inspection or using a Bore Snake or cleaning rod through the barrel.
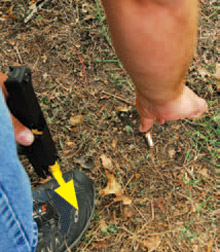 The Ammo Saver This usually occurs while unloading a semi-automatic pistol. After the magazine is removed and the slide is racked, the ammo saver stops paying attention to muzzle direction and becomes obsessed with the ejected live round. Often, this results in the muzzle pointing at the shooter’s feet or pointing up range. To correct this unsafe behavior, the shooter should ignore the ejected round and instead complete the unloading process by checking the chamber to ensure that it’s empty, and then holstering the pistol or setting it down, muzzle in a safe direction, before bending over to pick up the ejected round.
Tune Up Your Gun Handling : Personal Liberty Alerts=Join our efforts to Secure America's Borders and End Illegal Immigration by Joining ALIPAC's E-Mail Alerts network (CLICK HERE)
-
03-20-2012, 05:15 AM #1796Senior Member
- Join Date
- May 2007
- Location
- South West Florida (Behind friendly lines but still in Occupied Territory)
- Posts
- 117,087
 New study: Radiation treatments create cancer cells 30 times more potent than regular cancer cells
Monday, March 19, 2012 by: Tony Isaacs
(NaturalNews) In a groundbreaking new study just published in the peer reviewed journal Stem Cells, researchers at UCLA's Jonsson Comprehensive Cancer Center Department of Oncology found that, despite killing half of all tumor cells per treatment, radiation treatments on breast cancer transforms other cancer cells into cancer stem cells which are vastly more treatment-resistant than normal cancer cells. The new study is yet another blow to the failed and favored mainstream treatment paradigm of trying to cut out, poison out or burn out cancer symptoms (tumors) instead of actually curing cancer.
Senior study author Dr. Frank Pajonk, associate professor of radiation oncology at the Jonsson Center, reported that induced breast cancer stem cells (iBCSC) "were generated by radiation-induced activation of the same cellular pathways used to reprogram normal cells into induced pluripotent stem cells (iPS) in regenerative medicine." Pjonk, who is also a scientist with the Eli and Edythe Broad Center of Regenerative Medicine at UCLA, added "It was remarkable that these breast cancers used the same reprogramming pathways to fight back against the radiation treatment."
In the new study, Pajonk and his team irradiated normal non-stem cell cancer cells and placed them into mice. Through a unique imaging system, the researchers observed the cells differentiate into iBCSC in response to radiation treatments. Pjonk reported that the newly generated cells were remarkably similar to non-irradiated breast cancer stem cells. The team of researchers also found that the radiation-induced stem cells had a more than 30-fold increased ability to form tumors compared with non-irradiated breast cancer cells.
Despite mounting evidence, mainstream medicine clings to surgery, chemo and radiation and ignores natural solutions
Despite all the billions of dollars spent on cancer, the 40 year "war on cancer" has been a losing one by any honest evaluation. One hundred years ago, anywhere from 1 in 50 to perhaps 1 in 100 people could be expected to develop cancer. Now it is estimated that 1 in every 2 men and 1 in every 3 women will be diagnosed with cancer in their lifetimes. Despite more people around the world developing cancer and dying from cancer every year, mainstream medicine continues to cling to failed treatments which more often than not fail to eliminate the cancer and help cancer spread and return more aggressively than ever. Notably, two of the three major mainstream cancer treatments - radiation and chemo - are themselves highly carcinogenic.
One might think that the new study provided ample reasons to rethink using radiation. However, the study authors looked at the results as an opportunity to continue and enhance the use of radiation by finding ways to control the cell differentiation. What the scientists failed to note is that natural alternatives have already been found which prevent the development of cancer stem cells.
As just one example, Natural News reported in May 2010 that a University of Michigan study had found a compound in broccoli and broccoli sprouts which had the ability to target cancer stem cells. See:
Breast cancer breakthrough: broccoli component zaps cells that fuel tumor growth
The researchers failed to note how cancer cells fought against unnatural treatments. They also failed to take into account the mounting evidence that the best way to beat cancer as well as avoid it is to build and enhance our natural first line of defense - our immune system.
The safest and most effective way to enhance the natural immune system and fight cancer in general is by working with nature. It is also by far the least expensive way, and therein likely lies the rub. You can't patent and profit from nature like you can with mainstream drugs and treatments.
Note: Neither NaturalNews nor this author condone the inhumane use of animals in medical studies.
Other sources included:
www.cancer.ucla.edu/Index.aspx?page=644
www.sciencedaily.com/releases/2012/02/120213185115.htm
www.naturalnews.com/cancer_cells.html
www.naturalnews.com/stem_cells.html
About the author:
Tony Isaacs, is a natural health author, advocate and researcher who hosts The Best Years in Life website for those who wish to avoid prescription drugs and mainstream managed illness and live longer, healthier and happier lives naturally. Mr. Isaacs is the author of books and articles about natural health, longevity and beating cancer including "Cancer's Natural Enemy" and is working on a major book project due to be published later this year. He is also a contributing author for the worldwide advocacy group "S.A N.E.Vax. Inc" which endeavors to uncover the truth about HPV vaccine dangers.
Mr. Isaacs is currently residing in scenic East Texas and frequently commutes to the even more scenic Texas hill country near Austin and San Antonio to give lectures and health seminars. He also hosts the CureZone "Ask Tony Isaacs - featuring Luella May" forum as well as the Yahoo Health Group "Oleander Soup" and he serves as a consultant to the "Utopia Silver Supplement Company".
New study: Radiation treatments create cancer cells 30 times more potent than regular cancer cells
Join our efforts to Secure America's Borders and End Illegal Immigration by Joining ALIPAC's E-Mail Alerts network (CLICK HERE)
-
03-22-2012, 06:23 AM #1797Senior Member
- Join Date
- May 2007
- Location
- South West Florida (Behind friendly lines but still in Occupied Territory)
- Posts
- 117,087
Have You Considered Re-Loading Your Ammo?
by Administrator on March 21, 2012


There are two types of single-stage presses, “C” (left) and “O” (right). The “C” has more space to work in while the “O” is much stronger. Both of these are Lee presses, and the Lee philosophy is that most steel reloading presses are made for several times the load you rely on them for. Their presses are made of lighter and less expensive materials, and most people have no problems with them at all.

This is a Lyman T-Mag turret press. Redding and RCBS also make turret models, which still require a separate pull for every stage of the reloading process. For rifle cases that have to be trimmed, progressive presses aren’t practical and there is little disadvantage to a turret press, but if you are going to re-load a lot of straight wall handgun brass, you should go progressive if you are not going to start with a single stage. The Hornady Lock & Load single stage has little disadvantage to turret presses because the dies can be twisted in and out and left adjusted correctly.

A shellholder is the part that actually holds the case in a press that has a single-station ram.

Progressive presses are the most expensive, complicated, and tedious type of press to get up and running, but once you do, you can turn out hundreds of finished cartridges per hour. This is a Dillon 650, probably the most advanced presses on the market, and most of its bells and whistles are attached to the tune of hundreds of extra dollars over the base price of the press kit.

A shellplate is different from a shellholder. A shellplate holds many cases at once so several different die stations can be used at the same time. A shell holder holds only one case.

Your primary source for handloading information should be one of the thorough manuals from a major handloading component or equipment manufacturer. Also get secondary data sources so you have more data choices, and can confirm the range of data for given components.

Handloading manuals will show you everything you need to know about case length, case type, primer size, and usually have historical or performance information on the cartridges listed.

Data is clearly spelled out in manuals. It shows you what kind of powder to use with which bullets, how much powder, and how long the finished cartridge should be (Cartridge Overall Length, or COL).

Dies are generally sold in “sets” with all of the dies necessary to handload a given cartridge. How many dies in a set depends on the cartridge. This is a two die rifle set from Hornady and it has the shell holder there in the case with the dies.

Sizing dies also incorporate a decapping pin the punches out the spent primer. Depending on the cartridge, the decapping pin may also have an expander ball to size the inside of the neck. If you remove your primers in advance and use a priming tool before reloading, this pin can usually be unscrewed.

You’ll need a neck brush to clean and lube inside case necks. For a neck brush, you can simply use bore brushes. The author finds that the nylon ones are cheap, effective, and last almost forever.

If using a spray lube, spray the cases from an overhead angle to get a little lube inside the necks. Use only spray lube specifically made for case sizing. This is Hornady One Shot which works fabulously.

Loading blocks hold the cartridge cases while you work on them. Having two blocks facilitates batch processing when using a single-stage press.

Whether you choose a balance beam-type or an electronic scale, it’s a good idea to have a reference weight to check the accuracy of the scale periodically. Most of the electronic scales made for reloading have at least one test weight. Most beginner kits, except notably the Hornady, come with a balance beam.

This is the scale that comes with the Hornady Lock and Load kit. The Hornady single stage also has a unique die swapping lock feature. It is probably the best of the kits.

Volumetric powder measures produce ammunition that is every bit as accurate as loads with carefully weighed out powder charges, and are a heck of a lot faster. This is also the Hornady one. It comes with a plate to mount to your bench and it also screws into a die station.

If you don’t load many cartridges, you can easily manage your case trimming needs using a simple trimmer tool with case length gauge. There are also lathe-like trimmers that are electric powered, and now there are even trim dies that have a grinder built right into the die.

After trimming, you have to chamfer and deburr the mouth of the case. Don’t sharpen the mouth to a knife-edge; just “kiss” it with the tool enough to take off the burrs.

Cases that have been loaded too many times, or that have been fired in guns with excessive headspace can experience incipient head separation indicated by a bright ring around the head of the case (left). Get rid of those cases or you may experience head separation (right) while shooting, which can be very dangerous.

A caliper is a must-have so you can load cartridges to the specified overall length and so you can keep track of case length.

Die sets for straight-wall cases include a die with a neck expander. Expand the necks just enough to let the bullet ease into the mouth. At left is a case that is sized, at center is a case that is sized and properly expanded at the mouth, at right the case is expanded too much at the mouth and will have problems later on.

If you work case mouths too much, the brass will get brittle and can split (arrow). Splits may not happen when you seat the bullet; they may happen later while the loaded ammunition is in storage. You can prevent this by annealing cases, which we’ll get to hopefully.

A primer tray is more than just a tray; it’s a functional tool that turns primers all over to the same side.

Anvils on new primers stick up just a little higher than the primer cup. Properly seating primers will push the legs of the anvil level with the inside lip of the primer cup.
By Scott Mayer
As ammo has gotten more and more expensive over the past few years, a lot of people have begun to consider re-loading, and well they should. Because when you buy loaded ammunition, part of what you are paying for is the bullet you shoot downrange and the powder and primer that burn, and part of that cost is also the brass case. Re-loading, or for the purpose of discussion here, “handloading,” allows you to reuse that brass case for more loaded rounds, thereby saving you money on re-buying the brass. Not all cases are brass of course. These days some cases are aluminum or steel, and these generally cannot be reloaded (That is why steel and brass cased ammo is cheaper). But almost all brass ammunition is capable of being re-loaded, and when you get right down to it, brass ammo was created to reload. Leaving brass on the ground is just plain old wasting, and these days who can afford that?
The mechanics of handloading are very simple. A cartridge has a primer at its rear, powder in the middle, and a bullet at the front. When you fire the cartridge, the primer goes off, the powder burns up, and the bullet chugs its way out of the muzzle. Handloading amounts to nothing more than putting in a new primer, new powder and a new bullet, into the fired brass case.
There are some really good beginner reloading kits on the market. The brands you should search for are Hornady, Lyman, RCBS and Redding on the high end, and Lee is generally going to be the least expensive. Before you rush out and buy one, however, understanding some of the tools and what choices you have might be a better way to start. Sometimes you buy a beginner kit then replace all of the stuff in it within a short time as you discover how more advanced tools are more convenient and more precise. A little bit of overview will help you wade through what you should expect to buy, and some of the options.
The Press
The most important thing you will have to decide is what type of reloading press you want to start with. Lee even has a no-press option called a Lee Loader, and it works, but veerryyy slowly, and most likely you will want a “single stage” reloading press at the very least.
A single stage press holds one “die,” which is the tool that you force the brass shell into in order to make it shootable again. Handloading most often involves three dies, but can be two, three, four, or even five of these dies to make the loaded shell. On a single stage press, you have to insert and adjust the die, then process one “stage” of your ammo, then take out that die, put in the next die, do a round of the same shells with that die, then do the next one, and in between there you drop the powder in and position a new bullet.
Most people start with a single stage press because it is the simplest, and down the road, as you get into more precision handloading with long range rifle rounds, many would argue that a single stage press is the most consistent, but if you are making a lot of handgun rounds, a single stage press may not be your best option. If reloading was something you could do casually while you catch up your DVR watching, spending 3 hours on 500 rounds of 9mm would be fine, but it isn’t. If you don’t want to double charge gun powder and make a bunch of mistakes, you have to focus on what you are doing while you handload, and quicker is usually better.
The next step up from single stage is what is called the “Turret” press. It has four or five die stations built into it so you can build a lot of ammo without having to swap out dies. Lyman, RCBS and Redding all make manually indexing turret presses, and Lee makes a unique turret press that has a rotating tool head, so you pull the handle one, two, three, four (including powder) times, and the press indexes the dies for you. This may sound like a no brainer with the Lee, but some people prefer the sturdiness of the big heavy options, especially when building precision long range rifle ammo.
The next step up is the “progressive” press. Generally they don’t make a beginner kit with progressive presses. You have to buy the other stuff, covered below, separately. This can be a good thing. For example, the RCBS single stage kit comes with a balance beam scale. Today this is nothing short of a doorstop and a complete waste of money. The single stage Hornady kit comes with a proper high quality electronic scale, but not the nicest one Hornady makes. Options are what makes handloading fun, not just about saving money.
With a progressive press, every pull of the handle produces a new loaded round. The press has a “shell plate” that revolves under the die and powder stations, and all the stations get filled as the plate turns itself through the loading process. Progressive presses are more money than single stage and turret presses, but the time savings can pay you back in droves.
Hornady, Dillon and RCBS are the biggest names in progressive presses, and once you start looking into the technology you will see that they are quite elaborate. The basic press requires you to feed a case and bullet by hand for every pull, but all three companies make a bullet and case feeder attachment that will do even that for you.
Lee, again, is a much less expensive option in a progressive press, but if you plan to be a handloading snob don’t bother. Lee uses aluminum and some plastic in place of steel on their press designs, and though all the Lee stuff works great, many hardcore handloaders opt for the more expensive brands. Eventually we’ll get to some actual overviews of some of these presses, but for now just Google around and you’ll find plenty to help you make an informed purchasing decision.
Why Handload?
Before moving on to the rest of the stuff you’ll need, any conversion about handloading should include a little history of what is correctly called, “precision, ” as opposed to “accuracy.” When you handload, most of the time you will end up with more precise ammunition, loaded round compared to loaded round compared to loaded round. Commercial ammunition is manufactured on automated equipment flying at thousands of rounds per hour. When you slow down and do it by hand, one at a time, or even on a progressive press at one per pull, you are generally going to produce more consistent and precise ammunition than can the factory.
As we have discussed here before, Hornady ammo has definitely pioneered genuinely precise and consistent factory ammo. Some of the testing we have done with our resident US Army Sniper Ben Becker has been truly amazing. But you will note that Hornady makes not only some of the most advanced handloading equipment, they are also the largest producer of packed bullets for handloading, and they have worked with Hodgdon Powder to bring even their exclusive “Superformance” and “LeverEvolution” brands to the handloader. Even Hornady, the pioneer in precise factory ammo, recognizes that handloading is an enormous asset to shooting sports, and if anyone knows the difference, they do.
Can you save money? Yes, you actually can. If you take just simple 9mm rounds, a box of the cheapest factory ammo you can find is amost $20 per 50 rounds these days. In comparison to handloading, assuming you have the spent brass cartridges, a box of 500 Hornady 124 grain bullets on Midsouth is $53. One thousand (1000!) primers are under $30, and a pound of Hodgdon Titegroup, enough for approximately 1500 rounds, is $15. Conservatively that is under $150 per thousand. I was unable to find 9mm even in bulk surplus crates at under $250 per thousand delivered. You definitely will save money.
Should you handload? Safety is a big deal. If you can exercise common sense and follow directions, then yes, please keep reading. If you have attention issues or think that it is ok to “half way” the safety issues of reloading, let me tell you right now that there is a whole world of difference, and a ton of hurt, between 2.7 grains and 7.2 grains of Bullseye, and both measurements fit in a .45ACP case. This is not something you want to experience. You will need to be extra careful when handloading. If you’re someone who thinks a maximum recommended load is merely a suggestion or think loading manuals have “lawyered down” data, please don’t handload.
A Brief Laundry List of Stuff You Need- A manual with data – Handloading manuals are not like manuals that come with, for example, computers. Instead, handloading manuals really do have good instructions. Often they have whole chapters devoted to tools and how to set them up, cartridge components and their differences, and every step to handloading. The data sections of manuals contain the recipes you’ll follow to handload safely. Usually the data tells you everything–what brand case, what brand and size primer, what brand and type of bullet, how much of the right powder to use, and how long to make the finished cartridge. All you have to do is follow the recipe and put the parts together.
- A secondary data source – In 30 years of handloading I think I’ve seen only one typo in printed data published by a manufacturer. Errors are more common in magazines and online, but a secondary data source isn’t necessarily so much for double-checking as it is for knowing more about the data range for a combination of components. They can’t put every powder in the book, and you may have a powder you bought for another caliber that could be used for the one you want to load next, but for which there is no data in the manual. I often find that given the same combination of components, the loads in one manual are different from the loads in another manual. Data varies because even “identical” components vary and it’s all but impossible for different ballistic labs to all use the exact same lot of every component when developing data. For example, one lot of a bullet you want to use may be slightly harder than the next, so the ballistic results may differ. In all instances, I err on the side of caution and between my primary and secondary data sources consider the more conservative maximum load as my maximum. The Hodgdon website has a data generator for all of the Hodgdon, IMR and Winchester powders.
- Shellholders/shellplates – Shellholders and shellplates are the parts that hold the cartridge cases in the press. If your press has a single station ram, as on a single-stage press, then you need a shellholder that holds one case. On a progressive, you need a shellplate that holds a case at each station. Both holders and plates come sized for different case rims, and since many cartridges share the same rim dimensions, a single holder or plate works for many calibers. For example, a holder or plate made for the .30-’06 also works for the .308 Win., and any other case made off of those such as the .25-’06 or 7mm-08. It also works for the .45 ACP, a host of Mauser cartridges, and more.
- Dies – Dies are generally sold as a “set” for a given caliber, and the number of dies in a set depends on the cartridge. Bottleneck rifle cases are reloaded with as few as two dies—one that resizes the case and one that seats the bullet. Die sets for straight-walled cases typically consist of a sizing die, neck-expanding die, bullet-seating die, and sometimes a crimping die. There are other specialty dies including ones that lubricate, universally deprime, or are used for trimming, but if you’re a beginning handloader stick with a basic 2- 3- or 4-die set, and follow the set up instructions that come with the dies. All of the manufacturers mentioned previously use a standardized thread design, so dies are interchangeable between different makes of presses (except for some old Dillons). We will get to some specialty types of dies from Redding, Lyman, Hornady and RCBS as we go down the road with this series, but to start all you need is the basic caliber specific set. and FYI the Lee sets also come with the shellholder. All die sets for a given caliber will have generally the same function in the dies, except Lee that works an optional powder station into their expander dies.
These are the basic function of the dies:
- Sizing dies return fired cases to near-factory dimensions. When you fire a cartridge, the brass case expands to seal the chamber. There is some spring-back once the pressure inside the chamber drops, but the case never goes back to the original dimensions. The expanded case might not fit the chamber of a different gun, might not feed reliably in any gun, and probably won’t grip a new bullet tightly in the neck, so you have to resize it. There are advanced sizing options such as neck sizing, but for now, follow the directions that come with your die to set it up to full-length resize. Full-length sizing returns the entire case to near-factory dimensions. If you load straight-walled cases, such as 9mm, it’s worth the extra few bucks to get carbide or nitride dies. Those dies are inherently “slick” inside so you won’t have to lubricate your cases when you size them (more on that later). Sizing dies usually also have a decapping pin that pushes out the spent primer and, depending on the cartridge you’re loading, the decapping pin may incorporate an expander ball that changes the dimension of the case neck from the inside so it properly grips a new bullet.
- Neck-expanding dies are used on straight-walled cases to open the case mouth slightly to help it receive the new bullet without crumpling the case when you seat the bullet. You want to set these dies so that they bell the mouth just enough to easily start a bullet. If you bell the mouth too much, you might have trouble getting the case to go into the bullet-seating die, and you’ll unnecessarily work the case mouth. Brass work-hardens, meaning the more you bend it the more brittle it becomes. If you over-work the case mouth, the case can split. I’ve even seen over-worked but loaded cases split while in storage.
- As its name implies, the bullet-seating die seats the bullet. Inside the die is a stem that you thread in or out to adjust how deeply a bullet seats. Bullet seating depth is something you can experiment with as an advanced handloader, but for now, seat bullets so that the finished cartridge is the overall length specified in the loading data you’re using, or so the case mouth is just below the top of the bullet’s crimping groove or cannelure if it has one. Don’t go deeper as that can cause increased chamber pressure and depending on the cartridge, could increase pressure to dangerous levels. By seating to just below the top of the crimping groove, the crimp rolls neatly into the groove. Many seating dies are also adjustable to put a little roll crimp on the case mouth. The instructions that come with your die will say whether or not it has that feature and how to adjust it. Light-recoiling cartridges fired in bolt-action rifles generally don’t need much, if any, crimp because there’s nothing to push the bullet deeper into the case, and recoil isn’t heavy enough to pull bullets out or smash them against the inside of the magazine. Cartridges destined for tubular magazines need crimps so the magazine spring doesn’t push the bullets deeper into the cases. Revolver loads need crimps so the bullets don’t telescope out of their cases under recoil. Auto pistol cartridges should be crimped, preferably with a taper crimp. By design, many auto pistol cartridges are supposed to headspace via the case mouth against the front of the chamber and a taper crimp makes that more positive. As a practical matter, though, these auto pistol cartridges are more likely headspacing on the rim against the extractor so the crimp wouldn’t matter. Regardless, for whatever reason I’ve found that taper crimped cases cycle more reliably through semi-autos than rolled crimped. Don’t ask me why.
- Sizing dies return fired cases to near-factory dimensions. When you fire a cartridge, the brass case expands to seal the chamber. There is some spring-back once the pressure inside the chamber drops, but the case never goes back to the original dimensions. The expanded case might not fit the chamber of a different gun, might not feed reliably in any gun, and probably won’t grip a new bullet tightly in the neck, so you have to resize it. There are advanced sizing options such as neck sizing, but for now, follow the directions that come with your die to set it up to full-length resize. Full-length sizing returns the entire case to near-factory dimensions. If you load straight-walled cases, such as 9mm, it’s worth the extra few bucks to get carbide or nitride dies. Those dies are inherently “slick” inside so you won’t have to lubricate your cases when you size them (more on that later). Sizing dies usually also have a decapping pin that pushes out the spent primer and, depending on the cartridge you’re loading, the decapping pin may incorporate an expander ball that changes the dimension of the case neck from the inside so it properly grips a new bullet.
- Case neck brush – I overlooked this tool for many years, and then I got a decapping pin with expander ball stuck in a .30-’06 case. A case neck brush loosens any burnt on carbon from inside the case neck, and if you put a little case lube on the brush, it makes it easier for the expander ball to pass through the neck of the case. It’s amazing how big a difference this little step makes on the effort it takes to operate your press. You can buy a special brush to use inside of case necks, but I use a nylon bore brush of the same caliber as the case.
- Case lubricant – Unless you’re using a carbide or nitride die for straight-walled cases, you need to lubricate cases for the sizing operation. If you don’t, you put added wear and tear on your die and press, and you will get a case stuck in the die. Then, when you put a little extra muscle behind the press handle to try and get the stuck case out, you’ll tear the rim off of the case and then it will be really stuck in the die. For basic handloading, all of the case lubes on the market will work equally well differing mainly in how they’re applied. The most common applicator is a case lube pad. You basically wet the pad with lubricant, and roll your cases across the pad just before sizing. A drawback to using a pad is that it’s easy to get too much lube on a case and when you run it into the sizing die, the lube hydraulically presses a dent into the case. Pads are also messy; your hands get covered in lube and the pad gets dirty from carbon and tumbling media. Some handloaders dispense with the pad and simply use their bare hand to apply the case lube. That’s fine if you’re batch processing on a single-stage press, but things get messy if you’re using a turret or progressive press and need to turn the turret head or add powder manually to the case. More recently spray lubes have come on the market and, pardon the pun, they’re pretty slick. I think the best way to apply spray is to stand your cases in a loading block and spray at a downward angle from two corners of the block. All of the cases get a light coating, and you’ll also get a little lube into the case necks for your expander ball. If you go the spray route, just be sure to use spray lube specifically for handloading and not something like WD-40. Sprays for handloading evaporate away and leave nothing behind that can contaminate the powder.
- Primer tray – Yes, it’s a tray to hold the primers—but it’s actually a functional tool. Primer trays have ridges on the inside of one side. You dump your primers onto the ridges, shake the tray gently, and the primers all jump over anvil side up. Depending on how your priming tool is loaded, you’ll either need all of your primers anvil side up, or cup side up. If you need them cup side up, simply put the lid on the primer tray and flip it over.
- Powder scale – When you look at your handloading data, it will indicate how many grains (not grams) of powder to use. Weighing a powder charge on a scale is the only way to insure you’re putting the right amount of powder in a case. We used to have to use balance beam scales and they worked, but it was and sometimes frustrating process. These days we have electronic and for the most part they work well. Electronic scales are like anything else electronic—sometimes they have a mind of their own—and there are reports of static electricity causing reading errors. Most scales come with reference weights, or you can simply take a bullet, weigh it, record the weight, and keep THAT bullet as a reference. It won’t be as accurate as true reference weights, but will keep you from weighing out grossly off charges.
- Adjustable powder measure or scoops, and a funnel – A powder measure “scoops” a consistent volume of powder from a powder reservoir and dumps it in your case. Some come with inserts for different size case mouths and some require you to use a plastic funnel. Lee sells scoops for powder and many of their die sets come with a scoop that is designed for that cartridge and a given type of powder. Other than the Lee system (their progressive press has a similar volumetric system), you will use your scale to figure out where to set your powder measure so that it drops the correct charge. Precision handloading will benefit from something called a powder trickler, to get it right to the perfect tenth of a gram, but for most bulk reloading tasks a regular adjustable powder measure and electronic scale are all you need. Make sure to tighten up the lock collars on the measure so it stays adjusted for your charge, and every 5th or so charge you should throw one into the scale pan to check, just to make sure. You can never be too careful with making sure your charge is correct. And watch the volume of powder in the measure. It can go dry or close to dry and give you empty cases or part full cases, and these “poof” rounds can be as dangerous or more dangerous than overcharges. These days there are automatic powder drops from Hornady and others that measure the charge and weigh it as the same time. They are of course more expensive, but they work great and make your bench look really professional as well.
- Loading blocks Loading blocks are simply trays with either square or circular recesses in which you stand up cartridge cases while you’re working on them. You can get by with one block, but I think you’re better off having two—especially if you’re batch processing. By using two, you can have one on each side of the tool you’re using and as you process your batch, you move the cases from one block to the other. It’s a particularly effective method to avoiding double-charging a case. If you are using a Lee turret press or any progressive press you don’t need these, but most beginner kits will come with them.
- Caliper – There are lots of important measurements in handloading and you will need a caliper that measures to 0.001-inch. Maybe it’s my positively electric personality, but electronic tools frequently frap out on me, so I go with a dial caliper over an electronic one. I have a friend who swears by his electronic caliper, so who knows. Measurements you’ll need to take include the overall length of the finished cartridge, which is listed in your loading data. You’ll also want to keep track of the length of your cartridge cases so you know when and how much to trim them.
- Case trimmer – This only applies to bottleneck rifle cases, and bottleneck pistol cases like the .357 Sig and 44-40. Shooting and then re-sizing cartridge cases causes the brass to “flow,” and they get longer. Case length needs to be kept in check, because eventually they don’t fit into your chamber anymore. The Sporting Arms and Ammunition Manufacturers’ Institute publishes specifications on cartridge case and gun chamber dimensions with tolerances that ensure cartridges and guns from different manufacturers are safe and compatible. Your handloading manual will have case length information in the data section that includes the maximum case length and the trim-to length. You may or may not have to trim each time you reload a case–it all depends on how much your case stretches during firing and sizing—but you do have to trim when cases reach the maximum length or if you’re using a load that calls for a crimp. As an aside, if you’re loading a cartridge that needs a crimp, then cases with slightly different lengths results in cartridges with more or less crimp, depending on the length of the case. That may cost you in accuracy, but I’d be more concerned about inconsistent crimps simply failing and causing a bullet to be pushed down into the case (which can increase pressure to dangerous levels), or cause bullets to telescope out (which can cause a revolver cylinder to lock up). Another important consideration about case length is that if the case is too long, when you chamber the cartridge the mouth of the case may enter the throat of the chamber. When that happens, the case mouth can’t expand properly to release the bullet and you’ll get high pressure.
There are several types of trimmers on the market. The simplest is the hand crank kind that will be in most beginner case prep kits. It has a clamp to hold the fired case and a set of collets to guide a rotating cutter that trims the end. There are electric versions of the same thing basically, and now there are even trimmer dies that file the top of the case when you raise it up into the die station.
Regardless of which type of trimmer you use, five trims is about the limit you should consider before you throw the case away. By the fifth trimming, the case has likely stretched so much near the head that its integrity is questionable and you could start having cartridge case failures when you shoot. Regardless of the number of trimmings, if you notice a visible “ring” at the case head, smash the case and throw it away. That’s a sign of incipient separation. It indicates that your cases are already stretched too thin. The reason for smashing the necks is so that later on if you’re feeling really cheap, you won’t be able to use those cases again. - Deburring tool – Freshly trimmed cases have very square, sharp mouths with little “burrs” of metal inside and out. If left like that, they can shave the sides of bullets as you seat them, and I’ve even had the little burrs stab into my hands. You remove those burrs with a deburring tool, which is a little suppository-looking thing with cutters on both ends. One end is pointed so the cutters go into the mouth of the case and on the other end the cutters are like little “fingers” that take care of the outside of the mouth. When you use a deburrer, you use it just enough to smooth things out; you don’t want to thin the mouth down to a knife-edge. Usually you can use a deburring tool immediately after trimming without even removing the case from the trimmer. Most beginner kits will have a hand deburring tool, and Hornady and others make electric ones. Hornady now even makes a complete case prep station we will be reviewing here soon that trims deburs and polishes for you. It is a great time to be a handloader.
- Vibratory or Ultrasonic Cleaner – Dull and stained brass is perfectly safe to reload, but after a couple firings you will notice that it has collected a considerable amount of burnt powder deposits on the inside. Most people invest in some kind of case cleaning system when they reload regularly. There are two types, vibratory and ultrasonic. A vibratory tumbler has a big bin on the top of it that you fill with some sort of media, usually made from either ground corncobs or walnuts. You can leave hundreds of rounds of pistol brass in the tumbler overnight and in the morning it will be bright and shiny, outside, and even mostly inside. If you de-prime before you tumble, even the primer pocket will lose some of its carbon deposits. An ultrasonic tumbler works with water and some kind of solution that you add to the water, a subtle acid usually. They are quicker, in the several minutes range quick, but they leave you with wet brass that needs to dry. It is thought that if you de-prime before you use an ultrasonic tumbler, it will remove more carbon from the primer pocket than a vibratory will, but we are still in the middle of in-house testing on that, so stay tuned. Ultimately the choice is up to you. Millions of handloaders have used vibratory tumblers for decades, but the rage is all about ultrasonic these days. Nike vs. Reebok.
- Priming tool – Clearly, since you’re removing the spent primers with the sizing die, you have to replace them with new primers, but I’m calling a dedicated priming tool optional. Progressive presses prime as an operation and most single-stage and turret presses these days have priming capabilities and with practice you’ll develop the “feel” for seating a primer perfectly. On some press-mounted priming systems you’ll have to manually place each primer on the primer ram, but many presses also have a tube or tray feeder so you never have to handle a primer. I’ve read that oil from your fingers can contaminate primers, but I think that’s stretching things a bit. The one thing I will note about using your press to seat primers is realize you have a lot of leverage and it’s easy to overdo it when seating a primer. There’s a little anvil inside of each primer and the gun’s firing pin smashes the priming pellet between that anvil and the primer cup to get it to go off. If you look at a new primer, you’ll see that the legs of the anvil sit just above the edge of the primer cup. A properly seated primer will be just deep enough to push the legs of the anvil down even with the inside edge of the primer cup. Seat a primer too deeply, and you risk over sensitizing the pellet, possibly cracking the pellet, which can cause misfires, or setting the primer off in your press, which is always a lively occurrence. If you don’t seat the primer deep enough, the strike of the firing pin can actually seat the primer instead of set it off and you’ll get a misfire. Never seat primers high; if you do, you risk at worst a slam-fire as you’re chambering the round before the bolt is locked.
The advantage of a dedicated priming tool is that you can de-prime your cases sitting around watching Idol on Wednesday night (Lee makes a hand press and Lyman makes a universal de-capping die), then clean your cases with no primers so the pockets get clean overnight, then use the priming tool for Idol on Thursday night. By the weekend you’ll be ready to reload (which you can ‘t do watching TV) and you have removed the trickiest part of smooth progressive reloading, which is always re-priming the cases. You simply remove the de-priming pin from your sizing die and you are good to go.
In my experience, the above are the mostly must-have tools to start handloading. It’s not a bare minimalist list so you can kinda-sorta get handloading, but there’s nothing extravagant or superfluous listed either. If you really get into handloading, at some point you’ll start adding more tools that are “niceties” or just make handloading faster or easier. You don’t need things like cartridge case gauges, but they do make handloading faster and more satisfying when you can simply drop a loaded cartridge into one knowing that if it fits the gauge, it will fit your chamber. You don’t need a primer pocket cleaner, but with a clean primer pocket it’s sure easier to seat primers precisely when going for the best possible accuracy. There’s an almost endless list of other tools that are nice to have for handloading, but the ones above are the ones you simply pretty much can’t do without. As time goes on with this column we’ll go over some very specific handloading tools and how to use them.
Enthusiasts use the term handloading instead of re-loading because though most of us get started re-loading, to save money on shooting, it can quickly turn into a labor of love and learning. There are so many variables that effect long range rifle accuracy that it would take a book to cover them. Over the years, ingenuity has bred some interesting products to solve problems that are thought to cause a lack of precision in handloads, and one company especially, Redding Reloading, has dedicated their entire company to the needs of the thoughtful handloader. There is also Dillon that has take the progressive reloader concept and turned it into a thousand dollar plus commercial grade machine, for consumers. Handloading can end up costing you a lot more than you initially saved on ammo. What these days that is much if any fun isn’t expensive? Handloading is fun! Testing handloads is even funner, and there are a lot of side things, (like bullet casting we have already started to cover), that bring whole new aspects to this really great hobby.
Many people think that the era of the gun nerd and voracious handloader is over, or in the process of ending. This is anything but true. The previous generation is indeed aging out of the active reloading years, but it will only be a matter of time before all of these new shooters discover what the previous generation discovered decades ago. Few hobbies are as fun and rewarding as shooting sports, and handloading brings a rich dimension to shooting that you have to experience in order to understand. Stay tuned for more articles in this column on specific choices within all of these tools above. We have a lot of ground to cover, but don’t let that stop you from going out and buying a press and getting started. Most of us are self taught when it comes to handloading, and other than getting sloppy with unsafe practices, there isn’t a lot you can do wrong.
How to Get Started Reloading Ammunition
Join our efforts to Secure America's Borders and End Illegal Immigration by Joining ALIPAC's E-Mail Alerts network (CLICK HERE)
-
03-22-2012, 07:48 PM #1798Senior Member
- Join Date
- May 2007
- Location
- South West Florida (Behind friendly lines but still in Occupied Territory)
- Posts
- 117,087
Could This Be the Ultimate SHTF Handgun?
Mac Slavo
March 22nd, 2012
SHTFplan.com
Comments (124)
Video: AF2011-A1 "Second Century" - Double barrel pistol - YouTube
This is eight double rounds [.45 ACP] with the Arsenal Firearms 2011 Second Century Double Barrel Pistol…in other words, it is 4000 grains of payload sent downrange in about 5 seconds. To achieve the same result with a single barrel 9mm pistol we would need to shoot about 30 rounds, with two changes of magazines, in about 30 seconds.
This is performance…
Photos:
http://www.shtfplan.com/wp-content/u...rms-tm-tfb.jpg
http://www.shtfplan.com/wp-content/u...3/af2011-B.jpg
http://www.shtfplan.com/wp-content/u...3/af2011-E.jpg
Via Arsenal Firearms:The AF2011-A1 Double Barrel Pistol comes actually as the very first industrial double barrel semiautomatic pistol of all times. The original idea came about ten years back to Swiss armourer Vivian Mueller, who at the time experienced cutting and welding together multiple parts of the famous Sig P210: the result was a long slide, double barrel 9mm, highly decorated collector piece, which indeed shot very well.
Our idea took the challenge further: to commemorate the legendary Colt 1911-A1 in the Centenary by making a true industrial market-ready double barrel .45 caliber pistol. We achieved success in the brief span of 6 months, after intense and round-the-clock 3D designing, stereolithographic modeling and parts machining.
The gun can be handled by any shooter able to shoot with a .45 Acp and it is not only very pleasing, but very accurate and great fun. The AF2011-A1 holds amazing and surprising target performance for the shooter: in fact, it will group all the 8 double .45 caliber rounds (16 bullets) held in the duplex, single columns magazines, in a target of the size of an orange at 15 yards and of a water melon at 25.
The stopping power of the AF2011-A1 is tremendous: 2 bullets for a total of 460 Grains weight impacting at 1 to 2 inches apart (depending on the distance of the target) will knock down a bull, while the whole 18 bullets, for a payload exceeding 4000 Grains, can be delivered to the target in about 3 seconds.
Hat tip The Firearm Blog
Also See: The Annihilator 2000
Could This Be the Ultimate SHTF Handgun?Join our efforts to Secure America's Borders and End Illegal Immigration by Joining ALIPAC's E-Mail Alerts network (CLICK HERE)
-
03-22-2012, 09:17 PM #1799Senior Member
- Join Date
- May 2007
- Location
- South West Florida (Behind friendly lines but still in Occupied Territory)
- Posts
- 117,087
New Proto Type Texas Flashlight
FMG 9 : Not Just A Flashlight
Video: New Proto Type Texas Flashlight - handy to have to walk the dog or take care of any little problem that might come upLast edited by AirborneSapper7; 03-22-2012 at 09:19 PM.
Join our efforts to Secure America's Borders and End Illegal Immigration by Joining ALIPAC's E-Mail Alerts network (CLICK HERE)
-
03-22-2012, 09:25 PM #1800Senior Member
- Join Date
- May 2007
- Location
- South West Florida (Behind friendly lines but still in Occupied Territory)
- Posts
- 117,087
12 Reasons Why Everyone Needs a Bug Out Bag: Series Post 5 of 12: Fire
March 14, 2012
By Creek
Series Introduction
This post series is for anyone who has an interest or curiosity in building their own Bug Out Bag. In the next 3-4 months leading up to the release of my book Build the Perfect Bug Out Bag: Your 72-Hour Disaster Survival Kit, my publisher has authorized me to write a series of 12 posts outlining the 12 Supply Categories needed to build the perfect Bug Out Bag and WHY they are important and necessary.
Each post in this 12 Step Series will highlight a separate Bug Out Bag Supply Category.In my book I elaborate on each of these supply categories in great detail with 100s of detailed photos, instructions, practice exercises, recommended gear and specific supply check-lists.
The purpose of this 12 Step Series is to identify, define and explain why each of the 12 Supply Categories I outline in my book are critical elements of a well-thought out Bug Out Bag. I will not get into recommended gear, survival instruction or specific check-lists – I have to save something for the book! This blog series isn’t as much about pitching my book as it is about selling the idea of building a bug out bag. I truly believe that every person should have their own 72 hour disaster survival kit – especially in the uncertain times we live in today. You can almost look at this post series as 12 Reasons Why People Need a Bug Out Bag. It is my hope that this series motivates people to begin building their own kit that may very well serves as their survival life-line one day.
Supply Category # 5: FIRE
This post is going to be short, sweet and to the point. I can’t say enough about the importance of Fire Starting Supplies in a Bug Out Bag. Fire is without a doubt in a survivor’s TOP 5 Survival Priorities.A Bug Out Bag without a GUARANTEED way to start a fire is incomplete.

Why is FIRE so important to a survivor? First and foremost, fire is a tool that can be used to regulate your core body temperature and stave off hypothermia in cold weather environments. It can dry wet cloths and heat rocks for radiant heat while you sleep. It can provide light in dark conditions and can boost the morale of those who become emotionally exhausted. Fire can also boil and disinfect your #1 Life-Saving Resource – Water.
In addition, it can heat and cook your meals. Use can use fire to make tools, containers and harden spear tips. Furthermore, you can signal for rescue with fire.Countless survivors have been saved by their ability to start a fire. It’s their ability and knowledge that saved them – not the fire.
What is GUARANTEED FIRE?
Guaranteed Fire means that you have the tools and resources in your Bug Out Bag to start and build a fire in virtually any condition you can imagine – wet, cold, damp or windy. Your FIRE KIT should be comprised of 2 components: 1) An Ignition Device and 2)Fire Starting Tinder. I review a variety of ignition tools and fire tinders in my book that I would rely on in a Bug Out Scenario for GUARANTEED FIRE.
Heat + Fuel + Oxygen
Just igniting your fire tinder doesn’t mean you’re ‘out of the woods’. Building a healthy self-sustaining fire requires experience and know-how. From the Fire Platform through several stages and sizes of kindling, preparation and planning are critical. Unfortunately, in many instances when you really NEED a fire, you typically NEED IT RIGHT NOW. Resist the temptation to rush through the important first stages of fire building.
CONCLUSION
Can your Bug Out Fire Kit pass the test?
Try starting a fire in ‘not-so-perfect’ conditions to see if you need to reevaluate your choices. As we enter into the famed year of 2012, I’d like to end this post with a quote from the opening chapter of my book: You’ve heard the phrase “If you build it, they will come.”
When discussing Bug Out Bags and disasters, my survivalist motto is “Build it, they are coming.”
Remember, it’s not IF but WHEN,
Creek
Similar Posts:
- 12 Reasons Why Everyone Needs a Bug Out Bag: Series Post 3 of 12: Shelter and Bedding
- 12 Reasons Why Everyone Needs a Bug Out Bag: Series Post 4 of 12: Clothing
- 12 Reasons Why Everyone Needs a Bug Out Bag: Series Post 1 of 12: Water and Hydration
- 12 Reasons Why Everyone Needs a Bug Out Bag: Series Post 2 of 12: Food and Food Preparation
- Bug Out Bag Preparedness Lessons from the BEAVER: Chip away at it!
http://willowhavenoutdoor.com/featur...-5-of-12-fire/Last edited by AirborneSapper7; 03-23-2012 at 05:37 AM.
Join our efforts to Secure America's Borders and End Illegal Immigration by Joining ALIPAC's E-Mail Alerts network (CLICK HERE)


 Reply With Quote


Looters Forcibly Evict LA Millionaires, Stealing Everything...
04-28-2026, 10:53 PM in Videos about Illegal Immigration, refugee programs, globalism, & socialism