

Results 2,951 to 2,960 of 8348
 210Likes
Thread Information
Users Browsing this Thread
There are currently 3 users browsing this thread. (0 members and 3 guests)
 LinkBack URL
 About LinkBacks
-
02-22-2013, 10:13 AM #2951Senior Member


- Join Date
- May 2007
- Location
- South West Florida (Behind friendly lines but still in Occupied Territory)
- Posts
- 117,696
Hidden Moveable Bookcase Installation Project
DIY Projects
by admin

photo credit garymkatz.com
This is the most amazing Step By Step DIY Picture Tutorial (about 40 pictures)
Hidden door bookcases arent easy to design or build, but theyre intriguing. Maybe one day well all be able to build one thats perfect in every way.
Click here to read article: http://www.garymkatz.com/trimtechniques/hidden_pivot_bookcase_install.htm
Hidden Moveable Bookcase Installation Project » The Homestead SurvivalJoin our efforts to Secure America's Borders and End Illegal Immigration by Joining ALIPAC's E-Mail Alerts network (CLICK HERE)
-
02-22-2013, 10:15 AM #2952Senior Member
- Join Date
- May 2007
- Location
- South West Florida (Behind friendly lines but still in Occupied Territory)
- Posts
- 117,696
A Portable Solar Water Heater Thrifty
Off Grid, Solar, Water
by admin
 Mother Earth NewsI think many of us are looking for Thrifty was to prepare for emergency, hiking trips or an off the beaten path kind of road trip. My motto has always been to think smarter than to work harder. I respect people who can see an item and picture in their minds 10 unique ways to use it.
Click here to read another creative way to make a portable solar water heater:
http://www.motherearthnews.com/renewable-energy/portable-solar-water-heater-zmaz80mazraw.aspx#axzz2LO1VDIVG
A Portable Solar Water Heater Thrifty » The Homestead SurvivalJoin our efforts to Secure America's Borders and End Illegal Immigration by Joining ALIPAC's E-Mail Alerts network (CLICK HERE)
-
02-22-2013, 10:20 AM #2953Senior Member
- Join Date
- May 2007
- Location
- South West Florida (Behind friendly lines but still in Occupied Territory)
- Posts
- 117,696
Monday, February 18, 2013
Building Communities From the Food Up
Activist Post
Politicians like to talk a lot about community building; it is a surefire appeal to emotion that we are all in this together and can work toward prosperity from the ground up. Naturally, the fine print is filled with government-run programs which are bloated with extra costs, special interests, and guaranteed to fail by their structural inefficiency.
In the independent media we often discuss the need to get away from fiat money and into tangible assets like gold and silver. While essential for those who have the means to do so, fewer and fewer people have the ability to buy even a few ounces of gold, since the savings account of the average American stands at around $3,800.
You might be amazed that the price of one ounce of gold can put you well on your way to food independence, or even help create a small business. So, let's take a quick look at some practical solutions that can empower individuals and local communities by returning to the land, as well as taking advantage of new methods for to modify what "returning to the land" really entails.
There is exciting progress being made even in areas hardest hit by the current economic crisis. In fact, it might even be because communities have been hard hit that, similar to the necessary innovations in places like Greece, we are seeing evidence that people are transforming from a mindset of crisis avoidance and survival toward rendering the concept of economic crisis as irrelevant.
Current agricultural techniques such as aquaponics and vertical farming have reduced the space that is required for self-sufficiency. This first video highlights the benefits of producing low-cost, healthy food to begin a process of community building that combines economic concerns, health, and education to start a much more positive feedback-loop than is traditionally offered through government programs.
Growing Power.mov - YouTube
This second video discusses what can be offered by a small-scale aquaponic system. The closed circle of fish feeding nutrients to vegetables provides year-round healthy food.
Small Scale Aquaculture - YouTube
For those who have the individual financial means, or would like to help educate their local community about what a large-scale aquaponics operation entails and can provide, the following video from Purdue Extension, NOAA, & Sea Grant Illinois-Indiana is an excellent way to open a discussion. It also gives statistics on what level of production can be expected, what fish/plant combination is best, what type of feed is best, the different aquaponic methods and a thorough discussion of the feedback cycle.
Aquaponics - YouTube
With dedication and proper planning, everyone has the ability to survive the looming food crisis by producing their own food and/or working within their community to organize the means to ensure that no one remains dependent on upon government programs.
Once a community finds itself with the means to provide the most basic necessities of survival -- and do it in a healthy fashion -- the move from stability to growth paves the way toward a long-lasting, thriving local and independent economy built upon production.
Have you or your local community been involved in planning similar low-cost solutions to food and economic crises? We would love to hear your ideas in the comment section below.
Hat tip to Local Org for highlighting these videos and other practical solutions to political problems.
Sources:
LocalOrg: Growing Power :: Urban Agriculture & Aquaculture
LocalOrg: Small Scale Aquaculture - A How To Introduction
LocalOrg: Aquaponics
Other key source:
Reddit's Aquaponics section, and its subreddits offer a wealth of resources and discussion that provide a quick way to get up to speed, connect with others and plan your system.
Activist Post: Building Communities From the Food UpJoin our efforts to Secure America's Borders and End Illegal Immigration by Joining ALIPAC's E-Mail Alerts network (CLICK HERE)
-
02-22-2013, 10:23 AM #2954Senior Member
- Join Date
- May 2007
- Location
- South West Florida (Behind friendly lines but still in Occupied Territory)
- Posts
- 117,696
Tuesday, February 19, 2013
29 Reasons to Use Coffee Filters for Survival
Gaye Levy
Activist Post
Coffee filters are ubiquitous. They are inexpensive, light weight and readily available. Heck, you can purchase coffee filters at the Dollar store, Amazon, Costco, the corner grocery and even on EBay.
Now I will be first to admit that there are a lot of lists floating around with suggested uses for coffee filters but most include all kinds of uses that are nice, but irrelevant to the prepper. After all, if you are in experiencing hard times, or a survival situation, do you really care about preventing your fine china from chipping?
Today I list 29 reasons why you should include coffee filters in your survival kit and preparedness pantry.
29 Uses of Coffee Filters For Survival
1. Substitute rag or paper towel
Use a coffee filter as a makeshift rag. Unlike paper towels, coffee filters are lint free and take up very little space. They are also dirt cheap.
2. Keeping insects away from food
When cooking or dining outdoors, cover your plates and bowls of food with coffee filters to keep the flying insects at bay.
3. Pre-filter collected water
When collecting water, you will likely find some sediment, leaves, twigs or other undesirable matter in the water. Pre-filter collected water using a water filter then process as you normally would, typically by boiling or by the use of a filtering system.
4. Make a disposable plate or bowl
If you are bugging out or on the run, plates and bowls, even disposables, may be scarce. Dry foods can be eaten directly from a coffee filter bowl held in your hands. Heavier foods, even those that are moist, can be supported by a paper of plastic plate or bowl. When done, throw out the filter and your plate or bowl is still clean enough to use for the next meal. Saves cleanup and even more important, saves water.
5. Keep small hardware items organized
Nails, screws and all manner of fix-it items are good to have on hand in your survival kit. Secure them in little bundles made of coffee filters. Tie off the bundles with some paracord since that will be useful too.
6. Keep your specs spotlessly clean
You dont need fancy liquid products to clean your glasses and, as a matter of fact, some products can also damage the coatings on specialized lenses. (I know it happened to me.) The next time you need to clean your glasses, try using a coffee filter with a bit of plain water. Your glasses will come clean and will be lint-free. You can also use a coffee filter to safely clean cell phone. E-reader and computer screens.
7. Protect your cast iron skillets from rust
Nothing can be more discouraging to the cast iron maven than to find a bit of rust on your well-seasoned cast iron skillet. You can help prevent this by putting some coffee filters in the skillet when its not in use. The filter will absorb moisture and prevent rusting.
8. Emergency toilet paper
No TP? No worries. A coffee filter will work just fine just dont flush it down a toilet remember, this is for emergency use.
9. Pet pooper scoopers
Ditto for pet pooper scoopers. Coffee filters work like a little glove for taking care of your pets business. Great on the hiking trails or even indoors when Fido has a little accident. You can also use a coffee filter to wipe a messy tush if you have to.
10. Keep potting soil where it belongs in the pot
Before placing soil in a pot, cover the hole in the bottom with a coffee filter. This will prevent the soil from leaking out and yet will allow the excess water to drain properly.
11. Make an air freshener
To make an air freshener, fill a coffee filter with baking soda, twist-tie it shut (again, use a bit of paracord) and you are all set. The baking soda will absorb all kinds of nasty odors. Make several and tuck them into your backpack, shoes, ice chest, vehicle or tent and anyplace else that tends to get stinky smelly.
12. Make a cold compress
Soak filters in brewed tea or even just plain water and chill. Fold them up to fashion a cold compress when you have a headache or slight fever or even just to tame puffy eyes.
13. Make a bandage
If you have a small cut or even a razor nick, grab a piece off of a coffee filter and slap it on with pressure to stop the bleeding. Your coffee filter will work similar to a styptic pencil but without the stinging. Note: this is not a replacement for a decent first aid kit.
14. Trap cooking grease
When cooking greasy foods especially meats you can soak up the extra grease by placing a coffee filter both under the cooked food and on top. Pat your food down well with the coffee filter and you will be good to go.
15. Make an instant funnel
Cut the end off of a cone-style coffee filter to make an instant funnel.
16. Make an herbal tea
Gather up some fresh herbs, crush them a bit, them make a little sack out of your coffee filter. Tie off the top with a bit of twine from your survival kit (or some strands of paracord). Boil some water, add it to a cup, and then let your packet of herbal tea steep to the desired strength. If you have a cold or sore throat, be sure to add a bit of honey or honey powder.
17. Flavor your sun tea
When making a sun tea, add dried orange peels, mint leaves or other herbs for flavor. Take a filter and center the contents in the middle. Gather the edges, twist and tie with string. Drop your little flavor packet into the jar along with the tea bags and let it brew as usual.
18. Use as a filter for fresh juices
If you have found a citrus tree and are scavenging fruit for juice, you can use a coffee filter to filter the juice, leaving seeds and pulp behind.
19. Spot clean clothing
Spots and spills are a fact of life. Use a coffee filter to spot clean your clothing. If you have some, use some white vinegar or hydrogen peroxide and the spot will be greatly reduced if not disappear completely.
20. Sprout seeds for consuming
To sprout seeds, dampen the coffee filter then place seeds inside. Fold it up then place the filter and seed packet into a plastic baggie until they sprout. If you can, keep your little sprout packet in a dark spot for a few days then move them into the light so chlorophyll develops. Some good seeds to use are mung beans, bean sprouts, and mixed broccoli and radish seeds.
21. Sprout garden seeds
You can also sprout garden seeds in coffee filters to give them a head start before putting them into the ground or pots.
22. Store garden seeds between seasons
Even without a desiccant, a coffee filter can be stored with seeds to keep them moisture free between growing seasons.
23. Keep glass surfaces clean
Coffee filters are lint-free so your glass surfaces will sparkle after they are cleaned. If you have some and you should add a little vinegar to water and use this combo as a cleaning solution. (But use only water and soap on eye glasses no vinegar please. See above.)
24. Keep fresh produce crisp and dry in your cooler
Wrap fresh picked produce especially greens in coffee filters before putting them in your cooler. The coffee filter will help absorb any moisture and keep your produce fresh and crisp longer.
25. Make a portable food wrapper
While fending for yourself, you may not have aluminum foil, plastic wrap or other containers for storing your food. Instead, use a coffee filter as a food wrapper or storage container. You may need to split the filter and combine two or more to surround your food but after securing your food wrapper with a bit of string, you will be all set.
26. Strain soup stock and broths
In a survival situation, you will not want to waste anything food wise. After boiling up food scraps, strain the broth for a nice rich soup stock that can be consumed as-is or used as a base for another meal.
27. Make a Bouquet Garni
Bundle herbs and spices into a coffee filter, tie it off, and add to your soups and broths as a nifty way of seasoning your homemade creation.
28. Make coffee!
Lest I forget, dont forget to use your filters for making coffee. If all you have is a pot, some ground coffee and water, boil it up and filter the resulting brew into your cup. Not exactly a Starbucks experience, but if you are a coffee addict, it will be delicious nonetheless.
29. Bonus item: Make dryer sheets
Okay, this is not a survival necessity but it works so well, I just had to include it. First of all, I do not use nor do I endorse the use of commercial dryer sheets. Sometimes, though, I will dampen a coffee filter with some white vinegar and a few drops of my favorite essential oil (lavender). When it is raining and cold and I cannot hang my sheets outdoors to dry, I will pop one of these scented filters into the dryer and my sheets will smell heavenly.
The Final Word
My inspiration for this article was finding myself without a bowl for Tucker the Dogs food while traveling home from my recent visit to the Seattle area. I just happened to have a coffee filter in my glove box the perfect makeshift bowl.
I had a long drive so that go me thinking what a great pooper scooper!
When I got home, I started thinking of other uses some I found on the Internet and just sort of came to me. What about you? Do you have some unique uses of coffee filters in a survival situation?
Read other articles by Gaye Levy here.
Enjoy your next adventure through common sense and thoughtful preparation!
Gaye started Backdoor Survival to share her angst and concern about our deteriorating economy and its impact on ordinary, middle-class folks. She also wanted to become a prepper of the highest order and to share her knowledge as she learned it along the way. She considers her sharing of knowledge her way of giving back and as always, we at Activist Post are grateful for her contributions.
If you would like to read more from Gaye Levy, check out her blog atBackdoor Survival - Survival blog and prepper tools for creating a sustainable lifestyle using self-reliance, thoughtful prepping and optimism.. You can also visit her Facebook page or sign up for updates by email by clicking onBackdoor Survival Updates.
Activist Post: 29 Reasons to Use Coffee Filters for SurvivalJoin our efforts to Secure America's Borders and End Illegal Immigration by Joining ALIPAC's E-Mail Alerts network (CLICK HERE)
-
02-25-2013, 06:54 PM #2955Senior Member
- Join Date
- May 2007
- Location
- South West Florida (Behind friendly lines but still in Occupied Territory)
- Posts
- 117,696

 1,000,000 Patriots Defending Our Second Amendment Rights.
Like This Page · 19 February
Topic of Discussion: What are some must haves in any survival bug out Kit?Join our efforts to Secure America's Borders and End Illegal Immigration by Joining ALIPAC's E-Mail Alerts network (CLICK HERE)
-
02-28-2013, 08:55 PM #2956Senior Member
- Join Date
- May 2007
- Location
- South West Florida (Behind friendly lines but still in Occupied Territory)
- Posts
- 117,696
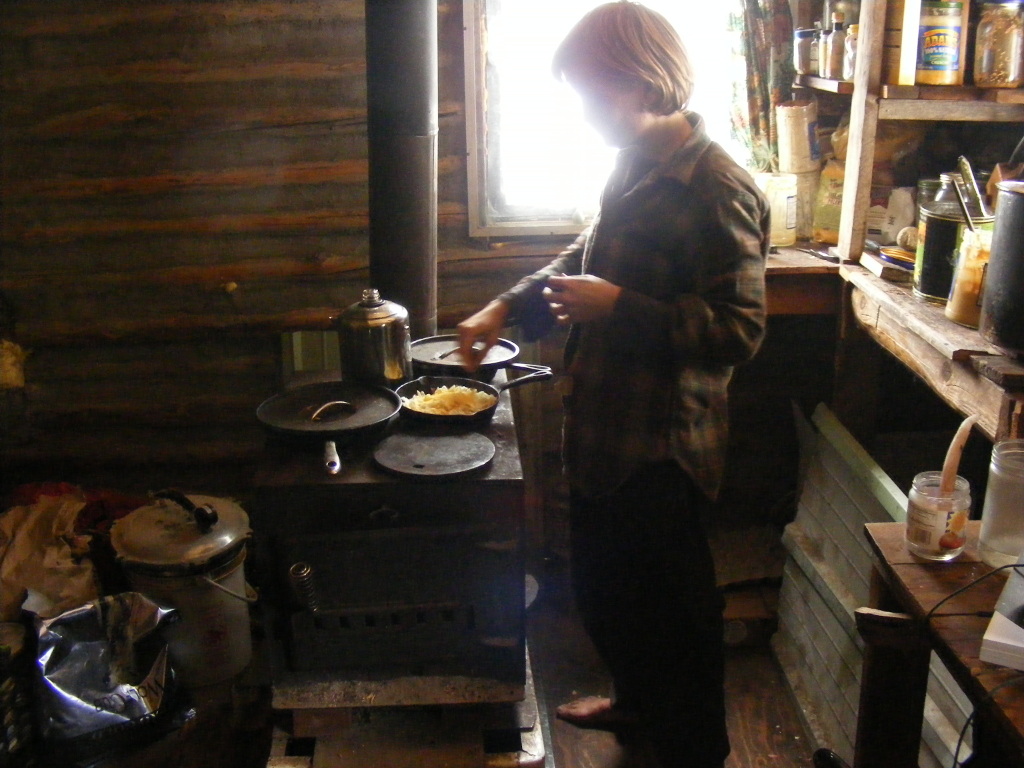
Where There Is No Kitchen: Cooking When The Grid Goes Down
Todd Walker
Survival Sherpa
February 27th, 2013
Reader Views: 1,698
Comments (7)
 Editors note: P. Henry offers some very practical tips to cooking in a SHTF scenario. He even added a tip for washing dishes from a 1880′s homesteading manual Ive never heard of or tried this one. Check out the other practical advice over at their site The Prepper Journal.
By P Henry
Many of you are familiar with the nearly famous books Where There Is No Doctor and Where There Is No Dentist that are the most widely used health education books in tropical and sub-tropical developing countries. These are great references that you can download from our Resources page that cover basic medicine and dental care from a perspective of a people who arent able to drive to the doctor or see the dentist whenever they have a tooth ache.
The concept of Where there is no popped into my mind as I was preparing to write this post. In a grid-down scenario we may not have the easy access to our kitchen tools that we have relied on in the past. Most kitchen appliances are powered by electricity or gas and if those both go out due to an emergency you could find yourself living where there is no kitchen.
Not having access to your microwave shouldnt cause you any panic though, because people have been living pretty well without these conveniences for a very long time. Even if you have stored 30 days worth of dehydrated food and water, chances are you will want to eat something warm before it is all over. Even in the military we only ate MREs once a day when we were out in the field. MREs will keep you alive but eventually you get tired of that and want something hot and delicious. I know that MREs can be heated up too, but the contents of a regular bag of MREs cant hold a candle to a nice venison stew that has been cooking slowly over a fire all day.
With some simple planning and preparation you can cook just about anything you need to keep you alive and healthy through any disruption. There are a few considerations and lots of options for cooking that we will discuss below.
Cooking Options
We are going to assume that any cooking that you will be doing is outside in this grid-down scenario. No cooking with open flame should be done indoors and that includes using your big stainless steel propane grill. Fumes are toxic and can hurt you so keep it outside for safety.
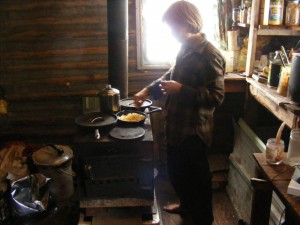 Wood stoves These are about the closest you can come to the power and convenience of a range or oven inside your house or retreat location. Yes I know that I just said to cook outside, but your stove is vented outside already. This is a winter solution though because you wont likely want to fire up the big wood-stove in the living room in the middle of August. In much older homes, the kitchen was in a different part of the house because the heat would stifle everyone else. During the winter a wood stove is a perfect solution for cooking and you can easily fit a couple of pans on the top and regulate the heat easily. You can cook on a wood-stove with your regular pans without any problem.
Backyard Grill This is my personal first line of defense if the power goes out. It is simple to use and already set up outside. The main drawback is the need for propane but I keep an extra 50lb. canister of propane at all times so that if my main source runs out I still have a spare. This spare propane would be on my list of basic household items that you need to stock up on also. Some people use charcoal so an extra bag or two would be wise. It wont last as long as a can of propane but having the ability to cook for a few days is always a smart idea. Optionally, if your house is heated with propane, you can purchase an adapter to run your grill but you probably are already using your oven in the house. Its nice to have options.
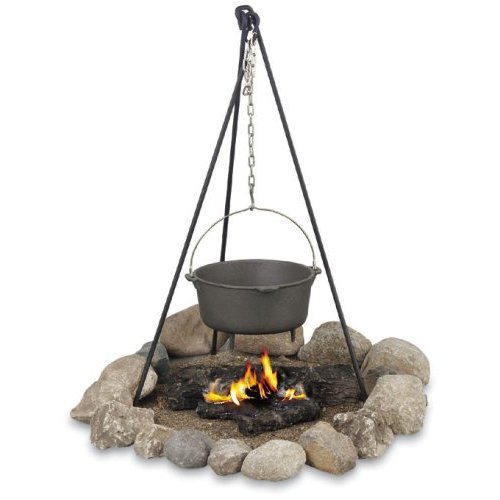
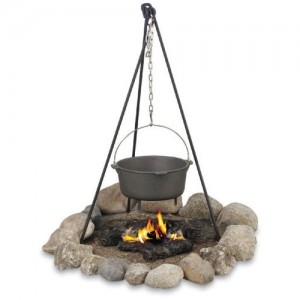 Campfire Since the dawn of time people have been cooking over an open fire on the ground. This would be my fallback option after the propane was gone or if I had something that was larger and needed to cook for a long time. Campfires dont need to be fancy but having a pit surrounded with rocks to contain the fire is preferred. To cook on a campfire, you will want to invest in at least one piece of cast iron cookware. Two would be the best giving you the option to fry or cook a big stew. You will also want to have a method to suspend your cookware over the flames. This is where a great tripod like the one on the left here or a grate you can set on the ground over the coals. I prefer the tripod, but the grate is much simpler when you are using a skillet.
Camping stoves These are a great solution too and use the same type of Coleman propane cylinders your lanterns take. They do have the drawback that the grill does though, and once your fuel is gone, they are worthless. You can use the grill grating itself over a regular campfire so dont throw that away. We will talk about that more later. Backpacker stoves also come in handy in a pinch, but that would not be ideal for cooking larger meals. It will heat up single portions nicely though, and there are a lot of fuel options for the short-term emergency.
Rocket Stove Rocket stoves are simple to build using materials you may have lying around or in the shed. These can be fueled with sticks and twigs and make a great surface that produces a lot of heat without a big footprint. There is an article about how to make a rocket stove out of a few cans that you should check out also.
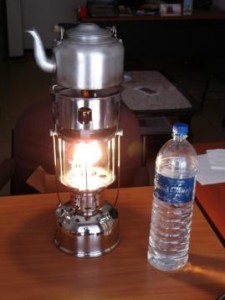 Lanterns Anything that produces heat can warm your food and some lanterns give you the ability to use the heat escaping from the top to boil water or heat soup. This is yet another good option that may work for some people. Candles can also be used but this would be my last resort. They take forever but you are already using your candle so this is a way to get two uses out of your preparations.
Solar I saved this one for last but solar cooking shouldnt be discounted at all. If you have sun and dry weather this is a great way to heat up and cook meals if you have time to wait. You will want to build your own solar oven which is fairly simple or there are several you can buy online. If you just need to warm up a can of soup you can sit that in the sun on the driveway for 30 minutes and voila!
Solar ovens can be made in numerous ways with lots of material. Here is a video for a funnel solar oven by LDSPrepper that cost only $5.
Cooking Necessities
The first place we look is to our cooking containers, or what we are going to hold over our source of heat to contain this wonderful food you are getting ready to cook. Cast iron is my personal favorite but that isnt practical if you are on the move. You can also cook with #10 cans if needed, just be sure that the plastic coating on the interior melts out first.
Aluminum foil is not only useful for creating a solar oven, but you can form bowls out of this to cook with or boil water in a pinch. Aluminum foil is a second cousin to Duct tape I believe, because it has so many uses and should be on your list of supplies for your household. Can and bottle openers are nice. They arent necessary because if you are hungry enough, you will get that can open, but they are very convenient and do not cost anything at all. You will also want to have plenty of capacity for making fire in the first place. Lighters are simple and cheap, but flint and strikers should be in your survival kits also.
Other tools you could use are oven mitt or pot holders to handle the pots on these cooking surfaces. Wooden spoons and spatulas wont melt like plastic and you can even make these yourself if you have plenty of time on your hands and a sharp knife.
Cleanup
Now that the group has been fed how do you clean up? Sanitation is something that becomes more important with the severity and duration of the emergency. Germs are easily passed so cleaning your food utensils is an important consideration for the health of your survival group. Assuming you have some water on hand for cooking, we can look back at how the pioneers cleaned their dishes.
The rare 1881 Iowa settlers manual has a tip for washing dishes when youve run out of soap. Its in the cleaning chapter of the book and was written for some of the first people moving into Iowa to homestead in the 1880′s.
To wash dishes without soap, have your dishwater hot and add a very little milk, as this softens the water, gives the dishes a nice gloss and preserves the hands. It removes the grease, even that from beef, and yet no grease is ever found floating on the water as when soap is used.For the most part, hot water and a sponge with abrasive on one side will do the trick. Boiling dishwater before doing dishes would be the safest way to make sure youre not scrubbing your pots with Giardia. But as for me, 99% of the time, Im content with just getting it hot enough to cut the grease. Your call. After scrubbing, strain your dishwater through a fine mesh strainer (or a bandana) and broadcast the waste-water. In other words, fling it far and wide. You can use the rest of whats left for compost. Delivered by The Daily Sheeple
Contributed by Todd Walker of Survival Sherpa.
Todd Walker is married to the lovely Dirt Road Girl, proud father and grandfather, a government school teacher, a lover of the primal lifestyle and liberty. You can check out his website at Survival Sherpa with a vision of helping each other on the climb to self-reliance and preparedness the Survival Sherpa way One step at a time. Follow him on Twitter. Send him mail: survivalsherpa@gmail.com
Where There Is No Kitchen: Cooking When The Grid Goes DownJoin our efforts to Secure America's Borders and End Illegal Immigration by Joining ALIPAC's E-Mail Alerts network (CLICK HERE)
-
03-01-2013, 06:01 AM #2957Senior Member
- Join Date
- May 2007
- Location
- South West Florida (Behind friendly lines but still in Occupied Territory)
- Posts
- 117,696
Field Evasion Skills, by JOAT
Thursday, February 28, 2013 17:42
(Before It's News)
So there I was, in the back of the UH-60 Blackhawk lifting my feet at various intervals for fear that they would scrape the pine trees as the pilot hugged the terrain below with the chopper. One thing led to another and the next thing I knew the chopper was on the ground and I was running full speed to get to the trees to find concealment from nearby hostiles that intended to do me harm. As I got up and over the nearest ridge and ducked into some temporary concealment; I stopped and listened. After waiting for what seemed like an eternity for my heart to slow down so I could hear something other than the pounding in my ears, it was quiet. An eerie quiet that made me wonder if the bad guys were just sitting behind the next tree waiting to roll me up the second I started to move. I knew I wasn’t far enough away from where I left the Blackhawk so I got moving again and after the most nerve-racking 1,200 meters of my life, I found a place to hide. In the middle a huge patch of brush where no one would find me unless they stepped on me, I pulled out my map to figure out where I was. That was a long cold night shivering under my poncho listening for any sign of danger. At dusk the next morning I cautiously headed in the direction of where I thought the good guys would be. After 5 agonizing days and nights avoiding detection and a ton of other circumstances that I do not have the liberty to discuss, I was recovered by a friendly indigenous force and eventually reunited with my loved ones.
Thankfully, every detail of the preceding account took place in northeastern Washington as part of an elaborate training exercise. This phase of training combined with eight other separate phases prepared me to become a US Air Force Survival, Evasion, Resistance and Escape (SERE) Specialist.
I’ve set up and participated in multiple evasion training events, playing the evader and other times the aggressor. I’d like to offer some instruction and insight on the topic of evasion which is not often discussed, but can make the difference between life and death when/if the time comes. The following narrative is written with the assumption that you are in a rural setting (urban evasion is much different) and there is no recovery force available. You are on your own.
The Five Phases of Evasion
1-Immediate Action:
Time is of the essence! This phase is where you are quickly deciding if you should stay and fight or evade instead and if you choose the latter, what should you take with you (hopefully your BOB is packed and nearby). A quick check to sanitize yourself so nothing compromises you or your group if you’re caught, then it’s time to high-tail it out of there. Assume the enemy is nearby and take caution when leaving the area.
2-Initial Movement:
The main objective here is to put time, distance and terrain between you and the bad guys and avoid lines of communication (roads, water bodies, trails, railroads, power lines, fences, etc.). You’re moving with a purpose, but shouldn’t be running with reckless abandon. Moving in an erratic pattern will limit the enemy’s ability to anticipate your line of travel. Periodic stops to take note of the environment will prevent running into more danger and give you the chance to detect any followers. The idea is to get far enough away from danger, effectively hide and plan your exit strategy. Consider the fact that your adversary may have a dog and handler looking for you. Forget the nonsense you’ve seen in Hollywood and don’t waste valuable time/resources leaving traps behind or trying to get to water and “float away your scent”.
Nothing you’re going to do is going to fool the dog; the handler is the one to be defeated. Using the principles of time, distance and terrain will work against the best dog/handler team. Time: dogs and handlers fatigue and have a limited workday. The more time you put between you and the area they start looking for you; the harder it is on that team. Distance: fatigue will continue to build on the dog/handler which degrades their ability to locate you. Additionally, more miles introduce more variables to the dog which have to be factored in by the handler as reliable or unreliable leads.
Terrain: traversing difficult/dangerous terrain is challenging to the dog/handler team. This buys the evader time to plan his next move and continues to erode the will and energy of the dog and handler. While on the move, be on the lookout for a hole up site.
3-Hole Up:
The BLISS acronym comes in handy when remembering evasion shelter principles.
Blend- Hole up sites must look like and be a natural part of their surroundings.
Low silhouette- For the same reason you lay down to hide.
Irregular shape- Similar to blending, so don’t string up your poncho and start creating straight lines that draw attention.
Small- Just big enough for you and your gear.
Secluded- Like any real estate, location is everything. Don’t use the only clump of brush on the hill side.
You will want a site that will conceal you, but also protect from the weather if possible. Rocky outcroppings and/or dense vegetation can get the job done while also obscuring your movements and heat signature should the enemy have night vision or thermal capabilities.
Make use of the military crest if it’s available (2/3 up the mountainside, 1/3 from the top). This prevents silhouetting, provides good line of sight and avoids setting up shop in the cold sump of a valley or windy ridge line. Once a potential hole up site is identified, don’t just dive in. Approach the site using a large sweeping “J” pattern. This allows you the opportunity to detect anyone following your trail while you are in the site and get out before they discover your hole up area. Along the same lines, your hole up site should afford you multiple avenues of escape.
Now that you’re in the hole up site and have naturalized the immediate entrance area, inventory your gear, take care of medical issues, work on your camouflage, get some rest and develop a plan. Light discipline should be strictly adhered to-- if you’re breaking out the map during low light, use a small red light with a poncho over you at a minimum. Typically, bad situations don’t happen to people on warm sunny days, but by the same token, you must not light a fire unless your life absolutely depends on it! In the event you NEED a fire, the Dakota hole is the way to go (two holes about fist width, 12 inches down, 12 inches apart, with a tunnel connecting the two at the bottom). Dig the holes near the base of a tree with lots of boughs/branches to help with smoke dispersal and use the smallest (think pencil lead size), driest wood you can find (hardwood is preferred). Hover over this fire with your poncho on (if available) and keep your flames below ground level. If bad guys start to roll up on you, keep the dirt from digging your Dakota hole on a piece of material nearby so you can quickly extinguish your fire, naturalize the area and get out of there. Latrines should be separate from your hole up site (avoid leaving trails) and must be naturalized as well. Procuring water during your evasion should be done only using obscure water sources (i.e. small mud hole, mopping up dew with a bandana, melting snow in a bottle between clothing layers, catching rainwater, etc).
Approaching other water sources (creeks, ponds or rivers) puts you in unnecessary danger (more on this later). Food should be in the form of edible plants or insects, but staying hydrated is the primary concern. Edible plants are beyond the scope of this article and many books are available on the topic. As far as insects go, look for 6 legs or less and 3 distinct body segments (ants, grasshoppers, crickets, etc) Side note: My vote is for the ants. They’re similar to lemon flavor and much better tasting then any of the other slow moving protein I’ve eaten. Even worms and grubs will provide enough protein to take the edge off the hungriest evader. Fishing, snaring and hunting will generally not be conducive to the evader who has major concealment/security concerns as well as limited supplies and limited time for these activities.
4-Evasion Movement:
If you are well hidden and can meet your needs in your hole up site, there may be no need to ever enter this phase of evasion. If you determine that you must move, develop a plan of where you need to go and how you will get there (line of travel). Movement should be slow and methodical. The environment will dictate the speed, body posture and navigation route you choose. For example: dry conditions with leaves on the ground will make every step a tightrope act for fear of crunching foliage underfoot. Crossing an area of sparse vegetation if unavoidable, may require crawling to reduce visibility to enemy eyes. While straight line navigation may be the shortest route, it’s probably not the safest and can make it much easier for the bad guys to figure out where you might be headed (and cut you off) should they find your tracks.
During travel, move to and from points of concealment while using natural cover and shadows to your advantage. Constantly be on the lookout for the enemy and if seen, slowly fade away into concealment (quick movements catch the eye). Consider memorizing the evasion route and avoid marking on your map (if available) or folding it to a specified area then handling it with dirty hands. This can reveal your intended destination (retreat/group location) to adversaries if you are caught. If there are two or more evaders in your group use the additional eyes and ears to your advantage with tactical movement. There are a number of ways to skin this cat, but here is one that may work for you: Evader #1 moves along the route to concealment (still in visual contact with #2). #1 gets his bearing for his next point of concealment, looks back and gives #2 the thumbs up. #2 does a quick scan of their 6 o’clock (he’s rear security) and if everything is kosher, he slowly moves to #1’s concealment site. #2’s movement prompts #1 to move to his next concealment. When he gets there the process repeats until they make it home. If #2 were to pick up on noise or movement during this process, he simply stays at his concealment until the threat is gone. His inaction will show #1 that the coast is not clear. If #1 identifies a threat at any time he simply does not give the thumbs up to #2 until the danger is gone. No thumbs up signals #2 to sit tight. This method ensures good communication between evaders and allows the group to move in a tactical manner. If there are three or even more evaders, movement is the same. #2 would give the thumbs up to #3 and so on (a domino approach). Any time there are multiple evaders the group must decide on a rally point (before movement) should the group get separated for any reason. Ideally, your evasion movement should get you out of the danger area and on to the final phase of evasion.
5-Recovery: There’s always been a recovery force in the scenarios I’ve dealt with, but here we’ll assume the worst and say that it’s up to you to return to friendly control (wherever/whoever that may be). History and everyday life have shown that people start to ease off when they think the end is near. My advice is- don’t become complacent! It would break your heart to be so close to safety only to get rolled up by the bad guys. This is the time to focus and avoid the distracting thoughts of freedom (run through the tape, as the saying goes).
Principles of Evasion
- Be flexible- Successful evasion involves fluid decision making and not restricting yourself to one approach. Change with your environment and the challenges that it presents (be like water, grasshopper). Having an Evasion Plan of Action with multiple courses of action can prepare the evader for the changes that are sure to come.
- Stay hidden- There are several techniques that play into avoiding detection.
- Pay attention to the environment. Especially during times of movement- stop, look, listen and smell. You are extremely vulnerable when on the move. Movement catches the eye, creates sound and generally draws unwanted attention so you’ve got to keep your head on a swivel. Be alert to game in your immediate area. Birds, squirrels and the like can act as your personal alarm system if you’re paying attention in the hole up site. However, this can work against you when you’re the one on the move.
- Only move if you have to and use periods of low light and/or inclement weather for concealment. Dusk and dawn provide the evader with enough light to avoid stumbling through the dark making a ton of noise and possibly getting lost, while also minimizing the effectiveness of night vision devices that may be used by the search party. Inclement weather aids the evader with covering tracks, masking the noise of movement, obscuring visibility and making life very hard on the bad guys looking for you.
- If you must move at night, navigation is going to be more challenging without the use of a compass, but you can use celestial aids (Polaris in the Northern hemisphere/Southern cross for the Southern hemisphere) to avoid walking circles in the woods. When looking at ground objects in the dark, look slightly to one side and use your peripheral vision. Squat down and skyline the things in front of you to assist with identifying more distant objects.
- Steer clear of lines of communication. These areas are natural lines of drift for the common populace and the evader must be uncommon, unconventional and unpredictable. While these areas are much easier/faster traveled, they invite trouble for the evader.
- Leave no evidence of your presence by cleaning up after yourself. This doesn’t just apply to your hide site; it applies to movement (i.e. tracks, broken branches, matted grass, ruffled leaves, etc). Be conscious of disturbing your surroundings and walk on hard surfaces when available. Consider wrapping your boots with cloth to make tracks appear older, or better yet, travel during inclement weather!
- Camouflage needs to be appropriate for your surroundings and updated as the environment changes. Hide the shiny objects like glasses, watches, zippers, jewelry and buckles. Pad the noisy items on your body and equipment. Cover exposed skin with any available materials (face paint, mud, ash, etc). If using natural vegetation to conceal items on your person, ensure they appear natural (leaves/boughs are a very different color on the bottom side) and are changed out as they wilt. Much has been written on the topic of camouflage so we’ll leave it at that.
- Generally speaking, engaging hostiles while evading is bad for business. There are exceptions to every rule, but the evader is usually badly outnumbered and out gunned. If you do decide to drill the bad guy walking in the vicinity of your hole up site, be sure you’re prepared for your next move. Is he a scout for the main party shortly behind? Are you sure he even sees you? I’ve seen the warrior mentality compromise people’s judgment. Sometimes it’s better to run away and live to fight another day.
Plan ahead- An Evasion Plan of Action can serve you and your group well in the event that you need to evade. If you live in a bigger city, this plan should be part of your bug out preparations and incorporate several scenarios with emphasis placed on rally points and timelines. The Evasion Plan of Action is worth its weight in gold when you are separated from your main party and communications are down. We use the PACE acronym in the military: Primary, Alternate, Contingency, Emergency. All eventualities are covered (or as many as possible).
An example Evasion Plan of Action may look like, but is not limited to the following:
Communications plan/Call Signs:
P-Cell Phone
A-Landline
C-CB/two way radio
E-Shortwave/ham radio
Immediate communication intentions ( 0 to __ hours): Try to establish comms using Primary and Alternate method for the first half hour. If no contact is made, attempt contact at the top of the hour for the next 24 hours…
Extended communication intentions (after __ hours): Try to establish comms using Contingency or Emergency methods at 1200 local every day…
Call signs also listed here.
Rally Points:
P-The house
A-Relative/Friend’s house
C-Beacon Hill (easily recognizable terrain feature just outside the city)
E-The retreat location
Immediate rally intentions ( 0 to __ hours): Try to get to Primary rally point. If compromised, use Alternate rally point…
Extended rally intentions (after __ hours): If unsuccessful rally after the first 24 hours use Contingency rally point. After 48 hours…
Cache Locations/Descriptions:
Evasion Intentions: Will move away from lines of communication and attempt to make comms…
Code Words/Numbers/Bullseye/Etc:
--Note: use of a Bullseye (prearranged landmark used as a point of reference) can come in handy for a group. For example, if I have comms with my group and a map compass or GPS, I can relay that I am 8 miles at 115 degrees from Bullseye. My group knows what bullseye is and therefore knows where I am, but nobody else listening in knows where I am.
Obviously the Evasion Plan of Action is going to have information on it that you don’t want just anybody seeing, so keep it close hold or better yet, memorize it! Keep in mind, the Evasion Plan of Action is just a plan and plans get tossed out sometimes depending on the circumstances and that’s okay. Never forget the first principle of evasion-- be flexible! Evading will never be easy. You’ll likely be cold, tired, hungry, scared and injured to name a few, but remember your worst day evading is better than your best day in captivity!
Further Reading on Survival, Evasion, Resistance and Escape:
Return With Honor by George E. Day
Lone Survivor: The Eyewitness Account of Operation Redwing and the Lost Heroes of SEAL Team 10 by Marcus Luttrell
Bravo Two Zero: The Harrowing True Story of a Special Forces Patrol Behind the Lines in Iraq by Andy McNab
Wilderness Evasion: A Guide to Hiding Out and Eluding Pursuit in Remote Areas by Michael E. Chesbro
Air Force Regulation 64-4 Search and Rescue Survival Training
2013-02-28 17:31:44
Source: http://www.survivalblog.com/2013/03/field-evasion-skills-by-joat.html
Related Stories
- Letter Re: .300 AAC Blackout Uppers for AR-15s
- Letter Re: A Primer on Guns for Survival
- Two Letters Re: Bug Out Vehicle Advice
- DoubleStar Corp Joins Firearms Equality Movement
- Kids and Guns, the Real Story
- LAN World Adds the Oakley Standard Issue Product Line To Our Utah Showroom
- USAMU hosts Army National Junior Rifle Championship
- Muster the Tea Party Special Forces
- Montana Shooting Sports Association Invites Gun Manufactures to Move to Montana
- Montana Patriots Advance Several Pro-Gun Bills
Field Evasion Skills, by JOAT | SurvivalLast edited by AirborneSapper7; 03-01-2013 at 06:04 AM.
Join our efforts to Secure America's Borders and End Illegal Immigration by Joining ALIPAC's E-Mail Alerts network (CLICK HERE)
-
03-04-2013, 04:28 PM #2958Senior Member
- Join Date
- May 2007
- Location
- South West Florida (Behind friendly lines but still in Occupied Territory)
- Posts
- 117,696
NATURALLY FEEDING RABBITS
Homesteading, Raising Livestock
by admin
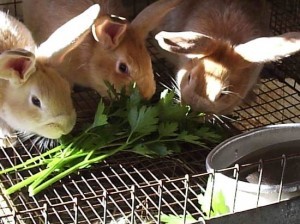 rise and shine rabbitryRise And Shine Rabbitry website share a long and in depth article about nutritional requirements when feeding rabbits naturally. They also discuss what it is like for a day of a wild rabbit food foraging and how to use that information towards feeding your rabbits.
Take from the article the information you find helpful . I know there may be a few PET rabbit owners that may find parts of the article difficult but no one article is going to meet everyones expectations.
Click here to read article: http://riseandshinerabbitry.com/2012/09/09/naturally-feeding-rabbits/
.
NATURALLY FEEDING RABBITS » The Homestead Survival
Join our efforts to Secure America's Borders and End Illegal Immigration by Joining ALIPAC's E-Mail Alerts network (CLICK HERE)
-
03-04-2013, 04:38 PM #2959Senior Member
- Join Date
- May 2007
- Location
- South West Florida (Behind friendly lines but still in Occupied Territory)
- Posts
- 117,696
How To Build a Coracle A One Person Boat Made From Twigs and Such
Build It, DIY Projects
by admin
 Photograph by the National Museum WalesMother Earth News shares how to build a Coracle . The article has detailed instructions but very little visual pictures. The video below will more than make up for that as well as make you laugh.
Click here: http://www.motherearthnews.com/do-it-yourself/how-to-build-a-coracle.aspx?page=2#axzz2MUeBPFiM
This video is truly the best way to explain how to build and (funny) how to use.
Making Coracle - YouTube
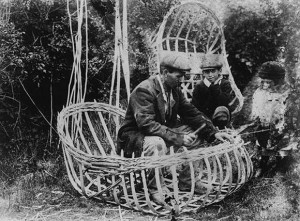 Photograph by the National Museum Wales.
A father teaching his son to build a coracle . passing the skill on to the next generation.
Howto build a Coracle with twigs and poly. - YouTube
 Photograph by the National Museum Wales.
Two men who used their coracles to fish upon the waters photographed bringing home their catch of fish 1905..
.
The Big Book of Boat Canvas: A Complete Guide to Fabric Work on Boats
How To Build a Coracle A One Person Boat Made From Twigs and Such » The Homestead SurvivalJoin our efforts to Secure America's Borders and End Illegal Immigration by Joining ALIPAC's E-Mail Alerts network (CLICK HERE)
-
03-04-2013, 04:41 PM #2960Senior Member
- Join Date
- May 2007
- Location
- South West Florida (Behind friendly lines but still in Occupied Territory)
- Posts
- 117,696
Making Soil Blocks For Seed Starting Gardening
Gardening, Seeds
by admin
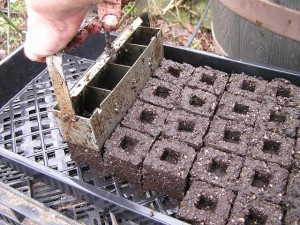 bare mtn farmBare Mountain Farm shares how to create a more sustainable soil blocks for seed starting.
It is better for the environment ( less plastic ) and healthier for the seeds as they grow into plants then transferred into into the garden.
Click here to see pictures and detailed instructions: http://baremtnfarm.blogspot.com/2012/02/using-soil-blocks-on-farm.html
.
.
Soil Block Maker Hand Held Makes 4 Blocks
Soil Block Maker Hand Held Makes 20 Blocks
Mini Soil Blocker
Davids Seed Starter Soil Block Propagation Tray 5 per Order
Mini Farming: Self-Sufficiency on 1/4 Acre
Espoma PR8 8-Quart Organic Perlite
Earthworm Castings, 15 lb
Making Soil Blocks For Seed Starting Gardening » The Homestead SurvivalJoin our efforts to Secure America's Borders and End Illegal Immigration by Joining ALIPAC's E-Mail Alerts network (CLICK HERE)


 Reply With Quote
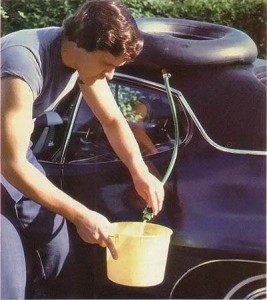


New poll shows rising Latino support for border wall, mass...
04-18-2024, 06:50 PM in General Discussion