

Results 3,171 to 3,180 of 8376
 210Likes
Thread Information
Users Browsing this Thread
There are currently 4 users browsing this thread. (0 members and 4 guests)
 LinkBack URL
 About LinkBacks
-
03-30-2013, 01:06 AM #3171Senior Member


- Join Date
- May 2007
- Location
- South West Florida (Behind friendly lines but still in Occupied Territory)
- Posts
- 117,696
Wood burning pizza oven plans.Wood pizza oven Building wood burning brick bread ovens
How to build oven domes, hearths, flues and chimneys.
Wood burning ovens in general
Join our efforts to Secure America's Borders and End Illegal Immigration by Joining ALIPAC's E-Mail Alerts network (CLICK HERE)
-
03-31-2013, 12:15 AM #3172Senior Member
- Join Date
- May 2007
- Location
- South West Florida (Behind friendly lines but still in Occupied Territory)
- Posts
- 117,696

 Fun Recipes
Bacon Ranch Foil Packet Potatoes
3 sheets of heavy-duty foil
10-12 baby red potatoes, thinly sliced
6 slices of cooked and crumbled bacon
1 packet ranch dressing mix
Salt and pepper to taste
3 tablespoons butter
Sour cream for serving, if desired
1. Spray each sheet of foil with cooking spray. Top each piece with equal portions of potatoes, bacon, and ranch dressing mix. Add salt and pepper to taste. Add 1 tablespoon of butter to each serving. Wrap securely.
2. Grill for 20 to 30 minutes. Let stand 10 minutes before serving. Serve in foil, topped with sour cream if desired.
Join our efforts to Secure America's Borders and End Illegal Immigration by Joining ALIPAC's E-Mail Alerts network (CLICK HERE)
-
03-31-2013, 12:17 AM #3173Senior Member
- Join Date
- May 2007
- Location
- South West Florida (Behind friendly lines but still in Occupied Territory)
- Posts
- 117,696

Fun Recipes
All-in-One English Breakfast Bake
8 Servings
1 1/2 pounds English bangers, or substitute your favorite link style uncooked sausages (Bratwurst sausages are the most similar to English Bangers that Ive found in the US)
1 pound medium potatoes, scrubbed and cut lengthwise into eighths
2 teaspoons vegetable oil
Seasoning salt, your favorite kind such as Lawrys, Schilling Salt & Spice, etc.
1/2 pound large fresh mushrooms, stems removed
3/4 pound Roma tomatoes, cored and cut in half
8 eggs
2 14 oz. cans pork and beans
Preheat the oven to 400°.
If the bangers are the larger 1" diameter sausages, cut them in half; if they are smaller, leave as they are. Place the sausages in a large shallow casserole dish.
Place the potato wedges in a bowl and pour the vegetable oil over them.
With your hands, coat each of the wedges with the oil and arrange them around the sausages; sprinkle them with the seasoning salt.
Bake the sausages and potatoes in the preheated oven for 25 minutes.
Remove the dish from the oven and arrange the mushrooms and tomatoes in between the sausages and potatoes; sprinkle the mushrooms and tomatoes with seasoning salt.
Return the dish to the oven and bake an additional 20-30 minutes or until the potatoes are crisp and the tomatoes and mushrooms are cooked through.
Make six indentations in the casserole dish and break an egg into each one.
Bake for an additional 5-10 minutes or until the eggs are set. Serve immediately.
Just before the eggs are done, heat the pork and beans separately either in the microwave or on the stovetop.
To serve: spoon some of the beans on serving plates, and surround them with the eggs, bangers, mushrooms, tomatoes, and chips.
Serve with toast or English muffins on the side if desired.
Amount Per Serving
Calories 453 Calories from Fat 200
Percent Total Calories From: Fat 44% Protein 22% Carb. 34%
Nutrient Amount per Serving
Total Fat 22 g
Saturated Fat 7 g
Cholesterol 263 mg
Sodium 1166 mg
Total Carbohydrate 38 g
Dietary Fiber 2 g
Sugars 0 g
Protein 25 g
Vitamin A 15% Vitamin C 40% Calcium 0% Iron 25%
Join our efforts to Secure America's Borders and End Illegal Immigration by Joining ALIPAC's E-Mail Alerts network (CLICK HERE)
-
03-31-2013, 12:53 AM #3174Senior Member
- Join Date
- May 2007
- Location
- South West Florida (Behind friendly lines but still in Occupied Territory)
- Posts
- 117,696
Baked Eggs in Bread Bowls

Photo: Mark Thomas; Styling: Lynn Miller
Serve these adorable baked eggs for breakfast or brunch. At just 88 cents per serving, they're a budget-friendly way to dress up your breakfast table.
Yield: Serves 8
Cost per Serving: $.88
Recipe Time
Cook Time: 25 Minutes
Prep Time: 10 Minutes
Nutritional Information
Amount per serving
- Calories: 191
- Fat: 9g
- Saturated fat: 3g
- Protein: 12g
- Carbohydrate: 18g
- Fiber: 1g
- Cholesterol: 219mg
- Sodium: 465mg
Ingredients
- 8 crusty dinner rolls
- 8 large eggs
- 1/4 cup chopped mixed herbs, such as parsley, chives and tarragon
- 2 tablespoons heavy cream
- Salt and pepper
- 4 tablespoons grated Parmesan
Preparation
1. Preheat oven to 350ºF. Slice off top of each dinner roll and gently remove some bread until there is a hole large enough to accommodate an egg. Arrange rolls on a rimmed baking sheet. Reserve tops.
2. Crack an egg into each roll, then top with some herbs and a bit of cream. Season with salt and pepper. Sprinkle with Parmesan.
3. Bake until eggs are set and bread is toasted, 20 to 25 minutes. After eggs have cooked for 20 minutes, place bread tops on baking sheet and bake until golden brown. Let sit 5 minutes. Place tops on rolls and serve warm.
Join our efforts to Secure America's Borders and End Illegal Immigration by Joining ALIPAC's E-Mail Alerts network (CLICK HERE)
-
03-31-2013, 01:04 AM #3175Senior Member
- Join Date
- May 2007
- Location
- South West Florida (Behind friendly lines but still in Occupied Territory)
- Posts
- 117,696
removed per request
Last edited by AirborneSapper7; 04-01-2013 at 10:23 PM.
Join our efforts to Secure America's Borders and End Illegal Immigration by Joining ALIPAC's E-Mail Alerts network (CLICK HERE)
-
03-31-2013, 01:07 AM #3176Senior Member
- Join Date
- May 2007
- Location
- South West Florida (Behind friendly lines but still in Occupied Territory)
- Posts
- 117,696
How to Pack a Camp Kitchen
Camping season is right around the corner! In my anticipation of our next trip Ive been organizing my gear and inventorying my supplies. I find that knowing exactly what I have and what I need makes preparing for an adventure that much easier and more enjoyable. The gear thats needed for backpacking is very different than what youll take car camping but there are some multipurpose items that cross over. Because I love both types of adventures almost equally, I want to share what I pack in my camping kitchen for both situations!
BASICS FOR BACKPACKING
When off in the wilderness with nothing but the contents of your backpack, every item counts. Its important to consider the weight, necessity and usefulness of every object you plan to carry and make good use of each, or suffer the pain of a heavy pack filled with junk that wont be used. Thus the backpacking kitchen is usually simpler than its car camping counterpart, but that doesnt have to mean its any less delicious! Heres what I usually pack:

1. WATER Its very important to carry 1 gallon of water per person per day to stay fully hydrated. If Im in an area that Im confident has a good, clean spring water source, Ill pack more than enough water to get to the water source plus chlorine tablets to purify the new water. I recently discovered lightweight, collapsable water bottles that fold flat when empty and hold up to a gallon of water which are perfect for backpacking. Additionally, I keep a three-litre Camelback in my back to keep me watered on the go.
2. FOOD The best part! When backpacking its important to pack 3 solid meals per day plus snacks to fuel you on the trail. Theres a range of pre-packaged, freeze-dried and lightweight meals available for backpackers but they can get pretty expensive and time consuming to prepare for every meal. I like to pack a freeze-dried entree for each dinner, eat fruit, granola and coffee for breakfast, then have cheese, crackers, cured meats, trail mix and granola for lunch and snacks.
3. THINGS TO DRINK Theres nothing like waking up to a hot bowl of instant black coffee or green tea after a night under the stars, or warming up with super hot tea before settling into the sack. I like to pack the Starbucks Via single instant coffees and individually wrapped teas from Tazo. Emergen-C is also a pack staple because its packed with vitamins and minerals that help the body recover after a long day. Beer and wine are too heavy and bulky to carry backpacking. So I pack a flask of my current favorite whiskey or bourbon and call it a day. Jameson or Bulleit but sometimes Makers Mark. You know, for medical purposes.
 4. BEAR BAGS & ROPE Bears and raccoons and mountain lions and other nocturnal beasts have sensitive senses of smell and may come creeping for food scraps that are left around a camping area. Bear Bags are made of sealable plastic that blocks odors and prevents scent transmission. All food and scented items should be packed in bear bags and stored a minimum of 50 yards from the campsite, high up in a tree if possible. Rope is a necessary item for all camp kitchens, to hang the bear bags, to hang clothes, to use in emergencies. I carry at least 100 feet of nylon rope not cotton, it degrades quickly and is not as strong with me on all trips.
5. BANDANA AND OR TOWEL Keep a bandana on hand to use as a handkerchief and to wipe away sweat. Its also great for a napkin and can be used to dry dishes. Adding a pack towel can be handy on longer trips for cleaning oneself and ones dishes.
6. LIGHT While backpacking I pack a small battery powered Black Diamond lantern for light while cooking and eating. Its very important to check and charge the batteries before a trip and have a backup light source in case the batteries die. I also cary a Petzl headlamp for task-oriented light. Each camper should carry their own light and be able to access it at all times. I sometimes also pack a third light source such as a small LED flashlight or candle lantern for extra or emergency light.
7. BOWLS & UTENSILS I prefer to use my titanium spork for all camping adventures. Its lightweight and you can eat anything with it! As far as tableware, reusable is better than disposable and bowls are better than plates because they hold everything well, and warm your hands in the process. Keep it simple with one bowl per person: eat dishes as they are cooked and rinse the bowl for dessert or tea after dinner.
8. POTS I got an excellent set of titanium cookware for christmas that Ive been dying to use! But before these excellent tools I used a combination of simple nesting aluminum pots and bowls: 2 pots and 1 bowl for each camper. Its essential to carry a potholder if your pots dont have external, heat-proof handles. Camping pot holders are aluminum-handle-gadgets that work like the handles of a pliers but fit securely on your pots and allow you to pick up and pour the hot pots without risk of being burned.
9. FIRST AID KIT Necessary for all camping, I like to keep my kit with the kitchen gear because it ensures it will always be packed. My first aid kit is simple and made up of my favorite items drawn from other kits. I build my own so I know exactly whats in it and because a store-bought kit never contains everything you need. But thats another post altogether!
 10. CLEANING SUPPLIES A tiny container of Dr. Bronners Soap is all thats needed to wash hands, faces and dishes. Its organic, naturally derived, biodegradable and okay to use in small quantities. I also pack wet-naps, sandwich bags and an extra trash bag. Pack in-pack out!
11. FIRE MAKING MATERIALS This is my favorite part of packing! I love making safe fires and being able to choose the best tool to light said fire. So I carry a weatherproof and waterproof torch lighter that Ive filled with butane and tested before the trip. I also pack waterproof container with weatherproof matches. And for fun and a backup-backup I pack a Flint and Steel, with which I can make sparks to start a fire manually. Choose your fire making materials carefully. Consider all types of weather you may encounter in your journeys, the possibility of wet matches and leaking fuel, and know that the ability to make a fire for warmth and signaling can save your life in a pickle.
12. KNIVES Every camper should carry their own knife for eating but also to use around camp or in an emergency. Knives should be sharp, easily accessible, and the camper should be familiar with the safety features and operation of their tool of choice. I carry a Leatherman with me and also pack an Opinel carbon folding knife in my kitchen kit for easy access during meal prep.
13. SEASONINGS & SPICES When backpacking I keep it super simple and pack an old aluminum film canister with a 2:1 mix of ground pepper and kosher salt.
14. STOVE & FUEL I carry a small single-burner stove. It is efficient, lightweight, and even though it only cooks one pot at a time its all thats really needed in the bush. Pack enough for the estimated amount of cooking time for the duration of the trip plus 25-50% more just in case theres heavy wind, wet or cold conditions, or emergencies that would require increased cooking times. Make sure the fuel type is compatible with the stove type. I use isopro because its clean, compact, and works with my stove. Also pack the wind guard that comes with the stove. Get to know your stove and fuel, and test them, before going on a multi-day backpacking extravaganza.
CAR CAMPING COMMODITIES
Let me say now that not all car camping is created equal. My style, which I inherited from my camping-crazy parents, is definitely that of a purist just because there is a car involved does not mean I feel free to pack glassware, tablecloths, plates, silver, or any other excessive supplies. In car camping the car functions simply as a tool to enable an experience, not as a huge container waiting to be stuffed with all the conveniences of the home kitchen. Car camping can be harder to pack for than backpacking simply because you have the ability to carry more. Dont Take only what youll need and youll be happier with what you have. A good guide is to keep it to one egg crate of supplies and one small cooler, but if you insist, you could also bring a picnic basket. Heres how I pack my car camping kitchen:
STOVE A Coleman two burner stove is the perfect stove for car camping. Efficient and powerful, it helps make breakfast and dinner a snap. When available I take advantage of the grills present in most established camp grounds to grill up sausages and veggies.
COOLER When youre camping with the car its easier to bring a few foods that need refrigeration. What exactly I pack depends on the meals I plan to make but Ill usually bring cheese, yogurt for breakfast, butter, beer and vegetables. Dont forget ice to keep everything cold, and pack leak-able containers in bags so they dont muck up the cooler if they fall over.
FOOD, SEASONINGS & SPICES When car camping I prepare the cooked meals ahead of time. My favorite thing to eat is chicken sausage and marinated vegetable kabobs! Preparing and seasoning everything at home before the trip ensures a quicker prep time at camp and fewer things to pack. But when Im feeling very adventurous Ill cut and prep the meal at camp, which usually requires the addition of a bowl, cutting board, olive oil, and a few choice spices. Id pack dried garlic, smoked paprika, and fresh rosemary to name a few.
LANTERN The best lanterns are gas-burning Coleman double-mantle lanterns. Bright or dim, the classic lantern choice. I need to get myself one stat.
Other great stuff you could use while car camping without going overboard include, simply, plates and mugs, napkins and card games. The car is not just a bigger backpack or an extension of all the conveniences of a home kitchen. Camping is about being in nature, keep it simple!
Having an organized camp kitchen is essential to having a good camp cooking experience. Consider: by the time camp is reached its likely dark, possibly very cold, and its probable that everyone in the party is hungry and exhausted. The cook has the challenge and the skill to make even the roughest evening in camp a delicious, warming, conversation-filled end to the day!
This is by no means an exhaustive list of everything to pack for a camping trip but it should cover the kitchen. I want to write more about the rest of the ingredients in a well-planned pack. Lets go camping soon!
How to Pack a Camp Kitchen â Liberty and LunchJoin our efforts to Secure America's Borders and End Illegal Immigration by Joining ALIPAC's E-Mail Alerts network (CLICK HERE)
-
03-31-2013, 01:10 AM #3177Senior Member
- Join Date
- May 2007
- Location
- South West Florida (Behind friendly lines but still in Occupied Territory)
- Posts
- 117,696
Skills That Pay the Bills: Self Employment for Homesteaders
Homesteading
by admin
Homestead.org website shares an article about how homesteaders can use the skills that use on their homestead everyday to find side work employment in their community to supplement their income.
Cash flow is always a problem for everyone at one point or another so this article helps how to find a way to create some.Every person who wants to move to the country but wonders how they are going to make money.
Click here to read article: "Skills That Pay the Bills: Self-employment for Homesteaders" by Regina Anneler page one
.
Skills That Pay the Bills: Self Employment for Homesteaders » The Homestead Survival
The Self-Sufficient Life and How to Live It
The Backyard Homestead Guide to Raising Farm Animals: Choose the Best Breeds for Small-Space Farming, Produce Your Own Grass-Fed Meat, Gather Fresh Rabbits, Goats, Sheep, Pigs, Cattle, & Bees
DIY Projects for the Self-Sufficient Homeowner: 25 Ways to Build a Self-Reliant Lifestyle
Mini Farming: Self-Sufficiency on 1/4 Acre
Join our efforts to Secure America's Borders and End Illegal Immigration by Joining ALIPAC's E-Mail Alerts network (CLICK HERE)
-
03-31-2013, 01:18 AM #3178Senior Member
- Join Date
- May 2007
- Location
- South West Florida (Behind friendly lines but still in Occupied Territory)
- Posts
- 117,696
How to Make A Bar & Stools from Wood Pallets Project
Build It, DIY Projects, Upcycling
by admin
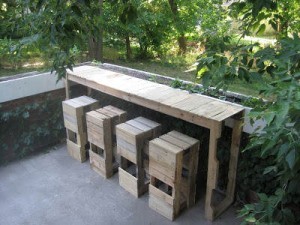 stackeddesignStacked Design blog shares how to create a high outdoor table/bar and stools by recycling wood pallets as a salvaged material.
I see so many possibilities with slight alternations to this project but it is a wonderful base to beginning with or just enjoy it in its simplicity.
Click here to view how to make this project:
Stacked Design: Pallet Bar/Table
How to Make A Bar & Stools from Wood Pallets Project » The Homestead SurvivalJoin our efforts to Secure America's Borders and End Illegal Immigration by Joining ALIPAC's E-Mail Alerts network (CLICK HERE)
-
04-04-2013, 02:21 PM #3179Senior Member
- Join Date
- May 2007
- Location
- South West Florida (Behind friendly lines but still in Occupied Territory)
- Posts
- 117,696
Join our efforts to Secure America's Borders and End Illegal Immigration by Joining ALIPAC's E-Mail Alerts network (CLICK HERE)
-
04-04-2013, 02:34 PM #3180Senior Member
- Join Date
- May 2007
- Location
- South West Florida (Behind friendly lines but still in Occupied Territory)
- Posts
- 117,696
 Fun Recipes
Prep/Total Time: 30 min. Yield: 10 Servings
1 pound sliced bacon, diced
1 medium onion, chopped
32 ounces frozen shredded hash brown potatoes, thawed
10 eggs
Salt and pepper to taste
2 cups (8 ounces) shredded cheddar cheese, optional
Chopped fresh parsley
Directions
In a large skillet, cook bacon and onion until bacon is crisp. Drain all but 1/2 cup of the drippings. Add hash browns to skillet; mix well.
Cook over medium heat for 10 minutes, turning when browned. Make 10 "wells" evenly spaced in hash browns. Place one egg in each well. Sprinkle with salt and pepper. Sprinkle with cheese if desired.
Cover and cook over low heat for about 10 minutes or until eggs are set. Garnish with parsley; serve immediately. Yield: 10 servings.
Nutritional Facts
1 serving (1 cup) equals 239 calories, 12 g fat (4 g saturated fat),
225 mg cholesterol, 314 mg sodium, 18 g carbohydrate, 2 g fiber, 13 g protein.
http://www.tasteofhome.com/recipes/Sheepherder-s-Breakfast-
 Join our efforts to Secure America's Borders and End Illegal Immigration by Joining ALIPAC's E-Mail Alerts network (CLICK HERE)


 Reply With Quote


Illegal Alien Charged with Sexually Assaulting Two Girls After...
04-23-2024, 05:10 PM in illegal immigration News Stories & Reports