

Results 61 to 70 of 8376
 210Likes
Thread Information
Users Browsing this Thread
There are currently 1 users browsing this thread. (0 members and 1 guests)
 LinkBack URL
 About LinkBacks
-
07-21-2009, 12:51 PM #61Senior Member


- Join Date
- May 2007
- Location
- South West Florida (Behind friendly lines but still in Occupied Territory)
- Posts
- 117,696
Last edited by AirborneSapper7; 02-20-2012 at 05:55 PM.
Join our efforts to Secure America's Borders and End Illegal Immigration by Joining ALIPAC's E-Mail Alerts network (CLICK HERE)
-
07-21-2009, 09:42 PM #62Senior Member
- Join Date
- May 2007
- Location
- South West Florida (Behind friendly lines but still in Occupied Territory)
- Posts
- 117,696
Seven Ways To Light a Fire Without a Match
Photo Gallery by Field & Stream Online Editors. Uploaded on October 15, 2006

Friction-Based Fire Making
Rubbing two sticks together is likely the oldest of all -fire-starting techniques, and also the most difficult. Besides proper technique, you have to choose the right wood for the fireboard and spindle. Sets made from dry softwoods, including aspen, willow, cottonwood, and juniper, are preferred, although a spindle made from a slightly harder wood, combined with a softer fireboard, can also work. The friction of the spindle against an indentation in the fireboard grinds particles from both surfaces, which must heat to 800 degrees?F before a glowing coal forms. This must then be transferred to tinder and -gently blown to life.
Hand Drill
Using a hand drill is one of the simplest friction methods, but high speed can be difficult to maintain because only the hands are used to rotate the spindle. It works best in dry climates.
Step One Cut a V-shaped notch in the fireboard, then start a small depression adjacent to it with a rock or knife tip. Set a piece of bark underneath the notch to catch the ember.
Step Two Place the spindle, which should be 2 feet long, in the depression and, maintaining pressure, roll it between the palms of your hands, running them quickly down the spindle in a burst of speed. Repeat until the spindle tip glows red and an ember is formed.
Step Three Tap the fireboard to deposit the ember onto the bark, then transfer it to a tinder bundle (see "Tinder Bundle-¿ on page 56) and blow it to flame.
Photo by Steve Sanford

Two-Man Friction Drill
Two people can do a better job of maintaining the speed and pressure needed to create an ember using this string variation of a friction drill.
Step One Have one person apply downward pressure to the drill while the other uses a thong or shoelace to rapidly rotate the spindle.
Photo by Steve Sanford

Fire Plough
This produces its own tinder by pushing out particles of wood ahead of the friction.
Step One Cut a groove in the softwood fireboard, then plough or rub the tip of a slightly harder shaft up and down the groove. The friction will push out dusty particles of the fireboard, which will ignite as the temperature increases.
Photo by Steve Sanford

Pump Fire Drill
The Iroquois invented this ingenious pump drill, which uses a flywheel to generate friction. The crossbar and flywheel are made of hardwood; the spindle and fireboard are made from softwoods (as in the hand drill).
Step One Bore a hole in the center of a rounded piece of hardwood and force the spindle in so that it fits tightly. Select wood for the crossbar and bore a larger hole that will slide freely on the spindle.
Step Two Attach the crossbar to the top of the spindle with a leather thong or sturdy shoelace.
Step Three Wind up the flywheel so that the thong twists around the spindle, then press down. The momentum will rewind the crossbar in the opposite direction. Repeat until friction creates a glowing ember.
Photo by Steve Sanford

Bow Drill
Of all the friction -fire-starting methods, the bow drill is the most efficient at maintaining the speed and pressure needed to produce a coal, and the easiest to master. The combination of the right fireboard and spindle is the key to success, so experiment with different dry softwoods until you find a set that produces. Remember that the drill must be as hard or slightly harder than the fireboard.
Step One Cut a notch at the edge of a round impression bored into the fireboard, as you would for a hand drill. Loosely affix the string to a stick bow, which can be any stout wood.
Step Two Place the end of a wood drill the diameter of your thumb into the round impression, bear down on it with a socket (a wood block or stone with a hollow ground into it), catch the drill in a loop of the bowstring, then vigorously saw back and forth until the friction of the spinning drill produces a coal.
Step Three Drop the glowing coal into a bird's nest of fine tinder, lift the nest in your cupped hands, and lightly blow until it catches fire.
Photo by Steve Sanford

A dried grass and cottonwood bark tinder bundle like the one above will turn your hard-earned coal into flame
Spark-Based Fire Making
Human beings have been starting fires from sparks since the days of the cave dwellers of the Paleo-lithic era. It is still a vital survival skill for modern hunters and fishermen to learn. If conditions are wet or windy and matches are extremely difficult to light, a glowing spark in tinder uses wind to its advantage to burst into flame.
How To Make Char Cloth
The only naturally -occurring material that readily glows from a spark is tinder -fungus, a corky brown deposit found under scars on birch trees. Don't stake your life on finding any in a survival situation, though. Carrying char cloth in an emergency kit is a safer bet. To make it, cut strips from any 100 percent pure cotton material and set them on fire. After the strips have blackened but not yet turned to ash, stuff them into a lidded jar to smother the fire. Test your new char cloth by striking sparks onto it. A spot on the cloth should -begin to glow, the glow holding and slowly spreading. If it doesn't do this, make another batch.
To blow the bundle into flame, make a small pocket in the center. Tuck the glowing coal or char cloth into the pocket, then loosely fold the edges around it. Next, pick up the bundle and gently blow on it. Once it has burst into flame, place it under a tepee formation of small twigs and add larger pieces until a strong fire has been established.
Tinder Bundle
Fire making does not end with the birth of a red-hot coal, nor does a glowing char cloth ensure that you're going to get a flame. The coal or char cloth must be transferred to a bundle of fine tinder before being blown into flame. Good sources include dried grasses, lichens (including old man's beard), shavings from the inner bark of aspen, poplar, and cottonwood trees (which burn even when wet), and windblown seed or fluff. The tinder bundle should be roughly the size of a softball and loosely formed to allow air circulation.
Photo by Cliff Gardiner & John Keller

Flint and Steel
Striking the softer steel against the harder flint will produce sparks to flame your fire. The curved steel striker provided with flint and steel kits is easiest to use, although with some practice you can produce sparks by using the back of a carbon-steel knife blade. (Stainless-steel knives are usually much too hard to shave sparks from.) An old bastard file or an axe head will also work.
Step One Grasp a shard of hard rock, such as flint or quartzite, between your thumb and forefinger with a sharp edge protruding an inch or two.
Step Two Tightly clamp a piece of your homemade char cloth or a lump of birch tinder fungus under the thumb holding the piece of flint. Grasping the back of the striker, knife blade, or file in your other hand, strike a glancing blow against the edge of flint, using a quick wrist motion. If you're using an axe, hold the head still and sharply strike the flint near the blade, where the steel is harder. Molten sparks from the steel will fly off and eventually be caught by an edge of the char cloth, causing it to glow.
Step Three Carefully fold the cloth into a tinder nest and gently blow on it until it catches flame.
Another option is to use a magnesium-and-steel tool, which is an updated version of an ancient method that creates a strong shower of sparks. The advantage of this method is that the magnesium shavings flame briefly at an extremely high temperature, eliminating the need for char cloth or tinder fungus.
Step One Using a knife blade or striker, shave a pile of magnesium flecks into a nest of tinder.
Step Two Strike the steel edge of the tool with the back of a knife blade or the scraper provided to direct sparks onto the tinder.
Step Three When the tinder starts to smolder, gently blow on it until it bursts into flames.
Rock Striker
An ideal tool for starting a spark-based fire, the striker should be made of flint for best results. If you can't find flint, look for quartzite, which is much more common and is hard enough to strike sparks from steel.
Step One Identify quartzite by the many crescent-shaped fractures on the surface.
Step Two Choose a quartzite boulder that is flat or discus-shaped and drop it against a larger rock to chip off an edge. Round or oval rocks are more difficult to break.
Step Three A flake broken from the quartzite boulder is usually sharp enough to use as a striker or knife. If you can't find one to your liking, break the boulder again.
Photo by Steve Sanford
http://www.fieldandstream.com/photos...ode-1000014415Last edited by AirborneSapper7; 01-12-2012 at 01:47 AM.
Join our efforts to Secure America's Borders and End Illegal Immigration by Joining ALIPAC's E-Mail Alerts network (CLICK HERE)
-
07-21-2009, 09:42 PM #63Senior Member
- Join Date
- May 2007
- Location
- South West Florida (Behind friendly lines but still in Occupied Territory)
- Posts
- 117,696
Last edited by AirborneSapper7; 02-20-2012 at 05:56 PM.
Join our efforts to Secure America's Borders and End Illegal Immigration by Joining ALIPAC's E-Mail Alerts network (CLICK HERE)
-
07-22-2009, 01:10 AM #64Senior Member
- Join Date
- May 2007
- Location
- South West Florida (Behind friendly lines but still in Occupied Territory)
- Posts
- 117,696
Simple Survival Snares
written by Keith Sutton
Catching table fare when you're in desperate need is something every outdoorsman should know how to do

In a survival situation, simple snares can be used to catch everything from mice to rabbits to deer for food. Unfortunately, this doesn't happen as easily or as often as Hollywood might have us believe, not even under the best circumstances with the most skilled survivalist. First, the snares must be properly constructed. Second, they must be correctly placed. Third, an animal must come along and stick its head in the snare loop, tightening it as it moves. At the same time, nothing about the snare location, presence or smell can give the animal warning. Done properly, your success ratio might be as high as 10 to 1; ten snares set will yield one success. But this will happen only if you've taken time to learn proper methods for rigging and placing snares.
A snare is simply a noose that tightens over an animal's body as it tries to go through it. Wire snares are best for small animals and can be made from light wire carried in your survival kit or scavenged from your vehicle. If wire is unavailable, you can improvise with fishing line, twine, shoelaces, strips of leather or cloth, or even rope or heavy cable if deer or other large animals inhabit the area.
Regardless of the type of snare you're making, you must begin by making a noose. When using wire or other stiff material, bend the tip over and twist it several times to form an eye. Then run the other end of the wire through it to form the noose. When using fishing line or other pliant materials, make a loop that's closed with a slip-knot.
The strategy is to suspend the noose so the animal's head, but not its shoulders, will pass through the loop as the animal moves along. Sticks can be positioned on either side to hold the loop open. As the animal's head passes through the snare, its shoulders push against the line, drawing the loop tighter as it moves forward. The animal will lunge as the noose tightens, trying to get free. If it does not escape during its struggles, it usually will die from strangulation or a broken neck.
Snares can be very elaborate, but simplicity is best, because success may require numerous sets. The simplest type is a trail set. The open noose is placed in a trail or run used by animals, and the anchor end is secured to a tree, bush, log or stake. Something heavy and awkward to drag -- a long branch, for instance -- may be used if a solid tie-off point is unavailable.
 In a survival situation a simple wire snare like this is best.
Rabbits often travel distinct, well-worn runways in dense cover, and trail sets placed in such locations are very effective for catching them. Secure the anchor end of the snare to an overhanging branch, and open the loop about 4 inches, keeping the bottom of the loop three or four inches above the ground. Set several snares about 10 yards apart along each runway.
Deer also follow trails, so if you have a strong piece of material from which to make a snare -- some nylon rope or wire cable, for instance -- you may want to try for a large supply of meat. Find a recently used deer trail, then, in a narrowly confined spot (such as between two trees), position a noose three to four feet in diameter at your waist height. Be sure your slip knot slides easily. Then anchor the other end of the snare to a solid tree.
Another good place to set snares is at the entrance of den holes. Look for burrows of woodchucks and smaller ground squirrels, the stream-bank holes of beavers and muskrats, and holes at the base of hollow trees that might be used by raccoons, squirrels, rabbits or other small animals. Hollow logs may be used by many animals. Attach the snare to a solid anchor -- a stake driven near the entrance with a rock, if necessary. And be sure the snare noose is smaller than the entrance hole. Any animal moving in or out of the den is likely to be caught.
Look, too, for logs that have fallen across shallow creeks. Animals like raccoons often cross a creek over a log rather than getting in the water. Snares placed at each end of the log to catch animals as they start across often prove effective.
If squirrels are abundant, consider making a pole snare. Given a choice, squirrels would much rather go up a slope than climb directly up a tree. To take advantage of this behavior, a long pole is leaned against a tree used by squirrels. Then several wire nooses, about 2-1/2 inches in diameter, are anchored to the pole, with each loop curving up and around so it lays on top of the pole. When a squirrel is caught, it tends to flip off the pole and strangles. As one is caught, others may come to investigate, with similar results.
If you are in an area inhabited by coyotes, bears or other opportunistic feeders, a snare that lifts your game out of reach above the ground is advisable. These are usually called twitch-up snares, spring snares or trigger snares. Using the same noose, twitch-ups add a device that triggers a bent sapling or a rock weighting the snare line. Serious injuries can occur if one doesn't exercise the utmost caution when rigging this type of trap.
Prejudices against unusual foods usually disappear in a true survival situation. An armadillo would be a welcome meal
It's a good idea to include several yards of wire or fishing line in your survival kit for use in improvising snares. My own kit contains a spool of green, 20-gauge snare wire purchased at an army surplus store for less than $2. The spool, about the size of two ordinary spools of thread, contains enough wire to rig several dozen snares.
You may also want to consider purchasing commercially made snares. These are made of strong, braided steel wire and have a locking mechanism that secures the animal once it is snared. It is virtually impossible for the animal to get out by jumping or twisting.
Finally, it is important to remember the snaring techniques discussed here are illegal in most areas, although all law enforcement agencies recognize the right to harvest food in a survival situation. Special permits may or may not be available from your state wildlife agency for survival training. Check with the proper authority before practicing.
http://www.basspro.com/webapp/wcs/st...&storeId=10151Last edited by AirborneSapper7; 02-19-2012 at 04:33 AM.
Join our efforts to Secure America's Borders and End Illegal Immigration by Joining ALIPAC's E-Mail Alerts network (CLICK HERE)
-
07-22-2009, 01:10 AM #65Senior Member
- Join Date
- May 2007
- Location
- South West Florida (Behind friendly lines but still in Occupied Territory)
- Posts
- 117,696
TRAPS AND SNARES
For an unarmed survivor or evader, or when the sound of a rifle shot could be a problem, trapping or snaring wild game is a good alternative. Several well-placed traps have the potential to catch much more game than a man with a rifle is likely to shoot. To be effective with any type of trap or snare, you must--
- Be familiar with the species of animal you intend to catch.
- Be capable of constructing a proper trap.
- Not alarm the prey by leaving signs of your presence.
- Runs and trails.
- Tracks.
- Droppings.
- Chewed or rubbed vegetation.
- Nesting or roosting sites.
- Feeding and watering areas.
For an evader in a hostile environment, trap and snare concealment is important. It is equally important, however, not to create a disturbance that will alarm the animal and cause it to avoid the trap. Therefore, if you must dig, remove all fresh dirt from the area. Most animals will instinctively avoid a pitfall-type trap. Prepare the various parts of a trap or snare away from the site, carry them in, and set them up. Such actions make it easier to avoid disturbing the local vegetation, thereby alerting the prey. Do not use freshly cut, live vegetation to construct a trap or snare. Freshly cut vegetation will "bleed" sap that has an odor the prey will be able to smell. It is an alarm signal to the animal.
You must remove or mask the human scent on and around the trap you set. Although birds do not have a developed sense of smell, nearly all mammals depend on smell even more than on sight. Even the slightest human scent on a trap will alarm the prey and cause it to avoid the area. Actually removing the scent from a trap is difficult but masking it is relatively easy. Use the fluid from the gall and urine bladders of previous kills. Do not use human urine. Mud, particularly from an area with plenty of rotting vegetation, is also good. Use it to coat your hands when handling the trap and to coat the trap when setting it. In nearly all parts of the world, animals know the smell of burned vegetation and smoke. It is only when a fire is actually burning that they become alarmed. Therefore, smoking the trap parts is an effective means to mask your scent. If one of the above techniques is not practical, and if time permits, allow a trap to weather for a few days and then set it. Do not handle a trap while it is weathering. When you position the trap, camouflage it as naturally as possible to prevent detection by the enemy and to avoid alarming the prey.
Traps or snares placed on a trail or run should use channelization. To build a channel, construct a funnel-shaped barrier extending from the sides of the trail toward the trap, with the narrowest part nearest the trap. Channelization should be inconspicuous to avoid alerting the prey. As the animal gets to the trap, it cannot turn left or right and continues into the trap. Few wild animals will back up, preferring to face the direction of travel. Channelization does not have to be an impassable barrier. You only have to make it inconvenient for the animal to go over or through the barrier. For best effect, the channelization should reduce the trail's width to just slightly wider than the targeted animal's body. Maintain this constriction at least as far back from the trap as the animal's body length, then begin the widening toward the mouth of the funnel.
Use of Bait
Baiting a trap or snare increases your chances of catching an animal. When catching fish, you must bait nearly all the devices. Success with an unbaited trap depends on its placement in a good location. A baited trap can actually draw animals to it. The bait should be something the animal knows. This bait, however, should not be so readily available in the immediate area that the animal can get it close by. For example, baiting a trap with corn in the middle of a corn field would not be likely to work. Likewise, if corn is not grown in the region, a corn-baited trap may arouse an animal's curiosity and keep it alerted while it ponders the strange food. Under such circumstances it may not go for the bait. One bait that works well on small mammals is the peanut butter from a meal, ready-to-eat (MRE) ration. Salt is also a good bait. When using such baits, scatter bits of it around the trap to give the prey a chance to sample it and develop a craving for it. The animal will then overcome some of its caution b efore it gets to the trap.
If you set and bait a trap for one species but another species takes the bait without being caught, try to determine what the animal was. Then set a proper trap for that animal, using the same bait.
Note: Once you have successfully trapped an animal, you will not only gain confidence in your ability, you also will have resupplied yourself with bait for several more traps.Trap and Snare Construction
Traps and snares crush, choke, hang, or entangle the prey. A single trap or snare will commonly incorporate two or more of these principles. The mechanisms that provide power to the trap are almost always very simple. The struggling victim, the force of gravity, or a bent sapling's tension provides the power.
The heart of any trap or snare is the trigger. When planning a trap or snare, ask yourself how it should affect the prey, what is the source of power, and what will be the most efficient trigger. Your answers will help you devise a specific trap for a specific species. Traps are designed to catch and hold or to catch and kill. Snares are traps that incorporate a noose to accomplish either function.
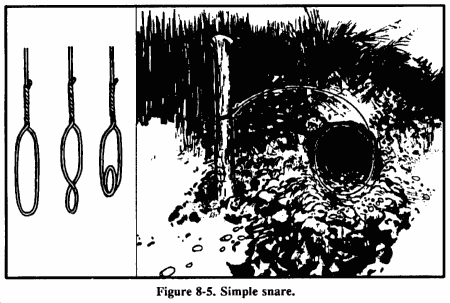
Simple Snare
A simple snare (Figure 8-5) consists of a noose placed over a trail or den hole and attached to a firmly planted stake. If the noose is some type of cordage placed upright on a game trail, use small twigs or blades of grass to hold it up. Filaments from spider webs are excellent for holding nooses open. Make sure the noose is large enough to pass freely over the animal's head. As the animal continues to move, the noose tightens around its neck. The more the animal struggles, the tighter the noose gets. This type of snare usually does not kill the animal. If you use cordage, it may loosen enough to slip off the animal's neck. Wire is therefore the best choice for a simple snare.
Drag Noose
Use a drag noose on an animal run (Figure 8-6). Place forked sticks on either side of the run and lay a sturdy crossmember across them. Tie the noose to the crossmember and hang it at a height above the animal's head. (Nooses designed to catch by the head should never be low enough for the prey to step into with a foot.) As the noose tightens around the animal's neck, the animal pulls the crossmember from the forked sticks and drags it along. The surrounding vegetation quickly catches the crossmember and the animal becomes entangled.
Twitch-Up

A twitch-up is a supple sapling, which, when bent over and secured with a triggering device, will provide power to a variety of snares. Select a hardwood sapling along the trail. A twitch-up will work much faster and with more force if you remove all the branches and foliage.
Twitch-Up Snare
A simple twitch-up snare uses two forked sticks, each with a long and short leg (Figure 8-7). Bend the twitch-up and mark the trail below it. Drive the long leg of one forked stick firmly into the ground at that point. Ensure the cut on the short leg of this stick is parallel to the ground. Tie the long leg of the remaining forked stick to a piece of cordage secured to the twitch-up. Cut the short leg so that it catches on the short leg of the other forked stick. Extend a noose over the trail. Set the trap by bending the twitch-up and engaging the short legs of the forked sticks. When an animal catches its head in the noose, it pulls the forked sticks apart, allowing the twitch-up to spring up and hang the prey.
Note: Do not use green sticks for the trigger. The sap that oozes out could glue them together.Squirrel Pole

A squirrel pole is a long pole placed against a tree in an area showing a lot of squirrel activity (Figure 8-8). Place several wire nooses along the top and sides of the pole so that a squirrel trying to go up or down the pole will have to pass through one or more of them. Position the nooses (5 to 6 centimeters in diameter) about 2.5 centimeters off the pole. Place the top and bottom wire nooses 45 centimeters from the top and bottom of the pole to prevent the squirrel from getting its feet on a solid surface. If this happens, the squirrel will chew through the wire. Squirrels are naturally curious. After an initial period of caution, they will try to go up or down the pole and will get caught in a noose. The struggling animal will soon fall from the pole and strangle. Other squirrels will soon follow and, in this way, you can catch several squirrels. You can emplace multiple poles to increase the catch.
Ojibwa Bird Pole

An Ojibwa bird pole is a snare used by native Americans for centuries (Figure 8-9). To be effective, place it in a relatively open area away from tall trees. For best results, pick a spot near feeding areas, dusting areas, or watering holes. Cut a pole 1.8 to 2.1 meters long and trim away all limbs and foliage. Do not use resinous wood such as pine. Sharpen the upper end to a point, then drill a small diameter hole 5 to 7.5 centimeters down from the top. Cut a small stick 10 to 15 centimeters long and shape one end so that it will almost fit into the hole. This is the perch. Plant the long pole in the ground with the pointed end up. Tie a small weight, about equal to the weight of the targeted species, to a length of cordage. Pass the free end of the cordage through the hole, and tie a slip noose that covers the perch. Tie a single overhand knot in the cordage and place the perch against the hole. Allow the cordage to slip through the hole until the overhand knot rests against the pole and the top of the perch. The tension of the overhand knot against the pole and perch will hold the perch in position. Spread the noose over the perch, ensuring it covers the perch and drapes over on both sides. Most birds prefer to rest on something above ground and will land on the perch. As soon as the bird lands, the perch will fall, releasing the over-hand knot and allowing the weight to drop. The noose will tighten around the bird's feet, capturing it. If the weight is too heavy, it will cut the bird's feet off, allowing it to escape.
Noosing Wand

A noose stick or "noosing wand" is useful for capturing roosting birds or small mammals (Figure 8-10). It requires a patient operator. This wand is more a weapon than a trap. It consists of a pole (as long as you can effectively handle) with a slip noose of wire or stiff cordage at the small end. To catch an animal, you slip the noose over the neck of a roosting bird and pull it tight. You can also place it over a den hole and hide in a nearby blind. When the animal emerges from the den, you jerk the pole to tighten the noose and thus capture the animal. Carry a stout club to kill the prey.
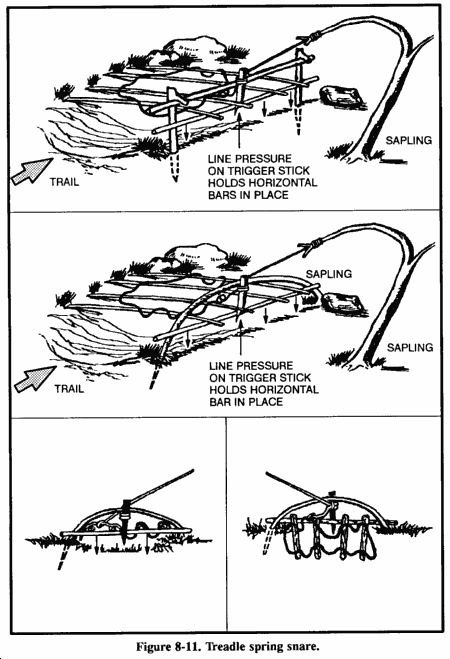
Treadle Spring Snare

Use a treadle snare against small game on a trail (Figure 8-11). Dig a shallow hole in the trail. Then drive a forked stick (fork down) into the ground on each side of the hole on the same side of the trail. Select two fairly straight sticks that span the two forks. Position these two sticks so that their ends engage the forks. Place several sticks over the hole in the trail by positioning one end over the lower horizontal stick and the other on the ground on the other side of the hole. Cover the hole with enough sticks so that the prey must step on at least one of them to set off the snare. Tie one end of a piece of cordage to a twitch-up or to a weight suspended over a tree limb. Bend the twitch-up or raise the suspended weight to determine where You will tie a 5 centimeter or so long trigger. Form a noose with the other end of the cordage. Route and spread the noose over the top of the sticks over the hole. Place the trigger stick against the horizontal sticks and route the co rdage behind the sticks so that the tension of the power source will hold it in place. Adjust the bottom horizontal stick so that it will barely hold against the trigger. A the animal places its foot on a stick across the hole, the bottom horizontal stick moves down, releasing the trigger and allowing the noose to catch the animal by the foot. Because of the disturbance on the trail, an animal will be wary. You must therefore use channelization.
Figure 4 Deadfall
The figure 4 is a trigger used to drop a weight onto a prey and crush it (Figure 8-12). The type of weight used may vary, but it should be heavy enough to kill or incapacitate the prey immediately. Construct the figure 4 using three notched sticks. These notches hold the sticks together in a figure 4 pattern when under tension. Practice making this trigger before-hand; it requires close tolerances and precise angles in its construction.
Paiute Deadfall

The Paiute deadfall is similar to the figure 4 but uses a piece of cordage and a catch stick (Figure 8-13). It has the advantage of being easier to set than the figure 4. Tie one end of a piece of cordage to the lower end of the diagonal stick. Tie the other end of the cordage to another stick about 5 centimeters long. This 5-centimeter stick is the catch stick. Bring the cord halfway around the vertical stick with the catch stick at a 90-degree angle. Place the bait stick with one end against the drop weight, or a peg driven into the ground, and the other against the catch stick. When a prey disturbs the bait stick, it falls free, releasing the catch stick. As the diagonal stick flies up, the weight falls, crushing the prey.
Bow Trap

A bow trap is one of the deadliest traps. It is dangerous to man as well as animals (Figure 8-14). To construct this trap, build a bow and anchor it to the ground with pegs. Adjust the aiming point as you anchor the bow. Lash a toggle stick to the trigger stick. Two upright sticks driven into the ground hold the trigger stick in place at a point where the toggle stick will engage the pulled bow string. Place a catch stick between the toggle stick and a stake driven into the ground. Tie a trip wire or cordage to the catch stick and route it around stakes and across the game trail where you tie it off (as in Figure 8-14). When the prey trips the trip wire, the bow looses an arrow into it. A notch in the bow serves to help aim the arrow.
WARNINGThis is a lethal trap. Approach it with caution and from the rear only!Pig Spear Shaft
To construct the pig spear shaft, select a stout pole about 2.5 meters long (Figure 8-15). At the smaller end, firmly lash several small stakes. Lash the large end tightly to a tree along the game trail. Tie a length of cordage to another tree across the trail. Tie a sturdy, smooth stick to the other end of the cord. From the first tree, tie a trip wire or cord low to the ground, stretch it across the trail, and tie it to a catch stick. Make a slip ring from vines or other suitable material. Encircle the trip wire and the smooth stick with the slip ring. Emplace one end of another smooth stick within the slip ring and its other end against the second tree. Pull the smaller end of the spear shaft across the trail and position it between the short cord and the smooth stick. As the animal trips the trip wire, the catch stick pulls the slip ring off the smooth sticks, releasing the spear shaft that springs across the trail and impales the prey against the tree.
WARNINGThis is a lethal trap. Approach it with caution!Bottle Trap

A bottle trap is a simple trap for mice and voles (Figure 8-16). Dig a hole 30 to 45 centimeters deep that is wider at the bottom than at the top. Make the top of the hole as small as possible. Place a piece of bark or wood over the hole with small stones under it to hold it up 2.5 to 5 centimeters off the ground. Mice or voles will hide under the cover to escape danger and fall into the hole. They cannot climb out because of the wall's backward slope. Use caution when checking this trap; it is an excellent hiding place for snakes.
Back to Food Procurement

Last edited by AirborneSapper7; 02-19-2012 at 04:41 AM.
Join our efforts to Secure America's Borders and End Illegal Immigration by Joining ALIPAC's E-Mail Alerts network (CLICK HERE)
-
07-22-2009, 01:20 AM #66Senior Member
- Join Date
- May 2007
- Location
- South West Florida (Behind friendly lines but still in Occupied Territory)
- Posts
- 117,696
Setting Out a Catfish Fishing Trotline
each state has differant regulationsLast edited by AirborneSapper7; 02-19-2012 at 04:42 AM.
Join our efforts to Secure America's Borders and End Illegal Immigration by Joining ALIPAC's E-Mail Alerts network (CLICK HERE)
-
07-22-2009, 01:20 AM #67Senior Member
- Join Date
- May 2007
- Location
- South West Florida (Behind friendly lines but still in Occupied Territory)
- Posts
- 117,696
The Top 50 Survival Blogs!
20 CARD\'s blog
33 Doug Ritter
35 Survival Joe
39 SHTF Blog
40 SHTF America
50 The Retreat
http://www.survivaltop50.com/
=> View these other great Survival Blogs that almost made the Top 50!
http://www.survivaltop50.com/runners-up/Last edited by AirborneSapper7; 01-12-2012 at 07:03 AM.
Join our efforts to Secure America's Borders and End Illegal Immigration by Joining ALIPAC's E-Mail Alerts network (CLICK HERE)
-
07-22-2009, 01:31 AM #68Senior Member
- Join Date
- May 2007
- Location
- South West Florida (Behind friendly lines but still in Occupied Territory)
- Posts
- 117,696
How To Make A Jug For Jug Fishing And Paint It
(or incert a glow stick for night fishing to see the jug bobbing)
know your state laws ..... again talking about emergency survivalLast edited by AirborneSapper7; 02-19-2012 at 04:43 AM.
Join our efforts to Secure America's Borders and End Illegal Immigration by Joining ALIPAC's E-Mail Alerts network (CLICK HERE)
-
07-22-2009, 01:31 AM #69Senior Member
- Join Date
- May 2007
- Location
- South West Florida (Behind friendly lines but still in Occupied Territory)
- Posts
- 117,696
Last edited by AirborneSapper7; 02-20-2012 at 05:56 PM.
Join our efforts to Secure America's Borders and End Illegal Immigration by Joining ALIPAC's E-Mail Alerts network (CLICK HERE)
-
07-22-2009, 01:47 AM #70Senior Member
- Join Date
- May 2007
- Location
- South West Florida (Behind friendly lines but still in Occupied Territory)
- Posts
- 117,696
I had to build these in Alaska ... they work and keep you toasty
When Storms Rage
How to build a snow cave
by Randy Gerke©
all photos by author©
PHOTOS AT THE PAGE LINK
The radio on my chest crackled to life "team one this is rescue base, we are having mechanical difficulties with our helicopter and will be unable to reach you before dark. Do you copy".
"Understood rescue base. I will be establishing a bivouac at the designated landing zone"
I stood for a moment and looked at the scene around me, thinking about the hot shower and warm bed I would not have tonight. It was now 3:00PM in early February. I was located at 12,000 feet in the Rocky Mountains of Colorado. The staging area for the search I was involved in was a distance of about 10 miles. The wind was picking up and mid level clouds were quickly beginning to obscure the low sun. The National Weather Service was also reporting a fast moving system coming into the area sometime during the night. In two hours it would be dark and the temperature would plummet well below zero. In my mind I surveyed the gear in my pack. "Its going to be a long night" I said to myself as I grabbed my avalanche shovel from my gear and went to work on my shelter.
For people involved in rescue work this is not an uncommon scenario. Helicopters break down, the weather changes, and mission requirements place us at risk for emergency bivouac each time we leave the security of the staging area. As rescuers we often hyperfocus on helping others involved in an emergency, pouring all of our energy and resources into that objective. In the process we become distracted from the most important mission and that is to protect ourselves.
During the winter season it is critical that we are proficient in the use of various survival skills. One of the most vital is knowing how to construct a snow shelter.
There are many different types of snow shelters used throughout the world, but one of the most common and easiest to construct is the snow cave. Almost any improvised tool can be used, even hands if nothing else is available. But for a planned and comfortable cave a shovel is best to use. There are four main steps to follow in building a snow cave. These are; Choosing a site, tunneling in, shaping the cave, and adding finishing touches.
Choosing the site
When choosing a site for a cave one of the most important considerations is the snow depth. A depth of at least 4 or 5 feet is helpful to start with. Many areas in the world do not commonly have this depth of snow available. To overcome this problem, snow must be formed into a large pile. This pile should be designed large enough to accommodate the number of people that the shelter will house. To form the snow pile, begin shoveling or moving snow onto a site that will provide a flat and stable base. Continue adding snow until a rounded pile is formed at least 4-5 deep and as long and wide as it needs to be for the number of people it will accommodate. It is better to start with more snow than you think you might need. The newly formed pile needs to be left undisturbed for at least an hour before any digging is attempted. This time allows the snow crystals to begin to bind together and gives the snow cave strength and stability. This binding time varies depending upon the type of snow, the moisture content, and the air temperature. It is possible that in some conditions, such as, granular or corn snow that the snow crystals will require a longer time to form this bond and in some cases not form a bond at all. In these situations other types of shelters need to be considered. When using this method, smaller shelters will be easier to build. If there is a large number in a group, it will be more effective to build several smaller caves.
When the natural snow depth is at least 4 or 5 feet, choose a site free of any avalanche danger. Look for a drift or swail near ridges or trees. Try to arrange the entrance to the cave so that it is on the leeward side of a slope. This will offer additional protection from the wind.
Preparing to dig
Before the actual digging begins make sure you are wearing the proper clothing. This includes layers with a waterproof shell. Remember; dry is warm. Heavy digging can be done with a large scoop shovel. Smaller avalanche shovels work well also. In an emergency situation where a shovel is not available, use whatever you can improvise, including your hands. A small cooking pot, a snow shoe, ski or even a signal mirror will work.
Tunneling in
In deep snow begin by digging a trench downward into the snow. As you dig place the snow that is being removed from the trench onto the roof area of the cave. In these conditions make the trench as deep as you are tall. The next step is to begin tunneling in. At a point at about knee level make the entrance. Make the tunnel slightly wider than your body. If the terrain and snow depth are adequate, tunnel at a slight upward angle. Ideally the cave end of the tunnel should be at least a foot above the entrance, this will help prevent warm air from escaping the shelter.
If possible make the tunnel the length of your body. At the upward end of the tunnel hollow out a space as large as your body. Moving the snow becomes a major task at this point. Use the shovel in front of your body to dig in. As you move forward use your feet to move the snow into the tunnel and out of the entrance. Now you are ready to begin shaping the cave.
Shaping the cave
The minimum thickness of the cave walls should be 12 inches. The thicker the walls the more stable the structure and the better it will insulate. The ceiling and the walls of the shelter should be dome shaped and smooth and should be large enough for you to sit upright. Try to eliminate any sharp edges or ridges on the walls and ceiling of the cave. Initial shaping can be done with a shovel to do the bulk of the work.
Final shaping is best done with a gloved hand. This shaping will prevent water dripping problems as the temperature in the cave rises.
Finishing touches
An elevated sleeping platform is the most important feature you can add to your shelter. This allows you to be nearer the warmer air in the upper part of the cave. Another necessary feature is the ventilation hole which can be made with a stick, ski pole or other object. This hole should be made in the top and be about 2 inches in diameter. This helps to eliminate carbon monoxide if stoves or candles are used and carbon dioxide buildup from your own breathing. Check the vent hole at regular intervals to prevent it from becoming clogged. Leaving a stick or ski pole in the hole is a good idea. To clear the vent hole just wiggle the inserted object. Make a shelf for a candle. One lighted candle can increase the air temperature in a small cave by as much as 20 degrees or more. Others shelves and platforms can be created for gear and equipment. The entrance to the cave can be blocked with a snow block, pack or other gear. This will further help to reduce air movement and increase the temperature inside.
On occasion during the construction of a snow cave, especially in granular snow, a collapse can occur. It is a good practice to build caves in teams of two. During the construction, one person should always remain on the outside. In case of a collapse the outside person can then rescue the person digging. It is uncommon for a snow cave to collapse after construction, especially after the temperatures drop at night. The cold temperatures tend to increase the overall strength of the shelter.
The ceiling of a snow cave can drop as much as 1-2 inches per day. This occurs because of normal settling of the snow pack. During a heavy storm the settling can increase drastically. When this occurs just reshape the inside of the cave. Always keep your shovel or digging device next to you in a snow cave. After a storm you may need to dig your way out.Emergency Snow Caves
In an emergency, snow caves can be created quickly by digging into a snow bank or drift. Eliminate the tunnel and dig a compartment so that it is large enough inside for you to sit upright. Place your pack in front of the entrance hole. Use evergreen bows or other natural materials to insulate yourself from the ground. Use your pack as an emergency bivy sack and light at least one candle. If you use a candle make sure you have a vent hole or adequate ventilation. If you think people will be out searching for you, make the site as visible as possible from the ground and the air by placing clothing, sticks or stomping an unusual pattern in the snow. Remember when you are inside the cave your ability to hear what is happening outside will be reduced to almost nothing.
The temperatures may drop and the storms rage but if you follow these simple steps and carry basic emergency gear you can be safe and secure in your home in the snow.
Back to the libraryemail: info@etisurvival.com
Enviro-Tech International
P.O. Box 2135
Montrose, CO 81402
(970)249-7590
(800)994-2434
http://www.etisurvival.com/snocv.htm
Last edited by AirborneSapper7; 02-19-2012 at 04:47 AM.
Join our efforts to Secure America's Borders and End Illegal Immigration by Joining ALIPAC's E-Mail Alerts network (CLICK HERE)


 Reply With Quote

Illegal Alien Charged with Sexually Assaulting Two Girls After...
04-23-2024, 05:10 PM in illegal immigration News Stories & Reports