Results 10,031 to 10,040 of 10955
LinkBacks (?)
-
12-26-2016, 11:32 AM
-
09-02-2016, 05:39 PM
-
whole garden made with pallets!! Love it!! | Pallets | Pinterest | Pallets, Pallets Garden and Wooden Pallets
Refback This thread03-06-2016, 11:30 AM -
10-20-2015, 05:29 PM
-
06-12-2015, 08:00 PM
-
02-26-2015, 01:58 PM
-
01-05-2015, 04:13 PM
-
12-19-2014, 10:19 AM
-
EMERGENCY: HUGE FEMA PANDEMIC EXERCISE IN USA IN NOVEMBER, INTERNET SHUT DOWN PART OF EXERCISE | Prepare4Survival
Refback This thread12-03-2014, 10:39 PM -
Off Grid World ? Ugly Duckling Shipping Container Home Built by Artist Is a Beautiful Swan on the Inside
Refback This thread11-25-2014, 03:10 PM -
11-17-2014, 10:59 PM
-
11-13-2014, 11:18 AM
-
11-09-2014, 02:54 PM
-
10-28-2014, 11:38 PM
-
10-26-2014, 05:54 AM
-
10-16-2014, 11:28 AM
-
10-03-2014, 01:25 PM
-
10-02-2014, 09:16 PM
-
09-26-2014, 07:00 PM
-
09-26-2014, 01:56 PM
-
09-19-2014, 04:46 PM
-
09-13-2014, 05:49 AM
-
09-05-2014, 01:52 PM
-
09-01-2014, 09:39 AM
-
08-30-2014, 06:29 PM
-
08-10-2014, 06:29 AM
-
08-04-2014, 05:07 PM
-
07-23-2014, 11:14 AM
-
New Evidence on Expiration Dates | Medical Preparedness | Doom and Bloom (TM) | Doom and Bloom (TM)
Refback This thread07-22-2014, 10:10 AM -
07-18-2014, 08:37 PM
-
07-15-2014, 04:57 PM
-
07-11-2014, 01:40 AM
-
04-22-2014, 11:14 AM
-
04-18-2014, 12:57 PM
-
04-18-2014, 10:10 AM
-
04-14-2014, 12:18 AM
-
04-12-2014, 02:28 AM
-
03-02-2014, 11:43 PM
-
12-24-2013, 11:59 PM
-
12-07-2013, 11:04 PM
-
kitchen | Cob
Refback This thread11-25-2013, 03:24 PM -
10-22-2013, 10:25 PM
-
Apple Pie Braid | Sweets
Refback This thread09-26-2013, 07:58 AM -
09-02-2013, 04:44 PM
-
5 Reasons Why You May have to Bug Out Even Though You Don’t Want to | The Apartment Prepper's Blog
Refback This thread08-23-2013, 03:20 PM -
06-27-2013, 06:30 AM
-
06-23-2013, 08:11 PM
-
06-17-2013, 11:21 PM
-
05-24-2013, 05:06 PM
-
To Eat / BASIC LIST / SUGGESTED ITEMS FOR LONG TERM SURVIVAL - Page 275 - ALIPAC
Refback This thread05-01-2013, 03:49 AM
Thread Information
Users Browsing this Thread
There are currently 29 users browsing this thread. (0 members and 29 guests)
-
06-25-2025, 09:46 PM #10031
How to Build a Safe Emergency Wilderness Shelter
Whether you’re heading on a low-cost camping trip or you get stranded out in the wilderness without many supplies, knowing how to build an emergency wilderness shelter is incredibly important.
Video Cheap Cabin Kits Starting At $3860 - SHTFPre... | Open Video
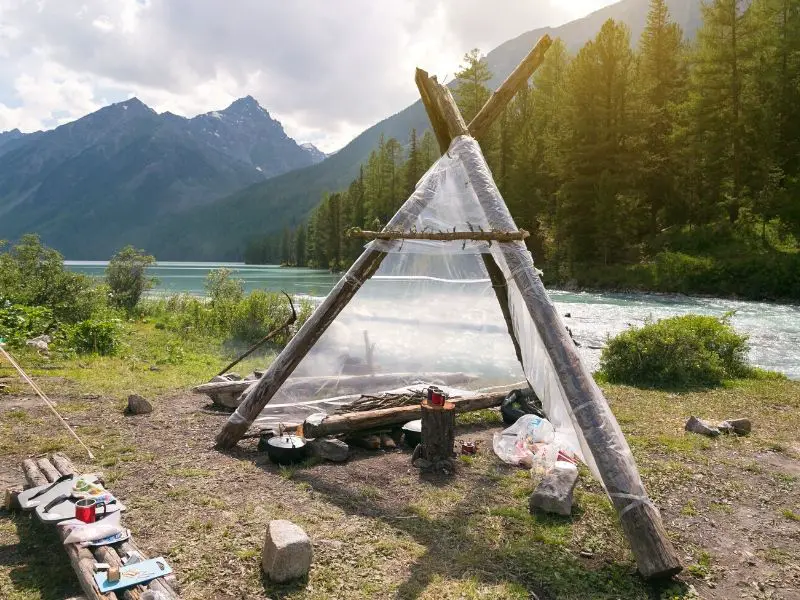 Types of Emergency Wilderness Shelter
A temporary emergency wilderness shelter can get you through the night no matter where you are.
Depending on where you are in the wilderness, there are many different ways to build a shelter. However, the types of emergency wilderness shelters tend to break down into two categories:
- poncho shelters
- natural shelters
If you have a poncho Mylar survival blanket or some other kind of waterproof material, you can make a poncho shelter.
One of these should be included in every bug-out bag. If you don’t have any of those things, you’re going to need to make a natural shelter.
Poncho Shelters

USGI Industries Military Poncho Emergency Tent Shelter
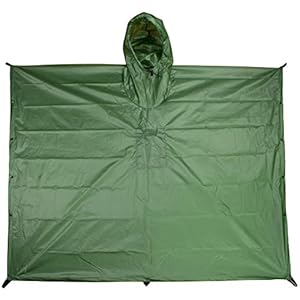
Ripstop SilNylon Poncho and Emergency Shelter –
Lean-To Poncho Shelter
There are a few different kinds of poncho shelters.
The most basic kind of poncho shelter is a lean-to. A lean-to is a shelter made with two points of contact. You will need to stretch your poncho tight. Attach it to the ground and then lean it at a 45-degree to a fixed structure.
If you are in the desert or other dry areas, you might be able to find a rock outcropping or a short tree. You can then attach the top of the poncho to the tree at a 45-degree angle. When you do this, make sure that the structure is very stable.
Also, take a few minutes to figure out which way the wind blows. You want the lean-to facing into the wind. That will keep wind, rain, and sand from blowing into your shelter.
If you cannot find a sufficient rock wall or sufficiently large tree, you can build the lean-to by creating the second point of contact. If two trees are close together, you can string a rope between them. Tie the top of the poncho to the rope and affix it to the ground. Just that quickly, you have a quality lean-to.
How to Stay Warm in Your Poncho Shelter
If you are in a dry area, you might be surprised by how quickly the temperature can drop when the sun goes down.
To maintain a comfortable temperature in your lean-to, you can build a fire outside of your lean-to. Since you need to keep the fire away from the poncho and not so close that you inhale smoke, a lot of heat will be lost.
To reduce the loss of heat, you can construct a firewall. A firewall is any type of structure that is on the opposite side of the fire from your shelter. That will cause light and heat to bounce towards your shelter.
In a sandy environment, you can actually just build a sand or earth embankment.
If you have wood available, a wall can be built by driving two sticks into the ground vertically and tying other branches to them. Paracord is probably the easiest way to tie items together; it is truly an indispensable survival tool.
Poncho Tent
The other type of poncho or Mylar blanket shelter is a poncho tent. Whereas a poncho lean-to has two points of contact, a poncho tent has three points of contact.
To build the poncho tent, string a rope between two trees or rock outcroppings. Make sure you pull the rope taut. Then, drape the poncho or Mylar blanket over the rope. Secure it to the ground on both sides to form an A-shaped tent.
This type of shelter requires a larger poncho than a lean-to but it will protect you from wind and rain more completely. It will also keep you a little bit warmer.
Building a fire outside of the tent and supporting it with a firewall will keep you warm throughout the night.
Natural Shelters
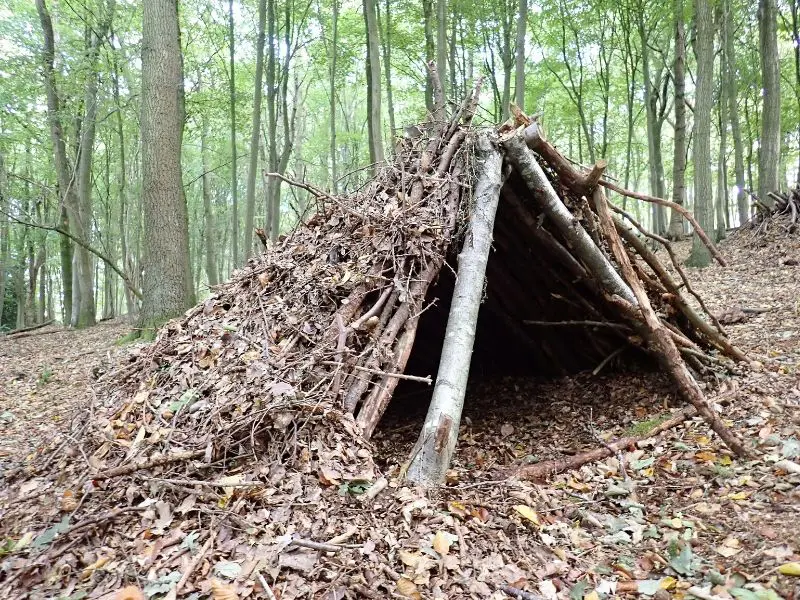 In contrast to poncho shelters that require ponchos and ropes, a natural shelter can be made with things found in the wilderness. The types of earthen shelters are actually similar to the poncho shelters but made from different resources.
A lean-to is still the simplest type of shelter. If you are anywhere that you can find branches, you will be able to build a quick lean-to. If the weather has been dry for a while, you might even be able to gather branches off the ground. Otherwise, you’ll need to cut green branches off of a tree.
To cut branches off a tree, you can use an axe, hatchet, or saw. If you’re cutting small branches or if you’re walking far, you want a hatchet. They’re easier to carry.
An axe is going to be much heavier and longer, which means you’ll be able to cut larger branches. You can see a more in-depth comparison of axes and hatchets here.
How to Build Your Natural Lean-To Shelter
To find the right branches for your lean-to, you need two long branches that are about the same length. These will form the roof of the lean-to. Then, decide how wide you need your lean-to. It should probably be at least wide enough for you to lay down completely.
Then, use your axe or hatchet to cut down several branches long enough to make a roof. If you can find large elephant ear leaves, palm fronds, or similarly large leaves, you will be able to make a roof out of these. A vine of some sort is a great substitute for rope or twine. If you can’t find vines, you can use an axe or knife to cut thin strips of green wood; while they’re still green, they can be used to tie branches to your lean-to.
A natural tent is made by essentially building two sides to a lean-to and leaning them against each other.
Underground Shelters
The final kind of natural shelter is actually an underground shelter. Underground shelters can be thirty or forty degrees Fahrenheit cooler than the outside air. However, the earth holds heat much better than the air. That makes them the perfect natural shelter for deserts.
To build the underground shelter, find a depression between rocks or dunes. If you can’t find a rock or dune, dig at least deep and wide enough that you can lie down comfortably. Pile up all of the dirt or rocks that you remove from the trench.
Finally, you need to create a partial roof over the top of your trench. If you have leaves or branches, you can use sand or rocks to anchor the branches as a roof.
Related: check out this guide to underground bunkers.
If you have a poncho, it won’t be a completely natural shelter, but it will be the easiest way to create a partial roof for your underground shelter.
Conclusion
These four kinds of shelters, two natural and two poncho, can keep you warm and dry no matter where you find yourself.
Learn how to create an emergency wilderness shelter for practice, before you actually needed it. If you are stranded in the wilderness or just testing your wilderness survival skills, keep these shelters in mind.
 4.1KSHARES
Pin789
Share3.3K
Tweet
By Author SHTFPreparedness
Posted on Last updated: June 28, 2024
Categories Security & Shelter
How to Build a Safe Emergency Wilderness ShelterIf you're gonna fight, fight like you're the third monkey on the ramp to Noah's Ark... and brother its starting to rain. Join our efforts to Secure America's Borders and End Illegal Immigration by Joining ALIPAC's E-Mail Alerts network (CLICK HERE)
-
06-25-2025, 09:55 PM #10032

Home Survival Hunting
Trapping 101: How To Catch Animals With A T-Snare Trap
by Ben W
in Survival Hunting

 Image source: CDispatch.com
Youre stocked with venison you shot during season, but now the family complains about venison steak, venison burgers, and venison stew again. How can you provide some variation in the menu and still supply adequate protein? Trapping is a safe and enjoyable activity that can net a variety of small mammals with uniquely different flavors. In addition, it can become a family project with the making, setting, and checking the traps.
To trap an animal is to catch one without having to play an active role in the process at all times. In this article, the main purpose to trap an animal is for food, although you may be able to harvest some other necessities from the trapping of animals, such as furs or scents.
Animal trapping is perhaps one of the first methods of hunting. As far back as the Neolithic period, this method was used to keep food on the table and money in the pocket. In early colonial America, the fur trade was the newest and most sought after form of employment. Learning from the Native Americans, the new colonists focused on the beaver and other small animals, including fur animals like small cats and fox.
An extremely easy to build, but relatively effective trap is the T-snare trap. The materials needed are:
- Heavy survival/hunting/multipurpose knife
- Two sticks, approximately 2-3 feet long and as straight as possible. These will form the vertical base.
- A slightly smaller diameter stick about 1.5 feet to 2.5 feet long, as straight as possible. This will be the horizontal support system.
- A small, slightly stumpy looking stick, maybe 2-4 inches long. This will act as the trigger for the trap.
- Small diameter, relatively concealable, string or wire (or a suitable alternative like paracord or snare wire)
- A younger sapling that has some springiness to it
Just as in real estate, the three main components of a successful trap are location, location, location! The location of the trap will be paramount to your success. Try for known animal paths that run near water and food sources. If you are using items directly from the outdoors, then also look for young vegetation and saplings nearby to make your process easier. Try to think like an animal that is worrying about their food, shelter, and safety when trying to determine the ideal location to set a trap.
To build a trap in this style, you will want to mark the two vertical supports at the same spot to allow your horizontal support to sit level. Notch out a cradle area in the shape of a C in the vertical supports at the height that allows the horizontal support to fit into the two verticals, without extending out too much past the surface of the verticals.
An Outdoorsmans Guide to Shelters, Tools, Weapons, Tracking, Survival, and More!
In the four-inch trigger piece, carve a C shaped notch as well, about in the middle of the wood which will allow it to rest on the horizontal bar. At one of the ends, carve a groove out to act as a nesting spot for the string/rope/wire which will be cut around the circumference of that end; it would be like a ring around the end of the trigger stick.
The end of the sapling spring piece will be about at the center of the trap. Generally speaking, the shorter the spring pole, the more tension potential.
Situate the verticals with enough room for the animal to get between them (slightly larger) and secure the poles in place with rocks or in the ground at even levels.
Place the horizontal support into the supporting notches. To form an H
Now take a single piece of twine or rope and attach one end to the tip of your spring pole using a slipknot. Measuring down to the horizontal bar with the spring pool flexed in position, attach the twine or rope to the notched circle on the trigger bar and continue it down to make the snare. Make a circle connected with a slip knot made with half hitches that isnt too tight since it needs to move when triggered to snare the animal. Use enough twine or rope to make a circle large enough to cover the opening between the vertical sticks. With the knot just slightly elevated off the ground.
Before you set the trap, you need to block the surrounding area alongside the trap so that the animal doesnt simply walk around. Use rock and tree branches to effectively make a barrier or fence, leaving only an open path into the trap.
Now you are ready to set the trap. Position the trigger pole onto the horizontal pole in the opposite direction that the horizontal pole is set into the vertical poles. This exerts opposing pressure keeping the horizontal pole stable and provides the ability for the animal to set off the trap from either direction. Position the snare and you are ready.
The point of the sapling is to add spring to the trap to ensure the snare part of this trap actually happens, so you will need to make sure that the tree can spring back upwards to return to its vertical position. The release of the tree simultaneously tightens the noose-like snare knot and elevates the animal off of the ground, keeping the noose tight. It is the most important part of the entire design.
Test the trap to make sure it functions properly. Beware as your poles or trigger may not be as stable as you had hoped and may become flying objects. Be aware of low lying branches on the spring pole as in windy conditions, they may inadvertently set off the device. You may need to trim back any bothersome branches before the trap is set.
Now comes the hardest part of the entire processwaiting for a thirsty or hungry animal to walk into your trap. Hopefully the terrain wasnt interrupted too much and the animal is unsuspecting of what awaits.
Set as many of these devices as you will have time to check. You wouldnt consciously leave a hanging animal dangling from a tree to die slowly of starvation. Check your traps daily and enjoy the fruits of your labors.
Beaver and raccoon are pretty common species from traps like this, but opossum and muskrats are easily subdued as well with this method. The trap described above isnt as difficult to perform as it is to read, and once you have it dialed in, it can be extremely efficient. Its difficult for the animal to recognize, as its made with natural items. This information is more for trying out the trapping process and for survival when you wont have access to traps that are commercially made.
In all reality, you can buy quality reusable traps for a small amount of money that can be used with incredible effectiveness, so you may be better off doing so, as the cost is outweighed by the long life and usefulness of the traps. The goal in trapping is more to create a passive supply of animals that will supplement your other methods for gathering meat. Use trapping to help stabilize your hunting intake, and make the best use of your active time.
How to make a primitive trap: the t-bar snare (wilderness survival traps)
Trapping 101: How To Catch Animals With A T-Snare Trap - Off The Grid News
If you're gonna fight, fight like you're the third monkey on the ramp to Noah's Ark... and brother its starting to rain. Join our efforts to Secure America's Borders and End Illegal Immigration by Joining ALIPAC's E-Mail Alerts network (CLICK HERE)
-
06-26-2025, 12:59 AM #10033

Muscadine – Wild Food Foraging, Identification & Recipes
- Home
- Recipes WIld Food
- Muscadine – Wild Food Foraging, Identification & Recipes
Melissa Francis
May 6, 2013
Recipes WIld Food, Wild Food Foraging
Identification, Muscadine

emergency outdoors
Emergency Outdoors blog shares a extremely educational article on a wild foraged food ” Muscadine “. Muscadine (Vitis rotundifolia) is a member of the grape family.
It goes into identification of the berries, leaves and bark, what part of the United States in grows in and recipes how to use it.
Click here to read this wonderful article:
Duck Dynasty
Nature’s Garden: A Guide to Identifying, Harvesting, and Preparing Edible Wild Plants
The Wild Table: Seasonal Foraged Food and Recipes
Wildcraft! – An Herbal Adventure Game
2 year old stock – Summit Muscadine Grapes
Muscadine - Wild Food Foraging, Identification & Recipes - The Homestead Survival
If you're gonna fight, fight like you're the third monkey on the ramp to Noah's Ark... and brother its starting to rain. Join our efforts to Secure America's Borders and End Illegal Immigration by Joining ALIPAC's E-Mail Alerts network (CLICK HERE)
-
06-26-2025, 01:26 AM #10034

- Home
- Homesteading
- Gardening
- Canning
- Chickens
- Recipes
- Food Storage
- Health
- Emergency Preparedness
- Natural Remedies
How To Build A Vertical Axis Windmill DIY Project
- Home
- DIY Projects
- How To Build A Vertical Axis Windmill DIY Project

Melissa Francis
July 2, 2014
DIY Projects, Off Grid,Wind
Axis, diy project, electrical generator, off the grid, vertical, windmill
How To Build A Vertical Axis Windmill DIY Project
This outline of how to build a vertical axis windmill DIY project encourages the self sufficient type of person to create an off the grid electrical generating device. Many homesteaders are searching for ways to create or supplement their power needs from a free renewable resource the wind !
creative-science
Click here to read How To Build A Vertical Axis Windmill DIY Project:
http://www.creative-science.org.uk/sav.html
How To Build A Vertical Axis Windmill DIY Project - The Homestead Survival
If you're gonna fight, fight like you're the third monkey on the ramp to Noah's Ark... and brother its starting to rain. Join our efforts to Secure America's Borders and End Illegal Immigration by Joining ALIPAC's E-Mail Alerts network (CLICK HERE)
-
06-26-2025, 01:28 AM #10035
Savonius windmill

This is an experimental vertical axis windmill and electrical generator, which in a fair breeze, easily provides 5V at a few 100mA's. I know that the following details are a bit scanty but I wanted to get something up on the web site to inspire people to get experimenting. I don't know when I will have time to add more details but do e-mail me if you think some major info. is missing and I will try to respond.In vertical axis windmills the turbine is positioned so that it rotates along a vertical axis. Changes in wind direction don't tend to effect such a windmill because unlike horizontal axis windmills they don't have to point into the wind for maximum efficiency.
If the wind turns round (as it does sometimes when it is blustery) a normal windmill will slowly come to a stop and then turn the other way, with subsequent loss of power during this period. A vertical axis windmill wont really notice any difference and will continue to produce power without stopping.

One disadvantage of the horizontal axis mill is that, for all but the short mills, the axis needs to be supported at each end. This means they sometimes need a clumsy supporting structure around them limiting the height above ground they can reasonably be positioned. As wind speed is usually greater and more stable high above the ground its a major limitation for these otherwise excellent devices.This particular design uses 10 mm studding (thread) as an axle to support the wind turbine and transmission gearing (a 15cm diameter wooden pulley). Everything is made from 1/2" plywood coated with several varnish layers to weather proof. As its fairly small we support the whole turbine from the base.

The basic Savonius design is a S shaped turbine made up of two double half circle (in this version each was ca. 30cm diameter) wooden templates which are supported by wooden batons. Half the circular shapes produced by the templates are covered in light weight plastic sheet to form a curved sail / wind resisting surface for the wind to make 'contact' with.
As the turbine turns it moves the axle turning the wooden pulley below. The gear arrangement to the simple generator, from a large to small pulley means the relatively slow turbine motions are stepped up powering the electrical generator at a suitable speed for all but very low wind speeds.
The generator is made using 8mm studing with two bearings as in the windmill axle. Two magnets are fixed on two nuts at the center and two coils of wire (each 1000 turns of ca. 30SWG enamalled copper wire) are arranged around them. As the axle spins the magnets rotate inducing electricity into the coils. This type of generator produces an AC voltage. Its nice as there are no moving electrical parts and so no connections to go wrong with water rust and oxidation. They work happily in all weathers. My one is shown with a white LED attached to the generator. See the generator pages (links below) for details of suitable magnets.The voltage produced depends on the rate at which the generator axle / magnets rotate. This in turn is dependant on the gear ratio between the large pulley on the windmill axle and the pulley on the generator. I used two bottle tops back to back secured by two washers and nuts as a simple homemade pulley for the generator.

The turbine and pulley system is fairly heavy, this means the windmill is a little slow to get working but it does tend to smooth out variations with changes in wind speed. The extra momentum keeps it going when the wind speed dips now and again.Finish the mill with a few coats of outside varnish on all the wooden surfaces to give it a water / weather proof finish. In an ideal world you might want to put cups / covers on the studing just above each of the bearings to protect them from rain and dirt etc. (you might get away with only having to do it on the very bottom bearing as the turbine, small pully and generator body give some protection to the other three bearings. A drop of oil every so often works wonders ....
movie clip of a savonius turbine and generator (ca. 4Mb)
The following URL's will be useful:
simple Rough Science generator I
simple generator II
6 gens page
Natures Power page
Note: coming soon:
Vega module film clip of three windmills (including the Sanovius mill shown here)
Dr Jonathan Hare, E-mail: jphcreativescience@gmail.com
NOTE: Although none of the experiments shown in this site represent a great hazard, neither the Creative Science Centre,
Jonathan Hare nor The University of Sussex can take responsibility for your own experiments based on these web pages.
THE CREATIVE SCIENCE CENTRE
The Creative Science Centre - by Dr Jonathan P. HareIf you're gonna fight, fight like you're the third monkey on the ramp to Noah's Ark... and brother its starting to rain. Join our efforts to Secure America's Borders and End Illegal Immigration by Joining ALIPAC's E-Mail Alerts network (CLICK HERE)
-
06-26-2025, 01:31 AM #10036
THE CREATIVE SCIENCE CENTRE (CSC)
by Dr Jonathan Hare
Visiting Outreach and Public Engagement Fellow
in the Chemistry department at Sussex University (UK)
The Creative Science Centre - by Dr Jonathan P. HareIf you're gonna fight, fight like you're the third monkey on the ramp to Noah's Ark... and brother its starting to rain. Join our efforts to Secure America's Borders and End Illegal Immigration by Joining ALIPAC's E-Mail Alerts network (CLICK HERE)
-
06-26-2025, 01:48 AM #10037
Projects
Contests
Teachers
Log In Sign Up
A Practical Zeer Pot (evaporative Cooler / Non-electrical Refrigerator)
By Berkana in Outside Camping
592,332
1,866
115Featured

Introduction: A Practical Zeer Pot (evaporative Cooler / Non-electrical Refrigerator)
 By Berkana Follow
More by the author:


About: I'm an inventor, poet, permaculture / sustainability nerd, and activist. I work in the renewable energy industry with biomass gasification. I love to show people neat tricks to optimize things, and I want the More About Berkana »
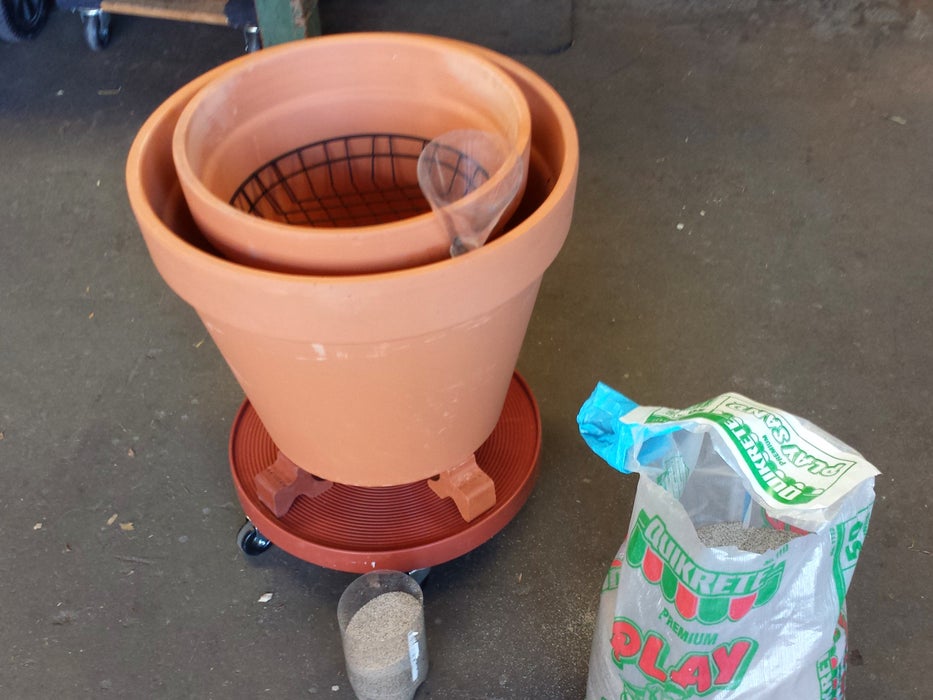
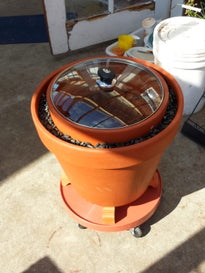
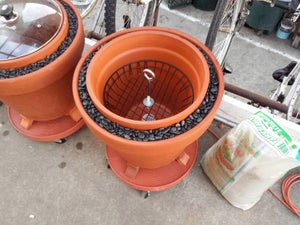
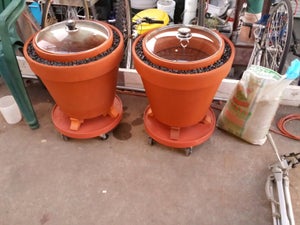
A zeer pot is an evaporative cooler used in rural Africa and the Middle East to keep vegetables fresh. They consist of two terra cotta pots, one nested inside the other, with the gap between them filled with wet sand. The sand serves as a thermal mass that helps keep the pot cold once it has cooled down, and acts as a wick to spread the moisture up the walls of the pot. When placed in a shaded, breezy location, the evaporation of water off the outer surface chills the pot. If you have a good breeze, or a fan powered by a solar panel blowing the pot, the pot can get quite cold. Imagine that chill you get when you step out of a pool when the wind is blowing. Now imagine that wet wind chill going on all day. That's what the pot feels with a constant breeze.
Unless the air is very dry and the pot is exposed to a constant breeze, they generally do not become as cold as a refrigerator, but they will keep vegetables fresh for a couple of weeks. If you do have cool dry air and a constant stiff breeze, the interior of a zeer pot can chill down to around 40˚F.
Think of it as an open-cycle refrigerator. Conventional refrigerators evaporate a refrigerant in a closed circuit to absorb heat from their interiors, then compress the refrigerant vapor in the coils in back to condense it and to expel heat. The zeer pot simply uses water as its refrigerant, and leaves the condensation to nature.
Zeer pots were re-discovered and popularized in the early 2000s by the Nigerian teacher Mohammed Bah Abba. By manufacturing and mass distributing zeer pots to the poor, he was able to bring refrigeration to tens of thousands of impoverished farmers and home makers, enabling them to extend the usable life of their produce from days to weeks. For his efforts Bah Abba was awarded the Rolex Award for bringing life-changing technology to people in need.
In the under-developed parts of Africa and the Middle East, zeer pots use custom made pots prepared by local potters. Here in the developed world, we need to settle for pre-made pots from the hardware store. There are some drawbacks, but also some advantages afforded by these limitations, as you will see.
What makes this zeer pot practical?
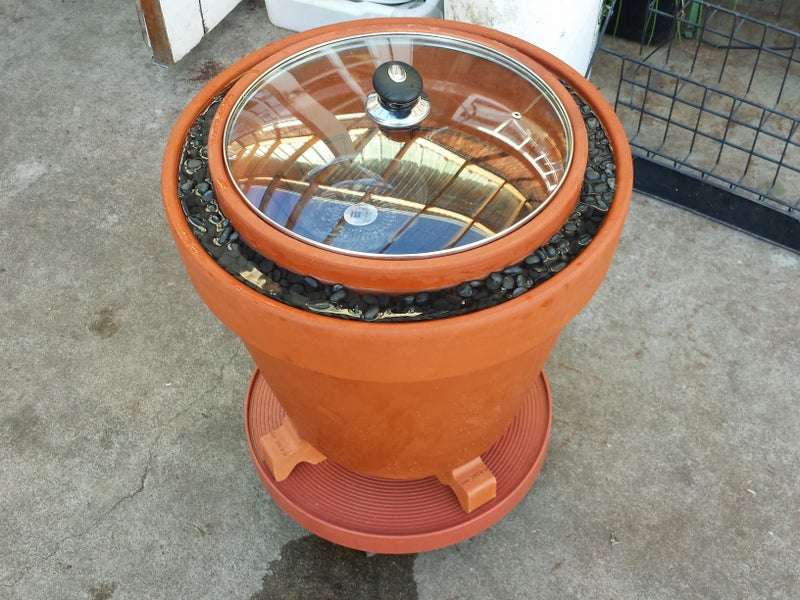
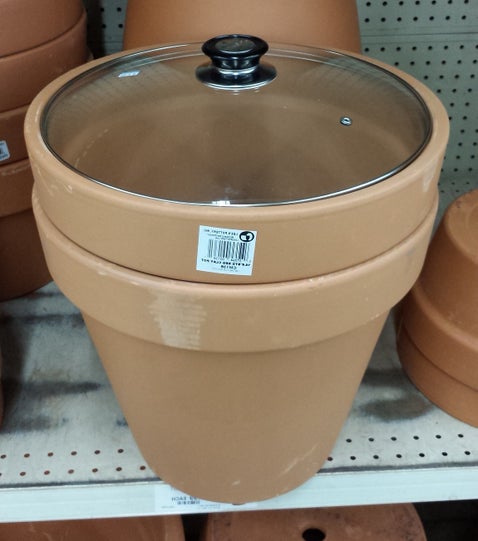
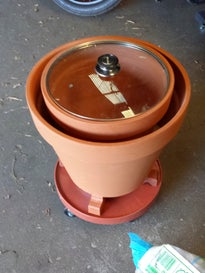
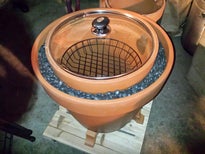
There are other zeer pot instructables out there, but this one is optimized for practicality. If the capacity is too small, the cooling capacity too low, or if it an eyesore or is annoying to use nobody would want to use it. This zeer pot uses a large glass pot lid, has an interior basket divider, and sits on a rolling cart. It even has a layer of decorative pebbles over the sand to make it look pretty. The terra cotta pot legs hold the pot off the rolling cart with enough clearance to let the bottom surface contribute to evaporation; this adds about 10%-15% more evaporative surface. The inner pot is bolted down so that it doesn't float up when you charge the pot with water. Nearly everything I used in this project was purchased at a hardware store, and it can be made in a few hours, plus a day to let the sealants cure.
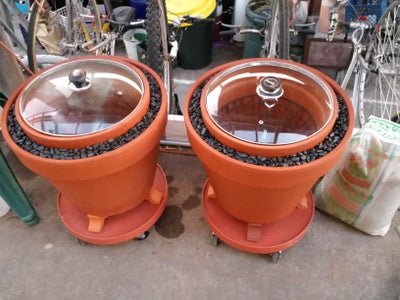
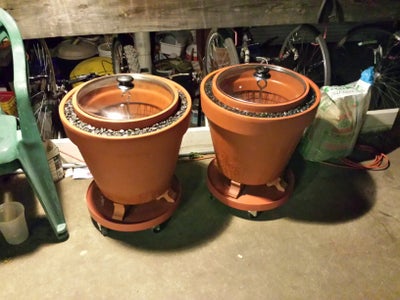
I will be building a zeer pot array for A Place for Sustainable Living in Oakland (California) based on this design. The goal is to use an array of zeer pots to displace the use of at least one of their refrigerators. The design shown here is the outcome of my experimentation with making zeer pots for them.
(Be sure to read all the notes to all of the photos. Many important details are listed there.)
Parts list with prices
Prices are rounded to the nearest dollar. (I must admit, this is by no means the inexpensive original African zeer pot, which cost $2 to make. You're going to spend well over a hundred dollars on this design. This one is for people are intentionally going out of their way to go off grid or to pursue sustainable options.)
Items are mostly from Orchard Supply Hardware (Berkeley, CA). The pot lid was from Kukje market (Daly City, CA), and the sandwich basket was from Web Restaurant Store.
- 18" unglazed terra cotta pot $30 @ Orchard Supply Hardware
- 14" terra cotta pot$15 @ Orchard Supply Hardware
- terra cotta pot feet, quantity: 7 $1.79 each, so about $13 @ Orchard Supply Hardware
- heavy duty planter caddy with five casters$30 @ Orchard Supply Hardware
- 50 lbs of sand; the finer the better, pre-washed $6 @ Orchard Supply Hardware
- 4" long 1/2" bolt
- 2" washers for a 1/2" bolt, quantity: 5
- jamb nuts for 1/2" bolt, quantity: 4
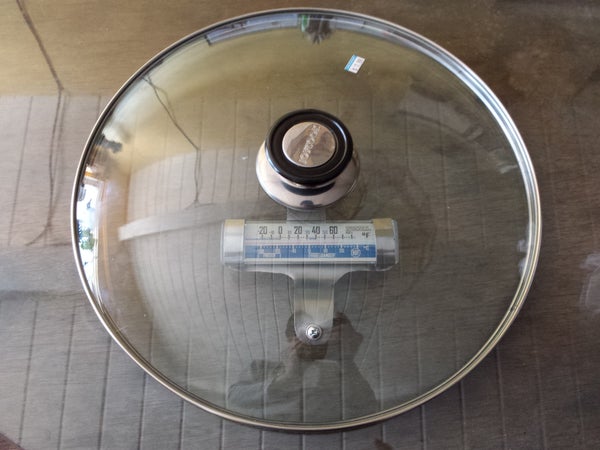
- Refrigerator thermometer: $8 @ Orchard Supply Hardware
- Silicone Sealant$5 @ Orchard Supply Hardware
- 13.5" glass pot lid $8 @ Kukje Market (Korean markets usually have these; wherever you are, if there's a korean market or housewares shop, you're in luck.)
- sandpaper
- 12" diameter sandwich basket $7 at Web Restaurant Store
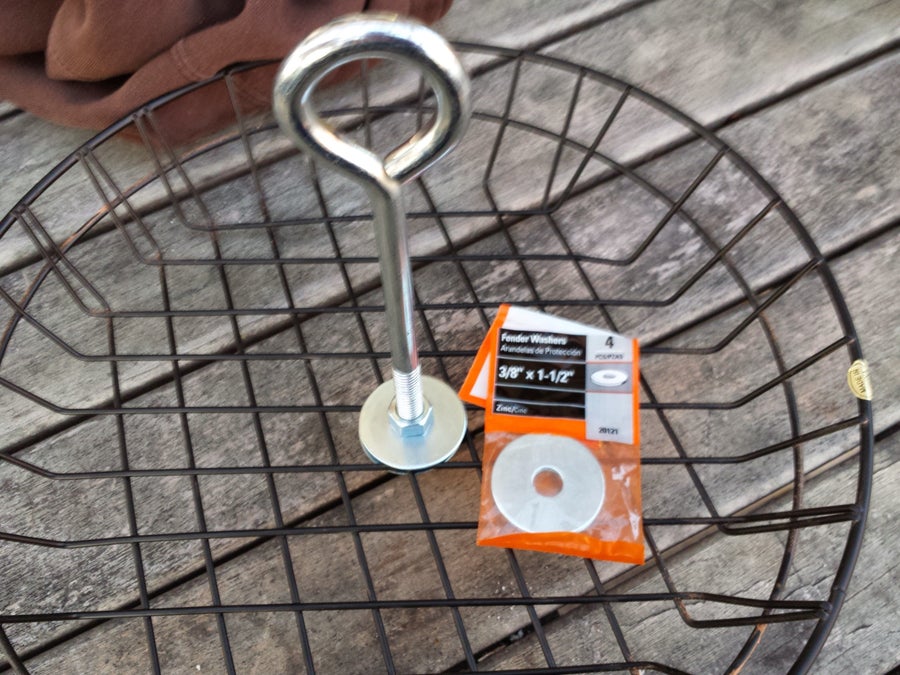
- 8" eyelet or hook bolt and a pair of nuts and washers about $6 @ Orchard Supply Hardware
Note: won't work as well in high humidity
If you live in a hot and humid area, the zeer pot probably won't work well; high humidity results in much less evaporative cooling. (However, a friend of mine who used a zeer pot to cool water in a humid part of Africa tells me that even with the humidity, it worked surprisingly well, so this is not definitive.)
Note: direct sunlight will cancel out all cooling effects
On the day I was doing the zeer pot seminar at the Place for Sustainable Living, we accidentally left one in direct sunlight. The amount of heat imparted by the sun totally overwhelmed the evaporative cooling effect. The cooling is supposed to come strictly from wind-induced evaporation, not from evaporation due to sun exposure. Sun exposure causes evaporation by imparting heat; wind exposure causes evaporation by lifting away water molecules, which carries away heat proportional to the heat it takes to evaporate the quantity of water carried away. If you do build a zeer pot, make sure you keep it in the shade for best effect.
Note: outer pot must be unglazed clay or terra cotta
At the hardware store, I saw a lot of fake terra cotta pots made of orange plastic. These are not usable for the outer pot of the zeer pot; the zeer pot cools by wind evaporating water that has been wicked through the outer surface. Plastic fake terra cotta is not porous, and will not work as an evaporative surface.
Glazed terra cotta pots also don't work for the outer pot. The inner pot doesn't necessarily have to be made of unglazed terra cotta, but the outer pot must be unglazed because glazed pots won't wick moisture to the outer surface for evaporation.
Note: many medium sized zeer pots work better than one giant zeer pot
The ability of a zeer pot to cool its content depends on the surface area to volume ratio. As you make the zeer pot larger, the volume will increases proportional to the cube of the linear dimensions, but the surface area only increases proportional to the square of the linear dimensions. Because the volume increases much faster than the surface area, one huge zeer pot will actually perform much worse than several smaller zeer pots. The size of the zeer pot in this instructable is about as large as you can make them while having a practical rate of cooling. You can always make them smaller; making them larger is not likely to give you reasonable performance. If you are serious about going off-grid, you would do better to make several zeer pots of this size than to make one huge zeer pot.
Step 1: Prepare the Central Bolt, Bolt Shut the Hole on the Outer Pot
(Be sure to view all of the photos above; much of the explanation is contained in the photo notes.)
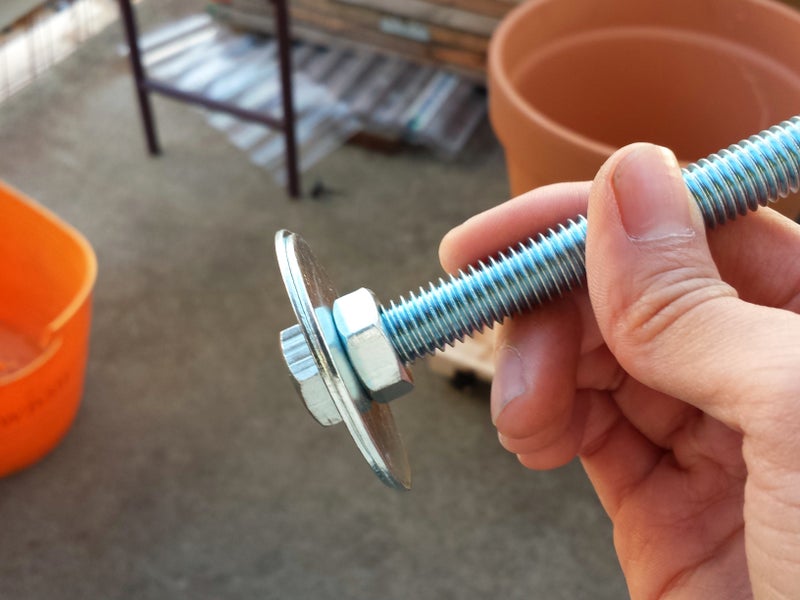
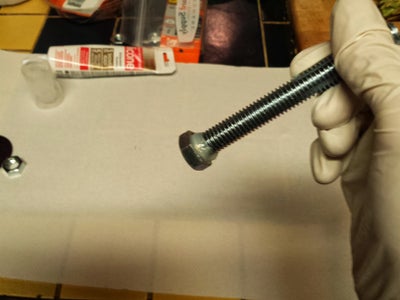
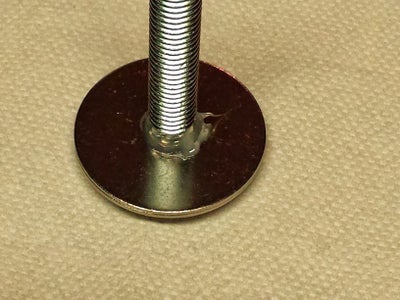
In this practical zeer pot design, we have a limitation that I turned into an opportunity. The terra cotta pots that we have access to have holes in the bottom for drainage; these need to be plugged so sand and water don't drain out the outer pot, nor into the inner pot. I have found that it is insufficient to merely plug the holes; zeer pots also have another annoying problem where the inner pot will try to float up as you wet the sand in the space between the pots. In order to solve both of these problems, I use a 4" long 1/2 diameter bolt, and a bunch of nuts and broad washers and a bit of silicone sealant to seal the holes in both pots. The secondary benefit of this is that the inner pot can't float up because it is bolted to the same bolt that seals the outer pot. This way, you can be generous with charging the sand with water without worrying about the inner pot floating up.
The first thing you need to do is to put a pair of broad washers on your bolt, put some silicone sealant on the threads, and tighten them down with a nut. Then, seal around the nut with more sealant.
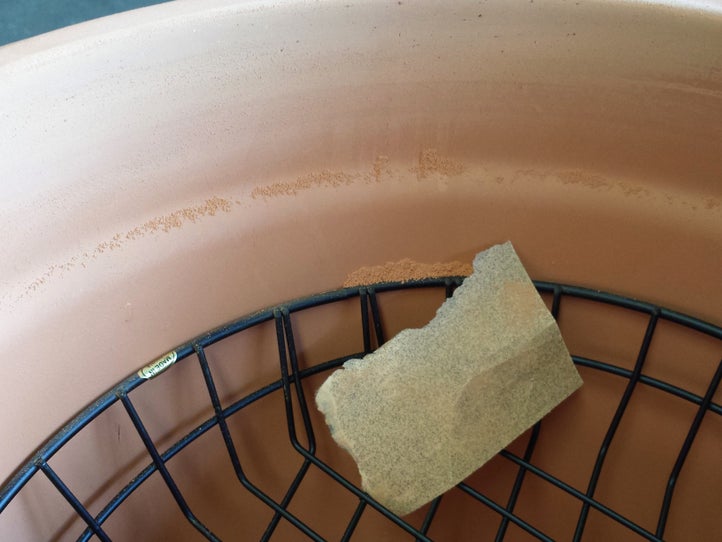
While the sealant is curing, use your sanding block to remove the clay burr around the hole of both pots. Be sure to sand off the burr both on the inside and the outside of the hole until the washer can lay flat against the pot. If you do not remove the burr, water will leak past the hole.
Now, it is time to seal the hole in the outer pot. This works best with an assistant helping you. Lay the pot on its side, and put some silicone sealant on the clay around the hole both the inside and outside the pot; insert the shank of the bolt through the hole, and have your assistant thread on a washer and bolt it down from the other side. Wipe up any sealant that squeezes out around the washer. Then smear sealant around the nut and bolt to prevent water from leaking out around the threads.
Step 2: Prepare the Washer on the Bolt to Seal the Inner Pot
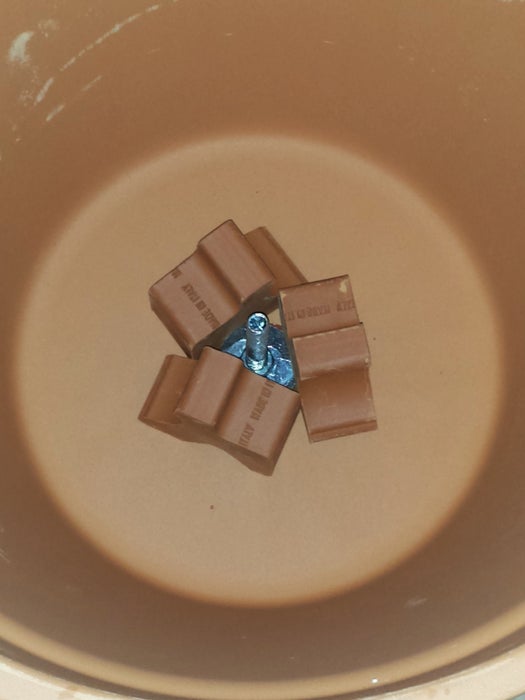
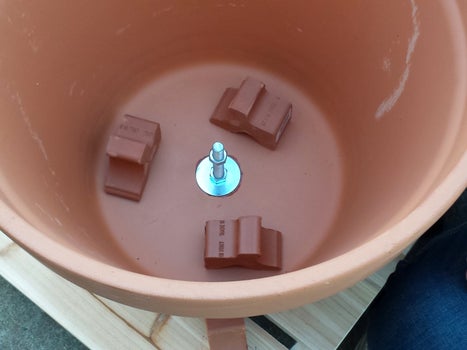
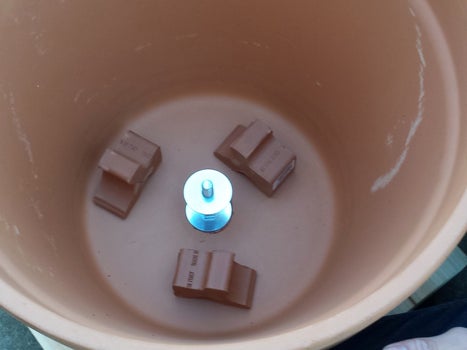
Turn the outer pot upright, and rest it on pot feet on your rolling pot cart. Put three pot feet into the pot near the bolt, and thread another washer onto the bolt such that when you put your washer down on the nut, the top level of the washer is just a tiny bit higher than the top of the pot feet. The washer must not have its upper surface lower than the upper surface of the pot feet; if it does, the inner pot will rest on the pot feet, and won't have its hole pinched tightly by washers from above and below.
Add a little bit of sand to the outer pot; you want just enough to fill the places that will be hard to get to once the inner pot is in place. Be sure there isn't sand on the washer or pot feet; the sand may prevent the inner pot from sitting flat on the washer, and will prevent a good seal. If you decide to dampen the sand to make it more easily shapable, do so BEFORE you put it into the pot, and add water using a spray bottle only until the sand has the consistency of brown sugar. Any more, and the sand sticks to everything.
Once the washer is in place, seal the threads with silicone, and thread on the nut that holds the washer in place. Put some silicone on the washer so that it will seal against the bottom of the inner pot, and rest the inner pot on that washer. Then put some sealant around the hole on the inside, add another washer to the bolt, and pinch it down with a nut. Seal the threads and the gap around the nut with silicone, and wipe up any silicone that squishes out around the washer.
(Unfortunately, I don't have a picture of the last step where we tightened down another washer to pinch down the inner pot.)
Variation: inner pot nested an inch lower
In the photos above, I show the pot legs used as spacers positioned upright. You can also position them laying on their sides so that the inner pot sits about an inch lower. (If you do this, be sure to use sand paper or a file to remove the clay burrs from the side edges of the pot feet, or else the inner pot won't sit properly on these spacers. Also, you can use a shorter bolt; I don't know precisely how much shorter, but probably about an inch shorter.) You can see from some of the photos in the other steps that the inner pot's upper lip sits about an inch above the later of decorative rocks. While this affords a little bit more evaporative surface, it also means the inner pot's upper edge is not surrounded by as much thermal mass as it could. Having the inner pot nested a little bit deeper also means you can use a couple of quarts less sand, which will also make the completed zeer pot just a bit lighter.
The next zeer pot I build will be this variation.
Note: Be sure the pot feet are close to the central bolt
I made a couple of mistakes in the pictures which show damp sand in the pot. Firstly, I put too much water in, and the sand started to stick to everything, which was a real hassle. Secondly, the pot feet were too spread out, and I had to move them back toward the central bolt. The reason you must have the pot feet close to the center is that the bottom of the inner pot actually has a raised perimeter. (This slightly raised perimeter can be seen in the photo from the prior step which shows me sanding the burr away from the hole.) If the pot feet end up contacting the raised perimeter, the part of the pot right around the hole won't touch the washer that you matched to the height of the pot feet, and you won't get a good seal around the hole of the inner pot.
Step 3: Sand Down the Inner Pot If Pot Lid Won't Fit
When you buy your inner pot, you should bring your pot lid to find one that fits well. However, please be aware that terra cotta is an imperfect material, and the pots will not likely be perfectly round. Because of this, you should use some sand paper to sand the inner pot's upper lip to make the lid fit.
Try to get the lid to fit as well as you can, and note where it contacts the terra cotta. Mark those areas either with pencil or perhaps with chalk. Use the sand paper to sand away the contacting areas, and keep doing this until the lid fits right. In our case, it took several hours of very careful checking and sanding to get the two zeer pots to fit their lids well.
Wipe up or vacuum up all the terra cotta dust before continuing.
Step 4: Optional, for the Sheet Metal Blackbelts: Add a Thermometer.
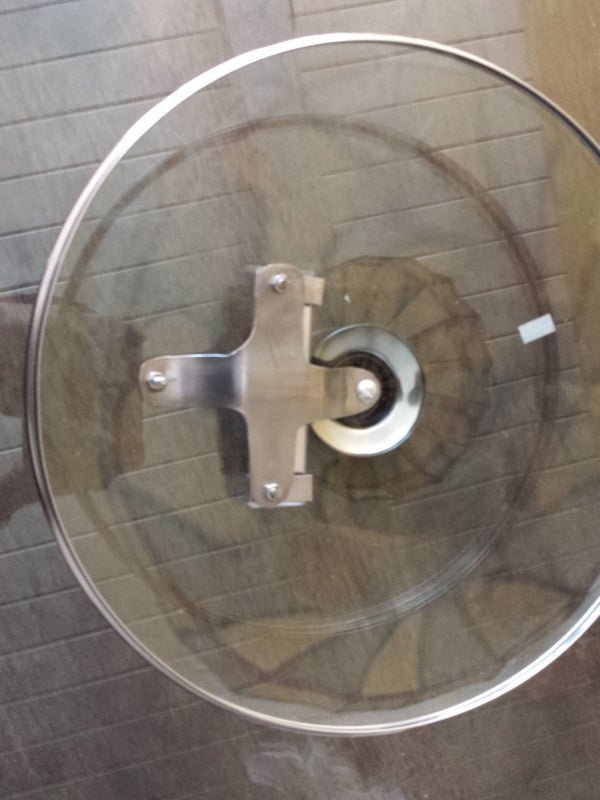
If you really want your zeer pot to have that extra nice touch, get a piece of sheet metal, and cut out a bracket to mount your refrigerator thermometer. You'll need a bot and nut that fits the vent hole of your lid to lock down one end of the bracket; the other end will thread through the same screw that holds the handle onto the pot lid.
With the thermometer mounted on the lid, you can tell the temperature at a glance. Since the warmest air in the zeer pot rises to the top, you'll know that the temperature inside will be cooler than what the thermometer indicates.
Step 5: Fill the Gap With Sand, Add Water, and Top With Decorative Rocks
Firstly, adjust the four pot feet on your rolling platform at this time so that they are evenly distributed. Once the sand is in and the pot is wet, the zeer pot will be very heavy.
Use a funnel to add sand. You will likely end up using all 50 pounds of sand. Add more if needed; we ended up adding a couple of quarts of extra sand you want about 1/2 inch of a gutter going all the way around, which you will fill with decorative rocks after you wet it all down.
Before adding water, let all the sealant on the bolts and washers cure for at least 3 hours, or overnight for best results.
Add water one quart at a time; the sand will settle, and you will probably need to add a bit more sand when the pot is saturated. When the sand is saturated, you can add the decorative rocks, and perhaps a bit more water. The rocks are not just for looks; when you re-wet your pot, the rocks dissipate the water that you're pouring into the gutter so that the stream of water doesn't cut a pit into the sand.
Once the pots have their sand saturated with water, the pot will darken from water wicking through the terra cotta. Put the pot in a breezy area for the initial cool down. A breeze is absolutely necessary; it simply will not cool down enough without it.
A decorative trim is one of those things that sets this zeer pot apart; people are more inclined to use beautiful things. A zeer pot that looks really nice is not going to be something you're embarrassed to use.
Note: if you are using beach sand, wash the sand to remove salt
If you decide to use beach sand to fill your zeer pot, be sure you wash the sand in a couple of changes of water to purge it of salt. Salt will contribute to the mineral build up on the terra cotta that lessens the cooling effectiveness of the zeer pot.
Note: water will likely pool in the inner pot after saturation
Do not be alarmed if some water pools up inside your inner pot during the initial cool-down after you saturate it with water. Use a sponge to soak it up and wring the sponge over the decorative pebbles to return the water to the sand.
If water accumulates inside quickly, you probably have a leak, which is a whole different problem. If your inner pot is cracked, you will need to replace it. If your washers and nuts are not well sealed, you will need to let the whole thing dry out, and re-seal the entire thing, leaving at least a few hours for the sealant to cure.
Step 6: Add a Handle to the Inner Basket
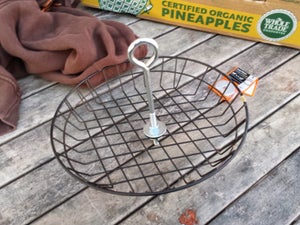
Get your eyelet bolt, and a pair of nuts and washers, and bolt it onto the sandwich basket as close to the middle as you can. The basket should be pinched tight between two washers. This inner basket gives you an extra platform to put stuff on, and is one of those features that makes this zeer pot practical compared to some of the other "first world" hardware store zeer pots you may have seen.
Insert the basket into the zeer pot, and put the lid on. Adjust the eyelet bolt such that it is as high as possible without touching the glass lid. You want the eyelet bolt to be useful as a handle even if the basket is filled with fruit or other items.
Step 7: Root Cellar Variant, and Important Notes About Usage and Limitations of the Zeer Pot
You should moisten the zeer pot with a quart of water three times a day. If you store your water in the zeer pot, or have a dedicated water chilling pot, you will have the best results, since the water you add will be cold already, and won't increase the temperature of the pot.
Root cellar variant
One neat variant for keeping root vegetables and scallions fresh is to build your zeer pot, and to fill the inner pot half way up with damp sand. Then, burry your carrots and beets in the sand to store them. Damp sand will keep your root vegetables as fresh as possible by keeping them alive. You will find that they remain crisp for longer this way. Also, if you have scallions, burry the root parts in damp sand to keep them fresh. This works even better than simply keeping them cold.
Please note:
- The zeer pot will eventually accumulate mineral build-up. Use hot water and a sponge, or perhaps a bit of lemon juice to dissolve away the minerals that crust up on the outside of the zeer pot.
- The zeer pot will not be as cold as a refrigerator; it will be cool, and it will keep your food cool, but it will not chill a hot container of food down to safe temperatures.
- The zeer pot needs a breeze to cool. If you have a good breeze all the time, or perhaps a small fan powered by a solar panel, the pot can get quite cold. Imagine that chill you get when you step out of a pool when the wind is blowing. Now imagine that going on all day. That's what the pot feels with a constant breeze.
- High humidity will result in reduced performance. However, a friend of mine who used a zeer pot in a hot humid part of Africa told me that it still worked "shockingly well", so it might just work. But keep it in the shade, with a breeze.
- Zeer pots actually perform better than refrigerators for many vegetables; vegetables wilt in the refrigerator because the condensation on the cooling tubes dries out the air. Refrigerators blow a lot of air over a little chilling surface that is really cold, causing the air to dry out. In contrast, the air in the zeer pot is chilled over a much larger surface that is only a little bit colder. This minimizes condensation; also, since the surface inside the pot will be moist terra cotta, the air inside will have as much moisture as possible, which keeps vegetables crisp in spite of not being as cold as a refrigerator.
The zeer pot is a greener option only if you use it according to the following rule:
- These things can evaporate a couple gallons of water a day if you have a good breeze, especially if the weather is dry and warm. If you multiply this water consumption by several zeer pots, this can be a considerable water consuming appliance. I don't intend to unleash upon the world a device that wastes water in lieu of using electricity, especially in California, where we are experiencing a drought; I expect that everyone who uses these zeer pots to use a bucket to catch the gallons of water that you would normally waste while waiting for the shower to warm up, and to recover this water for the zeer pot. That way, you're saving electricity without using any additional water. Or, go ultra-sustainable and use captured rain water.
A Practical Zeer Pot (evaporative Cooler / Non-electrical Refrigerator) : 7 Steps (with Pictures) - InstructablesIf you're gonna fight, fight like you're the third monkey on the ramp to Noah's Ark... and brother its starting to rain. Join our efforts to Secure America's Borders and End Illegal Immigration by Joining ALIPAC's E-Mail Alerts network (CLICK HERE)
-
06-26-2025, 02:37 AM #10038

- Home
- Homesteading
- Gardening
- Canning
- Chickens
- Recipes
- Food Storage
- Health
- Emergency Preparedness
- Natural Remedies
The Most Amazing Way To Build A Root Cellar DIY Project
- Home
- DIY Projects
- The Most Amazing Way To Build A Root Cellar DIY Project
Melissa Francis
November 29, 2012
DIY Projects, Food Storage & Skills, Home
fruit, prepping, project, root cellar, storing garden harvest, storing vegetables, vegetables
Roberts Projects blog shares a step by step process of how to build an walk in underground root cellar.
Storing your garden harvest at cooler temperatures will prolong it viability.
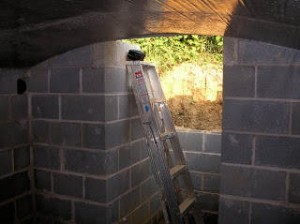
Click here to read and view the tutorial:
http://robertsprojects.blogspot.com/2010/02/root-cellar.html
Robert's Projects
My various projects that may be of interest to others. Dedicated to my brother Stan, Apr 16, 1955- Dec 4, 2010
Monday, February 22, 2010
Root Cellar
We decided that our little farm needed a root cellar to store our produce in. For those unfamiliar with the term, a root cellar is an underground room that acts like a natural refrigerator, maintaining temperatures in the mid 30's F in the winter and mid 50's in the summer.
Step one: Dig a hole in the ground. We are fortunate to have a local gravedigger who is a real artist with a backhoe. He can carve a hole with straight sides almost within an inch of what you ask for.
Step two, pour a concrete footer. Then start laying blocks. About 320 went into this 8 x 8 foot cellar.
Almost finished here. Now, for the fun part, pouring a concrete roof. A simple flat slab wouldn't do, for you want condensation to run off to the sides. So, I created a plywood from with an arched top. The arch would also create a stronger roof. It also created a very strong form.
I built the form in the shop, then dismantled it.
The arches are 1/2 inch plywood pressed into dadoed grooves in the 2x4's. This created an extremely strong structure.
Satisfied with the form I reassembled it on the root cellar walls.
A nice snug fit, supported by 3 vertical 2x4's on each side. (Not shown in the picture are 8 pieces of 1/2" plywood approximately 6" x 23". These were installed after the plywood sheets were added. They are used as extra reinforcing ribs by wedging them between the plywood sheets and the top of the 2x4's.) Next, the plywood, a sheet of plastic and lots of 1/2 rebar. Lots of rebar. Rebar is cheap, so why not? If this were a flat 4 inch slab, the calculated load rating is around 250 pounds/square foot. More then enough. But it is arched, and up to 5 inches thick. Also the rebar extends into the walls a foot, and are cemented in place. Not sure what the load rating is now, but it is certainly more than adequate.
18 half inch rebars on 8 inch centers. Strong enough!
Next, add a perimeter to the form and pour concrete. About 4,000 pounds worth. I expected at least a little deformation of my form, for all that weight was being borne by my 5 arches, but there was none! Impressive.
Not taking any chances, I did not enter the cellar until I was confident the concrete was fully cured.
Removing the form from inside was not difficult, for it was designed for easy disassembly and re-use.
A view of the top before the entrance was completed and the cellar covered with 2 feet of earth. The wood at the rear is covering the ends of the rebar to prevent injury. They will be part of the reinforcement for the entrance-way.
I poured the roof in 3 sections, for that is the most concrete I can handle working alone. The seams are nearly invisible from below, and are waterproof. It was not difficult creating the arch in the top using standard concrete. The radius of the top arch is about 6 inches larger than below.
The arched ceiling is as glossy as a counter top, thanks to the plastic sheet I laid over the plywood.
See light reflecting off ceiling in picture below left.
Below Right: Add stairs and doors at top and bottom, and you have a fine root cellar, ready for lots of fruits and vegetables. Currently we are storing apples, carrots and potatoes, and we are pleased with the results.
One of the two 4 inch vents can be seen in the corner. The other is in the opposite corner.
To save labor and materials, I built the stairway with half of it on a foundation at the floor level, and the other half of the foundation just below the frost line. I felt that digging the entire stairwell to the floor level would have just created a large inaccessible space.
This project took a few months of evenings after work over the summer. It was cooler then, and the mortar did not dry too fast. All concrete and mortar, about 8,000 pounds in all, was either mixed with a small mixer, or by hand.

Here is a drawing of the block layout. In order to center my stairwell, I had to cut some blocks into two pieces, a 12 inch piece, and a 4 inch piece. That is because my interior width is 88 inches. If you make your width 96 inches, you will not have to do this. A wet tile saw cuts through concrete blocks with ease. I have used mine to cut many blocks, including the angled pieces that form the arched tops of the walls. Since the saw can only cut about 1/2 inch deep, you make a cut on each side. The blocks will easily split then by driving a chisel into the cut. Make gentle taps, while moving the chisel along the cut and they will break cleanly. You can see how good the cuts are in the pictures of the walls before the roof was poured.

Here is a picture of a very similar cellar. He used a higher arch, which is something I would do if I had to do it all over again, for condensation does not readily run to the sides of my flatter arch. He was very conservative and used 28 vertical supports. I used only 6. His roof weighed 5,000 pounds wet vs. my 4,000 pounds, therefore his supports were holding only 250 pounds each, while mine were holding 670 pounds. However, his ceiling was much higher than mine, and his 96 inch supports would be more prone to bending under the load than my 65 inch supports. His wood arches are on 16 inch centers, while mine are on 24 inch centers. However, I have a "backbone" made from a 2x4 running along the top, and 2 rows of plywood rectangles fitted in between my wood arches. He tarred his sides, I did not. To tar or not is determined by how wet your ground is. For more info see: http://campfire.theoildrum.com/node/5596
Other topics that I have that may be of interest:
A solar hot water heater. This has performed far beyond my expectations, even in winter. If you can find a used system, like I did, it will pay for itself in only a few years.
Rion Greenhouse. An easy to assemble greenhouse kit that has proven to be durable in high winds and heavy snow. It is now 5 year sold, and has held up well.
Insulating and finishing the interior of a pole barn garage/workshop. How I gave my pole barn a nice insulated interior in a budget.
Posted by Robert at 7:53 PM
Email This
BlogThis!
Share to X
Share to Facebook
Share to Pinterest
Robert's Projects: Root Cellar
If you're gonna fight, fight like you're the third monkey on the ramp to Noah's Ark... and brother its starting to rain. Join our efforts to Secure America's Borders and End Illegal Immigration by Joining ALIPAC's E-Mail Alerts network (CLICK HERE)
-
06-26-2025, 03:21 AM #10039

FacebookYoutubePinterestInstagramX-twitter
More from EHT:
Home » Newest Articles » DIY Build a Freestanding Deck
DIY Build a Freestanding Deck
chad
June 13, 2024
Construction How-To, Decks, Decks, Framing, Outdoor Living
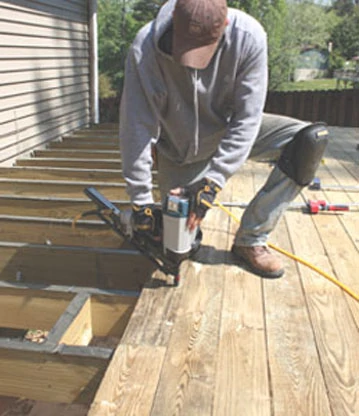
By Matt Weber
Build a Freestanding Cantilevered Deck Supported by Parallel Beams.
Around Alabama, where EHT is headquartered, most decks are connected to the side of a house with a ledger board fastened to the rim joist of the house. When done correctly, this is a strong and code-compliant method of building. But, when flashed or fastened incorrectly, this connection can pose potential problems, such as providing a prime location for water to collect against the house wall and ledger board, ultimately contributing to rot.

As an alternative to the ledger, the deck I recently built is a freestanding structure, basically a giant platform built right next to, but not connected to, the house wall. The house in question had two stories with a finished basement on the bottom level. The finished ceiling of the basement prevented access to the interior side of the rim joist. Unless I was to tear out the ceiling, I wouldnt be able to add nuts and washers to through-bolts on the interior side of the rim joist. And, if I couldnt fasten the ledger with through-bolts, then Id have to use lag screws. Although some heavy-duty lag screws are strong enough to attach ledgers to rim joists, if the wood were to eventually rot, then no matter how strong the lag screws, they could potentially pull out of the rotted wood. So, I figured that by building a freestanding deck, I could avoid these potential hazards altogether.
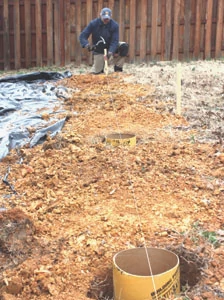
Stakes and string will help keep your deck layout lined up.
Think Big
As with every major construction project, always consult local codes, and if you have any questions, consult a building inspector. I pulled a building permit for this job and in doing so became friendly with my local inspector who was a great help suggesting building techniques and keeping this rather large deck code-compliant.
This freestanding deck surface was 40 feet by nearly 12 feetwere talking about a big platformbut thankfully it wasnt very high, which is a major concern with a freestanding deck. The higher the deck is from the ground, the longer its support posts will need to be and the more likely the deck will be unstable. Thanks to an uphill slope at the rear of the house, the deck surface was only 5 feet high next to the house but closer to 3-1/2 feet on the far end. Building the deck close to the ground helps keeps the wobble out of the completed structure.
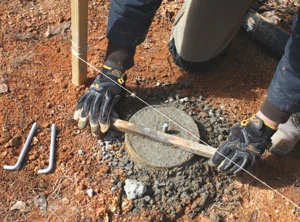
In lieu of the ledger board, I constructed this as a cantilevered deck where the joists were supported by large two parallel beams (also called girders) running parallel to the house wall. The beams were supported by 6-by-6 support posts J-bolted with post-anchor hardware to concrete pier footings.
Whatever you do, dont skimp on materials (i.e. using 4-by-4 posts) when building a freestanding deck. In fact, for this kind of construction its best to over-build the deck. For example, I constructed each beam from 2-by-10 boards laminated together to form a big, brawny 4-by-10. And, although the span ratings for the beam gave me 8 feet of play between posts, I generally kept the posts no greater than 7-1/2 feet apart for extra support. That rule held true for the distance between the two beams as well, with the two rows of support posts spaced about 7-1/2 feet on center from each other. The bigger, beefier and more closely positioned your framing members are, the stronger your deck will be.
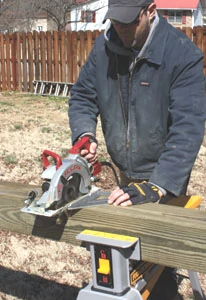
To cut a 6×6 post, I cut each side with a Skil saw and finish the middle with a reciprocating saw.
Support Beams
I started construction of the deck by laying out the area with stakes and string. I then ran two new rows of string within the perimeter, staking the location of each support post. I used a powered auger to dig the 2-foot post holes and slid cardboard footing tubes into the holes to retain the concrete. With the tubes in place, I again pulled some more string over each row of post holes, stretching it tightly and staking it on the far ends of each row. These new string lines placed over the footing tubes provided the straight lines I needed to center each tube in the hole and backfill around them to secure their alignment and position them parallel to the other row. Keep the openings of the tubes about 2 inches above the ground so they shed water.
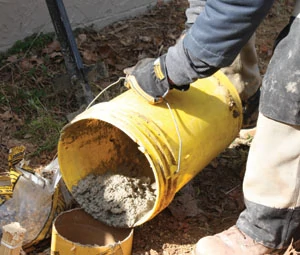
Next, I filled the tubes with a few inches of gravel and fast-setting concrete, struck off the tops flush with the rim of the tubes and inserted 8-inch J-bolts into the center of each pier footing. Dont leave the exposed threads of the J-bolts sticking too proudly out of the footings or they wont fit into the post-anchor hardware and youll have to cut them to size. (Learn from my mistake.)
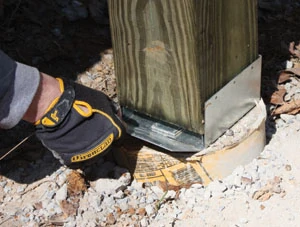
I fastened Simpson post anchors to the J-bolts of the pier footings, which keeps the posts elevated above the ground.
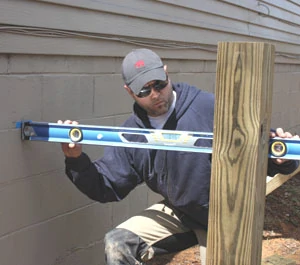
Determine the anticipated height of your deck, then measure downward, subtracting the thickness of the decking and the height of the joists and beam. Transfer this measurement to the posts to determine where to cut them to accept the beam.
I used adjustable galvanized post anchors (Simpson Strong-Ties item AB66) to fasten the post over the J-bolts, which keep the wooden posts elevated so they dont absorb standing water. When setting the posts, run some new string to keep things in line, fastening the posts in the hardware square and plumb, with the post faces lining up flush with the string.

The Post-Pod from Cepco Tool makes a handy brace when setting and cutting posts
Note: Hammering nails through the hardware and into the posts can really knock things out of whack in regard to your footings and J-bolts. For this job I used Paslodes new Positive Placement Metal Connector Nailer, which is a pneumatic nailer with a special guide tip designed to shoot the nails right into the tiny holes of the Simpson hardware without the imprecise impact of a hammer. This new nail gun made building the deck a heck of a lot easier.
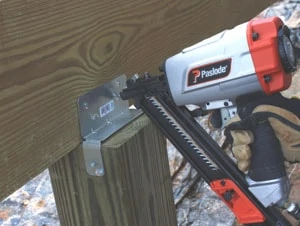
I installed galvanized hardware at the front and rear of the beam when fastening to the posts.
I was installing 4-foot 6-by-6s as posts, but theyre still tall enough to lean, so brace the posts with scrap lumber as you proceed.
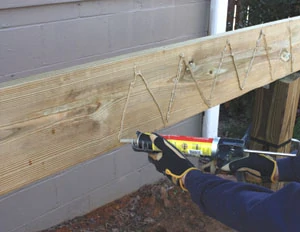
I laminated the beams together using a combination of construction adhesive and RSS screws from GRK Fasteners.
Once the posts of each row were fastened securely, determine where they should be cut to accept the beam. This is a matter of basic math, finding the anticipated height of the deck (in my case, less than an inch below the homes upper-level subfloor) and working downward, subtracting measurements for the thickness of the deck boards, the height of the joists and the height of the beams. I marked the first and last posts of each row at this height and then snapped a chalk line across the other posts to indicate where to cut.
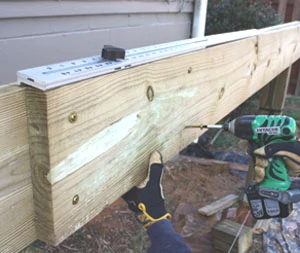
RSS screws from GRK Fasteners help the construction adhesive to hold the beams together.
You have a couple of options when it comes to mounting the beams to the posts. You can cut the posts completely through and use galvanized braces to hold the beams on top. Or, you can notch the posts and fasten the beam with a couple of through-bolts at each post. I opted to use the metal Simpson braces, which you can pick up at Lowes or any number of other hardware storesSimpson has more or less cornered the market on framing hardware, at least down here in the South.
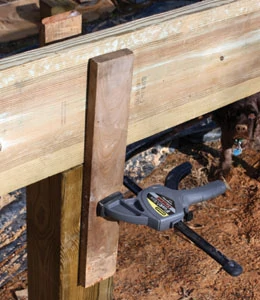
I temporarily clamped on a couple of scrap boards to hold the beam on top of the posts while fastening the connections.
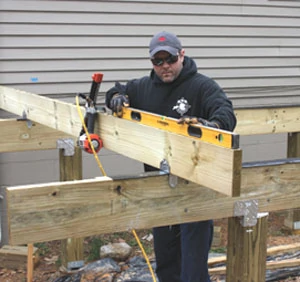
Note: Cutting the posts is a critical phase of construction. Use a string level, a laser level, or a hand level attached to a very straight board to keep an eye on your cutting heights and to make sure everything is level from post to post and beam to beam. Every measurement at this point determines the flatness and level surface of your deck.
Additionally, in some cases it may be advisable to engineer a slight slope to the deck that pitches downward away from the house, especially if your decking material is a seamless system which could collect water. However, I was planning to install 2-by-6 treated lumber as deck boards, which naturally shrink as they dry and create plenty of space for drainage between the joints. So, I built a level deck.
Next, I installed the beams, one 2-by-10 at a time, using some clamps and scrap lumber as makeshift braces to hold the lumber atop the posts while I made the connections. With at least one end of the board fastened to the metal post hardware, I laminated another board against it using some heavy-duty RSS screws from GRK Fasteners along with plenty of construction adhesive sandwiched between them. Again, I may be over-building here, but I wanted this deck virtually bomb-proof. RSS screws are really gnarly fasteners, with many times the holding power of nails or regular screws. Once driven, they arent going to budge. And, if there are any bows or warps in the lumber, the RSS screws are powerful enough to bite the lumber and pull it flush with the mating board. I drove two RSS screws slightly offset every 16 inches along the beams.
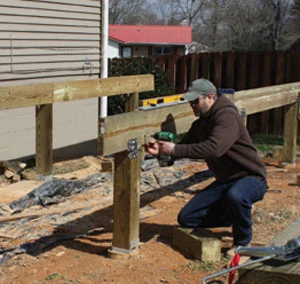
With a 40-foot run for each beam, it was necessary to splice the boards together. When doing this, always locate the splice over a post to eliminate any weak spots in the beams. I also ran the beams a bit long on each end, with plans to cut them to size later.
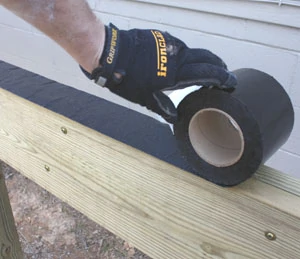
I covered the tops of the beams and joists with joist tape to shed water and prevent rot.
Another extra step I took with both the beams and the joists was to flash the tops of the framing members to shed water. This is a commonly overlooked step, but a great way to prevent accumulation of water which can lead to rot and overall weakening of the construction. Plus, application is so easy that its well worth the extra effort. I used joist tape(butyl tape), which comes in rolls, either 2 or 4 inches wide, which you roll out just like duct tape over the tops of the joists. The product is a self-adhesive asphalt mastic that creates a waterproof membrane and self-seals around screws and nails, blocking a primary pathway for water infiltration into deck joists.
Joist Installation
I was building with 2-by-8 joists running perpendicular to the house wall. Use the 3-4-5 rule or a large framing square to make sure you lay out the first joist square to the house. I then measured and marked the location of the following joists on 16-inch centers across the tops of the two beams.
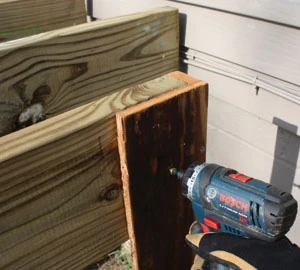
Shown here is the L-shaped jig I screwed to the ends of the joists during installation to serve as a spacer against the siding.
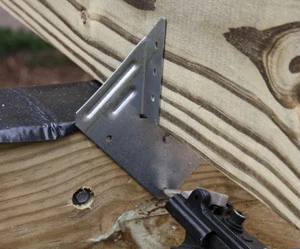
The joists were connected to the beam with Simpson hurricane ties. Paslodes new Positive Placement Metal Connector Nailer has a special guide tip designed to shoot nails right into the tiny holes of the metal hardware, which greatly simplifies installation.
When installing the joists I kept the ends about 3/4-inch away from the house siding to allow plenty of room for drainage and hopefully avoid debris accumulation. To do so I fashioned a simple L-shaped jig from scrap wood that I screwed to the end of each joist during installation. The jig gave me the consistent joist spacing I needed against the house.
These joists were catilevered, meaning they overhung the beams on each side by roughly 2-1/2 feet. Instead of fastening the ends with joist hangers as with the ledger-board method of construction, the joists were connected over each beam with Simpson Hurricane Ties, which keep them upright and stable in all directions. Again, I ran the 12-foot joists wild, snapped a chalk line over the ends after installation was complete, and trimmed them all to a matching length.
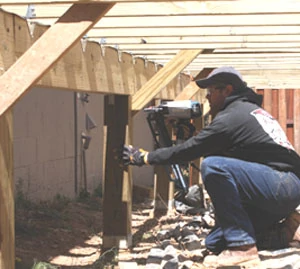
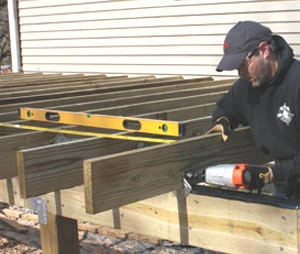
After the joists are installed, add diagonal bracing between the posts and joists to stabilize the deck. Use a recip saw to cut the bracing flush with the tops of the joists.
Rim Shot
I capped the exposed ends of the joists with a 2-by-10 rim board, positioned with its upper edge about 1-1/2 inches above the tops of the joists to conceal the thickness of the nominal 2-by boards I was planning to install as the decking. To fight the tendency of the rim joist to twist, bow or cup, I drove four deck screws through the rim board and into the ends of each joist. (Once the decking was down I would drive a fifth screw through the rim and into the edge of the decking).
I was forced to splice together the rim board as well. Center the splices over a joist, predrill holes for the screws to avoid splitting the wood, and drive the screws into the joist ends at an angle. For a belt-and suspenders approach I also glued the splices in the rim board with construction adhesive.
Note: There are many different ways to build a deck. This design would eventually have similar 2-by-10 boards attached to the sides of the deck as fascia. For this reason, I made sure to leave at least 1-1/2 inch of rim board extending beyond the corners of the deck to conceal the end-grain of the two side-mounted fascia pieces. It always helps to plan ahead.
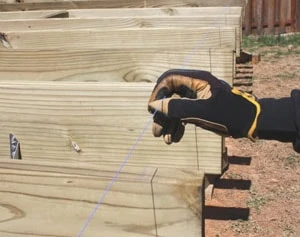
Snap a chalk line across the ends of the joists and cut them to a matching length.
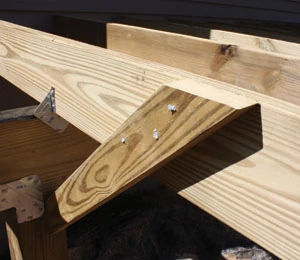
Brace for It
At this point I gave my construction a little tug here and there, and I was happy to see it was fairly stable at this point, but not completely satisfactory. For extra stability I ventured beneath the framing to nail in diagonal 2-by-4 bracing from below. The bracing ran from the support posts to the joists, and I tacked three or four framing nails at each connection to prevent movement.
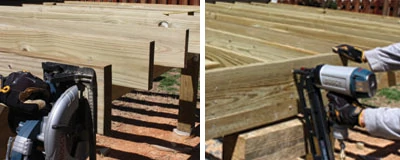
When installing the rim board, use several fasteners per joist to prevent the board from cupping or warping.
Depending on where the posts were located in relation to the joists, I nailed from the side of the posts to the lower edge of the joist, or from the face of the post to the side of the joist. In some cases, the posts fell right between two joists, so I had to add some 2-by-8 blocking between the joists to give the braces a solid place to terminate. It does take some extra work, but youll be glad you invested it. I was amazed by how sturdy the bracing made the deck frame, knocking out practically any wiggleand this was before the decking was installed which would tie everything together into a rigid and steadfast structure.
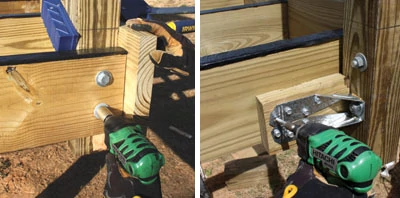
Left: Code requires a minimum of two 1/2″ galvanized through=bolts driven through the full thickness of a 4×4 handrail post (no notching of the posts allowed). Right: For a rock-solid handrail system I included Simpsons Post-to-Deck Framing Bracket. This may require installation of extra blocking, but the added safety is worth the effort and expense.
Guardrail Posts and Decking
Before installing the decking I added the 4-by-4 posts that would eventually support my handrail system. I made a mark on each 4-foot post at 36 inches, the length of the post that would extend above the decking surface. I then clamped the posts in position and used a spade bit to predrill two holes through the rim board (or joist, depending on location of the post) and all the way through the full 4-by-4 thickness at the bottom of the posts. I then drove galvanized 1/2-inch hex-bolts through the posts and tightened securely with nuts and washers.
But thats not all. For a truly rock-solid handrail, Simpson Strong-Tie offers a galvanized Post-to-Deck Framing Bracket that not only fastens to one of the two through-bolts, but also connects flush to an adjacent framing member with galvanized screws. To use these brackets I did have to install additional blocking in the locations where the post didnt happen to fall right at the intersection of the rim board and a joist, but it was worth it. Not that I would encourage my younger family members to swing from the handrails like orangutans, but its bound to happen and these brackets will give me peace of mind.
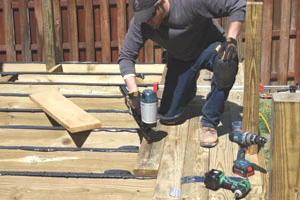
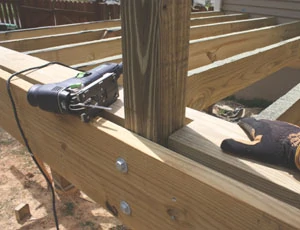
I used a jigsaw to notch the first row of decking to fit around the posts, then completed the walking surface using treated 2×6s as deck boards.
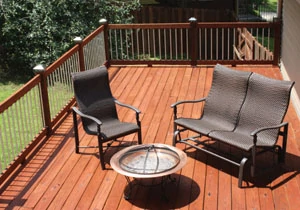
Finally, I was ready to install the treated 2-by-6 deck boards which would be stained and sealed after a month or two of drying time. Once the floor was down, the interconnection of the bracing, decking, framing and hardware worked together to create a war-ready deck platform that would barely budge at alljust what I was looking for with this freestanding deck. Now, to finish up the handrail system and build some stairs for access, which you can read about here: https://extremehowto.com/take-a-wood-deck-rail-to-the-next-level/
Side Note
Treated Wood, Tried and True
Decking comes in all sorts of materials these days, from wood-plastic composites to PVC to aluminum decking. Ive installed some beautiful composite decks as well as easy-to-install PVC decks, all with great success. And Im not taking sides in regard to which material is better or worse, as I think there are advantages to each material, depending on the deck application and the personal taste of the homeowner.
However for this project, I chose Wolmanized Residential Outdoor pressure-treated lumber not only for the framing, but the decking as well. For aesthetic reasons, I wanted the deck to match the natural look of the surrounding wood fence I had built the year before, and I had a plan to use the same tone of wood stain to tie in a uniform color theme to the elements of the backyard. All 2-by-4s (for handrails) and 2-by-6s (for decking) are No. 1 grade southern pine. The 2-by-8s and 2-by-10s, used for joists and beams, are No. 2 grade southern pine. The 4-by-4 and 6-by-6 timbers are specified for ground-contact use, and all the wood was treated with the same preservative, copper azole type C preservative, which is the most common preservative for backyard projects.

When building your next deck, youll definitely need to use treated lumber for the framing, but using treated wood as the decking also has big benefits. It offers a genuine natural appearance, its comfortable underfoot, its strong and durable, economical to purchase and easy to work with. Its also fairly simple to maintain and serves as a renewable, earth-friendly material. To me, these characteristics meant treated lumber was the right choice for this deck. Learn more about using treated lumber for outdoor projects at wolmanizedwood.com.
Facebook
Share on X
Pinterest
DIY Build a Freestanding Cantilevered Deck - Extreme How ToIf you're gonna fight, fight like you're the third monkey on the ramp to Noah's Ark... and brother its starting to rain. Join our efforts to Secure America's Borders and End Illegal Immigration by Joining ALIPAC's E-Mail Alerts network (CLICK HERE)
-
06-26-2025, 03:33 AM #10040

Subscribe
Cherry Jam Recipe
Updated: October 7, 2023
By: Author Tracy R.
Home » Recipes » Cherry Jam Recipe
Cherry jam is classic for a reason. Simple, sweet, and delicious on everything from a toasted muffin to ice cream!

(Tracy R.)
Are you as thrilled about the royal baby news as we are?
As with the royal wedding a couple years back, we just cant seem to hide our excitement for everything William & Kate. So, with cherries in season right now and a reason to celebrate, I decided to head to the kitchen and whip up a jam fit for royalty.
Based on cherries jubilee, the popular dessert made for one of Queen Victorias Jubilee celebrations, this jam also contains sweet cherries, citrus, and cherry brandy. Since some recipes call for currant jam as a thickener, I added in some red currants to help cut some of the sweetness from the cherries and sugar so that the resulting jam isnt too cloying.
Perfect on a biscuit with your afternoon cup of tea!
If raspberries are still in season where you are, we bet youd enjoy Tracys Raspberry Jam Recipe too!
Recommended

Cherry Jam Recipe
Tracy R.
Cherry jam is classic for a reason. Simple, sweet, and delicious on everything from a toasted muffin to ice cream!
Print Recipe
Pin Recipe
Prep Time 15 minutes mins
Cook Time 15 minutes mins
Total Time 30 minutes mins
Servings 80
Calories 47 kcal
Ingredients
1x2x3x
- 3 cups Fresh Cherries red
- 2 cups Red Currants
- 2 tablespoons Lemon Juice
- 1/4 cup Kirsch Brandy
- 1 3/4 ounces Powdered Pectin (one package)
- 4 cups Granulated Sugar
Instructions
- In a large sauce pan, combine the cherries, currants, lemon juice, and kirsch. Crush the fruit and then bring the mixture to a boil.
- Prepare your canning supplies. Bring the temperature of the glass jars up by processing them in hot water for several minutes, and heat a few cups of water in a small saucepan for the lids. Stir in the pectin until dissolved. Bring back to a boil, and then add in the sugar all at once. Boil hard for a minute longer.
- Skim off any foam and ladle the hot jam into the hot jars, leaving 1/4″ headspace. Place the lids and bands on top, screwing on the bands just until fingertip-tight.
- Place the full jars back into the boiling water and process 10 minutes.
- Remove from the water and place the jars on a towel. Let the jars cool. The seals should suck down (youll hear a popping noise as they do).
Nutrition
Calories: 47kcalCarbohydrates: 12gSugar: 11g
Keyword Canning, Cherries, Jams, Preserving, Summer
Posted on Published: July 26, 2013
By Author Tracy R.Tracy's blog, Sugarcrafter, is a baking, canning, and occasional cooking blog that features from-scratch recipes using seasonal and local ingredients. Tracy also has her own side business, Sugarcrafter Sweets, making handcrafted confitures and selling them ...more
Categories Berries, Breakfast + Brunch, Canning + Preserving, Cooking Method, Fruit, Jam + Preserves, Seasonal Recipes, Summer
Home » Recipes » Cherry Jam Recipe
Cherry Jam Recipe - Food FanaticIf you're gonna fight, fight like you're the third monkey on the ramp to Noah's Ark... and brother its starting to rain. Join our efforts to Secure America's Borders and End Illegal Immigration by Joining ALIPAC's E-Mail Alerts network (CLICK HERE)


 226Likes
 LinkBack URL
 About LinkBacks


 Reply With Quote




Is Trump's Third World Immigration Ban A Precursor To The...
11-28-2025, 08:56 PM in illegal immigration News Stories & Reports