

Results 7,811 to 7,820 of 11487
 226Likes
LinkBacks (?)
-
12-26-2016, 11:32 AM
-
09-02-2016, 05:39 PM
-
whole garden made with pallets!! Love it!! | Pallets | Pinterest | Pallets, Pallets Garden and Wooden Pallets
Refback This thread03-06-2016, 11:30 AM -
10-20-2015, 05:29 PM
-
06-12-2015, 08:00 PM
-
02-26-2015, 01:58 PM
-
01-05-2015, 04:13 PM
-
12-19-2014, 10:19 AM
-
EMERGENCY: HUGE FEMA PANDEMIC EXERCISE IN USA IN NOVEMBER, INTERNET SHUT DOWN PART OF EXERCISE | Prepare4Survival
Refback This thread12-03-2014, 10:39 PM -
Off Grid World ? Ugly Duckling Shipping Container Home Built by Artist Is a Beautiful Swan on the Inside
Refback This thread11-25-2014, 03:10 PM -
11-17-2014, 10:59 PM
-
11-13-2014, 11:18 AM
-
11-09-2014, 02:54 PM
-
10-28-2014, 11:38 PM
-
10-26-2014, 05:54 AM
-
10-16-2014, 11:28 AM
-
10-03-2014, 01:25 PM
-
10-02-2014, 09:16 PM
-
09-26-2014, 07:00 PM
-
09-26-2014, 01:56 PM
-
09-19-2014, 04:46 PM
-
09-13-2014, 05:49 AM
-
09-05-2014, 01:52 PM
-
09-01-2014, 09:39 AM
-
08-30-2014, 06:29 PM
-
08-10-2014, 06:29 AM
-
08-04-2014, 05:07 PM
-
07-23-2014, 11:14 AM
-
New Evidence on Expiration Dates | Medical Preparedness | Doom and Bloom (TM) | Doom and Bloom (TM)
Refback This thread07-22-2014, 10:10 AM -
07-18-2014, 08:37 PM
-
07-15-2014, 04:57 PM
-
07-11-2014, 01:40 AM
-
04-22-2014, 11:14 AM
-
04-18-2014, 12:57 PM
-
04-18-2014, 10:10 AM
-
04-14-2014, 12:18 AM
-
04-12-2014, 02:28 AM
-
03-02-2014, 11:43 PM
-
12-24-2013, 11:59 PM
-
12-07-2013, 11:04 PM
-
kitchen | Cob
Refback This thread11-25-2013, 03:24 PM -
10-22-2013, 10:25 PM
-
Apple Pie Braid | Sweets
Refback This thread09-26-2013, 07:58 AM -
09-02-2013, 04:44 PM
-
5 Reasons Why You May have to Bug Out Even Though You Don’t Want to | The Apartment Prepper's Blog
Refback This thread08-23-2013, 03:20 PM -
06-27-2013, 06:30 AM
-
06-23-2013, 08:11 PM
-
06-17-2013, 11:21 PM
-
05-24-2013, 05:06 PM
-
To Eat / BASIC LIST / SUGGESTED ITEMS FOR LONG TERM SURVIVAL - Page 275 - ALIPAC
Refback This thread05-01-2013, 03:49 AM
Thread Information
Users Browsing this Thread
There are currently 1 users browsing this thread. (0 members and 1 guests)
 LinkBack URL
 About LinkBacks
-
07-10-2023, 02:30 PM #7811Senior Member


- Join Date
- Aug 2018
- Posts
- 91,639
The Top Medicinal Herbs for the Garden: How to Grow & Use Healing Plants
Amy S. May 24, 2023 No Commentson The Top Medicinal Herbs for the Garden: How to Grow & Use Healing Plants

In an ideal world, we would each have inherited the ability to conjure a personal list of essential garden herbs, tailored to our particular climate and health concerns. As it is, many of us are re-learning the traditional art of the apothecary garden—a place where beauty, medicine, and bees reign supreme.
My hope is that the information below inspires you, as a jumping board of sorts, to create your own unique dream herb garden. I chose each plant based on its ease of cultivation and medicinal usefulness and versatility. But bear in mind, there are many more herbs out there to choose from!
Thinking of starting a medicinal herb garden? Growing medicinal garden plants allows you to harvest homegrown remedies right outside your door. Here are more than 45 medicinal plants to consider growing in your garden this season.
While many of us grow medicinal plants without even realizing it, some folks grow gardens filled with medicinal herbs they use to stock homegrown apothecaries.
HOW TO CHOOSE PLANTS FOR YOUR MEDICINAL HERB GARDEN
With so many wonderful medicinal plants to choose from, how do you pick what to grow? I’d advise starting with plants you think you’ll actually use. So if you’re a fan of tulsi, chamomile, or lemon balm tea, those are good places to start.
Plants for the home medicinal garden :
Calendula – Gorgeous flowers excellent for many uses
Tulsi – Great for tea, fresh or dried
Chamomile – Great as a tea fresh or dried, wonderful nervine, aid upset stomach, calm upset children
Mint (in pots) – Helps some formulas work a bit better, tastes good in tea, great for drying, great for sun tea infusions
California Poppy – Best tinctured fresh and so easy to grow from seed. A family favorite for tea
Spilanthes – Fabulous antiviral, antibacterial, antimicrobial. Fun for kids to grow and taste. I use it a lot and it’s very easy to grow
Lemon Balm – Great taste and so relaxing. Best to tincture when fresh as opposed to dry, so grow it yourself to be able to do that
American Skullcap – Great nervine which, along with California poppy and lemon balm, is best when tinctured fresh
Sage – So useful for so many things: Hot flashes, seasoning food, make an herbal honey that works great as a cough syrup
Solomon’s Seal – Great for all things musculoskeletal as well as digestion
Yarrow (white) – Good for bruising, stopping bleeding, pain relief, one of my most used with grandkids
Lavender – Great for a lovely tea, massage lotion, add to baked goods, digestion. A favorite for many.
- Medicinal Garden
- With your seeds kit, you’ll also receive a FREE Medicinal Guide that shows you how to turn these 10 plants into tinctures, ointments, salves, poultices, decoctions, infusions, essential oils —all in minute detail so you can follow our guide even if you’ve never made an herbal medicine in your life.
It can be difficult to keep up with harvesting and processing all the medicinal herbs in the garden, so don’t go overboard when you’re first starting out or you’ll likely find it’s too much.
Note which medicinal plants are perennial in your growing zone, or are suited to conditions like part shade. Then also consider which might be especially useful remedies for you to have on hand, like plantain and violet (good herbs for cough, among many other uses).
Or perhaps you’d like to choose some herbs known for stress-relieving properties or herbs for sleep, including lemon balm, chamomile, valerian, and California poppy. Or plan to stock your apothecary with immune-boosting herbs like elderberry and echinacea.
USING MEDICINAL GARDEN HERBS SAFELY
Please note that when using medicinal herbs, you need to research their cautions and contraindications. Many herbs can affect the way prescription medications are absorbed by the body or are not recommended for certain health conditions. Look up this information and discuss any herbs you’re considering with your physician before consuming.
Little research has been done on the safety of medicinal plants during pregnancy, so proceed with caution and check with your doctor before using herbs in pregnancy.
WHERE TO GET PLANTS FOR THE MEDICINAL GARDEN
Many of these plants are perennial herbs, which means they can often be obtained as divisions from other gardeners, though you want to be sure the garden you’re getting it from isn’t one of the unlucky hosts of the dreaded jumping worm, an invasive you want to learn to recognize. Here’s what to know about identifying and dealing with Asian jumping worms.
If you want to avoid the possibility of contaminated soil, you can either grow these plants from seeds, or root them from cuttings. Here’s what to know about propagating plants from cuttings.
High Mowing Seeds, Botanical Interests, and True Leaf Market carry seeds for many of the medicinal herbs listed below. Seeds Now has a medicinal herb garden starter pack worth checking out.
The most expensive, but the quickest and easiest way to get your medicinal herbs, is as plant starts from a nursery. You’re less likely to find the more unusual medicinal plants at your local garden center, though, and you may need to purchase seeds for those.
WHAT TO GROW IN A MEDICINAL HERB GARDEN
Below you’ll find suggestions for some of the more common plants you might consider adding to your medicinal herb garden, as well as many useful wild plants that are often dismissed as weeds. Last, I’ll include a list of some of the less common plants you can add to your medicinal herb garden if you want to expand your homegrown herbal apothecary.
PERENNIAL HERBS TO GROW IN THE MEDICINAL GARDEN
Elderberry
Elderberry is on the shortlist for must-have herbs for the medicinal herb garden if you have the space. An elderberry plant will provide you with not one, but two medicinal (and delicious!) crops, elderberries and elderflowers. Here’s what to know about growing elderberry and elderberry varieties to consider for your growing conditions, including some compact cultivars for smaller-space gardens. If you live in a very cold or very warm climate, be sure to choose an elderberry suited to your growing zone.
Elderberry is best known for its immune-stimulating properties, but it’s also considered useful for arthritis and many other ailments, and as an all-around anti-inflammatory. Elderflower is often used for soothing skin and as a fever reducer, wonderful in elderflower tea or as a tincture.
Here are research-backed recipes for homemade elderberry syrup and elderberry tea. You’ll find loads more delicious recipes for elderflower and elderberry in my book, Everything Elderberry.

Lemon Balm
One of most herbalists’ favorite medicinal plants, lemon balm is delicious and a soothing de-stresser. Wonderful both fresh and dried in tea, lemon balm can also be tinctured.
A tough perennial, lemon balm is easy to grow from plant divisions or cuttings, so you can see if you can get plants free from another gardener. You can also grow it from seed.
Lemon balm can be a bit invasive in warmer climates, so harvest often if you don’t want it seeding the rest of your yard.
Here’s more on uses for lemon balm.
Peppermint
A go-to remedy for headaches and upset tummies, peppermint is also a delicious herb to keep on hand even if you don’t use it medicinally.
A notoriously aggressive plant, peppermint should grow somewhere you don’t mind it spreading. You can also grow it in a container to help keep it in check.
Lavender
The soothing scent of lavender has been studied for its beneficial impact on sleep quality. One especially lovely way to enjoy lavender is to grow your own and dry buds on the stem to keep in a vase by your bedside. They’re also delicious steeped with other sleep-promoting herbs in a relaxing bedtime tea.
Lavender needs full sun and well-draining soil. Lavender may have more concentrated essential oils when grown in poorer soils.
Thyme (Zones 2 to 10)
Besides being a delicious culinary herb, thyme has antimicrobial properties and is often recommended for treating coughs and respiratory infections.
Upright thyme is easier to harvest than creeping thyme, but creeping thyme spreads nicely as a groundcover, helping to reduce the need for mulch in garden beds. Thyme also makes a deliciously scented and beautiful grass alternative if you’re looking to replace some of your lawn.
Here are loads more ground cover herbs to consider. You can grow thyme beneath your taller plants as a living mulch. It’s often recommended as an elderberry companion plant.
Thyme is easy to propagate from divisions or cuttings, and once you have some, you can divide it to expand your thyme patch.
If you live in a cold climate, be sure to find a thyme suited to your growing zone, as not all can survive extremely cold winters.
Echinacea
Echinacea is well known as an herb for supporting immune function and fighting infection, and it’s a wonderfully drought-tolerant, pollinator-friendly plant to include in the medicinal herb garden.
Echinacea purpurea is considered easier to grow, and the whole plant may be used medicinally. Flowers, stems, leaves, and roots may be tinctured for use both internally and externally.
Echinacea prefers full sun but isn’t fussy about soil. A deep-rooted plant, it’s a good choice for areas that get less water.
Rosemary
Rich in antioxidants, rosemary is prized for its beneficial effects on pain and cognition. If your medicinal herb garden grows in zones 7 to 10, you may be able to grow this delicious herb all year round. If you live in a cooler climate, you can pot up your rosemary and grow it indoors, though it can be challenging to keep it happy in the winter.

Rosemary prefers full sun and high humidity and soil with good drainage.
Hyssop
Hyssop teas or syrup are often used to help with coughs, congestion, and fever. The leaves can be applied topically to alleviate pain and bruises.
Hyssop is yet another member of the mint family, but unlike many mints is not an aggressive spreader. Hyssop prefers full sun and makes a beautiful addition to the medicinal herb garden.
Note that anise hyssop (Agastache foeniculum) is a related, but different plant from hyssop (Hyssopus officinalis). Anise hyssop was used in similar ways by Native Americans.
Bee Balm / Bergamot
Bee balm’s other name, bergamot, comes from the plant’s delicious scent, which smells a lot like the fruit bergamot that gives Earl Grey tea its flavor. But these bergamots aren’t related, and many bee balm leaves taste a lot like oregano (not what you want in your tea).
Drying bee balm may improve its flavor for tea, and some people use the flower.
Bee balm has antimicrobial properties and is considered helpful for promoting digestion and alleviating bloating. An antispasmodic, it’s also used for menstrual cramps and coughs. Here’s more on using bee balm from The Herbal Academy.
Yet another member of the mint family, bergamot is also prone to spreading, making it a good candidate for sharing with others (or getting some from a neighbor). It’s relatively easy to pull, though.
Catnip
Most people don’t think of catnip as an herb for humans, but it’s useful for promoting sleep and a natural bug repellent. I put the catnip growing in my garden in my evening tea blend along with my fresh lemon balm, yarrow, and violets.
Catnip is an exceptionally hardy perennial, often one of the earliest herbs to green up in spring. Catnip self-sows readily, so cut the flowers before they seed if you don’t want it popping up in other parts of your yard.
A lot of people confuse catnip with catmint, a lovely garden plant that’s generally not used medicinally. Here’s what to know about catnip vs catmint.
Meadowsweet
High in salicylic acid (the active ingredient in aspirin), meadowsweet is anti-inflammatory, and a go-to for pain relief and digestive issues. In Backyard Medicine, Julie Bruton-Seal and Matthew Seal recommend a tea made with dried meadowsweet before meals for digestive issues or 1-3 cups daily for arthritis and rheumatic pains.
Meadowsweet prefers full sun but can tolerate some shade. A generally unfussy plant, meadowsweet doesn’t need a lot of special treatment and will thrive in average soils with consistent moisture. Meadowsweet clumps may be propagated by division every few years.
ANNUAL HERBS TO GROW IN THE MEDICINAL GARDEN
Chamomile
Chamomile is a go-to for tea that promotes relaxation and sleep. In the aster family, chamomile may bother those with ragweed allergies.
Chamomile’s tiny seeds may take up to three weeks to germinate, so plant them where you’ll remember to water them. Chamomile self-sows readily, so you may find volunteers in other parts of your garden..
German chamomile is generally preferred for herbal uses, though perennial Roman chamomile is also an option.
Tulsi
Tulsi, also known as holy basil, is considered an especially vaulable adaptogenic herb, which means it’s thought to help the body manage stress while providing numerous other benefits.
Tulsi is most commonly consumed as a tea, either on its own or combined with other herbs. Tulsi may can also be used as a spice on salads or cooked dishes.
You can grow tulsi as a perennial if you live in zone 10 or warmer, otherwise we grow tulsi as an annual. You can also bring tulsi indoors for winter.
Calendula
Calendula’s plentiful flowers make it a beautiful addition to the garden as well as a valuable ingredient in soothing homemade skincare.
Calendula flowers are also edible. You can add them to tea, or dry them and add the petals to wintertime cooking, where herbalists recommend them for symptoms of SAD. Here’s more on calendula from the Herbal Academy.
Calendula grows easily in poor soils and will self-seed if you don’t harvest all its plentiful flowers.
California Poppy
Beautiful California poppy is a go-to for those in need of more restful sleep. An antispasmodic and nervine, California poppy can help soothe tension and anxiety. Here’s more on uses for California poppy from the Herbal Academy.
Easily grown from seed, California poppy prefers full sun and can tolerate a wide range of soil conditions.
Borage
Borage’s tasty leaves make a refreshing addition to seltzer or homemade sun tea. It’s a cooling herb that is often used for coughs and fevers, as well as an anti-inflammatory.
Borage is a vigorous self-seeder, so once you plant it, you’ll find it popping up in your yard each season. It can tolerate partial shade and poor soils, and bees love it as well.
Here’s more on growing and using borage.
OTHER HERBS TO CONSIDER PLANTING IN THE MEDICINE GARDEN
There are many more plants to choose from when you’re choosing medicinal herbs, and I will try to add descriptions as I find the time. Here are some other herbs to look into as you expand your medicinal herb garden:
American skullcap
Arnica
Betony
Black cohosh
Comfrey
Elecampane
Feverfew
Garlic
Ginseng
Goldenrod
Goldenseal
Horehound
Marshmallow
Motherwort
Oregon grape
Passionflower
Red raspberry leaf
Sage
Solomon’s seal
Spilanthes
St. John’s Wort
Sweet Woodruff
Valerian
Wild ginger
Wild yam
WILD PLANTS FOR THE MEDICINE GARDEN
In addition to the cultivated plants above, some medicinal herbs are commonly considered weeds, though those in the know use them for all manner of things. Here are some of the valuable medicinal plants you might already have growing in your medicinal herb garden:
Dandelion
Wild violet
Yarrow
Cleavers
Wood Sorrel
Nettle
Chickweed
Jewelweed
Plantain
Lady’s Thumb
Creeping Charlie (aka ground ivy; learn about creeping Charlie look alikes you may also find)
That should give you plenty of herbs to choose from for your medicinal garden. Enjoy experimenting with a few new medicinal plants each season to discover new favorites you can add to your rotation.
Now that you’ve got all these wonderful medicinal herbs growing, learn what you need to know about preserving herbs so you can enjoy them all year round.
Want to learn more about using medicinal plants? Check out these fantastic herbal medicine books or the many fascinating herbal courses offered by The Herbal Academy. Here’s a list of the courses they’re currently enrolling.
What herbs do you like to grow in your medicinal herb garden?
Pin to save this info on what to plant in a medicinal herb garden!

Do you know about the gift of nature to save the life of people from various health problems and make them feel secure by curing significant issues? How to live healthy in this world without having chronic diseases or illness or any other health issues which may hurt you physically and mentally? Due to dense population, people are trying to demolish the forest, garden areas to create shelter, so they forced to destroy the nature’s gift such as natural ingredients, secret medicinal herbs and more which are grown in wild forest, mountains and other places. When you read this review entirely, sure you will get chance to know about secrets medicinal ingredients, herbs and more used by our ancestor to get back the lost health without losing your life. Claude Davis was highlighted all the stuff in the form of the e-bookThe Home Doctor filled with a list of natural ingredients and remedies that you can quickly grow in the backyard or at free space to include it in your routine diet or external usage to get well soon.
Books can be your best pre-collapse investment.
Carnivore’s Bible (is a wellknown meat processor providing custom meat processing services locally andacross the state of Montana and more. Whether your needs are for domestic meator wild game meat processing)
The Lost Book of Remedies PDF ( contains a series of medicinal andherbal recipes to make home made remedies from medicinal plants and herbs.Chromic diseases and maladies can be overcome by taking the remediesoutlined in this book. The writer claims that his grandfather was taughtherbalism and healing whilst in active service during world war twoand that he has treated many soldiers with his home made cures. )
Easy Cellar(Info about building and managing your root cellar, plus printable plans. The book on building and using root cellars – The Complete Root Cellar Book.)
The Lost Ways (Learn the long forgotten secrets that helped our forefathers survive famines,wars,economic crisis and anything else life threw at them)
LOST WAYS 2 ( Wordof the day: Prepare! And do it the old fashion way, like our fore-fathers did it and succeed longbefore us,because what lies ahead of us will require all the help we can get. Watch this video and learn the 3 skills that ensured our ancestors survival in hard times offamine and war.)
The Top Medicinal Herbs for the Garden: How to Grow & Use Healing Plants - PrepperFortress
Last edited by Airbornesapper07; 04-07-2024 at 02:05 AM.
If you're gonna fight, fight like you're the third monkey on the ramp to Noah's Ark... and brother its starting to rain. Join our efforts to Secure America's Borders and End Illegal Immigration by Joining ALIPAC's E-Mail Alerts network (CLICK HERE)
-
07-10-2023, 03:10 PM #7812Senior Member
- Join Date
- Aug 2018
- Posts
- 91,639
Marshmallow – The Most Powerful Plant for a Healthy Digestive System
Amy S. May 18, 2023 No Commentson Marshmallow – The Most Powerful Plant for a Healthy Digestive System
What is marshmallow root?
Marshmallow root (Althaea officinalis) is a perennial herb that’s native to Europe, Western Asia, and Northern Africa. It’s been used as a folk remedy for thousands of years to treat digestive, respiratory, and skin conditions.
Its healing powers are due in part to the mucilage it contains. It’s typically consumed in capsule, tincture, or tea form. It’s also used in skin products and cough syrups.
Keep reading to find out more about the healing potential of this powerful plant.
It may help treat coughs and colds
The high mucilaginous content of marshmallow root may make it a useful remedy for treating coughs and colds.
A small study from 2005 found that an herbal cough syrup containing marshmallow root was effective in relieving coughs due to colds, bronchitis, or respiratory tract diseases with formation of mucus. The active ingredient of the syrup was dry ivy leaf extract. It also contained thyme and aniseed.
Within 12 days, all 62 participants experienced an 86 to 90 percent improvement in symptoms. Further studies are needed to validate these findings.
Marshmallow root appears to act as an enzyme to loosen mucous and inhibit bacteria. Lozenges containing marshmallow root extract help dry coughs and an irritated throat.
How to use: Take 10 milliliters (mL) of marshmallow root cough syrup each day. You can also drink a few cups of bagged marshmallow tea throughout the day.
It may help relieve skin irritation
The anti-inflammatory effect of marshmallow root may also help relieve skin irritation caused by furunculosis, eczema, and dermatitis.
A review from 2013 found that using an ointment containing 20 percent marshmallow root extract reduced skin irritation. Researchers suggested that the herb stimulates certain cells that have anti-inflammatory activity.
When used alone, the extract was slightly less effective than an ointment containing an anti-inflammatory synthetic drug. However, an ointment containing both ingredients had higher anti-inflammatory activity than the ointments containing only one or the other.
More research is needed to confirm and elaborate upon these findings.
How to use: Apply an ointment containing 20 percent marshmallow root extract to the affected area 3 times per day.
How to do a skin patch test: It’s important to do a patch test before using any topical medication. To do this, rub a dime-sized amount on to the inside of your forearm. If you don’t experience any irritation or inflammation within 24 hours, it should be safe to use elsewhere.
It may help with wound healing
Marshmallow root has antibacterial activity that may make it effective in wound healing.
The results of one 2015 animal study Trusted Source suggest that marshmallow root extract has the potential to treat gram-positive bacteria Trusted Source. These bacteria are responsible for over 50 percent of the infections that occur and include the antibiotic-resistant “super bugs.” When applied topically to rat wounds, the extract significantly increased wound healing in comparison to antibiotic controls.
It’s thought to speed up the healing time and reduce inflammation, but further research is needed to confirm these findings.
How to use: Apply a cream or ointment containing marshmallow root extract to the affected area three times per day.
How to do a skin patch test: It’s important to do a patch test before using any topical medication. To do this, rub a dime-sized amount on to the inside of your forearm. If you don’t experience any irritation or inflammation within 24 hours, it should be safe to use elsewhere.
It may promote overall skin health
Marshmallow root may be used to enhance the appearance of skin that has been exposed to ultraviolet (UV) radiation. In other words, anyone who’s ever been out in the sun may benefit from applying topical marshmallow root.
Although laboratory research from 2016 supports the use of marshmallow root extract in UV skin care formulations, researchers need to learn more about the extract’s chemical makeup and practical applications.
How to use: Apply a cream, ointment, or oil containing marshmallow root extract in the morning and evening. You can apply it more often after sun exposure.
How to do a skin patch test: It’s important to do a patch test before using any topical medication. To do this, rub a dime-sized amount on to the inside of your forearm. If you don’t experience any irritation or inflammation within 24 hours, it should be safe to use elsewhere.
It may act as a pain reliever
A study from 2014 cites research that marshmallow root can act as an analgesic to relieve pain. This may make marshmallow root an excellent choice for soothing conditions that cause pain or irritation such as sore throat or an abrasion.
How to use: Take 2–5 mL of liquid marshmallow extract 3 times per day. You can also take the extract at the first sign of any discomfort.
It may work as a diuretic
Marshmallow root also has the potential to act as a diuretic. Diuretics help the body to flush out excess fluid. This helps to cleanse the kidneys and the bladder.
Other research suggests that the extract can support overall urinary health. One 2016 study suggests that the soothing effect of marshmallow can relieve internal irritation and inflammation in the urinary tract. Research from 2015Trusted Source also suggests that its antibacterial effect may be useful in treating urinary tract infections.
How to use: Make fresh marshmallow root tea by adding a cup of boiling water to 2 teaspoons of dried root. You can also buy bagged marshmallow tea. Drink a few cups of tea throughout the day.
It may aid in digestion
Marshmallow root also has the potential to treat a wide range of digestive conditions, including constipation, heartburn, and intestinal colic.
Research from 2011 found that marshmallow flower extract demonstrated potential benefits in treating gastric ulcers in rats. Anti-ulcer activity was noted after taking the extract for one month. More research is needed to expand upon these findings.
How to use: Take 2–5 mL of liquid marshmallow extract 3 times per day. You can also take the extract at the first sign of any discomfort.

It may help repair gut lining
Marshmallow root may help soothe irritation and inflammation in the digestive tract.
An in vitro study from 2010 found that aqueous extracts and polysaccharides from marshmallow root can be used to treat irritated mucous membranes. Research suggests that the mucilage content creates a protective layer of tissue on the lining of the digestive tract. Marshmallow root may also stimulate the cells that support tissue regeneration.
Further research is needed to expand upon these findings.
How to use: Take 2–5 ml of liquid marshmallow extract 3 times per day. You can also take the extract at the first sign of any discomfort.
It may act as an antioxidant
Marshmallow root has antioxidant properties that may help protect the body from damage caused by free radicals.
Research from 2011 found marshmallow root extract to be comparable to standard antioxidants. Although it demonstrated strong total antioxidant activity, further research is needed to elaborate on these findings.
How to use: Take 2–5 mL of liquid marshmallow extract 3 times per day.
It may support heart health
Scientists are investigating the potential of marshmallow flower extract in treating various heart conditions.
A 2011 animal study examined the effects of liquid marshmallow flower extract in treating lipemia, platelet aggregation, and inflammation. These conditions are sometimes linked to cardiovascular disease. Researchers found that taking the flower extract for one month had a positive effect on HDL cholesterol levels, promoting heart health. More research is needed to expand on these findings.
How to use: Take 2–5 mL of liquid marshmallow extract 3 times per day.
Possible side effects and risks
Marshmallow root is generally well tolerated. In some cases, it can cause upset stomach and dizziness. Starting with a low dose and gradually working your way up to a full dose can help reduce your risk of side effects.
Taking marshmallow root with an 8-ounce glass of water can also help reduce your risk of side effects.
You should only take marshmallow root for four weeks at a time. Be sure to take a one-week break before resuming use.
When applied topically, marshmallow root has the potential to cause skin irritation. You should always do a patch test before moving forward with a full application.
Talk to your doctor if you’re taking other medications before starting marshmallow root, as it’s been found to interact with lithium and diabetes drugs. It can also coat the stomach and interfere with absorption of other medications.
Avoid use if you:
are pregnant or breastfeeding
have diabetes
have a scheduled surgery within the next two weeks
The bottom line
Although marshmallow root is generally considered safe to use, you should still talk with your doctor before taking. The herb isn’t meant to replace any doctor-approved treatment plan.
With your doctor’s approval, add an oral or topical dose into your routine. You can reduce your risk for side effects by starting with a small amount and increasing the dosage over time.
If you begin experiencing any unusual side effects, discontinue use and see your doctor.
- Medicinal Garden
- With your seeds kit, you’ll also receive a FREE Medicinal Guide that shows you how to turn these 10 plants into tinctures, ointments, salves, poultices, decoctions, infusions, essential oils —all in minute detail so you can follow our guide even if you’ve never made an herbal medicine in your life.
Books can be your best pre-collapse investment.
Carnivore’s Bible (is a wellknown meat processor providing custom meat processing services locally andacross the state of Montana and more. Whether your needs are for domestic meator wild game meat processing)
The Lost Book of Remedies PDF ( contains a series of medicinal andherbal recipes to make home made remedies from medicinal plants and herbs.Chromic diseases and maladies can be overcome by taking the remediesoutlined in this book. The writer claims that his grandfather was taughtherbalism and healing whilst in active service during world war twoand that he has treated many soldiers with his home made cures. )
Easy Cellar(Info about building and managing your root cellar, plus printable plans. The book on building and using root cellars – The Complete Root Cellar Book.)
The Lost Ways (Learn the long forgotten secrets that helped our forefathers survive famines,wars,economic crisis and anything else life threw at them)
LOST WAYS 2 ( Wordof the day: Prepare! And do it the old fashion way, like our fore-fathers did it and succeed longbefore us,because what lies ahead of us will require all the help we can get. Watch this video and learn the 3 skills that ensured our ancestors survival in hard times offamine and war.)
Marshmallow – The Most Powerful Plant for a Healthy Digestive System - PrepperFortress
Last edited by Airbornesapper07; 07-10-2023 at 03:14 PM.
If you're gonna fight, fight like you're the third monkey on the ramp to Noah's Ark... and brother its starting to rain. Join our efforts to Secure America's Borders and End Illegal Immigration by Joining ALIPAC's E-Mail Alerts network (CLICK HERE)
-
07-10-2023, 03:13 PM #7813Senior Member
- Join Date
- Aug 2018
- Posts
- 91,639
Sea Buckthorn : Anti-oxidant, Anti-inflammatory, Anti-cancer Protects Heart, Brain, Liver, Kidney, Skin
ahjhrfhKL43746DDf May 15, 2023 No Commentson Sea Buckthorn : Anti-oxidant, Anti-inflammatory, Anti-cancer Protects Heart, Brain, Liver, Kidney, Skin
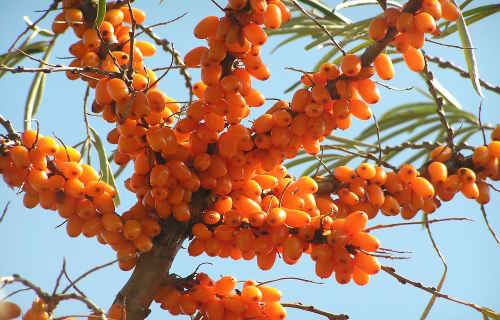
Sea buckthorn contains many important nutrients your body needs daily, like vitamin A, vitamin E, and important unsaturated fats. It is always best to take a food-first approach to obtain all the necessary vitamins, minerals, and other nutrients.
Often, a healthy, well-balanced diet provides plenty of the nutrients in sea buckthorn.
Food Sources of Sea Buckthorn
Sea buckthorn is not widely found in foods sold in stores. You would most likely need to cook or bake your own recipes containing sea buckthorn to ingest it through food.
You may find jellies, jams, sauces, or beverages containing sea buckthorn at specialty grocery stores or online.
Keep in mind that since there is no recommended daily intake for sea buckthorn, it is unnecessary to use it as a supplement or add it to recipes unless otherwise advised.
Sea Buckthorn Supplements
You can find sea buckthorn supplements in various forms, including an oil or cream, a capsule, or a capsule combined with other herbal remedies. It is unknown which form of sea buckthorn is best or most beneficial, as research is still limited.
Sea buckthorn supplements are available online and in some natural-food stores. You can also find skin-care products containing sea buckthorn in many specialty beauty shops.
When choosing a sea buckthorn supplement, the label will include vital information, including the amount of active ingredients per serving as well as any other ingredients that have been added.
Since the U.S. government does not regulate supplements, it is best to look for a third-party seal of approval on the supplement label. Independent organizations, like U.S. Pharmacopeia (USP), ConsumerLab.com, and NSF International, help verify the product.
These groups will ensure that supplements:
Were manufactured correctly
Contain the ingredients listed on the label
Do not have harmful levels of contaminants
Remember, a seal of approval from one of these organizations does not guarantee the products safety or effectiveness.
Given the lack of supporting research, it is too soon to recommend sea buckthorn for any health condition. Its important to note that self-treating a condition with sea buckthorn and avoiding or delaying standard care may have serious health consequences.
The Home Doctor
Do you know about the gift of nature to save the life of people from various health problems and make them feel secure by curing significant issues? How to live healthy in this world without having chronic diseases or illness or any other health issues which may hurt you physically and mentally? Due to dense population, people are trying to demolish the forest, garden areas to create shelter, so they forced to destroy the natures gift such as natural ingredients, secret medicinal herbs and more which are grown in wild forest, mountains and other places. When you read this review entirely, sure you will get chance to know about secrets medicinal ingredients, herbs and more used by our ancestor to get back the lost health without losing your life. Claude Davis was highlighted all the stuff in the form of the e-bookThe Home Doctor filled with a list of natural ingredients and remedies that you can quickly grow in the backyard or at free space to include it in your routine diet or external usage to get well soon.
Recap
Supplements are unregulated, so be sure to read labels and look for a third-party seal of approval to help ensure the supplement has been vetted and approved.
Eczema
Older studies suggest oral sea buckthorn supplements may help treat atopic dermatitis (eczema). For example, one 1999 study tested sea buckthorn pulp oil on 49 people with atopic dermatitis. Researchers observed significant improvement in eczema symptoms among those who took sea buckthorn supplements every day for four months.
However, other recent research suggests that supplements like sea buckthorn provide no benefit.
Wound Healing
Some nonhuman animal-based studies have suggested that sea buckthorn may promote wound healing when applied topically. For example, in a 2009 study, scientists found that topically applied sea buckthorn seed oil helped speed up the healing of burn wounds in rats.
However, its important to mention that this study was not performed on humans. More human research using sea buckthorn would need to be done to make further conclusions about its effectiveness for wound healing in humans.
Blood Sugar
A 2021 human trial in China found that consuming a puree of sea buckthorn fruit for five weeks resulted in a slight decrease in fasting blood sugar.5 However, the study was smallincluding only 38 people. The participants had impaired glucose regulation (IGR), or pre-diabetes.
Another small study of 18 males (sex assigned at birth) suggested that sea buckthorn berries decreased and delayed the insulin response after eating.
The antioxidant components of sea buckthorn are thought to be responsible for its potential blood sugar-lowering effects.7 Overall, the research in this area has been limited, and more comprehensive studies are needed.
Skin Care and Cosmetics
A 2017 review reported various skin uses of sea buckthorn. According to the review, topical sea buckthorn may be helpful in the following ways:
Moisturizing the skin
Easing irritation
Treating acne
Healing aging-related damage
The review notes that the antioxidants and fatty acids in sea buckthorn are helpful tools in skin care. The antioxidants are thought to remove free radicals and, thus, reduce the appearance of aging, while the fatty acids are said to add moisture to the skin.
Other Potential Uses
In addition to the above, studies have also looked at sea buckthorns use in:
High blood pressure
High cholesterol
Inflammation
Cancer
According to a short review, sea buckthorns antioxidant and anti-inflammatory components are thought to have anti-cancer properties.
However, the review points out that the research thus far has been done on animals or in vitro (in a glass); this means human trials are needed before potential anti-cancer effects of sea buckthorn in humans can be confirmed.
Recent animal studies have demonstrate remarkable beneficial benefits of Sea buckthorn oil made from the plants berries and seeds. Use of Sea Buckthorn is by no means new. Its medicinal use was noted in ancient Tibetan healing texts since the Tang Dynasty (617907) and has been called the Holy Fruit of the Himalayas. Its use has been recorded in early Ayurvedic medicine.
Sea Buckthorn berries, together with the juices, jams, and oils made from them, have a range of beneficial antioxidant, anti-inflammatory, and anticancer effects .
Sea Buckthorne oil has been shown to stimulate the immune system, improve kidney and liver function . In cancer patients it kills cancer cell as well as slow their reproduction.
Sea Buckthorne oil has been shown to lower LDL (bad) cholesterol and increase HDL (good) cholesterol. It protects the cardiovascular as well as the cerebrovascular systems .
When used topically, Sea Buckthorne oil is a great natural cleanser and exfoliater. It can also help heal burns, cuts, wounds, sunburn, rashes, and other types of skin damage. Sea-buckthorn oil improves blood circulation, facilitates oxygenation of the skin, removes excess toxins from the body and easily penetrates through the skin . Sea-buckthorn oil protects against infections, prevents allergies, eliminates inflammation and inhibits the aging process in skin .
Sea Buckthorne oil is an excellent source of two important unsaturated fatty acids palmitoleic acid (omega-7) and gamma-linolenic acid (omega-6) as well as vitamins A and E and phytosterols, especially beta-sitosterol .
The optimal dosage for Sea Buckthorn oil is to yet to be determined through human studies. A guideline is to look for a supplement made from both pulp and seed. Take enough to get about about 300-400 mg of palmitoleic (Omega 7) per day.
Various parts of sea buckthorn [Elaeagnus rhamnoides (L.) A. Nelson], particularly the berries, known also as seaberries, or Siberian pineapples, are characterized by a unique composition of bioactive compounds: phenolic compounds, vitamins (especially vitamin C), unsaturated fatty acids, and phytosterols such as beta-sitosterol. These berries, together with the juices, jams, and oils made from them, have a range of beneficial antioxidant, anti-inflammatory, and anticancer effects. This short review discusses whether sea buckthorn may represent a golden mean for the treatment of cancers: It has anti-proliferation properties and can induce apoptosis and stimulate the immune system, and sea buckthorn oil counteracts many side effects of chemotherapy by restoring kidney and liver function, increasing appetite, and keeping patients in general good health. Although the anticancer activity of sea buckthorn has been confirmed by many in vitro and animal in vivo studies, the treatment and prophylactic doses for humans are unknown. Therefore, greater attention should be paid to the development of well-controlled and high-quality clinical experiments in this area.

Books can be your best pre-collapse investment.
Carnivores Bible (is a wellknown meat processor providing custom meat processing services locally andacross the state of Montana and more. Whether your needs are for domestic meator wild game meat processing)
The Lost Book of Remedies PDF ( contains a series of medicinal andherbal recipes to make home made remedies from medicinal plants and herbs.Chromic diseases and maladies can be overcome by taking the remediesoutlined in this book. The writer claims that his grandfather was taughtherbalism and healing whilst in active service during world war twoand that he has treated many soldiers with his home made cures. )
Easy Cellar(Info about building and managing your root cellar, plus printable plans. The book on building and using root cellars The Complete Root Cellar Book.)
The Lost Ways (Learn the long forgotten secrets that helped our forefathers survive famines,wars,economic crisis and anything else life threw at them)
LOST WAYS 2 ( Wordof the day: Prepare! And do it the old fashion way, like our fore-fathers did it and succeed longbefore us,because what lies ahead of us will require all the help we can get. Watch this video and learn the 3 skills that ensured our ancestors survival in hard times offamine and war.)
Sea Buckthorn : Anti-oxidant, Anti-inflammatory, Anti-cancer - Protects Heart, Brain, Liver, Kidney, Skin - PrepperFortress
If you're gonna fight, fight like you're the third monkey on the ramp to Noah's Ark... and brother its starting to rain. Join our efforts to Secure America's Borders and End Illegal Immigration by Joining ALIPAC's E-Mail Alerts network (CLICK HERE)
-
07-10-2023, 03:17 PM #7814Senior Member
- Join Date
- Aug 2018
- Posts
- 91,639
HOW TO MAKE PROBIOTIC GINGER BEER A Naturally Fermented Probiotic Drink That is Packed With Health Benefits
Amy S. May 12, 2023 No Commentson HOW TO MAKE PROBIOTIC GINGER BEER A Naturally Fermented Probiotic Drink That is Packed With Health Benefits

How to Make Probiotic Ginger Beer a naturally fermented probiotic drink that is packed with health benefits.
This article includes a photo tutorial, information on secondary fermentation, flavoring your ginger beer, and troubleshooting when the process goes awry.

Disclaimer: brewing probiotic beverages at home can be risky. When fermenting probiotc foods and beverages, use caution. Always use sanitized tools and when in doubt, throw it out! If you notice any strange smells or mold, be sure to discard the whole batch.
Many moons ago, I wrote a cookbook called Self Sufficient Backyard. This cookbook is focused entirely on making probiotic-rich beverages such as kombucha, kefir, ginger beer, fermented vegetable juice, and more, at home.
My favorite of all the fermented beverages to make is ginger beer. First and foremost, it is magnificent tasting.
Secondly, it is CHALLENGING.
Perhaps the most challenging and unforgiving of all the fermented drinks.
And for that reason, the most rewarding.
For those of you who have been around this site for a long time, you may remember my easy tutorial on How to Make Ginger Beer.
This is the goof-proof method that works each and every time and does not require much time or attention.
This version of probiotic ginger beer is different. It involves preparing a ginger bug (or ginger starter) from scratch.

How does that work?
Probiotics and yeast are naturally occurring everywhere. They are in our fruit and vegetables and are also present in the air. Giving these probiotics and yeast optimal conditions to grow and reproduce results in fermentation.
Youre already familiar with this concept, as it is the same process for creating yogurt, cheese, beer, wine, pickles, prosciutto (and other fermented meats), etc.
Applying this idea to fresh ginger is how we create a ginger starter, which is then used to make ginger beer.
Dont worry Ill go over how to make a ginger starter in excruciating detail later on in this post. First, lets cover some basics.
WHAT IS GINGER BEER?
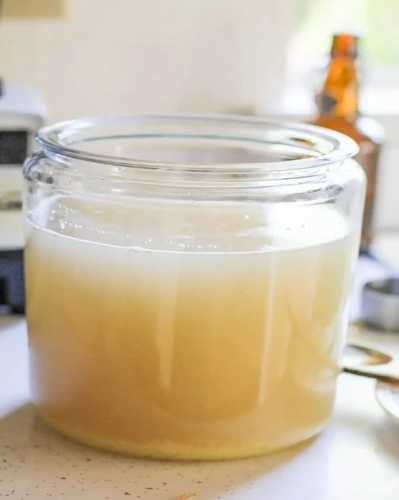
Ginger beer is a naturally fizzy beverage with a sweet and spicy bite. Grated ginger is fermented in sugar water and lemon juice, allowing the natural yeasts in ginger to feed and multiply, creating a probiotic beverage.
While ginger beer is a sweet, spicy, delicious beverage all on its own, it is famous for its role in cocktails, particularly the Dark & Stormy cocktail, a mixture of ginger beer and rum, garnished with a slice of lime.
WHAT IS THE DIFFERENCE BETWEEN GINGER BEER AND GINGER ALE?
The phrases, ginger beer and ginger ale are typically used interchangeably, but there is a difference between the two beverages. Ginger beer is fermented for up to 2 or 3 weeks using a ginger bug, where ginger ale is more of a ginger flavored soda.
While there are ginger ale beverages made with real ginger, most ginger ales are simply carbonated water with ginger flavor and sugar. In this sense, ginger ale does not go through the same fermentation process that ginger beer does.
METHODS FOR MAKING GINGER BEER
There are multiple ways to make ginger beer. Here are three of the most common methods:
- Non-probiotic ginger soda/ale: For those who arent concerned about the probiotic benefit of fermented ginger beer, you can simply combine ginger simple syrup (made with ginger and sugar) with soda water and achieve a great-tasting homemade beverage. This version contains no probiotics and is basically fancy soda.
- Quick and Easy Ginger Beer with some probiotic benefits: This fast method uses bread yeast for fermentation and requires only two days to complete. For this version, read my blog post on How to Make Ginger Beer. This version is not as probiotic rich, but is still lower in sugar than regular soda.
- Authentic Probiotic Ginger Beer a health elixir: The authentic method for making fermented ginger beer is outlined in this post. It uses a probiotic-rich ginger bug (or ginger starter) which you make yourself at home. Like most things in life, the authentic version takes much longer than the easy version, but also yields great results. This version can take between 2 and 3 weeks to complete.
HEALTH BENEFITS OF GINGER BEER
Fermented ginger beer has a great deal of health benefits and is commonly used to ease upset stomach, nausea or diarrhea.
Ginger is an anti-inflammatory, which can help with migraines, and studies show fresh ginger prevents and fights several types of cancer cells including breast, colon, ovarian, prostate, and lung cancer.
Ginger is also known for cleansing the body of toxic chemicals, easing menstrual cramps, and much more!
The probiotics and yeast that grow during the fermentation process help colonize your gut with good bacteria, which helps boost immunity, fight disease, and promotes overall health.

HOW TO MAKE FERMENTED PROBIOTIC GINGER BEER
Fermented probiotic ginger beer requires a three-step process.
Step 1: Make a ginger bug or starter using fresh ginger, water, sugar and lemon juice. This starter is used to brew a batch of ginger beer (Step 2). This can take 1 to 2 weeks to complete (depending on the temperature of your home and how active your culture decides to be).
Step 2: Brew a large batch of ginger beer using the ginger bug you could compare this process to making a batch of sourdough bread dough using sourdough starter. This process takes about 1 to 3 weeks, depending on how active your ginger bug is and how warm your home is.
Step 3: Bottle the ginger beer and allow it to ferment further Once the beverage becomes effervescent (fizzy/probiotic-rich) we bottle it and allow it to sit for secondary fermentation (more on this below). This process takes about 2 to 5 days.
You Will Need:
- 1-quart glass jar or jug
- Cheesecloth
- Stretchy rubber band
- 1-gallon glass jug
- Flip-Cap Bottles
- Fresh ginger
- Organic Cane Sugar
- 2 to 4 Lemons
Ingredients for the Ginger Bug:
- 1-inch nub fresh ginger, peeled and grated, plus more for feeding the starter
- 1 tablespoon raw organic sugar, plus more for growing the starter
- 2 cups water
Instructions for the Ginger Bug / Ginger Starter:
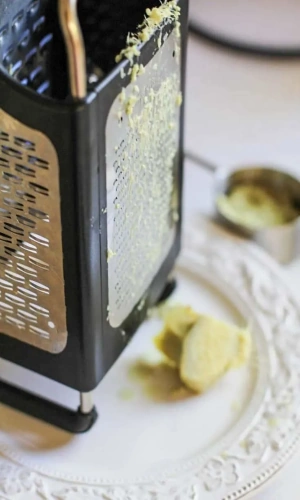
Peel and grate a 1-inch nub of fresh ginger (about 1 tablespoon).
Add the grated ginger, 1 tablespoon of sugar, and two cups of filtered water or spring water (non-chlorinated) to the jar and stir (a 1-quart jar works great).
Cover the jar with a cheesecloth or towel. Secure the cloth around the jar with a rubber band. This keeps insects away from the starter.
Allow jar to sit in a warm, dark place for 24 hours. The optimal temperature for preparing the ginger starter and brewing ginger beer is between 70 and 85 degrees.
If your house stays cool, find the warmest spot in your home to place the ginger starter. This process activates the probiotics and yeast that are in the ginger and allows them to begin reproducing.

Feed the colony Once a day for one week, add one teaspoon of sugar and one teaspoon of grated fresh ginger to the jar and stir well.
This ensures your ginger starter stays fed and grows, similar to sourdough starter. Stir a couple of times per day.
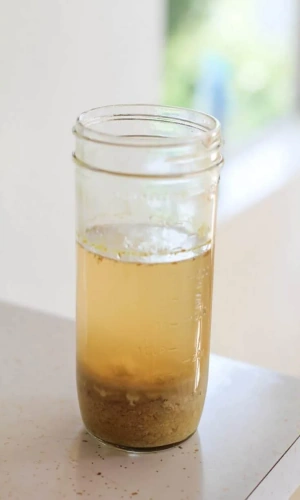
During this process, natural yeasts are released and create a white substance at the bottom of the jar. This is where the probiotics come from.
After about 3 to 5 days (perhaps longer if your house is very cold), the liquid will begin bubbling when you stir it. Once you can see and hear bubbles without touching the jar, your ginger bug is ready to be used. This will usually take 7 to 10 days in a warm (70 to 80 degrees F) house, but longer in a cool house.
To expedite the process, wrap the ginger starter jar in a heat blanket or an insulated blanket to keep it warm. If after 7 days, your ginger bug is still not bubbling, continue adding a teaspoon of sugar and ginger until it does. Have patience, friend!
In some cases, folks have gotten bubbles within only a few days of beginning their starter. While this is unusual, it is a sign the starter is ready! As soon as you see the bubbles rushing from the bottom to the top, youre ready to go.
Use the liquid from ginger starter to make ginger beer (instructions below).
You can continue adding water, ginger, and sugar to the starter and to use it for multiple batches of ginger beer. In this sense, you can treat your ginger starter the same way one would treat sourdough starter and keep it alive.
Note: If you ever see mold floating on top of the starter liquid, discard the starter and make a new one.
Ingredients for the Ginger Beer:
- 1 cup ginger starter (see above)
- 1 scant gallon of filtered spring or well water
- 1 1/4 cups organic cane sugar
- 1/2 cup fresh lemon juice
- 1/3 cup fresh ginger, grated
Instructions for 1 Gallon of Probiotic Ginger Beer:
Fill a gallon-sized jug most of the way up with spring or well water (do not use water from the tap unless your house runs on a well). This water should be room temperature or slightly warmer (aim for 70 to 80 degrees).
Add one cup the the ginger starter, along with 1 1/4 cups of sugar, 1/2 cup of lemon juice, and 1/3 cup of grated ginger. Stir very well.
Cover the jug with a cheesecloth or towel bound by a rubber band and put it in a warm, dark place at room temperature for 8 to 10 days. Mine takes 8 days, even in a very warm (80⁰F +) house.
Taste-test the mixture periodically to see if more sugar needs to be added (the natural probiotics will eat the sugar so if the beverage ever loses all of its sweetness, add a little more sugar (no more than 2 tablespoons at a time), but be careful to not overload the probiotics, as they can die when given too much sugar.
Stir the mixture once or twice a day. You will notice a white substance forming around the ginger at the bottom of the jug.
This is the natural yeasts coming out of the ginger its a good sign! There will also be large bubbles that form on the surface of the liquid.
The ginger beer is ready when the substance becomes bubbly when stirred (similar to when youre making the ginger starter).
Once the ginger beer is ready, give it a taste test. If it doesnt taste sweet, add additional sugar and ginger because once you bottle the brew, it goes through secondary fermentation and the probiotics continue to need to eat sugar.
At this point, your options are to either bottle the ginger beer as-is or flavor it prior to bottling it. See information on Secondary Fermentation and flavoring options below.
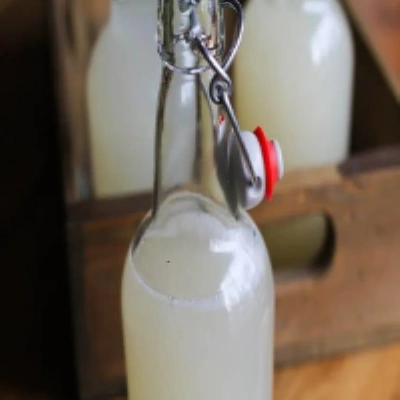
Pour the liquid (including the ginger pulp) into sealable bottles and set them in a dark room for 2 to 4 days. This process makes the ginger beer very fizzy.
The warmer the room, the faster the beverage gets fizzy, so open a bottle every day or so to check the fizz and level of sweetness.
Both the fizz and sweetness is up to your taste but be very careful to not allow the bottles to sit for too long because they most definitely will explode.
Place bottles in the refrigerator to calm the fermentation process. Note that the ginger beer will continue to ferment in the refrigerator, so try to consume the beverage within a few days after secondary fermentation is complete for best results.
Leaving it in the refrigerator for longer than a week will result in a drier, less sweet ginger beer.
You can now brew another batch of ginger beer using the ginger starter you have been feeding. Because your ginger starter is now more mature, it will take a little less time to brew your second batch.

SECONDARY FERMENTATION
Once ginger beer is finished with its primary fermentation, you may add additional sugar and/or ingredients (see Flavoring Ginger Beer section below) to flavor it and allow it to go through a secondary fermentation.
The purpose of secondary fermentation is threefold: To achieve a fizzy beverage (it will get just as fizzy, if not fizzier than soda!), to make the drink even more probiotic-rich, and to give it delicious flavor.
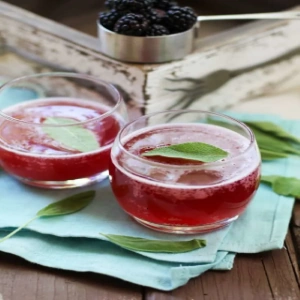
FLAVORING GINGER BEER
Ginger beer is perhaps the easiest probiotic drinks to flavor because just about any type of fruit and/or herb goes wonderfully with ginger.
The fact that there is already a great deal of sweet and spicy flavor in ginger beer provides a wonderful canvas for incorporating other sweet, sour, tart or creamy flavors.
In this way, the added ingredients are typically what one tastes first when drinking the ginger beer, with the spicy ginger coming through at the finish.
You have a few options for adding ingredients for secondary fermentation. You can add fresh fruit juice, a homemade simple syrup infused with any flavor you like, or a fruit/herb sauce (similar concept to simple syrup).
If youre adding fruit juice, simply add 1/4 cup to each glass bottle before filling them the rest of the way up with ginger beer. Secure the lids tightly and allow them to sit for 2 days. Immediately transfer to the refrigerator to slow the fermentation process.
Getting creative with fruit and herb combinations is brilliant when it comes to this drink and you are virtually guaranteed to end up with a delicious probiotic drink!
To make flavor ginger beer, choose your fresh fruit and/or fresh herbs. Combine 2 cups of fresh fruit with ½ cup cane sugar and 1/3 cup water in a saucepan (Note: if youre adding fresh herbs, do so here as well). Bring to a full boil and cook until the fruit has softened. Allow mixture to cool completely. Once cool, divide it between the bottles you are using to bottle the ginger beer.
Fill the bottles the rest of the way up with ginger beer, seal tightly, and allow bottles to sit at room temperature for 2 days to undergo secondary fermentation. Transfer the bottles of ginger beer to the refrigerator and chill.

Here are some of my favorite flavor combinations for ginger beer:
- Blackberry Sage (2 cups blackberries, 1/2 cup sugar, 1/3 cup fresh sage, packed)
- Grapefruit Rosemary (1 cup fresh grapefruit juice, 2/3 cup sugar, 3 sprigs rosemary)
- Coconut Basil (1 can full-fat coconut milk, 1/2 cup sugar, 1/2 cup fresh basil, packed)
- Blood Orange (1 cup fresh blood orange juice, 1/2 cup sugar)
- Raspberry Mint (2 cups fresh raspberries, 1/2 cup sugar, 1/2 cup fresh mint)
SHELF LIFE OF GINGER BEER
When properly sealed in bottles, plain ginger beer can last for up to one month in the refrigerator. For best results, drink within 2 weeks of brewing.
When ingredients such as fruit, are added to ginger beer, consume within 1 week for best results and keep in the refrigerator for up to 2 weeks. While ginger beer can last even longer than this, it is best to err on the safe side when it comes to probiotics.
A NOTE OF CAUTION
As is always the case with probiotic beverage, be cautious when opening a bottle after secondary fermentation as pressure builds and the drink will be fizzy. Never point a bottle at your face (or at any other person) while opening, and never hand a bottle to a child to open.
TROUBLESHOOTING
If it seems like either your ginger starter or ginger beer is taking a long time to come to life (get bubbly), dont worry. This is likely the result of the temperature of your home, and it may just take some extra time.
As mentioned previously, if you want to expedite the process, wrap the jar in a heating pad and set it to a low temperature to keep the starter warm.
On the flipside, in rare cases, a ginger starter may be ready after only a few days. As long as bubbles are flowing from the bottom to the top, that is a sign the starter is rich in probiotics and is ready to be put to use.
Like many probiotic beverages, ginger beer is one of those that seems to be doing nothing for quite some time and then all of a sudden, its working.
At the end of secondary fermentation, if your ginger beer too dry (not sweet and very fizzy), this is because the yeast consumed all of the sugar that was in the bottle, leaving very little sweetness for you.
Some people prefer drier ginger beer, but if you prefer it to be on the sweet side, simply make sure you add additional sugar (either cane sugar, fruit, or juice) prior to bottling your next batch.
Did you pop open a bottle of ginger beer after 3 days of secondary fermentation and it wasnt fizzy and it still tasted sweet? If this is the case, your ginger beer still contains residual sugar that needs to get eaten up by the probiotics. This is okay!
Simply leave the remaining bottles (if any) at room temperature to continue secondary fermentation. Because there was plenty of sugar in the beverage prior to bottling, it will simply take an additional day or two for the probiotics to consume the sugar and for the beverage to become fizzy.
How to Prevent Flat Ginger Beer:
To prevent flat ginger beer, be sure there are small bubbles that rise from the bottom to the top of the liquid prior to bottling it for secondary fermentation, as this is a sign of probiotic activity. Keep in mind that even if your ginger beer does not get fizzy, it is still full of probiotics and is great for you!
Wondering if Your Batch is Bad?
If at any point you find mold on the surface of your ginger beer while it is brewing, throw the whole batch out, even if it is only a tiny bit of mold. Ginger beer is easy to re-make (especially since you already have your ginger starter ready to go), and it is not worth sacrificing quality and health even if it is frustrating to have a failed batch.
Books can be your best pre-collapse investment.
Carnivores Bible (is a wellknown meat processor providing custom meat processing services locally andacross the state of Montana and more. Whether your needs are for domestic meator wild game meat processing)
The Lost Book of Remedies PDF ( contains a series of medicinal andherbal recipes to make home made remedies from medicinal plants and herbs.Chromic diseases and maladies can be overcome by taking the remediesoutlined in this book. The writer claims that his grandfather was taughtherbalism and healing whilst in active service during world war twoand that he has treated many soldiers with his home made cures. )
Easy Cellar(Info about building and managing your root cellar, plus printable plans. The book on building and using root cellars The Complete Root Cellar Book.)
The Lost Ways (Learn the long forgotten secrets that helped our forefathers survive famines,wars,economic crisis and anything else life threw at them)
LOST WAYS 2 ( Wordof the day: Prepare! And do it the old fashion way, like our fore-fathers did it and succeed longbefore us,because what lies ahead of us will require all the help we can get. Watch this video and learn the 3 skills that ensured our ancestors survival in hard times offamine and war.)
HOW TO MAKE PROBIOTIC GINGER BEER - A Naturally Fermented Probiotic Drink That is Packed With Health Benefits - PrepperFortressIf you're gonna fight, fight like you're the third monkey on the ramp to Noah's Ark... and brother its starting to rain. Join our efforts to Secure America's Borders and End Illegal Immigration by Joining ALIPAC's E-Mail Alerts network (CLICK HERE)
-
07-10-2023, 03:53 PM #7815Senior Member
- Join Date
- Aug 2018
- Posts
- 91,639
How to Do It: Practical Advice from the Early 20th Century
Amy S. May 9, 2023 No Commentson How to Do It: Practical Advice from the Early 20th Century
You might still make use of some of the time-proven wisdoms today.
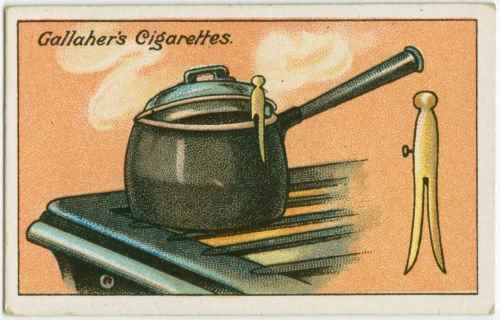
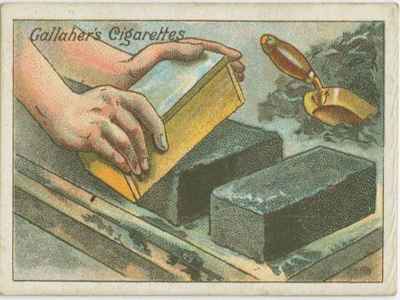
In 1910, one of the manufacturers, Gallaher Ltd Belfast & London, tried to make their products more popular by printing practical everyday advice on the cards. You might still make use of some of the time-proven wisdoms today.
The life hacks of 100 years ago
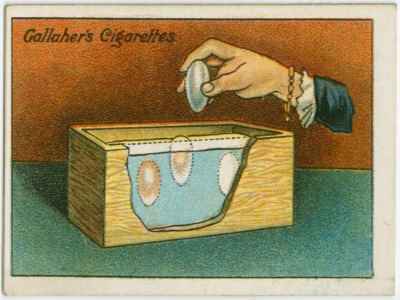
How to Preserve Eggs
Eggs for preserving must be new laid, and by simply putting these into a box or in of dry salt burying the eggs right in the salt and keeping in a cool dry place it is possible to preserve them for a very long period. No air whatever must be allowed to get at the shells.
Are these eggs too old How to Test for Egg Freshness
As an egg ages it gets lighter by evaporation of water through the porous shell, causing the growth of the air space. A fresh egg is heavy and should feel well filled. Hence the old water test for freshness, a fresh egg sinks and an old egg floats. When broken, the white of a fresh egg should be compact round the yellow. It spreads out, as it gets older. Holding it up to the light can also test the freshness of an egg. A very small air chamber indicates a very fresh egg. Typically eggs reach the shops within 2-3 days of being laid. Eggs should be used within 1 month and kept under the conditions described.

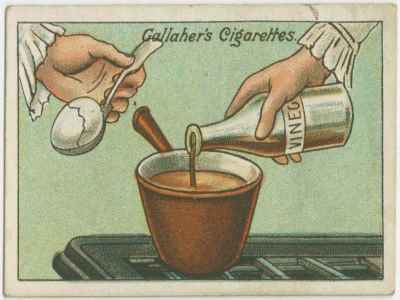
How to test butter quality
A good way of testing butter is shown in the picture. Rub a little of the suspected compound upon a piece of paper and set the paper alight. If it is pure butter, the odour will be dainty and agreeable, while the presence of Margarine is made known by an unpleasant tallow smell
Natural butter is firm when touched. Another clue is that butter will not stain your package when you take it. Also, it does not stick to the knife.
When real butter is heated after cold it does not become soft, in contrast to margarine, which melts quickly (due to vegetable fats).
The butter made from high-quality cream is hard and smooth to touch. When you cut it, it should be shiny and homogeneous.
Finally, natural butter should not crumble once it has been taken out of the refrigerator. Real butter is spread on bread as a dense homogeneous layer.
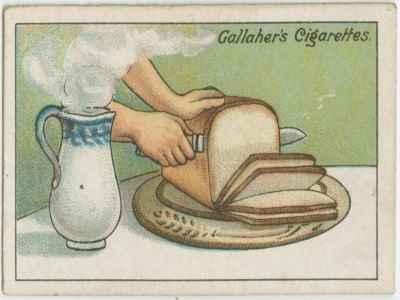
How to Cut New Bread into Thin Slices
The difficulty of cutting new bread into thin slices can readily be overcome by the following expedient. Plunge the bread knife into hot water and when thoroughly hot wipe quickly. It will be found that the heated knife will cut soft, yielding new bread into thinnest slices.
When boiling cracked eggs.
What is the best way to peel a boiled egg so the egg white does not stick to the shell? Here are several responses, although all bets are off for eggs only a couple days old.
After boiling, pour off the hot water, shake pan back and forth to crack the shells. Cover eggs in cold water and let set for a couple of minutes. Leave water and eggs in pan and peel, using water to rinse away excess shells.
Or, take the egg from boiling water and immediately run cold water on it. Peel the egg under cold running water starting with rounded top where the air pouch is.
Why do eggs crack? How can I prevent eggs from cracking while boiling?
The bottom, rounded end of an egg contains a small air bubble. As the egg heats up, the air inside the bubble expands. As the hot air pushes outwards, it puts pressure onto the shell, making it crack. You can prevent this by making a pin-pick in the bottom rounded end of the egg. This will let the expanding air escape.
You can also prevent cracking by letting eggs come to room temperature before cooking them. Add the eggs to tap water and then apply the heat. Do not add eggs directly into boiling water.
Adding either salt or vinegar in the water will not prevent the egg from cracking but will congeal the white if it starts to leak out of the shell from a small crack, making the cracked egg, still pleasing to look at.

A hint when boiling potatoes.
Potatoes are easier to prepare and healthier for you when cooked with their skins on. Always rinse and scrub the potatoes thoroughly before using.
When you are using cut up potatoes in your cooking, preserve the color by place them in cold water. Limit the water soaking time to two (2) hours to retain the water-soluble vitamins.
Color discoloration (pinkish or brownish) happens from the carbohydrates in the potato reacting with oxygen in the air. Potatoes that do become discolored in this way are safe to eat and do not need to be thrown. Usually the color discoloration will disappear with cooking.
Cooking Potatoes
Boiled Potatoes:
Boiled potatoes should be started in cold water rather than in hot water. This allows for a more even cooking and heat penetration from outside to inside during the relatively long cooking time required. Potatoes are never COOLED in cold water, unlike most vegetables. This would make them soggy.
Tip: For fluffier boil potatoes, simply pour off all the water after they are boiled and cover the pot with a double thickness of paper towels, then cover with the saucepan lid. In ten minutes, steam will be absorbed by the towels and your potatoes will be dry and fluffy.
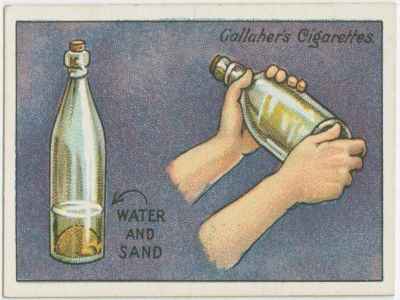
How to Clean Bottles
To clean the interior of bottles, a little sand and water should be well shaken about inside them. This will have the effect of cleansing every part, and the bottles can then be washed out and dried.
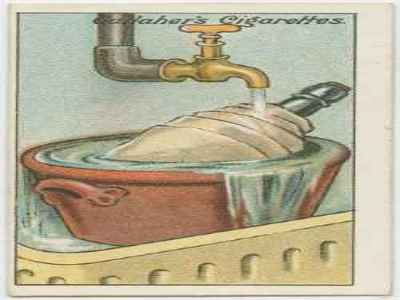
How to cool wine without ice.
This is very simple. Take a thick cloth, soak it in water and then dress the bottle with this cloth.
Take glass bottles wrap with thick jute clothes with many layers and keep the jute wet with water again and dont let jute cloth dry up.
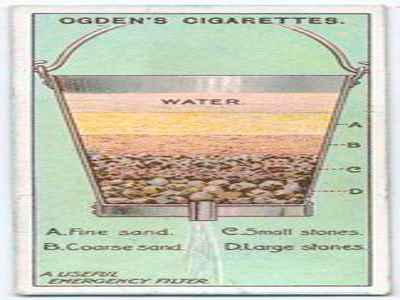

How to make a water filter
A most handy and efficacious filter can be made out of an ordinary perfectly clean zinc water pail, through the bottom of which a hole has been drilled and a small pipe fitted. The water percolates through the layers of fine and coarse sand, and clean picked gravel and stones, with which the pail is filled, filtering through to the bottom in a clear state.
How To Use Up Coal Dust
An economical way to treat coal dust, and to make same into bricks of fuel, is to mix the dust with salt (about a handful of slat to each shovelful of coal dust) , add water and stir to a stiff paste, and mould the bricks in an old tin box, afterwards placing on a board or shelf to dry.

How to Prevent Colors Running
To prevent colors in household linen from running and staining other linen when washed together, coloured things should first be steeped in a solution of salt water. A double handful of salt to a gallon of water is a good proportion, and colored things should be left to soak in this for about twenty-four hours.

Books can be your best pre-collapse investment.
Old Time Wisdom ( Timeless Bits of Wisdom on How to Grow Everything Organically, from the Good Old Days When Everyone Did you can prepare yourself for war by moving to the countryside and building a farm, but you must take guns with you, as the hordes of starving will be roaming. Also, even though the elite will have their safe havens and specialist shelters, they must be just as careful during the war as the ordinary civilians, because their shelters can still be compromised.)
The Lost Ways (Learn the long forgotten secrets that helped our forefathers survive famines,wars,economic crisis and anything else life threw at them)
Survival MD (Best Post Collapse First Aid Survival Guide Ever)
Conquering the coming collapse (Financial advice and preparedness )
Liberty Generator (Build and make your own energy source)
Backyard Liberty (Easy and cheap DIY Aquaponic system to grow your organic and living food bank)
Bullet Proof Home (A Preppers Guide in Safeguarding a Home )
Family Self Defense (Best Self Defense Strategies For You And Your Family)
Survive Any Crisis (Best Items To Hoard For A Long Term Crisis)
How to Do It: Practical Advice from the Early 20th Century - PrepperFortress
If you're gonna fight, fight like you're the third monkey on the ramp to Noah's Ark... and brother its starting to rain. Join our efforts to Secure America's Borders and End Illegal Immigration by Joining ALIPAC's E-Mail Alerts network (CLICK HERE)
-
07-10-2023, 03:54 PM #7816Senior Member
- Join Date
- Aug 2018
- Posts
- 91,639
If you're gonna fight, fight like you're the third monkey on the ramp to Noah's Ark... and brother its starting to rain. Join our efforts to Secure America's Borders and End Illegal Immigration by Joining ALIPAC's E-Mail Alerts network (CLICK HERE)
-
07-10-2023, 04:30 PM #7817Senior Member
- Join Date
- Aug 2018
- Posts
- 91,639
 If you're gonna fight, fight like you're the third monkey on the ramp to Noah's Ark... and brother its starting to rain. Join our efforts to Secure America's Borders and End Illegal Immigration by Joining ALIPAC's E-Mail Alerts network (CLICK HERE)
-
07-11-2023, 07:42 AM #7818Senior Member


- Join Date
- Apr 2016
- Posts
- 31,826
 Originally Posted by Airbornesapper07

There should be a program where churches and schools grow different fruits and vegetables on the properties, get kids and communities involved, and share the food with schools and food banks.
Teach the kids to build greenhouses.ILLEGAL ALIENS HAVE "BROKEN" OUR IMMIGRATION SYSTEM
DO NOT REWARD THEM - DEPORT THEM ALL
-
07-11-2023, 03:18 PM #7819Senior Member
- Join Date
- Aug 2018
- Posts
- 91,639
Turning Empty Offices Into Vertical Farms
Linked by Michael Levenston
 Vertical farming can produce as much as traditional farming while using less water and less energy if executed correctly. Photography by Area 2 Farms With office usage hovering near 50 percent of pre-pandemic levels, many cities are struggling with a plethora of under-utilized space.
By Ciara OBrien
Modern Farmer
July 4, 2023
Excerpt:
Although the COVID-19 pandemic drove workers out of their offices over three years ago, many office buildings still remain deserted. According to data gathered in 10 major cities, office usage rates just crossed 50 percent of pre-pandemic levels in late January, and these numbers seem to be stalling only a few months later. Nearly 20 percent of office space is empty across the United States, and some projections suggest that more than 300 million square feet of US office space could be obsolete by 2030. The pandemic has shown that people are capable (and in some cases, in favor) of working in a remote setting.
With many folks comfortably working from home offices, many downtown highrises serve as a looming frustration to landlords but also to local restaurants and small businesses that rely on office commuters to sustain business. So, many municipalities are trying to fill those spaces back up. In New York, city officials are transforming empty office buildings into apartments around parts of Midtown. Many other regions are also exploring this idea, including Washington, Los Angeles, Milwaukee, Chicago and Philadelphia. Although modifying an existing building is less expensive than rebuilding, turning offices into residential space can be costly, as most office spaces are laid out differently from residential buildings. But there are other options for these empty offices such as farms.
Read the complete article here.
Turning Empty Offices Into Vertical Farms City Farmer News
If you're gonna fight, fight like you're the third monkey on the ramp to Noah's Ark... and brother its starting to rain. Join our efforts to Secure America's Borders and End Illegal Immigration by Joining ALIPAC's E-Mail Alerts network (CLICK HERE)
-
07-11-2023, 04:10 PM #7820Senior Member
- Join Date
- Aug 2018
- Posts
- 91,639
 Fenbendazole for Cancer - Clif High
FENBENDAZOLE FOR CANCER - CLIF HIGH
Health Odyssey
The Fenbendazole Cancer Protocol has been gaining rapid interest over the past year following some fenbendazole cancer success stories. The most recognized one is of a man diagnosed with stage 4 small cell Lung cancer that sent home with a 3-month life expectancy. He started taking fenbendazole (Panacur C), a dog dewormer, with some additional supplements. The following PET scan showed remarkable improvement, and after a few months, he was declared cancer-free.
If you're gonna fight, fight like you're the third monkey on the ramp to Noah's Ark... and brother its starting to rain. Join our efforts to Secure America's Borders and End Illegal Immigration by Joining ALIPAC's E-Mail Alerts network (CLICK HERE)


 Reply With Quote


Green Bay Man Accused of Trying to Murder Ex-Girlfriend with a...
04-29-2026, 08:05 PM in illegal immigration News Stories & Reports