Results 2,881 to 2,890 of 11279
LinkBacks (?)
-
12-26-2016, 11:32 AM
-
09-02-2016, 05:39 PM
-
whole garden made with pallets!! Love it!! | Pallets | Pinterest | Pallets, Pallets Garden and Wooden Pallets
Refback This thread03-06-2016, 11:30 AM -
10-20-2015, 05:29 PM
-
06-12-2015, 08:00 PM
-
02-26-2015, 01:58 PM
-
01-05-2015, 04:13 PM
-
12-19-2014, 10:19 AM
-
EMERGENCY: HUGE FEMA PANDEMIC EXERCISE IN USA IN NOVEMBER, INTERNET SHUT DOWN PART OF EXERCISE | Prepare4Survival
Refback This thread12-03-2014, 10:39 PM -
Off Grid World ? Ugly Duckling Shipping Container Home Built by Artist Is a Beautiful Swan on the Inside
Refback This thread11-25-2014, 03:10 PM -
11-17-2014, 10:59 PM
-
11-13-2014, 11:18 AM
-
11-09-2014, 02:54 PM
-
10-28-2014, 11:38 PM
-
10-26-2014, 05:54 AM
-
10-16-2014, 11:28 AM
-
10-03-2014, 01:25 PM
-
10-02-2014, 09:16 PM
-
09-26-2014, 07:00 PM
-
09-26-2014, 01:56 PM
-
09-19-2014, 04:46 PM
-
09-13-2014, 05:49 AM
-
09-05-2014, 01:52 PM
-
09-01-2014, 09:39 AM
-
08-30-2014, 06:29 PM
-
08-10-2014, 06:29 AM
-
08-04-2014, 05:07 PM
-
07-23-2014, 11:14 AM
-
New Evidence on Expiration Dates | Medical Preparedness | Doom and Bloom (TM) | Doom and Bloom (TM)
Refback This thread07-22-2014, 10:10 AM -
07-18-2014, 08:37 PM
-
07-15-2014, 04:57 PM
-
07-11-2014, 01:40 AM
-
04-22-2014, 11:14 AM
-
04-18-2014, 12:57 PM
-
04-18-2014, 10:10 AM
-
04-14-2014, 12:18 AM
-
04-12-2014, 02:28 AM
-
03-02-2014, 11:43 PM
-
12-24-2013, 11:59 PM
-
12-07-2013, 11:04 PM
-
kitchen | Cob
Refback This thread11-25-2013, 03:24 PM -
10-22-2013, 10:25 PM
-
Apple Pie Braid | Sweets
Refback This thread09-26-2013, 07:58 AM -
09-02-2013, 04:44 PM
-
5 Reasons Why You May have to Bug Out Even Though You Don’t Want to | The Apartment Prepper's Blog
Refback This thread08-23-2013, 03:20 PM -
06-27-2013, 06:30 AM
-
06-23-2013, 08:11 PM
-
06-17-2013, 11:21 PM
-
05-24-2013, 05:06 PM
-
To Eat / BASIC LIST / SUGGESTED ITEMS FOR LONG TERM SURVIVAL - Page 275 - ALIPAC
Refback This thread05-01-2013, 03:49 AM
Thread Information
Users Browsing this Thread
There are currently 1 users browsing this thread. (0 members and 1 guests)
-
01-10-2013, 02:12 PM #2881Senior Member


- Join Date
- May 2007
- Location
- South West Florida (Behind friendly lines but still in Occupied Territory)
- Posts
- 117,088
 Join our efforts to Secure America's Borders and End Illegal Immigration by Joining ALIPAC's E-Mail Alerts network (CLICK HERE)
-
01-10-2013, 02:14 PM #2882Senior Member


- Join Date
- May 2007
- Location
- South West Florida (Behind friendly lines but still in Occupied Territory)
- Posts
- 117,088
 Join our efforts to Secure America's Borders and End Illegal Immigration by Joining ALIPAC's E-Mail Alerts network (CLICK HERE)
-
01-10-2013, 02:17 PM #2883Senior Member


- Join Date
- May 2007
- Location
- South West Florida (Behind friendly lines but still in Occupied Territory)
- Posts
- 117,088
 Join our efforts to Secure America's Borders and End Illegal Immigration by Joining ALIPAC's E-Mail Alerts network (CLICK HERE)
-
01-10-2013, 02:18 PM #2884Senior Member


- Join Date
- May 2007
- Location
- South West Florida (Behind friendly lines but still in Occupied Territory)
- Posts
- 117,088
 Join our efforts to Secure America's Borders and End Illegal Immigration by Joining ALIPAC's E-Mail Alerts network (CLICK HERE)
-
01-10-2013, 02:22 PM #2885Senior Member


- Join Date
- May 2007
- Location
- South West Florida (Behind friendly lines but still in Occupied Territory)
- Posts
- 117,088
DIY Clothesline
April 1st, 2011 | Author: Angie
Back in Georgia a clothesline is a function of living. When we moved to Virginia and into Steve’s townhouse clotheslines were not allowed. Yeah, home owner’s associations make no sense. When we bought this house there was a clothesline. Not the best, not the most useful but it was there. A line tethered from the grill house to the tobacco barn. When we decided to build the swimming pool it had to come down because it was running right through the deepest end of the pool layout. From then on every spring and summer I asked for a new clothesline. The person who I felt sure would put me up a line never did. The deer caught in the headlights look always met my request. Out of necessity I started putting the clothes on hangers straight from the washer and hanging them along the main stretch of the back fence. It worked but a strong wind would blow them off and sometimes the fence left a powdery imprint on the clothes. It became such a point of contention that hanging out the clothes last fall made me angry. Just angry. I knew I had to do something for this spring and I knew what kind of clothesline I wanted. Then the snow and ice came and I completely forgot about my lack of a proper clothesline.
When I finished the raised bed project I had these timbers left over and there were two 2×3′s from the greenhouse still leaning under the awning out of the rain. I looked at them a few times and wondered what I could do with them. It was about 2am when I woke up knowing exactly what I was going to do with them. I decided I would build my own clothesline.
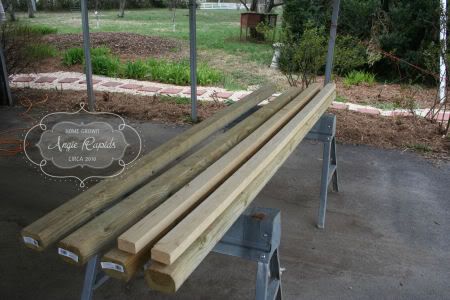 These treated timbers are approximately 3 1/2 x 3 1/2 x 8. I decided to use them to construct the T post to support the drying lines with pieces cut from the 2×3 lumber as the support arms.
 First I measured 2 feet from the bottom of the post (the end I planned to put into the hole in the ground). I marked this off on both posts.
 Next I measure 4 inches from the top of the post and marked this. Then I measure 3.5 inches below this mark and marked it on both posts. Next I cut two 42 inch lengths of the third post to use as the cross T. I located the center of this piece then marked the exact width of my post. Both of the areas I planned to notch so that fit together snug with good support.
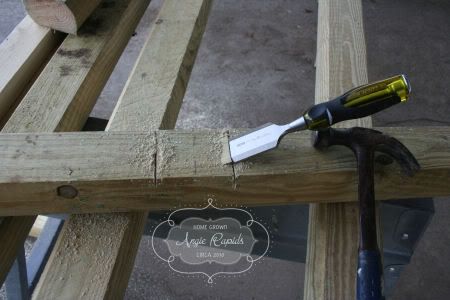 The wood chisel is sharp. Very sharp. It will cut right in to the wood with a tap of the hammer.
 I worked carefully on both pieces until I had notched out about half an inch on both pieces.
 Then I checked the fit. I wanted them to be snug and tight and pressed together completely.
 Next I drilled two holes through both pieces as they rested together.
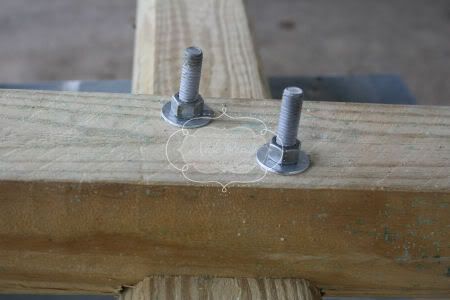 I tapped a bolt through each hole making sure that the heads of the bolts where on the post side. Rolling the post over I secured each bolt with a washer and a nut. It is important that the end of the bolts be on this side of the arms. Once the lines are strung you want the force pulling the cross T into the post with the post as your resistance. If you turned it around the other way the lines and weight of the laundry would always be pulling the cross T away from the post and over time the arm would weaken, the bolts would loosen and eventually it would sag and no longer be a strong sturdy line.
 Also with the bolt ends facing out you are never in danger of cutting or scrapping your hands on the exposed ends as you work with the lines and hanging laundry.
 Next I used a miter box and saw to cut the arms that would support the weight of the cross T. I measured four 2 foot lengths and cut 45 degree angels on each end.
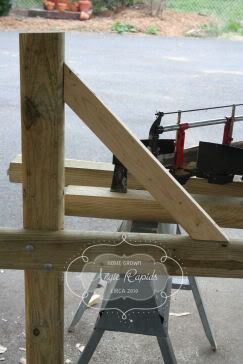 Thanks to Evelyn Shepperd and 10th grade geometry I didn’t even have to stop and think about what degree the angel should be cut. See that gorgeous triangle? W00t!
 I used nails to secure the supports to the post and the cross T.
 I worked through each side until I had both posts finished.
It took about 4 hours to do this part of the project. This includes set up of my workspace, clean up of the area, lunch for Steven, a phone call and a FB update while I waited for Steven to make up his mind if was going to come back outside (it was cold!) or stay in by the fire and watch GI Joe on Hub. GI Joe won and I finished out the project alone.
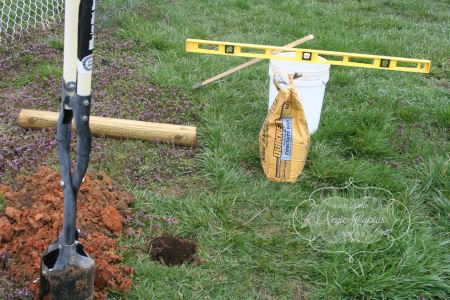 With rain in the forecast I really wanted to get those posts in the ground but it did not work out the way I planned. The rain came cold and quick so I had to wait until the following morning to dig the holes. I had to dig the holes manually – that was a real work out!! I used a leftover piece of timber marked at 2 foot to measure my hole depth, a level to make sure my posts where straight and quikrete to anchor the posts in the ground.
 A 2 foot hole is much deeper than you can imagine! It is very important that the posts be put in the ground as deep as possible. Weather and temperature changes can cause the earth to heave those posts up. My posts are 8 foot leaving me with 6 foot above ground to work with. If you are in a sandy area you would need to use 12 foot posts and sink them much deeper – 3 to 4 foot deep each.
 Bags of quikrete are heavy! This is an 80lb bag and I could barely handle it. If you do this I suggest two 40lbs bags instead. Quikrete is a ready mix cement. You don’t have to do anything to it but add water. If your ground is very dry it will pull the water out of your quikrete. When you dig your hole and your ground is dry wet the ground in hole. Spray it with the hose all around the sides and bottom.
 Once I set my post into the hole I poured in a bit of the mix and used a stick to tamp it down tight around the post. Then I used the level and made sure the post was straight.
 Next I filled the hole about one third of the way tamped it down tight, sprinkled in a tiny bit of water to get things going then added another layer of cement mix. I repeated the process again and filled the hole to the top. I tamped everything as compacted as possible. With the rain coming and amount of moisture in the ground I did not wet the top of the quikrete as it is exposed at ground level. I waited and let the rain and gravity do that work for me.
 It took me about 25 minutes to dig that first hole. That end of the ground was filled with hard packed clay and rocks. The second hole was easy. It took only about 15 minutes to work down two feet. The quilrete needs 24 to 48 hours to cure. Give it time to set up before stringing lines.
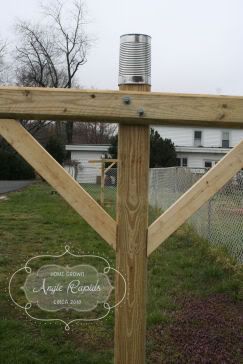 I had saved the cans from kidney beans when I made chili knowing I would find a use for them. Instead of purchasing a post end cap to keep the rain from settling on the post and eventually rotting down into it I used the cans as the post caps. It works. You’ll see this done at many old farms along fence lines. The fence posts will be sporting a tin can cover. I like the way it looks. Colby thinks it is ghetto fabulous. Whateveah!
 I had wanted my hardware to be installed before I set the posts but FedEx did not bring my items on time and I really needed to get those posts in the ground while it was raining. For as long as I can remember I have wanted a clothes line with pulleys. Just something left over form my childhood that I thought was fabulous and deemed one day I would have. Since I was building this one myself I indulged my dreams. I could not find a galvanized pulley in my local shop and what they did offer was more than I wanted to pay. So I ordered pulleys and line tighteners online and had to wait for them to be shipped.
 I picked up at my local hardware store the eye screws and the linkage to connect my pulleys to the eyescrews. The links are actually links for chain that come open and you have to pound them closed. They were much less expensive than other linkage options and I didn’t have anything already on hand that I could use. This is my own pulley assembly. You don’t have to use pulleys. You can install the eye screws and hang your lines from there. I chose to indulge myself in something more.
 I drilled 3 equally spaced holes on the cross T’s.
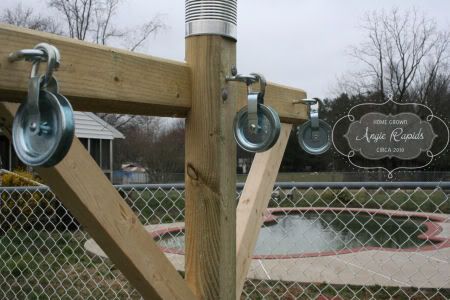 In the cold drizzle of the late afternoon I worked with cold hands and installed all six pulley assemblies.
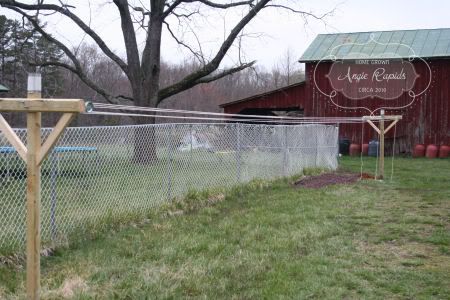 Next I ran 3 lengths of cotton clothesline. I chose cotton over the plastic coated wire that is now offered for clothesline. I just don’t like the wire and it won’t work well with my pulleys.
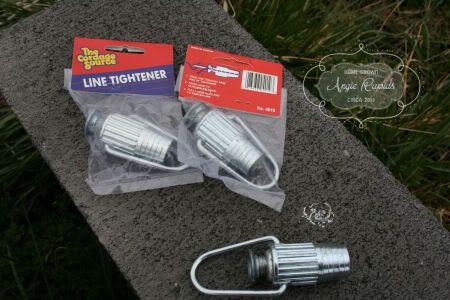 No matter what the package says a cotton clothesline will stretch and relax over time. The weight of wet clothes will pull it down and make it sag. For months after there will be the need for pulling up sagging lines.
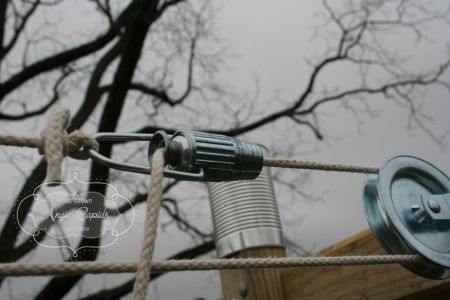 Unless you install line pullers. These grip the lines when you pull it tight to remove the slack. It locks in tight with the use of springs and bearings and the line will not pull back through. Once it is tight it will stay tight.
 Simply tie off one end on the loop then feed the other end through the device. When you tighten the line make sure you put a knot or two in the tail piece and cut off the leftover length.
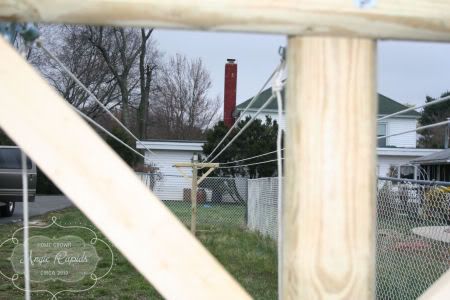 Next up? A sunny day and clothes pins!
Clothesline Project Cost:
3 – 8ft landscape timbers $3.97 each (I used these because this is what I had. Cedar timbers are expensive $12 each. 4 x 4 treated lumber is also expensive and not much different in size to the timbers I used.) $7.94
2 – 2 x 3′s @ $1.78 each = $3.56
6 pulleys @ $2.76 each = $16.56 – I chose galvanized pulleys and not the plastic ones at my local hardware. The plastic will degrade over time. In the deep winter of ice and snow they will eventually crack and need to be replaced.
3 line pullers @$2.56 = $7.68 – Kudos to the person who invented this! It works excellently!
6 eyescrews @$1.49 = $8.94 – I used the ones rated for 190lbs.
6 chain links @.49 = $2.94 – Thanks to Beverly at the hardware store for pointing me in a less expensive direction when I was in there looking for linkage.
3 cotton clothesline $5.79 = $17.37 – Old fashion choice that makes me very happy.
Total = $64.99
I think this summer I will easily cut my electric bill by using the clothesline. It will certainly pay for itself over the spring, summer and fall.
This is certainly a doable project for us ladies. If you need a new clothesline go ahead and do it yourself. I think you’ll be far more pleased with your own work and skills as you hang your laundry out on a sunny day.
I have one more upgrade planned for my clothesline. I intend to plant lavender in raised beds at either end of the posts.
Don’t you love the way your sheets and clothes smell when you bring them in off the line? I do!
Posted in Do It Yourself, LaundryJoin our efforts to Secure America's Borders and End Illegal Immigration by Joining ALIPAC's E-Mail Alerts network (CLICK HERE)
-
01-10-2013, 02:23 PM #2886Senior Member


- Join Date
- May 2007
- Location
- South West Florida (Behind friendly lines but still in Occupied Territory)
- Posts
- 117,088
Heres a pretty good site
Home Grown
Join our efforts to Secure America's Borders and End Illegal Immigration by Joining ALIPAC's E-Mail Alerts network (CLICK HERE)
-
01-15-2013, 07:24 PM #2887Senior Member


- Join Date
- May 2007
- Location
- South West Florida (Behind friendly lines but still in Occupied Territory)
- Posts
- 117,088
To-Do List for January
Here’s a zone-by-zone to-do list for the month of January.

Zone 3
- Check your leftover seeds and make a list of what you need before ordering.
- Order seeds and plants early to avoid substitution.
- Take cuttings from fruit trees for grafting in April. Wrap the twigs in a wet paper towel, seal the wrapped twigs in a plastic bag, and store the bag in the freezer until spring.

Zone 4
- Organize your seeds: Discard those that are too old; then make a list of seeds to order.
- Order seeds of onions, geraniums, and other slow-growing plants now so you receive them in time to start indoors next month.
- Draw your garden plan.
- Check the condition of your gardening equipment.
- Build a garden trellis.
- Surprise your friends by harvesting Jerusalem artichokes and parsnips from the garden during a January thaw.

Zone 5
- Start seeds of pansies, snapdragons, and hardy perennials.
- Replenish your supplies, including seed-starting mix and organic fertilizers.
- Where there isn't much snow cover, push back any plants that have "heaved" out of the ground because of freeze-thaw cycles.
- Start a collection of scented geraniums by taking cuttings from a friend's plants.
- If you're growing geraniums indoors in pots, cut back leggy stems by about half, repot the plants in fresh soil, and then set them in a cool, bright window.

Zone 6
- Study the "skeleton" of your landscape and decide where to put new structures, such as pathways and arbors.
- Keep bird feeders well stocked with favorites, such as black oil sunflower seeds.
- Discard old seeds for the garden; mail orders for new seeds.
- Create a computer database of your garden plants with notes on performance.
- Rake heavy snow off shrubs.
- Start seeds of pansies, dusty miller, browallia, begonias, snapdragons, and delphiniums indoors under lights.
- At month's end, start seeds of onions, leeks, broccoli, cabbage, and cauliflower indoors under lights.

Zone 7
- On mild days, remove winter weeds, such as wild onions and chickweed.
- Sow seeds of Shirley poppies (Papaver rhoeas) for bloom in May and June.
- Sow larkspur seeds directly in flowerbeds where you want them to grow; look for blooms by midspring.
- Indoors, start seeds of perennials or slow-growing annuals, like coleus and geraniums, beneath lights.
- Start seeds of cabbage, early lettuce, and at the end of the month, broccoli.
- When onion and cabbage transplants are available at the garden center, select the best ones, then plant them in the garden beneath a row cover.
- Near the end of the month, weed the asparagus bed and strawberry plot, then feed the plants and renew the thinning mulches.

Zone 8
- Shop local nurseries for asparagus roots, strawberry plants, and fruit trees.
- Cover root crops still in the ground with an extra layer of mulch.
- When cold temperatures are predicted, protect transplants of onions, cabbage, broccoli, and chard with a row cover.
- Sow beets, carrots, radishes, cress, bok choy, and garden peas directly in the garden; cover the planting rows with dark compost to warm the soil.
- Sow seeds of herbs, such as dill and parsley.
- Sow seeds of annual flowers (delphiniums, snapdragons, and larkspur are good choices) anywhere you want flowers for cutting or as a background for other plants.
- Top-dress lawns and garden beds with compost.

Zone 9
- Use the weather to your advantage: Observe the location of standing puddles left by winter rains; note where you need to improve drainage for plants.
- Finish pruning fruit trees, vines, and bushes.
- Sow seeds of geraniums, peppers, tomatoes, and eggplant in pots filled with a peat moss/vermiculite mixture; set the pots on a sunny windowsill or beneath lights until it's warm enough to plant them outside.
- In the garden, "scratch in" wildflower seed mixes and California poppy seeds; plant nasturtium seeds a bit deeper.
- Set out transplants of pansies, calendulas, and primroses.
- As the soil warms, plant carrots, broccoli, lettuce, spinach, cilantro, parsley, and Asian greens.
- Harvest carrots, radishes, and Brussels sprouts—sweetened by frost.

Zone 10
- It's the dry season—water vegetable plants, nondormant tropical plants, and bedding plants regularly.
- Spray compost tea on roses and bromeliads.
- Mulch peas to extend the harvest.
- Sow pumpkins and winter squash directly in the garden; start cucumbers and watermelons in pots.
- Sow quick-maturing varieties of carrots, broccoli, cabbage, coriander, parsley, and dill.
- Plant heat-tolerant chicory, lettuce, and Swiss chard in shade so that they stay cool when the weather warms.
- Snip off flowers of tropical fruit and young citrus to save their strength while they grow; bring the flowers indoors to perfume the house.
Zone by zone to-do list for gardeners in January: Organic GardeningJoin our efforts to Secure America's Borders and End Illegal Immigration by Joining ALIPAC's E-Mail Alerts network (CLICK HERE)
-
01-16-2013, 05:33 PM #2888Senior Member


- Join Date
- May 2007
- Location
- South West Florida (Behind friendly lines but still in Occupied Territory)
- Posts
- 117,088

 Homestead Survival
Arc Welding with 3 Car 12v Batteries Video & Demo
Arc Welding with 3 Car 12v Batteries Video & Demo » The Homestead SurvivalJoin our efforts to Secure America's Borders and End Illegal Immigration by Joining ALIPAC's E-Mail Alerts network (CLICK HERE)
-
01-22-2013, 08:38 PM #2889Senior Member


- Join Date
- May 2007
- Location
- South West Florida (Behind friendly lines but still in Occupied Territory)
- Posts
- 117,088
Bugging Out vs. Hunkering Down
M.D. Creekmore
January 19th, 2013
The Survivalist Blog
Comments (440)
Read by 18,011 people
This article has been contributed by M.D. Creekmore of The Survivalist Blog.
The very idea of leaving the security of your home to “bug out” to the woods has never sat well with me – In nearly every instance it’s better to hunker down or “bug in” than to bug out. I mean, why leave the safety and familiar surroundings of your home, for the open and unforgiving wilderness.
For many people this is their first line of preparation against disaster, unfortunately, most will end up joining the multitude of other refugees freezing in a cave and eventually end up dead or wards of whatever government is still functioning.
I live in a fairly safe area and have prepared to survive at home and can conceive of only a few scenarios that would force me to leave. Even then, I would go to an out-of-state relatives house with whom, I have a pre-arranged agreement, where if need be he can come to my place or I to his after a disaster.
I know what you’re thinking “what about an end of the world as we know it” type event, well if such an event were to take place, there would be no 100% safe place for most of us, and really do you think you would be better of making a go of it in the open wilderness as opposed to hunkering down at home.
Don’t get me wrong, I’m not saying we should never bug out to the wilderness; we should indeed keep all our options open, what I am saying is that there are better ways to survive most disasters than heading into the bush.
You need to weigh the risks of bugging out vs. hunkering down and make your final decision based on logic and type of threat. That’s the way decisions should be made, unfortunately many people when making plans for survival side with emotion (that emotion being to run and hide) instead of the more tried and true form of decision-making known as logic.
Relying on emotion instead of logic can make for some interesting adventures; however without sound planning beforehand those adventures are likely to be sort lived. For example, I recently asked a fellow in his late 30’s what he would do if disaster struck his area.
He thought for a moment and said he would gather his family and all the food, guns and ammunition he could find and head for the mountains that lay some seventy-five miles to the north of his home.
Depending on the type of disaster, his “plan” might work short term for a lone survivor or a small group of individuals in good physical condition with proper gear and mind-set. But he is a new father and his wife is one of those that think missing an appointment at the nail-salon is the end of the world as she knows it.
Making matters worse he has no outdoor survival training or skills other than watching reruns of Less Stroud’s “Survivorman” and camping at a national park campground with all the utilities and hookups. Why he thinks he can survive off the wilderness while dragging his family along, I don’t know. He isn’t thinking logically.
His decision was based on emotion and as a result if he ever has to put his plan to the test in the real world his family will likely suffer or die because of his decision and “Red Dawn” thinking. Unfortunately, this batman in the boondocks mentality is and will continue to be the chosen survival plan for many who haven’t thought it through.
When making survival plans for your family you have to honestly weigh the risks of your decision based on logic. In almost every disaster scenario, it is better to stay put (bugging in) or head to a pre-arranged safe place at an out-of-town relatives or friends house than it is to head to the woods to eat twigs and pine bark.
For most people an evacuation bag is a better choice than a bug out bag. An evacuation bag should contain the gear necessary to get you from point A to point B, whereas a bug out bag (in most cases) is geared more toward wilderness survival. I have both, but admittedly my bug out bag is an option of last resort.
Knowing when to go is much more important than the contents of your survival pack or even where you will go. You don’t want to jump and run before you need too, but you don’t want to wait too long or you may never reach your destination.
If you wait for the authorities to give the order to evacuate it may already be too late. The roads leading to safety could be blocked and impassable by motor vehicle and walking to your destination may be impossible or too dangerous to attempt.
On the other hand if you jump and run in response to every potential disaster you’ll soon deplete your resources and the patience of your family, school and employers.For example, say you live in an area prone to tornadoes like Texas and you evacuate to Arkansas every time the clouds turn dark or the wind shakes the leaves. You would literally stay on the road. But waiting until the twister is at your door will put you at an unnecessary risk.
There are no easy answers; all you can do is weigh the dangers of bugging out vs. hunkering down depending on the situation and logic. You have to consider the nature of the threat and ask yourself which gives the best chance of survival with regards to the type of disaster you are facing.
Then, there are times when evacuation is a no brainer, say you live on the Florida coast and a category 5 hurricane has been predicted to hit that coast within twenty-four hours, in that case you would be stupid not to go now, even if you have no prearranged bug out location…
On the other hand let’s say there is snow storm heading your way and you have food, water, heat and a way to cook even if the power goes out for an extended amount of time then you are probably better off to hunker down where you are.
In my opinion the bugging out vs. hunkering down debate is moot because it all comes down to the type of threat, your personal situation and preparedness level – in the end you’ll have to make that decision based on that knowledge and common sense.
Do you plan to “bug out” or “bug in” please let us know in the comments below…
Bugging Out vs. Hunkering Down
Join our efforts to Secure America's Borders and End Illegal Immigration by Joining ALIPAC's E-Mail Alerts network (CLICK HERE)
-
01-24-2013, 07:17 PM #2890Senior Member


- Join Date
- May 2007
- Location
- South West Florida (Behind friendly lines but still in Occupied Territory)
- Posts
- 117,088
Survival Of The Most Adaptable
Wednesday, 23 January 2013 04:04
Daisy Luther

This article was written by Daisy Luther and originally published at The Organic Prepper
Forget survival of the strongest, the meanest, the fastest, the toughest, the fittest or the smartest.
All of those are fine qualities in a prepper but there is one key to survival in nearly any situation that trumps all of the above. That key is adaptability.
adaptability:
The ability to change to fit changed circumstances.
The ability to assess a situation and immediately change gears is a vital skill. It doesn’t come naturally for everybody. Like any skill, it takes practice. You must be able to toss Plan A out the window without a regretful look back and plunge immediately and wholeheartedly into Plan B, C, or beyond. You must possess the ability to change your paradigm without hesitation. You can’t cling to the way you want things to be, or the way they should be – you must instantly adapt to the way things are.
Everyone remembers the story about the soccer team whose plane went down in the Andes Mountains. The handful of survivors had no option but to consume the bodies of their teammates. Those who refused to adapt to that grim reality perished of starvation.
Here are some less horrific examples where adaptability might be key.
1) You’re out for a day hike with your family when an unexpected storm blows up. This isn’t something you can control – you can only control your response to it. You must immediately accept that the storm is occurring and that you are under-supplied. You must look to your surroundings to create shelter from the elements, and possibly find drinking water and food.
2) Your home is well-stocked for any event…except suddenly your home is in the path of a raging wildfire. You can’t cling to the fact that your preps are in your home. Your survival reality has changed instantly and you must evacuate with your family and find a new way to be fed and sheltered.
3) Your environment has suddenly changed. Maybe it’s global warming, maybe it’s global cooling or maybe somehow the earth was rocked on its axis. Suddenly your familiar climate is gone. You now have to learn to keep your body at the appropriate temperature and keep yourself fed in a totally different way.
4) The power is gone. Permanently. Your heat no longer comes from a thermostat dial, your food can no longer be refrigerated in the convenient rectangle in your kitchen and even a light to read by now requires a different outlook. Some people will spend precious time mourning what is gone instead of planning their course of action with what is left.
So, back to the skill of adaptation – it can really be broken down into steps, no matter what the crisis may be. Some things require immediate action, so you have to get through the steps rapidly, while other situations allow you a little bit of thinking time.
“Adaptability is not imitation. It means power of resistance and assimilation.”
Mahatma Gandhi
Accept what is.
You have to accept what is. In the event of a disaster, natural or otherwise, many people suffer some cognitive dissonance. Their psyches are simply unable to assess the reality of the situation and accept that it’s actually happening. Sadly, this renders them pretty much useless in a crisis situation. Cognitive dissonance is defined as…
“the feeling of discomfort when simultaneously holding two or more conflicting cognitions: ideas, beliefs, values or emotional reactions…Dissonance is aroused when people are confronted with information that is inconsistent with their beliefs. If the dissonance is not reduced by changing one’s belief, the dissonance can result in restoring consonance through misperception, rejection or refutation of the information, seeking support from others who share the beliefs, and attempting to persuade others.”
Sadly, we are surrounded by cognitive dissonance, by people who stubbornly hang on to the way things were yesterday and refuse to adjust to the reality of today. Denial ain’t just a river in Egypt, as the saying goes. Some examples might be:
1) The person who lost his job but continues to spend money frivolously, using a credit card to make up for the lost income.
2) A person in the path of a horrible natural disaster who refuses to believe it’s actually going to hit their home (think those who refused to evacuate when Hurricane Sandy was headed their way).
3) A person who refuses to accept the fact that the debt-fueled lifestyle of the average North American is about to grind to a horrible halt.
4) A person who stubbornly clings to the belief that groups like the national governments, NATO and the United Nations are actually there for the benefit of society rather than the benefit of the wealthy elite.
In a crisis situation, these people can be dangerous to be around. A lack of acceptance of the current reality can cause fatal mistakes, endangering not only the individual, but those included in their group.
When a bad thing happens, the absolute first step is accepting that it’s happening. Believe that the thugs are really at your door, believe that the power is out and it’s going to get cold fast, believe that the economy is making its last gasping breath. Accept what your senses are telling you and move on to the next step.
Take action.
The next step is to take action and do so immediately. In a chaotic situation, the first actions you take can set the course for the entire event. So, if there are gang-bangers kicking in your door, tell the kids to hide and grab your weapon. If a tornado is bearing down, go to the basement. If you’ve lost your job, stop all unnecessary expenditures and hunker down. If the power has gone out in the middle of a snowstorm, curtain off one room and concentrate your heating efforts there. If your instinct tells you it’s time to bug out, grab your bag, the kids, the dog, and get the heck out of Dodge.
In cases like this, it helps, of course, if you have prepared for these events ahead of time. Clearly, no one knows exactly what the future holds, but your basic preparations will stand you in good stead in all of these scenarios.
Adjust to the new reality.
Finally, once the adrenaline wears off, you may be left with a new type of reality. Even the most adaptable person can find this part difficult. It’s one thing to take action when the blood is pounding in your ears and fear is speeding you along. It’s quite different to live a new life in the day to day. Depression and unhappiness can set in when you are removed from beloved and comfortable surroundings. This is the hardest step for many people. If you’ve planned ahead and prepped your family but then for some reason, like a fire or natural disaster, those preparations are gone, then you may feel like it was all for nothing.
It couldn’t be further from the truth, though. As Hubert H. Humphrey Jr. famously said, “It is not what they take away from you that counts. It’s what you do with what you have left.” If you had to start over, right this instant, think of all the things you’ve learned during the time you’ve been awake and aware. You have learned to prioritize for the future instead of satisfying the whims of the here and now. You may have learned skills like gardening, personal defense, food preservation, or chopping firewood. Your MIND is the number one tool to help you adjust to the new reality, whatever that reality may be. Most of all, you’ve learned how to think. No fire can take away the knowledge you’ve acquired. No thieves can steal your learned skills. No natural disaster can undo the mental preparedness that you have built up.
How can we become more adaptable?
If you’re reading this article you are probably more than halfway there! It’s the nature of a prepper to think about the things that might go wrong. That is how we become better prepared for a variety of events, natural and otherwise.
Run scenarios with your loved ones. This is one case in which television can actually be valuable. Some programs and movies can serve as a teaching tool. For example, I watched an older episode of Criminal Minds with my daughter, in which a child her age was approached by a nice looking man and tricked into going into a secluded area, where she was then kidnapped. We watched the scene in its entirety, then we backed up and replayed it bit by bit, discussing the warning signs and what the girl could have done differently. We discussed ways that something similar could happen here in our hometown and ways to respond to similar threats. When terrible things happen in the world, discuss them and determine a few courses of action that could be taken to avoid becoming a victim.
Keep up with current events. Notice trends in the economy, crime and government. Pay attention to things happening in other countries too – what happened in Greece a few years ago is happening in the United States now. Learn from their collapse to predict what might happen during ours, and then prepare accordingly.
Think about your preps critically. Have you ever realized that a preparation you’ve made isn’t all it was cracked up to be? I recently discovered that some food I’d stored away was loaded with bugs (gross!!!!!!!) Luckily, I didn’t lose a great deal of food and I learned a valuable lesson about the way I had been storing that particular item. If you live in an earthquake prone area, are your jars of home-canned food secured against breakage? Do you have “enough” ammo and the means to make more? Do you have back-ups for your primary garden tools? Extra handles and blades? Sometimes adaptability takes a little advance preparation.
Even if you don’t agree with all the conclusions of Charles Darwin, there is much to be learned from his studies of nature. Although he was talking about reproductive evolution in his writings, his premise rings true for those of us who intend to survive challenges, both mundane and extraordinary. You don’t have to be the strongest, smartest, fastest or toughest. You have to be the most flexible. Whatever comes your way, take it and roll with it.
“It is not the strongest of the species that survives, nor the most intelligent that survives.
It is the one that is most adapatable to change.”
Survival Of The Most AdaptableJoin our efforts to Secure America's Borders and End Illegal Immigration by Joining ALIPAC's E-Mail Alerts network (CLICK HERE)


 226Likes
 LinkBack URL
 About LinkBacks


 Reply With Quote


Alleged Tren de Aragua Venezuelan national known as 'pig face'...
02-02-2026, 01:22 AM in General Discussion