

Results 631 to 640 of 11801
 226Likes
LinkBacks (?)
-
12-26-2016, 11:32 AM
-
09-02-2016, 05:39 PM
-
whole garden made with pallets!! Love it!! | Pallets | Pinterest | Pallets, Pallets Garden and Wooden Pallets
Refback This thread03-06-2016, 11:30 AM -
10-20-2015, 05:29 PM
-
06-12-2015, 08:00 PM
-
02-26-2015, 01:58 PM
-
01-05-2015, 04:13 PM
-
12-19-2014, 10:19 AM
-
EMERGENCY: HUGE FEMA PANDEMIC EXERCISE IN USA IN NOVEMBER, INTERNET SHUT DOWN PART OF EXERCISE | Prepare4Survival
Refback This thread12-03-2014, 10:39 PM -
Off Grid World ? Ugly Duckling Shipping Container Home Built by Artist Is a Beautiful Swan on the Inside
Refback This thread11-25-2014, 03:10 PM -
11-17-2014, 10:59 PM
-
11-13-2014, 11:18 AM
-
11-09-2014, 02:54 PM
-
10-28-2014, 11:38 PM
-
10-26-2014, 05:54 AM
-
10-16-2014, 11:28 AM
-
10-03-2014, 01:25 PM
-
10-02-2014, 09:16 PM
-
09-26-2014, 07:00 PM
-
09-26-2014, 01:56 PM
-
09-19-2014, 04:46 PM
-
09-13-2014, 05:49 AM
-
09-05-2014, 01:52 PM
-
09-01-2014, 09:39 AM
-
08-30-2014, 06:29 PM
-
08-10-2014, 06:29 AM
-
08-04-2014, 05:07 PM
-
07-23-2014, 11:14 AM
-
New Evidence on Expiration Dates | Medical Preparedness | Doom and Bloom (TM) | Doom and Bloom (TM)
Refback This thread07-22-2014, 10:10 AM -
07-18-2014, 08:37 PM
-
07-15-2014, 04:57 PM
-
07-11-2014, 01:40 AM
-
04-22-2014, 11:14 AM
-
04-18-2014, 12:57 PM
-
04-18-2014, 10:10 AM
-
04-14-2014, 12:18 AM
-
04-12-2014, 02:28 AM
-
03-02-2014, 11:43 PM
-
12-24-2013, 11:59 PM
-
12-07-2013, 11:04 PM
-
kitchen | Cob
Refback This thread11-25-2013, 03:24 PM -
10-22-2013, 10:25 PM
-
Apple Pie Braid | Sweets
Refback This thread09-26-2013, 07:58 AM -
09-02-2013, 04:44 PM
-
5 Reasons Why You May have to Bug Out Even Though You Don’t Want to | The Apartment Prepper's Blog
Refback This thread08-23-2013, 03:20 PM -
06-27-2013, 06:30 AM
-
06-23-2013, 08:11 PM
-
06-17-2013, 11:21 PM
-
05-24-2013, 05:06 PM
-
To Eat / BASIC LIST / SUGGESTED ITEMS FOR LONG TERM SURVIVAL - Page 275 - ALIPAC
Refback This thread05-01-2013, 03:49 AM
Thread Information
Users Browsing this Thread
There are currently 2 users browsing this thread. (1 members and 1 guests)
 LinkBack URL
 About LinkBacks
-
04-09-2011, 01:23 AM #631Senior Member


- Join Date
- May 2007
- Location
- South West Florida (Behind friendly lines but still in Occupied Territory)
- Posts
- 117,087

All Around Preparedness
How Prepared Are You? http://www.mediafire.com/file/k27cgb6n6 ... You.pdf
New to Precious Metals? http://www.mediafire.com/?hi5pqf4m2s897za
Safe Plastics for Storage http://www.mediafire.com/?vbvponwso3p89cc
Survival Manuals http://www.mediafire.com/?iplyyy7jia37bb3
Using Pool Shock as a Water Purifier http://www.mediafire.com/?iplyyy7jia37bb3
Emergency Preparedness
Costco TEOTWAWKI Shopping Guide http://www.mediafire.com/?5l01tdn7b6fr7wu
Emergency Exits http://www.mediafire.com/file/ikm7jt911 ... 0Exits.pdf
Handy No-Cook Foods http://www.mediafire.com/file/fyifosbhw ... 0Foods.pdf
Prep your Vehicle for an Emergency http://www.mediafire.com/?e8kf3rt59qf8448
Survival Moms on the Go http://www.mediafire.com/file/pb0qcadkd ... he_Go1.pdf
Vehicle Emergency Kit Check-List http://www.mediafire.com/?lo1aggsqqxlzlft
Vehicle Emergency Kit 2 http://www.mediafire.com/?0w37aunzdd3f8lw
Family
Tylenol & Advil dosages for kids http://www.mediafire.com/file/mwcca4r5m ... 20kids.pdf
Wilderness Survival Kit for Every Kid http://www.mediafire.com/file/2e6ax4uzc ... ry_Kid.pdf
Food Storage
Dehydrated Dinners Step by step instructions http://www.mediafire.com/?7a1092xehjpbp1t
Nutritional Value of Beans chart http://www.mediafire.com/?layrawgalad2rwo
Reconstituting Dehydrated Foods http://www.mediafire.com/?9z0amiiz5fz950g
WEBINAR: Top Ten Foods class outline http://www.mediafire.com/?ojbwpd3g374v3j4
Wheat Storage Worksheet http://www.mediafire.com/?c0866c8jxzng68d
Survival Manuals
LDS Preparedness Manual http://www.mediafire.com/?zrn88m9dck1xzdo
The U.S. Air Force Survival Training manual http://www.mediafire.com/?yc16dnagd52vfrg
Where There is No Dentist http://www.mediafire.com/?drtgawkm9wxo1bb
Where There is No Doctor http://www.mediafire.com/?68c9sq41shui49a
http://thesurvivalmom.com/resources/dow ... resources/Last edited by AirborneSapper7; 01-29-2012 at 10:34 PM.
Join our efforts to Secure America's Borders and End Illegal Immigration by Joining ALIPAC's E-Mail Alerts network (CLICK HERE)
-
04-09-2011, 01:27 AM #632Senior Member
- Join Date
- May 2007
- Location
- South West Florida (Behind friendly lines but still in Occupied Territory)
- Posts
- 117,087
INSTANT SURVIVAL TIPS
http://thesurvivalmom.com/category/inst ... ival-tips/Last edited by AirborneSapper7; 01-29-2012 at 09:43 PM.
Join our efforts to Secure America's Borders and End Illegal Immigration by Joining ALIPAC's E-Mail Alerts network (CLICK HERE)
-
04-09-2011, 01:43 AM #633Senior Member
- Join Date
- May 2007
- Location
- South West Florida (Behind friendly lines but still in Occupied Territory)
- Posts
- 117,087

Starting Seeds
By Angela, on March 28th, 2011
Well, its finally time to start planting around here. We are about 8 weeks out from our last frost, so cold crops like peas can go in the ground outside and the plants I'm starting from seed to transplant later can be started inside. It's windy today, so I did the inside plants first. I'm using a Jiffy style planter system with the peat pellets. I don't know if this is the best way to start seedlings or not, but it has worked well for me the last two years, plus it's a pretty inexpensive system and easy to find at your local chinamart or home improvement center, so I'm using it again. Here's how it works.
First pour warm water over the peat pellets. The instructions say about 1/8 cup for each pellet, but just pour some water in there a bit at a time until they are all soaked up.

Jiffy made their container so it holds the pellets pretty tight. I guess this is so they don't slide around on the store display rack, but it's kind of obnoxious when the pellets are trying to expand since a bunch of them got stuck in their slot and couldn't expand properly. I ended up pulling each pellet out and squishing it a bit then putting it back in.

When they're all expanded, they'll be dark brown and about 1 -1 1/2 high.
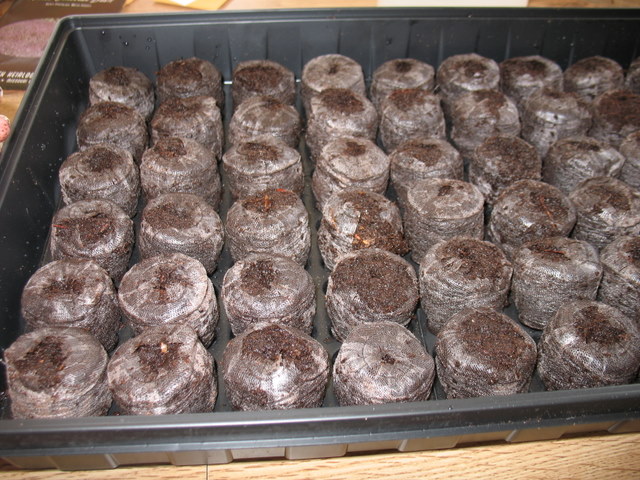
Now it looks like you could just drop a seed in the middle hole of each pellet, but I like to use the whole dirt surface, so I peel the mesh off the top. You'll need to tear it a bit to spread it out. Not as pretty, but more usable space on each pellet.

I planted onions, peppers, ground cherry tomatoes, and a bunch of herbs. Serious lot of herbs. I like to pack my onions in nice and tight. When they're ready to transplant, I just pull them apart carefully and re-plant them bare root into the garden. This way I get more onions from fewer pellets.
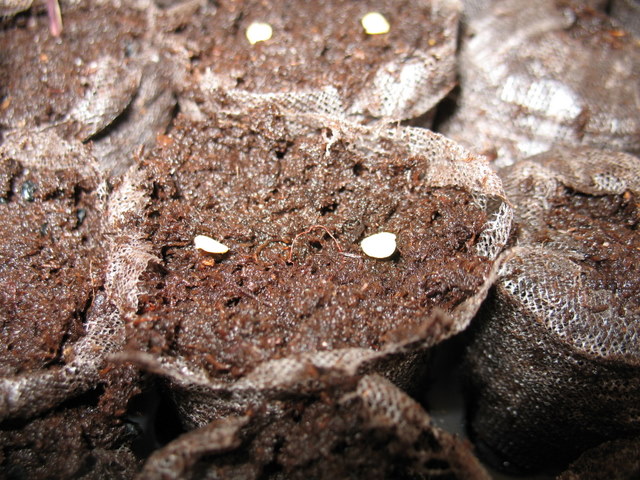
Plants like peppers, tomatoes, and most of the herbs I put 2-3 seeds in each pellet. The theory is that if they both sprout you choose the stronger plant and transplant that one to your garden. The problem with the theory is that most times both plants will live just fine and I hate to waste a perfectly good plant, so I plant my seeds toward the sides of the peat pellet away from each other so they'll separate easier when it's transplanting time. Tuck them into the dirt with your toothpick and they're ready to grow.
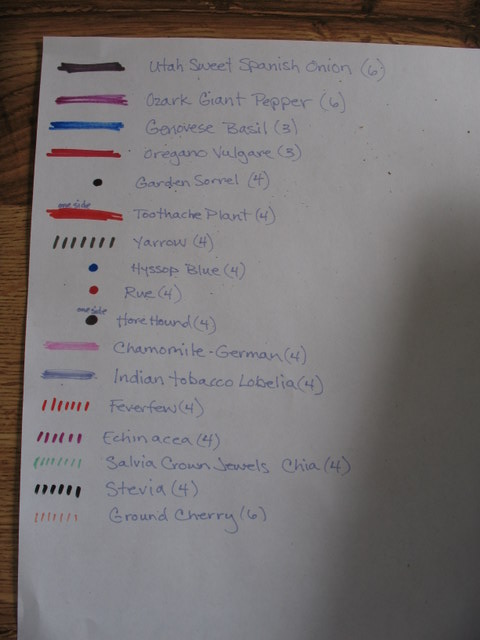
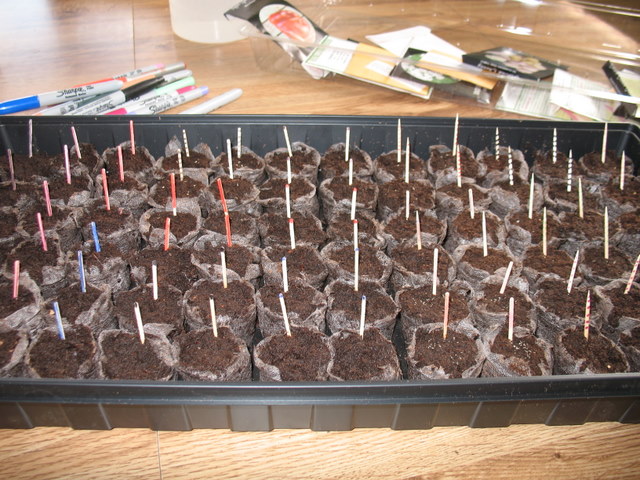
When you're planting a number of different varieties of plants, you'll need some way to keep track of what you've planted where. I like toothpicks and sharpies. Flat toothpicks work best. Regular markers tend to bleed during the watering process and the colors sometimes become difficult to distinguish. Color code your seedlings by coloring different colors and patterns on the toothpicks and inserting the toothpicks in the peat pellets.
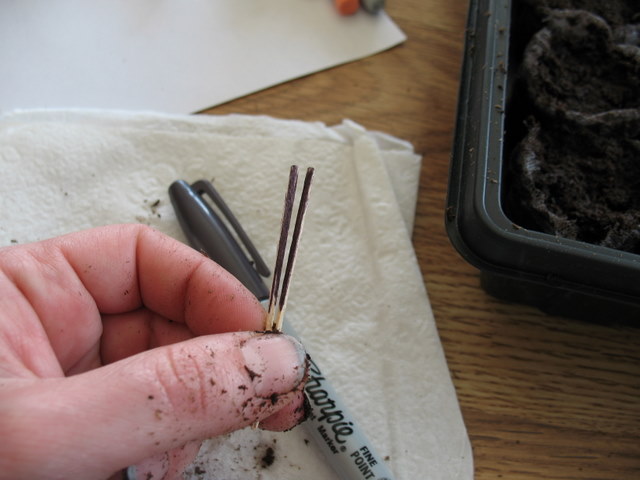

This method needs a “key” so you’ll remember what each color/pattern toothpick means. Put it somewhere safe–you don’t want to lose it and not know what you have planted anymore.
Once the pellets are all planted, put the lid back on the tray and put it somewhere warm. Somewhere it says to put them in a dark warm place like on your water heater until they sprout, but I’ve found that my south facing window sill works fine. And that way I don’t forget them and have them dry out and die.
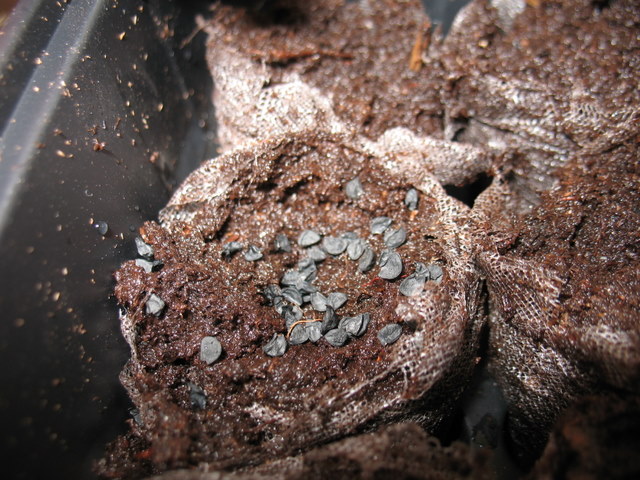
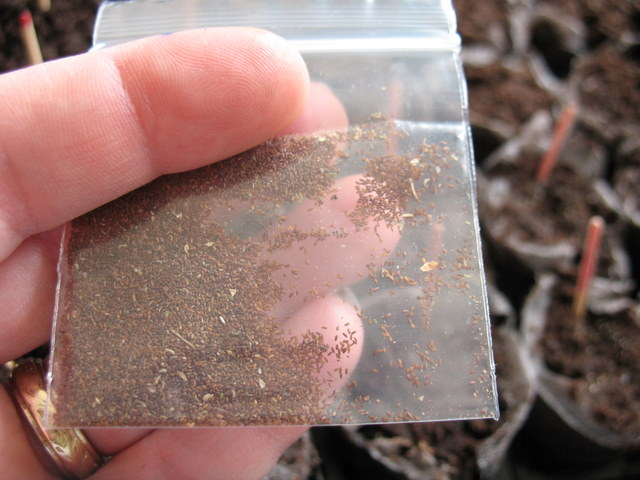
The herb seeds were fun. This is my first year planting a variety of herbs and I was pretty surprised at the size of some of the seeds.
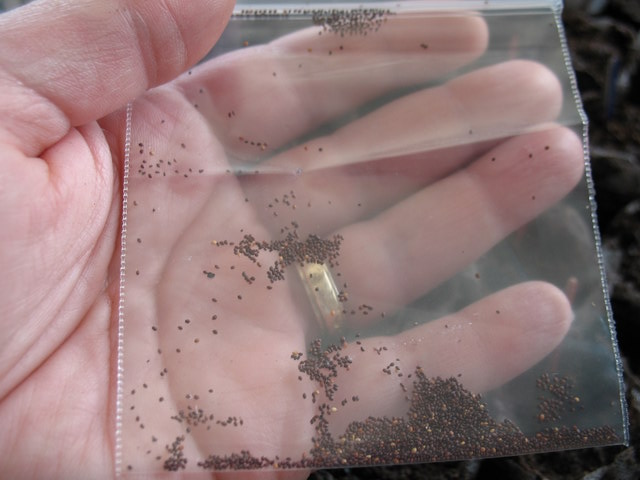
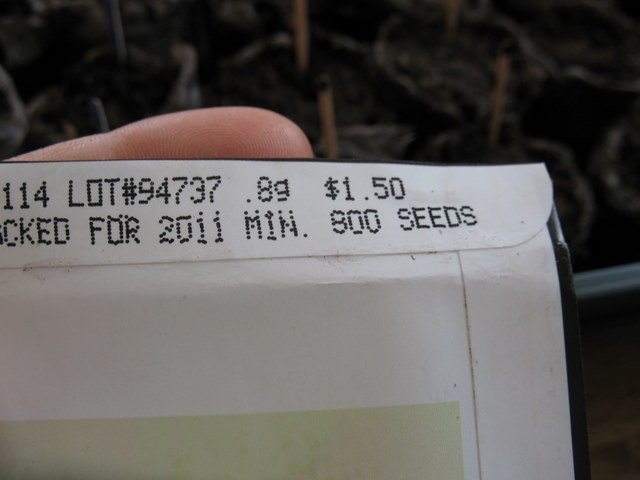
And yes, that says a minimum of 800 seeds in the pack. Really, you could get together with a friend and share herb seeds. Nobody needs 800 Yarrow plants. Well, maybe somebody does, but I don’t know anyone.
And I probably put two or three hundred of these Indian Tobacco Lobelia seeds on each peat pellet just because I couldn’t possibly grab one at a time. We’ll see how they grow–I’ll probably have to thin them out after they sprout, but no worries–there’s still lots of seeds for re-planting next year if these don’t work right. Seriously, it just looks like uniformly sized dust particles in a baggie.
I’m wanting to pick up some large containers and grow most of the herbs in containers this year. It’s not that we have a shortage of dirt around here, it’s just that it’s possible we’ll be moving mid season and I’d like to take some of my work with me if we do.
How are your garden plans coming?
http://foodstorageandsurvival.com/starting-seeds/
Last edited by AirborneSapper7; 01-29-2012 at 10:01 PM.
Join our efforts to Secure America's Borders and End Illegal Immigration by Joining ALIPAC's E-Mail Alerts network (CLICK HERE)
-
04-09-2011, 01:50 AM #634Senior Member
- Join Date
- May 2007
- Location
- South West Florida (Behind friendly lines but still in Occupied Territory)
- Posts
- 117,087
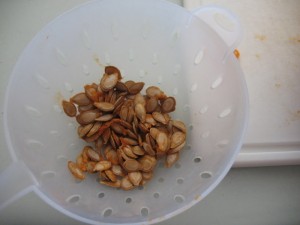
Saving Seeds: Cucumber
By Angela, on February 7th, 2011
Saving cucumber seeds is a bit more tricky than saving radish seeds. So how do you save seeds from a cucumber? First, start with a non-hybrid cucumber plant. You can get non-hybrid seeds at a number of places–I do my shopping online, and a couple of my favorites are Hometown Seeds and Baker Creek Heirloom Seeds. Or you can search for “heirloom seeds” or “non-hybrid seeds” and you’ll get plenty of other results. Hybrid plants will give you all kinds of random results when you plant their seeds–not all the kind you thought you planted. Remember Mendel’s peas? You want non-hybrids if you’re going to go through the hassle of saving seeds.
Bitterness in cucumbers is related to genetics, so if you’ve got a plant giving you more bitter tasting cucumbers, that’s not the one you want to save seeds from. I know this is tricky, especially if your cucumber plants are all intertwined, but taste a cucumber as you pick it, and if it’s good, trace that plant to another cucumber and put a ribbon or some other marker on the stem to remember that is the one you’ll be saving for seed.
You can’t eat a cucumber and get seeds from it. At the eating stage, the seeds aren’t matured enough. So you let the cucumber you’re saving seeds from get big and kind of soft. After you pick it, you can leave it on your counter for a few more days (or weeks depending on your location). Don’t let it go moldy, but it will continue to ripen for a bit after picking.

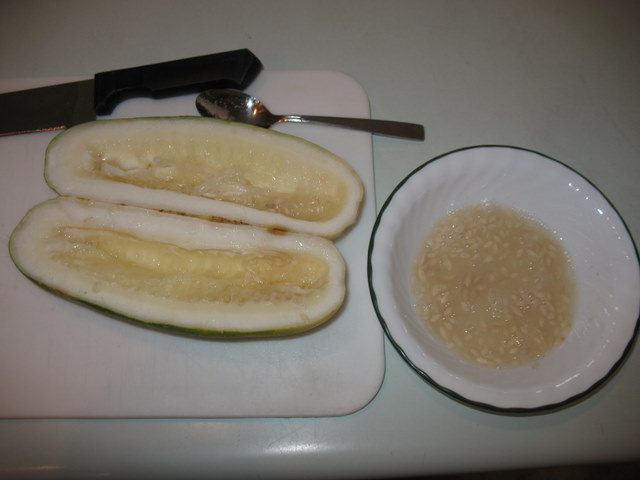
When it’s nice and big and softish, cut it open gently so you aren’t cutting seeds, and scoop the seeds out into a bowl. I guess at this point, you could eat the rest of the cucumber if you’re that hungry. We gave ours to the chickens.
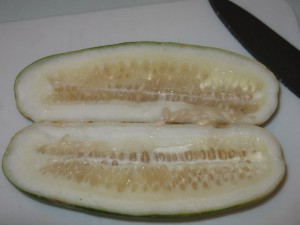

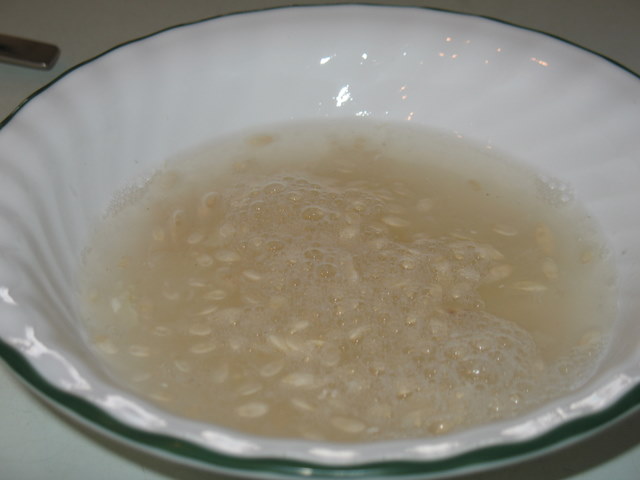
Each of the seeds are encased in a gel sack that needs to be removed, and the recommended process for gel sack removal is fermenting. When your seeds are in the bowl, add some water (about as much water as you have seeds). A deep bowl will work better than a shallow one–I don’t think I got enough water in here for the separation to be obvious, but it still worked. If you put too much water in, the fermenting process will be slowed or won’t work at all.

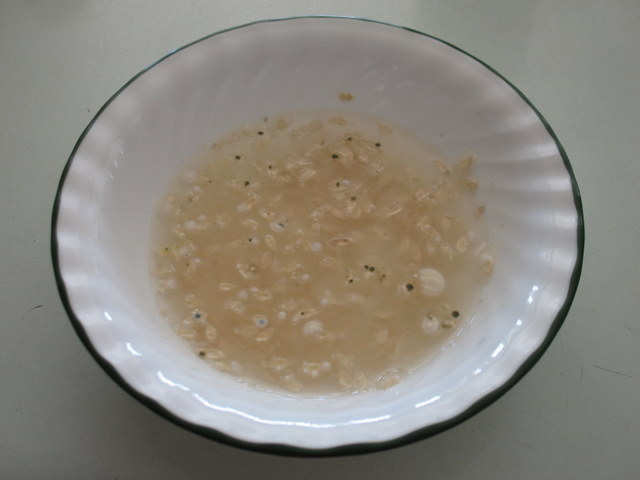
Then let the seed/water mixture sit on your counter for 2-3 days and get gross. Mine actually developed a bit of mold on the top–it may have gone a day too long, but I was waiting to see the gel sacks separate, and like I said, I don’t think I had enough water in the bowl to make the separation obvious enough, so I let it go until I was sure it was done.

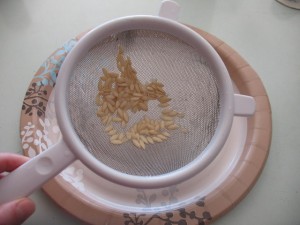
When the sacks have separated from the seeds, the sacks will be floating and the seeds will sink to the bottom of your bowl. Skim and pour the gel stuff off the seeds and rinse the seeds off.
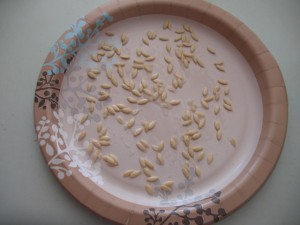
When the seeds are separated, they’ll be all clean and shiny and just the seed with no gross slimy stuff on them. Now lay them on a paper plate or something and let them dry for a week or so. They’re done when they snap in half instead of flexing when you try to bend them.
Now you’ve saved seeds from a cucumber! That wasn’t too hard, right? Bag them up and label them and keep them in a cool, dry place. Then plant some next spring and see how they grow!
http://foodstorageandsurvival.com/sa...eeds-cucumber/Last edited by AirborneSapper7; 01-12-2012 at 04:03 AM.
Join our efforts to Secure America's Borders and End Illegal Immigration by Joining ALIPAC's E-Mail Alerts network (CLICK HERE)
-
04-09-2011, 01:54 AM #635Senior Member
- Join Date
- May 2007
- Location
- South West Florida (Behind friendly lines but still in Occupied Territory)
- Posts
- 117,087
Saving Seeds: Squash
By Angela, on February 25th, 2011
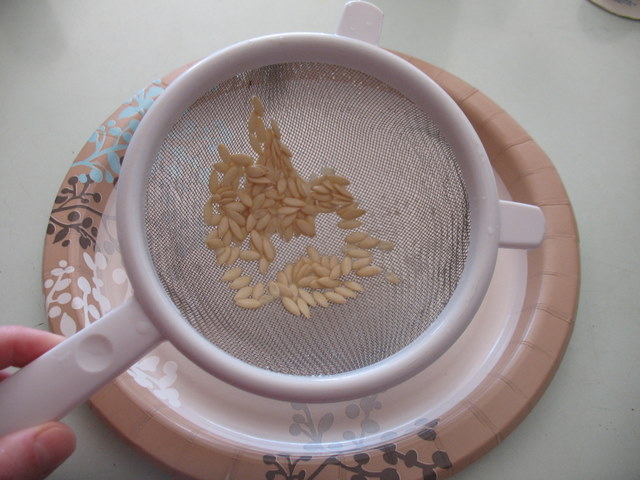
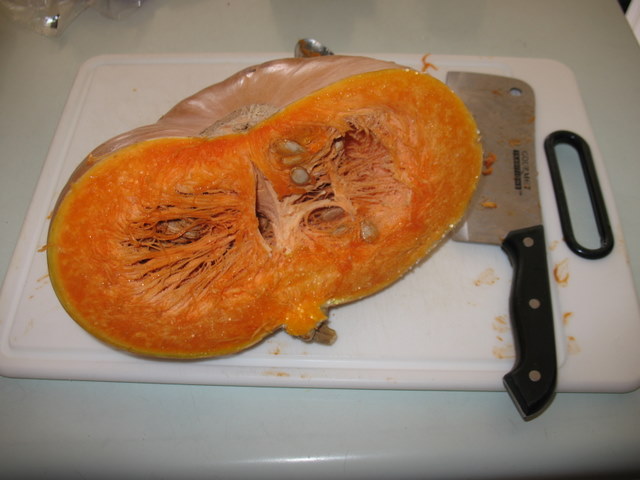
Saving squash seeds is pretty simple. The pictures I’m using are from a winter squash called Long Island Cheese. For summer squash, you want to let the squash get big and over-ripe like we did with the cucumber so the seeds can mature before trying to save the seeds. The squash will be long past the tender, eatable stage. Winter squash are eaten at the big mature stage, so their seeds are already ready to save. Seeds will continue to draw reserves from the squash after it is fully mature, so it’s okay and even good to wait a month or so (into late fall or even winter time) to extract your seeds from the harvested squash.
Saving seeds starts in the spring. You want to start by growing a non-hybrid plant. Now you want to keep your squash seeds pure. There are a couple of methods to keep your squash seeds from cross pollinating each other. The first and most tedious way is to hand pollinate your plants. You’ll need to be able to recognize the male and female flowers as well as know when they will open. I didn’t hand pollinate or take pictures of it, but someone else did and there is a fantastic pictorial guide on hand-pollinating squash here.
The second way to keep your squash from cross pollinating each other is to only plant one variety of squash for each of the four primary squash genus. The genus are cucurbita maxima, cucurbita mixta, cucurbita moschata, and cucurbita pepo. Each genus of squash will cross pollinate within its own genus, but they won’t cross with another genus. So a squash that is c. maxima won’t cross with a squash that is c. pepo. This gives you four different varieties of squash that can safely be planted in the same garden without having to hand pollinate the plants.
If you’re not sure what genus your squash seed is, check this list at Wikipedia. Some good seed companies (like Baker Creek Seeds) will list the genus in the seed description.
Once you’ve decided what squash to plant, let them grow and produce mature squash. When your squash is mature, carefully cut it open to expose the seeds.

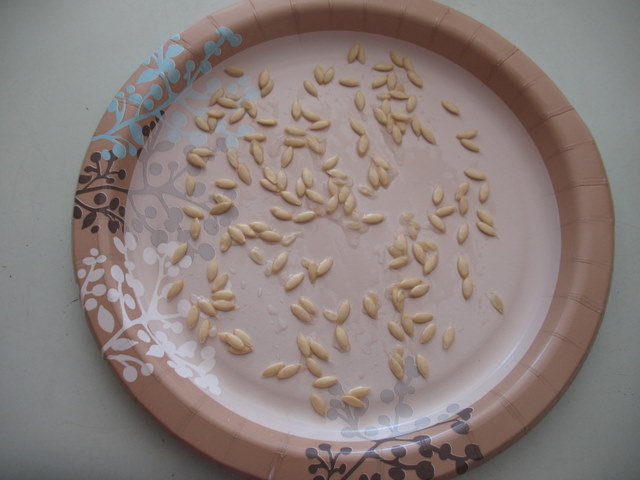
Remove the seeds with your hands or a scoop of some kind so you don’t damage them and separate them from the stringy stuff as best you can. Put the seeds in a colander and wash some of the slime off them.
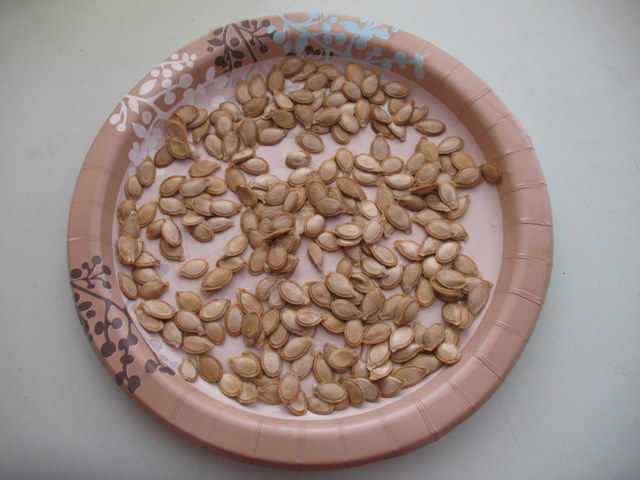
Now lay them out to dry. I put mine on a paper plate and set them on the counter. We live in a dry climate. If you live in a humid climate, this may not work for you. Maybe put them in a room where you’re running your air conditioner and it’s not so humid? I’m open to suggestions from any of y’all in the humid states to get your seeds dry.
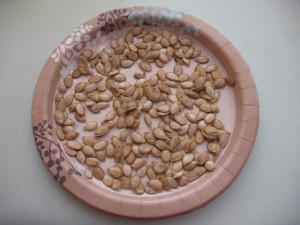
Let them dry until they snap when they are bent. It took about a week here. Now you can store them in a ziplock or paper sack or whatever and plant them next spring. Because you didn’t let them cross pollinate, you’ll get the same kind of squash from the seeds you plant as the squash you harvested the seeds from. The seeds should be good up to 5 years stored in a cool dry place. Once you get past the pollinating stage, squash are one of the easier plants to save seed from. Happy planting!
http://foodstorageandsurvival.com/saving-seeds-squash/Last edited by AirborneSapper7; 01-12-2012 at 04:04 AM.
Join our efforts to Secure America's Borders and End Illegal Immigration by Joining ALIPAC's E-Mail Alerts network (CLICK HERE)
-
04-09-2011, 01:59 AM #636Senior Member
- Join Date
- May 2007
- Location
- South West Florida (Behind friendly lines but still in Occupied Territory)
- Posts
- 117,087
Saving Seeds: Radish
By Angela, on January 21st, 2011
If you have an heirloom garden going with non-hybrid seeds, usually the point of going through the extra trouble of getting the non-hybrid varieties is so that you can save seed from your plants to plant again the following spring. Right? Saving seeds is not always as easy as it sounds, with some plants being easier to save seeds from than others. Today I’ll show you how to save radish seeds–they’re one of the easier seeds to grow and save.
First, plant some radishes. If you like to eat radishes, plant a few extra just for seed. If you’re like me and only your husband eats radishes, you can probably just plant radishes like normal and surely there will be extra that get too big that you can claim for your seed plants. The radishes that are going to produce seed are not going to be edible, so keep that in mind.
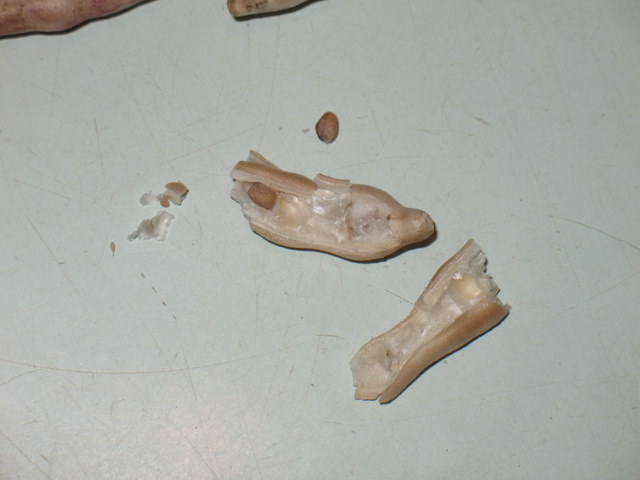
To let your radishes produce seed, simply don’t pull them out of the ground. Let them get big and ugly and then they’ll sprout a seed head that actually goes up pretty high and spreads a bit. It’s not a little radish plat anymore. Of course I didn’t take a picture of them on the plant, but I did have a few radish seed pods sneak into a picture I took of lettuce going to seed.
The radish pods are circled in red.
Next, let them dry on the plant. You’ll want to use early radishes for your seed so they have plenty of time to mature. The first year I tried this I used a later radish and the seeds didn’t mature enough to be viable the next spring. When the seed pods are dry, pull them off the plant. If you want, you can pick the whole plant before they’re all dry and hang it in a shed or someplace to let the pods finish drying (like if you’re going to get a long rainy spell at the end of your garden season or if your freeze is coming a little sooner than you expected). You’ll have better success just letting them dry while the plant is in the dirt. Now the pods look like this:
You can store them for however long you want in the pods–they’re nice and dry in there, they just take up more space than necessary and you can’t actually plant them until you get the seeds out of the pods, so eventually (like in the middle of January when there’s not much else going on) you’ll want to get the seeds out of the pods.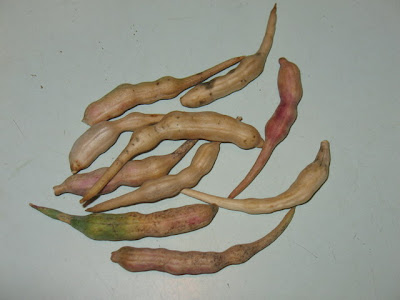
To save the seeds, just break open the radish seed pods. The tiny radish seeds are inside the pods.
Some of them are harder than others, you might end up getting out your nut cracker or using a blunt object to kind of crack the pods open to save your fingers!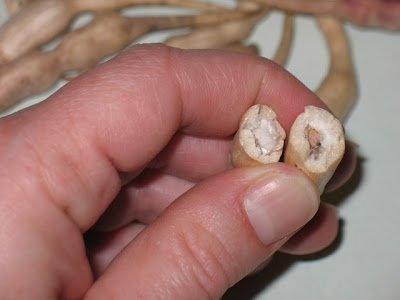

Save your seeds in a cool, dry place and label the packaging so you remember which year you harvested them. If you’re interested in saving seeds, I fully recommend Suzanne Ashworth’s book Seed to Seed
that covers techniques for saving seeds from most all the edible plants you’d want to save seeds from–many I’ve never even heard of! And, if you’re planning on saving seeds in a survival situation, it’s a really good idea to start now so you’ll be comfortable and competent at it if the time comes when saving seeds is the only way to get next year’s garden.
http://foodstorageandsurvival.com/saving-seeds-radish/Last edited by AirborneSapper7; 01-12-2012 at 04:07 AM.
Join our efforts to Secure America's Borders and End Illegal Immigration by Joining ALIPAC's E-Mail Alerts network (CLICK HERE)
-
04-09-2011, 02:16 AM #637Senior Member
- Join Date
- May 2007
- Location
- South West Florida (Behind friendly lines but still in Occupied Territory)
- Posts
- 117,087
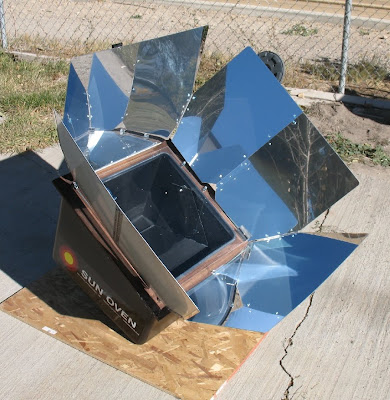
Cookies in the Sun Oven
By Angela, on November 4th, 2009
I’ve borrowed a Sun Oven from a sweet friend, and since it’s been sunny, I’ve been out experimenting with it a bit. I got it out Monday, intending to cook some bread in it since I was baking bread anyway, but it had never been out of the box, and the instructions say to let it heat up and then cool down and wash the interior before baking in it (you know, to burn off the “new” fumes), so that’s how Monday’s baking went–all the bread just went in the regular oven.
Tuesday was nice and sunny, so I busted the sun oven back out to bake some cookies. Here it is all set up in my yard:
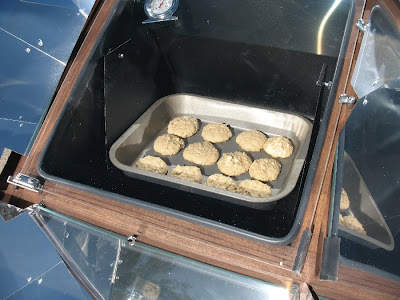
 After 20 or so minutes, it had heated up to about 310 degrees. Really. All you skeptics out there that think it would take two hours to heat up a solar oven, it really did heat up in 20 minutes. Here’s the thermometer:
 And just for good measure, here’s a photo of the back of the sun oven with the height adjustment leg to enable you to aim it right at the sun. EASY.
 I made my husband’s favorite oatmeal cookies and put a pan of them in the oven. The cooking chamber isn’t extremely large. I used a smallish pan instead of my regular cookie sheets.
 This cookie recipe is 350 for 10 minutes, so I checked at 10 minutes and the cookies weren’t quite done (of course, since the heat level was lower than 350).
 Here’s how we looked at 15 minutes. Done. Actually a little overdone–they were a bit dry. Not burned, just a bit dry. I pulled the second batch out a little sooner with better results.
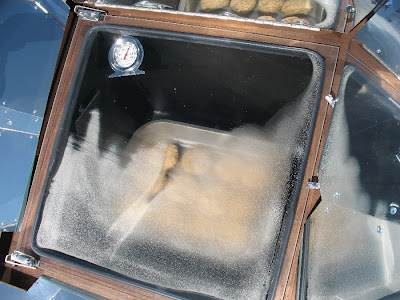 That’s steam coming out the top of the door when I opened it. Yep, it gets that hot in the oven.
 The cookies were delicious, and cooking in the sun oven was easy. I’m definitely sold. I’ll be trying something else this week before I have to give the oven back.
http://foodstorageandsurvival.com/co...-the-sun-oven/
Last edited by AirborneSapper7; 01-12-2012 at 04:09 AM.
Join our efforts to Secure America's Borders and End Illegal Immigration by Joining ALIPAC's E-Mail Alerts network (CLICK HERE)
-
04-09-2011, 02:20 AM #638Senior Member
- Join Date
- May 2007
- Location
- South West Florida (Behind friendly lines but still in Occupied Territory)
- Posts
- 117,087
Kids Prep Minute: Code Words
By Angela, on February 10th, 2010
Here’s a quick one to think about with your kids. If mom was unavailable to come get you and she had to send someone you didn’t know to pick you up from school/ball practice/whatever, how would you know they were safe to go with? Well, they’ll know the secret code word (or phrase) of course. When we were growing up, we made up a crazy secret code phrase. It is hilarious and nobody could come up with it if they weren’t told it, but it would be hard to forget once you heard it. Perfect. Never had to use it. I know you’re dying to know what it was, but I can’t give it away here because it’s a SECRET code word! Come up with some phrase that your kids and you can remember in an emergency situation. Then if anyone comes up to your kids and says their mom needs help and they are supposed to get in that person’s car right now, they’ll know to run the other way if they don’t hear the code word.
Another place a code word could be used is in an event that requires kids going straight to a safe room in the house or dropping and hiding where they are. Then if it is an intruder at the door, he won’t know what you’re yelling “BLUE PICKLES” for, but the kids will get the message and do what they need to do.
This code word could also be something you could “text” to your kids if they have cell phones. The key is that the code word enacts a plan that you have already made.
Think up times when your family might need to communicate something without letting the whole world know what you mean (think “Alas, Babylon“), or might need a “password” for security reasons. Come up with some good memorable code words for your family, and by all means, don’t tell me what they are!
http://foodstorageandsurvival.com/ki...te-code-words/
Last edited by AirborneSapper7; 01-12-2012 at 04:10 AM.
Join our efforts to Secure America's Borders and End Illegal Immigration by Joining ALIPAC's E-Mail Alerts network (CLICK HERE)
-
04-09-2011, 02:26 AM #639Senior Member
- Join Date
- May 2007
- Location
- South West Florida (Behind friendly lines but still in Occupied Territory)
- Posts
- 117,087
Baking Bread in a Solar Oven in the Utah Winter
By Angela, on January 24th, 2011
Solar ovens have a very good reputation for cooking things on hot, sunny days, but what if it’s not a hot day? Have you ever wondered how well a solar oven cooks in the winter? Me too. So I’ve spent a few days with the Global Sun Oven in the Utah winter. I’m kind of disappointed I missed the spell when high temperatures were in the teens early in January, but it was only in the low 30′s while I was baking January 15-20, so I wasn’t too far off of super-cold. And I’m in America, so all the temperatures in this article are Fahrenheit.
One thing about cooking in the winter is that you have fewer hours of available daylight to do the cooking. The best hours to use the solar oven are between 10:00 am and 2:00 pm, so you need to plan your cooking accordingly. Which, of course, I didn’t the day I was making bread for the family. I was planning on putting a loaf or two into the solar oven that day, and the rest in the regular oven, but I didn’t get the bread started early enough, so by the time it was risen in the pans it was 1:30 and I had an appointment at 2:00 I had to be at, so I didn’t want to chance putting a loaf in the solar oven and not being able to monitor whether it would cook all the way that day–especially with the temperatures dropping. As it was, I had to leave someone else in charge of taking the bread out of the regular oven.
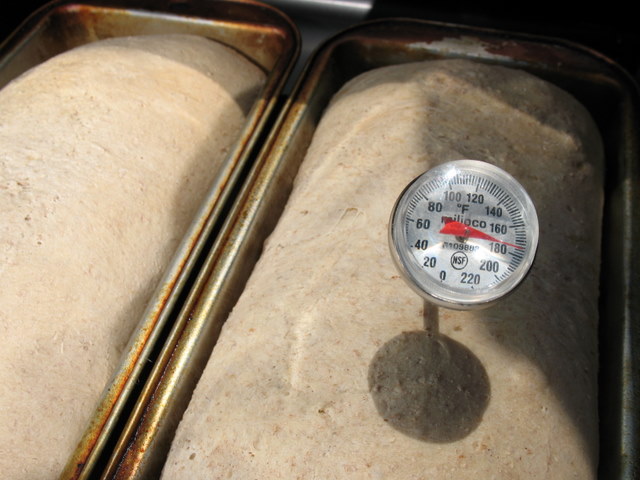
So I tried again on some cinnamon swirl bread since I had a bunch of regular bread already made up. This time I got started earlier. I set the solar oven up when the bread was doing its first rise so it could pre-heat. I got the bread in the oven around 11:00 am–it was 30 degrees outside, clear and sunny, and the Sun Oven was 355 degrees. Perfect.
As soon as the bread started to cook, it sweated and caused some condensation on the glass of the oven. This is normal, since in order for the oven to retain its heat it is not vented. This condensation caused the temperature of the oven to drop since it was blocking some of the sun rays entering the cooking chamber, but the temperature stabilized at just over 300 degrees.
So instead of baking the bread for the usual 40 minutes at 350, I left it in for 1 hour at degrees from 355 to 305. At the end of the hour, I tested it with my meat thermometer to make sure it was cooked all the way through. Bread needs to register 175 degrees or higher to be “done”, which mine was, so I took it out and set it on the cooling rack in the house.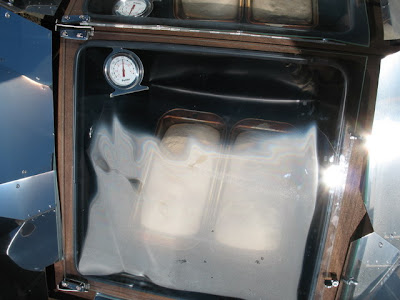
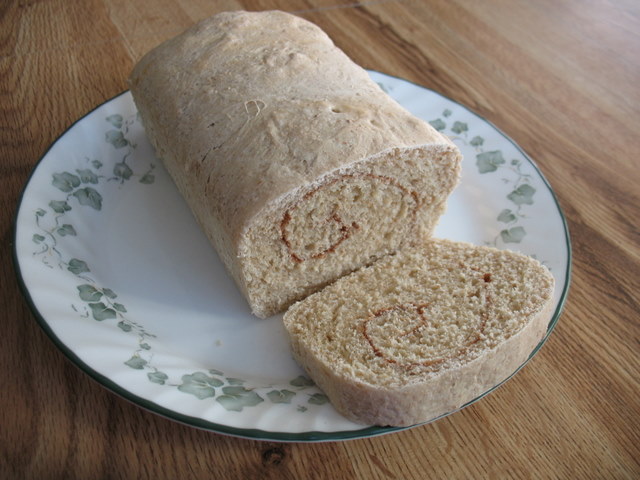
Bread cooked in the Sun Oven doesn’t brown like it does in the oven, so this is blond cinnamon swirl bread. It cooked up fine, moist and chewy. In fact, one whole loaf disappeared shortly after the kids got home from school. Nice. I hid the other loaf so sweet husband and I can have some!
So now you know it works. You can bake bread in a solar oven in the winter time. In fact, you could cook about anything in your solar oven in the winter as long as the day has some sunshine. Just keep that 10:00-2:00 window in mind and you’ll do fine. If you’re needing a solar oven, the Global Sun Oven is the one I use and sell, just shoot me an email and I’ll get you pricing on it.
http://foodstorageandsurvival.com/ba...e-utah-winter/Last edited by AirborneSapper7; 01-12-2012 at 04:12 AM.
Join our efforts to Secure America's Borders and End Illegal Immigration by Joining ALIPAC's E-Mail Alerts network (CLICK HERE)
-
04-09-2011, 04:23 AM #640Senior Member
- Join Date
- May 2007
- Location
- South West Florida (Behind friendly lines but still in Occupied Territory)
- Posts
- 117,087
What Can We Learn?
By Angela, on March 14th, 2011
I’m sure you’ve all been following the devastation in Japan the last few days. The earthquake, ensuing tsunami, evacuations, and nuclear power plant problems are beyond the average disaster. So what can be learned from this super disaster?
Here are a few things I’ve thought of–feel free to add your own in the comments.
1. Some situations you can’t prepare for–like the total sudden destruction of your home as in these pictures: (before/after). Any of those homes could have had a year’s worth of food in them and it wouldn’t help anybody now. Earthquakes come suddenly, Tsunamis usually with very little warning if any. There is not always time to get out or protect yourself or your family. But if you do have a bit of warning, you need to be ready to move out–fast!
2. #1 does not mean preparing is useless! If you happened to be away from home when something like that occurred, some emergency supplies in your car or office would be more than a little helpful in the days following the disaster. Note the people two days later in Japan needing clean water, food, etc. OR if you have important documents, etc. ready to grab at a moment’s notice, you’d save yourself a lot of trouble during recovery time.
3. The time to prepare for an earthquake is before it happens. Look around and see what things could cause damage in your home and get them secured. Don’t hang pictures above the beds in your home that could come off the wall and injure or kill. Take some precautionary measures in your home so it will be safer in the event of a disaster.
4. Take stock of your surroundings–natural and man-made. Do you live on or near a fault line? Near the ocean? On the edge of a river? Down stream from a dam? What are your most likely natural disasters? Then what man-made structures could cause a problem in an emergency? Do you live near nuclear plants, oil refineries, other places that could cause health and safety concerns if they are damaged or compromised? Or places like power plants that might be a potential terror target? Look around, assess your own situation, and act so that your family is as safe as you can make them.
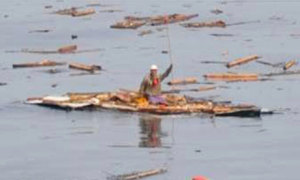
5. Sometimes you get lucky. Like this guy.
6. Help is coming, but slowly. No way are the hardest hit areas going to see relief any time soon. Resources are stretched pretty thin in a major disaster like this one. 72 hour kits are misleading–it could take a week or likely longer for outside help to get to some areas. It usually does.
7. Disease is also coming. Although the cold weather is not great for those left homeless, it might help keep disease down from the bodies long enough to get some of them cleaned up and taken care of. I’m no medical expert here, just a thought I had. Sanitation is huge at this stage to keep the survivors healthy. Clean water will be a big factor here also. We’ll see over the next few weeks how this plays out–hopefully they’ll be able to keep health issues under control.
What I don’t want is to watch all the news coverage in shock and come away no better prepared in our own families. And so I ask, what can we learn? What is one more thing you or I could do to be better prepared? What observations have you made?
http://foodstorageandsurvival.com/what-can-we-learn/Last edited by AirborneSapper7; 01-29-2012 at 10:36 PM.
Join our efforts to Secure America's Borders and End Illegal Immigration by Joining ALIPAC's E-Mail Alerts network (CLICK HERE)


 Reply With Quote


Breaking: 25 Chinese "Soldiers" Caught at US Border, Massive...
06-21-2026, 07:49 PM in General Discussion