

Results 7,061 to 7,070 of 10756
 226Likes
LinkBacks (?)
-
12-26-2016, 11:32 AM
-
09-02-2016, 05:39 PM
-
whole garden made with pallets!! Love it!! | Pallets | Pinterest | Pallets, Pallets Garden and Wooden Pallets
Refback This thread03-06-2016, 11:30 AM -
10-20-2015, 05:29 PM
-
06-12-2015, 08:00 PM
-
02-26-2015, 01:58 PM
-
01-05-2015, 04:13 PM
-
12-19-2014, 10:19 AM
-
EMERGENCY: HUGE FEMA PANDEMIC EXERCISE IN USA IN NOVEMBER, INTERNET SHUT DOWN PART OF EXERCISE | Prepare4Survival
Refback This thread12-03-2014, 10:39 PM -
Off Grid World ? Ugly Duckling Shipping Container Home Built by Artist Is a Beautiful Swan on the Inside
Refback This thread11-25-2014, 03:10 PM -
11-17-2014, 10:59 PM
-
11-13-2014, 11:18 AM
-
11-09-2014, 02:54 PM
-
10-28-2014, 11:38 PM
-
10-26-2014, 05:54 AM
-
10-16-2014, 11:28 AM
-
10-03-2014, 01:25 PM
-
10-02-2014, 09:16 PM
-
09-26-2014, 07:00 PM
-
09-26-2014, 01:56 PM
-
09-19-2014, 04:46 PM
-
09-13-2014, 05:49 AM
-
09-05-2014, 01:52 PM
-
09-01-2014, 09:39 AM
-
08-30-2014, 06:29 PM
-
08-10-2014, 06:29 AM
-
08-04-2014, 05:07 PM
-
07-23-2014, 11:14 AM
-
New Evidence on Expiration Dates | Medical Preparedness | Doom and Bloom (TM) | Doom and Bloom (TM)
Refback This thread07-22-2014, 10:10 AM -
07-18-2014, 08:37 PM
-
07-15-2014, 04:57 PM
-
07-11-2014, 01:40 AM
-
04-22-2014, 11:14 AM
-
04-18-2014, 12:57 PM
-
04-18-2014, 10:10 AM
-
04-14-2014, 12:18 AM
-
04-12-2014, 02:28 AM
-
03-02-2014, 11:43 PM
-
12-24-2013, 11:59 PM
-
12-07-2013, 11:04 PM
-
kitchen | Cob
Refback This thread11-25-2013, 03:24 PM -
10-22-2013, 10:25 PM
-
Apple Pie Braid | Sweets
Refback This thread09-26-2013, 07:58 AM -
09-02-2013, 04:44 PM
-
5 Reasons Why You May have to Bug Out Even Though You Don’t Want to | The Apartment Prepper's Blog
Refback This thread08-23-2013, 03:20 PM -
06-27-2013, 06:30 AM
-
06-23-2013, 08:11 PM
-
06-17-2013, 11:21 PM
-
05-24-2013, 05:06 PM
-
To Eat / BASIC LIST / SUGGESTED ITEMS FOR LONG TERM SURVIVAL - Page 275 - ALIPAC
Refback This thread05-01-2013, 03:49 AM
Thread Information
Users Browsing this Thread
There are currently 6 users browsing this thread. (1 members and 5 guests)
 LinkBack URL
 About LinkBacks
-
11-03-2022, 06:26 AM #7061Senior Member


- Join Date
- Aug 2018
- Posts
- 84,358
The Top 50 Survival Blogs!
http://www.survivaltop50.com/
=> View these other great Survival Blogs that almost made the Top 50!
http://www.survivaltop50.com/runners-up/If you're gonna fight, fight like you're the third monkey on the ramp to Noah's Ark... and brother its starting to rain. Join our efforts to Secure America's Borders and End Illegal Immigration by Joining ALIPAC's E-Mail Alerts network (CLICK HERE)
-
11-04-2022, 02:42 AM #7062Senior Member
- Join Date
- Aug 2018
- Posts
- 84,358
Prepper tips and tricks: How to stay warm in winter using cayenne peppers
Thursday, November 03, 2022 by: Zoey Sky
140VIEWS

If you need help keeping your feet warm during winter, use an unusual but effective ingredient: cayenne peppers. (h/t to AskAPrepper.com)(Natural News) Winter is just around the corner. It is important to keep your feet warm during cold season especially if the circulation in your feet is a concern.
You can buy cayenne salve, also called capsaicin salve or ointment, at the local pharmacy or supermarket. This product is used to relieve back and neck pain and it works by warming the muscles and loosening them up. (Related: Seven evidence-based medicinal properties of cayenne pepper.)
Cayenne salve can also be used to keep your feet warm. If you dont want to spend money on cayenne salve, use the homemade pepper remedies detailed below to warm your feet during the cold winter months.
You can use any peppers that contain capsaicin, but be very careful when using peppers that are very high on the Scoville scale because they could burn your skin. This also means that peppers at the low end might not be hot enough to be effective.
Another option is to use hot peppers from your home garden. Dry them first using a dehydrator or an oven to remove all water, then use a grinder to turn the peppers into powder.
Things to remember before using cayenne pepper
Keep these tips in mind when using cayenne peppers to make home remedies:
- Always wash your hands after touching hot peppers. Touching sensitive parts of your body like your eyes will cause an intense burning sensation.
- Never use pepper if you have cuts or open wounds because it can burn you.
- Cayenne pepper can stain your socks and your feet. If youre going to put pepper in your socks, use an old pair that you dont mind getting stains on.
- Use cayenne sparingly at first since it can warm more than expected. Gradually increase the amount you use until you find the right amount for you.
Sprinkle cayenne powder on your feet
Looking for an easy and cheap way to use hot pepper to warm your feet? Sprinkle a bit of cayenne pepper powder into your socks.
 Just be careful not to use too much and spread it evenly over your feet. If its your first time using cayenne powder on your feet, test a tiny amount first to see if you are sensitive to peppers.
Once youre used to the remedy, use more or less cayenne pepper powder depending on your sensitivity.
Limit the amount of pepper and get it evenly distributed by adding a small amount of pepper such as half a teaspoon into 1/4 cup of cornstarch or foot powder. Mix the ingredients well and add a teaspoon of the mixture to each sock. Move the sock around a bit to evenly distribute the powder.
Alternatively, you can shake the powder evenly onto your feet using a sifter or shaker jar. Sprinkle cayenne powder to keep your feet warm and dry on a cold, wet day or when working in the snow.
Eat hot peppers
Eating hot peppers will also help warm up your entire body.
Hot peppers like cayenne contain an active ingredient called capsaicin and it makes your blood vessels dilate, which then makes extra blood flow and provides warmth to the hands and feet. You may feel the effect immediately, but other people feel the heat increase gradually.
As a bonus, eating hot peppers also helps add nutrients to your diet. Peppers contain beneficial vitamins, antioxidants and anti-inflammatory compounds like potassium and magnesium, along with vitamins A, B6, C, E and K.
Try adding peppers to dishes to stay warm and healthy during winter.
Here are more ways to incorporate hot peppers into your regular diet:
- Add a pinch of cayenne into hot chocolate for a warming beverage with a spicy kick. Hot chocolate with cayenne pepper is often enjoyed in Latin American countries. Add a dash of cinnamon or stir the hot chocolate with a cinnamon stick to complement the cayenne pepper.
- Keep a shaker of cayenne pepper at the dining table and sprinkle cayenne on seafood like fish, lobsters, oysters, and shrimp.
- Add cayenne to hot soups and stews.
- Replace salt with cayenne to give dishes a flavor boost or as a low-sodium spice alternative.
- Add cayenne pepper to egg dishes like breakfast souffles, omelets and egg salad.
- Sprinkle cayenne pepper over tomatoes and other fresh vegetables when making a salad.
- Add cayenne to meat marinades, especially for poultry and fish dishes.
- Use cayenne to spice up hummus, guacamole and other dips.
Make DIY cayenne pepper salve
Instead of buying commercially available salves with cayenne pepper, make some at home using only three ingredients. Cayenne pepper salve will warm your feet and help heal the skin, depending on what type of oils you add.
Some DIY cayenne pepper salve recipes call for a double boiler, but this recipe takes a shortcut by using a crockpot and a Mason jar for infusing the oil and melting the beeswax.
Homemade cayenne pepper salve
You will need:
- 2 Tablespoons cayenne powder
- 1/2 Cup olive oil or other carrier oil
- 1/2 Ounce beeswax
Preparation:
- Pour one to two inches of warm water in the bottom of the crockpot and set it on medium.
- Place the beeswax into a small heatproof jar and the olive oil in a second small jar. Use eight-ounce mason jars.
- Add the cayenne powder to the oil and mix it thoroughly.
- Place the oil and the pepper jar into the crockpot. Place the lid on loosely to keep condensation out of the jar. Put the lid on the crockpot and let it heat gently for four hours or infuse it on low overnight.
- Remove the lid and place the jar with the beeswax into the crockpot. Let the jar warm until the wax is melted.
- Remove the two jars from the crockpot, dry off the outsides and pour the oil through a cheesecloth or a strainer if you want to remove the pepper.
- Stir the infused oil into the wax slowly. Keep stirring until the wax and oil are completely mixed.
- Pour the salve into small jars or tin cans and let it cool. Label the salve containers and store them in a cool, dark place for future use.
Stay warm in cold weather by adding cayenne pepper powder to your socks or make a cayenne salve.
Watch this video to learn more about the health benefits of cayenne pepper.
This video is from the Holistic Herbalist channel on Brighteon.com.
More related stories:
Prepper secret: Cayenne pepper offers a natural way to improve blood circulation in your feet.
Prepper medicine: Cayenne pepper boosts metabolism, kills bacteria and even stops bleeding.
Cayenne pepper makes herbs up to 75% more effective, aids weight loss, offers pain relief, improves circulation and heals ulcers.
Sources include:
AskAPrepper.com
MindBodyGreen.com
Livestrong.com
Prepper tips and tricks: How to stay warm in winter using cayenne peppers NaturalNews.comIf you're gonna fight, fight like you're the third monkey on the ramp to Noah's Ark... and brother its starting to rain. Join our efforts to Secure America's Borders and End Illegal Immigration by Joining ALIPAC's E-Mail Alerts network (CLICK HERE)
-
11-06-2022, 06:58 PM #7063Senior Member
- Join Date
- Aug 2018
- Posts
- 84,358
 If you're gonna fight, fight like you're the third monkey on the ramp to Noah's Ark... and brother its starting to rain. Join our efforts to Secure America's Borders and End Illegal Immigration by Joining ALIPAC's E-Mail Alerts network (CLICK HERE)
-
11-07-2022, 04:53 AM #7064Senior Member
- Join Date
- Aug 2018
- Posts
- 84,358
$7 Winter Cabin Build (on an Extreme Budget!) - YouTube
$7 Winter Cabin Build (on an Extreme Budget!)
17,813 views
Jan 15, 2022
1.7K
Modern Self Reliance
248K subscribersIf you're gonna fight, fight like you're the third monkey on the ramp to Noah's Ark... and brother its starting to rain. Join our efforts to Secure America's Borders and End Illegal Immigration by Joining ALIPAC's E-Mail Alerts network (CLICK HERE)
-
11-07-2022, 04:54 AM #7065Senior Member
- Join Date
- Aug 2018
- Posts
- 84,358
This Survival Tool Is Built to Last Forever - YouTube
#survival #prepping #camping
This Survival Tool Is Built to Last Forever
921k views
Dec 27, 2021
11K
Canadian Prepper
663K subscribersLast edited by Airbornesapper07; 07-31-2024 at 12:07 AM.
If you're gonna fight, fight like you're the third monkey on the ramp to Noah's Ark... and brother its starting to rain. Join our efforts to Secure America's Borders and End Illegal Immigration by Joining ALIPAC's E-Mail Alerts network (CLICK HERE)
-
11-07-2022, 05:02 AM #7066Senior Member
- Join Date
- Aug 2018
- Posts
- 84,358
Crisco candle room heating | Power Outage Room Heating | 9 hour test - YouTube
#criscocandleroomheating #poweroutageroomheating #emergencyheatpoweroutage
Crisco candle room heating | Power Outage Room Heating | 9 hour test
19,309 views
Dec 12, 202
1.3K
Riverside Homestead Life
45.7K subscribersIf you're gonna fight, fight like you're the third monkey on the ramp to Noah's Ark... and brother its starting to rain. Join our efforts to Secure America's Borders and End Illegal Immigration by Joining ALIPAC's E-Mail Alerts network (CLICK HERE)
-
11-07-2022, 05:03 AM #7067Senior Member
- Join Date
- Aug 2018
- Posts
- 84,358
Springfield Armory M1A SOCOM 16 308 Rifle - YouTube
Springfield Armory M1A SOCOM 16 308 Rifle
4,413,496 views
Aug 1, 2016
45K
sootch00
1.22M subscribersLast edited by Airbornesapper07; 07-30-2024 at 11:58 PM.
If you're gonna fight, fight like you're the third monkey on the ramp to Noah's Ark... and brother its starting to rain. Join our efforts to Secure America's Borders and End Illegal Immigration by Joining ALIPAC's E-Mail Alerts network (CLICK HERE)
-
11-07-2022, 05:25 AM #7068Senior Member
- Join Date
- Aug 2018
- Posts
- 84,358
Building an Off-Grid Homestead ..... start to finish - YouTube
Building an Off-Grid Homestead ..... start to finish
7,064,259 views
Jan 10, 2021
125K
2.8K
Bushradical
474K subscribersIf you're gonna fight, fight like you're the third monkey on the ramp to Noah's Ark... and brother its starting to rain. Join our efforts to Secure America's Borders and End Illegal Immigration by Joining ALIPAC's E-Mail Alerts network (CLICK HERE)
-
11-07-2022, 05:49 AM #7069Senior Member
- Join Date
- Aug 2018
- Posts
- 84,358
How to Throw a Knife Without It Spinning
Using the Mumyou-Ryu Technique2Using the Russian Technique3
Using the Thorn Technique
OTHER SECTIONS
Questions & Answers
Video
Related Articles
References
Article Summary
Co-authored by wikiHow StaffLast Updated: June 1, 2022 References Approved
Knife throwing is a timeless skill handed down through the generations that requires extraordinary focus, dexterity and precision. Most knife throwing techniques are recognizable by the mathematical calculation of the thrower and the signature whirl of the blade as it spins through the air. However, its also possible to hit a target accurately from almost any range without prior planning or a meticulous setup. This is accomplished through no-spin techniques, where the blade travels from the throwers hand to the target with little or no rotation. Throwing a knife with no spin only requires minor adjustments from standard knife throwing techniques, and can often be learned in just a few days.
ethod1
Using the Mumyou-Ryu Technique
- 1

Take the proper grip. Sticking a knife with no rotation is made possible by modifying the standard throwing grip. Wrap your hand loosely around the handle of the knife. Pinch the handle between your thumb and the length of your middle finger. Place your index finger flat against the spine of the blade at the knifes center of balance. This is known as the thumb grip, or sometimes the drive-finger grip, as youll be using your thumb to guide the movement of the knife and your index finger to drive it forward as you release.[1]
- The thumb grip is used to neutralize the rotation of the blade after it leaves the hand.
- Every knife will have a slightly different center of balance. Locate the knifes center of balance by laying it across one outstretched finger and adjusting it until it balances on its own. This is the section of the knife on which you should place the point of your finger.[2]
- 2

Line the knife up with the target. Hold your arm straight out in front of you with the tip of the blade trained on your target. Eyeball the exact spot youre aiming for. Pay close attention to the angle and position of your arm. This is where your arm will need to be at the moment you release the knife.[3]
- Pointing the knife in the direction of the target before you throw can help muscle memory take over, giving you a sense of exactly where your arm should be when you release.
- For better accuracy, make a quick initial lineup part of your throwing ritual.
- 3

Raise the knife up beside your head. Keeping your shoulder fixed and your upper arm parallel with the ground, draw the knife back until its level with your head. Your elbow should be bent about 90 degrees, with the blade of the knife pointing straight up. Square your stance and take a small step forward with your opposite foot.[4]
- To get an idea of what position your shoulder and forearm need to be in, hold up your throwing arm as though you were making the goal gesture used by fans of American football.
- The Mumyou-Ryu technique was derived from a technique used by ancient Japanese warriors to throw circular projectiles (shuriken, or throwing stars) without rotation. It was adapted for use with straight, modern knives and spikes.[5]
- 4

Release the knife in a smooth slinging motion. Lean over your front foot as you prepare to throw. Let go of the knife while your throwing arm is at roughly a 45 degree anglethis will help compensate for gravity and create the relaxed arc that the knife will trace in the air. At the moment of release, lightly brush the length of the spine with your pointer finger. Straighten your arm so that you complete the throw pointing at your target. With any luck, youll hear the thump of a successful stick.[6]
- Bring your forearm and knife hand down in a circular path, in one quick movement.
- Your forearm should stay straight up and down throughout the windup and release.
- Method2
Using the Russian Technique
- 1

Hold the knife with the thumb grip. Assume the thumb grip. This will be the most efficient way of minimizing the knifes rotation in flight. Press the handle of the knife snugly between your thumb and middle finger, but dont squeeze too tight. During the throw, your wrist and forearm should move as one.[7]
- With the thumb grip, the blade must be flung with the arm and shoulder using a pushing motion, rather than the snap of the wrist which usually causes the knife to spin.
- 2

Raise the knife up and out to the side of your body. Extend your throwing arm with the knife held upright just above and behind your head. The blade should be almost vertical, hovering out at a shallow angle. When using the Russian technique, the knife should point slightly out to your dominant side before it is thrown. Bend your elbow a little so that the blade of the knife is nearly parallel to the ground. Stay loose and ready to time your throw.[8]
- Holding the knife out further from your body creates additional torque, allowing you to throw the knife with more force.
- The Russian technique requires a little more room to move, so be aware of your surroundings before you start waving the knife around.
- 3

Rotate your hips and shoulders. Initiate the throwing motion by winding up with your upper body. Turn your hips and shoulders a few inches away from the target in the same direction of your knife hand (right-handed knife throwers will turn clockwise, left-handed throwers should turn counterclockwise). The Russian no-spin throwing technique relies on lateral motion to generate force, which means youll be focusing on the movement of your midsection rather than just your arm.[9]
- Dont let your knees or feet turn as you twist your upper body. This will throw off your base, as youll no longer be facing the target.
- 4

Use a whip-like motion to throw the knife. Once youve drawn back all the way, reverse the motion suddenly. Rotate your hips and shoulders in the opposite direction. At the same time, sling your arm out at an angle, releasing the knife just before your throwing hand lines up with the target. Follow through with the throw the way you would if you were cracking a whip, keeping your arm extended until the blade makes contact.[10]
- The trickiest part of the Russian technique is timing your release correctly. Its more difficult to gauge where the knife will end up as youre throwing from the side and not centering the blades path with your line of sight like with vertical throws.
- Despite the somewhat complicated mechanics, the Russian method of no-spin throwing is thought to be more consistently accurate than other techniques.[11]
Method3Using the Thorn Technique
- 1

Take hold of the knife. Grab the knife high up on the handle. For the Thorn technique, you can use either a thumb grip or a modified hammer grip for increased stability. Since youll be using your entire arm to throw, so you should make sure that you have a secure grasp in order to control the path of the blade.[12]
- The Thorn method of no-spin throwing was invented by and named after knife throwing instructor Ralph Thorn.[13]
- To modify a hammer grip for no-spin throwing, wrap your whole fist around the handle of the knife, the way you would a hammer. Then, uncurl your pointer finger and rest it along the spine of the blade.
- Whether you choose a thumb grip or a modified hammer grip, your grasp should be firm but not too strong. The tighter you hold on, the more difficult and unreliable your release will be.
- 2

Keep your shoulder relaxed. The key to the Thorn technique is the windmill-like motion of the arm. This can put a lot of strain on the tendons and ligaments of the rotator cuff if youre maintaining a lot of tension. Shake out your arm and loosen up a bit before you start throwing. If youre not careful, you may be setting yourself up for injury.[14]
- Warm up before your knife throwing sessions with some basic mobility exercises and a little light stretching.
- If the Thorn method causes pain in any part of your shoulder or arm, stop and switch to a less strenuous technique.
- 3

Pull your arm back beside your head. Bend your throwing arm slightly and lock it into place. Your upper arm and elbow should only form about a 35 or 40 degree angle. Raise your arm until its above and slightly behind your head. With the Thorn technique, youll use your entire arm to throw, not just the momentum of the forearm.
- Stand up straight and fully extend your back as you start the windup.
- 4
Throw the knife using your entire arm. To perform the throw, drop your arm fast in a circular arc, not letting the elbow bend. Release the knife right before your hand falls level with the target. Thrust your index finger forward during the release and follow through to prevent the knife from spinning. When executed correctly, the knife should sail in a smooth, direct line toward the target.[15]
- It may be helpful to practice the Thorn technique in two separate phases: the wide, looping motion of the arm and the timing of the release.
- Most no-spin techniques, like the Thorn method, are a combination of a traditional knife throwing motion and the heaving action used to throw spears.
3 Ways to Throw a Knife Without It Spinning - wikiHow
If you're gonna fight, fight like you're the third monkey on the ramp to Noah's Ark... and brother its starting to rain. Join our efforts to Secure America's Borders and End Illegal Immigration by Joining ALIPAC's E-Mail Alerts network (CLICK HERE)
-
11-07-2022, 06:02 AM #7070Senior Member
- Join Date
- Aug 2018
- Posts
- 84,358
How to get fresh water out of thin air
by: True Activist Posted on September 5, 2013
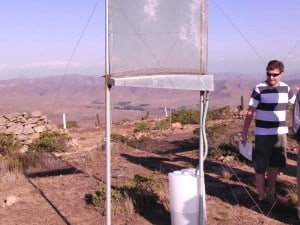 Image Credit: MITFog-harvesting system developed by MIT and Chilean researchers could provide potable water for the worlds driest regions.
CAMBRIDGE, Mass. In some of this planets driest regions, where rainfall is rare or even nonexistent, a few specialized plants and insects have devised ingenious strategies to provide themselves with the water necessary for life: They pull it right out of the air, from fog that drifts in from warm oceans nearby.
Now researchers at MIT, working in collaboration with colleagues in Chile, are seeking to mimic that trick on a much larger scale, potentially supplying significant quantities of clean, potable water in places where there are few alternatives.
Fog harvesting, as the technique is known, is not a new idea: Systems to make use of this airborne potable water already exist in at least 17 nations. But the new research shows that their efficiency in a mild fog condition can be improved by at least fivefold, making them far more feasible and practical than existing versions.
The new findings have just been published online by the journal Langmuir, a publication of the American Chemical Society, in a paper by MIT postdoc Kyoo-Chul Park PhD 13, MIT alumnus Shreerang Chhatre PhD 13, graduate student Siddarth Srinivasan, chemical engineering professor Robert Cohen, and mechanical engineering professor Gareth McKinley.
Fog-harvesting systems generally consist of a vertical mesh, sort of like an oversized tennis net. Key to efficient harvesting of the tiny airborne droplets of fog are three basic parameters, the researchers found: the size of the filaments in those nets, the size of the holes between those filaments, and the coating applied to the filaments.
Most existing systems turn out to be far from optimal, Park says. Made of woven polyolefin mesh a kind of plastic that is easily available and inexpensive they tend to have filaments and holes that are much too large. As a result, they may extract only about 2 percent of the water available in a mild fog condition, whereas the new research shows that a finer mesh could extract 10 percent or more, Park says. Multiple nets deployed one behind another could then extract even more, if so desired.
While some of the organisms that harvest fog do so using solid surfaces such as the carapace of the Namib beetle, native to the Namib desert of southern Africa permeable mesh structures are much more effective because the wind-blown fog droplets tend to be deflected around solid surfaces, Park says. Thus, a woven mesh structure resembling a window screen turns out to be most effective. With the right chemical coating, fog droplets that form on the screen then slide down to be collected at the bottom and are funneled into buckets or tanks.
(1822) Current standard fog-harvesting mesh material - YouTube
A comparison of the current standard fog-harvesting mesh material (top) and the new version designed by the MIT team (bottom), under identical conditions, demonstrates how much more rapidly water accumulates from the improved version. Video courtesy of the researchers.
(1822) MIT-designed fog-harvesting mesh material - YouTube
Video courtesy of the researchers
The researchers found that controlling the size and structure of the mesh and the physical and chemical composition of this coating was essential to increasing the fog-collecting efficiency. Detailed calculations and laboratory tests indicate that the best performance comes from a mesh made of stainless-steel filaments about three or four times the thickness of a human hair, and with a spacing of about twice that between fibers. In addition, the mesh is dip-coated, using a solution that decreases a characteristic called contact-angle hysteresis. This allows small droplets to more easily slide down into the collecting gutter as soon as they form, before the wind blows them off the surface and back into the fog stream.
While the systems currently deployed in the coastal mountains at the edge of the Atacama Desert tend to yield a few liters of drinking water per day for each square meter of mesh, the theoretical calculations show that newly designed systems operating in the strong winds and dense fogs that form along the Chilean coast at certain times of the year could yield up to 12 liters per day or more, the researchers say.
In collaboration with researchers at the Pontifical Catholic University in Santiago, Chile, the MIT researchers have recently installed a variety of test screens made of different materials on hilltops in a semi-arid region north of Santiago, an area that sees very little rainfall, but which is regularly enshrouded in a strong windblown coastal fog called camanchaca rolling in from the Pacific Ocean. The team is currently carrying out a yearlong test to study the durability and water yield of different configurations.
Maria Tou 14, an MIT undergraduate, worked with the team in Chile, helping to install instrumentation that can observe the fluid mechanics associated with the fog droplets as they collect, grow and coalesce on the meshes.
Large mesh structures, of hundreds of square meters each, could be set up relatively inexpensively; once in place, they cost virtually nothing to operate. They consume no energy, needing only an occasional brushing to remove particles of grit and bugs. The operating cost is essentially zero, McKinley says, because nature has already done the hard work of evaporating the water, desalinating it and condensing the droplets. We just have to collect it.
Chilean investigators have estimated that if just 4 percent of the water contained in the fog could be captured, that would be sufficient to meet all of the water needs of that nations four northernmost regions, encompassing the entire Atacama Desert area. And with the MIT-designed system, Park points out, 10 percent of the fog moisture in the air passing through the new fog collector system can potentially be captured.
The research was supported by a Samsung scholarship, the MIT-Legatum Center for Entrepreneurship and Development, MITs MISTI-Chile program, and the Xerox Foundation.
Credits: http://web.mit.edu
If you're gonna fight, fight like you're the third monkey on the ramp to Noah's Ark... and brother its starting to rain. Join our efforts to Secure America's Borders and End Illegal Immigration by Joining ALIPAC's E-Mail Alerts network (CLICK HERE)


 Reply With Quote


Say No To Taxpayer Healthcare For Illegals
10-02-2025, 08:44 AM in illegal immigration Announcements