

Results 11 to 20 of 49
 1Likes
Thread Information
Users Browsing this Thread
There are currently 2 users browsing this thread. (0 members and 2 guests)
 LinkBack URL
 About LinkBacks
-
06-18-2013, 07:38 PM #11Senior Member


- Join Date
- Apr 2006
- Location
- New York, The Evil Empire State
- Posts
- 2,680
Ultimate List of Open Source Software
Ultimate List of Open Source Software
http://www.datamation.com/osrc/artic...e-Software.htm
Hundreds of open source software applications, from accounting to graphics editors to office software, games to multimedia to security the mega open source software list.
December 21, 2010
By Cynthia Harvey
(Page 1 of 13)
This list of open source software applications covers the gamut and then some. After all, 'tis the season to overindulge, and in honor of the occasion we've put together a list with more open source software than anyone can digest in one sitting. Gulp. We've updated last year's Monster List of Open Source Downloads getting rid of the projects that are no longer active and adding the projects that were featured on Datamation for the first time this year. The result is a sprawling list of 715 noteworthy tools from the open source community.
Of course, with any list this long, some of the apps are more mature than others. And it's even possible that we may have overlooked some great open source apps. Feel free to add your suggestions for next year's open source monster list in the comments section below.
Ultimate list of open source software:
Accounting to Audio Tools // Backup to Cloud Infrastructure // Cloud Desktop to CRM // Databases to Developer Tools // Dictionary to Encryption // Emulators to Foreign Language // Forensics to Graphics Editors // Healthcare to Modeling // Multimedia to Network Simulation // Office to POS // Portable Apps to Smoking Cessation // Speech to Typing // Utilities to Web Editors
Open Source Software: Accounting
1. Edoceo Imperium
This Web-based app combines basic CRM features with accounting capabilities. While it can be accessed from any browser, you'll need a Linux server running Apache, PHP, Zend, and PostgreSQL to host the software. Operating System: Windows, OS Independent.
2. FriFinans
Aimed at small to medium-sized organizations, FriFinaans offers a cross-platform, multi-user client-server based accounting system. It tracks accounts, debtors, creditors, products, and more. Operating System: OS Independent
3. FrontAccounting
If your business is large enough to have multiple users who need access to your accounting system, FrontAccounting offers a Web-based app that also adds some ERP features. The interface is basic but easy to use, and the site includes an extensive wiki with lots of support. Operating System: OS Independent.
4. GnuCash
If you run a very small or home-based business and you've been using Quicken to track your accounts, GnuCash can give you some of the additional business features you need, like tracking customers, vendors, invoices, accounts payable and accounts receivable. And it's compatible with Quicken and OFX formats, so you can transfer you existing data. Operating System: Windows, Linux, OS X.
5. Lazy8Ledger
If you've been doing your accounting old-school, that is, keeping track of your books with a paper and pencil or a simple spreadsheet, Lazy8Ledger gives you a step up. The interface looks just like a paper-based system, so you won't have to spend any time learning something new. It's also available in a Web-based version that can be used by multiple users. Operating System: Windows, Linux, OS X.
6. osFinancials
Designed to be simple, osFinancials can be used by anyone. The basic software is free, but plug-ins and support are available for a fee. Note: because it is developed by a team in the Netherlands, a lot of the osFinancials Web site and documentation is in Dutch, but English is also available. Operating System: Windows
7. Phreebooks
This Web-based accounting and ERP package for small businesses compares favorably with Sage and QuickBooks. It's available on an SaaS basis from Phreebooks hosting partner UniMatrix. Operating System: OS Independent.
8. TurboCASH
This bookkeeping app boasts more than 80,000 users and invites users to compare its extensive feature list to QuickBooks and Sage. Although its owners are based in the UK, it's available in a US edition and has been localized for many other countries and languages as well. Operating System: Windows.
Open Source Software: Appliances
9. Turnkey Linux First launched in 2008, Turnkey provides pre-configured virtual appliances based on open source applications. One of their most recent offering is a backup and migration appliance, and they also offer LAMP stack, Drupal, Joomla, WordPress, File server, Ruby on Rails, and dozens of other appliances. Operating System: Linux.
Open Source Software: Address Book
10. Rubrica Written using GNOME and GTK+, Rubrica stores contact information as XML data. It can import/export from a variety of formats, including GnomeCard, KAddressbook, Evolution, and csv file format. Operating System: Linux/Unix.
Open Source Software: Anti-Spam
11. ASSP Stop spam at your SMTP server with ASSP, the "Anti-Spam SMTP Proxy." It uses whitelists and Bayesian filtering and supports a wide variety of servers, including Exchange, Lotus Notes, and many others. Note that this is software, not an appliance like Barracuda, and it only stops spam, not malware. Operating System: OS Independent.
12. SpamAssassin
The highly acclaimed "#1 open-source spam filter," SpamAssassin, uses a number of different features to identify spam, including header tests, body phrase tests, Bayesian filtering, blacklists and whitelists, and others. It can be used on its own, but it's also been incorporated into a number of other commercial and open-source applications. Operating System: OS Independent.
13. Spamato
Available as an Outlook add-on, as a Thunderbird extension, or as a stand-alone proxy, Spamato uses multiple filters to separate junk mail from the stuff you actually want to receive. Unlike some anti-spam tools, it also lets you see why a message gets classified as spam and adjust your settings as necessary. Operating System: Windows, Linux, OS X.
Open Source Software: Anti-Spyware
14. Nixory Nixory works along with your existing firewall and anti-virus software to eliminate data-mining and spyware threats. While Spy Sweeper works with all browsers, Nixory is specifically designed for Firefox users. Operating System: OS Independent.
15. xpy
For Windows XP only (hence the name) this 60KB program improves the privacy, security, and performance of the OS. It disables the Windows "calling home" features, tweaks the settings on Internet Explorer and Windows Media Player, removes Windows Messenger, and more. Operating System: Windows.
Open Source Software: Anti-Virus/Anti-Malware
16. ClamAV One of the best-known open source security software, ClamAv's anti-virus capabilities have earned it a stellar reputation. The version available at this site works on Linux/UNIX and is most suitable for larger organizations. Operating System: Linux.
17. ClamAV for Windows
Recently released, the official ClamAV for Windows is a partnership between SourceFire (the owner of ClamAV) and cloud-based security provider Immunet. Because it runs in the cloud, this anti-virus software doesn't drain system resources, and it's able to use community-based protection to improve security. And while both Panda Cloud Antivirus and ClamAV for Windows are free, only ClamAV has source code available. Operating System: Windows.
18. ClamTK
Like ClamAV for Windows, ClamTK provides a front end for the ClamAV engine, this time for the Linux OS. It allows you to schedule system scans, but it does not provide real-time scanning for incoming files. Operating System: Linux.
19. ClamWin
Suitable for home users, this front-end for the ClamAV antivirus offers good protection from viruses and integrates into Windows Explorer and Microsoft Outlook. Unlike the commercial products, however, ClamWin doesn't automatically scan files in real time as you download themyou'll have to schedule a scan of your system or manually click on a file to scan it individually. Operating System: Windows.
20. Moon Secure
This app also uses the Clam AV engine (though developers claim to be working on one of their own), but offers a different interface and some different features. Operating System: Windows.
21. P3Scan
This e-mail proxy server scans both incoming and outgoing messages for viruses, worms, trojans, spam, and other malware. Like most open-source anti-virus tools, it's based in part on the ClamAV engine. Operating System: Linux.
22. Rootkit Hunter
This no-frills tool scans for rootkits and other malware on Linux system. While it does not provide live or scheduled scanning, the Web site explains how to set up your system to scan daily. Operating System: Linux, Unix.
23. Viralator Still getting the occasional network virus even after you install anti-virus software? Viralator supplements the existing anti-virus software on your proxy server to block malware that might otherwise slip in when users access free webmail accounts. Operating System: Linux, Unix.
Open Source Software: Application Firewall
24. AppArmor Part of openSUSE and SUSE Linux Enterprise, Novell's application firewall uses policy-based profiles to control who can access various applications. This is not an appliance like the Barricuda product, but it does perform many of the same functions. Operating System: Linux.
25. ModSecurity
ModSecurity provides a wide range of protection for Web applications. You can also purchase an appliance from Breach Security. Operating System: OS Independent.
26. SELinux
Developed by the NSA, Security Enhanced Linux adds mandatory access control features to the Linux OS. It enforces complete separation of information to make it more difficult to bypass application security mechanisms. Operating System: Linux, Unix.
Open Source Software: Astronomy
27. Celestia If you're tired of staring at your cubicle walls, why not take a break and fly around the galaxy for a while. Celestia lets you see the skies at any time from any point in the known universe, using real images wherever possible. Operating System: Windows, Linux, OS X.
28. KStars
Developed by the KDE Education Project, KStars is a planetarium program that's very similar to Stellarium (see below). Unique features include an altitude vs. time tool, what's up tonight tool, and an AAVSO Lightcurve Generator. Operating System: Linux.
29. Space Trajectory Analysis
This app lets researchers analyze, simulate, and visualize the paths of objects that have been launched into space. It's currently being used by the European Space Agency and a number of international universities. Operating System: Windows, Linux, OS X.
30. Stellarium
If you're thinking of taking up astronomy as a hobby but don't want to buy a telescope or stay up late, try Stellarium. It offers a view of the night skies from any point on earth, and it's so accurate, it's even used by many planetariums. Operating System: Windows, Linux, OS X.
Open Source Software: Audio Tools
31. Amarok Amarok plays music, creates playlists, displays lyrics and cover art, and integrates with a number of Web services for listening to or purchasing tracks. The interface has improved with time, and the latest version offers some great new features like the automatic playlist generator. Operating System: Windows, Linux, OS X.
32. Aqualung
Originally designed for Linux, this multi-platform tool plays audio CDs, internet radio streams, podcasts, and "soundfiles in just about any audio format." At the top of its long list of features is the ability to play multiple tracks without gaps in betweena real plus for concert recordings or other albums designed to flow seamlessly from one song to the next.. Operating System: Windows, Linux, OS X.
33. aTunes
Java-based aTunes plays and manages your music, much like its obvious namesake. The interface isn't as pretty as some of the other music players, but its easy to use and provides contextual info for the artists, like cover art, YouTube videos, etc. Operating System: OS Independent.
34. Audacity
Audacity does not offer the quality of features that professionals would need, but it can handle just about any audio recording and editing task most home users and garage bands need. Features include pitch change, tempo change, noise removal, and a number of special effects. Operating System: Windows, Linux, OS X.
35. AC3Filter
This audio decoder and processor filter allows media players to play AC3 and DTS audio tracks from movies. It also allows you to mix audio tracks and adjust sound quality. Operating System: Windows.
36. BonkEnc
This tool rips CDs and converts audio files to MP3, MP4/M4A, WMA, Ogg Vorbis, FLAC, AAC, WAV and Bonk formats. It's also optimized for multi-core systems for fast performance. Operating System: Windows
37. CDex
Tremendously popular, CDex has been downloaded more than 38 million times. In addition to creating WAV files, it also supports Lame MP3 encoder, APE lossles audio format, Ogg Vorbis encoder, Windows WMA8 encoder, and many others. Operating System: Windows
38. Cdrtools
If you're comfortable working from the command line, this set of tools will let you record audio, burn CDs/DVDs, and perform a variety of other tasks. It also now supports Blu-Ray. Operating System: Linux.
39. CoolPlayer This audio-only player boasts a small file size and "blazing fast" speed when you just want to play audio tracks. Other features include an 8-band equalizer, MP3 to WAV conversion, playlist editor and support for streaming content. Operating System: Windows.
40. DrumTrack
Want to add a drum track to your composition, but don't own drums? This app lets you take real rhythm samples and arrange them as you see fit. Operating System: Windows.
41. EasyTAG
EasyTAG allows users to view and edit the tag fields on MP3, MP2, MP4/AAC, FLAC, Ogg Vorbis, MusePack, Monkey's Audio, and WavPack files. It includes a tree-based browser and CDDB support for manual and automatic searches. Operating System: Windows, Linux.
42. Frinika
Like Audacity, Java-based Frinika offers music recording and editing features suitable for amateur musicians. It also lets you create music right from your PC, using your keyboard to add synthesizer and drum beat tracks. Operating System: OS Independent.
43. Hydrogen Replaces: DrumCore
For Linux and Mac users, Hydrogen offers similar functionality as DrumTrack. Its feature set is also more robust than DrumTrack's, making it suitable for professionals. Operating System: Linux, OS X.
44. Jajuk
Designed for people with large and/or scattered music collections, Jajuk aims to make organizing your music easier. It looks and feels similar to aTunes, and it's been called "the most powerful jukebox out there." Operating System: OS Independent
45. Jukes This twelve-year-old app was recently rewritten to be cross-platform and renamed (from "Put up your Jukes"). It's highly customizable with great management features. Operating System: Windows, Linux, OS X.
46. Juice
Juice makes it easy to capture and listen to podcasts, any time, anywhere. It includes a directory of thousands of online podcasts, so its also easy to find the one you want. Operating System: Windows, Linux, OS X.
47. KMid
Turn your PC into a karaoke player with this KDE app. It also plays Midi files and includes features like pitch control, a visual metronome and a piano player window. Operating System: Windows.
48. LAME
Although LAME stands for "Lame Aint No MP3 Encoder," the first line on its Web site states, "LAME is an MPEG Audio Layer III (MP3) encoder." It was intended as an educational tool for those interested in improving the speed and quality of MP3 files. Operating System: Windows, Linux, OS X.
49. Linux MultiMedia Studio
This app lets you create your own melody, drum track, bass line, and import samples, then mix them all together. Note that although it says "Linux" in the name, it is also available for Windows. Operating System: Windows, Linux
50. Mixere
While not as advanced as the professional tools above, Mixere lets you mix sound during a live performance with an easy-to-understand spreadsheet-like interface. Key features include dynamic looping, auto-triggering of audio, fully automated sliders, gradual muting, and crossfading. Operating System: Windows.
51. Mixxx
Much more robust than Mixere, Mixxx offers a real alternative to the commercial tools. Even if you're new to DJing, Mixx makes it easy to beatmatch songs, add effects, and scratch. Operating System: Windows, Linux, OS X.
52. MOC
Simply select a directory, and the MOC (Music On Console) audio player will play all files in that directory. Supported file formats include MP3, Ogg Vorbis, FLAC, Musepack, Speex, WAVE, AIFF, and AU. Operating System: Linux/Unix, OS X.
53. Moosic
While most of the other apps in this category have fairly nice GUIs, Moosic is sort of an iTunes for command-line junkies. If you want to organize and play your music by typing in shell commands, this is the option for you. Operating System: Linux/Unix.
54. MP3Gain
Tired of constantly adjusting the volume when playing MP3s? MP3Gain uses statistical analysis to gauge how loud songs sound in the human ear, and then modifies the volume appropriately without degrading the quality of playback. Operating System: OS Independent.
55. Mp3splt
Mp3splt is an audio utility that does just one thingit lets you cut mp3 and ogg files into smaller files and rename them. Its especially useful if you need to split an entire album into individual tracks. Operating System: Windows, Linux, OS X.
56. Pandora Radio Desktop App
You don't have to upgrade to Pandora One in order to get a desktop app to listen to the free Pandora service. This lightweight app minimizes to your system tray and removes banner ads. Operating System: Windows.
57. pulpTunes
Want to access your home iTunes library while youre at work? Install pulpTunes and you can access your music from any Web-connected computer. Operating System: OS Independent.
58. Radio Downloader
If your favorite online radio station only offers streaming content, you can turn it into a podcast you can listen to any time with Radio Downloader. It comes with built-in support for BBC content and a helpful "favourites" tab. Operating System: Windows.
59. Songbird
One of the best open source iTunes alternatives, Songbird offers an attractive interface, both audio and video playback, track and concert ticket purchase, and much more. It's also now available on many Android phones. Operating System: Windows, Linux, OS X, Android.
60. StreamRipper
StreamRipper allows you to record and save Shoutcast streams and other Internet audio. Its key feature is the ability to find silences and mark them as possible points of track separation. Operating System: Windows, Linux/Unix.
61. Zinf Like CoolPlayer, Zinf is a barebones music player. It plays most types of audio files, allows creation of playlists and displays album art. Operating System: Windows, Linux.
Ultimate list of open source software:
Accounting to Audio Tools // Backup to Cloud Infrastructure // Cloud Desktop to CRM // Databases to Developer Tools // Dictionary to Encryption // Emulators to Foreign Language // Forensics to Graphics Editors // Healthcare to Modeling // Multimedia to Network Simulation // Office to POS // Portable Apps to Smoking Cessation // Speech to Typing // Utilities to Web Editors
Page 1 of 13
1 2 3 4 5 6 7 8 9 10 11 12 13
Next PageIn questions of power let no more be heard of confidence in man, but bind him down from mischief by the chains of the Constitution. Thomas Jefferson
-
06-19-2013, 04:38 PM #12Senior Member
- Join Date
- Apr 2006
- Location
- New York, The Evil Empire State
- Posts
- 2,680
 The world's best thinkers on social media

- Home
- Post Here
- Marketing
- Social Networks
- Mobile
- Practices
- Social Customer
- Webinars & Reports
- Social Shake-Up Event
Posted by: Itamar Kestenbaum Posts Profile Comments Follow
6 Alternatives to Facebook
Like it? 78
comments 22
Posted May 20, 2010
Keywords: facebook
15

 With the entire internet attacking Mark Zuckerberg and the folks at Facebook for their extreme approach to Privacy (or the lack thereof,) many influencers including Leo Laporte have deleted their Facebook accounts in protest. With that being the case the concept of an alternative to Facebook has been brought to the forefront of the tech industry's buzz. Here are a few of the interesting alternatives to Facebook that can help you connect even if you do decide to oust Facebook from your daily routine:
Diaspora*
Diaspora aims to be a distributed network, where totally separate computers connect to each other directly, will let us connect without surrendering our privacy. We call these computers seeds'. A seed is owned by you, hosted by you, or on a rented server. Once it has been set up, the seed will aggregate all of your information: your facebook profile, tweets, anything. We are designing an easily extendable plugin framework for Diaspora, so that whenever newfangled content gets invented, it will be automagically integrated into every seed.
TrustWorks
TrustWorks is a software company that enables private conversations within enterprise and social networks. When a user needs assistance on any personal or business matter, the system sends a confidential message to one member of the community who has the relevant knowledge. This contrasts the news feed model of Facebook, where users read as much or as little as they choose; it also contrasts the email to all model of LinkedIn Answers, which sends questions to many people. For matters that are too sensitive to broadcast, or which require immediate responses, one-on-one communications get a faster and safer response.
The more people we know, the less we know about each one, says founder Aaron Sylvan, so TrustWorks solves the problem of finding who to ask. Users ask questions about travel destinations, personal health problems, recommendations and referrals, as well as serious business questions. A confidential database allows the system to find which friend, classmate, or co-worker has experience with Venezuela or cancer or knows a great babysitter. Users provide their information on an opt-in basis, and questions can be asked or answered anonymously, by email or SMS.
webNetwork
webNetwork lets anyone start their own social networking community site with profiles, pictures, videos, music, events, and more. The software is fully template based, so you can change the look and feel of the site to make it stand out from others. It runs on your own server (which can be provided by Web Scribble), meaning you own that data, and no one else!
A social network can be your primary site, or part of your existing site. If already have a site and you'd like to add some interactive and community based features, adding a social aspect using webNetwork is a great way to do it. As with all Web Scribble products, updates and support are free for a year.
Snabbo
SNABBO is a free-to-use social networking website created expressly for the Baby Boomer generation. The name Snabbo is an acronym for Social Network Allowing Baby Boomers Only. Driven by nostalgia for the good old days, members are encouraged to use a photograph taken any time during the 1940's through the 1980's as their Profile page picture. The more information members provide about their past, the more likely someone can rediscover them. A member may list other names they have been known as during their lifetime. For example, you might have been known as Margaret Smith in elementary school, Maggie Smith in high school, Tootsie Smith in college and finally Meg Eldringhoff when you got married. Members are also able to list (with corresponding years) towns they grew up in, schools they attended, companies they have worked for, military service and organizations they have joined. Snabbo's Find Friends feature is able to successfully search for a person even if all you can remember is their nickname when you knew them in elementary school.
Statistics indicate that Baby Boomers are the fastest growing online population, so much so that the phenomenon is referred to as the silver tsunami. However, this demographic may be more reluctant, than their younger Facebook counterparts, to post personal information on the Internet. In order to address the privacy concerns of their members, Snabbo became a licensee of the TRUSTe Privacy Program. Snabbo also states clearly in their privacy policy that they will never share personally identifiable information to third parties for marketing purposes. Finally, Snabbo offers members opportunities to explore a wide variety of shared interests through features like Groups, Blogs and Discussions. Snabbo has an easy-to-use Photo Album that can help members create, organize and share pictures. All in all, Snabbo provides a Boomer-friendly exposure to what might be a first time online social networking experience.
SocialGo
SocialGO.com is a do-it-yourself platform that enables anyone to quickly and easily create a fully functioning online social network, with features and functionality similar to Facebook or Myspace. With SocialGO you are your own network and are not simply populating a master network (Facebook). With this set-up comes complete data ownership & controlâincluding content and network API, which is becoming a hot button issue in the social networking industry. By customers owning their own platforms there is the distinct advantage of being able to customize a network with HTML, Javascript Flash and other source code anywhere in the network. With this control of the network comes the ability to monetize content, completely white-label a network, and control the advertising banner. With the SocialGO platform an organization or business can integrate social networking features (like video chat or instant messaging) into an already existing web-site. Although there is an entry-level free network option, SocialGO's premium user created network is priced for everyone at $25/month.
JackTheDonkey
JackTheDonkey.com is a free social network where users can give a poop' about charities and causes simply by sharing content with others. Have a picture or deep thought you think other people might enjoy seeing? Please put it on JackTheDonkey.com, the community where being social makes 1.1 cents every page impression for your choice of more than 20 charities from Canada, The US and UK. Some people call it Facebook with a conscience. The members of our community call it giving a poop freely, regularly and socially for the charity of your choice.
Added to the JackTheDonkey.com community in May 2010, iGiveapoop provides unsigned musicians with the opportunity to directly better the world as well.
In my honest opinion I'm sticking with Facebook, since a) I don't feel like my privacy is at risk, and b) I don't think my information is important enough to have to be top secret.
In questions of power let no more be heard of confidence in man, but bind him down from mischief by the chains of the Constitution. Thomas Jefferson
-
06-19-2013, 05:01 PM #13Senior Member

- Join Date
- Aug 2008
- Location
- PARADISE (San Diego)
- Posts
- 99,040
NO AMNESTY
Don't reward the criminal actions of millions of illegal aliens by giving them citizenship.
Sign in and post comments here.
Please support our fight against illegal immigration by joining ALIPAC's email alerts here https://eepurl.com/cktGTn
-
06-19-2013, 05:06 PM #14Senior Member
- Join Date
- Aug 2008
- Location
- PARADISE (San Diego)
- Posts
- 99,040
NO AMNESTY
Don't reward the criminal actions of millions of illegal aliens by giving them citizenship.
Sign in and post comments here.
Please support our fight against illegal immigration by joining ALIPAC's email alerts here https://eepurl.com/cktGTn
-
06-19-2013, 08:35 PM #15Senior Member
- Join Date
- Apr 2006
- Location
- New York, The Evil Empire State
- Posts
- 2,680
Official website for Linux User & DeveloperFOLLOW US ON:


- Linux User & Developer
- Back Issues
- Subscribe
- Bookazines
- Digital editions
digg
May
5
Build your own cloud Tutorial
by Kunal Deo
Make your own private cloud so you can access your files from any device, including PCs, smartphones and tablets, from anywhere in the world
Cloud computing is more than a buzzword. It is an essential part of how we use technology today. On a personal level, we all store and retrieve data and we do this on multiple devices, like PCs, smartphones, tablets and media players. We also want a coherent experience with this data: we want to be able to retrieve and store any data from/on any device. In the old days, we had to manually sync every other device to a central location to have the same copy of data everywhere else. But this is a very cumbersome and confusing process. On top of that, you will also have to limit where data is being saved. In most of the cases this place is the central system from where we are syncing the other devices. This method is still not that bad if you are doing this between just two devices; but when you go beyond that, you will always think that there must be a better way to do this.
Imagine having all your data available to you on every device you own. You are not bound by limitations such as where you can store or retrieve the data. This is where the cloud comes into the picture and makes it all a reality. Cloud computing in a more general sense means making computing resources (like storage, processing power, software etc) available in the form of services (on public or private networks) which can then make those resources available from any other system.
In this feature we will be building our own cloud system, a cloud storage system to be precise. Much like Dropbox, Ubuntu One or SkyDrive, but our implementation will have more features. Before you move on, you may ask what is the point in doing this when we already have such popular services on our disposal. Here is why:
Not your cloud: While these services are popular and easy to use, you do not own them. You use them by agreeing to certain terms and conditions (we bet you havent even read them) that can be changed at any given time by the service providers. This may leave your files at risk.
Downtime: Sometimes you may lose access to your files because of server issues faced by your service provider. This can very problematic if you are unable to gain access to one of your important files when you really need it.
Privacy: Since your files are hosted elsewhere, they may be viewable to certain third-party agencies (like governments) without your consent. This worries a lot of people.
Features and restrictions: Most of these proprietary services do not have a lot of features and are very restrictive in terms of what you can do with the files.
 The interface Step by Step
We will be building our private cloud using the open source software called ownCloud. The name says it all: it allows you to build your own cloud storage infrastructure. OwnCloud started its life as a The KDE cloud computing project and is now available on almost all popular platforms. Created by KDE developer Frank Karlitschek, it is now developed by the ownCloud team.
Step 01
Installing the prerequisites
The ownCloud core is written in PHP5. Its prerequisites are basic, like those of any typical PHP web application. On the database side it supports SQLite, MySQL, Oracle and PostgreSQL. For our setup well use MySQL to keep things simple yet scalable. If you are only doing a test setup, you can use SQLite, which is a zero configuration database system.
You will need to install the following on your Linux distribution:
PHP packages: php5, php5-gd, php-xml- parser,php5-intl
Database driver: php5-mysql. If you are planning to use any other database you will also need to install the respective database together with its PHP driver.
Curl packages: curl, libcurl3, php5-curl
SMB client: smbclient; this is used to mount Windows share.
Web server: apache2
For a Debian-based distribution, you can run the following command to install all the prerequisite packages:
$ sudo apt-get install apache2 php5 php5-gd php-xml-parser php5-intl php5-sqlite php5-mysql smbclient curl libcurl3 php5-curl mysql-server Step 02
Installing ownCloud setting up the web root directory
Download the latest version of ownCloud from http://owncloud.org/releases/. For this tutorial we are using owncloud-4.5.6.tar.bz2 At this point youll need to set up the web server root directory. On Debian-based distributions it is /var/www. Extract the owncloud package in the web server root directory When in doubt, look at the Apache configuration file.
$ tar xjf owncloud-4.5.6.tar.bz2 $ cp -r -v owncloud/ /var/www/ ludcloud // In our example, we are using ludcloud as the root installation directory.
OwnCloud needs to write to certain directories of its installation. To do that, the web server user (www-data for Debian-based distributions) must own apps, data and config directories of the installation. Run the following commands to give the required permissions:
$ cd /var/www/ludcloud $ sudo mkdir data // This folder is not present, but is needed during installation.
$ sudo chown -R www-data:www-data data $ sudo chown -R www-data:www-data config $ sudo chown -R www-data:www-data apps Step 03
Installing ownCloud configuring the web server
In this step we will be configuring Apache Web Server for ownCloud. OwnCloud requires .htaccess to be enabled on the Apache server. .htaccess files (or distributed configuration files) provide a way to make configuration changes on a per-directory basis. To enable the .htaccess in the web server, edit your web server configuration file (in Debian-based distributions it is /etc/apache2/sites-enabled/000-default) with AllowOverride All.
<Directory /var/www/> Options Indexes FollowSymLinks MultiViews AllowOverride All Order allow,deny allow from all </Directory> Next we need to enable an Apache module called mod_rewrite. Mod_rewrite provides a rule-based rewriting engine to rewrite requested URLs on the fly. To enable this module, run the following commands:
$ sudo a2enmod rewrite $ sudo a2enmod headers Once you have enabled the necessary modules, you can restart the service to apply the changes.
$ service apache2 restart Step 04
Installing ownCloud running the installation
Navigate to http://localhost/ludcloud. You will be presented with the installation screen for ownCloud.
The first thing to do here is to create an admin account. Enter the desired username and password to do so. To configure the database, click on Advanced then select MySQL. Then enter the MySQL username password along with the database name. If you do not have a separate database user configured then you can use the root username; ownCloud will create a dedicated database with a dedicated db user for use with ownCloud.
Click Finish Setup to complete the process.
Step 05
Adding extra storage
If you have lot of users on your server you can quickly run out of storage. Thats why it helps to have additional storage available. OwnCloud supports SMB (Windows share), FTP, WebDAV, OpenStack and Local File system.
To enable extra storage youll need to create and edit <ownCloud Root>/config/mount.php. Additional storage can be created either for a single user or a user group.
The following is an example mount.php with all the back-ends enabled:
<ownCloudRoot>/config/mount.php // Example mount.php showing few of the supported backends enabled <?php return array( // Mount options for group group=>array( admin=>array( /$user/files/Admin_Files=>array( // Accessing Local Filesystem class=>OC_Filestorage_Local,options=>array( datadir=>/mnt/admin_extra_storage) ), ), ), //Mount options for users user=>array( all=>array( // Accessing WebDav Storage /$user/files/Web_Dav_Files'=>array( class=>OC_Filestorage_DAV, options=>array( host=>webdavhost.com/webdav.php, 'user'=>'max', password=>secret, secure=>true) ), ), user1=>array( //Accessing FTP Share /user1/files/ftpdownloads=>array( class=>OC_Filestorage_FTP, options=>array ( host=>ftp.mywebhost.com' 'user'=>'max', 'password'=>'secret' 'root'=>'/ftpfiles') ), ), ) ); Step 06
Configuring user authentication
If you have lots of users for your cloud, then creating individual users again in ownCloud could become tedious. If you already have a user authentication system in place, ownCloud can use it. OwnCloud supports LDAP, IMAP, SMB, OpenID, WebDAV and FTP. This support is provided in the form of apps. Apps are a way to extend ownClouds functionality.
To install additional user authentication back- ends, log into ownCloud, click Settings (gears icon) then Select Apps, then select an App which is not represented with bold fonts, then click Enable in the right pane. Bold means the app is already enabled.
You can use the following apps:
For LDAP: LDAP user and group back-end For OpenID: OpenID user back-end
For WebDAV: WebDAV user back-end
For IMAP, SMB, FTP: user_external
The following shows an example of using the user_external app for authenticating from IMAP, SMB and FTP. You will need to edit the <ownCloudRoot>/config/config.php file.
For IMAP:
user_backends=>array( array( class=>OC_User_IMAP, arguments=>array({imap.gmail.com:993/imap/ssl}INBOX) ) ) For SMB:
'user_backends'=>array( array( class=>OC_User_SMP, arguments=>array(smbserver) ) ) For FTP:
user_backends=>array( array( class=>OC_User_FTP, arguments=>array(ftpserver) ) ) Step 07
Accessing ownCloud over WebDAV
OwnCloud comes with full WebDAV support. WebDAV is an HTTP protocol that allows read/write file management over the web. The good thing about WebDAV is that the clients are already built into all the popular operating systems, such as Linux, Mac OS X and Windows.
WebDAV is automatically enabled on ownCloud. To access it you will need to use the following URL: www.yoursite.com/ludcloud/ files/webdav.php
Log in with your ownCloud credentials when prompted.
To access your ownCloud account from Nautilus (a popular Linux file manager), you can click File>Connect to Server under Type Select WebDAV and enter server details, click Connect.
You can also use the URL in the format
dav://username@yoursite/ludcloud/files/webdav.php and type it directly into the location bar of Nautilus.
If you want to access it from Mac OS Xs Finder, you can click on Go>Connect to Server and enter the URL in the format http://www. yoursite.com/ludcloud/files/webdav.php. Enter your credentials when asked.
Step 08
Syncing files using desktop sync clients
If you like Dropbox then you will love this feature. You can use desktop sync clients to sync your files across multiple computers and devices. Desktop sync clients are available for Linux, OS X and Windows. Like ownCloud, desktop sync clients are also open source.
On Ubuntu you can install the package using Apt-get:
$ sudo apt-get install owncloud-client For other distributions (Debian, CentOS, Fedora, openSUSE etc) you can use the following URL to get the ownCloud desktop sync clients: http://software.opensuse.org/download/pack age?project=isv wnCloud:devel&package=ow ncloud-client
Download Windows and OS X sync clients from http://owncloud.org/sync-clients/
Desktop sync clients can be used for continuous sync, selective folder sync, multi-folder sync. Multi-folder sync means you can sync multiple ownCloud folders to multiple folder locations. This is an important feature which is not even provided by most popular cloud service providers.
Step 09
Syncing files using mobile sync clients
OwnCloud syncing is not just limited to the desktop. You can use ownClouds mobile sync clients to sync your files on the go. OwnCloud mobile apps are available for the Android and iOS (iPhone/iPod touch/iPad) platforms. Both allow you to sync files on the go. The Android version of the app also allows you upload files from any Android app and offers automatic favourite file syncing. The latter feature will keep all your favourite files synced with the mobile device all of the time.
You can either purchase the Android app from the Google Play Store (https://play.google. com/store/apps/details?id=com.owncloud. android) or the Amazon Appstore (www. amazon.com/ownCloud-Inc/dp/B00944PQMK/ ref=sr_1_1?ie=UTF8&qid=1352459188&sr=8- 1&keywords=owncloud). If you are not keen on paying, you can either build the client yourself from the source (https://github.com/owncloud/ android) or download a prebuilt APK file from http://alefzero.eu/a/master.
The iOS version of the App is not open source and is only available in the Apple App Store at https://itunes.apple.com/us/app/owncloud/ id543672169?mt=8. The ownCloud developers say that this is because of Apples policy on open source applications in the App Store. The Android and iOS apps cost 63p and 69p (both 99¢) in their respective stores.
Step 10
Extending ownCloud functionality using community add-ons/apps
One of the best features about having your own setup is that you can customise it to your own needs. Using ownCloud, you not only get to customise it but also have the ability to add more features to it. OwnCloud has a vibrant community of people building add-ons for ownCloud, called apps, at apps.ownCloud.com. These apps are available in the Multimedia, PIM, Productivity, Games and Tools categories.
To see how to install apps in ownCloud, in this section we will install the Notes app, which provides notes functionality for ownCloud. Notes is a very capable note-taking app which supports MarkDown and syncing to standalone note-taking apps. You can use Papyrusex, a free note-taking Android app on the Google Play Store (https://play.google.com/store/apps/d...isto.papyrusex) to sync notes. You can also use zNotes (http://sourceforge.net/projects/znotes/) to sync notes on Linux, BSD, OS X and Windows platforms.
Download the Notes zip archive from http:// apps.owncloud.com/content/show.php/ Notes?content=155599. Extract the zip file and copy the extracted folder (in this case, Notes) into the <ownCloudRoot>/apps/ directory. Log into your ownCloud instance as an Admin user, then click Settings>Apps. In the Apps list you will notice a new entry called Notes. Click on it, then click Enable in the right pane to activate the installed app. After activation, refresh the ownCloud page and youll see Notes in the left navigation bar. Click on it to start using Notes.
Other apps may require additional steps; check with the documentation of the apps you are installing.
Conclusions
As you can see, creating your own personal cloud has some real benefits in terms of the features and the flexibility. Thanks to ownCloud you can now create the cloud of your dreams using open source software. The ownCloud developers have made sure that you dont miss your data anywhere by creating sync clients for both desktops and mobile devices. OwnCloud installation is also flexible. As we have seen, you can choose from a wide variety of storage (including other cloud services) as well as plenty of very unconventional authentication mechanisms. If you still think there is something missing in ownCloud that you want, well fear not: you can add that feature yourself. Watch out for a future tutorial on how to write ownCloud apps on Linux User & Developer.
Tags: cloud, private cloud
Did you enjoy this article? Share it!


Follow our to find out about all the latest Linux news, reviews, previews, interviews, features and a whole more.
Trackbacks
What's your opinion?
Add your comment below, or trackback from your own site. You can also subscribe to these comments via RSS.
Be nice. Keep it clean. Stay on topic. No spam.
* Required fields
Name *
Mail * (will not be published)
Website
Most Read Posts

Linux User & Developer Issue 127
Print Edition Buy Online
Subscribe Now
Digital Editions GreatDigitalMags.com
Most Recent Posts
- Break free of PRISM with the EFFs PRISM Break site
- Webconverger 20 out now
- Debian 7.1 update released
- Create multiple servers with OpenVZ
- Super Test RSS feed readers
Open source Bookazines
 Linux & Open Source Genius Guide Vol. 4
 Linux Tips, Tricks, Apps & Hacks Vol. 1
 Linux & Open Source Genius Guide Vol. 3
 Linux & Open Source Genius Guide Vol. 2
 Linux & Open Source Genius Guide Vol. 1
Twitter
Back issues of Linux User & Developer
- Linux & Open Source Genius Guide Vol. 4
- Linux Tips, Tricks, Apps & Hacks Vol. 1
- Linux & Open Source Genius Guide Vol. 3
- Linux & Open Source Genius Guide Vol. 2
- Linux & Open Source Genius Guide Vol. 1

- Richmond House
33 Richmond Hill
Bournemouth
Dorset
BH2 6EZ - +44(0)1202 586200
- enquiries@imagine-publishing.co.uk
About Imagine
Technology
- 3D Artist
- Advanced Photoshop
- Android Magazine
- Apps Magazine
- Digital Artist
- iCreate
- Linux User & Developer
- Photoshop Creative
- SciFiNow
- Total 911
- Web Designer
Videogames
Knowledge / Science
Photography
Copyright © 2005 - 2013 Imagine Publishing Ltd. All rights reserved
Registered company: 5374037 (England) | VAT No: 997 3331 76
Directors: Damian Butt, Steven Boyd, Mark Kendrick, Alistair Ramsay, Marco Peroni, Aaron Asadi
Download our iPhone & iPad Apps Buy Imagine products online Listen to our PodcastsIn questions of power let no more be heard of confidence in man, but bind him down from mischief by the chains of the Constitution. Thomas Jefferson
-
06-19-2013, 09:42 PM #16Senior Member
- Join Date
- Apr 2006
- Location
- New York, The Evil Empire State
- Posts
- 2,680


Not just for fun: Build a Ubuntu Server-based virtual appliance
Build your own OpenVPN home server in 7 easy steps!
On July 10, 2011, in HowTOz, by subZraw
I dont know about you but I can hardly resist an open WiFi hotspot. Sure I have a data plan for my smartphone and I can even use it as a wireless router for my laptop, but WiFi is way faster than 3G and there are usually no bandwidth caps or extra costs associated with it. On the other hand, a WiFi hotspot is inherently insecure. Thats why I use to leave my iMac running when Im out and about, so I will be able to surf the web through an encrypted tunnel to the SSH server at home. That technique works quite well and is pretty secure. Heck, it even helped me stay away from the Wall of Sheep during DEF CON 17!
A more robust and feature-rich solution than SSH tunneling is to make your laptop a member of a Virtual Private Network or VPN. Traditionally, a VPN is what a company would implement in order to provide its workers full yet secure access to the corporate network when theyre away from the office or even at a remote branch of the same company.
But you dont have to be a big boy to reap the benefits of VPN technology. Thanks to the free and Open Source OpenVPN you can actually setup your very own VPN server at home and then be able to securely access resources inside your home LAN from wherever you happen to be, no matter how you got online. Plus, with a few minor tweaks in your OpenVPN configuration you can also use the server for secure surfing, meaning you can re-route all network traffic through an encrypted channel from your laptop to the remote OpenVPN server.
Prerequisites
You may install the OpenVPN software practically on any OS under the sun. In reality, youll be better off with a Linux or *BSD box. For me, the Linux path was the obvious one. Although at first I thought Id go with Ubuntu Server, the Amahi Home Server quickly won me over for its dead-easy installation and configuration.
A Linux distribution is all one really needs for the software part of a similar setup. For the hardware part, a pretty modest box with a Pentium 3 class processor, 512 megs of RAM and a 20 gig hard drive will do just fine. Alternatively, you can always prepare a virtual machine for Amahi and use that instead of a physical computer. Actually thats *exactly* what I did.
For my virtualization platform I couldve chosen the free VirtualBox software, which by the way is available for Windows, Mac OS X and Linux hosts. But VMware has long earned my trust and, truth be told, thats what Im most comfortable using. My old iMac running Mac OS X Snow Leopard is more than adequate for the role of a small-time virtualization host, so I began by building an Amahi VM with VMware Fusion. If your host computer runs Windows or Linux and you want to stick with VMware, then youll work with the Workstation edition or with the free VMware Player.
In the remainder of this post I will demonstrate how exactly you can build your very own OpenVPN home server using the Amahi distribution, in seven easy to follow steps.For a VPN connection to be even possible the client must be in a different subnet from the server. You cant choose the subnet youre connecting from, though you can make sure your OpenVPN server lives in a not-so-common subnet like 10.10.10.* or 10.20.30.* etc. All youll have to do is setup your residential (ADSL) router accordingly and possibly re-configure any PC within the LAN which uses a static IP address. Having said that, in some of the screenshots that follow youll see that our OpenVPN server lives within the extremely common subnet of 192.168.1.*. But this is because we only built *that* server for the purposes of this demonstration.Step 1 Configure a new VM for Amahi
Its not necessary to take the virtualization route, especially if you happen to have a spare box laying around, doing nothing but gathering dust. As a pure virtualization junkie I rarely have spare hardware, so I happily set off for a yet another enjoyable journey to virtua-land. In the following screenshots the main aspects of my Amahi VM are shown.


Step 2 Create a profile for your HDA and download
Amahi is a Fedora-based distribution designed for home-grade file, media and application servers. The good folks over at Amahi like to refer to such servers as Home Digital Assistants or simply HDAs and for a good reason. If you want to know more about Amahi and find out what it can do for your home network, youre strongly encouraged to check it out starting from this page of the official web site. Before you even download Amahi you need to register for a free account and create a profile for your HDA. See the following screenshots for more details.


For our particular setup theres really no reason to download the Install DVD. The Amahi Express CD is more than fine and you can get it from here, either via BitTorrent or via direct HTTP download. Between the 32bit and 64bit editions I suggest you choose the former, for theres really no benefit to go with the 64bit one. After the download finishes youll have an ISO image named Amahi-6.1-Express-v1-i386.iso.
Step 3 Install Amahi
The installation of Amahi is unlike the installation of any other Linux distribution you may have performed. What that means in our particular case is that the installation procedure is easy, fast and straightforward. See the screenshots below for all the details.


Step 4 Initial configuration
After the successful installation of Amahi you need to log into the system via its web interface, change the default admin password and create one or more regular users.


Step 5 Test the OpenVPN server
Your home OpenVPN (virtual) server should be up and running by now. In order to test it you need to be outside of your home LAN. But dont rush out with that laptop just yet, for you can test the server right from the Amahi website!


Step 6 Download, install and configure a VPN client for your OS
You may download a suitable OpenVPN client from this Wiki page of the Amahi project. No matter what the OS your laptop runs, the configuration of the client is pretty easy.
In the Windows case, all you need to do is first download this client, then install and run it. See the following screenshots for the details.


The installation of a VPN client under Mac OS X is more involved. Between the two clients the Amahi guys suggest I chose Tunnelblick, which is Open Source and always has worked fine for me. There are detailed installation and configuration instructions in this page of the Amahi wiki. Heres exactly what I did on my MacBook, running Mac OS X Leopard.
First I fired up a Terminal window and downloaded the latest stable version of Tunnelblick on my desktop. At the time of this writing, that was version 3.1.7:
mblack:~ cvar$ cd ~/Desktop
mblack esktop cvar$ curl -O http://tunnelblick.googlecode.com/fi...lick_3.1.7.dmg
% Total % Received % Xferd Average Speed Time Time Time Current
Dload Upload Total Spent Left Speed
100 3441k 100 3441k 0 0 706k 0 0:00:04 0:00:04 --:--:-- 802k
mblackesktop cvar$
mblackesktop cvar$ ls -lh Tunnel*
-rw-r--r-- 1 cvar staff 3.4M Jul 10 08:43 Tunnelblick_3.1.7.dmg
mblackesktop cvar$
From the *.dmg file I got on my desktop I installed Tunnelblick as usual, i.e., I opened up the DMG and copied the Tunnelblick.app to the Applications folder. Back in the Terminal window, I created a folder named amahi.tblk on my desktop and changed to it:
mblack esktop cvar$ mkdir amahi.tblk
mblackesktop cvar$ cd amahi.tblk
mblack:amahi.tblk cvar$
Per the instructions in the Amahi wiki, I downloaded the following three files:
mblack:amahi.tblk cvar$ curl -O http://dl.amahi.org/vpn/AmahiHDAClient.crt
% Total % Received % Xferd Average Speed Time Time Time Current
Dload Upload Total Spent Left Speed
100 3809 100 3809 0 0 6291 0 --:--:-- --:--:-- --:--:-- 14373
mblack:amahi.tblk cvar$ curl -O http://dl.amahi.org/vpn/AmahiHDAClient.key
% Total % Received % Xferd Average Speed Time Time Time Current
Dload Upload Total Spent Left Speed
100 887 100 887 0 0 1364 0 --:--:-- --:--:-- --:--:-- 2889
mblack:amahi.tblk cvar$ curl -O http://dl.amahi.org/vpn/ca-cert.crt
% Total % Received % Xferd Average Speed Time Time Time Current
Dload Upload Total Spent Left Speed
100 1257 100 1257 0 0 2072 0 --:--:-- --:--:-- --:--:-- 4054
mblack:amahi.tblk cvar$
mblack:amahi.tblk cvar$ ls -lh
total 24
-rw-r--r-- 1 cvar staff 3.7K Jul 10 09:08 AmahiHDAClient.crt
-rw-r--r-- 1 cvar staff 887B Jul 10 09:08 AmahiHDAClient.key
-rw-r--r-- 1 cvar staff 1.2K Jul 10 09:08 ca-cert.crt
mblack:amahi.tblk cvar$
I created an empty file and named it openvpn.ovpn:
mblack:amahi.tblk cvar$ touch openvpn.ovpn
mblack:amahi.tblk cvar$ ls -lh
total 24
-rw-r--r-- 1 cvar staff 3.7K Jul 10 09:24 AmahiHDAClient.crt
-rw-r--r-- 1 cvar staff 887B Jul 10 09:24 AmahiHDAClient.key
-rw-r--r-- 1 cvar staff 0B Jul 10 09:27 openvpn.ovpn
-rw-r--r-- 1 cvar staff 1.2K Jul 10 09:24 ca-cert.crt
mblack:amahi.tblk cvar$
I opened openvpn.ovpn in TextEdit and pasted the following contents in it:
remote delta.yourhda.com 1194
client
dev tun
proto udp
resolv-retry infinite
nobind
persist-key
persist-tun
ca Ca-cert.crt
cert AmahiHDAClient.crt
key AmahiHDAClient.key
comp-lzo
verb 3
auth-user-pass
Of course, in your particular case youll replace delta with the name you gave to your HDA. I then saved openvpn.ovpn, exited TextPad and ran Tunnelblick for the first time. See the following screenshots to find out what happened


Last but certainly not least, theres the case of Linux. As you may have expected, there are detailed instructions on how you can connect to your OpenVPN server right here, in the Amahi wiki. I followed the simple, generic instructions, one time on an openSUSE box and another time on a Ubuntu box. In both cases I managed to connect to the remote OpenVPN server without the slightest problem.
Step 7 Re-route all network traffic through the OpenVPN server
Up until now youre able to securely connect to your home network from wherever you are and access resources behind your (ADSL) router. Thats quite useful but it would be even more so if you could also securely surf the web through the OpenVPN server. Thats 100% doable and all you have to do is make a couple of changes in the main OpenVPN configuration file.
From the text console of your Amahi VM, log into Fedora as root, change to the /etc/openvpn directory and open amahi.conf with a text editor (nano is a fine choice):
[root@localhost ~]# cd /etc/openvpn/
[root@localhost openvpn]# nano amahi.conf
Look for the line
push "route 192.168.1.0 255.255.255.0"
and comment it out:
#push "route 192.168.1.0 255.255.255.0"
Warning: Your Amahi may be living within a different subnet, so instead of 192.168.1.0 you may see something like 192.168.0.0 or 10.0.0.0 or what have you. Right beneath the commented out line, insert the following:
push "redirect-gateway def1"
Save the changes to amahi.conf and exit the editor. Restart the OpenVPN service and youre all set:
[root@localhost openvpn]# /etc/init.d/openvpn restart
Shutting down openvpn: [ OK ]
Starting openvpn: [ OK ]
[root@localhost openvpn]#
Congratulations! From now on, whenever you connect to your OpenVPN server not only will you be accessing resources behind your home router, but youll also be able to securely surf the web through the remote home server!


Tagged with: Amahi OpenVPN Privacy Remote Access Security SSH Virtual Machines Virtualization VPN
If you enjoyed this article, please consider sharing it!


Fresh Stuff
- Build your own OpenVPN home server in 7 easy steps!
- Not just for fun: Build a Ubuntu Server-based virtual appliance
- BackTrack 5 is coming *real* soon [updated: already here]
- Make Ubuntu Server 11.04 use a static IP address
- Ubuntu Natty: A custom kernel is what you want
Recent Comments
-
 Rob
Rob
10 May 2013 (23:36) Make Ubuntu Server 11.04 use a static IP address Thanks for the guide, I had one issue with it though does it do the same eth0 configuration as th... -
 James
James
2 November 2012 (16:41) Make Ubuntu Server 11.04 use a static IP address This Guide worked great! I have tried other guides on other websites with no prevail, Thanks so M... -
 andrean
21 October 2012 (12:42) Ubuntu Natty: A custom kernel is what you want dear locker, I'm glad to found this tutorial. but, when I try it, I always cant boot up proper... -
 Ax
Ax
3 July 2012 (21:29) Make Ubuntu Server 11.04 use a static IP address I tried Tim McCormack's suggestion and my networking stopped. I had to undo everything to get it ... - Ax
3 July 2012 (20:15) Make Ubuntu Server 11.04 use a static IP address I've installed 5 different installs of Ubuntu 11.10 server and the first thing I did on everyone ...
Categories
Tags
Amahi Anonymity Assembly AVR BackTrack command line compilation Crypto Cryptography Debian FreeBSD Linux Mac OS NAT Natty openSUSE OpenVPN package management patching Penetration Testing phishing Privacy programming Public Key Cryptography PuTTY Reiser4 Remote Access scam Secure Shell Security Server SPAM SSH tool Tor tunneling Ubuntu Virtual Appliances Virtualization Virtual Machines VPN Windows ZFS
Facebook
Keep getting by giving
Amount Currency  2.50
2.50
 5.00
5.00
 10.00
10.00
 20.00
20.00

Frequency Donate!  Once
Once
 Monthly
Go To Top »
Looking for something?
Use the form below to search the site:
Still not finding what you're looking for? Drop a comment on a post or contact us so we can
take care of it!
Archives
All entries, chronologically...
Visit our friends!
A few highly recommended friends...

Pages
Stay In Touch
More
Thanks for dropping by! Feel free to join the discussion by leaving comments, and stay updated by subscribing to the RSS feed.
© 2011 Parabing!
More in HowTOz (1 of 4 articles)
UIn questions of power let no more be heard of confidence in man, but bind him down from mischief by the chains of the Constitution. Thomas Jefferson
-
06-28-2013, 12:47 PM #17Senior Member
- Join Date
- Apr 2006
- Location
- New York, The Evil Empire State
- Posts
- 2,680
Warning: this is not for Novices, this is for pen testing your security, if you are a beginner try learning Snort or Wireshark first. Reciprocity.

BackTrack Linux Penetration Testing Distribution
BackTrack Linux
 Welcome to Backtrack-Linux.org, home of the highest rated and acclaimed Linux security distribution to date. BackTrack is a Linux-based penetration testing arsenal that aids security professionals in the ability to perform assessments in a purely native environment dedicated to hacking. Regardless if youre making BackTrack you Install BackTrack, boot it from a Live DVD or thumbdrive, the penetration distribution has been customized down to every package, kernel configuration, script and patch solely for the purpose of the penetration tester.
BackTrack 5 R3 Released! Aug 13th, 2012
Best viewed in full screen !
BackTrack is intended for all audiences from the most savvy security professionals to early newcomers to the information security field. BackTrack promotes a quick and easy way to find and update the largest database of security tools collection to-date. Our community of users range from skilled penetration testers in the information security field, government entities, information technology, security enthusiasts, and individuals new to the security community. Feedback from all industries and skill levels allows us to truly develop a solution that is tailored towards everyone and far exceeds anything ever developed both commercially and freely available. The project is funded by Offensive Security. Whether youre hacking wireless, exploiting servers, performing a web application assessment, learning, or social-engineering a client, BackTrack is the one-stop-shop for all of your security needs.
Sitemap
Recent Posts
- Kali Linux Has Been Released!
- Kali Linux A Teaser into the Future.
- Upgrade From BackTrack 5 R2 to BackTrack 5 R3
- BackTrack 5 R3 Released!
- BackTrack 5 R3 Release Aug 13th, 2012
- Hakin9 Guide to BackTrack and European Open Source Event
- The Debian Administrators Handbook
- BackTrack 0day privilege escalation
- BackTrack 5 R2 Released
- Upgrading to BackTrack 5 R2
- Maltego 3.1 Released
- BackTrack Enterprise Support and Customization Services
- BackTrack 5 R1 released
 BT5 BugTracker RSS
© BackTrack Linux 2011 | Theme by Tick Tock Computers


Last edited by Reciprocity; 06-28-2013 at 07:19 PM.
In questions of power let no more be heard of confidence in man, but bind him down from mischief by the chains of the Constitution. Thomas Jefferson
-
06-28-2013, 07:13 PM #18Senior Member
- Join Date
- Apr 2006
- Location
- New York, The Evil Empire State
- Posts
- 2,680
Build Your Own IDS Firewall With pfSense
 open source, m0n0wall, pfSense, Snort, IDS, Intrusion Detection
Wed, 02 Feb 2011 14:00
Greg Noel


Prev - Page 1 of 4 - Next >>
Introduction
Hear that sound? That is someone rattling your doorknob. If they are able to break in, they will ransack your home, rifle through your private papers, correspondence, bank statements, photos, and if lucky theyll find your club memberships and credit cards - your identity. They may even plant listening devices. If you lived in a bad neighborhood, youd put in high quality locks and maybe an alarm system. The problem is, on the net, everywhere is a bad neighborhood.
What stands between you and this happening on the internet is generally your router, which is designed more as a doorway than a lock. Consumer grade firewalls, either software or hardware, can act as a lock or gatekeeper. But to truly turn back the faceless attacks (even if they would just find pictures of your kids), you need a dynamic firewall with intrusion detection; the kind of 1U firewall server appliances usually found only in corporate data centers (read: expensive). Devices that generally start at about $3K; a Cisco PIX firewall starts at nine.
Well show you how you can put together your own firewall/router with all of the capabilities of high-end gear using open source software and inexpensive components. There are a significant number of open source distributions available for homebrew router/firewall builds. We chose pfSense for its outstanding built-in functionality, active support forums, first class documentation and overall maturity. Most significantly, beyond rich routing functionality, pfSense offers firewall and intrusion detection/prevention well beyond that of the mere mortal router.
Firewall vs. Intrusion Detection/Prevention
To understand the advantages offered by pfSense over your router or a firewall, we need to understand the difference between what a router/firewall offers and what an Intrusion detection system (IDS) provides.
A firewall, in the most general sense, works at the connection level of your network traffic, looking at the envelope of a network connection: Where is it coming from? Where is it going? What is the origin and/or destination address/port?
Figure 1 is as real firewall log, notice the aforementioned doorknob rattling:
Figure 1: A real firewall log showing network probes
An intrusion detection system goes beyond and below firewall filtering. Beyond, by looking at the pattern of network connections, recognizing port scans, specific threat signatures and denial of service attacks. Below by looking at the actual contents of each packet, recognizing executable code, badly formed packets, buffer overflow attempts, and things like plain-text credit card numbers.
Figure 2 shows a real log from the IDS tool Snort for the same period as above:
Figure 2: Snort log
Note: The IP addresses have been obscured to protect the innocent and the network the router/firewall protects. These logs are from a developers (my) home network, with no P2P traffic or other dodgey activity that might advertise the WAN IP address.
pfSense
pfSense is a free, mature open source project that runs on top of FreeBSD, for firewall/router installations. It has been around since 2004, when it was spun-off from m0n0wall. Where m0n0wall is designed for embedded systems, pfSense is geared toward x86 commodity hardware.
Like any modern router, pfSense is administered through a comprehensive Web GUI (Figure 3). At no point do you need to drop to a shell window, unless you want to further customize your router.

Figure 3: pfSense Dashboard
The out-of-the-box functionality is impressive, and too long to go into here, but includes full routing capabilities across multiple interfaces, graphical traffic monitoring, firewall filtering, VPN Support (IPSec, OpenVPN, PPTP ), Captive Portal login handling, Quality of Service traffic shaping, load balancing across multiple interfaces, ISP & Router failover, and network logging. Over the top functionality.
In addition, Table 1 shows a few of pfSense's add-in integrated packages adapted to pfSenses Web GUI, providing a surprising array of functionality.
Table 1: pfSense packagesSnort Eminent packet filtering rules engine, providing intrusion detection and prevention, allows for policy enforcement, and IP blocking. With custom and regularly updated dynamic rules. Squid High speed caching web proxy, can run transparently SquidGuard Squid Proxy Add-on for Content Filtering HAVP HTTP antivirus scanning proxy, a front-end to ClamAV IP-Blocklist IP blocking based on various published IP address lists from iBlockList.com
Beyond the integrated pfSense packages, FreeBSD offers a rich set of network tools and open source packages, including EtherApe, PFTop and Tarpit that can run in conjunction with and alongside pfSense.
<< Prev - Page 2 of 4 - Next >>
The Build
Meet Cerberus, named after the mythical three-headed dog guarding hell. The name was chosen because of the three forms of protection that it provides: the pfSense Firewall, Snort IDS, and the IP-Blocklist package.
Figure 4: Cerberus hardware
Figure 5: Cerberus hardware - rear view
Figure 6: Cerberus hardware - top
This is my second pfSense build, the first used a mothballed 550W Pentium Core 2 Duo E6750 desktop with two network cards added to support a total of three interfaces, WAN, LAN and a Guest WLAN access point. Though inexpensive (already had the hardware), it was like killing a gnat with a bazooka. pfSense requires nowhere near that much machine, and left an ATX Desktop box where the much smaller DGL-4500 router used to sit.
When the need for a Drupal developer machine arose, it was decided that a purpose-built, low power small footprint pfSense box would be used to free up the desktop machine for that purpose. Less cost, greener, and not nearly as ugly.
For size, Mini-ITX was selected: a dual NIC motherboard using Intels NIC chipset, and supporting up to 3 GB of memory to support the memory-hungry Snort package. The budget was initially around $200, reusing spare parts from the previous build. We were not set on a particular processor; that decision was driven by the motherboard size, memory limit, and Intel dual NIC requirements (wanting to avoid the widely reported problems around the Realtek NIC chipsets). Our only choice of CPU was the Atom processor.
Dual NIC was needed to support all three interfaces, a single NIC motherboard, though cheaper, would have required a significantly more expensive Intel Dual NIC card, pushing the price to about the same point as a mini-ITX server motherboard.
Table 2: Component listCPU Intel Atom D525 (Pineview-D) Dual Core, 1.8GHz (13W) processor Incl in mobo Motherboard Supermicro X7SPA-H-D525 Mini-ITX Server $180 RAM 2 x non-ECC DDR3 1066MHz SO-DIMM (running @800MHz) $50 Storage WD Scorpio Blue 2.5 250Gig drive $40 Ethernet Intel 10/100/1000 PCIe NIC $30* Case Antec Mini-Skeleton-90 $90 DVD Sony DVD-ROM *
* Reused from previous build
I initially selected the Asus Hummingbird Atom D510 motherboard. But when that was temporarily out of stock, I discovered the less expensive, newer generation Supermicro Atom D525 motherboard. Though scarcer, it sold for the same price as the D510 Supermicro model and for less than the Asus.
The choice of Antec Mini-Skeleton-90 case, though relatively expensive, was completely driven by aesthetics and build quality. All other choices were non-descript boxes. This decision did mean a 2.5 SATA drive would be needed, since the case provides only one 3.5 drive bay for our spare DVD drive, and two internal 2.5 bays. After the build, we realized the DVD drive was unnecessary, the install could have been done from a USB drive and a spare 3.5 SATA hard drive could have been used instead.
To get our third network interface, we reused the Intel 1000/100 Pro board from our first build for the wireless guest AP via a wireless N bridge. If we had not already had these components on hand we probably had gone with a Wireless-N PCI-e NIC (most likely the Asus PCE-N13, which was not supported at the time of the first build).
A note for builders looking at a Mini-ITX build for the first time, the selection and availability is dramatically different than you are probably used to in the ATX world. We found only one vendor for the Asus board, and getting the newer D525 Supermicro board took some wrangling with a very helpful small vendor, who also carried the Antec case (a thanks for personal attention to InterProMicro.com).
Several other components were needed to make this a full-blooded router, which we took from the first build. To expand the number of ports to support our home network, a Gigabit switch was added. The already-mentioned wireless-N bridge was added for guest wireless, and our old wireless router in AP mode for wireless access to the LAN network to provide shared file and printer access to trusted clients.
Table 3: External component listPort Expansion D-Link DGS-2205 Gigabit 5-Port Desktop Switch $32 Guest Wireless TRENDnet TEW-637AP 802.11b/g/n Wireless Easy-N-Upgrader $45 LAN Wireless AP D-Link DGL-4500 (existing router) -
These components are largely optional and dependent on your requirements. Your current wireless router may already have guest wireless, and the switch is only needed if the number of machines exceeds the remaining ports on your router. With the switch and the router, Cerberus can handle seven wired clients. Additionally, the wireless bridge can be turned off in the absence of guests.
Total base cost was about $360. If you add the switch, the bridge, and the NIC, you are looking at about $470 all in. Yes, it's a little high, and almost twice our budget. But you can get a reasonable case for half the cost and pfSense will run in half the amount of memory and a lesser processor.
Further cost reduction is realized by dropping guest wireless. This would eliminate the third NIC and need for the wireless bridge. And if you have a spare port on your current router, no switch is needed.
These changes would bring total cost below $300 maybe $100 more than a premium router. Of course, the cheapest solution would be our first build, an old surplus x86 machine fitted with the needed additional NICs for maybe $80?
The assembly itself was straightforward, no need for seating of the CPU or cooler, the case provides a power brick, and there is pull-out tray with sufficient cable play to easily wire up the case from there the fingers pinch a bit fitting in the drives, and cable routing is a bit of a hassle. But this was the quickest build Ive ever accomplished.
Performance
One of the available packages for pfSense is iPerf, making it easy to measure throughput.
Running iPerf as the server on Cerberus, directly over Gigabit LAN to iPerf on another machine running Windows 7, the average throughput was 236 Mbps, with a peak of 253 Mbps (Figure 7).

Figure 7: Cerberus performance
CPU utilization was never over 75%, and under normal usage the CPU utilization rarely exceeded 10%, which means that Atom D410 would probably serve just as well. Surprisingly, running Snort versus not running Snort had a negligible effect on throughput.
pfSense and Package Install
Installing pfSense could not be easier, and is well documented here, but briefly:
- Burn a LiveCD, downloaded from pfSense.org.
- Boot the CD.
- Using Auto-Detect, when prompted plug in each network cable, in order: LAN, WAN, OPT1/WLAN.
- Your router is now up in RAM. From here, select from the menu &99. Install to hard disk.
- Go with the defaults to dedicate the hard disk to pfSense; once completed, remove the CD.
- From a browser, log in to your routers Web GUI at 192.168.1.1 with the default user-id / password of admin, pfSense
- Step through the set-up wizard, changing the defaults: LAN IP, User Name, Password.
- Set up your wireless interface, change the name, and enable DHCP.
- Set up a Firewall Rule to define a route for the Wireless interface to the WAN and to your LAN, or not.
For Cerberus, this entire process took less than an hour, and was seamless. You will need to configure your legacy router to operate as an AP. The steps are specific to your router but generally, you need to disable DHCP and plug a LAN cable into a LAN, not the WAN port. You can also check this popular how-to.
For your wireless bridge setup, follow the manufacturer's directions. These tend to be configured first and then plugged into your optional WLAN interface.
Snort
As previously introduced, Snort is a packet inspection rules engine which scans network traffic looking for anything that might raise an eyebrow. The rules for Snort come from Snort.org, and are comprehensive - thousands of rules. As you can imagine, setting up and running Snort is a bit more demanding both for you and for your build; you, because of the inevitable generation of false positives, and for your build, because of the sheer amount of processing and memory required for real-time packet scanning of that many rules.
To get rules for your install, you need to register with Snort.org and get your free OinkMaster Code. Once you get your code, you are ready to install.
All packages for pfSense are added through the System->Packages submenu. Once added, enter your code into the Snort's global settings (Figure by going back to Packages, then to Services->Snort. Then update rules through the Update tab. If you have a problem, ensure there are no trailing or leading blanks in your Oinkmaster code.

Figure 8: Snort global settings
You now need to bind Snort to your interfaces. Start with the WAN interface. This is like alarming your main entrance, its where most of the action occurs. I recommend either the AC-STD or AC-SPARSEBANDS memory model, providing a good balance between performance and memory usage (Figure 9).

Figure 9: Snort WAN interface settings
Choosing to block offenders will make you more invisible to those probing your network for a weakness and offers higher security But this requires more administration as youll need to clear false positives and add them to your whitelist. A shorter block period in global settings will ease this burden - I use one day, but a couple of hours would probably be enough to make an attacker move on to an easier target.
Once this is accomplished, turn up the rules you want applied. Return to the Snort Interfaces tab and select the edit icon for the WAN interface. For many of the rules, HTTP Inspect has to be enabled. Youll also want to normalize specific traffic for scanning as well as enable detection of port scans, done via the Preprocessor tab. These settings are pretty self-explanatory (Figure 10).

Figure 10: Snort preprocessor settings
We are now ready to select the rules that Snort will apply. From the Preprocessors tab, select Categories. If you performed the update correctly, the rule categories should be prefixed with Snort, ET (Emerging Threat), and pfSense. These are the rule sources; ignore any categories without a prefix.
A way to approach these categories is that there are three types: policy, specific target, and general target categories. The policy categories include P2P, Games, and Inappropriate and allow you to block those types of traffic from your network. For example, you might enable the P2P categories on your Guest WLAN interface because of bandwidth or legal responsibility concerns.
Specific target categories are those where a particular protocol or software package can be targeted by attackers. These include protocols like SNMP, IMAP, and NNTP and software packages like IIS, Oracle, and MYSQL. If you are not running these protocols or software packages on your network there is no reason to enable those categories. Remember, the more categories you enable, the larger the performance burden. Additionally, the more categories you enable, the higher the probability of false positives and more of a network administration headache.
The General target categories, as Im sure youve guessed, are general attacks on your network, for example denial of service attacks, web client, and the exploit categories. Youll probably want to enable all of these.
If you are unsure of the type of the category, just click on it. This will take you to the corresponding rule set, where the rule descriptions should clarify the ambiguity. For example, are the FTP categories a policy or a specific target?
Once youve completed selecting your categories and saving your settings, you can now start Snort for the WAN interface from the Snort Interfaces tab. You can now be confident that you are protected against all sorts of nefarious interlopers.
Youll find that it takes longer to set up Snort than it took bring up pfSense for the first time, but for the protection it offers you will find the time well spent.
IP-Blocklist
IP Blocking is another tool for securing your network, by preventing a user from accidentally inviting in players whose only interest is wreaking havoc.
IP-Blocklist is another pfSense package that blocks specific IP addresses and ranges of IP addresses from accessing your network. Common IP Address lists include known compromised hosts, spammers, spyware, and egregious advertisers you can find all sorts of lists on iBlocklist.com, a clearing house for list maintainers.
Once installed and enabled, youll need to provide a set of URLs that point to the lists you want to use (Figure 11). Each URL must point to a gzipped file.
To do this you need to de-reference the URLs from iBlocklist. The easiest way to do this is to first download the list, then use your browsers download manager get the URL to enter.

Figure 11: IP blocklist
Other Packages
Cerberus has several lesser packages installed (Figure 12). These provide mostly expanded monitoring capabilities and enabling identification of performance issues and possible intrusions such as traffic irregularities.

Figure 12: Other pfSense packages
Security Tips
It has been recently reported that routers configured and administered via a Web GUI can be vulnerable to Man in the Middle attacks. There are some basic hygiene steps you can take to prevent this from happening to you. These steps apply to any networking product that has a web interface.
- Change all the defaults to personalized values; change the default IP address from 192.168.1.1; change the default user from admin.
- Use a separate browser to administer and monitor your router. If you use Firefox for web browsing, use Chrome to administer your router.
- Use HTTPS instead of HTTP to access your router.
- Use a unique strong password (need it be said?)
- Unless you have a compelling reason to do so, do not allow for remote administration.
- Review your system and traffic logs from time to time, looking for any unusual traffic.
Conclusion
After installing my first pfSense router, I was surprised to see my network constantly under siege; packet after packet, scan after scan poking and prodding my home network. This converted me to a true believer in IDS as I became enamored with pfSense and its impressive capabilities. So this begs the question, why doesnt everyone run one of these puppies?
It strikes me that that $400 dollars is not a lot of money to spend on an intrusion detection appliance that allows the user to be confident that the machines they rely on, on their home network, havent become zombified members of a global botnet.
If you look at commercial IDS appliances, youll see the price for this DIY solution is in the ballpark. But it comes without subscription prices, generally offers better performance and, as an open platform, is wholly extensible.
The next logical step for Cerberus is to add an LCD display to the front, for bandwidth monitoring and intrusion alerts. Both pfSense and the Antec case can support a nice display. Replacing the wireless bridge with the Asus PCE-N13 would also reduce the cable tangle behind the router. And maybe we'll install Tarpit for a little funIn questions of power let no more be heard of confidence in man, but bind him down from mischief by the chains of the Constitution. Thomas Jefferson
-
07-04-2013, 12:03 PM #19Senior Member
- Join Date
- Apr 2006
- Location
- New York, The Evil Empire State
- Posts
- 2,680
July 3, 2013 | By Adi Kamdar
How To Opt Out Of Twitter's Tailored Advertisements (And More!)
https://www.eff.org/deeplinks/2013/0...ments-and-more
Earlier, we posted about Twitter's new tailored advertising announcement. We applauded Twitter's commitment to privacy by allowing two opt-out mechanismsboth an internal setting and your browser's Do Not Track capability. To make things easier for you, here's a guide to opt out of Twitter's tailored advertisements and how best to protect yourself from online tracking.
Opting out of Twitter's tailored advertisements
Twitter has a simple, built-in setting for opting out of tailored advertisements. Opting out will not remove Twitter's ads altogetherwhich show up as Promoted Tweets and Promoted Accountsbut they will prevent Twitter from collecting external data to modify which ads you receive.
1. Go to your Twitter settings by clicking on the gear on the top right and choosing "Settings."
2. Under "Account" (the first page), there is an option called "Promoted content." Uncheck the box by "Tailor ads based on information shared by ad partners."
 3. There is also an option called "Personalization." Uncheck "Tailor Twitter based on my recent website visits."
 It should be that simple.
Opting out using Do Not Track
You can also opt out of Twitter's browser-based tailored advertisements using Do Not Track (DNT). Do Not Track is a signal sent from your browser to indicate just thatyou do not want to be tracked. While many advertisers, companies, advocacy groups, and regulatory bodies are currently netotiating how to respond to the DNT signal, we are pleased to see Twitter respecting their users' choice by disabling targeted ads when DNT is turned on. (Note that using DNT does not opt you out of Twitter's tailored ads using hashed email data.)
To enable Do Not Track, follow our handy guide with instructions for Safari, Internet Explorer 9, Chrome, and Firefox. (DNT is enabled by default with IE 10.)
If Do Not Track is enabled, under your "Personalization" setting you should see a green check mark.
 Other ways to limit online tracking
There are a number of tools to help curb online tracking and block third-party cookies. We recommend you use a tool such as Ghostery (available on Firefox, Safari, Chrome, Opera, and Internet Explorer) or Abine's DoNotTrackMe (available in Firefox, Safari, Chrome, and Internet Explorer).
You can also block third party trackersand advertisements altogetherusing AdBlock Plus with EasyPrivacy Lists enabled. For information on how to install this add-on and enable other privacy settings, check out our 4 Simple Changes to Stop Online Tracking guide.
Apart from technological solutions, we recommend you take caution when giving out personal information online. Use your full name, phone number, and email address sparingly, if you can. Often times companies don't actually need this information, which could end up in the hands of a number of data brokers (or, worse, governments) down the line.In questions of power let no more be heard of confidence in man, but bind him down from mischief by the chains of the Constitution. Thomas Jefferson
-
07-13-2013, 03:09 PM #20Senior Member
- Join Date
- Apr 2006
- Location
- New York, The Evil Empire State
- Posts
- 2,680


The SSD Project
- Risk Management
- Data Stored on Your Computer
- Data on the Wire
- Information Stored By Third Parties
- Foreign Intelligence and Terrorism Investigations
- Defensive Technology
Questions? Feedback? Contact us.
View a print-friendly version of this site.
The SSD Project
The Electronic Frontier Foundation (EFF) has created this Surveillance Self-Defense site to educate the American public about the law and technology of government surveillance in the United States, providing the information and tools necessary to evaluate the threat of surveillance and take appropriate steps to defend against it.
Surveillance Self-Defense (SSD) exists to answer two main questions: What can the government legally do to spy on your computer data and communications? And what can you legally do to protect yourself against such spying?
After an introductory discussion of how you should think about making security decisions it's all about Risk Management we'll be answering those two questions for three types of data:
First, we're going to talk about the threat to the Data Stored on Your Computer posed by searches and seizures by law enforcement, as well as subpoenas demanding your records.
Second, we're going to talk about the threat to your Data on the Wire that is, your data as it's being transmitted posed by wiretapping and other real-time surveillance of your telephone and Internet communications by law enforcement.
Third, we're going to describe the information about you that is stored by third parties like your phone company and your Internet service provider, and how law enforcement officials can get it.
In each of these three sections, we're going to give you practical advice about how to protect your private data against law enforcement agents.
In a fourth section, we'll also provide some basic information about the U.S. government's expanded legal authority when it comes to Foreign Intelligence and Terrorism Investigations .
Finally, we've collected several articles about specific defensive technologies that you can use to protect your privacy, which are linked to from the other sections or can be accessed individually. So, for example, if you're only looking for information about how to securely delete your files, or how to use encryption to protect the privacy of your emails or instant messages, you can just directly visit that article.
Legal disclaimer: This guide is for informational purposes only and does not constitute legal advice. EFF's aim is to provide a general description of the legal and technical issues surrounding you or your organization's computer and communications security, and different factual situations and different legal jurisdictions will result in different answers to a number of questions. Therefore, please do not act on this legal information alone; if you have any specific legal problems, issues, or questions, seek a complete review of your situation with a lawyer licensed to practice in your jurisdiction.
Next: Risk Management
Subtopics
- Risk Management
- Data Stored on Your Computer
- Data on the Wire
- Information Stored By Third Parties
- Foreign Intelligence and Terrorism Investigations
- Defensive Technology


A project of the Electronic Frontier Foundation | Privacy Policy | Languages | Contact EFF
In questions of power let no more be heard of confidence in man, but bind him down from mischief by the chains of the Constitution. Thomas Jefferson


 Reply With Quote


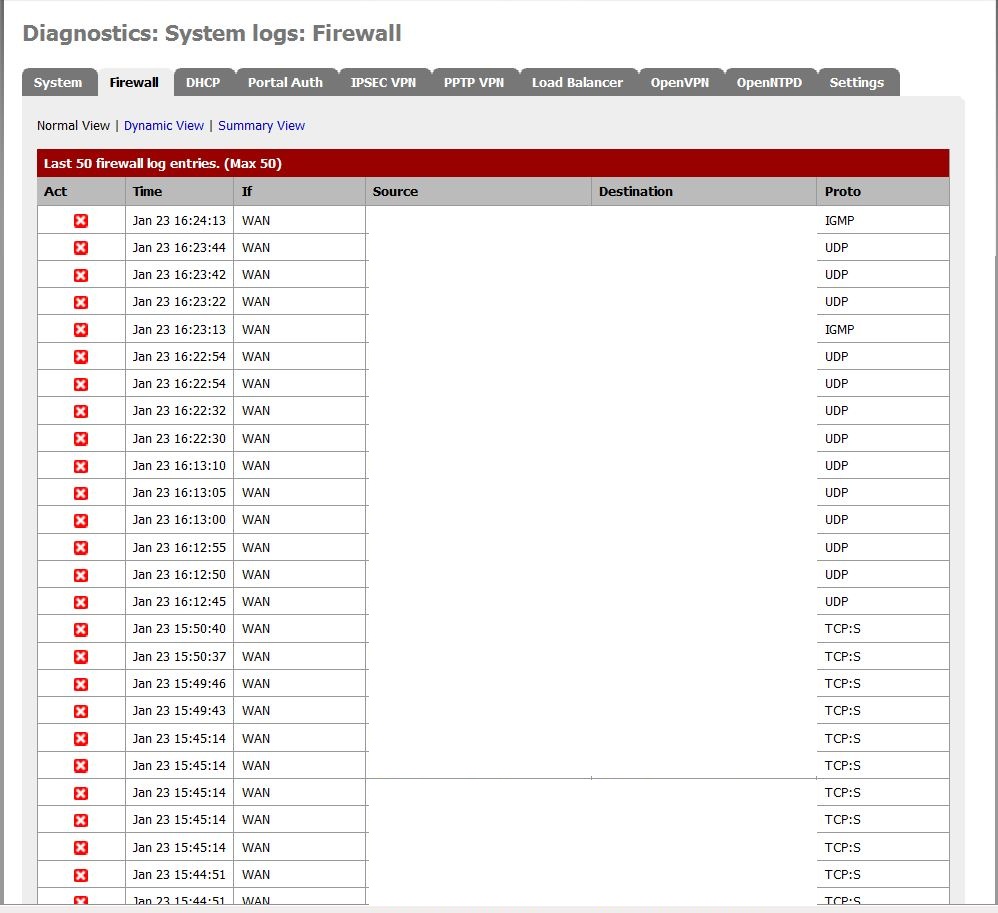
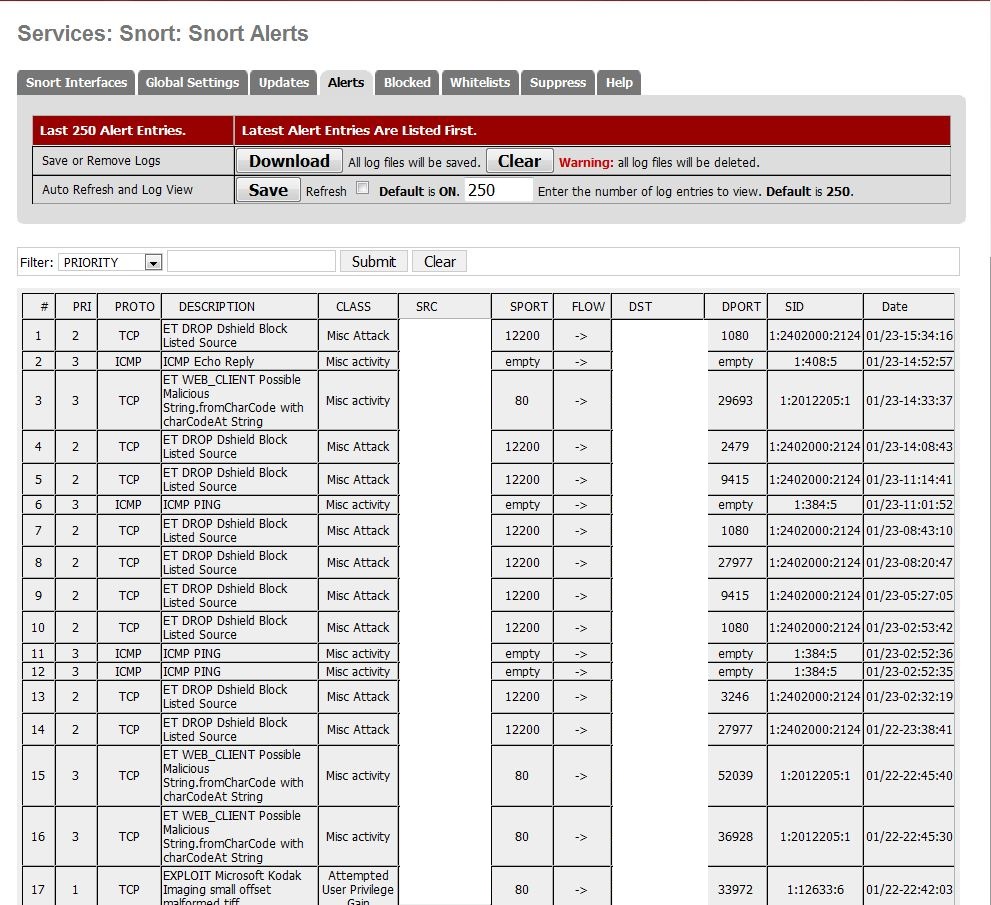
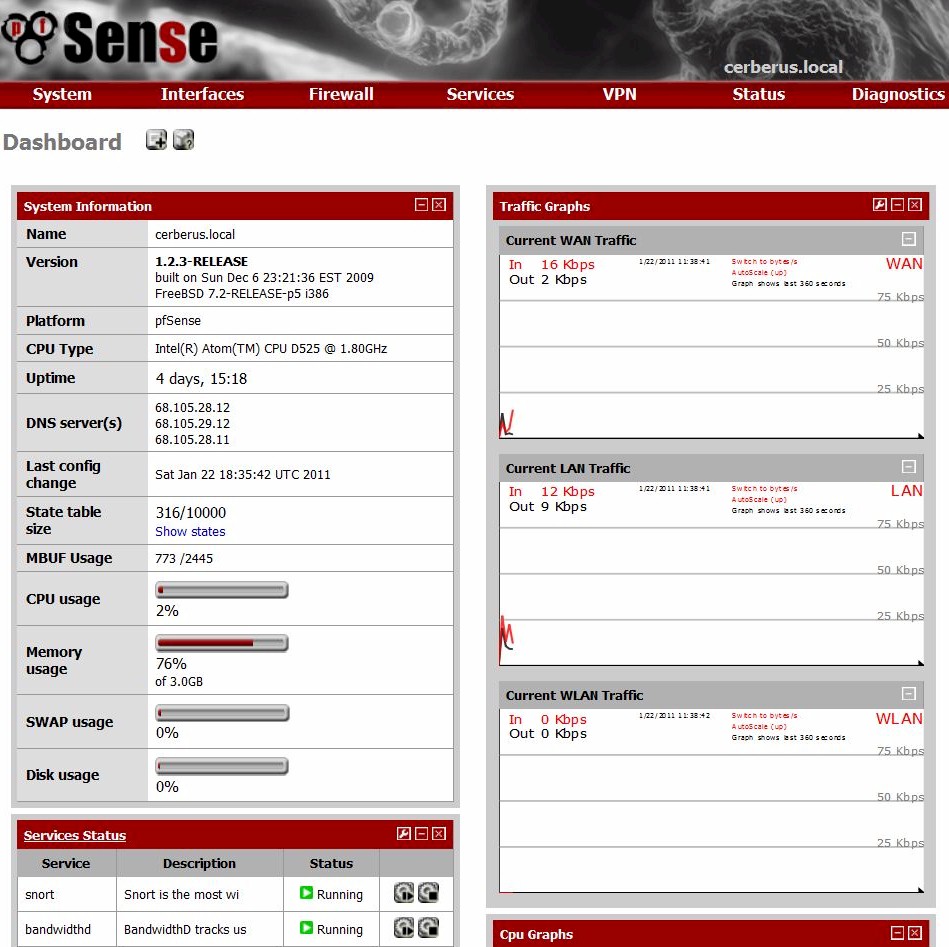

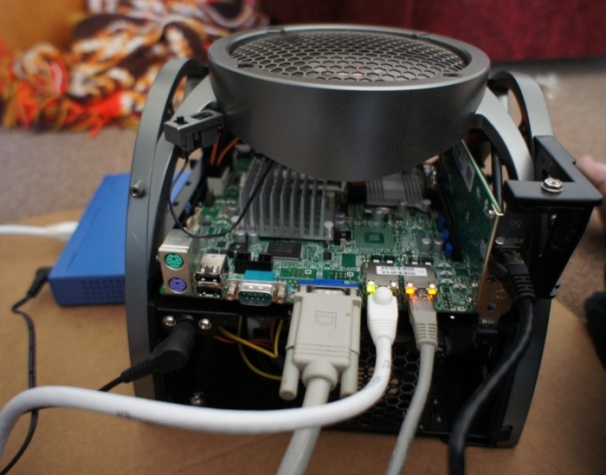

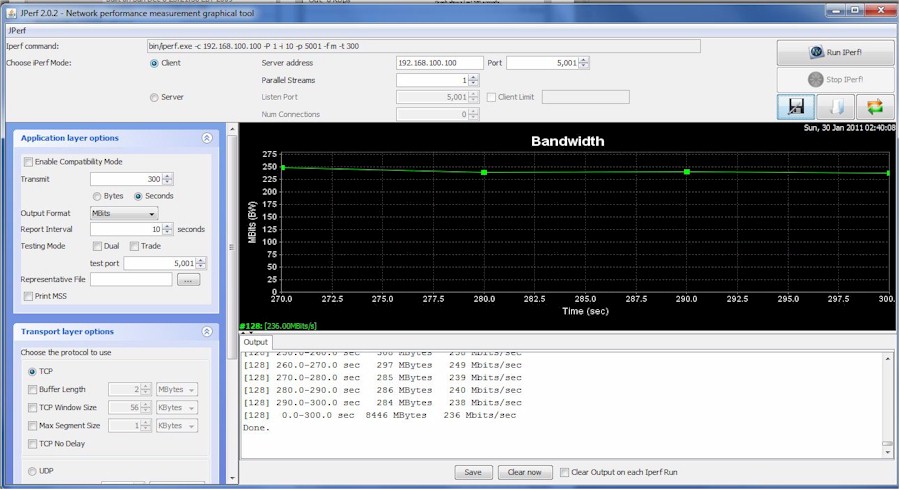

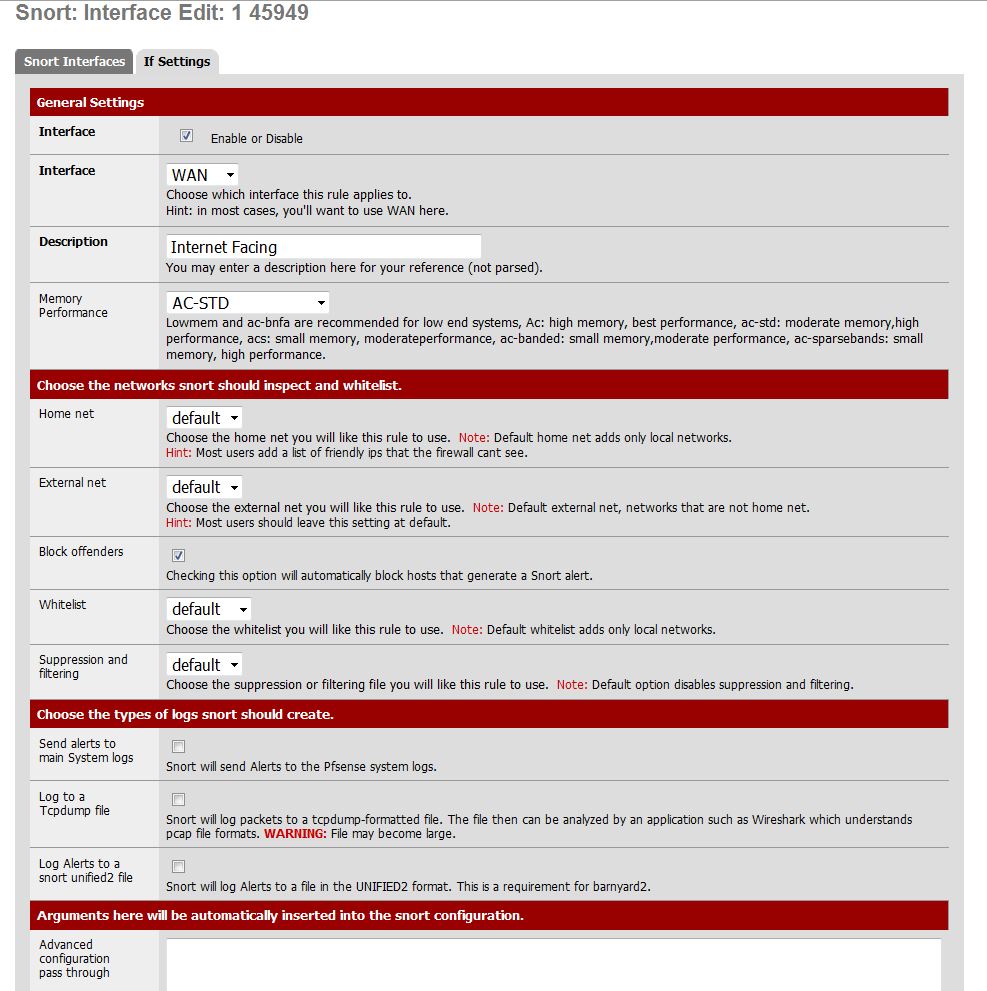

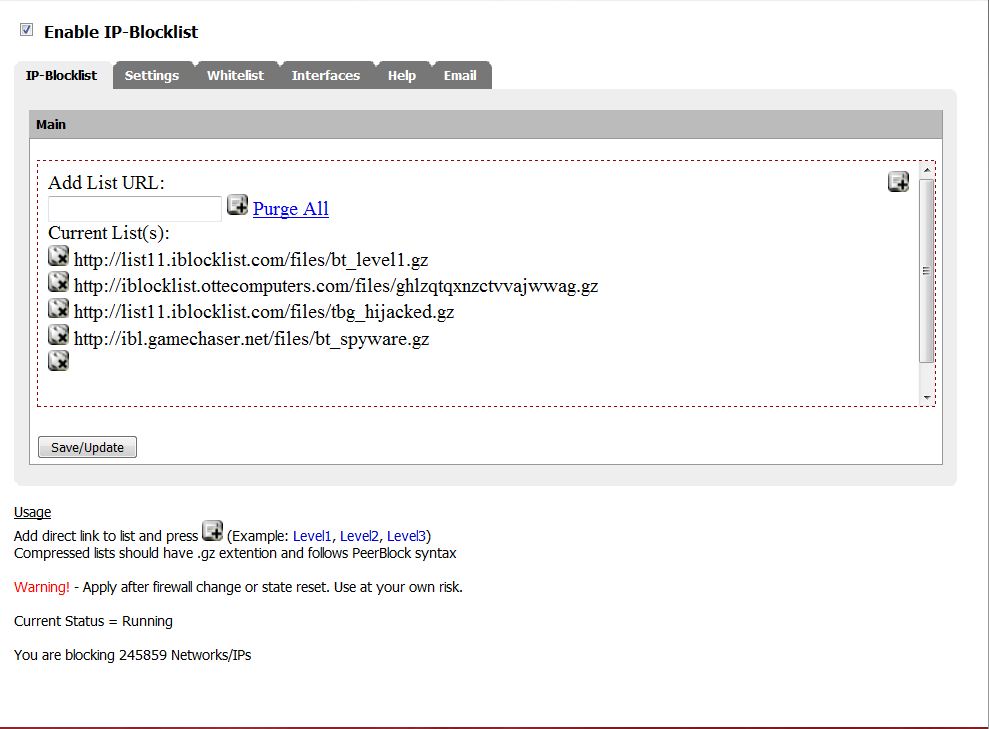
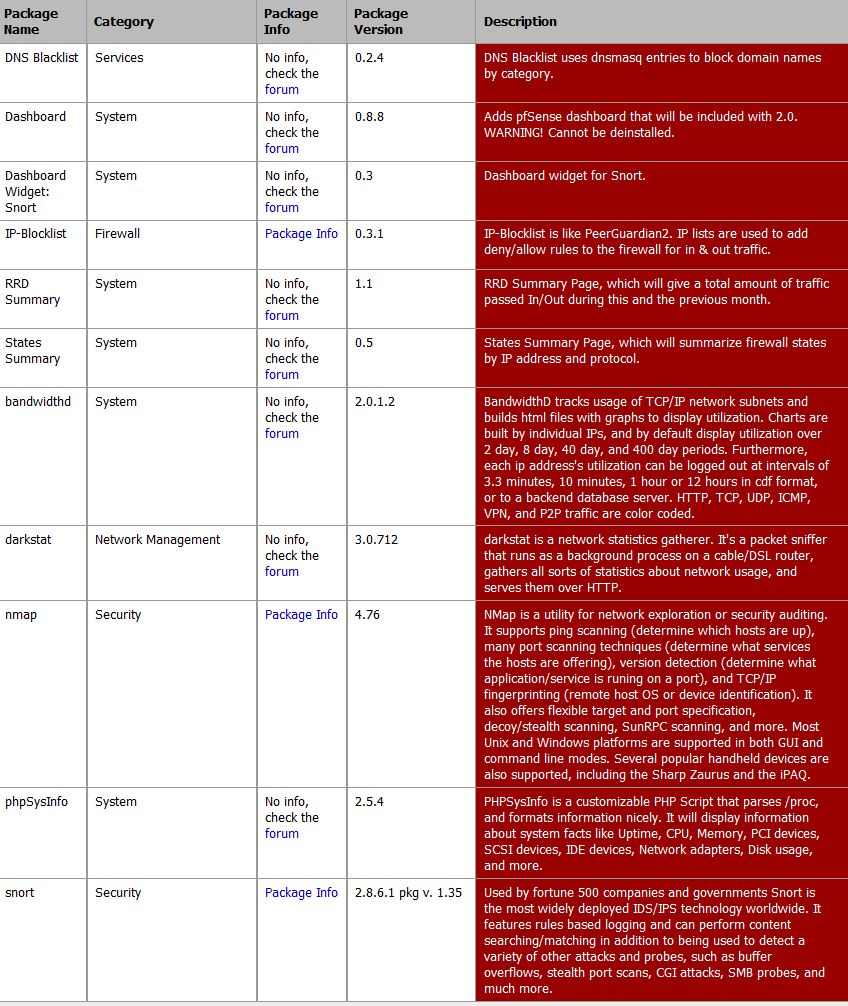


Durbin pushes voting rights for illegal aliens without public...
04-25-2024, 09:10 PM in Non-Citizen & illegal migrant voters