

Results 10,161 to 10,170 of 11856
 226Likes
LinkBacks (?)
-
12-26-2016, 11:32 AM
-
09-02-2016, 05:39 PM
-
whole garden made with pallets!! Love it!! | Pallets | Pinterest | Pallets, Pallets Garden and Wooden Pallets
Refback This thread03-06-2016, 11:30 AM -
10-20-2015, 05:29 PM
-
06-12-2015, 08:00 PM
-
02-26-2015, 01:58 PM
-
01-05-2015, 04:13 PM
-
12-19-2014, 10:19 AM
-
EMERGENCY: HUGE FEMA PANDEMIC EXERCISE IN USA IN NOVEMBER, INTERNET SHUT DOWN PART OF EXERCISE | Prepare4Survival
Refback This thread12-03-2014, 10:39 PM -
Off Grid World ? Ugly Duckling Shipping Container Home Built by Artist Is a Beautiful Swan on the Inside
Refback This thread11-25-2014, 03:10 PM -
11-17-2014, 10:59 PM
-
11-13-2014, 11:18 AM
-
11-09-2014, 02:54 PM
-
10-28-2014, 11:38 PM
-
10-26-2014, 05:54 AM
-
10-16-2014, 11:28 AM
-
10-03-2014, 01:25 PM
-
10-02-2014, 09:16 PM
-
09-26-2014, 07:00 PM
-
09-26-2014, 01:56 PM
-
09-19-2014, 04:46 PM
-
09-13-2014, 05:49 AM
-
09-05-2014, 01:52 PM
-
09-01-2014, 09:39 AM
-
08-30-2014, 06:29 PM
-
08-10-2014, 06:29 AM
-
08-04-2014, 05:07 PM
-
07-23-2014, 11:14 AM
-
New Evidence on Expiration Dates | Medical Preparedness | Doom and Bloom (TM) | Doom and Bloom (TM)
Refback This thread07-22-2014, 10:10 AM -
07-18-2014, 08:37 PM
-
07-15-2014, 04:57 PM
-
07-11-2014, 01:40 AM
-
04-22-2014, 11:14 AM
-
04-18-2014, 12:57 PM
-
04-18-2014, 10:10 AM
-
04-14-2014, 12:18 AM
-
04-12-2014, 02:28 AM
-
03-02-2014, 11:43 PM
-
12-24-2013, 11:59 PM
-
12-07-2013, 11:04 PM
-
kitchen | Cob
Refback This thread11-25-2013, 03:24 PM -
10-22-2013, 10:25 PM
-
Apple Pie Braid | Sweets
Refback This thread09-26-2013, 07:58 AM -
09-02-2013, 04:44 PM
-
5 Reasons Why You May have to Bug Out Even Though You Don’t Want to | The Apartment Prepper's Blog
Refback This thread08-23-2013, 03:20 PM -
06-27-2013, 06:30 AM
-
06-23-2013, 08:11 PM
-
06-17-2013, 11:21 PM
-
05-24-2013, 05:06 PM
-
To Eat / BASIC LIST / SUGGESTED ITEMS FOR LONG TERM SURVIVAL - Page 275 - ALIPAC
Refback This thread05-01-2013, 03:49 AM
Thread Information
Users Browsing this Thread
There are currently 3 users browsing this thread. (0 members and 3 guests)
 LinkBack URL
 About LinkBacks
-
07-02-2025, 07:02 AM #10161Senior Member


- Join Date
- Aug 2018
- Posts
- 95,580
Bubble Wrap Window Insulation
I've used bubble wrap on windows for two three+ years now, and I'm amazed how quick and easy it is. This year, we are even covering the windows in the guest room -- we just take the bubble wrap down when guests come, and put it back up when they leave -- 15 seconds a window.
This is a simple technique for insulating windows with bubble wrap packing material. Bubble wrap is often used to insulate greenhouse windows in the winter, but it also seems to work fine for windows in the house. You can use it with or without regular or insulating window shades. It also works for windows of irregular shape, which can be difficult to find insulating shades for.
Its been five years since I put this page up, and I've heard from MANY people who are quite happy with using bubble wrap for window insulation.
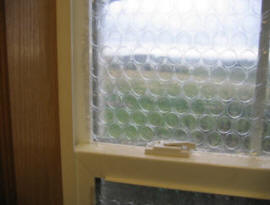
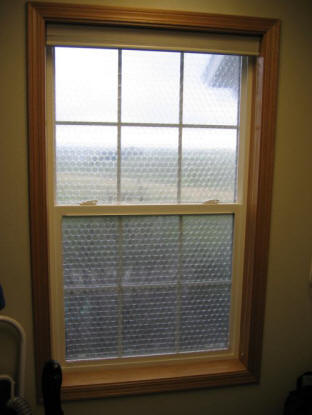
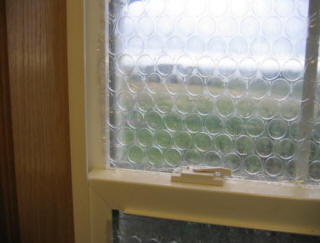
The view through the bubble wrapped window is fuzzy, so don't use it on windows where you need a clear view. But, it does let plenty of light through.I know you came here to look at bubble wrap for your windows, but our site also has literally hundreds of good practical projects and ideas on energy efficiency, solar heating and electricity, and the Half Plan to help you cut your total energy use in half.
Have a look around.
I like the medium to large size bubbles. The larger ones appear (from surface temperature
measurements) to insulate a little better, and you still get a nice artistic effect looking out of them. The small bubble warp totally obscures the view, but you still get light. Most people seem to prefer the large bubble version.
Nov 10, 2013 -- added a Comments and Suggestions section...
Installation
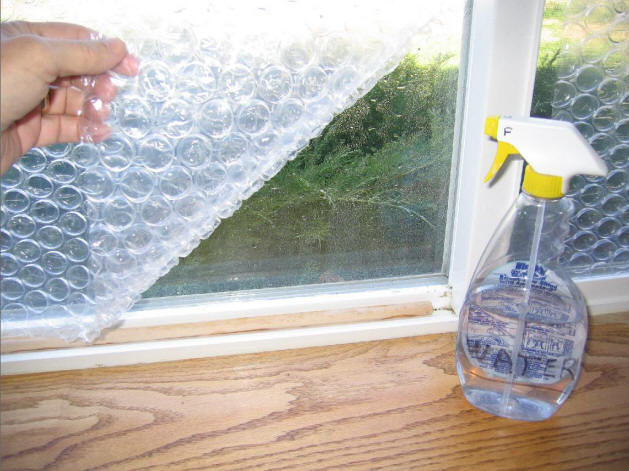
- Cut the bubble wrap to the size of the window pane with scissors.
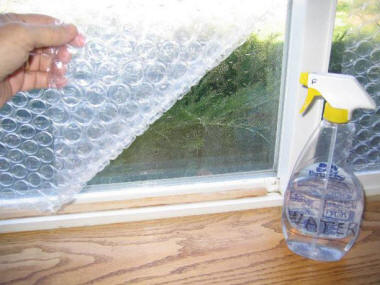
- Spray a film of water on the window using a spray bottle.
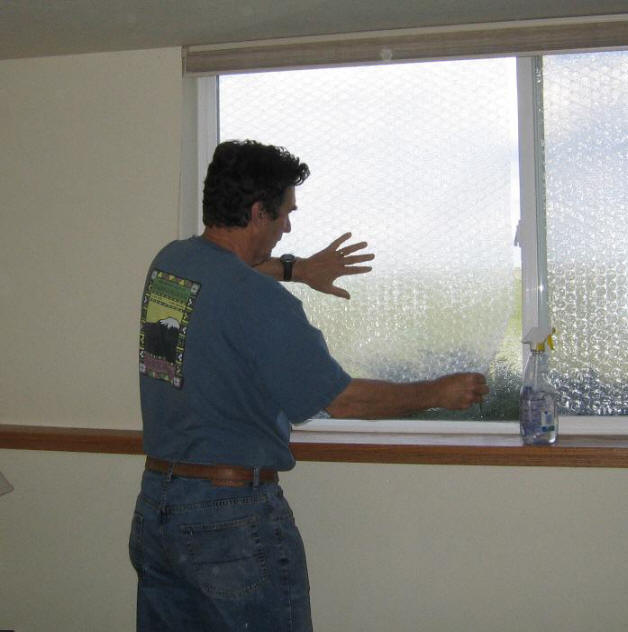
- Apply the bubble wrap while the window is still wet and press it into place.
- The bubble side goes toward the glass.
- To remove the bubble wrap, just pull it off starting from a corner. You can save it and use it for several years. It does not leave a mess or stains on the window glass.
If you have trouble with the bubble wrap separating from the window when the film dries, you can try adding a little Glycerin to the water, but this probably won't be necessary.
A few small pieces of double back tape can be helpful on really stubborn windows.
The bubblewrap can be installed in the fall, and removed in the spring. Judging by how mine looks after a year, it may last quite a while.
When you take the bubble wrap down, put a small number in on the upper right corner of each piece of bubble wrap, and write down which window that number goes with on a piece of paper. Save the paper for the installation next fall. This tells you instantly where each sheet goes, and which way its oriented.
Some places to get bubble wrap:- Save up bubble wrap packing material that you and friends receive.
- Check places that sell larger items like canoes or furniture -- bubble wrap is often used for packing these.
- Check for wholesale suppliers of packing material in your area -- these places will often sell a roll to the public.
- Here is one potential online source: http://www.uboxes.com (I've not actually tried them, but looks OK)
- As a last resort, places like the UPS store have it, but the prices are usually high.
Suggestion from Pat:
"Bubble wrap small bubble and large can be had for free by contacting furniture retailers or rental shops. They throw it away by the tons!"
I've heard the same thing for places that sell canoes.
(2/27/07 -- see note below on reported bubble wrap life)
Installation:
Click pictures to enlarge:
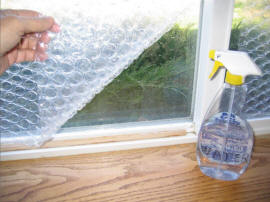
Spray water on glass with bubble side
toward glass
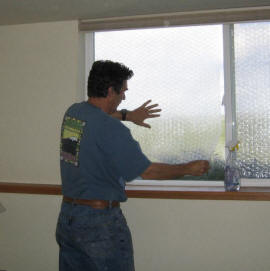
Smooth bubble wrap out so that water
contact holds it in place.
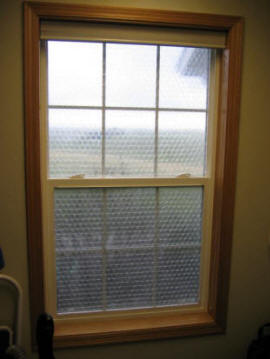
Double Bubble (added Nov 15, 2007)
I thought it might be worth a try to see if two layers of bubble wrap might be used.
This may be going a bit far, but it does seem to work.
I applied a 2nd layer of bubble wrap over the first layer in exactly the same way as the first layer was applied to the window glass. That is, spray the first layer of bubble wrap with water mist, and while its still wet apply the 2nd layer of bubble wrap to it and smooth it out.
For both layers, the bubble side face the glass.
It has been a couple days since I did this, and it is staying in place OK -- not sure if it will stay up with the added weight in the long term or not.
The two layers of bubble wrap fuzzy the view a bit more than one layer, but it still seems to transmit quite a bit of light.
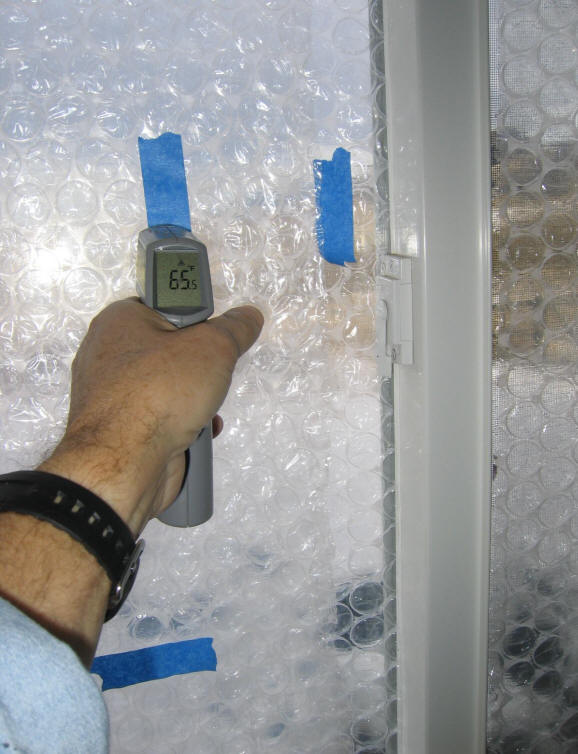
The surface temperature on the 2nd layer is higher than the surface temperature on the first layer, so it is adding some insulation value.
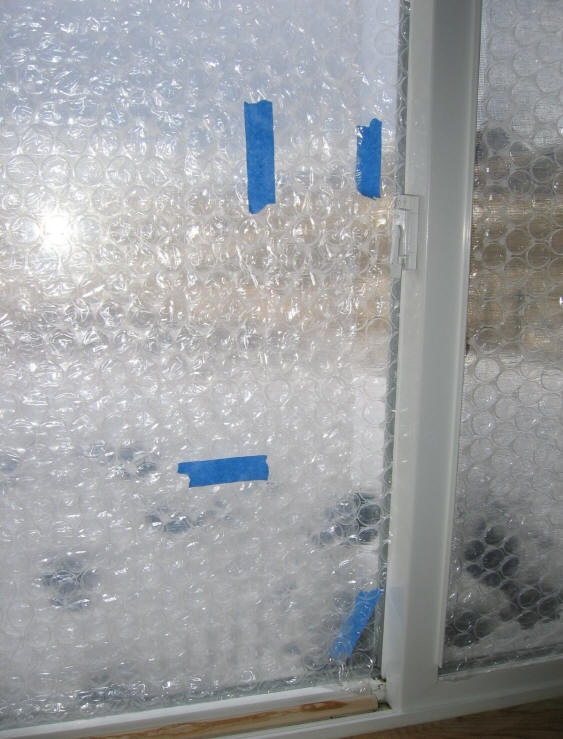
Click on images to enlarge.
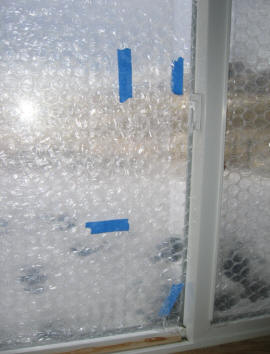
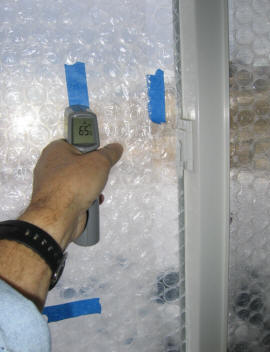
View through single and doubled bubble wrap.
Blue tape is to take temperature readings on with the IR thermometer.
Payoff
The bubble wrap has a short payback in cold climates. About 2 months for single glazed windows, and half a heating season for double glazed widows. Details on payback:For an 7000 deg-day climate (northern US), and single glazed windows, the bubble wrap increases the R value from about R1 to about R2. This cuts the heat loss from the window in half.
Heat losses with and without bubble wrap for 1 sqft of window are:
Heat loss w/o wrap = (7000 deg-day)(1 ft^2) (24 hr/day) / (1 ft^2-F/BTU) = 168K BTU per season
Heat loss with wrap = (7000 deg-day)(1 ft^2) (24 hr/day) / (2 ft^2-F/BTU) = 88K BTU per season
If you are heating with natural gas at $1.50 per therm (100 CF) in an 80% efficient furnace, then the saving for 1 sqft of wrap for the season is:
Saving per sqft = ($1.50)(168K - 88K)/(100K*0. = $1.65 per season per sqft of window
The bubble wrap cost about $0.30 per sqft, so the payback period is about 2 months -- not too bad!
If you repeat the numbers above for double glazed windows, the saving is $0.60 per sqft per season, and the payback period is a about one half heating season.
If you use a more expensive fuel like propane, fuel oil, or electricity, the savings will be correspondingly more.
Performance:
Here is my Rough Performance Test
Some interesting work done by students at LIU on insulation value of packing materials. Probably not exactly applicable to windows, but interesting.
Does Bubble Wrap Help In the Summer? (added March 2016)
There have been a few questions on whether bubble wrap is effective in reducing unwanted heat gain in the summer. The answer is that it does help some, but there are probably better approaches.
The bubble wrap adds insulation, so just as this added insulation helps to reduce heat loss from the warm room to the cold outside in the winter, it also helps to reduce heat gain from the hot outside to the cool room in the summer, and that is good and helps the room run cooler. But, heat gain also comes from the sun shining right through the window and the bubble wrap and then being absorbed when it hits a surface in the room. In the winter, this direct absorption of solar radiation is a good thing in that its free heat gain -- its one of the nice features of bubble wrap that it allows the sun to shine right through it and get beneficially absorbed in the room. But, in the summer this direct absorbtion of solar radiation in the room is a negative and its a big part of summer heat gain for windows that get a lot of direct sun.
For summer heat gain with windows that get direct sunlight its really important to prevent the sunlight from shinning through the window and into the room. The best way to do this is to stop the sunlight outside the window by shading the window on the outside in some way. The shading can be things like shade trees or bushes, shade screen (which still allows some light into the room, but blocks most of the heat gain), or completely opaque shades on the outside of the window that block all of the sun. If its not possible to shade the window on the outside, than another approach is to place a reflective surface (like a shade) just inside of the window with the reflective side facing the window. This reflects much of the sun right back out the window so it is not absorbed and converted to heat inside the room. Surfaces like aluminum foil or a reflective white paint are good at reflecting sunlight back out the window.
The section on passive cooling has a lot of ideas and schemes for reducing summer heat gain. The window shading page in particular has ways to reduce heat gain through windows.
Bubble Wrap Life:
Doug reports that bubble wrap that he installed 6 years ago has about had it. He thinks the life is around 5 to 7 years. In his application, the bubble wrap stays up year round.
He reports that at the end of its life, it tends to stick to the glass, so replacing it before this happens might save some cleanup work.
The bubble wrap he is using was intended for packaging, so this still leaves open the question of whether the bubble wrap intended for greenhouses will last longer. The greenhouse bubble wrap we installed is on its third winter, and is still doing fine.
Comments and Suggestions
- 595 comments
BubbleWrapIf you're gonna fight, fight like you're the third monkey on the ramp to Noah's Ark... and brother its starting to rain. Join our efforts to Secure America's Borders and End Illegal Immigration by Joining ALIPAC's E-Mail Alerts network (CLICK HERE)
-
07-02-2025, 08:00 AM #10162Senior Member
- Join Date
- Aug 2018
- Posts
- 95,580
Financial prepping: 10 Signs of economic suffering in the U.S. (And how to protect your finances)
07/01/2025 // Zoey Sky // 390 Views
Tags: Collapse, debt bomb, debt collapse, disaster, economic suffering, economy, emergency funds, emergency preparedness, finance, financial collapse, financial prepping, homesteading, off grid, preparedness, prepper, prepping, savings, SHTF, survival, tips

- Despite claims of a strong economy, homelessness in the U.S. is at record highs (especially in California), unemployment is likely much higher than reported (24.3 percent vs. the official 4.2 percent), and mass layoffs continue across industries, including Walmart and Procter & Gamble.
- Food costs (meat, poultry, etc.) are surging, and shrinking cattle herds mean prices won’t drop soon. Families are cutting back, but groceries still strain budgets.
- Major chains like Hooters are closing locations, and small businesses face even worse conditions. The housing market is stagnant, with nearly $700 billion worth of homes unsold.
- Many companies are quietly pushing employees out ("quiet firing") instead of formal layoffs, avoiding severance pay. Financial stress is at an all-time high, with 70 percent of Americans feeling worse off than ever.
- Experts warn of a coming recession, so protect yourself by making changes. Cut unnecessary spending, avoid risky job changes, buy secondhand, pay down high-interest debt and build an emergency fund (ideally three to six months of expenses). The economy isn’t working for most people, and preparation is key as conditions worsen.
The headlines insist the economy is strong, but for millions of Americans, the reality feels anything but stable. From soaring homelessness to mass layoffs and skyrocketing food prices, the signs of economic distress are impossible to ignore.
While politicians and pundits debate whether the U.S. is in a recession, the financial pain for everyday people is undeniable.
Here are 10 alarming indicators that the economy is far from "fine," along with some practical tips to safeguard your money as conditions worsen. (h/t to SHTFPlan.com)
Homelessness hits record highs
California, which is often seen as an economic powerhouse, is now home to nearly 25 percent of the nation’s homeless population, with over 187,000 people living on the streets.
Two-thirds of the homeless are unsheltered, a crisis not seen since the Great Depression. If one of the richest states can’t solve this, what does that say about the rest of the country?
The "true" unemployment rate is 24.3 percent
The government claims unemployment is at a low 4.2 percent, but the Ludwig Institute for Shared Economic Prosperity (LISEP) reports that the real rate is 24.3 percent.
Why the gap? Because official numbers don’t count people stuck in poverty-wage jobs or those who’ve given up looking for full-time work.
More Americans are delaying major purchases
Nearly one in four Americans are canceling plans to buy homes or cars, while another 32 percent are postponing big purchases due to economic uncertainty.
When people stop spending, businesses suffer, leading to more layoffs and closures.
Restaurants are collapsing
Hooters suddenly closed 30 locations in June, joining a growing list of chains struggling with declining sales.
If even well-known brands like Hooters can’t survive, small businesses are in even worse shape.
Mass layoffs continue
Procter & Gamble is cutting 7,000 jobs and companies across industries are downsizing.
Even Walmart, the nation’s largest brick-and-mortar retailer, is trimming its workforce, signaling broader economic pressures beyond the tech sector. The Arkansas-based company confirmed layoffs affecting up to 106 employees in its San Bruno, California, offices, according to a May 23 filing under California’s Worker Adjustment and Retraining Notification (WARN) Act.
While some affected workers may have the option to relocate or transition to other roles within Walmart, the cuts will be permanent for those unable to secure new positions. This places Walmart among a growing list of major employers, from social media firms to life sciences startups, reducing their Bay Area tech and corporate workforces amid shifting economic conditions.
Don't be fooled. The job market isn’t as secure as the headlines suggest.
Meat prices are soaring and cattle herds are shrinking
Steak prices are up by seven percent, ground beef by 10 percent and chicken by three percent. The U.S. cattle herd is now the smallest since the 1950s, meaning prices won’t drop anytime soon.
Families are cutting back, but groceries still take a bigger bite out of budgets.
"Quiet firing" is on the rise
Instead of formal layoffs, 53 percent of companies are making work conditions unbearable to push employees out, which is one way they can avoid severance pay and bad press.
Workers are being forced out without recourse.
The housing market is stagnant
A record $698 billion worth of homes are sitting unsold.
With $330 billion in listings older than 60 days, prices are expected to drop further. This is bad news for sellers and a warning sign of weakening demand.
Financial stress is at an all-time high
A survey has revealed that a whopping 70 percent of Americans say that they’re more financially stressed than ever.
When the majority of the population is struggling, it’s not a personal failure, it points to a systemic crisis.
Mainstream media keeps saying "Everything is fine"
Despite all evidence, mainstream outlets downplay the problem.
But when homelessness, unemployment and debt are rising, how can anyone claim the economy is healthy?
How to protect your money as the economy worsens
With 60 percent of Chief Financial Officers (CFOs) predicting a recession in 2025, now is the time to prepare.
Here’s how to recession-proof your finances:
Cut unnecessary spending
Review all your expenses, from small purchases to bigger ones. You can save money by canceling unused subscriptions.
Downgrade services, such as phone plans, streaming and gym memberships. Additionally, you can save by cooking more at home instead of eating out.
Avoid risky job moves
If you’re in a stable job, think twice before jumping ship. Recessions hit low-wage and new hires first.
Buy secondhand
Buying used cars, clothes and electronics can save you hundreds, or even thousands of dollars. (Related: Preparing for the unthinkable: How to safeguard your finances against collapse.)
Pay down high-interest debt
Credit card rates are brutal. Focus on paying off existing debt before rates climb higher.
Build an emergency fund
If money is tight, having an extra $500 to $1,000 can prevent disaster. Aim for at least three to six months' worth of expenses if possible.
The economy isn’t working for most Americans, and pretending otherwise won’t fix it. Prepare now, because if trends continue, the worst may still be ahead.
Visit Preparedness.news for tips on how to build a reliable food stockpile on a budget. You can also check out Health Ranger Store and Brighteon Store for affordable, lab-verified clean food supplies for your prepping stockpile.
Watch this video from "Coffee and a Mike,” as host Michael Farris and Health Ranger Mike Adams talk about war and how it is being used as the cover story for financial collapse.
This video is from the Health Ranger Report channel on Brighteon.com.
More related stories:
Decentralize TV hosts Mike Adams and Todd Pitner share top strategies for financial freedom and survival.
53% of Millennial and Gen Z consumers are resorting to “buy now, pay later” services and racking up enormous debt.
Health Ranger Report: Adapt 2030’s David DuByne elaborates on the escalating global supply chain crisis.
Prepping on a budget: How to use your food supply to get through unexpected financial emergencies.
Sources include:
SHTFPlan.com
PPIC.org
Finance.Yahoo.com
MarketWatch.com
Brighteon.com
Financial prepping: 10 Signs of economic suffering in the U.S. (And how to protect your finances) – NaturalNews.com
If you're gonna fight, fight like you're the third monkey on the ramp to Noah's Ark... and brother its starting to rain. Join our efforts to Secure America's Borders and End Illegal Immigration by Joining ALIPAC's E-Mail Alerts network (CLICK HERE)
-
07-02-2025, 08:28 AM #10163Senior Member
- Join Date
- Aug 2018
- Posts
- 95,580
If you're gonna fight, fight like you're the third monkey on the ramp to Noah's Ark... and brother its starting to rain. Join our efforts to Secure America's Borders and End Illegal Immigration by Joining ALIPAC's E-Mail Alerts network (CLICK HERE)
-
07-02-2025, 08:37 AM #10164Senior Member
- Join Date
- Aug 2018
- Posts
- 95,580
How to Make Razzleberry Jam
August 1, 2014 by Stephanie26 Comments

Pin Around here, wild blackberries abound. They are thorny, but they’re free! Pull over just about anywhere and you can help yourself to delicious, flavorful berries. To preserve your skin, you’ll to wear long sleeves, but not your favorite shirt because blackberries stain!
We’ve gone the free route many times, but now we we are lucky enough to have both raspberries and blackberries growing in here in my in-laws’ garden. My mother-in-law has given us an entire row of raspberries and half of the blackberries to pick.
In honor of my dad coming to visit this weekend, I wanted to make a razzleberry pie.
What is Razzleberry
I wasn’t quite sure myself until I researched razzleberry pies so that I could make one for my dad’s visit. It turns out that the most popular combination for razzleberry is raspberries and blackberries (wikipedia has my back on that one), though I have seen many berry combinations.
LATEST VIDEOS
Since we have plenty of both raspberries and blackberries, why stop at pie? We eat a lot more jam around here than pie, so I decided to combine the raspberry and blackberry flavors in jam. And boy am I glad I did! I like razzleberry jam even more than I like either flavor separately.
You will need:
Ingredients
- Raspberries– You’ll need about a quart of raspberries (2.5 cups of crushed berries) per batch
- Blackberries– You’ll need about a quart of blackberries (2.5 cups of berry juice) per batch
- Sugar- You’ll need 7 cups per batch.
- Pectin
— For this recipe, we’ll use the original yellow box (NOT the low sugar kind). If you happen to live near an Amish bulk foods store you can buy the powered pectin in bulk for cheaper than you can find anywhere else. The container I have from several years ago was $2.79/lb.
Yield
You will get 8-9 cups of jam per batch. We like to can jam in quart jars for our own use (because we use it so fast), but I also use pint jars to give away. Each batch will make 2 quarts or 4 pints with a little extra to put in the fridge to use now.
Canning Supplies
- Canning jars and rings– You can use quarts, pints, or smaller jam jars. Any decent grocery store should have them. You can always look on craigslist or ask your grandma!
- Flat lids— While canning jars and screw-on rings can be reused, flat lids must be new. You can get them anywhere you can get canning jars. The cheapest place I know of is at an Amish bulk foods store if you’re lucky enough to have one near.
- Canning Utensils–– You could probably make-do without them, but they are really handy.
- Water Bath Canner
or Steam Canner— You can actually just use a heavy pot with a lid as long as you can have an inch of boiling water cover the jars. You will want something in the bottom for the jars to sit on so they aren’t in direct contact with the bottom of the pan. You could line the bottom of the pot with the metal rings for canning jars, for example.
Preparing Raspberries

Pin Preparing your raspberries is pretty straight-forward. Remove all stem and leaves and wash your berries. Mash or puree berries, depending on how chunky you want your jam. You can mash them with a potato masher or use a blender. I gave them a few seconds in the Blendtec and they were ready to go.
You can use frozen berries. I always wash and freeze my berries after I pick them. I set them out to thaw the morning that I plan to make jam.
For each batch you’ll need 2.5 cups of raspberry puree. As you can see, I did much more since I always do multiple batches.
Preparing Blackberries
Blackberries take a little more work. While raspberry seeds are tiny and barely noticeable, blackberry seeds are larger and can be annoying. We use a hand-crank food mill/strainer like thisthat is perfect for this purpose. My mother-in-law has one that was her mother’s and I found a nearly new one at a yard sale several years ago (the seller had no idea what to do with it, so they gave it to me for $1). I would like to get a berry screen
to go with my food strainer/sauce maker sometime.
TIP– Heat the berries either in a saucepan or in the microwave before straining. The juice will come out much more easily when they are hot. The blackberry juice will be much thinner than the raspberry puree. I always re-strain the seedy portion (and sometimes reheat it) to get the most juice possible.
For each batch you’ll need 2.5 cups of blackberry juice.

Pin Making Jam
I make jam in bulk, meaning I do several batches in one canning episode. It’s important to do each batch separately though. I often have two batches going simultaneously in separate pans.
Measure Sugar
Measure out 7 cups of sugar into a bowl and set it aside. When it’s time to add the sugar, you will need to add it quickly and won’t have time to measure it out a cup at a time. Pus, you’ll need your other hand to stir in the sugar. Make sure to use the correct amount. Reducing the amount of sugar keeps the jam from setting properly.
Mix Berries with Pectin
Measure 2.5 cups of raspberry puree and 2.5 cups of blackberry juice/puree into a large sauce pan or pot. Stir in a box of pectin or (1/3 cup of bulk pectin) making sure to smash any powder lumps.

Pin Bring to Boil
Stir regularly as you bring the berry and pectin mixture to a full rolling boil. If you can’t stir down the boil, then you’re there.
Add Sugar and Stir
Quickly add in sugar and stir well. Continue stirring.

Pin Bring to Rolling Boil
Bring the jam back to a rolling boil that can’t be stirred down easily. When you reach a rolling boil, set a timer for 1 minute. After 1 minute, turn off the heat and get ready to ladle the jam into hot jars!
Canning Jam
You will want to start some of these steps before or during the jam-making process so that you have hot, sterile jars ready when your jam is done.
Prepare Jars and Flat Lids
Clean your jars in the dishwasher or hot, soapy water even if they already look clean. Turn warm (not cold) jars upside down in an inch or two of boiling water to sterilize the jar and make sure they’re as hot as boiling jam. Adding boiling jam to a cold jar is bad news– trust me!

Pin
Pin I either use the bottom of my steam canner (first picture) or just use a regular pan (second picture) to heat my jars.
Put your flat lids in the boiling water as well. Heating them helps soften the rubber seal and sterilizes them. The flat lids should not be re-used. Glass canning jars and metal rings can be used for generations, but you should always use new flat lids.
Fill Jars
Using the funnel from your canning tool kit and a regular ladle to pour the jam into your jars. Leave about 1/8 inch headspace (empty space at top of jar), which is nearly full.

PinClean Rim, Put on Flat Lids and Rings
Make sure the rim of the jar is clean and free of chips or cracks. Use a wet cloth to wipe off any jam from the rim. Grab a flat lid from the boiling water with the handy magnetic lid lifter from your canning utensils (or try using a fork) and place it on a jar.

Pin
Pin Screw a metal band on firmly, but not overly tight. The jar will be too hot to touch, but there’s a tool for that in every kit (see red thingamajig in picture below).

Pin Process
In a water bath canner, process hot jam in pint jars (or smaller) according to the table below.
Side note: Can you can quarts of jam?Jar Size 0 – 1,000 ft 1,001 – 3,000 ft 3,001 – 6,000 ft 6,000-8,000 ft Pints (or smaller) 10 min 15 min 20 min 25 min
Well I mentioned earlier that I do can jam in quart jars. Nowadays, they never give a processing time for quarts of jam, but you can find times in older books. My mother-in-law has always done jam in quart jars without a problem, so that’s what I’ve always done and I am perfectly fine with it. I process quarts for about 5 minutes longer than I would pints.
To put it into perspective, when our grandmas canned jam, they didn’t even process it. At all. Just having the hot jam in the jar will make the lid seal, so that was that. My grandma still just turns the jam jars upside down to make they seal. The USDA says that it is effective, there is just more room for error if the jam cools down too much before you get the lid screwed on, so to be safe you should process the jars. For jam, the only real risk is mold, which is easy to detect and not nearly as scary as the potential for botulism if tomatoes or green beans are not processed properly.
If processing quarts makes you nervous, just do pints. [end of side note]

Pin I prefer using a steam canner since it takes less water and is not so big and bulky. In a steam canner, you start timing once the steam coming out the hole is at least the length of a quart jar. You can turn the heat down (so it doesn’t steam like crazy) as long as you still have a steady stream of steam. When the time is up, turn the stove off. Remove the lid by lifting it away from you so you don’t get a face full of steam.
Cool Jars, Remove Rings, Wash Jars
Using the jar lifter from your canning tools (or just a hot pad if you’re using a steam canner), move your jars to the counter. I usually set them on a towel and let them cool overnight in a non-drafty area.
About 24 hours later, remove the rings, wash the jars and check the seal. Pull up lightly on the flat lid with your finger to test the seal. If it pulls off easily, the jar did not seal right. Don’t fret because you can put the jar in the fridge to use now.
All the jars that sealed well can be stored for years in your pantry or any other relatively cool and dark location. Label them with the year and contents so that you can keep your food storage rotated.
Is it worth it?
You’re probably thinking that all sounds like a lot of work, especially if you’ve never canned anything or made homemade jam. It is work and does have a larger clean-up time than your average kitchen project. To make my jam-making (or canning in general) a more efficient process, I always do things in bulk. You will have the same number of dirty dishes if you do 8 batches as you would doing a single batch.
Making your own jam can save money, especially if you grow your own berries or pick them for free. Berries can be expensive to buy, so making your own jam isn’t always cheaper. That being said, homemade jam is much more delicious than store-bought jam and making it yourself is pretty satisfying. With all that sugar, it’s probably not on anyone’s list as nutritious, but compared with all the preservatives that are in store-bought jam you might say that homemade is more nutritious.
- Did you know what was in razzleberry?
- Do you make homemade jam? Is it worth it to you?
Linked to Link Party Palooza, Strut Your Stuff Saturday, One Project at a Time, Thrifty Thursday
Note: This post contains affiliate links for products I love. For more information, see my disclosure policy.
How to Make Razzleberry Jam - Six Figures Under
If you're gonna fight, fight like you're the third monkey on the ramp to Noah's Ark... and brother its starting to rain. Join our efforts to Secure America's Borders and End Illegal Immigration by Joining ALIPAC's E-Mail Alerts network (CLICK HERE)
-
07-02-2025, 01:07 PM #10165Senior Member
- Join Date
- Aug 2018
- Posts
- 95,580

Pickled Blueberries
My mind is just beginning to think about blueberries. It’s that blueberry time of year again. Blueberry jam. Blueberry pancakes. Blueberries eaten by the handful.
For a small blueberry farm in Rockport, Maine, however, the season has just ended.


Beech Hill Preserve is an organic wild blueberry farm managed by the Coastal Mountains Land Trust. Although it is situated on a hill, with reputedly lovely views of the coastline, the fields were heavily enshrouded in mist and rain on the day that I visited, and nary a lighthouse nor a seagull were seen.
I made the trek to Rockport at the invitation of Brianne, who has been spending her summer as an intern with the land trust.
She took me through all of the steps involved in blueberry harvesting, from picking berries in the field with a ‘rake,’ to winnowing and packaging the berries into quart- and ten pound-sized containers. It’s a fascinating process (with a $10k piece of equipment!) that illustrates how foraging can easily be ramped up to a commercial production level.


With the commercial season coming to a close, I returned home with a box of too-small-to-market berries (shown above top left), as well as a box of plumper fruit, some of which I raked myself. Now, I’m in the midst of freezing cookie sheet after cookie sheet of berries, and I’ve been dreaming up all of the ways I’ll enjoy this fruit in the months to come.
On Sunday, in between reading a tragically-long novel, I made Blueberry Mallow Doodles, which have been a huge hit. And today, I have an easy recipe for something that recently caught my eye (thanks Jenna!). I have been so excited to try making this. Are you ready?
Pickled Blueberries! Oh. You knew that was coming, didn’t you?

This recipe, published on Saveur last year, is credited to Chef Tyler Kord of No. 7 Sub in New York City. Like any quick pickling recipe, it’s just a base of vinegar, salt, and sugar. Add blueberries and some red onion, and you have a colorful hors d’oeuvre that could be served on a sandwich, or with crackers and cheese. I’m willing to bet it would also go very well with pickled herring.
I’ve played with the recipe a bit. I’ve altered it to fill a quart jar, used half white vinegar and half apple cider vinegar, and changed the ratios to use less onion and less sugar than were originally called for.
And I’m impressed. Chances are, if you knock on my door anytime in the coming week, you might catch me sneaking a spoonful of this stuff straight from the fridge. “It’s just so…. pretty!” I will explain to you in a red-cheeked, conciliatory manner.

Pickled Blueberries {adapted from Tyler Kord’s recipe published on Saveur}
Makes 1 quart
++Ingredients:++
1/2 c. white vinegar
1/2 c. apple cider vinegar
1/3 c. sugar (+1 tbsp if using wild/less sweet blueberries)
2 tbsp kosher salt
1 lb blueberries
1/4 to 1/2 large red onion, sliced thin
++Directions:++
In a medium bowl, whisk sugar and salt with vinegars until dissolved. In a quart glass jar, add blueberries and red onion slices (use closer to 1/2 of an onion if you are looking for a more onion-y end product). Top with pickling mixture. Cap the jar, and let sit in the refrigerator for at least one day.
Serve with crackers and cheese, or pickled herring, or on a sandwich (Chef Kord uses these blueberries on a sandwich of brie, pistachios, and chervil).

Visiting Beech Hill Preserve:
Located approximately 1.5 miles from the village of Rockport, between Routes 1, 17 and 90
Rockport, Maine
More information on their blueberries
pickled blueberries – of agates and madeleinesIf you're gonna fight, fight like you're the third monkey on the ramp to Noah's Ark... and brother its starting to rain. Join our efforts to Secure America's Borders and End Illegal Immigration by Joining ALIPAC's E-Mail Alerts network (CLICK HERE)
-
07-02-2025, 01:24 PM #10166Senior Member
- Join Date
- Aug 2018
- Posts
- 95,580
Blueberry Mascarpone Custard Ice Cream
blueberry mascarpone custard ice cream – of agates and madeleines
Note: Given that I wrote these words last month, their memory is extra sweet. What I wouldn’t give for some plump fresh berries!
Raspberries are in full swing here. I simply cannot pass by a raspberry bush without grabbing a few of those sweet morsels. Raspberry bushes grow well in sunlit compacted soils, such as one might find lining roads and old log landings, so it’s a given that a heck of a lot of raspberries cross my path. And I go crazy for them, day after day. Ignoring plump ripe raspberries is like wishing summer away, which is something I would never do. I see each berry that I pick as giving thanks to the splendor of the world around me, and thanks for summer’s plentiful bounty. Is there a small thing that you do to savor the season and make the most of each day? I’d love to hear about the raspberry equivalent in your life.
But meanwhile, this post isn’t about raspberries.

This post is about blueberries.
I’ve made it my life’s mission to 1) listen to New Kids on the Block’s slammin’ album ’10’ at least once per day, and 2) come up with as many tasty blueberry recipes as possible. I’m still working on my hefty score from last year, and while I thought this was going to be the recipe to wipe my stash clean, I somehow still have several pounds in my freezer.
As I will proudly proclaim if you ever ask me (though you won’t), I don’t own an ice cream maker. I don’t find it a useful:space taken up in the kitchen ratioed gadget, given that I can create wonderful custard ice creams that I can then proceed to let chill on their own in the freezer. I do dream of the day when I can freeze my way through my copy of Jeni’s Splendid Ice Creams At Home (finally, a cookbook I actually own… yet most recipes being ones I can currently only ponder), but for now, custard ice cream is the height of splendor at my home.
A whole tub of mascarpone has been added into this ice cream’s simple custard base, and the decadence is nearly outlandish. Smooth, creamy, and rich, each spoonful is akin to skiing down a mountain of mascarpone, skis cutting into the terrain and sweeping up great softly-cheesy waves of ambrosial delight.
If you know of a mountain where I can indeed ski across cheese, please contact me immediately.

Blueberry Mascarpone Custard Ice Cream
(Blueberry Saucy adapted from aforementioned Jeni’s)
Makes 1 delightfully large tub-full
For the Blueberry Saucy:
3 c. blueberries
Scant 1 1/2 c. sugar
Cook blueberries and sugar in a medium saucepan over medium heat, bringing to a boil. Reduce heat to low, and simmer, stirring frequently, for 8-10 minutes until the sauce has thickened somewhat. If you use wild blueberries, the thickenage will not be terribly apparent, but fear not, the sauce will thicken. Remove from heat and let cool.
For the Mascarpone Custard Ice Cream:
2 c. heavy cream
1 c. whole milk
4-8 egg yolks, depending on how you feel about wasting/using egg whites
1/2 c. sugar
1/2 c. brown sugar
Hearty pinch of salt
1 tub mascarpone (8 oz.)
In a large bowl, whisk together egg yolks and sugars. Set aside.
In a saucepan, combine the cream and milk and heat gently until the mixture is approaching the frothy-boil stage but not boiling. Remove the pan from heat, and ever so slowly, pour the milk mixture into the egg mixture in a small but steady stream, whilst furiously whisking to avoid scrambling your eggs. Return to saucepan, and constantly stirring, cook over low heat until the mixture thickens up. This will take at least ten minutes, and may take as long as twenty, depending on your heat level and stirrage.
Remove from heat, and allow to cool at least ten minutes, until it is still hot, yet you can touch the mixture without injury. Add the tub of mascarpone, mixing in until it is melted.
In a freezer-proof container, alternate layers of the custard with layers of the blueberry sauce. Freeze (no stirring!) until, you guessed it, frozen.


After what feels like months of rain, because it has been, we have finally been gifted with a day or two of sunshine.
Late summer flowers are decaying, like the joe-pye weed you see up above. That’s Joe-Pye named after a mythical Indian who once upon-a cured a man’s typhus by making him perspire profusely due to a tea made from this plant, not Josie Pye, the perenially-unpleasant cheater from Avonlea.
I’m seen a lot of inclement weather, picked more than my fair share of wild mushrooms, and I even (finally) got to go to the beach. Summer was wonderful…. bring on autumn!
Advertisement
Give a little shout out:
Related
 chocolate ginger blueberry crème brûlée
2013/03/05In "chocolate"
 blueberry chili
2012/08/24In "cooking"
 raspberry + coconut cream sherbet
2013/04/24In "epicurean adventures"
If you're gonna fight, fight like you're the third monkey on the ramp to Noah's Ark... and brother its starting to rain. Join our efforts to Secure America's Borders and End Illegal Immigration by Joining ALIPAC's E-Mail Alerts network (CLICK HERE)
-
07-02-2025, 01:31 PM #10167Senior Member
- Join Date
- Aug 2018
- Posts
- 95,580

Skip to primary content
Skip to secondary content
- Home
- About
- Celebrate
- Contact
- Cookery
- Do Good
- Goodies
- Housewifery
- Links
- Make It
- Mom-ness
- Real Food Sites
- Recent Posts
- Simplicity
- Site Archive
- Subscriber Goodies
- Site Map
Home→Blog→Cookery→
Great Depression Era Real Food Recipes
Post navigation
← 1,000 Pinterest Followers Celebration Best of The More With Less Mom
Great Depression Era Real Food Recipes
Posted on October 8, 2013 by morewithlessmom

I am a big supporter of eating “real” food. If your great-grandmother would have recognized the foods you put in your grocery cart, you are eating “real” traditional food. One of the things I have researched for my meal planning is Great Depression era and WWI recipes. Too many recipes today are based on canned cream-of-blech soup. At this point these foods were just starting to creep into recipes. You can make your own substitutions for these convenience foods, but I find it interesting to look at heirloom recipes.
Here are some Great Depression Era and WWI recipes (all from the sources below):
Barley Chocolate Cake (PDF)
Chocolate Potato Cake
Cornmeal Ragged Robins
Crumb Spice Pudding
Fruit Paste
Goldfish Loaf
Mock Duck
Oatmeal Rocks
Split Pea Pancakes
Here are some good sources of Great Depression Era and World War I recipes:
About.com Frugal Living Depression Era recipes
Best War Time Recipes 1918 from Ancestry.com’s Military Records on RootsWeb
Depression Era Recipes collection from Tish on Food.com
The Doughboy Cookbook from WorldWar1.com
Foods That Will Win the War and How to Cook Them on Project Gutenburg
Food Will Win The War Pamphlets from Project Muse, War Economy in Food may be from this series)
Great Depression Cooking with Clara This is a series of videos of a woman cooking some of her recipes, and she has released a book called Clara’s Kitchen(Amazon link)
Heavy Table’s review of Food Will Win the War(Amazon link)
Mary’s Depression Era Recipes
Taste of Home Forum Great Depression Recipes thread
Win The War Cookery Book from Great Food Magazine (four blog posts listed from last to first)
World War 1 Recipes from Feast of the Centuries
WWI: No One Need Be Hungry from YesterYear Once More
Great Depression Era Cookbooks:
Depression Era RecipesThis is a good book of basic recipes, including recipes for basics like condiments (Amazon link)
Dining During the Depression: Strong Family Ties, Hard Work, and Good Old-Fashioned Cooking Sustained Folks Through the 1930s (Reminisce Books)(Amazon link)
Hard Times Cookbook with Back to Basics Great Depression Cooking(Amazon link)
Stories and Recipes of the Great Depression of the 1930’s and More From Your Kitchen Today, Vol.This book is definitely an interesting read. This has very simple recipes but some are a little confusing, they make sense if you know what you’re doing. The stories are entertaining. (Amazon link)
Great Depression Recipe Pinterest Boards
Depression and WWII recipes
Great Depression/ recipes
Great Depression Recipes from The More With Less Mom
Recipes from the Great Depression
Melissa French - More With Less MomGreat Depression Recipes
Follow On
Melissa French - More With Less MomIt's the end of the worldFollow On
Hello my beautiful pinners!
Great Depression Era Real Food Recipes - More With Less MomMore With Less MomThis is my second most popular post, interesting read: Great Depression Era Real Food Recipes from The More With Less Mom
Want to learn how to stretch food like your great grandma? Try one of my More With Less Meal Plans.
What recipe has your family handed down from the Depression?


*Also see our Use It Up Adage Printable Use it up, wear it out, make it do, do without OR

Crunchy Baby Registry: 34 Things You Need or Should Make Before Baby Comes OR

Frugal, Flexible Monthly Menu Planning & Price List Download
Participated in Busy Monday, Frugal Famil, Old Fashioned Recipe Exchange, Thank Goodness It’s Monday, Thrifty Thursday linky party
We hope you enjoyed our Great Depression Era Real Food Recipes post
You may also like:
May 2014 Real Food Monthly Meal Plan
December 2013 Real Food Meal Plan
April 2013 Meal Plan Pinterest Board
January 2014 Real Food Meal Plan
June 2013 Meal Plan Pinterest Board
March 2013 Meal Plan Pinterest Board
July 2014 Real Food Monthly Meal Plan
Not-Margarine Spread Recipe - Using Real Butter, Olive Oil, and Coconut Oil
Posted in Cookery, MoreWithLessMom Tagged budget recipes, food, frugal, great depression, meals, recipes, thrift, thrifty, world war 1, world war i, ww1, wwi permalink
Great Depression Era Real Food Recipes - More With Less Mom
If you're gonna fight, fight like you're the third monkey on the ramp to Noah's Ark... and brother its starting to rain. Join our efforts to Secure America's Borders and End Illegal Immigration by Joining ALIPAC's E-Mail Alerts network (CLICK HERE)
-
07-02-2025, 02:09 PM #10168Senior Member
- Join Date
- Aug 2018
- Posts
- 95,580

CRISCO CANDLES: EMERGENCY HEAT and Light for 72 DAYS |SHTF
CRISCO CANDLES: EMERGENCY HEAT and Light for 72 DAYS |SHTF
CRISCO CANDLES: EMERGENCY HEAT and Light for 72 DAYS |SHTF
Wade-X
2,352 Subscribers
Wade-X
If you're gonna fight, fight like you're the third monkey on the ramp to Noah's Ark... and brother its starting to rain. Join our efforts to Secure America's Borders and End Illegal Immigration by Joining ALIPAC's E-Mail Alerts network (CLICK HERE)
-
07-02-2025, 08:57 PM #10169Senior Member
- Join Date
- Aug 2018
- Posts
- 95,580

10 Survival Uses For a Trash Bag {9 Bonus Uses}
- Home
- Emergency Preparedness
- 10 Survival Uses For a Trash Bag {9 Bonus Uses}
Melissa Francis
January 22, 2014
Emergency Preparedness,Upcycling
re purposing a trash bag, survival, trash bag, trash bag uses, trash bag uses for survival, trash bags
A simple plastic trash bag can be a valuable item with a variety of uses in an emergency survival situation.
After reading this article, I am going to add a couple plastic trash bags to my emergency preparedness car kit and add at least a couple extra boxes of trash bags to my home emergency supplies.
Outdoor Life website shares ten different uses but I know our “The Homestead Survival” readers could come up with a longer list of uses.
outdoor life
Here are a few more uses:
- Keep items dry
- Store waste when toilets will not flush
- Use as part of a solar still
- Transport food if no other option
- Use as a sleeping bag cover
- Use to tie a splint
- Wind break or sun shade
- Use as a liter cover
- Use several to make a tent
10 Survival Uses For a Trash Bag {9 Bonus Uses} - The Homestead SurvivalIf you're gonna fight, fight like you're the third monkey on the ramp to Noah's Ark... and brother its starting to rain. Join our efforts to Secure America's Borders and End Illegal Immigration by Joining ALIPAC's E-Mail Alerts network (CLICK HERE)
-
07-02-2025, 09:00 PM #10170Senior Member
- Join Date
- Aug 2018
- Posts
- 95,580
If you're gonna fight, fight like you're the third monkey on the ramp to Noah's Ark... and brother its starting to rain. Join our efforts to Secure America's Borders and End Illegal Immigration by Joining ALIPAC's E-Mail Alerts network (CLICK HERE)


 Reply With Quote


"The whites here are dying now, we are taking over." African...
08-01-2026, 09:45 PM in General Discussion