

Results 1,701 to 1,710 of 11856
 226Likes
LinkBacks (?)
-
12-26-2016, 11:32 AM
-
09-02-2016, 05:39 PM
-
whole garden made with pallets!! Love it!! | Pallets | Pinterest | Pallets, Pallets Garden and Wooden Pallets
Refback This thread03-06-2016, 11:30 AM -
10-20-2015, 05:29 PM
-
06-12-2015, 08:00 PM
-
02-26-2015, 01:58 PM
-
01-05-2015, 04:13 PM
-
12-19-2014, 10:19 AM
-
EMERGENCY: HUGE FEMA PANDEMIC EXERCISE IN USA IN NOVEMBER, INTERNET SHUT DOWN PART OF EXERCISE | Prepare4Survival
Refback This thread12-03-2014, 10:39 PM -
Off Grid World ? Ugly Duckling Shipping Container Home Built by Artist Is a Beautiful Swan on the Inside
Refback This thread11-25-2014, 03:10 PM -
11-17-2014, 10:59 PM
-
11-13-2014, 11:18 AM
-
11-09-2014, 02:54 PM
-
10-28-2014, 11:38 PM
-
10-26-2014, 05:54 AM
-
10-16-2014, 11:28 AM
-
10-03-2014, 01:25 PM
-
10-02-2014, 09:16 PM
-
09-26-2014, 07:00 PM
-
09-26-2014, 01:56 PM
-
09-19-2014, 04:46 PM
-
09-13-2014, 05:49 AM
-
09-05-2014, 01:52 PM
-
09-01-2014, 09:39 AM
-
08-30-2014, 06:29 PM
-
08-10-2014, 06:29 AM
-
08-04-2014, 05:07 PM
-
07-23-2014, 11:14 AM
-
New Evidence on Expiration Dates | Medical Preparedness | Doom and Bloom (TM) | Doom and Bloom (TM)
Refback This thread07-22-2014, 10:10 AM -
07-18-2014, 08:37 PM
-
07-15-2014, 04:57 PM
-
07-11-2014, 01:40 AM
-
04-22-2014, 11:14 AM
-
04-18-2014, 12:57 PM
-
04-18-2014, 10:10 AM
-
04-14-2014, 12:18 AM
-
04-12-2014, 02:28 AM
-
03-02-2014, 11:43 PM
-
12-24-2013, 11:59 PM
-
12-07-2013, 11:04 PM
-
kitchen | Cob
Refback This thread11-25-2013, 03:24 PM -
10-22-2013, 10:25 PM
-
Apple Pie Braid | Sweets
Refback This thread09-26-2013, 07:58 AM -
09-02-2013, 04:44 PM
-
5 Reasons Why You May have to Bug Out Even Though You Don’t Want to | The Apartment Prepper's Blog
Refback This thread08-23-2013, 03:20 PM -
06-27-2013, 06:30 AM
-
06-23-2013, 08:11 PM
-
06-17-2013, 11:21 PM
-
05-24-2013, 05:06 PM
-
To Eat / BASIC LIST / SUGGESTED ITEMS FOR LONG TERM SURVIVAL - Page 275 - ALIPAC
Refback This thread05-01-2013, 03:49 AM
Thread Information
Users Browsing this Thread
There are currently 1 users browsing this thread. (0 members and 1 guests)
 LinkBack URL
 About LinkBacks
-
02-19-2012, 04:05 AM #1701Senior Member


- Join Date
- May 2007
- Location
- South West Florida (Behind friendly lines but still in Occupied Territory)
- Posts
- 117,087
Home Remedies for Livestock
Tess Pennington
Ready Nutrition
February 2010
Just like humans, animals tend to get ailments, and without proper care, those ailments can turn into serious infections. As the price of pet/livestock medicine continues to rise, some are falling back on natural remedies to alleviate symptoms in their animals.
Look to the animal for clues as to what the problem may be. It is advised to research the ailment as much as possible and to look for clues to indicate what the problem may be before trying to remedy the problem.
- Listen to the respiration and heart rate, as well as take the temperature of the animal.
- Check to see if the animal is eating or drinking.
- Look at the consistency of the manure.
- Try the remedy, but if the problem persists, call a veterinarian.
5 Home Remedies for Livestock
Every farmer who owns livestock has a special remedy that he or she uses to treat their animals. Here are a few that may be helpful to those that are new to caring for livestock.
Organic Iodine Dextrose
Coughing in horses can be due to a serious, life threatening condition called heaves. Coughing can be brought on by dust, mold or anything that overworkds the respiratory system. An inexpensive way to assist the horse is organic iodine. Iodine is an anti-inflammatory and expectorant that assists in loosening phelgm, making it easier for the horse to cough. Adding 1 tablespoon of iodine to the horse’s evening grain for 21 days will make the cough go away. Organic Iodine Dextrose is available at many feed stores.
Aloe Vera Gel
The gel from the aloe vera leave can be used to treat skin inflammation due to insect bites, burns, cuts and scrapes, as well as hot spots. Aloe vera can also be used to heal deep lacerated cuts (as long as stitches are not required), as it possesses anti-bacterial properties. Additionally, if aloe gel is placed in area where the animal likes to lick itself, the animal will refrain from licking that area due to the taste of the herb. Aloe can also be used as a laxative for dogs, however, it is advised to discuss using aloe vera internally with a veterinarian.
Tea Tree Oil
This multipurpose extract is an anti-yeast, anti-fungal and antibacterial substance that can be used to treat minor cuts and scrapes. It can be easily found at many health food outlets as well as larger stores such as Wal-mart,
Dry Oats
Dry oats can be given to rabbits to keep them from getting hairballs. If rabbits get hairballs, they will not be able to regurgitate, thus causing serious complications in the animal’s health. Oatmeal is a fiber that keeps the digestive system moving and decreases the possibility of hair collection and forming blockage. Rabbit breeders advise to give a handful of uncooked oatmeal after they have given birth and in the spring when they begin to heavily shed.
Vitamin B12 Shots
Animals who are very frail or just born that have low energy would appreciate an injection of B12 to get their energy going.
This article is intended to offer natural alternative suggestions. It should not be used as a substitute for professional veterinary prevention, diagnosis, or treatment. Please consult with your veterinarian before taking any home home remedies or supplements or following any treatment suggested by anyone on this site. Only your veterinarian can provide you with advice on what is safe and effective for your pet’s unique needs or diagnose your pet’s particular medical history.
Home Remedies for Livestock | Ready Nutrition
Related Reading:
Join our efforts to Secure America's Borders and End Illegal Immigration by Joining ALIPAC's E-Mail Alerts network (CLICK HERE)
-
02-19-2012, 04:09 AM #1702Senior Member
- Join Date
- May 2007
- Location
- South West Florida (Behind friendly lines but still in Occupied Territory)
- Posts
- 117,087
Pet First Aid Kit
Tess Pennington
Ready Nutrition
May 2011
Preparing for emergencies does not stop with securing the doors and latches. Our furry friends need some extra TLC during these times to better cope with changes taking place and the disaster itself. When unexpected emergencies arise, pets tend to have increased anxiety and can react irrationally. Animals have instincts about severe weather changes and will often isolate themselves if they are afraid. If they are left outside when these instincts kick in, they may run away to find safety. This increases the chance of pets getting lost, injured or even killed. By preparing for these changes in our pet’s behavior, we can help them feel more secure, and give them what they need to cope with the situation at hand.
What Your Pets Need Before a Disaster Threatens
Knowing how your pet will react before, during and after a storm is the first step in ensuring their safety. Take your pet inside the home before the disaster occurs. This will help them find a secure and quiet spot for them to ride out the disaster in. Also, as a contingency plan, it is always good to have your pet’s medical documentation and emergency identification cards on hand, or included along with your emergency documents. Additionally, having some first aid supplies set aside for your pets may help ensure their safety if they happen to become injured.
Suggestions for your pet’s first aid kit:
- Phone numbers to the pet’s veterinarian
- Latex gloves
- Gauze rolls for wrapping wounds or for muzzling an injured pet.
- Gauze sponges
- Non-stick bandages, towels or towels cut in to strips to control bleeding.
- Adhesive tape, hypoallergenic
- Elastic cling bandages
- Water-based sterile lubricant
- Eye-wash or sterile saline wash
- Topical antibiotic ointment
- Petroleum jelly
- Antiseptic towelettes
- Diphenhydramine (antihistamine) – *Should be approved by your veterinarian
- Q-tips
- Milk of Magnesia or activated charcoal to absorb poison. *Call the pet’s vet first administering this.
- Hydrogen Peroxide to clean wounds and induce vomiting. *Call the pet’s vet before administering this.
- Thermometer to check your pet’s temperature.
- Eye dropper or large syringe without the needle to administer any medications orally.
- Materials to make a splint.
- Cold pack
- Small scissors
- Safety pins
- Tweezers
- Magnifying glass
- Emergency blanket
- Muzzle
- Leash
- Penlight with batteries
Ensuring our pets are as safe as the other members of the family will help all family members cope with the stressful situation. The American Red Cross offers Pet First Aid courses that could further assist you in caring for your pets when they become injured. At the very least, those who have pets should pick up a first aid manual for pets. The American Red Cross offers a pet first aid manual that can be bought online.
Pet First Aid Kit | Ready Nutrition
Related Reading:
- Week 5 of 52: Pet Care
- Are You Ready Series: The Prepared Pet
- SHTF Survival: First Response Packs for Medical Emergencies
- Are You Ready Series: Storing Medical Supplies To Be Ready
- Get Prepped Newsletter: May 27, 2011
Join our efforts to Secure America's Borders and End Illegal Immigration by Joining ALIPAC's E-Mail Alerts network (CLICK HERE)
-
02-19-2012, 04:16 AM #1703Senior Member
- Join Date
- May 2007
- Location
- South West Florida (Behind friendly lines but still in Occupied Territory)
- Posts
- 117,087
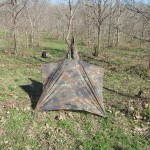
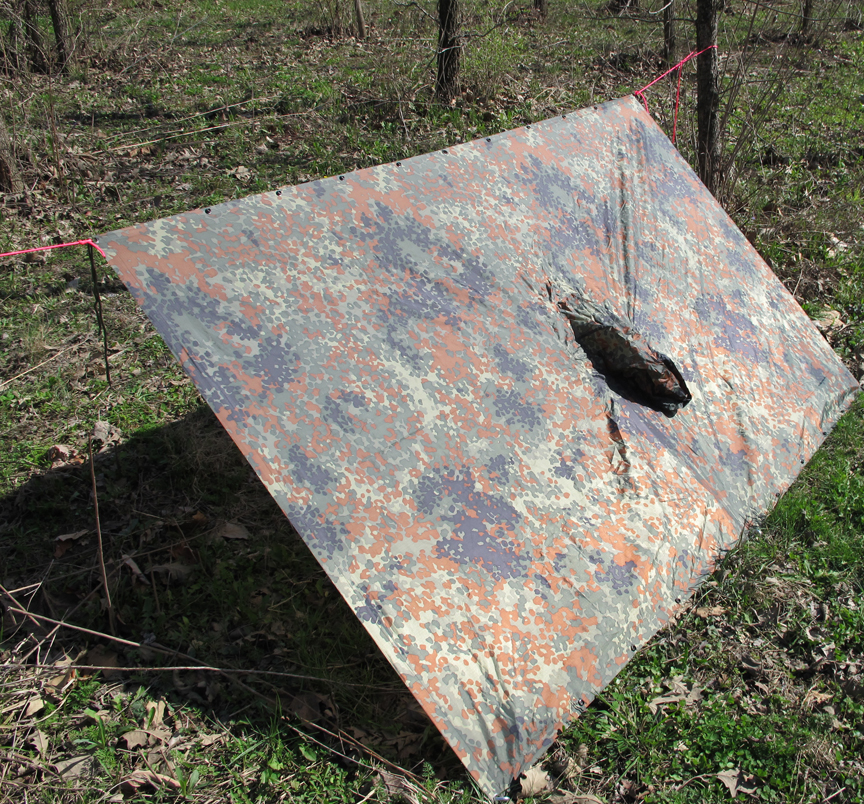
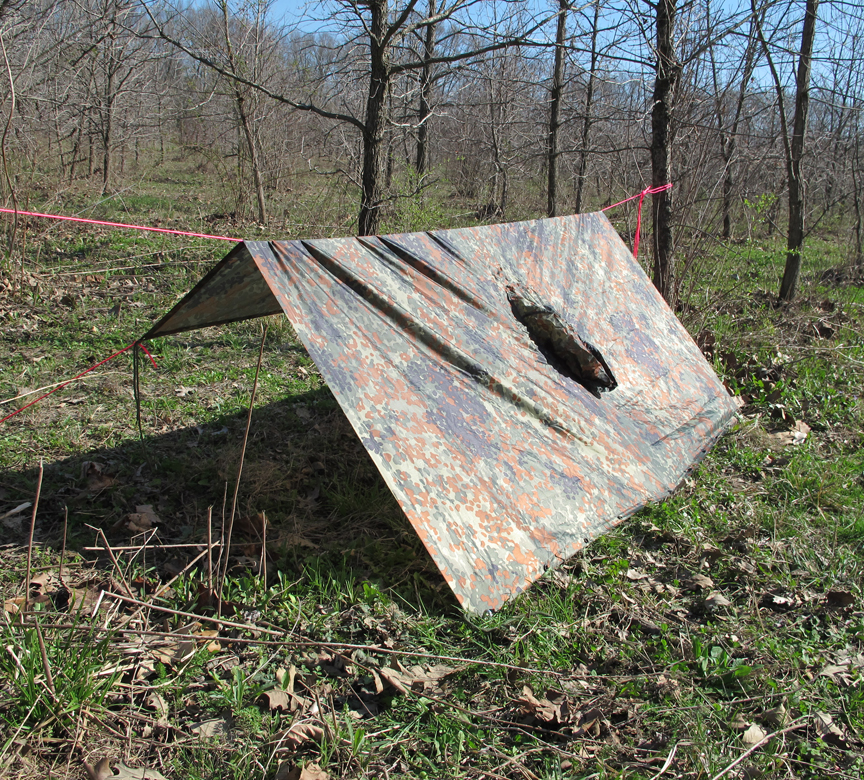
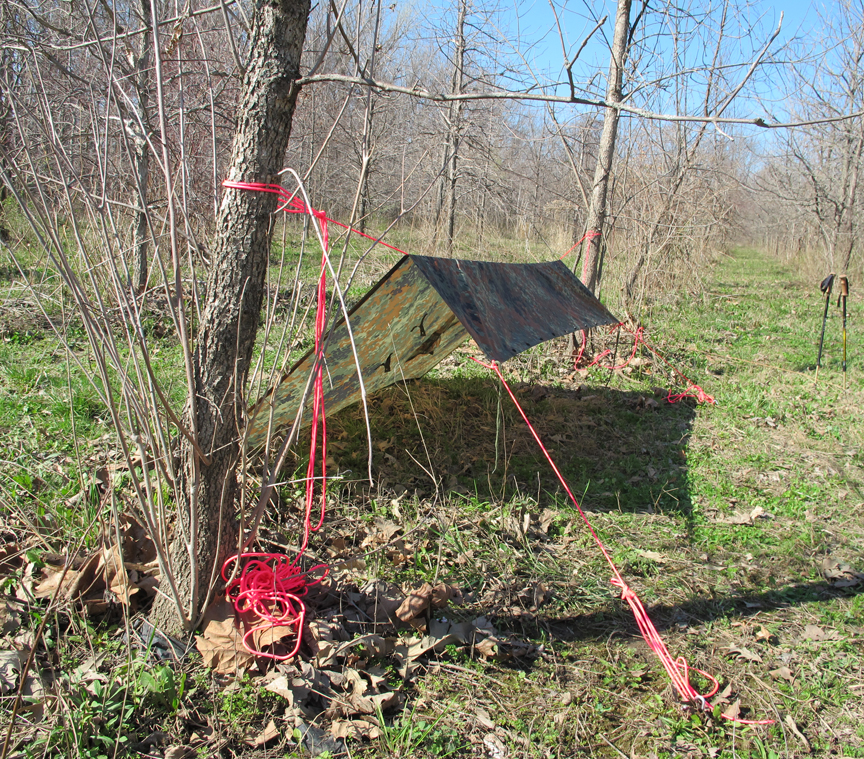
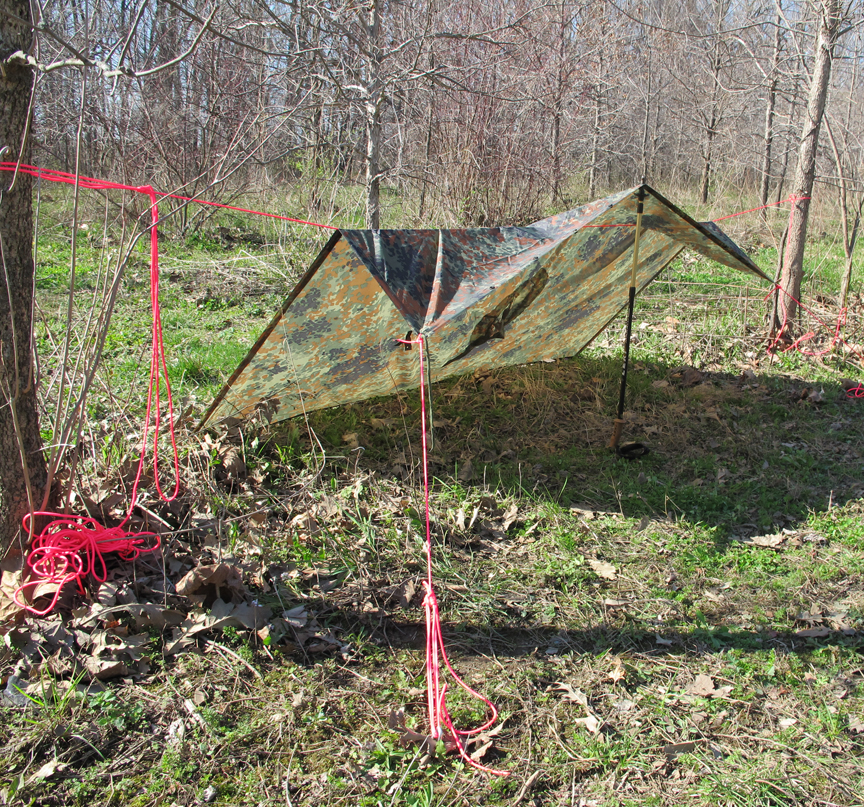
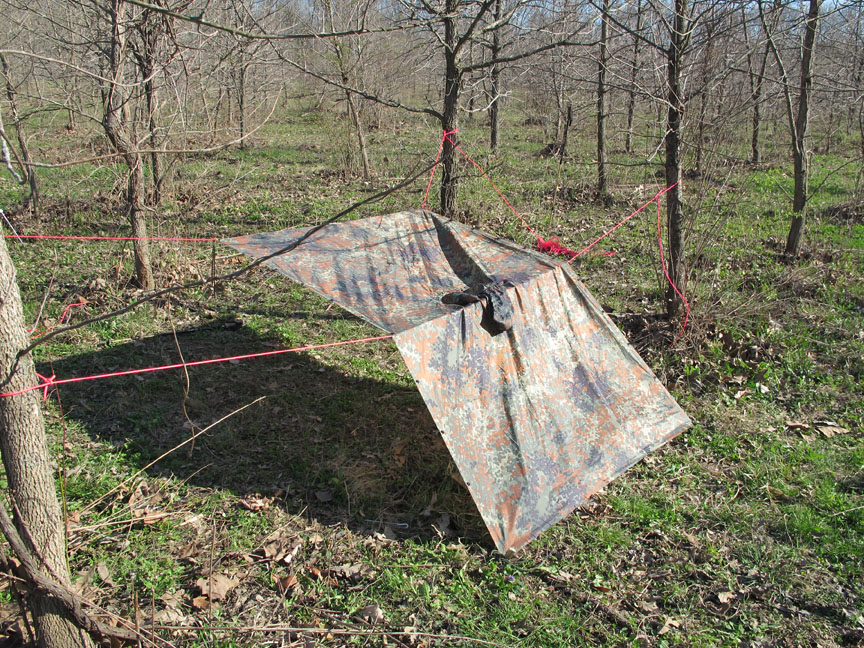
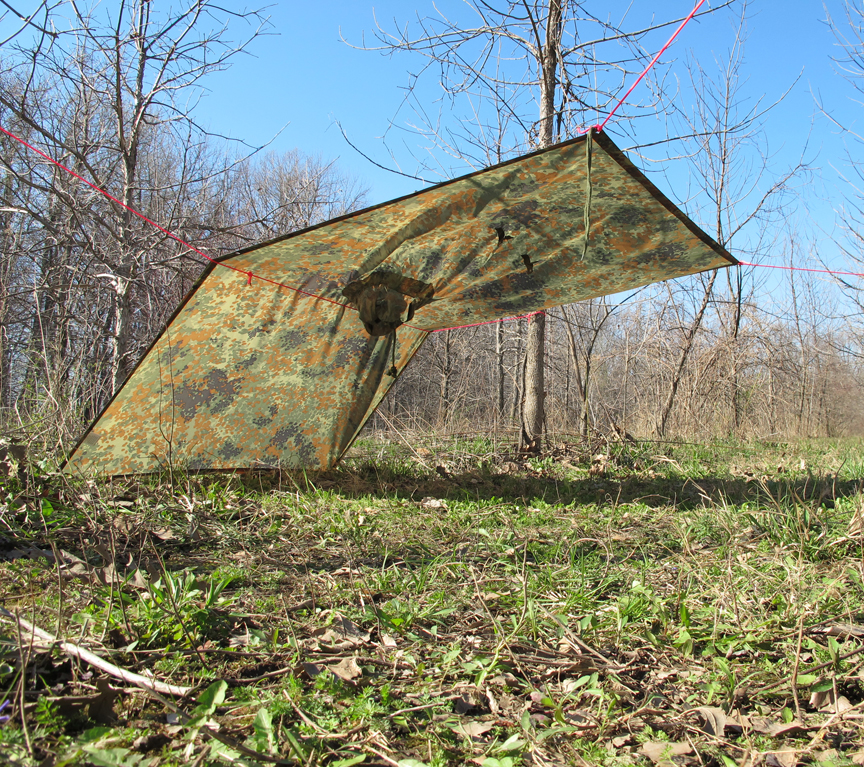
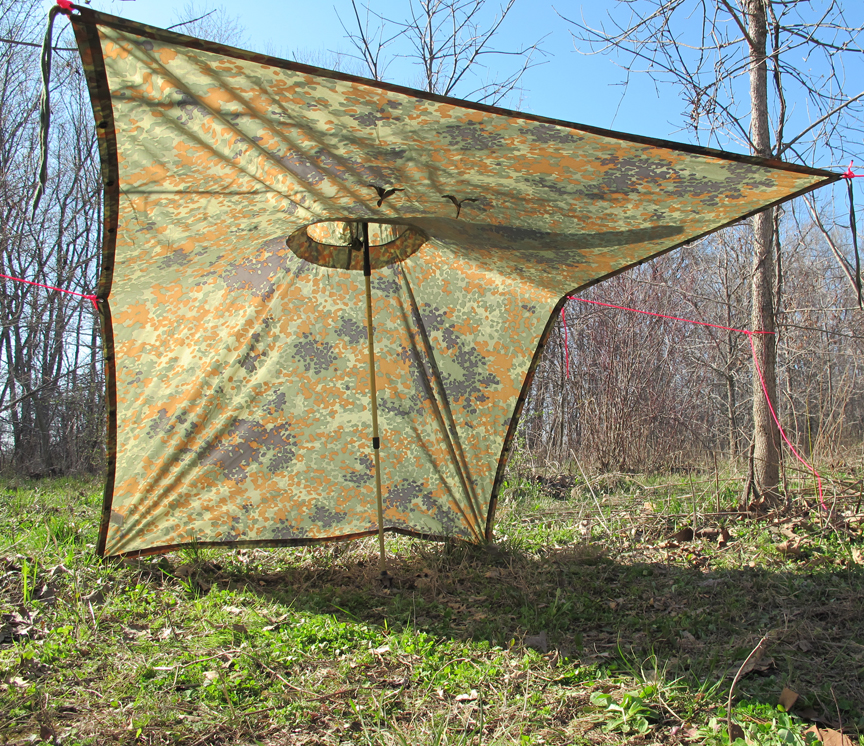
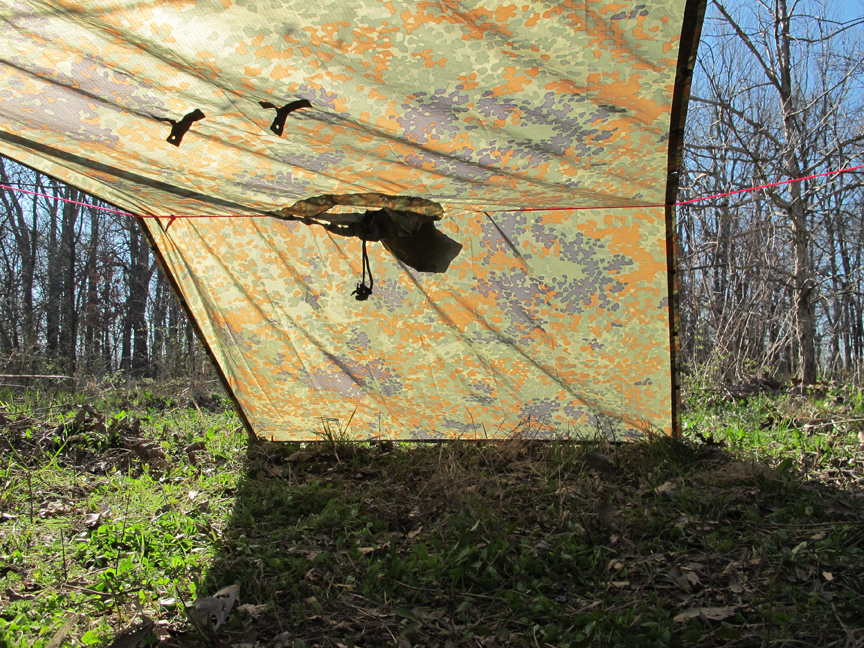
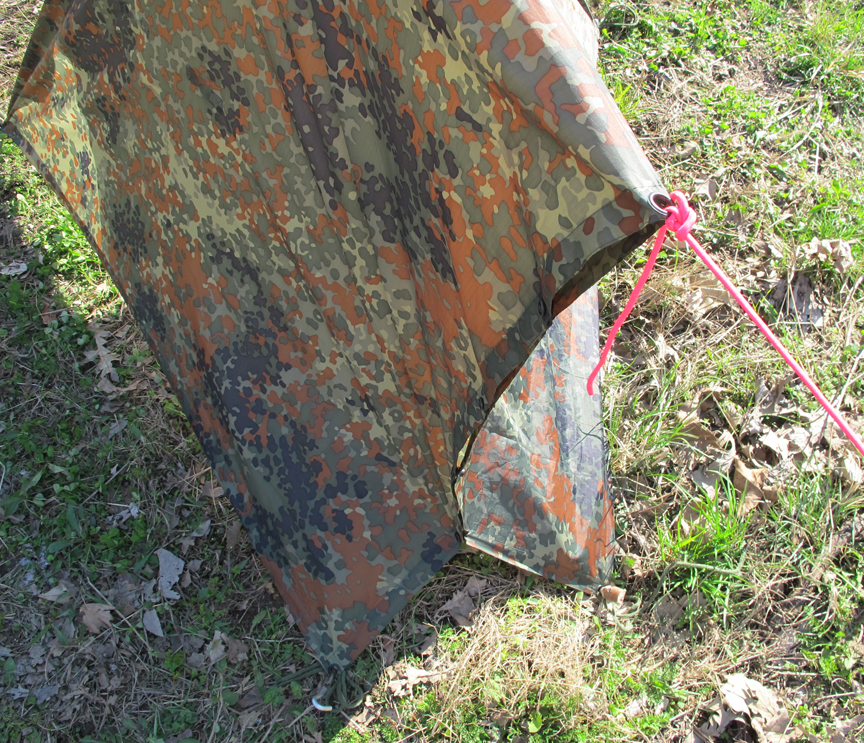
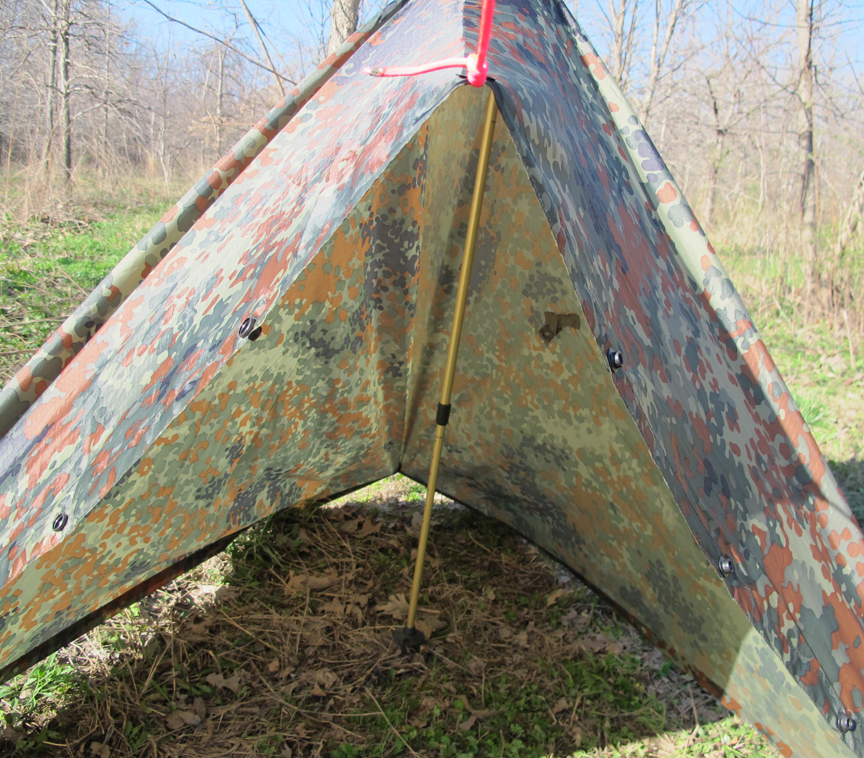
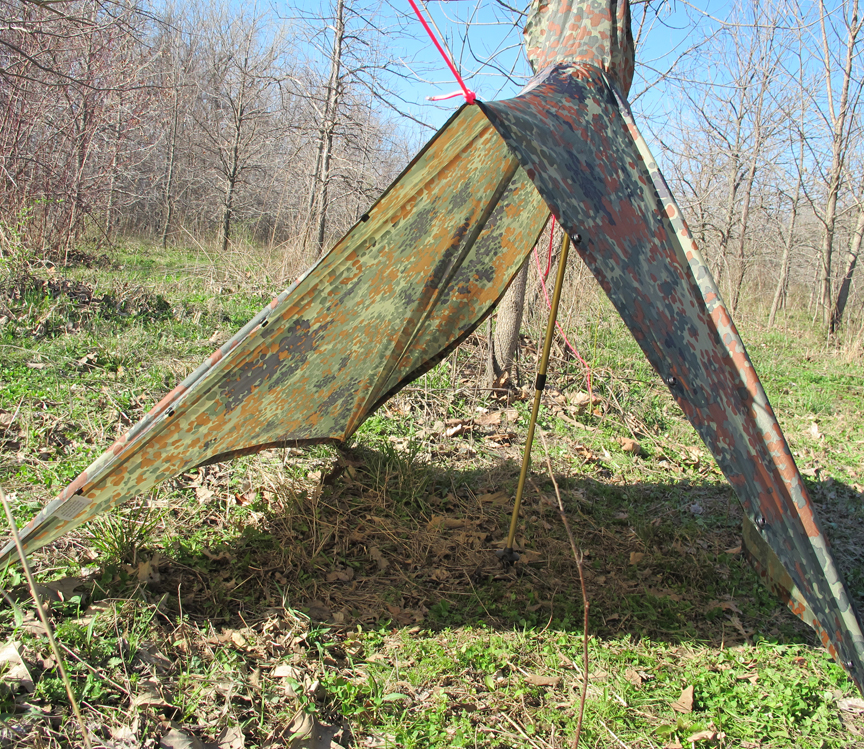
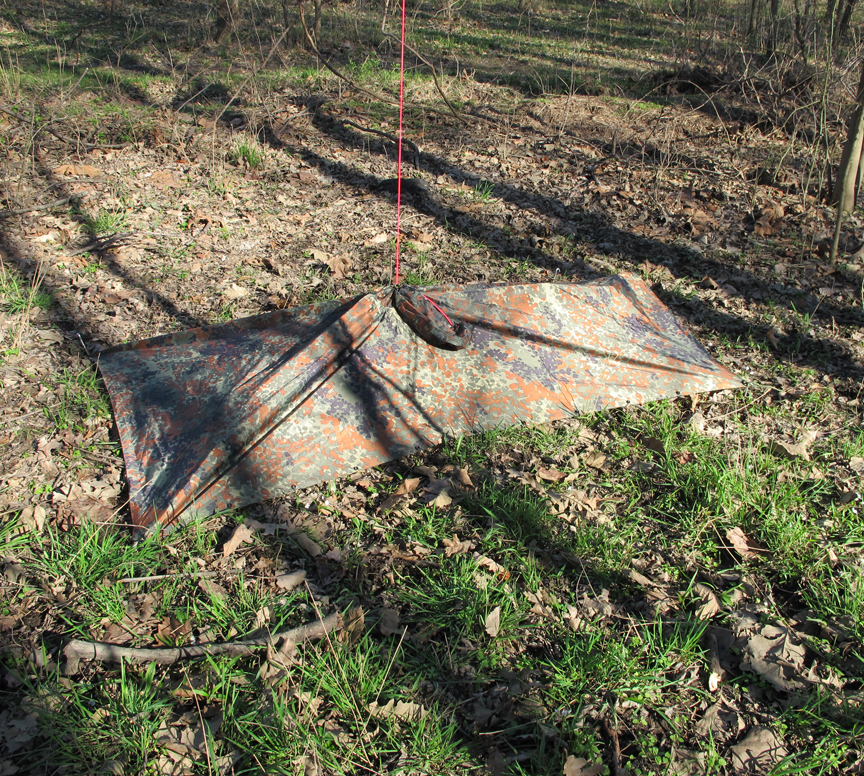
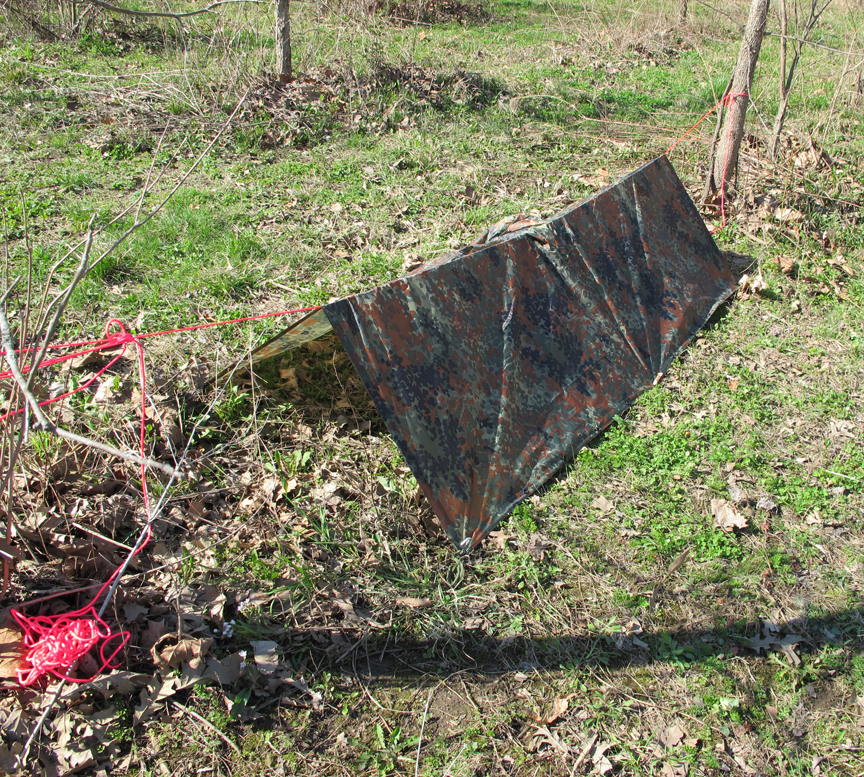
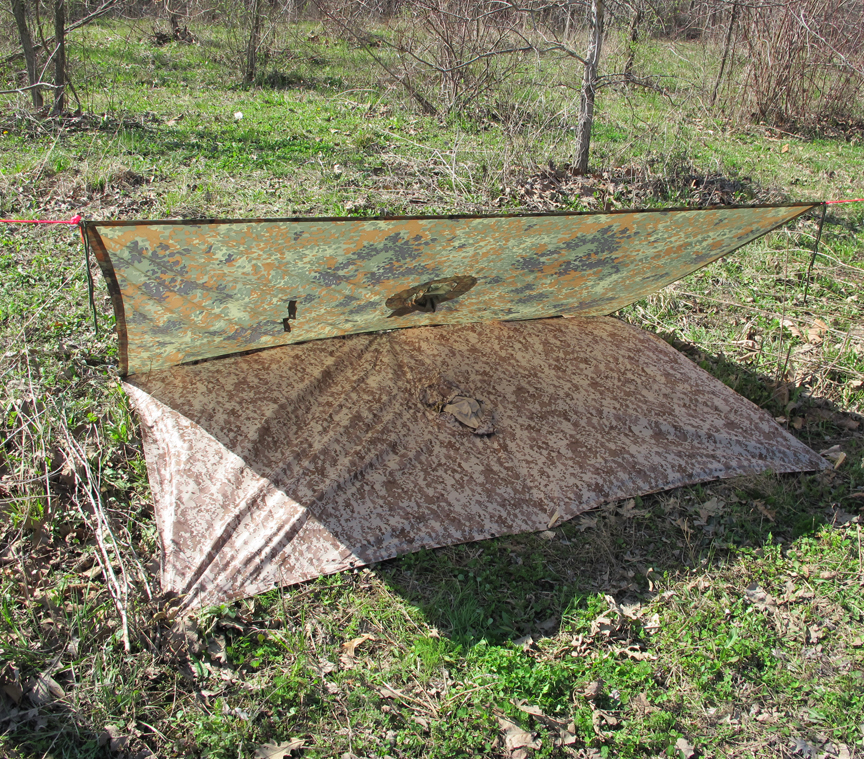
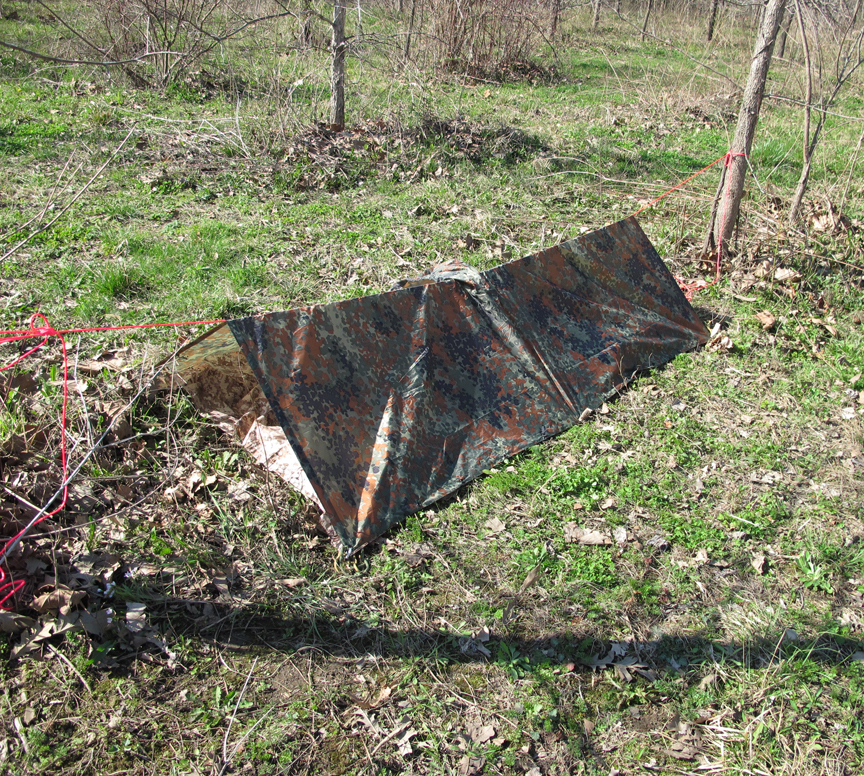
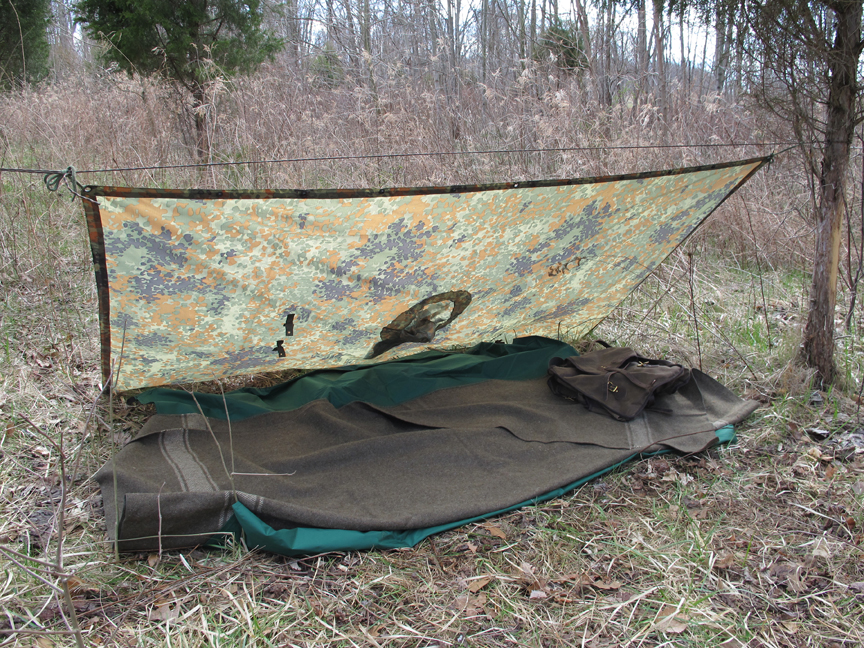
9 Military Poncho Survival Shelter Confirguations: How To Set Up A Military Poncho Shelter
April 10, 2011 By Creek 5 Comments
An essential item for ANY outdoor outing and certainly in every Survival Kit and Bug Out Bag is a good quality Poncho. There is nothing more miserable (and dangerous) than getting soaked by rain. There are 100′s of different ponchos to choose from. I prefer a Military Style Poncho with grommeted corners and snap closure sides. These are typically constructed of a nice quality rip-stop nylon material that not only makes them water proof but very durable.
CLICK ON THE PHOTOS TO ENLARGE THEM

I like for items in my pack to be multi-use items – meaning they can be used for more than 1 purpose. My Poncho is no exception. Besides protecting me from rain, I can also use my Poncho as a Ground Tarp to act as a moisture barrier. I can also use it as a tarp to protect my gear or to keep a wood pile dry. It can also be used as a make-shift shelter, which is the subject of this post. I’ve slept in a make-shift poncho shelter many times and if set up properly it will keep you as dry and comfortable as any tent on the market.
Below I have detailed 9 Different Military Poncho Set-Ups that can be used for multiple scenarios. I’ve listed when each one works best and when it doesn’t. I’ve listed the supplies needed for each one and also the knots I use to set them up. Hopefully you find this useful. Let me know if you have any questions.
Military Poncho Shelter # 1: Basic Lean-To (HORIZONTAL)
- Supplies Needed: Paracord, 3 Stakes
- Uses: Sleeping, Rain-Shed, Sun-Shed
- Ideal Environment: No to Moderate Wind, No to Moderate Rain
- Fire Friendly: YES
- Knots Used: Double Half Hitch, Siberian Hitch, Quick Release Taught Line Hitch


Military Poncho Shelter # 2: Basic Lean-To (VERTICAL)
- Supplies Needed: Paracord, 2 Stakes
- Uses: Sleeping, Rain-Shed, Sun-Shed
- Ideal Environment: Low Wind, No Rain
- Fire Friendly: YES
- Knots Used: Double Half Hitch, Siberian Hitch, Quick Release Taught Line Hitch


Military Poncho Shelter # 3: Ridge Line Lean-To
- Supplies Needed: Paracord, 5 Stakes
- Uses: Sleeping, Rain-Shed, Sun-Shed
- Ideal Environment: No to Heavy Wind, No to Heavy Rain
- Fire Friendly: YES
- Knots Used: Double Half Hitch, Siberian Hitch, Quick Release Taught Line Hitch


Military Poncho Shelter # 4: Flat Roof Lean-To
- Supplies Needed: Paracord, 3 Stakes, Center Pole (optional)
- Uses: Sleeping, Sun-Shed
- Ideal Environment: No to Moderate Wind, No Rain
- Fire Friendly: YES
- Knots Used: Double Half Hitch, Siberian Hitch, Quick Release Taught Line Hitch


Military Poncho Shelter # 5: Ghost Man
- Supplies Needed: Paracord, 4 Stakes, Center Pole
- Uses: Rain-Shed, Sun-Shed, Hunting Blind
- Ideal Environment: No to Moderate Wind, No to Moderate Rain
- Fire Friendly: YES (small)
- Knots Used: Double Half Hitch, Siberian Hitch, Quick Release Taught Line Hitch


Military Poncho Shelter # 6: Hood Hoist
- Supplies Needed: Paracord, 4 Stakes, 2 Poles (Optional)
- Uses: Rain-Shed, Sun-Shed, Hunting Blind, Sleeping (When set-up low and long)
- Ideal Environment: No to Moderate Wind, No to Moderate Rain, High Wind & High Rain (Low & Long)
- Fire Friendly: YES (small – when set-up high), NO when set up low
- Knots Used: Double Half Hitch, Siberian Hitch, Quick Release Taught Line Hitch


Military Poncho Shelter # 7: Poncho Tent
- Supplies Needed: Paracord, 4 Stakes
- Uses: Rain-Shed, Sun-Shed, Sleeping
- Ideal Environment: No to High Wind, No to High Rain, Works well in COLD temps
- Fire Friendly: YES (small out front)
- Knots Used: Double Half Hitch, Siberian Hitch, Quick Release Taught Line Hitch


Military Poncho Shelter # 8 & 9: Connecting 2 Ponchos By Snapping Them Together – using 1 as a ground tarp
- Supplies Needed: Paracord, Stakes
- Uses: Rain-Shed, Sun-Shed,Sleeping
- Ideal Environment: No to High Wind, No to High Rain
- Fire Friendly: YES
- Knots Used: Double Half Hitch, Siberian Hitch, Quick Release Taught Line Hitch

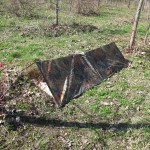

Below is a Basic Lean-To Set-Up that I use quite often in fair weather. I use a tarp to keep ground moisture at bay and a wool blanket for warmth. The Poncho Shelter acts as an excellent heat shield to deflect heat right on the sleeping area from a fire out front .

POST UPDATE: Below is a 10th Poncho Shelter Option I call the DIAGONAL. It involved tying off one corner to a tree and staking the opposite corner to the ground. The 2 remaining corners can either be staked or guy-lined out for added room. This is a great shelter set as well.

If you are using any of these shelters and are expecting rain you will want to tie a knot with paracord around the hood to prevent water from leaking inside.
As always I would love to get your thoughts on these. Let me know if there are any questions. Or if you have any additional ideas – post them in a comment below!
Like Survival Shelters? Subscribe for FREE now! More great posts in the pipe-line:
Delivered by FeedBurner
Similar Posts:
- Hammock Shelter Basics
- 12 Reasons Why Everyone Needs a Bug Out Bag: Series Post 3 of 12: Shelter and Bedding
- Pine Tree Winter Survival Snow Shelter Video Post
- Mora Knife Modifications
- BOB MMXII: Bug Out Bag 2012
9 Different Military Poncho Survival Shelter Configurations |Last edited by AirborneSapper7; 02-19-2012 at 04:19 AM.
Join our efforts to Secure America's Borders and End Illegal Immigration by Joining ALIPAC's E-Mail Alerts network (CLICK HERE)
-
02-19-2012, 06:00 PM #1704Senior Member
- Join Date
- May 2007
- Location
- South West Florida (Behind friendly lines but still in Occupied Territory)
- Posts
- 117,087
97% of Terminal Cancer Patients Previously Had This Dental Procedure...
Posted By Dr. Mercola | February 18 2012
Join our efforts to Secure America's Borders and End Illegal Immigration by Joining ALIPAC's E-Mail Alerts network (CLICK HERE)
-
02-19-2012, 06:05 PM #1705Senior Member
- Join Date
- May 2007
- Location
- South West Florida (Behind friendly lines but still in Occupied Territory)
- Posts
- 117,087
FDA Ignores Scientists, Dentists Warning of Amalgam Mercury Pandemic
Mike Barrett
NaturalSociety
February 17, 2012
Mercury found in dental amalgam fillings has been an issue within the dental community and beyond for many years. These fillings, used since the American Civil War, contain an estimated 50 percent mercury. Whenever friction meets these fillings, toxic mercury gases are emitted. This means that with each chew and dental drill comes an emission of mercury gases, leading to numerous health problems. While nearly half of dentists have stopped using amalgam fillings due to health dangers, the Food and Drug Administration has yet to act on these issues.
FDA Ignoring Own Scientists Warnings on Amalgam Fillings
In December 2010, the Food and Drug Administration convened its second scientific advisory panel on dental amalgams. Scientists yet again told the FDA that amalgam use in children, pregnant women, and hypersensitive adults must come to a halt. The toxic vapors emitted are harmful to everyone, but these groups of individuals especially suffer.
According to Campaign for Mercury Free Dentistry:
Dr. Kotagal said there is no place for mercury in children, Dr. Ismail said children less than 6 years of age, I would restrict it significantly, Dr. Thompson said definitely not in pregnant women and definitely not in those below 6 years of age, Dr. Fleming said we need contraindications for pregnant women, and Dr. Burbacher said, why put amalgams in children if we know theyre going to live with that for the rest of their lives? And we dont know what thats going to do.In 2009, no one on the FDAs panel agreed to the FDAs ruling unrestricted amalgam use in children and in pregnant women. Then, in 2011, FDA Center Director Jeff Shuren the person in charge of amalgam issues was put in the hot seat after being confronted by dentists, consumers, and scientists. In response to the concerns voiced by the dentists, consumers, and scientists, Shuren said that the FDA would make an announcement by the end of the year.
Needless to say, no such announcement has been made. Until the FDA listens to its scientists, children will continue to develop neurological system complications, and the toxic vapors will continue to toxify the environment.
The solution? Give your Congressman or Congresswoman a call and ask that he/she write the FDA on this issue. To locate the name of your Member of Congress, click here. Then phone Congress at 202-224-3121 and ask for your Members office. Tell them how the continued use of amalgam fillings is leading to human and environmental damage.
Explore More:
- Dental Mercury | A Major Source of Environmental Pollution
- Mercury Pandemic: Avoiding Toxic Levels of Daily Exposure
- United Nations Urged to Ban Mercury in Vaccines
- Highly Toxic Mercury Present in Processed Foods, Yet FDA Does Nothing
- Flu Shots Contain More than 250 Times the EPAs Safety Limit for Mercury
- Mercury and Mega-Toxins Found in Certain Body Care Products
FDA Ignores Scientists, Dentists Warning of Amalgam Mercury Pandemic | Natural SocietyJoin our efforts to Secure America's Borders and End Illegal Immigration by Joining ALIPAC's E-Mail Alerts network (CLICK HERE)
-
02-19-2012, 06:09 PM #1706Senior Member
- Join Date
- May 2007
- Location
- South West Florida (Behind friendly lines but still in Occupied Territory)
- Posts
- 117,087
Research: Roundup Diluted by 450-Fold is Still Toxic to DNA
Post date:
Wednesday, February 15th 2012 at 7:00 am by Sayer Ji

New research released ahead of print and published in the journal Archives of Toxicology indicates that Roundup, the most common formulation of the herbicide glyphosate, is not only more toxic than its constituent ingredients, but is capable of damaging DNA within a human cell line when diluted down to 450-fold lower concentrations than presently used in GMO agricultural applications. In the researchers' own words, Roundup has "genotoxic effects after short exposure to concentrations that correspond to a 450-fold dilution of spraying used in agriculture."
The chemical - glyphosate - is the highest selling herbicide in the world and has been identified as having a wide range of potential adverse health effects -- largely minimized and/or under-reported -- which include over two dozen diseases. Glyphosate's primary properties of concern are its carcinogenicity, genotoxicity and endocrine disruptive actions. Roundup contains a surfactant known as polyoxyethyleneamine which functions to reduce the surface tension between Roundup and the cells exposed to it, making the cellular membranes more permeable to absorbing glyphosate and other chemicals within the formula. The surfactant in Roundup may therefore be responsible for increasing the toxicity of glyphosate by several orders of magnitude higher than it exhibits by itself.
This new research sheds light on a fundamental problem associated with toxicological risk assessments of agrichemicals (and novel manmade chemicals in general), namely, these assessments do not take into account the reality of synergistic toxicologies, i.e. the amplification of harm associated with multiple chemical exposures occurring simultaneously. Moreover, toxicological risk assessments on novel chemicals are based on the concept of determining "an acceptable level of harm," instead of protecting those who would be exposed to a chemical by implementing the precautionary principle, i.e. if there is reason to believe that a chemical could cause harm (determined by animal and in vitro studies) then they should be regulated as if they do cause harm to humans. The precautionary principle would require that the manufacturers of these chemicals prove their product is safe to humans before being allowed to release it onto the market or into the environment, rather than putting the burden of proving it unsafe on the consumer and/or exposed populations, as is presently the case.
Glyphosate exposure is now ubiquitous due to the fact that 88,000 tons of it were used in US in 2007 alone, and likely billions of additional pounds globally. Accumulating evidence indicates it is resistant to biodegradation and now contaminates the air, rain and groundwater throughout the areas where it has been applied.
Read More
Roundup Weedkiller: Is This Monsanto's New 'Agent Orange'?
Is Monsanto's Herbicide Harming Male Fertility?
Toxicology Research on Roundup
Research: Roundup Diluted by 450-Fold is Still Toxic to DNA | GreenMedInfo | Blog entry | Natural Medicine | Alternative Medicine | Integrative Medicine | Consumer Advocacy
Recent Articles
- New Research: GMO Food Far Worse Than We Think
- Flu Shots Mandated In Health Workers, But Do They Work?
- Are Statins Worth the Risk?
- Join GreenMedInfo's Health & Wellness Revolution
- Probiotics And Mitochondria: Bacteria Are Not "Other"
- Is Cancer An Ancient Survival Program Unmasked?
- Ginkgo Biloba: The Living Fossil
- Celiac Disease: Unhealthy or Healthy Response To Wheat?
- Walnut And The 'Doctrine of Signatures'
- Chocolate: Candy or Cutting-Edge Medicine?
Join our efforts to Secure America's Borders and End Illegal Immigration by Joining ALIPAC's E-Mail Alerts network (CLICK HERE)
-
02-19-2012, 07:04 PM #1707Senior Member
- Join Date
- May 2007
- Location
- South West Florida (Behind friendly lines but still in Occupied Territory)
- Posts
- 117,087
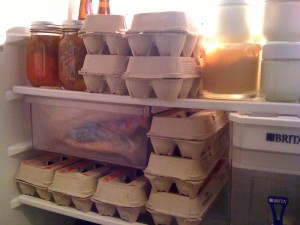
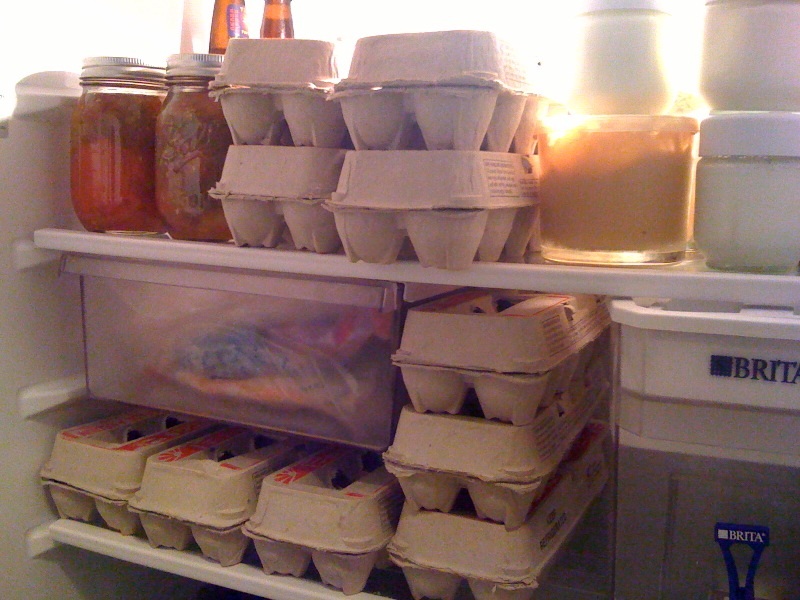
Safely Preserving Eggs
By Kellene Bishop, The Preparedness Pro
 Preserving eggs in the refrigerator for 9 months is unfathomable to most people, let alone safely preserving eggs that long without refrigeration. But today I’ll make crystal clear how you can preserve eggs worry-free without compromising your health and taste standards and perhaps I’ll even shed some light on how you came to believe that eggs can only be preserved in a refrigerator.
I assure you that Kellene Bishop has not lost her mind; I’m not some maniacal bad guy accompanied by the theme music from Jaws as I write this. Just read further and you’ll understand that this Preparedness Pro is no fraud but some other trusted entities may have been feeding you a fish story for the past several decades.
Bottom line, if you look at how nature preserves eggs you can learn an awful lot about preserving your own regardless of whether your purchased them at your local superstore or you collected them yourself from your personal brood of hens.
 When a chicken lays an egg, it has a natural coating on it known as the bloom. This bloom is a layer of protection for the egg which keeps out oxygen as well as harmful bacteria and germs. It’s very, very common for those who raise chickens for their eggs to collect them and then keep them on the counter until they are ready to use—not put them in the refrigerator. And in fact, the majority of the grocery stores in the world don’t put their eggs in a refrigerated environment. When they’re ready to use the eggs, they either wash them, which eliminates the bloom and any bacteria or germs, or they crack them open—just as is—but take care not to do so over food that they are going to eat. Instead, they crack them into a separate dish or into a clean hand, but never over the food that they are mixing them. Also, in order to not spread the outside germs into the eggs, they never separate them with the egg shells; instead, they use their hands to separate the yolks from the whites.
While it’s absolutely normal for you and I to get our eggs from the refrigerated department of the grocery stores, it’s actually very unusual in the rest of the world; eggs, butter, and most cheese products are usually just sitting on the shelf, not in a refrigerated display. Mind you, that doesn’t mean that the U.S. is wrong in such practice, but it’s important to remember that the majority of steps taken by the food industry are to avoid a lawsuit or to comply with whatever figments of grandeur the USDA wields as it creates various requirements. Such policies are not necessary to practice in your own home. Keeping that in mind, there are several steps you can take so that you can take advantage of great sales on eggs and not have to worry about whether or not they will all fit in the refrigerator.
Preserving Eggs is Easy!
Yes, you can preserve your eggs long-term without worrying about your family getting sick. There are several methods you can use and I’ve written of a couple of ways previously, but my favorite one (because it’s the easiest) is using mineral oil.
 All you have to do is warm a quarter cup of mineral oil (just about 10 seconds in the microwave will do). Set your eggs outside of the carton (because it will be hard to get them out one you start using the mineral oil). Put on some food handling gloves (I buy this at one of the warehouses). They are easy to use for safe food handling but they are also a lot less expensive than medical gloves and yet in some circumstances they can be used instead of medical gloves. They are NOT puncture resistant though, so exercise caution if using them for that purpose). Dab a little bit of the warmed mineral oil on your hands and then pick up an egg. Run your oiled hands all over the eggs, making sure to cover it completely with the mineral oil. Don’t worry if you’re putting it on too thick or thin, just so long as every part of it is covered. When you’re finished with an egg, put it in the egg carton, small pointed side down. A quarter cup of mineral oil should easily do 4 to 6 dozen eggs.
Now, store your egg cartons in a cool, dry place. You want the temperature to be about 68 degrees for long-term storage—otherwise storing them like this in your regular room temperature is just fine for a few weeks. Remember, the eggs come out of a warm hen. I’m always asked if this will help the eggs keep longer in the refrigerator too. The answer is yes.
You’ll want to set a reminder on your calendar or cell phone to flip your eggs once a month at which time you’ll simply flip the carton upside down gently so as not to break any of the eggs. Do this every month to maintain the integrity of the egg yolk.
 Don’t worry about an egg going bad and you not knowing it. Believe me; in this case the NOSE KNOWS. Rotten eggs smell awful. They won’t be able to sneak up on you. The gas hydrogen sulfide develops as bacteria breaks down the proteins in the egg white, creating that nasty gas smell.
There’s another way to tell if your egg has gone bad. As oxygen gets into the egg, it creates an air bubble inside in place of moisture and carbon dioxide. This will cause the egg to float when placed in cold water (at least double the depth as the length of the egg). Anything other than a floating egg is fine to ingest.
Don’t be put off by the other things that you might see in your egg. Some things may look odd to you, but don’t worry, there is nothing wrong with your egg when you see the little red spots in the yolk. Those spots (usually referred to as meat spots) just mean that a blood vessel ruptured during the formation of the egg. They are diluted as the egg gets older, which means that if you actually see them, your eggs are still quite fresh. Another misinterpreted egg issue is when you see a white strand (chalazae) in the egg white, usually right next to the yolk. It reminds me of a white umbilical cord. They are only there to keep the egg yolk centered and are sometimes more obvious in some eggs than others. Even if you see an egg white that is cloudy or has a yellow or green hue to it, it doesn’t mean that it’s bad. In fact, quite the opposite because it indicates that the carbon dioxide just hasn’t had enough time to escape the egg. Even if you end up with a fertilized egg, it’s still safe to eat.
 Of course all of these instructions for egg preservation only apply to eggs which you intend to cook prior to consuming. The nice thing about preserving eggs this way is that your deviled eggs will turn out better. The shells peel off of old hard-boiled eggs easier than fresh ones. In fact, the only downside I have found to preserving eggs this way is that they are pretty much useless when you want to whip up some egg whites. Old egg whites are very difficult to whip into a stiff stage once they’re older than a couple of weeks.
Yes, you can do this method on grocery store eggs. The grocery store egg distributors make sure to wash off the bloom and then refrigerate them. Your mineral oil essentially reapplies the bloom. Of course I always look at the dates on the egg cartons and get them as “new” as possible. This preserving eggs method will allow your eggs to stay good for 9 months and sometimes as much as 12. Obviously, rotating through your eggs is standard, so I like to number or alphabetize my eggs so that I can keep the egg cartons together in the batches that I purchased them. That way if there ever is a problem with a group of eggs, I know where they came from and can look at all of the eggs that I bought in that particular batch. You could also simply use a color marker coding system and get the same result so long as you stick with a particular color cycle.

Mineral oil is the key to preserving eggs
One last thing to mention here; the mineral oil. Mineral oil is found in the pharmaceutical sections along with Pepto Bismal, laxatives, etc. as it’s commonly used to help with bowels issues. However, I only use it for this purpose and with gloves on because it is a petroleum product. Petroleum products do cause estrogen dominance in a woman’s body which then causes a host of other problems in the body. So please don’t use it topically. This also goes for baby oil which is nearly 100% mineral oil except for the addition of a fragrance; though this means that you could also use baby oil in lieu of mineral oil.
Now that you know that preserving eggs is easy, you can use your egg substitutes to bake with and you’ll still have plenty of great eggs for those times when you just gotta have an egg over easy, deviled eggs, poached eggs on toast, homemade mayonnaise or a delectable hollandaise sauce! A good hollandaise sauce makes the little bit of time I have to spend preserving eggs all worth it!
HOT TIP: By the way, Walgreens has eggs on sale for only 99 cents a dozen, limit 3 per person. So I’m purchasing 3 dozen every day this week at two different Walgreens then slathering them all up in mineral oil. Now that you know all about preserving eggs, you can use this strategy too! AND you can take the Walgreens advertisement over to Walmart and Target and buy 3 dozen eggs from them TOO at the same price! Work it!
Safely Preserving Eggs |Join our efforts to Secure America's Borders and End Illegal Immigration by Joining ALIPAC's E-Mail Alerts network (CLICK HERE)
-
02-19-2012, 07:10 PM #1708Senior Member
- Join Date
- May 2007
- Location
- South West Florida (Behind friendly lines but still in Occupied Territory)
- Posts
- 117,087
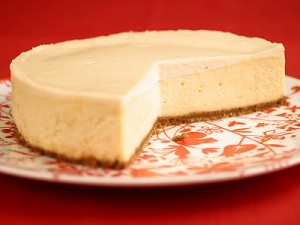
Powdered Cream Cheese Exists!
By Kellene Bishop
You can all rest easy now folks; powdered cream cheese does exist and as it turns out, it’s yummy.
 The other week I tried a little experiment. (see the YouTube video) I got my hands on some freeze-dried powdered cream cheese. To test it out I decided to try and make one of the most “cream-cheese dependent” recipes that I could think of. Cheesecake.
I’ve got a hankering for dairy. While I don’t believe in preparing for the world to end, I do feel that it might as well be done without my real cheeses, eggs, buttermilk, raw milk, and powdered milk goods. I’ve also found a powdered sour cream that I like that goes well with the casseroles, beef stroganoff, and Mexican dishes that I love. But I’ve sure been stumped when it comes to satisfying my love for cream cheese. Up until now I’ve been buying cream cheese and Neufchatel cheese and freezing it and using it here and there. I’ve also successfully substituted pureed cottage cheese and even yogurt cheese in a lot of recipes. But I’m happy to say I don’t have to look any further for an alternative cream cheese solution. I can die peacefully now.
Testing Powdered Cream Cheese
To test out the powdered cream cheese, I used a very, very basic cheesecake recipe. No frills, just cream cheese, sour cream, a homemade graham cracker crust and a few other minor ingredients. To really push the envelope I also used powdered sour cream in the recipe (though I’ve used that a lot and have been happy with it.) The end result was a really surprising one. The more I tasted it the more I loved it. It tasted like a very rustic, old world-style cheesecake. It actually tasted like a mild CHEESE instead of just some creamy sweet dessert. I loved it.
 Some would want a sweeter, more traditional taste to their cheesecake than what I ended up with, but that’s what’s so awesome about using powdered cream cheese. Instead of just mixing the powder with water, you can get all kinds of creative! You could use orange juice, key lime juice, a fruit puree, or even a thinned-down caramel syrup!
By the way, since I was experimenting with cheesecake recipes, I also discovered a great cheesecake recipe that’s made primarily from powdered non-dairy creamer! That recipe turned out very much like the familiar Jell-O instant cheesecake recipes. (I just used the Target brand of powdered creamer.)
Anyway, with the availability of products like these, you don’t have any excuse to overlook the necessary comfort foods for your family; and you can have the luxury of serving familiar dishes too! You don’t need a refrigerator to make these, though cold ingredients work best for the non-dairy creamer recipe.
Recipes using powdered cream cheese I’ve put both recipes below. If you’re interested in stocking up on the cream cheese or sour cream Five Star Preparedness is finishing out the week with their January group buy (a monthly event in which they buy in bulk and sell the products at or below wholesale). You’ll need the coupon code of “supreme” in order to get their group buy. They are offering a case of 2 #10 cans of powdered sour cream, 2 #10 cans of powdered cream cheese, and 2 #10 cans of freeze-dried grated cheddar cheese. (I love it so much more than that dust powder stuff—ugh!) And guess what?! If you’ve already got everything else and only want a case of the powdered cream cheese or sour cream you can! Yay! (See their “Place an Order” link at the top of their page. Don’t forget your coupon code though!) And if you’re interested in great fruit to top the cheesecake, you can save 10% off of their fruit packs this month too. Regardless, today’s technologies are giving us lots and lots of possibilities. Their sale is only through the end of the week. (Sorry for not letting you know sooner…I’m a space cadet that way lately.)
One thing I should mention, you CAN indeed make your own cream cheese from powdered milk. However, you use up a LOT of powdered milk to do so. It’s actually more economical to purchase the powdered cream cheese and personally, I liked the homemade from powdered milk and this brand equally.
By the way, I’d love to hear about your variations on these recipes.
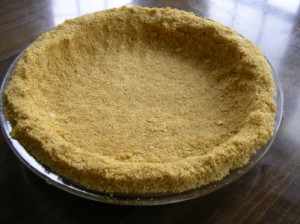
Graham Cracker Crust Recipe ©
By Kellene Bishop, The Preparedness Pro
1 stick of melted butter
12-14 graham crackers, finely crumbled
Simple mix together the butter and the graham cracker crumbs and then press the mixture down on the bottom of the pie pan or springform pan. Use as you wish.
Power Powdered Cheesecake ©
By Kellene Bishop, The Preparedness Pro
Ingredients:
24 ounces of prepared powdered cream cheese—room temperature
2 cups of sugar
4 eggs—set aside the white of one egg
3 T. lemon juice (of course the bottled stuff works just fine)
2 cups of prepared powdered sour cream
3 T. sugar
1 can of your favorite pie filling or make your own from freeze-dried fruit–YUM!
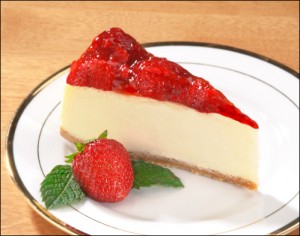 When preparing the powdered sour cream and powdered cream cheese, make them according to directions but to make this EXTRA special, substitute the liquid required for EITHER the cream cheese or sour cream. If your liquid choice is sweet then reduce the sugar to only 1 cup. If it’s tart or neutral, then use the full 2 cups of sugar measurement.
Mix together the prepared cream cheese, sugar, and eggs then add the lemon juice. Mix until smooth. Pour into a prepared springform pan with the graham cracker crust. Bake at 350 degrees for 35 minutes—don’t be tempted to cook it longer than that or you’ll scorch the graham cracker crust.
Let cool 10 minutes while you prepare the topping.
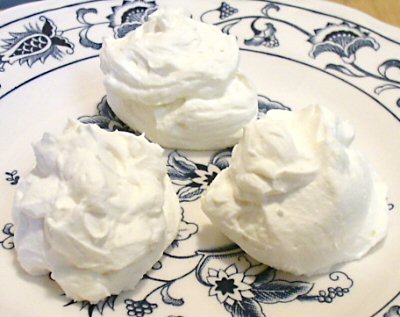
In a clean, dry bowl, whip the egg white and 3 tablespoons of sugar until stiff. Fold in the 2 cups of prepared sour cream. Top the cheesecake with the mixture and return to the oven for another 10 minutes. (Still at 350 degrees).
Allow to cool and then serve topped with your favorite pie filling on top, homemade caramel, fudge sauce, or a sweetened fruit puree. Be sure to have a napkin on hand for the accompanying drool.
Coffee Creamer Cheesecake ©
By Kellene Bishop, The Preparedness Pro
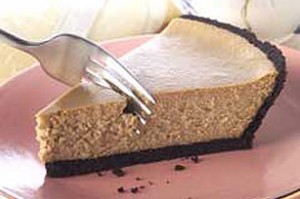
Prepared graham cracker crust
2 ¾ cups of powdered coffee creamer
1/2 cup of cold water.
1/2 cup of 100% lemon juice concentrate (preferably cold)
1 can sweetened condensed milk (Learn to make your own HERE)
With a hand mixer (this is where your Roadrunner Humless Generator comes in handy in the event of a power outage) mix water and coffee creamer together for about 1 minute. Add lemon juice and sweeten condensed milk and mix together for another minute. Pour into graham cracker crust pie dish and allow to set for about 30 minutes. (in a refrigerator or cold environment is best.) Cut into slices and devour—while chewing with your mouth closed, of course.
This recipe is sweet enough that you don’t require a topping, but it sure is good with one!
Powdered Cream Cheese Exists! |
related posts:
Join our efforts to Secure America's Borders and End Illegal Immigration by Joining ALIPAC's E-Mail Alerts network (CLICK HERE)
-
02-19-2012, 07:37 PM #1709Senior Member
- Join Date
- May 2007
- Location
- South West Florida (Behind friendly lines but still in Occupied Territory)
- Posts
- 117,087

DIY Steam Engine Boiler
Posted on February 9, 2012 by David Nash
 First off, playing with steam – especially under pressure is a dangerous thing. Failure to use common sense and a healthy dose of caution can melt the flesh from your bones.
However, if channeled properly steam can transmit a lot of power and turn heat to torque.
I have already shown you my weed-eater conversion to a basic single acting steam engine, now I will show my home workshop boiler. This portion of the project caused me the most sleepless nights and research, and I fully expect you to do your own research if you plan to create your own boiler. As I am not there to ensure you take the necessary precautions, I cannot be held liable for your actions.
That being said I used a pressure cooker for my boiler. I did this because I know it is tested to the pressures I plan on using for my boiler. I flirted briefly with a firetube boiler, but in the end, I feel much careful using something that was designed and constructed to boil water under pressure.
My pressure cooker (as well as every other cooker I have seen) has a pressure release that is designed to rupture well before the pressures inside the cooker endanger the integrity of the cooker itself. If this every goes off cut the heat immediately and get AWAY.
The pressure cooker has a pressure gauge on it also. The Agricultural extension office will test your gauge to ensure it is accurate (for food safety purposes) This calibration should be done annually, for food preservation and I would suggest you get it checked BEFORE you modify your boiler, as I doubt they will test it with a roll of copper pipe coming out the end. They may even call the revenuer’s thinking you have built a still… (By the way, my boiler is aluminum, and that reacts with alcohol so my steam boiler is in no shape, form, or fashion an alcohol distillation device.)
The other thing your pressure cooker should have on it is a weight of some kind to let steam out during the cooking process. This is the only thing of the three you should mess with. I used some tools and unscrewed it from the cooker lid. I replaced the weight with a brass ¾ mpt fitting and used hard copper line to attach the fitting to a ball joint and a quick release coupling. (Before I use this for more than testing I will also plumb in a 150 psi safety valve).
From the quick release coupling I attached an air tool line – I looked into using soft copper ¼ tubing, and even though the burst pressures were 900psi which was plenty strong enough, for testing I wanted the flexibility of a hose.
When filling the pressure cooker/boiler do not overfill it, don’t go more than 1/3 full or you could have dangerous overpressure. Believe me just a small amount of water will run weed eater steam conversion a long time, especially considering this is something you cannot fire and forget. If you have heat to your boiler you HAVE to be present at all times.
So in closing, a pressure cooker makes a pretty decent steam boiler, but you have to take into consideration the strength of all the components and realize that you are dealing with extremer heat and pressure, and if a failure occurs it will be at the weakest link. You have to think through the process and ensure that precautions are taken to keep that weakest link in a safe place.
Please watch the video, as it will explain things a lot better, as well as show the engine working.
DIY Steam Engine Boiler
Related posts:
Join our efforts to Secure America's Borders and End Illegal Immigration by Joining ALIPAC's E-Mail Alerts network (CLICK HERE)
-
02-20-2012, 05:12 PM #1710Senior Member
- Join Date
- May 2007
- Location
- South West Florida (Behind friendly lines but still in Occupied Territory)
- Posts
- 117,087
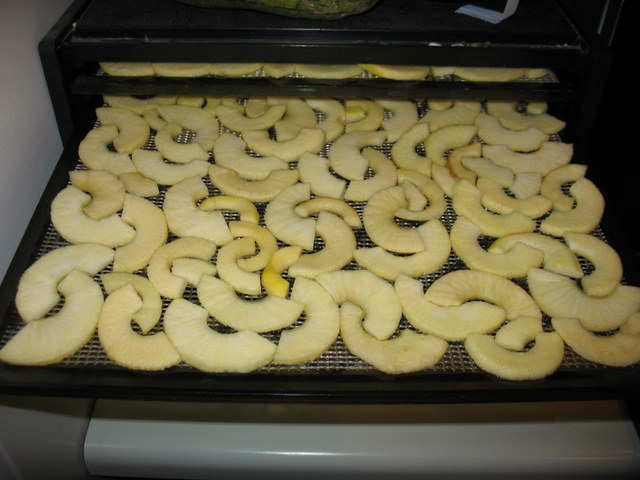
Dehydrating Apples
By Angela

If youve wanted to know how to dehydrate apples, heres your tutorial. We love dehydrated apples around here. Theyre a great snack and store really well if you can keep them hidden so that the little people dont eat them all up the day after you dry them!
To dehydrate apples, youll need a few supplies. First youll need a dehydrator. You can use a solar dehydrator like the sun oven with drying trays if you want. I just use my Excalibur. Its fast and easy and it holds a lot of apples.
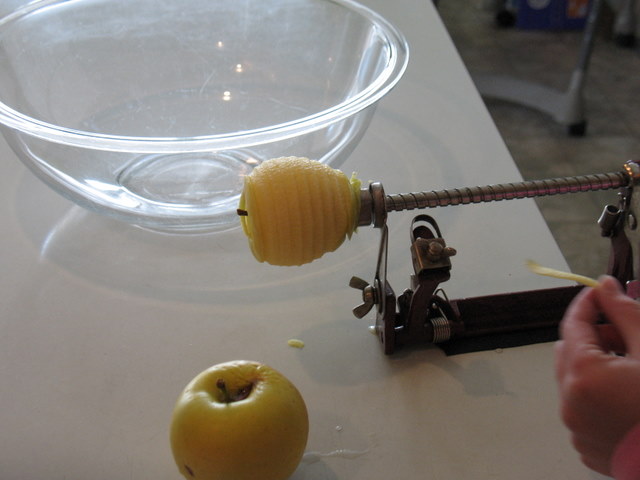
Youll also need some apples. If you want to make your life easier youll need an apple peeler, corer, slicer tooland if you want your apples to look nice and not brown when theyre done youll want some type of food color preserver. I use Fruit Fresh
, but Ive been told you can also crush up vitamin C tablets in water or use lemon juice in water to get the same result.
Ready then? Lets get started.
Step one: Wash the apples. I forgot to take a picture of apples floating in my sink, but Im sure you can visualize it if you try.
Step two: Assemble your helpers if you have any around. The kids usually come out of the woodwork when the apple peeler tool is getting clamped to the counter. They feed on apple peelings, so theyre perfectly content to flock to the apple peeling duty.
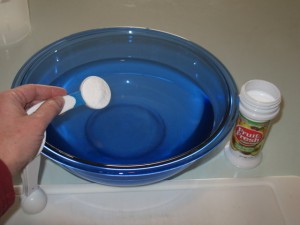
Step three: Prepare your Fruit Fresh soaking solution. The ratio is one Tablespoon of Fruit Fresh to one quart of water. I use two quarts and two tablespoons of Fruit Fresh in a big bowl. Mix well so it dissolves in your bowl.
Step four: Clamp your apple peeler to the work surface and attach an apple. We use the edge of the counter. Some of these peeler/corers attach with a suction cup. Im suspicious of suction cups so I bought one with a clamp. The suction cup ones probably work fine anyway.
Step five: Have one of your helpers turn the handle on the peeler tool, sending the apple through the peeler/corer/cutter while the other helper catches the peelings to eat. Or just send the peelings, cores, other apple scrap to the chickens or compost pile. Some folks like to save their apple peelings and make apple jelly. I keep thinking Im going to do this, but never have.

Step six: Once the apple is through the peeler tool, you have a spiral cut apple with no peel and a hole in the middle. Trim off any extra peel that didnt come off if you want at this point. The peel doesnt hurt you when its dried, it just turns out kind of hard. I prefer my dried apples with as little peel as possible. Trim off any bad parts of the apple, and cut the whole spiral in half. This leaves you with a bunch of apple half circles.

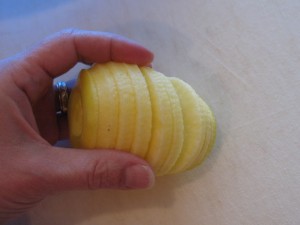
Step seven: Drop the apple pieces into the bowl of Fruit Fresh solution. Separate the pieces from each other so all sides of your apple slices get exposed to the soak solution. They dont need to be in here very long, but it also doesnt hurt them to stay in until youve filled your bowl with apple slices. They do start getting soggy if you leave them in there for an hour, though. You know how I know that, right? I usually wait until the bowl is about full, then move on to step eight.

Step eight: Pull the apple slices out of the soak solution and place them on the trays. If you take just a little time and like a good puzzle, you can fit quite a few pieces on a tray.

Step nine: Dehydrate at 135 degrees for 8 hours or overnight and they should be done. Now the apple eating helpers come back out of the woodwork to test the end product. Whos been eating off the front corner already???
Variations: Different varieties of apples give you different flavor dried apples. Delicious varieties are fairly mild flavored, Gala or Cameo a little stronger flavor with a nice hint of tart, but tart apples are just not okay in my opinion for dehydrating! Yes, Ive dried some Granny Smith, but they were pretty tough to eatthe sour only got more sour.
You can sprinkle cinnamon or a cinnamon/sugar mixture on your apples before drying. I didnt like this very well as the cinnamon is very dry and with the apples already being dry, I didnt like the extra dryness of the cinnamon on them. The taste was good though. Try dipping them in apple juice after the fruit fresh solution for a little stronger flavor. If you want a sweet treat, sprinkle dry jello powder on the apples just before dehydrating. Its a bit messy, but really tasty.
Storing Dehydrated Apples: I store our dried apples in mason jars. We eat through these pretty quickly, so I have no need to store them for long term storage, but if you want to store them for longer term, you could use a FoodSaver jar sealeror an oxygen absorber in each jar to keep them fresh longer. Foodsaver bags dont workthe apples can dry hard enough theyll poke holes in the bags and let air in. Mylar bags with oxygen absorbers
would work. Theyre much stronger.
Dehydrating Apples « Food Storage and Survival
Join our efforts to Secure America's Borders and End Illegal Immigration by Joining ALIPAC's E-Mail Alerts network (CLICK HERE)


 Reply With Quote


Black Pigeon Speaks | Somali Fraud Explains Why Racism Will...
07-31-2026, 10:36 AM in Videos about Illegal Immigration, refugee programs, globalism, & socialism