

Results 701 to 710 of 11510
 226Likes
LinkBacks (?)
-
12-26-2016, 11:32 AM
-
09-02-2016, 05:39 PM
-
whole garden made with pallets!! Love it!! | Pallets | Pinterest | Pallets, Pallets Garden and Wooden Pallets
Refback This thread03-06-2016, 11:30 AM -
10-20-2015, 05:29 PM
-
06-12-2015, 08:00 PM
-
02-26-2015, 01:58 PM
-
01-05-2015, 04:13 PM
-
12-19-2014, 10:19 AM
-
EMERGENCY: HUGE FEMA PANDEMIC EXERCISE IN USA IN NOVEMBER, INTERNET SHUT DOWN PART OF EXERCISE | Prepare4Survival
Refback This thread12-03-2014, 10:39 PM -
Off Grid World ? Ugly Duckling Shipping Container Home Built by Artist Is a Beautiful Swan on the Inside
Refback This thread11-25-2014, 03:10 PM -
11-17-2014, 10:59 PM
-
11-13-2014, 11:18 AM
-
11-09-2014, 02:54 PM
-
10-28-2014, 11:38 PM
-
10-26-2014, 05:54 AM
-
10-16-2014, 11:28 AM
-
10-03-2014, 01:25 PM
-
10-02-2014, 09:16 PM
-
09-26-2014, 07:00 PM
-
09-26-2014, 01:56 PM
-
09-19-2014, 04:46 PM
-
09-13-2014, 05:49 AM
-
09-05-2014, 01:52 PM
-
09-01-2014, 09:39 AM
-
08-30-2014, 06:29 PM
-
08-10-2014, 06:29 AM
-
08-04-2014, 05:07 PM
-
07-23-2014, 11:14 AM
-
New Evidence on Expiration Dates | Medical Preparedness | Doom and Bloom (TM) | Doom and Bloom (TM)
Refback This thread07-22-2014, 10:10 AM -
07-18-2014, 08:37 PM
-
07-15-2014, 04:57 PM
-
07-11-2014, 01:40 AM
-
04-22-2014, 11:14 AM
-
04-18-2014, 12:57 PM
-
04-18-2014, 10:10 AM
-
04-14-2014, 12:18 AM
-
04-12-2014, 02:28 AM
-
03-02-2014, 11:43 PM
-
12-24-2013, 11:59 PM
-
12-07-2013, 11:04 PM
-
kitchen | Cob
Refback This thread11-25-2013, 03:24 PM -
10-22-2013, 10:25 PM
-
Apple Pie Braid | Sweets
Refback This thread09-26-2013, 07:58 AM -
09-02-2013, 04:44 PM
-
5 Reasons Why You May have to Bug Out Even Though You Don’t Want to | The Apartment Prepper's Blog
Refback This thread08-23-2013, 03:20 PM -
06-27-2013, 06:30 AM
-
06-23-2013, 08:11 PM
-
06-17-2013, 11:21 PM
-
05-24-2013, 05:06 PM
-
To Eat / BASIC LIST / SUGGESTED ITEMS FOR LONG TERM SURVIVAL - Page 275 - ALIPAC
Refback This thread05-01-2013, 03:49 AM
Thread Information
Users Browsing this Thread
There are currently 1 users browsing this thread. (0 members and 1 guests)
 LinkBack URL
 About LinkBacks
-
04-22-2011, 08:18 PM #701Senior Member


- Join Date
- May 2007
- Location
- South West Florida (Behind friendly lines but still in Occupied Territory)
- Posts
- 117,087

FDA: Hand Sanitizers Do Not Prevent MRSA
Tess Pennington
Ready Nutrition
April 2011
In a recent report by the FDA, a number of hand sanitizer companies are making false claims that their product(s) can prevent MRSA, or methicillin- resistant Staphylococcus aureus. Deborah Autor, Compliance Director for the FDA states that “the FDA has not approved any products that prevent infections from MRSA, E. coli, Salmonella or H1N1.” Therefore, these claims by certain companies are erroneous and unproven.
Some of these unproven claims on the products are:
- Kills over 99.9% of MRSA
- Helps prevent skin infections causes by MRSA and other germs
- Is effective against a broad spectrum of pathogens, including MRSA.
The FDA states that they have contacted the companies in question and have requested that they remove these falsehoods. Specifically, four companies that have been sent letters are:
Staphaseptic First Aid Antiseptic/Pain Relieving Gel, by Tec Laboratories
Safe4Hours Hand Sanitizing Lotion and Safe4Hours First Aid Antiseptic Skin Protectant, by JD Nelson and Associates
Dr. Tichenor’s Anticeptic Gel, by Dr. G.H. Tichenor Anticeptic Co.
Clean Well All-Natural Hand Sanitizer, Clean Well All-Natural Hand Sanitizing Wipes, and Clean Well All- Natural Antibacterial Foaming Hand Soap, by Oh So Clean Inc., also known as Clean Well Comany.
The FDA advises consumers
- Don’t buy over-the-counter hand sanitizers or other products that claim to prevent infection from MRSA, E. coli, Salmonella, flu or other bacteria or viruses.
- Ask your pharmacist or other health care professional for help in distinguishing between reliable and questionable information on product labels and company websites.
- In general, wash hands often, especially before handling food, to help avoid getting sick. Wash hands with warm water and soap for 20 seconds. For children, this means the time it takes to sing the “Happy Birthday” song twice.
- If you find products on the Internet that you belive make false, or unproven claims, tell FDA by following the instructions at Reporting Unlawful Sales on Internet. Report side effects that you tink may be related to using hand sanitizers or other medical products to FDA’s MedWatch Adverse Event Reporting Program either online, by regular mail, by fax, or by phone.
Related Reading:
- Homemade Hand Sanitizer
- SHTF Survival: How to Prevent Infections
- Are You Ready Series: Pandemic Preparedness
- Baking Soda is a Booming Product of the Recession
- 30 Most Popular Herbs for Natural Medicine
Last edited by AirborneSapper7; 01-30-2012 at 12:12 AM.
Join our efforts to Secure America's Borders and End Illegal Immigration by Joining ALIPAC's E-Mail Alerts network (CLICK HERE)
-
04-22-2011, 08:23 PM #702Senior Member
- Join Date
- May 2007
- Location
- South West Florida (Behind friendly lines but still in Occupied Territory)
- Posts
- 117,087
Homemade Hand Sanitizer
Previously published at No Ordinary Homestead
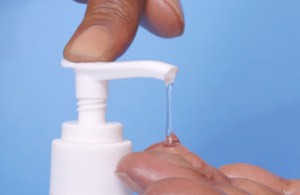
Cold and flu season is in full swing, and with H1N1 running around all over the place, taking a few extra precautions to keep germs at bay is never a bad thing. I’m not saying you need to bathe yourself and your kids in hand sanitizer every few minutes. Washing your hands with soap and water is still the best way to get rid of germs. But after an outing where you come into contact with a lot of germs (like the grocery store, the gas pump, public bathrooms) it’s a good idea to kill off some of those foreign attackers when you don’t have access to a sink and soap. And when you have an 11 month old sitting in the grocery cart who insists on putting as much of the cart in her mouth as possible, you like having a little piece of mind that your daughter isn’t going to break out in hives from all the germs at any moment.
There are many, many hand sanitizing products on the market, but I’ve found that you can make your own hand sanitizer for a fraction of the cost.
Most products you buy are made with an alcohol base but as the green craze continues, more natural products made with essential oils are finding their way to the market. If you elect for an alcohol based product, make sure it has an alcohol concentration of at least 60 percent so that it kills most harmful bacteria and viruses. Check those labels on your hand sanitizer products so you know they are actually getting the job done and not just smearing the germs around.
Essential oils have been used for thousands of years to combat disease and you may already have all of the oils in your home that are necessary to make your own hand sanitizer. Using essential oils with disinfectant, antiseptic and antiviral properties will allow you to create a homemade hand sanitizer with no alcohol at all.
Essential Oils to Use
Cedarwood, lavender, lemon, lemon grass, myrrh, neroli, patchouli, peppermint, rose, sandalwood, tea tree, thyme and ylang-ylang essential oils all have antiseptic properties.
Clove, niaouli and pine oils have both disinfectant and antiseptic properties.
Tea tree oil is the most powerful of these essential oils and has antiviral, antifungal and antibacterial properties–making it the recommended essential oil to use in the following recipes. But it should not be used on infants or pregnant /nursing women. Adding more tea tree oil to any recipe will make the hand sanitizer more effective but the smell can be overwhelming. View the American Society for Microbiology’s study about TTO for further information about its effectiveness. A few drops of essential oils like basil, rosemary, rose, lavender, lemon or geranium will lighten and balance the aroma.
Always be careful with essential oils and consult an herbalist before using if you have any current health conditions. As mentioned, some oils (like tea tree, cedar wood and hyssop) are not suitable for children or pregnant and nursing women.
In the recipes below, you can mix oils to suit you tastes or just use one type of oil but their effectiveness will be reduces versus using tea tree oil. One essential oil blend option which is safe for families is a combination of lavender and pine. This will create a disinfectant, antiseptic hand sanitizer with calming effects. Add a little citrus or rosemary to enhance and round out the aroma.
Aloe vera gel is in ingredient in all of these recipes and I just wanted to mention that this means pure aloe vera gel without the coloring, flavoring and so on. It’s not the same as juice. It should say “100% aloe vera gel” somewhere on the bottle. If it doesn’t, it’s the wrong stuff.
If you have trouble finding any of these ingredients in your local stores, try online sources. I’ll be happy to give you a few sites myself.
So here’s the homemade hand sanitizer recipes with and without alcohol.
Mixing up a batch of hand sanitizer only takes a few minutes but there’s often a question of what you have available in the house. You’ll probably want to do the mixing in a glass bowl (plastic may take on the aroma of the essential oils and metal may react with the ingredients) but you can also just pour the ingredients directly into a bottle if you prefer. Either way, a funnel is going to be useful. Add the ingredients together in your mixing vessel, then shake or stir to combine. Fill the mixture into hand sanitizer and other small bottles you’ve washed out to keep those landfills empty. Some more liquid recipes may need to be shaken before use to distribute the oils.
Alcohol Free Hand Sanitizer Gel
- 1 cup pure aloe vera gel
- 1-2 teaspoons of witch hazel (add until the desired consistency is reached)
- 8 drops of essential oils (as listed above)
- 2 cups pure aloe vera gel
- 2 tablespoons 90% SD40 alcohol (perfumer’s alcohol if you can get it)
- 2-3 teaspoons essential oils (as listed above)
- 1/4 cup pure aloe vera gel
- 1/4 cup grain alcohol or vodka
- 10 drops essential oils (as listed above)
Related Reading:
- FDA: “Hand Sanitizers Do Not Prevent MRSA”
- It’s All Flower Power: Use Your Favorite Plants To Repel Mosquitoes
- DIY: Recipes For Everyday Products
- SHTF Dental Care: 6 Alternatives to Toothpaste
- DIY: Making Infused Oils
Last edited by AirborneSapper7; 01-30-2012 at 12:15 AM.
Join our efforts to Secure America's Borders and End Illegal Immigration by Joining ALIPAC's E-Mail Alerts network (CLICK HERE)
-
04-22-2011, 08:29 PM #703Senior Member
- Join Date
- May 2007
- Location
- South West Florida (Behind friendly lines but still in Occupied Territory)
- Posts
- 117,087
Related Reading:
Homemade Hand Sanitizer http://readynutrition.com/resources/hom ... _21042011/
SHTF Survival: How to Prevent Infections http://readynutrition.com/resources/sht ... _17062010/
Baking Soda is a Booming Product of the Recession http://readynutrition.com/resources/bak ... _24112009/
SHTF Survival: Womens Health http://readynutrition.com/resources/sht ... _13012011/
Disaster Supplies for Surviving a Flood http://readynutrition.com/resources/dis ... _22012010/
Last edited by AirborneSapper7; 01-30-2012 at 12:16 AM.
Join our efforts to Secure America's Borders and End Illegal Immigration by Joining ALIPAC's E-Mail Alerts network (CLICK HERE)
-
04-24-2011, 04:59 PM #704Senior Member
- Join Date
- May 2007
- Location
- South West Florida (Behind friendly lines but still in Occupied Territory)
- Posts
- 117,087
Solar Water Disinfection
March 20, 2010 | Filed under: survival,water | Posted by: Ron Fontaine
Access to clean drinkable water is a top priorty for survival wherever you are. You can live without food for several weeks if need be, but surviving without water for more than a few days under any conditions will certainly endanger you physically and mentally.
Water is heavy and bulky and difficult to carry around, so often you must obtain most of your water from local sources. But there is a problem with this. In the field you should consider all sources of water suspect. Microorganisms in water, such as giardia, can make you very sick and even cause long term complications. The last thing you need when in a survival situation is ill health. You need a water treatment system to make water safe to drink.
Even cold, clear water can be riddled with disease organisms. I remember one incident in the White Mountains of New Hampshire. I came upon a crystal clear cold mountain stream from which a cool refreshing drink would have felt very good. This seemingly cleanest of water sources had a nasty surprise, for just upstream was a rotting moose carcass over which the entire water course flowed!
How to Make Water Safe to Drink
There are a number of common ways to make water safe to drink. These include:
- Boiling
- Chemical Disinfection
- Filtering
Chemically treating water is another way of making water safe to drink. One disadvantage of treating water with chemicals is that often they are potentially dangerous if used improperly and may not be readily available when you need them.
An age old method of making water safe to drink is to boil it. Boiling water to make it safe to drink has its problems. For one thing it requires an energy source. In developing countries the fuel source is often wood. Gathering enough firewood to boil water day after day can take a great deal of time and effort. In some areas of the world whole forests have been cut in order to boil water to make it safe to drink. Many people must walk for miles scavenging for this fuel.
All of these methods for making drinkable water out of contaminated water require special equipment or a plentiful source of fuel energy. What if you are short of fuel to boil water, had no readily available means to chemically disinfect drinking water, or lacked a water filtration system? What if large quantities of water must be decontaminated over a long period of time easily and efficiently? What can the survivor do when he finds himself with plenty of potentially contaminated water but no traditional readily available method to destroy disease causing organisms?
What if I told you there is a simple way to treat water and make it safe to drink wherever you are? Of all the ways to make water safe to drink, the method most simple and energy efficient can be very close at hand just about anywhere in the world.
Introducing Solar Water Disinfection.
What is SODIS?
Solar Water Disinfection, also known as SODIS, is a water treatment system using two readily available materials: sunlight and plastic PET bottles.
SODIS solves the problem of making water safe from microorganisms that cause water borne diseases simply by placing contaminated water into clear plastic bottles and exposing them to the sunlight, This makes SODIS an excellent tool in the survivors kit.
EAWAG (The Swiss Federal Institute for Environmental Science and Technology) and SANDEC (EAWAG’s Department of Water and Sanitation in Developing Countries) conducted extensive laboratory and field tests to develop and test the Solar Water Disinfection Process (SODIS). These efforts again proved this simple low cost method of making water safe to drink has great potential for those without access to safe drinking water.
How to Use the Sun to Make Water Safe to Drink
The SODIS water treatment system is as follows:
1. Find a clean, transparent plastic PET bottle of up to three liters in volume.
2. Fill the plastic pet bottle about three quarters full with clear water, or water that has been filtered through sand, or whatever you have at hand.
3. Shake the bottle vigourously for twenty seconds in order to dissolve as much oxygen as possible into the water to be disinfected.
4. Fill the remainder of the plastic PET bottle and replace the cap.
5. Place the plastic bottle in direct sunlight for six to eight hours. Resting on a highly reflective surface such as metal, light colored rock, or tin foil will improve the process
6. If the weather is cloudy, the length of daylight short, or the water is murky with suspended particles, leave the bottle outdoors in the sun for two full days.
7. The water is now disinfected and drinkable with 99.9% of living organisms having been destroyed.
How SODIS works
Sunlight is treating the contaminated water through three synergistic radiation mechanisms.
* UV-A (wavelength 320-400nm) which react with oxygen dissolved in the water produces highly reactive forms of oxygen (oxygen free radicals and hydrogen peroxides) in the water. These reactive forms of oxygen kill the microorganisms.
* UV-A also interferes with the reproduction cycle of bacteria by damaging their DNA
* Infrared heating the water. If the water temperatures raises above 50 degrees celsius or 122 degrees F, the disinfection process is three times faster.
The combined effect of all three mechanisms is greater than that of each individual components.
Notes:
SODIS efficiency depends on the physical condition of the plastic bottles. Mechanical scratches and aging reduce the efficiency of SODIS. Heavily scratched or old bottles should be replaced.
Solar Water Disinfection Considerations
The SODIS water treatment method requires solar radiation and temperature to destroy microorganisms. Using the solar water disinfection method does not remove chemical contamination.
The SODIS system works best in areas between 35 degrees north latitude and 35 degrees south latitude. The water to be treated should be exposed to the full sun for six hours when the sky is bright. If cloud cover is more than fifty percent, expose the contaminated water for two full days before drinking. If the temperature of the water can reach at least 50 degrees Celsius (122 degrees Fahrenheit) the time required for the solar disinfection of water can be as little as one hour under ideal conditions.
Particles that are suspended in the contaminated water will shield microorganisms from the full impact of solar radiation, so it is important to make the water as clear as possible. Water filtering or allowing the suspended particles to settle out before using the SODIS water treatment system will aid greatly in the solar disinfection process.
Containers Used for Solar Water Disinfection
The type and shape of the container used for SODIS water treatment is important.
Plastic PET bottles, which are made of PolyEthylene Terephtalate are considered the best choice since they do not have as much UV stabilizer as compared to PVC bottles, which are made of PolyVinylChloride. Bottles that are scratched will not work as well as clear clean plastic.
Glass bottles can be used for Solar Water Disinfection but are not nearly as efficient as PET bottles. Window glass in not recommended as it does not transmit enough UV radiaton.
Another important consideration when using SODIS to disinfect water is the depth of water in the container. The thinner the container the better, especially if the water has suspended particles. It has been found that if the the depth of water inside the PET container is ten centimeters, or about four inches, and the water has a moderate amount of suspended particles, the amount of UV-A radiation from the sun that penetrates the full volume is reduced by half. This will therefore increase the amount of time needed to successfully implement the solar water disinfection process.
Using SODIS in a Survival Situation
It is a sad fact that discarded plastic bottles can be found just about everywhere in the world. Even the remotest beach or river valley often contains a variety of human cast offs, one of the most common of which are plastic bottles.
If you are going to be in an area for an extended time, collect as many plastic PET bottles as you can, fill them with the water to be treated and place them in direct sunlight as shown in the SODIS instructions above.
If you are short on clean uncontaminated water, try to go as long as possible, at least a day, before drinking the SODIS treated water. Keep the plastic water bottles exposed to the sun as long as you are using them to insure the water remains free of pathogens. If possible place the bottles on a metal or dark surface to take advantage of heat and speed up the SODIS process. Refill bottles as soon as they are emptied, being sure to remember which bottles contain water that has been treated the for the longest time and which have been most recently filled.
If you are traveling, try to rig your water filled containers outside your pack or on the roof of your vehicle in order to expose them to the sun and heat as much as possible. This will help to further treat the water and prohibit the growth of new pathogenic organisms.
SODIS
Solar Water Disinfection is a five star method of making water safe to drink. SODIS materials are readily available, is environmentally friendly, is easy to implement, and can easily be taught to others. This makes the SODIS method of water treatment an excellent tool of the survivor.
In many areas of the world the SODIS method of making water safe to drink is being used, and with great success.
http://www.survivaltopics.com/surviv...r-disinfection
Last edited by AirborneSapper7; 01-30-2012 at 12:16 AM.
Join our efforts to Secure America's Borders and End Illegal Immigration by Joining ALIPAC's E-Mail Alerts network (CLICK HERE)
-
04-24-2011, 05:09 PM #705Senior Member
- Join Date
- May 2007
- Location
- South West Florida (Behind friendly lines but still in Occupied Territory)
- Posts
- 117,087
Bttt
Last edited by AirborneSapper7; 01-12-2012 at 06:18 AM.
Join our efforts to Secure America's Borders and End Illegal Immigration by Joining ALIPAC's E-Mail Alerts network (CLICK HERE)
-
04-24-2011, 07:51 PM #706Senior Member
- Join Date
- May 2007
- Location
- South West Florida (Behind friendly lines but still in Occupied Territory)
- Posts
- 117,087

Homemade Survival Bar Update 2+ Years Later
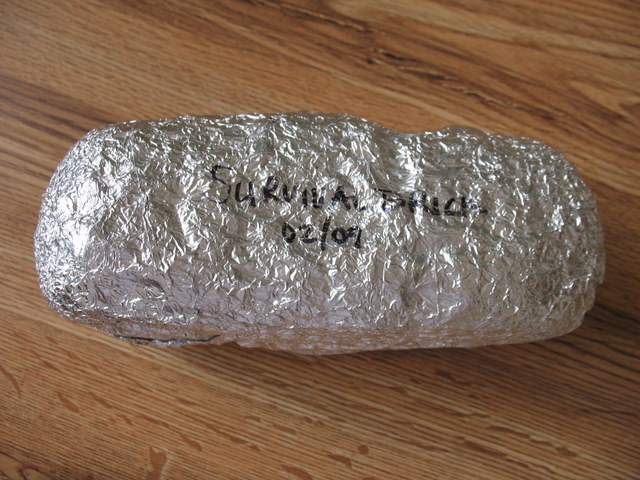
By Angela, on April 15th, 2011
Can you believe it’s been two years since we made these homemade survival bars? If you weren’t around for the homemade survival bar post, go ahead and check it out, I’ll wait. We checked on them last year here. Well, I had a sweet reader ask about their condition now, over two years later, so here’s the update.
The survival bricks have been in my car kits (one in each vehicle) for the majority of their lives. They are there through the horrible heat of summer and the freezing of winter. They’ve ridden to town about a hundred times and gone camping and even on our road trip vacation last summer. Heck, they’re practically part of the family now (except I don’t leave family members in the trunk).
I pulled one out to check on it and I’ll admit that after two years of bouncing around in the trunk the foil is looking a bit rough. I’ve wrapped this one in new foil. I’m actually thinking a nice Foodsaver bag would be better for it–might preserve some of the freshness.
This is the broken one, so it’s been broken for a while. It lost a few crumbs, but otherwise is still hard as a rock. Seriously amazing how hard these are. I would not make mine in a loaf shape again! Shape them in little cookies or something easier so you don’t have to break your survival brick with a rock (or a hammer if there’s one handy) when you need to eat it.
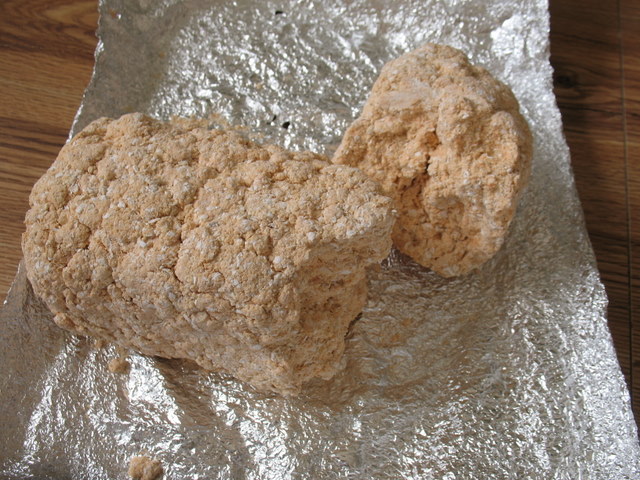
Still looks as good as the day it was made.
I did manage to chip off a few little pieces to see how the flavor was. Kind of strong in the powdered milk flavor. I don’t remember how they tasted fresh, but maybe the powdered milk part of it isn’t handling the long life all that well? Still edible for sure, but I’m in no hurry to eat it. We’ll just keep them around and do yearly updates on their condition. For reference, however, we did use the LDS cannery non-instant powdered milk to make them which scored very low on the powdered milk taste test, so maybe it’s just that the powdered milk we used had a strong flavor to begin with. Hard to say.
Also for reference, we live in a super dry climate. I would venture to say these would not last as long in a humid environment unless they were vacuum sealed to keep the moisture out. We’ll just keep checking on them and see how the “lasts indefinitely” claim on the recipe holds up.
http://foodstorageandsurvival.com/ho...2-years-later/Last edited by AirborneSapper7; 01-30-2012 at 12:18 AM.
Join our efforts to Secure America's Borders and End Illegal Immigration by Joining ALIPAC's E-Mail Alerts network (CLICK HERE)
-
04-24-2011, 07:54 PM #707Senior Member
- Join Date
- May 2007
- Location
- South West Florida (Behind friendly lines but still in Occupied Territory)
- Posts
- 117,087
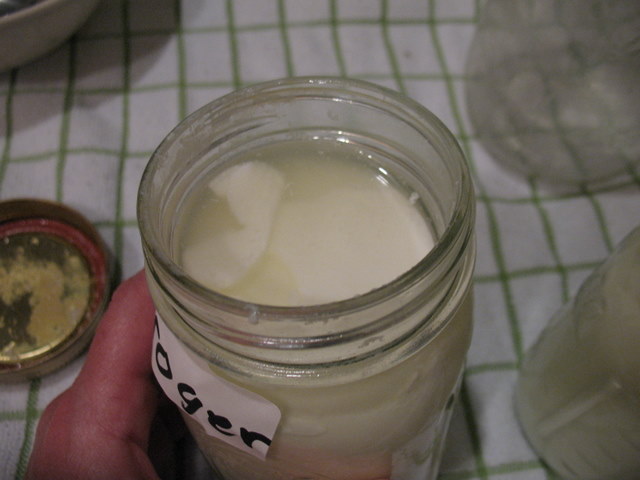
How to Make Homemade Yogurt at Home
By Angela, on April 11th, 2011
Have you ever wanted to make your own yogurt? It’s really not that hard and saves a ton of money if your family likes to eat yogurt (like mine does). Today we’ve got a step by step tutorial for making your own yogurt from scratch. As a side note, this was also my son’s science fair project since he had to do something dealing with bacteria. I was not thrilled at the thought of the mold collection from our refrigerator on display at his school, so convinced him to make yogurt instead. At least he could eat his results that way!
To make yogurt you’ll need:
1 quart of milk (any fat content is fine)
A thermometer that measures up to about 200 F (most candy or meat thermometers will work for this)
A yogurt culture starter which usually comes from existing yogurt. Here’s where my husband says, “So you can’t make yogurt unless you have yogurt?” Well, kind of. Yogurt starter can also be purchased freeze driedfrom specialty stores or online. If you’re using fresh yogurt as a starter, you’ll only need 2 TB per quart of milk. Follow the instructions with your freeze dried starter for how much to use.
You’ll also need some jars or containers to incubate the yogurt in (canning jars work great).
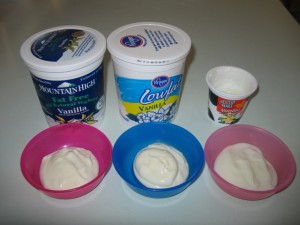
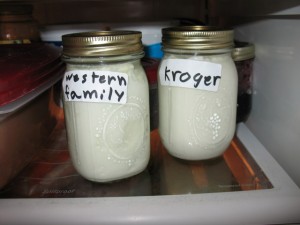
Some instruction sites say you can only use “plain” yogurt for a starter, but we used vanilla and it worked fine. Because we were doing a science fair project, we tested three different brands of yogurt. Mountain High which is pretty expensive and has a more natural yogurt texture, Kroger store brand, and Western Family store brand. We have such great variety out here in the sticks (not) that I ended up getting different sizes of containers just to get three of the same flavor.
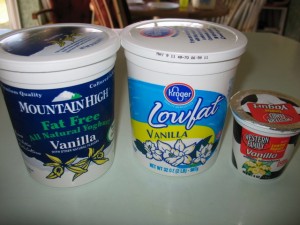
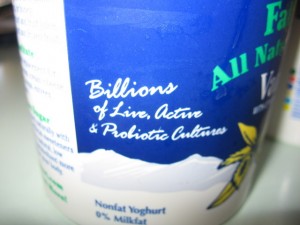
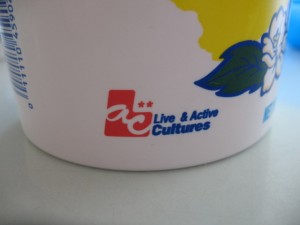
I tried to find one without the active cultures in it and thought I had, but apparently even the cheapo store brand had active cultures hidden in it–you just had to check the ingredient label closely. I guess they don’t want you to know they’re in there or something. Weird. To make sure your yogurt starter has live active cultures, look for one of these on the packaging:
Or it might be hidden way down on the ingredient listing:

That’s it for ingredients. I told you it was easy. You can add 1/4 to 1/2 cup powdered milk if you want–it is supposed to make the final product creamier. We might try that next time, but it is fine without it.
Now, let’s get started shall we?
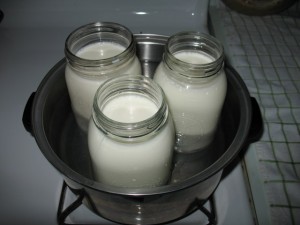
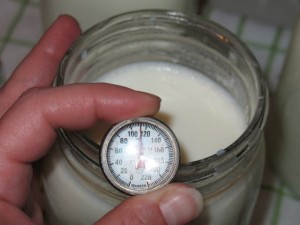
Step 1. Heat your milk to 185 F. If you’re adding the powdered milk, you can add it before heating the milk or after. You can put your milk right in a pan to heat it if you want, but you’ll have to be extra careful you don’t scorch it. We did ours in a double boiler system using quart canning jars–one for each brand of yogurt starter we were testing. I should have had the jars off the bottom a bit (like on a canning rack or the rack that goes in the bottom of a pressure cooker), but they survived fine.
By 185 F, the milk is getting pretty foamy on top. Also make sure you’re stirring it before taking the temperature to get an accurate reading.

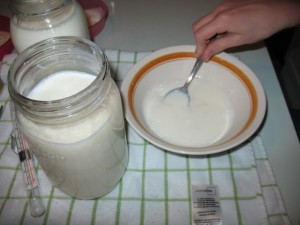
Meanwhile, set out your yogurt starters so they’re warmed up a bit (room temperature) when it’s time to use them. We put the containers back in the refrigerator after this picture, but left the little bowls on the counter to warm during the milk boiling process.
Step 2. When the milk is 185 F (one of my instructions sheets says to actually boil the milk, so it’s probably not going to hurt if it goes over temperature a bit), take it off the heat and let it cool down to under 120 F but not lower than 90 F. 110 F is ideal. We put ours on a towel on the counter. You could use a cold water bath to speed the process up a bit, but I wasn’t in a hurry so we just let them cool on their own. Stir and check the temperature occasionally until it’s about 110 F. (Now I’ve got the meat thermometer in it instead of the candy thermometer–it doesn’t matter which you use.)
Step 3. Mix in 2 TB of the yogurt culture to each quart of milk. It’s best to make sure it’s mixed thoroughly so put the yogurt starter in a bowl and add a little of the hot milk. Stir that until it’s smooth, then add it all back to the rest of the milk and stir again. No yogurt lumps–you want that culture distributed evenly throughout your milk.

Step 4. Pour your yogurt-to-be into containers to incubate. If you have yogurt cups, that’s great. Canning jars work fine. Decent tupperware would also work depending on what you’re using to incubate with. We used pint canning jars and labeled them with each brand of yogurt we were using for starter.
Step 5. Incubate 3-12 hours. To incubate your yogurt you want to keep it around 110 F for the duration of the incubation. You can use warm water or hot towels in a cooler, your oven with pilot light or super low setting or by pre-heating it and then using the pilot light to keep it warm, a yogurt maker, your Wonderbox or similar insulated cooker, your food dehydrator, a warm window in a car, or whatever other method you can devise for keeping your yogurt warm. I used my dehydrator set at 115 F since that’s the temperature the dehydrator book said to use. To incubate your yogurt in your Excalibur dehydrator, remove the trays and put the yogurt right on the bottom of the dehydrator.

Step 6. After 3-12 hours, when your yogurt has set, take it out and refrigerate it. The longer you leave it in the incubator, the tangier it gets. At the end of 3 hours (now 11:00 pm), only the store brands had set up, so I put them in the fridge. Your yogurt will keep for 1-2 weeks in the refrigerator just fine. You can use some of this yogurt to start your next batch.
The Mountain High brand still looked like milk at the 3 hour mark. I seriously thought I had done something wrong since that was the more expensive one with “billions” of live active cultures in it. It was probably just protesting because my son put frowny faces on those labels (that was the yogurt he liked the taste of the least).
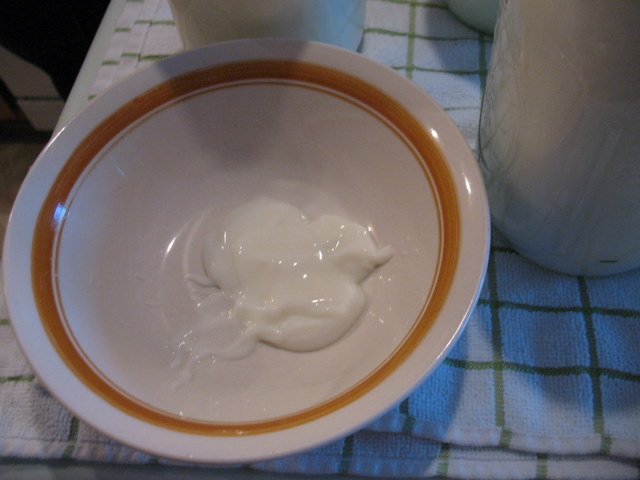
When the yogurt is set, it will have the whey liquid floating around. You can drain this off or stir it in–whichever you prefer.

At that point, I left the Mountain High yogurt in the incubator and went to bed (it was 11:00 already). I’m not sure what time it finally set, but this morning, after 11 hours in the dehydrator it was set up fine. The kids had some of the cooled yogurt for breakfast this morning. It was really mild, having only spent 3 hours incubating. Barely tangier than milk. I’ll leave it longer next time to get more “yogurt” flavor. We added some freezer jam/syrup to it to flavor it a bit and they loved it. Pretty easy.
For the actual experiment to show at school, we’ll do a batch without adding starter at all so it won’t set up since I couldn’t find a yogurt that didn’t have active cultures in it.
So there you have it. Making yogurt and/or a bacteria science experiment in less than a day! Easy and way less expensive than buying yogurt all the time. For food storage purposes, I have some of the freeze dried cultures
http://foodstorageandsurvival.com/ho...ogurt-at-home/Last edited by AirborneSapper7; 01-30-2012 at 12:19 AM.
Join our efforts to Secure America's Borders and End Illegal Immigration by Joining ALIPAC's E-Mail Alerts network (CLICK HERE)
-
04-24-2011, 07:59 PM #708Senior Member
- Join Date
- May 2007
- Location
- South West Florida (Behind friendly lines but still in Occupied Territory)
- Posts
- 117,087
Last edited by AirborneSapper7; 01-30-2012 at 12:20 AM.
Join our efforts to Secure America's Borders and End Illegal Immigration by Joining ALIPAC's E-Mail Alerts network (CLICK HERE)
-
04-24-2011, 08:17 PM #709Senior Member
- Join Date
- May 2007
- Location
- South West Florida (Behind friendly lines but still in Occupied Territory)
- Posts
- 117,087

http://www.canadianpreppersnetwork.com/
Here is a repost of an article on the American Preppers Network...very informative & worth a read.
Bugging Out as A Group
From: Sibi Totique
The Bug Out Bag (BOB) is a tool focused on providing an individual with the tools and equipment to Survive a shorter trip to a safe location in case of a sudden threat or disaster. The BOB can also be referred to as a Get Out Of Dodge (GOOD) bag, 72 Hour Kit, Grab Bag or I’m Never Coming Home (INCH) bag. In my view it’s far more likely that an individual would evacuate, or be bugging out together with family members and friends than doing so alone. This is the subject that this post will address: Tactics for bugging out as a larger or smaller group.
The size of groups can vary but ideally groups should have four to six members. The reason why this is an ideal number is that such a group can share the basic equipment needed: Shelter in form of for example a tent and stove for preparing food just name a few items. If a party consists of more than 6 people I would suggest that the group is split into smaller sub-groups that share tent and stoves. Carrying a fully equipped BOB is hard for a single individual; a single individual can’t carry all forms of specialized equipment. A larger group allows for more specialized tools and equipment too be brought than what a single individual can carry.
Individual Kits and the Group Kit
If an individual has to carry all the equipment need on he’s or her own the weight of the pack will be heavier compared to if a person could share the weight of items among a Group. The suggested step of individuals can also be reduced: It’s not necessary that every member carry multiple tools for starting a fire and several knives if every member has one. If an alone individual would carry a single knife or fire starter the consequences would be worse if this equipment would be lost compared to if this happened to a single individual. Multi functions shelters like the Fjellduk and Bivanorak functions both as a poncho and bivi-bag and can provide shelter for an individual if they would get separated from a Group.
During a real life emergency there is no telling what might happen, group members could be separated or unable to meet up so it is still important the individual packs can sustain the individuals. One of the most common forms of Groups is Families. If you are packing for a Family make sure that every member can carry their own bag. For children and young people how can walk by themselves prioritize that they carry their own clothing, water, sleeping bag and sleeping pads.
Individual Bug Out BagClothing
[ ] Long sleeve base layer shirt (I recommend Merino Wool)
[ ] Short sleeve base layer shirt
[ ] Change of underwear
[ ] Hat or Watch cap
[ ] Gloves
[ ] Buff or Shemag
[ ] Shell Jacket (Waterproof and wind proof)
[ ] Warm Long Sleeve Shirt
[ ] Heavy Duty Pants
[ ] Poncho, Rain Clothing, Fjellduk or Bivanorak
[ ] Hiking Boots
[ ] 2 pair of Extra socks
[ ] Watch
Backpack
Choose a backpack with a steel or aluminum frame. If you’re going to carry a heavy load over some distance you’re going to need a good backpack. If the frame is internal or external is a question of what you prefer, both have advantages and disadvantages. Backpacks with external frames are generally stronger and can be used to carry other things than your bag like a wounded person or a heavy tank of water. Pack your items in waterproof bags; use different colors so that you know what’s inside the different bags.
I also recommend that you get a waterproof bag or container for your cell phone. I suggest that you put certain equipment like your first aid kit in locations that are easily accessible if you would need them. Always put the same items in the same location in your bag so you don’t have to spend much time looking for your items, this also makes easier to see if something would be missing from your pack. Always carry at least one knife and your Pocket Survival Kit on your person in case you would lose your backpack.
Shelter
[ ] Sleeping Bag (Sleeping bag liners helps to extend the lifetime of your sleeping bag)
[ ] Sleeping Pad, Hammock or Hennessy Hammock.
Light
[ ] Flashlight or/and Headlamp (LED)
[ ] Extra Batteries (Lithium)
Fire
[ ] Matches in waterproof container
[ ] Lighter
[ ] Fire Steel
[ ] Tinder
Survival Knives
[ ] Fixed Blade Knife
[ ] Back Up Knife: Folding Knife, Multi Tool or Swiss Army Knife for example
[ ] Sharpener
Pocket Survival Kit
[ ] Matches
[ ] Fire Steel
[ ] Snare Wire
[ ] Wire Saw
[ ] Sewing Kit
[ ] Button Compass
[ ] Safety Pins
[ ] Whistle
[ ] Candle
[ ] Small LED lamp
[ ] Small Knife or Razor blade
[ ] Fishing kit
[ ] Pencil
[ ] Water Purification Tablets
[ ] Painkillers
[ ] Anti Diarrhea Tablets
[ ] Antihistamines
[ ] Antibiotics
[ ] Condom or Alok Sak
Water
[ ] One or Two Water bottles (Nalgene, Klean Kanteen, Camelback or SIGG)
[ ] Water Bladder for your backpack; Camelback, Nalgene or similar system.
[ ] Water Purification Tablets
Food
[ ] Freeze Dried Rations or Meals Ready to Eat (MRE:s). Pack minimum 6 meals for 72 hours
[ ] Powerbars, Flapjack, Beef jerkey, Trailmix or other snacks
[ ] Tea, Coffee, Sugar and Powdered milk
[ ] Salt and Pepper
[ ] Spork (Or Knife, Fork and Spoon)
[ ] Plate and Cup
[ ] Compass
[ ] Cash or Gold/Silver
[ ] Notebook
[ ] Pen
Hygiene
[ ] Roll of toilet paper (in waterproof bag)
[ ] Soap
[ ] Toothbrush, Toothpaste and Dental Floss
[ ] Razor
[ ] Hand Disinfection
[ ] Insect Repellant
[ ] Sun Block or Skin Care Lotion
[ ] 550 Paracord
[ ] Small First Aid Kit and Blister Kit
[ ] Sunglasses
[ ] Special personal needs (extra prescription glasses, medication etc)
Equipment shared by the Group
Every individual should have a personal Bug Out Bag but some of the equipment should be divided among the members most importantly:
[ ] Tent
[ ] Tent Repair Kit and Multi Tool
[ ] Stove and spare parts. Example of Stove could be a Trangia Stove, Kelly Kettle, Esbit, Multi Fuel Stoves or Jetboil.
[ ] Cooking Vessels
[ ] P-38 Can Opener
[ ] Steel wool, Mop and Washing Up Liquid
[ ] Fuel for the stove
[ ] Water Purification Filter
[ ] Map, Waterproof container for map, GPS, Extra Batteries, Compass
[ ] Large First Aid Kit with basic medication.
Examples of other items that can be divided among members of the group are:
[ ] Compact Radio with spare batteries
[ ] Axe, Machete, Parang or Folding Saw
[ ] Binoculars
[ ] Signal Flares, Emergency Strobe, Signal Mirror, Chemical Lightsticks or Spot (Satellite GPS Messenger)
At what point should one Bug Out?
The hardest questions for a Bug Out scenario is when one should be bugging out. What kind of circumstances should trigger such a response? Here Risk Assessments can help to identify potential threats but in a real crisis situation one will always have to make decisions based upon incomplete and often contradicting information. This will also have to be done under time pressure. It’s hard to manage and understand a crisis even for government agencies with enormous resources and a large staff. Knowledge and research about potential threats can help one understand how previous events have unfolded and what consequences they have had. Researching different risks in form of Man-Made and Natural Disasters that is likely to manifest in your local area can help you make better decisions based on limited information.
It’s also important that groups create routines for establishing contact if electronic communications goes down or are interrupted. Meeting points and alternative meeting points and possible routes should also be addressed. If one group decides to evacuate, where does this group leave messages to other concerning the route taken and the people how have evacuated.
The March
A briefing before the March is important so that all members know what intended route that the party intends to travel. Where should the members rally if the group members get separated? If the group is large walkie-talkies can be a useful tool for communicating between the different members of a large group especially if it’s stretched out during a March or travelling in different vehicles.
If the party travels by foot the party should stop after 15-30 min and regulate clothing so that people don’t sweat or are getting cold. If the members sweat too much dehydration may soon become a serious problem. When the group stops take time to adjust the packs so that they are comfortable to carry. Make a habit of often checking that your vital equipment like your knife rests in its sheath. When a group makes a stop also make sure that all the members are present. Never let any individual stray away alone without the group stopping, if something must be done members should always try to stay together with another individual. The pace of the party must be governed by the weakest members in the party, if members get to tired the risk of accidents and injury increases so make sure to make a short stop once per hour or after passing through rough terrain.
Checking up on the members and taking care of each other is also critical.
Everything from blisters, back problems, dehydration and other problems are much easier to deal with in an early stage. It’s also important for how the social dimension of the group is working.
The party members should regularly be checking the terrain behind them; especially those how walk in the rear of the party. This is very important because it can be very hard to find the way back since the terrain looks very different going back the other way. In high risk areas it can also important to see if anyone is following the party.
The rest of the members should also keep an eye open and be aware of the surrounding environment; it can be a good idea that different members keep attention to designated directions. By being alert the party can spot dangers, find water, shelter, eatable plants and sometimes other equipment that can be useful.
Setting Up and Breaking Camp
When a Group makes camp for the night it’s important that every member of the party helps out with the different tasks that must be done. Some of the tasks that should be done are
• Raising the tent or arranging shelter.
• Collecting fire wood and get a fire going in a secure location. Whenever there is fire wood available this should be used to save fuel for the stoves.
• Prepare an evening meal.
• Collecting and purifying water.
From the time that a party wakes up in the morning until the party has eaten breakfast, cleaned up and attended hygiene, packed tents and are ready to leave normally takes 1-2 hours.
Advantages
• A Group are likely to have more areas of expertise than a single individual.
• In case that an individual get injured the others can give care or in a worst case scenario carry this individual on a stretcher.
• More specialized equipment can be brought helping the group to cope with more situations.
• The carrying load for each individual will be lower if a Group shares tents and stoves.
Disadvantages
• Moving with a large group often takes longer time.
• The Group can have members with a poor physical fitness, children and elderly or even injured people that slow the phase of the Group.
• Some members are likely to have low quality equipment/clothing or be lacking some equipment.
Another important aspect is getting to know the other members of your group. Engaging in activities like hiking is an excellent way both to test equipment, routes, clothing, increase fitness, getting experience and getting to know the other members of a possible group. What are the strength and weaknesses of the members? What skills do they possess and what skills do they lack? What skills can the different members help each other obtain?
Working out differences within the group before a real crisis is also important; a real crisis will be extremely hard both physically and emotionally for a group evacuating an area. Latent conflict within the group may then become a big problem. Learning how to deal with conflict within a group is something that should be dealt with before an emergency. It’s hard to know how people will react under extreme pressure, but hiking, camping and hunting trips before a real emergency will provide some opportunities to deal with these issues before.
Bug Out Vehicles (BOV)
Vehicles can make it possible to travel over distances that would take weeks to travel in a matter of hours if the conditions are excellent. A vehicle intended to be used when bugging out is often referred to as a Bug Out Vehicle or BOV. Vehicles also allow heavier equipment to be brought along.
However, during an large scale evacuation from a city or urban area roads can turn into to traffic jams that can stretch for miles where the traffic bacilli comes to stand still. This problem may be reduced in some cases by taking roads that normally aren’t trafficked but is still not a guarantee. In addition to cars and trucks other alternatives can be used depending on terrain like boats, mountain bikes, snowmobiles, all-terrain vehicles or even air planes depending on your situation and budget.
Stashing
One tactic that is often discusses is the option to stash heavy equipment along possible Bug Out routes or at alternative locations like the homes of family members or friends. Some equipment can be outstanding for wilderness life and survival, however these items are often too heavy or bulky too be carried over long distances witch make caching them a possible alternative solution. There are of course risks involved in stashing equipment, it can be stolen or destroyed by weather just to name a few. If you have to evacuate by another route than the intended one you will be unable to take advantage of the equipment. If you are planning on using this tactic you must consider the pros and cons of different locations and methods.
Example of items that can be considered
[ ] Dutch Ovens
[ ] Murrikka
[ ] Larger Tents with Woodstoves
[ ] Large Tarps
[ ] Heavy Duty Wool Blankets
[ ] Large Water Containers
[ ] Tools like Axes, Shovels, Hammers, Rope, Pick axe etc
[ ] Fire wood and fuel for vehicles and stoves
Equipment vs Skill and Experience
Equipment can help individuals cope with different kinds of crisis and survival situations by providing tools that makes it easier to find solutions for different kinds of problems. Clothing and shelter provides protection from the elements; compass, map and GPS can makes navigation in un-known territories much easier; a headlamp, chemical lightstick or flashlight can provide light during nights, knives and tools like axes makes it possible to handle a number of different tasks that almost impossible to do my hand; fire steel, matches and lighter makes it much easier to start a fire and so on. However, no matter how much gear you carry your physical and mental endurance, skills, knowing your local area, the will to survive, knowledge and most of all the persons next you will most likely be the crucial factors that determine if you survive or not.
So is this the Ultimate Guide?
In this post you have gotten some suggestions for you can put together a setup for a Group during an evacuation or for a regular hike or camping trip. This Guide is intended to provide some basic ideas and Suggestion for possible setups. However – This is not a Guide that is perfect for every climate and setting.
Every situation, climate and setting is unique and requires specific skills and equipment to be dealt with. There is no One Size fits all when it comes to Bug Out Bags. There is a huge difference if you are putting together a kit for a desert climate, jungle, winter, arctic, wilderness or urban setting. In most regions there are people how spend time outside as wilderness guides, military, hunter, hikers and many more. Find a local expert and take advice from the people how know your local situation best – the people how live and spend time there.
Also see
Bug Out Bag and Checklist
Bug Out Bag - Example of Setups
Light Weight Bug Out Bag
Get Home Bag (GHB)
This article is a part of The Free Online Survival Guide that can be found on the site Sibi Totique.
http://www.canadianpreppersnetwork.c...-as-group.htmlLast edited by AirborneSapper7; 01-30-2012 at 12:31 AM.
Join our efforts to Secure America's Borders and End Illegal Immigration by Joining ALIPAC's E-Mail Alerts network (CLICK HERE)
-
04-24-2011, 08:42 PM #710Senior Member
- Join Date
- May 2007
- Location
- South West Florida (Behind friendly lines but still in Occupied Territory)
- Posts
- 117,087
Sibi Totique blogspot
For Himself and Everyone" The Free Online Survival Guide and Blog
http://sibitotique.blogspot.com/Last edited by AirborneSapper7; 01-30-2012 at 12:33 AM.
Join our efforts to Secure America's Borders and End Illegal Immigration by Joining ALIPAC's E-Mail Alerts network (CLICK HERE)


 Reply With Quote


Two Stabbings by Muslim Migrant in Barcelona Leave a Young Woman...
05-04-2026, 07:11 AM in illegal immigration News Stories & Reports