

Results 2,491 to 2,500 of 8443
 210Likes
Thread Information
Users Browsing this Thread
There are currently 11 users browsing this thread. (0 members and 11 guests)
 LinkBack URL
 About LinkBacks
-
10-13-2012, 02:42 PM #2491Senior Member


- Join Date
- May 2007
- Location
- South West Florida (Behind friendly lines but still in Occupied Territory)
- Posts
- 117,696
Last edited by AirborneSapper7; 10-19-2012 at 05:55 PM.
Join our efforts to Secure America's Borders and End Illegal Immigration by Joining ALIPAC's E-Mail Alerts network (CLICK HERE)
-
10-13-2012, 02:46 PM #2492Senior Member
- Join Date
- May 2007
- Location
- South West Florida (Behind friendly lines but still in Occupied Territory)
- Posts
- 117,696
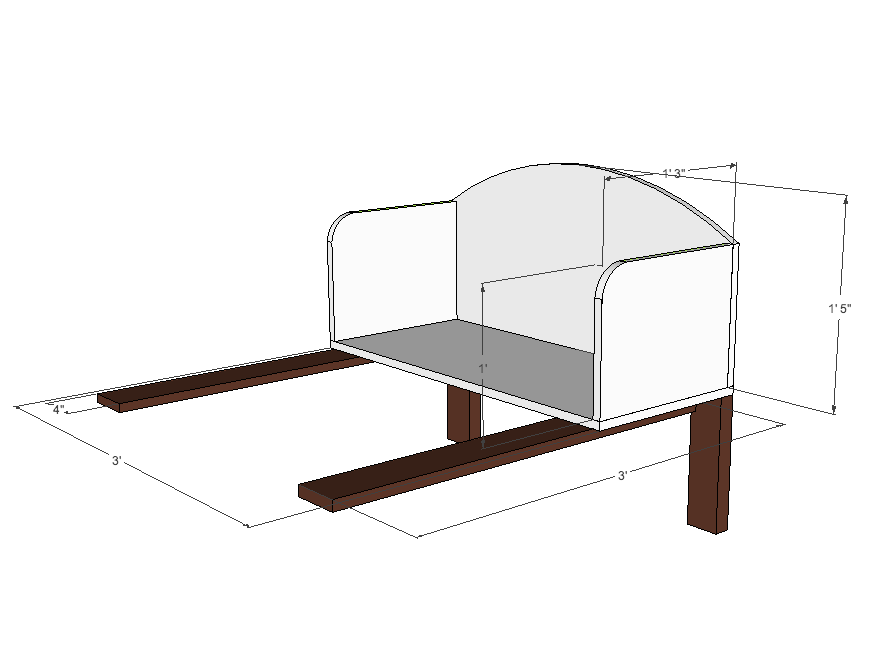
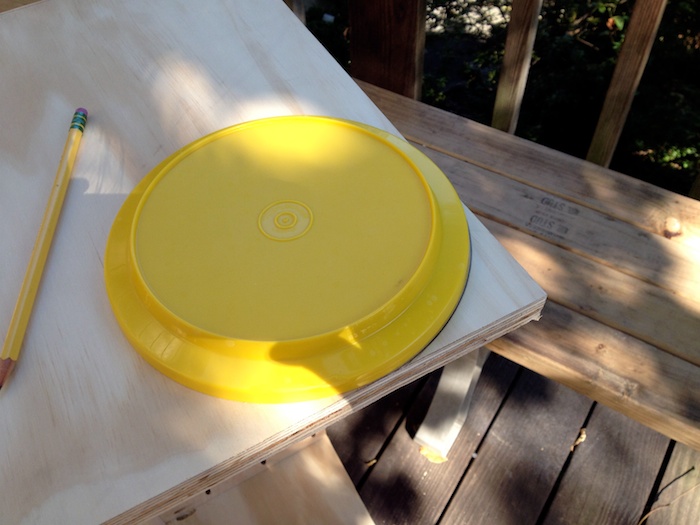
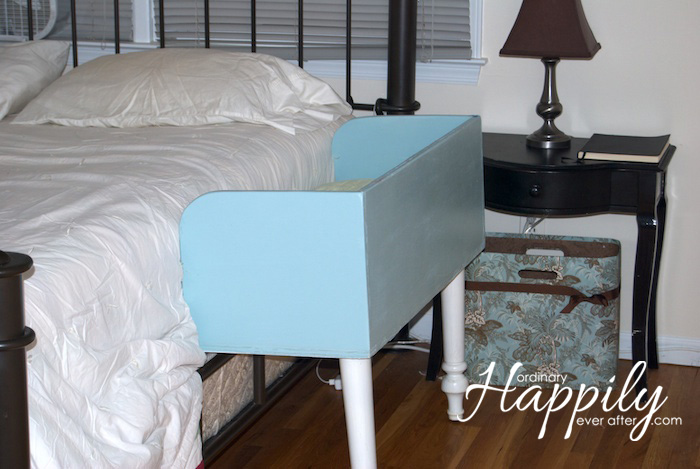
Baby boys new bed! DIY Co-Sleeper
October 8, 2012 posted by Courtney
Baby number five is getting evicted in just over five weeks. Weve always kept our babies close at night during the first six months or so. I cant decide if the reason is because Im paranoid about SIDS and babies stopping breathing in the middle of the night (I read that moms heart beat etc. can jumpstart a baby who is having a hard time breathing or if his heart starts to act up) or just maybe Im too lazy to get up every couple hours for six months.
Either reason is valid as far as Im concerned. During the first six months or so babys crib gets shoved up against our bed so that when I hear him start to fuss in the middle of the night, I reach over and pluck him out of his crib (or plastic box in Emmas case) and plug him in to eat. If Im awake when he is done I just reach over and put him back.
Hell get kicked out of our room about the time he starts to keep me up for reasons other than to eat (like kicking me or wanting to play). That usually happens around six months. Perfect time for sleep training.
This is the first time I dont have an extra crib lying around for the new baby to use. So I decided to build a co-sleeper!
I saw one floating around somewhere on the internets and thought it was brilliant. The price tag of $300 made me rethink its brilliance; but having just finished my table, I wasnt about to let that stop me.
I fired up google sketch-up (something Matt and I liked to use to dream up ridiculous house plans) and got to work.
The next day I went into the garage scrounging for scraps of wood.
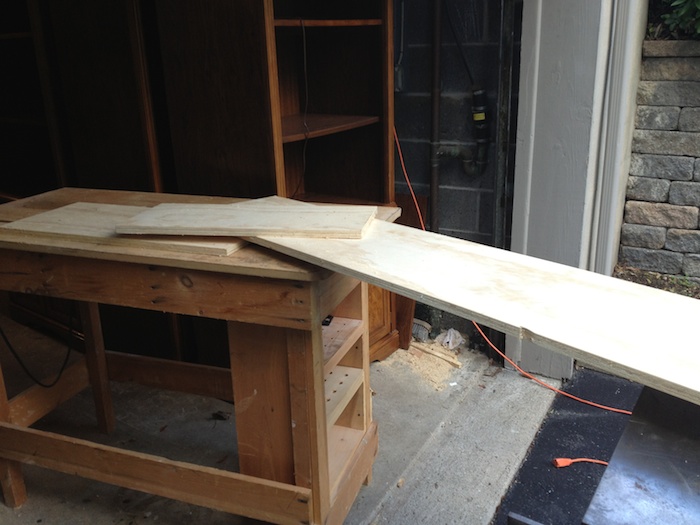
I found just what I needed!
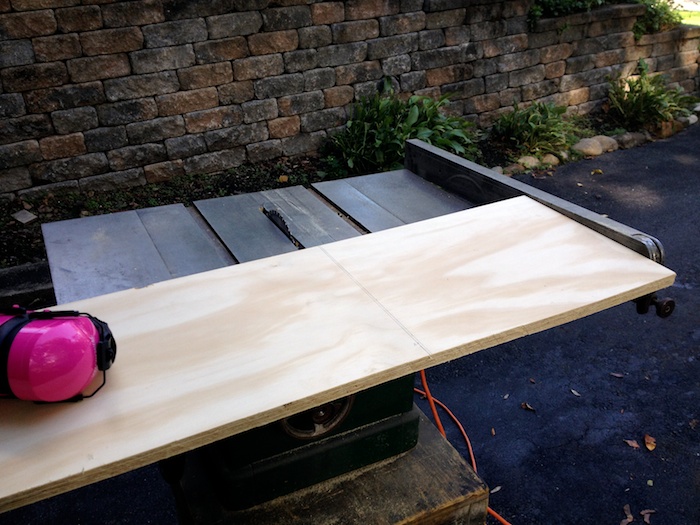
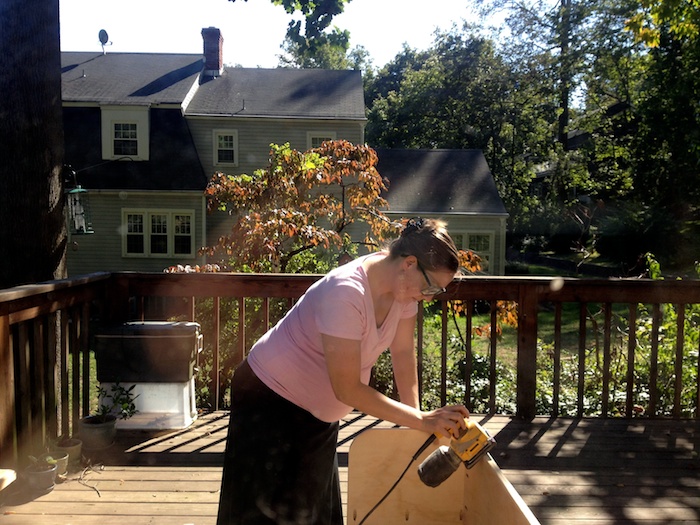
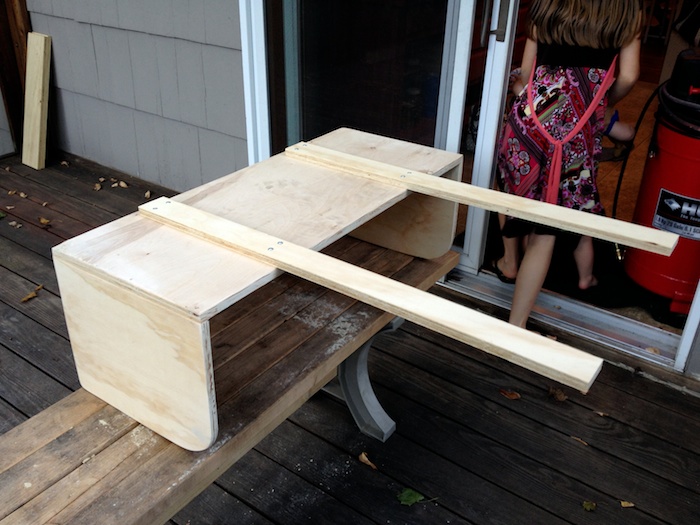
Once I had my boards cut I took them upstairs (where my drill was) to the deck to assemble them.
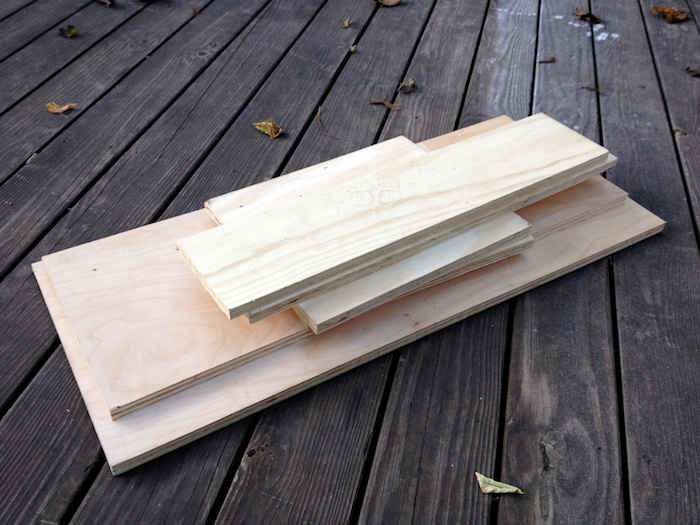
I drilled my pocket holes and put the sides on first (by the way, please read the directions for your Kreg Jig for adjusting to your wood and screw length and remember them so that you dont accidentally drill a hole into your jig not that I did that or um anyway )
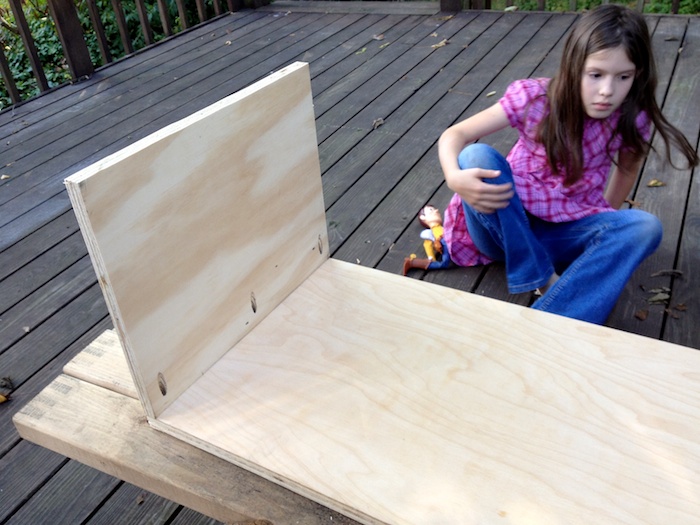
Then Jack discovered what I was doing. This boy loves his toys and flat surfaces to play with them on. He was delighted when he discovered this newly constructed flat surface.
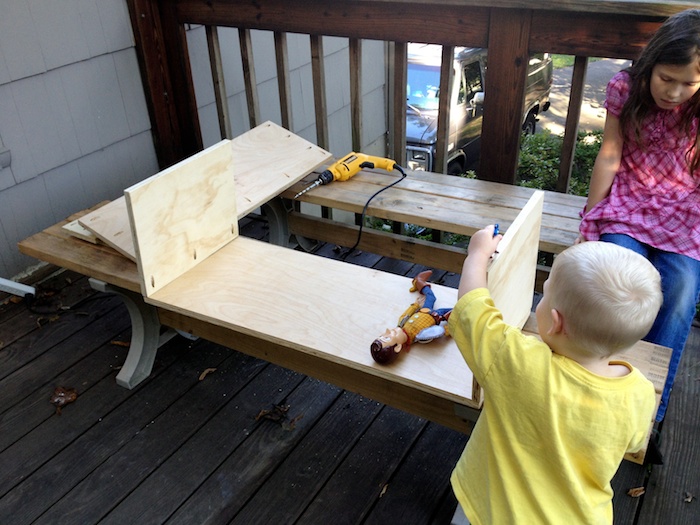
Once I pried Jack away (aka turned on Phineus and Ferb) I was able to put the back on.
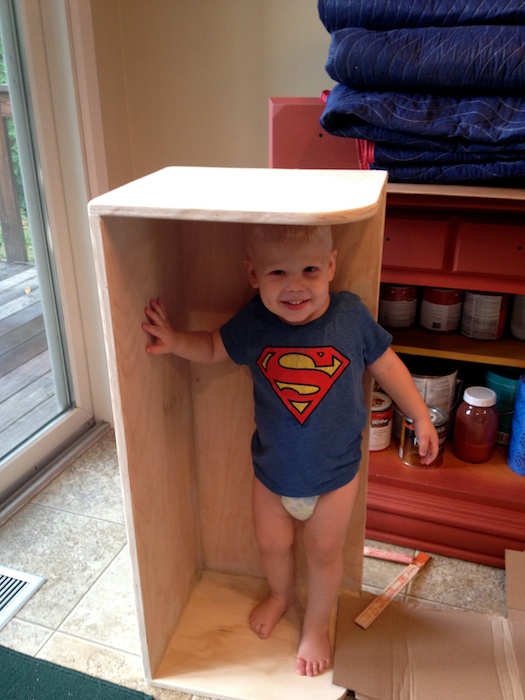
This is about when Matt suggested that I round off the corners. I used my new fancy shmancy jig saw to start it. As you can see, I was very technical and precise while tracing where to cut.
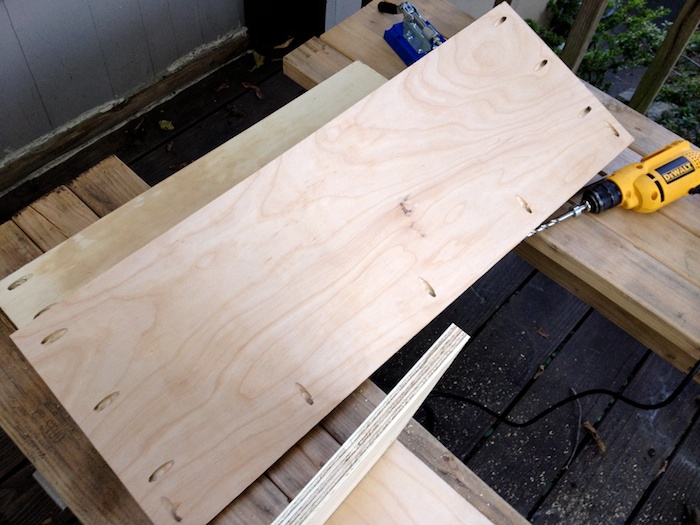
I filled all of the holes, sanded all of the edges and rounded everything off.
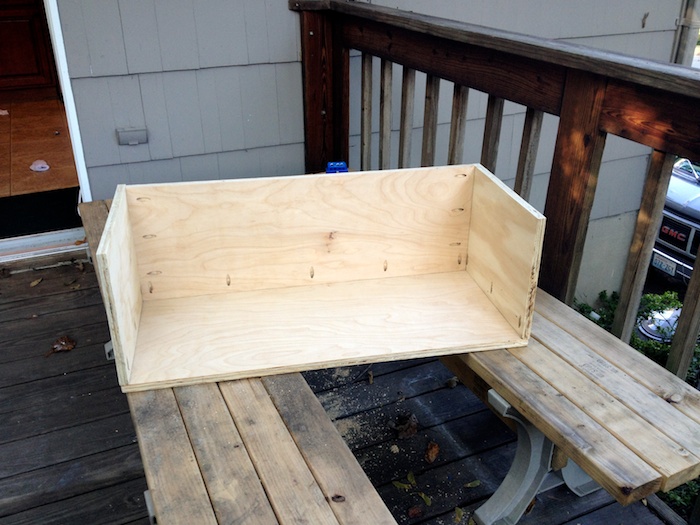
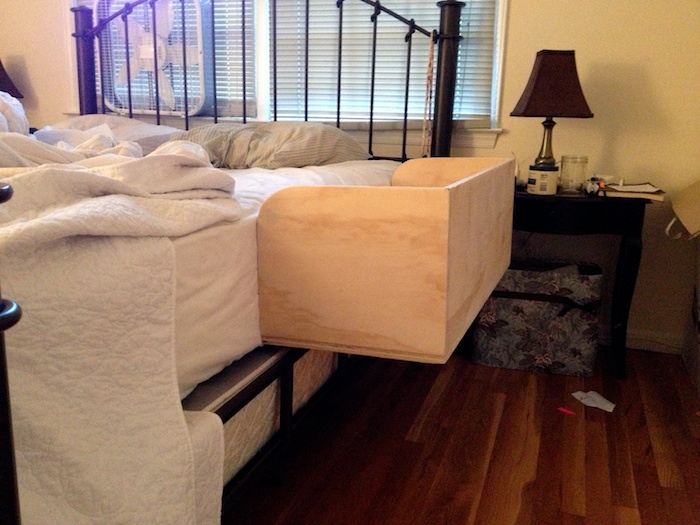
Look, Mom! Perfect fit!
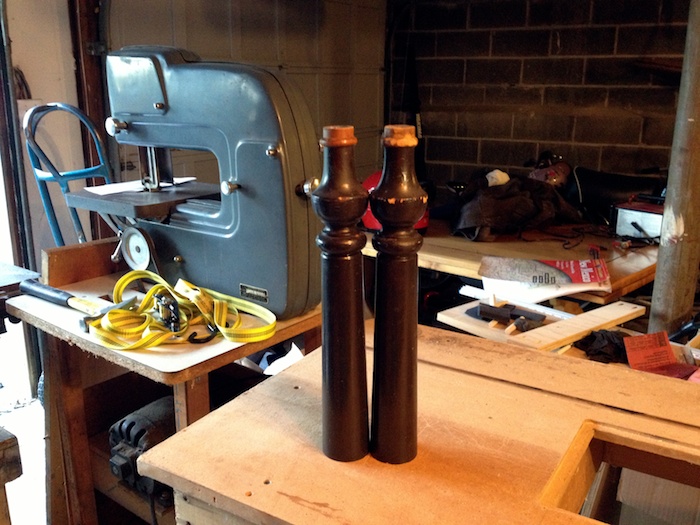
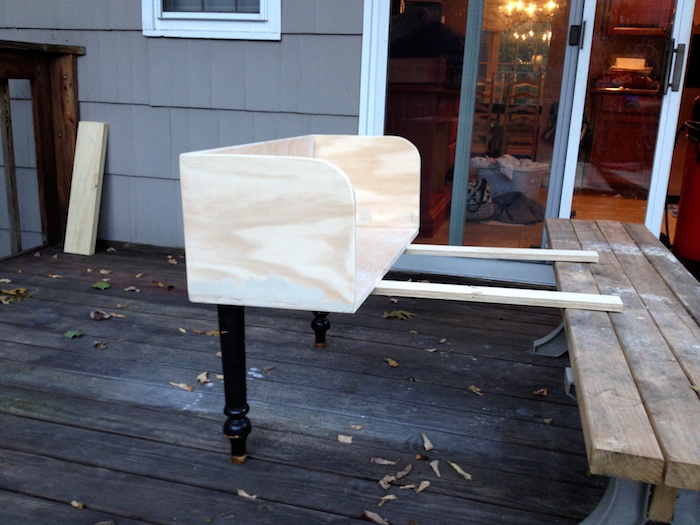
I already had some table legs hanging out just waiting to be put to good use. I also found a six foot piece of scrap plywood that I was able to cut in half for the slides that would go under the mattress (which was great because I didnt want to use my pretty wood for that).
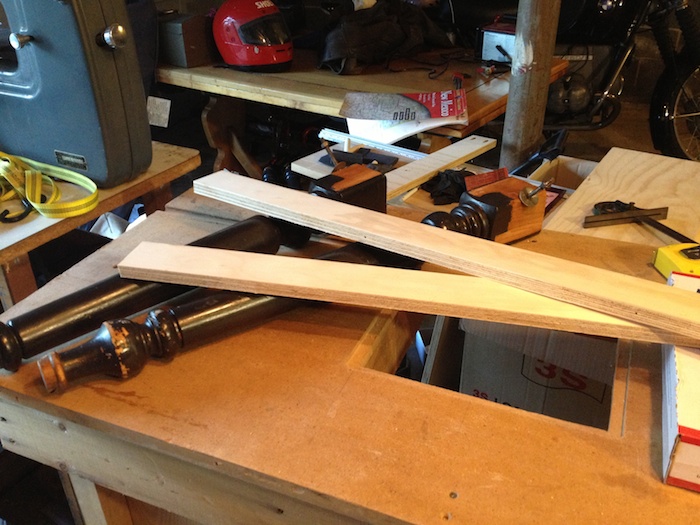
I put the slides on
Then I had Lucy help me take it up to my bedroom to fit on my bed to measure how long the legs would have to be (pay no attention to the mess on the nightstand or the unmade bed or the trash on the floor).
Then I cut the legs down to size.
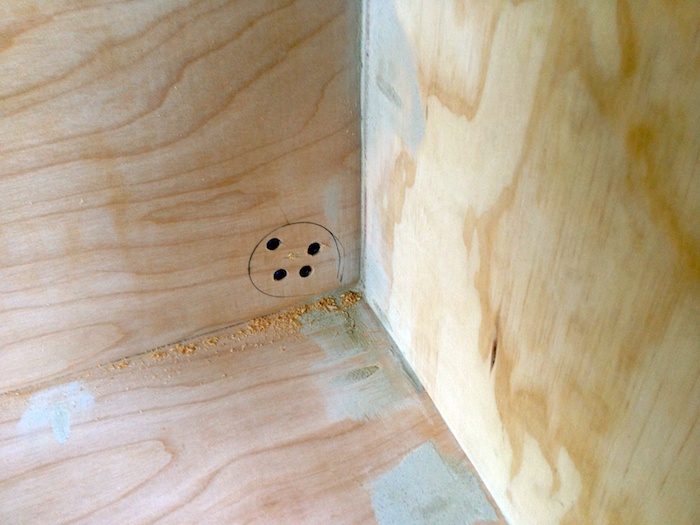
I drew circles (ish) around where I wanted the legs to be and used my countersink bit to drill some holes for the screws to go.
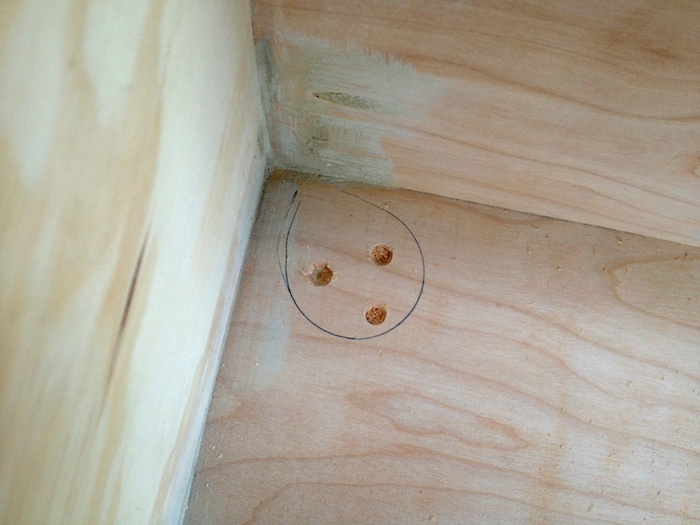
Instead of measuring everything really precisely only to have it turn out wrong, I drilled a hole in the center where I drew my circle (ish) thing.
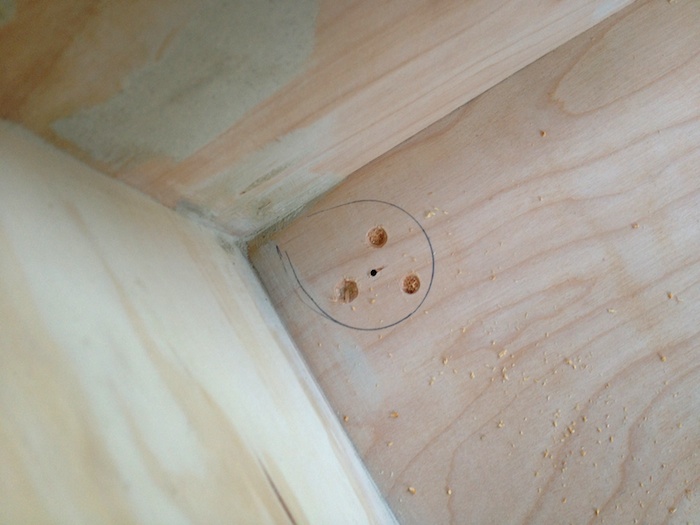
And in the center (ish) of the leg.
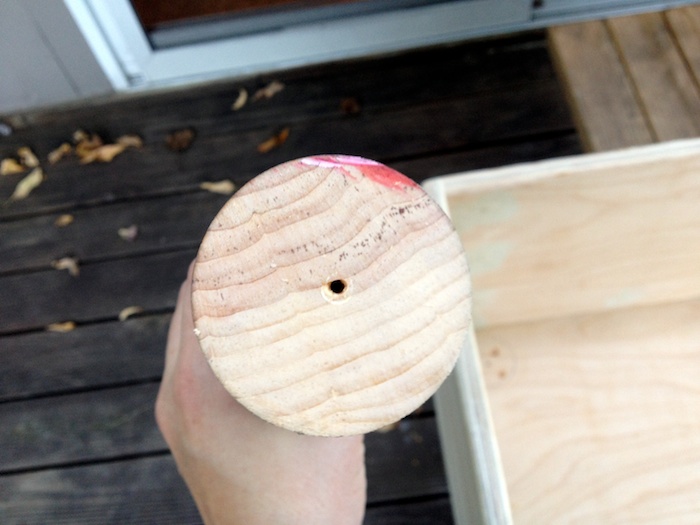
I stuck a wooden skewer that I fished out of my kitchen drawer into the leg hole then stuck it through the hole in the center of my circle (ish) drawing.
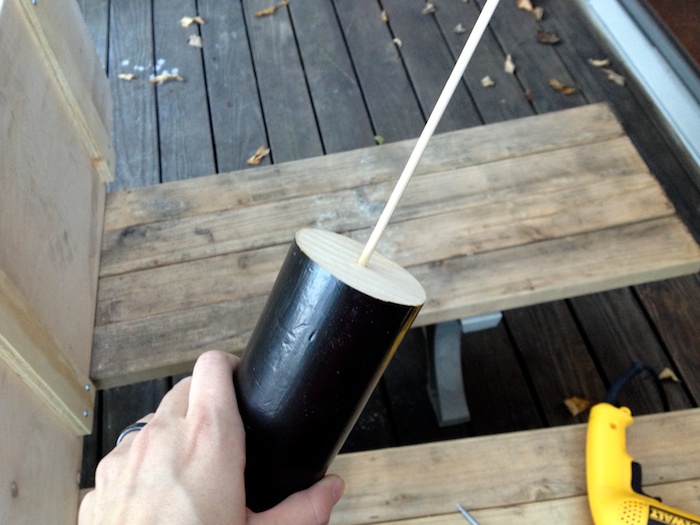
I was able to drive the screws in without fear that I would miss the leg. I broke off the wooden skewer and then did the other one with the same skewer.
Here she is! Ready for a couple coats of paint and a foam mattress!
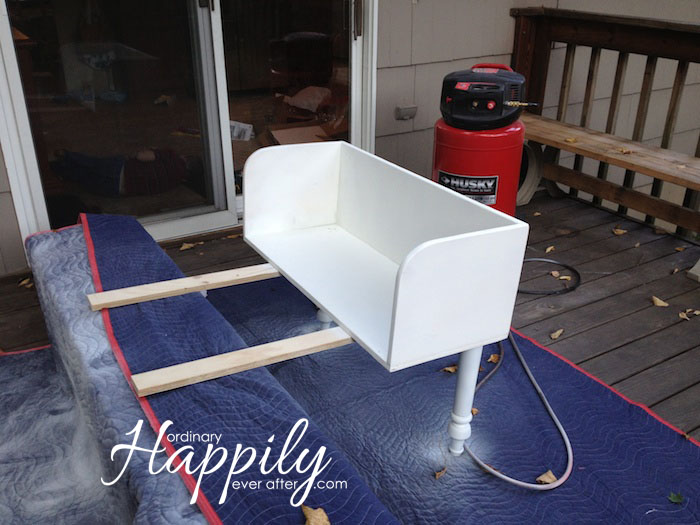
Painted
Changed my mind on the color and painted again
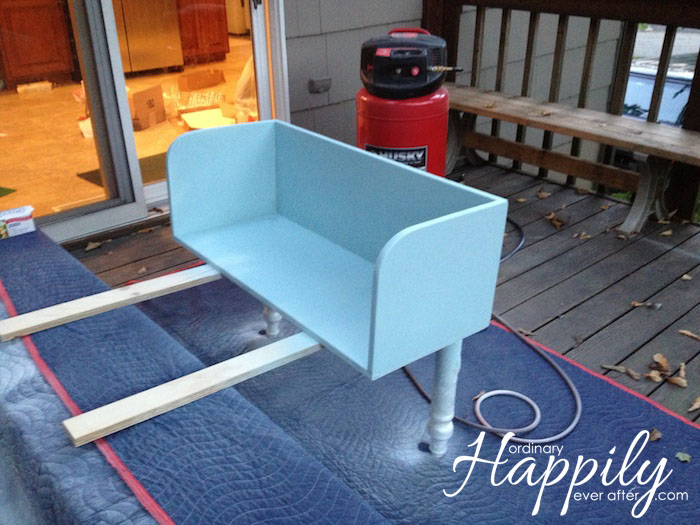
And ready to go!
Join our efforts to Secure America's Borders and End Illegal Immigration by Joining ALIPAC's E-Mail Alerts network (CLICK HERE)
-
10-13-2012, 02:49 PM #2493Senior Member
- Join Date
- May 2007
- Location
- South West Florida (Behind friendly lines but still in Occupied Territory)
- Posts
- 117,696

 The Homestead Survival
Pavatel – Puckery Plum Preserves
http://homesteadsurvival.blogspot.com/2012/10/pavatel-puckery-plum-preserves.htmlJoin our efforts to Secure America's Borders and End Illegal Immigration by Joining ALIPAC's E-Mail Alerts network (CLICK HERE)
-
10-13-2012, 02:51 PM #2494Senior Member
- Join Date
- May 2007
- Location
- South West Florida (Behind friendly lines but still in Occupied Territory)
- Posts
- 117,696
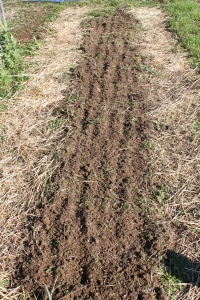
Planting Cover Crops

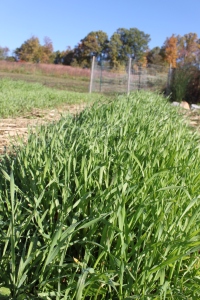
Our Raised Row Beds With The Annual Rye Cover Crop Coming Up Strong
What is the one single thing you can do right now to help you have a great garden next year? Plant a cover crop! Whether you have raised beds, a full size garden or a few rows here and there trust me when I say this can make all the difference in next years garden. Here are 5 reasons why you should followed by a quick tutorial on how to!
Just like those big time farmers on big time farms our gardens and raised beds get all the same benefits of a well grown cover crop.
The Benefits:
 Barren Soil makes it easy to lose top soil from wind and rain erosion
1. Helps Stop From Your Garden Losing Valuable Top Soil
A cover crop keeps your soil from being barren through the winter months. Barren soil is pelted by rains and winds and can whip away the top layer of your soil (usually the best in the garden), and leave you with less good stuff to grow your plants next year.
2. Loosens Your Soil For Next Years Crop
A cover crops roots can go deep down into the soil and help to break up heavy soils, making it easier for next years crop to put down deep roots which means less watering better protection against drought, and healthier plants. Annual Rye grows to depths of 18 or more to loosen up that soil.
 A thick stand of a cover crop hold the soil together and adds valuable nutrients to the soil
3. Adds Valuable Nitrogen To Your Soil
Cover crops, when dug into the soil in the spring add nitrogen and other valuable nutrients to your vegetable and garden plants. It is an easy way to replenish your soil from what this years garden plants took out.
4. Adds Valuable Organic Material To Your Soil
Digging in all of that green manure into your soil really helps to loosen your soil. As the cover crop breaks down underneath the soil it gives your garden and the plants a loose friable soil to grow freely in.
5. Cuts down on next years weeds!
Cover cropping now does cut down on next years weeds. By growing a nice stock of an annual cover crop it crowds out the soil and lessens the chance of runaway weeds seeds blowing in and finding a home in your garden.
 Rake the soil and the just sow like you would grass seed rake back over gently and thats it!
How To Put In Cover Crops
Here in Ohio cover crops can be planted anytime from late September to the ends of October the seed just needs enough time to come up and create a good growth before winter sets in.
What is best to plant?
We prefer annual rye it sprouts fast, grows fast and thick and has deep roots that loosen the soil. Other good crops to choose from are buckwheat, clover, and hairy vetch.
How Do I Do It?
Its easy! No need to till your soil just rake out your rows, existing garden, or your raised beds and scatter the seeds as if you were throwing grass seed on your lawn. Next, just gently rake it over and youre done! No matter if you still see seeds on top they will sprout soon enough and you will have a great cover crop growing!
 Annual Rye just poking through the surface after being planted just 6 days before.
What Do I Do Next Spring?
Just simply dig it under and plant your garden. We dont use a tiller at all in our raised row beds just a pitchfork and turn it over. Thats it and we are ready to go.
Wont I get grass growing in my bed from the cover crop seed?
No. First make sure you use a good annual cover crop seed like annual rye or buckwheat. Your local farm and feed store should be more than able to help you get the right one. The only precaution is if you do get a long stretch of warm weather in the fall or early spring before you till under; and the cover crops start to get high; just make sure you run your mower or weed eater over them to prevent them from going to seed. But trust me they have to get pretty big and high before they do that!
- Jim and Mary
Make sure to hit the like button on our Facebook sidebar icon to receive our weekly DIY tips and projects posts
Shared On Little House In The Suburbs
Planting Cover Crops « "The Farm" Old World Garden Farms
Join our efforts to Secure America's Borders and End Illegal Immigration by Joining ALIPAC's E-Mail Alerts network (CLICK HERE)
-
10-13-2012, 02:59 PM #2495Senior Member
- Join Date
- May 2007
- Location
- South West Florida (Behind friendly lines but still in Occupied Territory)
- Posts
- 117,696

The Homestead Survival
Granola in your Slow Cooker
http://homesteadsurvival.blogspot.com/2012/10/granola-in-your-slow-cooker-recipe.htmlJoin our efforts to Secure America's Borders and End Illegal Immigration by Joining ALIPAC's E-Mail Alerts network (CLICK HERE)
-
10-13-2012, 03:03 PM #2496Senior Member
- Join Date
- May 2007
- Location
- South West Florida (Behind friendly lines but still in Occupied Territory)
- Posts
- 117,696
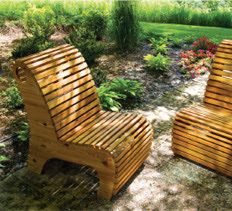
Outdoor Slat Chair Project Plan
Plans to build this cross between a park bench, an Adirondack chair and a modern lounge chair.
POSTED BY: Bruce Kieffer
September 12, 2012
The design for this patio chair has been coming together in my head for a long time. I think of it as a cross between a park bench and an Adirondack chair. I’m not fond of Adirondacks; I find them too hard to get in and out of. My adaptation feels more like a regular chair. It’s rock-solid, easy to build and unusual looking enough to be a conversation starter.
I spent a lot of time adjusting the prototype to make it comfortable and to achieve the look I wanted. (I considered adding arms but decided they would detract from the unique all-slat design.) The holes in the tops of the sides are handholds so the chair can be easily grabbed and moved. The chair is made from cedar, which is rot-resistant; I left mine unfinished so it would weather to a natural gray color. You could apply exterior-rated stain or finish, but keep in mind that there are a lot of hard-to-reach surfaces that will be difficult to finish.
Click here to download this complete article with construction drawings and photos as a pdf.

Construction notes
You can expect to spend about $100 for materials and eight hours on construction. You’ll need a table saw, a jigsaw, five 18-in. bar clamps, three 36-in.-opening pipe clamps, one 24-in. bar clamp and another 24-in. clamp that can be converted to a spreader, a pneumatic brad-nail gun, a router, a top-bearing pattern bit and a 1/8-in.-radius roundover bit (see SOURCES ONLINE, below). I also employed a surface planer because the cedar that I bought at my local home center was 7/8 in. thick and one face was rough sawn. I used the planer to remove the rough face and make the wood 3/4 in. thick. It is possible to build the chair without planing the wood — just orient the rough faces to the back, bottom. etc.
The sides of the chair are cut from large blanks of edge-glued cedar boards. You must use waterproof glue to create the blanks; otherwise the chair will fall apart when exposed to the elements. The slats are fastened with waterproof glue and galvanized brads set with a pneumatic nail gun. Don’t be tempted to forgo gluing the slats to the sides — gluing is essential to the strength of the chair. When you’re gluing the parts together, use a damp (not wet) rag to remove excess glue. (Dried glue is hard to sand off.)
Working with cedar can be frustrating. I bought construction-grade lumber to save money. It had a lot of knots, some sapwood (very light color) and some separations along the growth rings. Working around these defects takes time and planning. Carefully decide which board to use for each part. Any included knots must be tight and small. Don’t use boards with knots or defects for the 3/4-in.-wide slats, and make sure that all of the wood you use is structurally sound. I wound up with about 25 percent waste, which is not unusual with low-grade cedar.
Creating the chair side template
The shapes of the sides are routed using a pattern bit guided against a 1/4-in.-thick plywood template. You have two options for making the template. If you have access to the Internet and a copy center with a large-format printer, you can download the full-size PDF (Click here to download the full-size PDF template), send or take it to the copy center and have it printed. The printing instructions appear on the PDF file. It cost me $7 to print the pattern full-size — well worth the minor expense. To mount the printout on a 1/4-in.-thick x 36-in.-square piece of hardwood plywood, first apply a light coat of spray adhesive to the paper pattern and to the face of the plywood. Let both pieces dry. Cut a 36-in.-square piece of cardboard or poster board. Lay the cardboard on the plywood and the printout on the cardboard. (The dried adhesive won’t stick to the cardboard.) Slowly pull the cardboard out and press the pattern onto the plywood. The two surfaces with the dried adhesive will stick to each other.
Once you’ve transferred the pattern to the plywood, drill a starter hole for the handhold. Using a jigsaw, carefully cut out that opening and the shape of the sides; then sand the sawn edges smooth. Take your time — your chair sides will only be as good as your template.
The other option is the low-tech, old-fashioned method of transferring the small grid pattern to a larger grid by hand. Draw a 2-in. grid on a 36-in.-square x 1/4-in.-thick piece of plywood. Mark the points where the shape intersects with the grid; then connect the dots to create the shape.
Once you’ve transferred the pattern to the plywood, drill a starter hole for the handhold. Using a jigsaw, carefully cut out that opening and the shape of the sides; then sand the sawn edges smooth. Take your time — your chair sides will only be as good as your template.
Making the sides
Once you’ve completed the template, cut pieces A1 and A2 to size. You’ll need to glue together three A1 pieces for each side: First glue two pieces and let that joint dry; then add the third piece. Next, working with the faces up and using pipe clamps, add the A2 pieces one at a time to the side panels. (Cedar is too soft and pliable to use bar clamps for this step — I tried, and the assemblies just kept popping apart under pressure.) Keep in mind that as you work with the faces up, you need to add the short pieces to opposite ends of the blanks so that you create both a right and a left side blank.
Align the template leg bottoms with the bottom edges of the side blanks and trace the shapes onto each blank. Use a jigsaw to cut out the shapes. Cut close to the lines, but leave 1/16 in. to 1/8 in. extra to be trimmed away when you rout the shape. Be very careful when handling the sides; at this stage they are very flimsy.
Next, make the stiffeners. You can use screws, 1-1/4-in. brads or glue and clamps to fasten the stiffeners to the inner faces of the sides. Once the stiffeners are in place, the sides will be much sturdier. The stiffeners also raise the sides to make routing easier. Align and clamp the template to each rough-cut side and rout the shapes.
Assembling the chair
Make all of the slats. Cut a few extras of each size in case you find a few bad ones during assembly. Round over the top edges; then finish sand the slats.
Draw slat-alignment lines across the outside edges of the chair sides. Space the lines roughly every 5 in. These guides will help you to space the slats evenly and keep the slats perpendicular to the sides.
Set the sides upright and temporarily clamp a slat at the outside bottom of the front and rear legs. This defines the spread between the sides and holds the sides so that it’s easier to attach the first batch of slats. Position the first slat tight in the corner between the seat and the back; then fasten it with glue and nails.
Attach the next few seat and back slats. Finish adding the seat top slats, including four slats. Use one brad at each end when attaching the slats. Then lay the chair on its back and add the rest of the seat back slats. Continue adding slats, being careful to attach the correct number of each size slat in the proper sequence. Flip the chair over and add the chair back slats. Flip the chair over again and add the remaining chair front slats.
All that’s left is to finish sand the chair sides and any remaining unsanded surfaces and smooth all sharp edges. There’s no need to fill the nail holes. Your chair is ready to take outside and enjoy.
About the author:
Handyman Club life member Bruce Kieffer is a custom furniture builder, freelance woodworking author and technical illustrator. You can see a collection of his work at www.kcfi.biz.
Cutting List
Key No. Description Dimensions
Cedar
A1 6 Sides 3/4 x 5-1/8 x 33 in.
A2 8 Sides 3/4 x 5-1/8 x 14-1/2 in.
B1 2 Stiffeners 3/4 x 2-1/2 x 21-1/2 in.
B2 2 Stiffeners 3/4 x 2-1/2 x 17-1/2 in.
B3 2 Stiffeners 3/4 x 2-1/2 x 14-1/2 in.
C1 1 Slat 3/4 x 2 x 22 in.
C2 30 Slats 3/4 x 1-1/2 x 22 in.
C3 10 Slats 3/4 x 1 x 22 in.
C4 9 Slats 3/4 x 1 x 22 in.
Shopping List
1x6 x 8-ft. cedar boards (10; includes extra material to allow for 25 percent waste)
1/4-in. x 36-in. x 36-in. hardwood plywood (1)
18-gauge galvanized brads (15
Waterproof glue
Spray adhesive
SOURCES ONLINE
Woodworker's Hardware - 800-383-0130 www.wwhardware.com
CMT Pattern Series straight router bit - No. CMT811.690.11B
CMT 1/8-in.-radius roundover bit - No. CMT838.190.11
3M Super 77 multipurpose spray adhesive - No. 3M0077)
Free Woodworkign Project Plan | DIY | Deck Chair | Patio Chair | Woodworking plan
Related Articles
Deck Lounge Chair Project Plan There are some projects you look forward to finishing more than others—not because they’re less fun to build; it’s just that you can...
Deck Privacy Upgrade Project The ideal deck invites you to relax, unwind and enjoy the outdoors. Unfortunately, many decks place you on display for all your neighbors to see. As s...
How to Build a Boardwalk Path Project Boardwalks have been a part of American history for close to 150 years. Originally designed to help railroad passengers avoid wet or sandy conditions ...
How to Make a Hypertufa Planter Project Remember your sandbox years and those days at the beach spent constructing castles and carving cavities in the sand? Though you probably didn’t ...
Landscape Edging Options for Your Yard When used effectively, landscape edging not only helps to visually define a planting bed but also keeps new plants within a designated area while prev...Last edited by AirborneSapper7; 10-20-2012 at 01:27 PM.
Join our efforts to Secure America's Borders and End Illegal Immigration by Joining ALIPAC's E-Mail Alerts network (CLICK HERE)
-
10-13-2012, 03:05 PM #2497Senior Member
- Join Date
- May 2007
- Location
- South West Florida (Behind friendly lines but still in Occupied Territory)
- Posts
- 117,696
Other Projects
Join our efforts to Secure America's Borders and End Illegal Immigration by Joining ALIPAC's E-Mail Alerts network (CLICK HERE)
-
10-13-2012, 03:06 PM #2498Senior Member
- Join Date
- May 2007
- Location
- South West Florida (Behind friendly lines but still in Occupied Territory)
- Posts
- 117,696

The Homestead Survival
Jalapeno Pepper Jack Cornbread Bites
http://homesteadsurvival.blogspot.com/2012/10/jalapeno-pepper-jack-cornbread-bites.htmlJoin our efforts to Secure America's Borders and End Illegal Immigration by Joining ALIPAC's E-Mail Alerts network (CLICK HERE)
-
10-13-2012, 03:08 PM #2499Senior Member
- Join Date
- May 2007
- Location
- South West Florida (Behind friendly lines but still in Occupied Territory)
- Posts
- 117,696

The Homestead Survival
Weathering Severe Storms
Get your home ready to withstand Mother Nature’s worst
http://homesteadsurvival.blogspot.com/2012/10/weathering-severe-storms-get-your-home.htmlJoin our efforts to Secure America's Borders and End Illegal Immigration by Joining ALIPAC's E-Mail Alerts network (CLICK HERE)
-
10-13-2012, 03:21 PM #2500Senior Member
- Join Date
- May 2007
- Location
- South West Florida (Behind friendly lines but still in Occupied Territory)
- Posts
- 117,696

The Homestead Survival
An Easy Homemade Frozen Yogurt Recipe
http://homesteadsurvival.blogspot.com/2012/10/an-easy-homemade-frozen-yogurt-recipe.htmlJoin our efforts to Secure America's Borders and End Illegal Immigration by Joining ALIPAC's E-Mail Alerts network (CLICK HERE)


 Reply With Quote
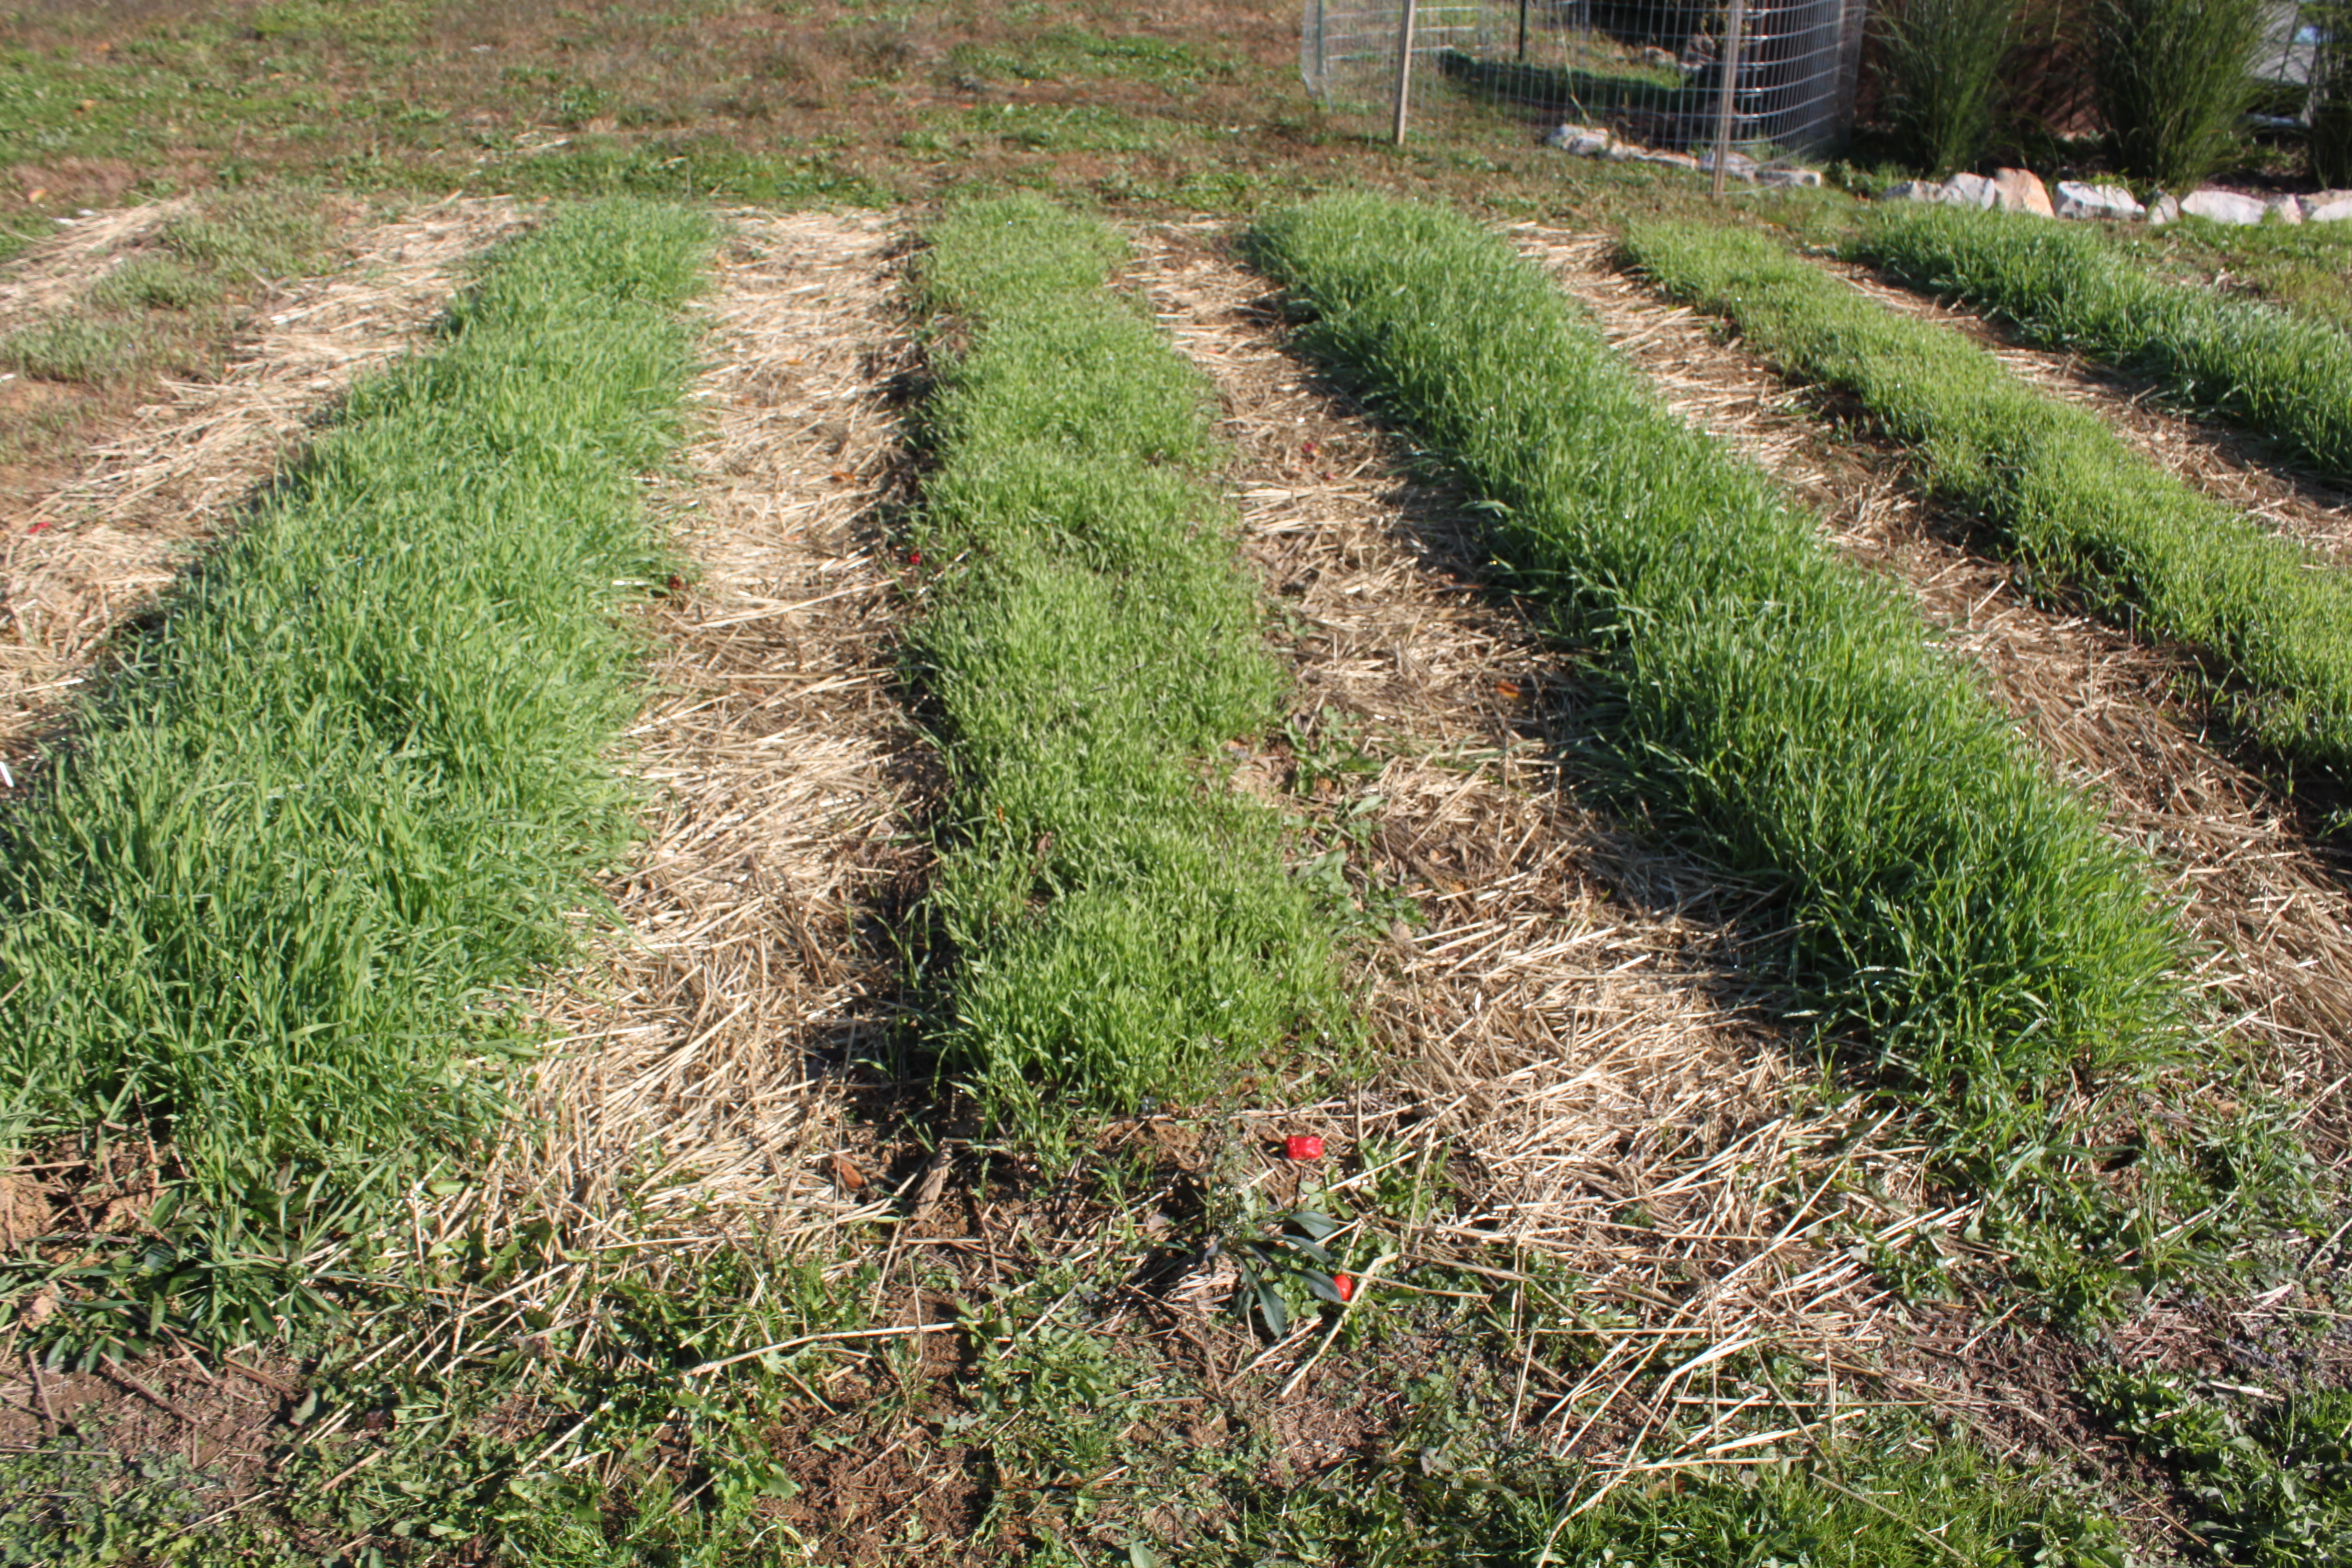


Durbin pushes voting rights for illegal aliens without public...
04-25-2024, 09:10 PM in Non-Citizen & illegal migrant voters