

Results 461 to 470 of 8458
 210Likes
Thread Information
Users Browsing this Thread
There are currently 8 users browsing this thread. (0 members and 8 guests)
 LinkBack URL
 About LinkBacks
-
01-06-2011, 05:27 AM #461Senior Member


- Join Date
- May 2007
- Location
- South West Florida (Behind friendly lines but still in Occupied Territory)
- Posts
- 117,696
Boomerang
A boomerang is an aerodynamically shaped object designed to fly efficiently through the air when thrown by hand. The term usually refers to an object made to follow a circular flight path that returns it to the thrower. (Some sources describe all aerodynamic "throwing sticks" as boomerangs, separating them into "returning" and "nonreturning" categories.) Traditional designs are V-shaped, but newer versions may have irregular shapes or more than two arms.
Two design components give the boomerang the capability of circular flight. One is the arrangement of the arms, and the other is the airfoil profile shape that allows the arms into wings. During flight, the boomerang spins rapidly (about 10 revolutions per second). The wing profiles create the same lift effect that makes airplanes fly. In addition, the spinning motion creates gyroscopic precession, which pulls the boomerang into a circular path. A similar effect can be seen with a spinning top: if the top's axis is not quite vertical, the upper portion of the toy travels in a circle around the axis.
For a successful flight, the boomerang must also be thrown correctly. It should be held near the end of one wing with the top (curved) surface facing the thrower's body. The boomerang should be almost vertical, with the thrower holding the lowest arm. Depending on wind conditions and the design of the particular boomerang, the upper portion may be inclined up to 30° outward. After drawing the arm backward, the thrower hurls the boomerang with an overhand motion, much as a pitcher would throw a baseball. At the moment of release, the thrower adds a snap of the wrist, as if cracking a whip. The release angle should be between horizontal and 15° above. If there is any breeze, the boomerang must be thrown between 30° and 90° to the right of the on-coming wind (or to the left for a left-handed thrower; right-and left-handed boomerangs are mirror images of each other).
As the boomerang flies forward, it begins to slowly roll over (counterclockwise for a right-hander), ultimately flying horizontally with its flat side down. When it returns to the thrower, it is caught safely at chest height, trapping it between open hands in a sandwich fashion.
Recreational throwers simply enjoy playing a solitaire game of catch. Those who are interested in competition can choose from a variety of events, including precision (returning as close as possible to the launch point) and endurance (making the most catches in a five-minute period). The inter-national record for distance traveled before returning to the thrower is 780 ft (238 m), in a flight that lasted nearly 22 seconds. The record for maximum time aloft (MTA) is two minutes, 59.94 seconds; the unofficial MTA record, which was witnessed but not thrown in a sanctioned competition, is an astounding 17 minutes, six seconds.
History
Boomerangs developed as a refinement of carved throwing sticks (kylies) that were used as weapons, primarily for hunting. The oldest kylie found to date is one formed from a mammoth tusk. Discovered in Poland in 1987, its age has been carbondated at about 20,300 years. This 2-ft (60-cm) long, 2-lb (0.9 kg), gently curved implement was probably thrown to kill reindeer. A plastic replica of it has been found to travel an average of 90 ft (27 m) when thrown, although throwing it into a head-wind increases its range to an average 123 ft (38 m).
Kylies were used by prehistoric people in all parts of the world. Usually made of wood, they were banana shaped; both faces of each arm were carved into curved, airfoil surfaces. When thrown, they traveled parallel to the ground for distances up to 650 ft (200 m), spinning furiously toward their target. Typically 3 ft (0.9 m) long and weighing 5-10 lb (2.3-4.6 kg), they were effective hunting tools.
There is some evidence that boomerangs were developed in several cultural groups. For example, a boomerang-shaped object found in Germany was made of ash wood. Carbon-dated to an age of 2,400-2,800 years, it is preserved enough to allow archaeologists to reconstruct its entire shape. The replica has been thrown left-handed to produce a complete boomerang trajectory; however, the wing profiles were less than optimal, making it difficult to throw successfully. Evidence suggests that boomerangs may also have been developed in Egypt and India.
In all areas except Australia, hunters devised spears for throwing and bows for shooting arrows, and they stopped using kylies. The Australian aborigines, however, continued to hunt with throwing sticks. Experimenting with designs, the residents of the eastern and southern parts of that continent developed boomerangs, which they used primarily for sport. At major tribal gatherings, they held competitions based on such qualities as the precision of the return and the speed and quality of the flight. Boomerangs were not thrown at animals of prey, although they were sometimes thrown as decoys to lure birds into a net.
The oldest boomerang found in Australia dates to about 14,000 years ago. The origin of the word is uncertain, although it may derive from the cry "boom-my-row" ("return, stick") that British colonizers heard Dharuk tribesmen shout when throwing the instruments in 1788. The traditional method for making a boomerang was to select an appropriately curved piece of wood, usually from the section where the tree trunk joins a large root, making an angle of 95-110°. If necessary, the angle between the wings was adjusted by heating the boomerang over a fire and bending it. The aerodynamic profiles were carved from the wood with an axe, smoothed with a flint, and polished with sand. Designs might be carved into the surfaces, either for decoration or to improve the flight characteristics. The wood was sealed with fish oil or paint.
Boomerangs remained a relatively obscure curiosity until about 1970. A workshop about how to make and throw boomerangs was presented by the Smithsonian Institution in Washington, DC. It sparked great enthusiasm for the sport, and the Smithsonian began sponsoring annual tournaments on the National Mall. The first international championship tournament was held in 1981.
Raw Materials
A wide variety of materials can be used to make a boomerang. Wood remains one of the most popular because it produces good results, is relatively inexpensive, and is easy to work. Generally preferred is aircraft-grade Finnish or Baltic birch plywood, which is laminated from very thin layers of wood. A 0.2-in (5-mm) thick sheet will have between five to 10 layers. To protect the wood from moisture, it is usually sealed with a polyurethane coating.
Among the synthetic materials that may be used for boomerangs are polypropylene, acrylonitrile-butadiene-styrene (ABS) plastic, fiberglass, carbon fiber, linen-phenolic resin laminates, and Kevlar para-aramid fiber. Toy boomerangs made from urethane foam or cardboard can be used indoors.
Design
Because proper spinning action is crucial to the performance of a boomerang, there are some fundamental concepts that must be followed during the design process. However, those basic elements leave a great deal of room for creativity, and boomerang makers frequently experiment with innovative shapes.
When creating a new pattern, the designer marks a point in the middle of a sheet of A boomerang.
sturdy paper. This first guide mark denotes the center of gravity of the boomerang. As the designer continues to sketch the boomerang, he or she must take care to balance the shape around the center of gravity point. The other important consideration is that the centerlines of each wing of the boomerang must point generally toward the center of gravity (i.e., within 10° in either direction). So the second set of guide marks the designer makes on the paper are the centerlines of the wings. Within the limitations set by the guide marks, the designer can then sketch as basic or whimsical design as desired. After the design is completely drawn, the designer cuts it out from the sheet of paper. By hanging the pattern successively from the end of each wing, the designer can verify that the planned center of gravity has been adequately preserved. This will be true if the centerline of each wing hangs within 30° of vertical.
Serious designers who seek more precise methods can use more sophisticated techniques, including computer-aided design software.
The Manufacturing Process
The following description focuses on making a V-shaped plywood boomerang. Synthetic materials are worked in a similar manner, but some generate dangerous dust or fumes when being cut or sanded. In this case, dust masks and protective clothing are essential.
Forming- 1 The plywood sheet is checked for flatness. If it is not completely flat, it is oriented so the concave side will correspond to the top surface of the boomerang. This significantly increases the boomerang's strength, and it raises the wingtips slightly for better aerodynamics.
- 2 The pattern is placed on the plywood so that the wood grain runs across from the tip of one arm of the boomerang to the tip of the other arm. The outline of the pattem is traced on the plywood with a pencil.
- 3 A scroll saw, jigsaw, coping saw, band-saw, or fret saw is used to cut the boomerang shape out of the plywood. This basic cutout is called the blank.
- 4 As an alternative to cutting a single-piece blank, two separate wings can be cut, allowing a section of overlap where they will be joined. Using a router, half the thickness of this overlap section is cut away from each wing. The overlapping sections are joined with wood glue and clamped together until the joint hardens.
- 5 An outline is drawn on the top of the blank to show the areas to be shaped for the leading and trailing edges of the wings.
- 6 The profiles of the wings are shaped with a belt sander or by hand with a rasp or a plane. The top of the leading edge of each wing is decreased at a 45° angle, while the rear of the wing is angled down to leave a 0.04-0.08 in (1-2 mm) thick trailing edge. The bottom face of the leading edge is cut back slightly. The tips of the wings are shaped down to the same thickness as the trailing edge. The various layers of the plywood serve as contour lines that help the worker achieve uniform slopes.
- 7 A shallow section may also be cut out from the bottom surface of each wing. For example, this might consist of a 2-in (5-cm) long strip near the wing tip and behind the leading edge.
- 8 Using progressively finer (80-250 grit) sandpaper, the surface of the boomerang is smoothed carefully with an orbital sander or by hand.
- 9 After spraying the surface with sanding sealer, fine steel wool is used to further smooth the surface. A coat of paint or wood stain is followed by one or more coats of clear polyurethane finish.
- 10 The boomerang is thrown several times to test its flight capabilities. Several types of adjustments may be made to tune the boomerang for better performance. For example, the wing profiles might be adjusted by additional sanding.
- 11 Another tuning technique is to bend the wings, raising their tips about 0.12 in (3 mm) above the plane of the vertex; this is called giving the boomerang a positive dihedral. It may be necessary to heat the boomerang to make it flexible enough for bending and to make the adjustment permanent. This can be done with steam or even in a microwave oven.
- 12 Twisting the wings to raise or lower the leading edges can also affect the boomerang's performance.
- 13 Other tuning techniques include drilling holes through the wings, cutting slots in the leading edges of the wings, or drilling shallow holes into the underside of the wings and inserting lead or brass plugs to add weight.
Throughout the manufacturing process, the quality of the boomerang is periodically checked. Any unevenness in the boomerang such as unequal sides or bumps will take away from the aerodynamic design. Boomerangs are sanctioned by comities such as the World Boomerang Association and the United States Boomerang Association (USBA). These groups set the standards and rules that any boomerang competitions must adhere to such as safety, skill, and timing.
The Future
Boomerang innovations can be developed in two areas: materials and design. As new materials are developed that are strong, durable, and lightweight, boomerang makers will try using them individually or in combination. For example, the boomerang that flew for more than 17 minutes consisted of a two-layer outer shell of carbon fibers and Kevlar; the shell was filled with epoxy resin mixed with phenolic microballoons.
Two recent innovations suggest ways that designs can be modified to improve aerodynamics. One involved making the upper and lower surfaces of the trailing edges of a boomerang's wings slightly concave. Normally, these surfaces are flat or slightly convex. This design was used for the boomerang that set the current world record for distance. In the other example, a boomerang's wing tips were cut at an angle that made them perpendicular to imaginary lines leading to the center of rotation. Usually, the wing tips are perpendicular to the centerline of the wings. This modification was created by the holder of the unofficial MTA record.
Where to Learn More
Books
Mason, Bernard Sterling. Boomerangs: How to Make and Throw Them. Mineola, NY: Dover, 1985.
Periodicals
Drollette, Daniel. "Field Notes: Return to Sender." The Sciences (May/June, 199 : 16-19.
Lane, Marke. "Classic Boomerang." Work-bench (June/July 1996): 36.
Valenti, Michael. "The Return of the Boomerang." Mechanical Engineering (December 1993): 68.
Other
Amateur Boomsmith. http://www.uku.fi/-hniskane/workmain.html (October 27, 2000).
— Loretta Hall
Read more: How boomerang is made - making, history, how to make, used, parts, components, History, Raw Materials, Design, The Manufacturing Process of boomerang, Quality Control http://www.madehow.com/Volume-6/Boom...#ixzz1l8wCpChh
http://www.madehow.com/Volume-6/Boomerang.htmlLast edited by AirborneSapper7; 02-01-2012 at 11:10 AM.
Join our efforts to Secure America's Borders and End Illegal Immigration by Joining ALIPAC's E-Mail Alerts network (CLICK HERE)
-
01-06-2011, 06:11 AM #462Senior Member
- Join Date
- May 2007
- Location
- South West Florida (Behind friendly lines but still in Occupied Territory)
- Posts
- 117,696
How to Build Stilts (Dads.. do something inexpensive with your kids)
By: Alexandra Bandon, This Old House television
http://www.thisoldhouse.com/toh/how-to/ ... 12,00.html
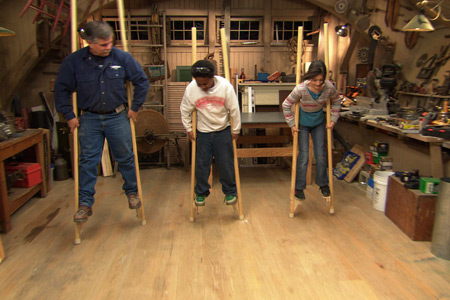
These stilts are adjustable, giving you anywhere from 1 foot of extra height to 3 feet of extra height. Walking 1 foot taller than normal feels trivial while 3 feet really gets your blood pumping. To use them you wrap your arms around each of the stilts and lift them up with your feet as you walk. It’s a bit of a challenge at first, but once you learn the skill you’ll be able can walk all over, even up and down inclines.
How to Build Stilts Fun Family Project
These stilts are adjustable, giving you anywhere from 1 foot of extra height to 3 feet of extra height. Walking 1 foot taller than normal feels trivial while 3 feet really gets your blood pumping. To use them you wrap your arms around each of the stilts and lift them up with your feet as you walk. It’s a bit of a challenge at first, but once you learn the skill you’ll be able can walk all over, even up and down inclines.
danger level
* negligible
* moderate
* high
* do not do this
tools
* F. Table saw or similar
* G. Drill
materials
* A. Wooden 2×4, 15.5" long
* B. (4) 3/8" wing nuts
* C. (4) 3/8" ID flat washers
* D. (4) 3/8" x 4" carriage bolts
* E. (2) Wooden poles, 8′x1.5"x1.5"
 danger level
- negligible
- moderate
- high
- do not do this
- F. Table saw or similar
- G. Drill
- A. Wooden 2×4, 15.5" long
- B. (4) 3/8" wing nuts
- C. (4) 3/8" ID flat washers
- D. (4) 3/8" x 4" carriage bolts
- E. (2) Wooden poles, 8′x1.5"x1.5"
how-to
- Cut the 2×4 at a 45° angle, forming two congruent trapezoids. The parallel sides should measure 6 inches and 9.5 inches. These two pieces will be the footholds.
 On the short side of the footholds, bore two holes 1.5" deep with a 3/4" wing bit. These holes should be spaced 4 inches apart (center to center). They will allow the carriage bolts to extend through far enough to get the wing nuts on.
- With a 3/8" bit, finish drilling the holes all of the way through. The footholds are now finished.
- You need to drill eight 3/8" holes in both of the 8′ poles. Start 6" from the bottom and drill a hole every 4" until you are 34" from the bottom.
- Place the footholds at whatever height you want (start low), insert the bolts, and tighten on the wing nuts with the washers underneath.
- To get onto the stilts, either back yourself up against a wall and step up as the stilts lean against the wall or have a trusted, strong friend hold them for you. Beginners often want to hold the poles in front of them, but is is impossible to balance that way. You have to place the poles placed behind your arm pits and wrap your arms around the front of them.
- If you notice that the bottom of the stilts start to splinter as you use them, wrap some electrical or duct tape around the bottoms to slow the process.
http://dangerouslyfun.com/stilts
Last edited by AirborneSapper7; 02-01-2012 at 11:15 AM.
Join our efforts to Secure America's Borders and End Illegal Immigration by Joining ALIPAC's E-Mail Alerts network (CLICK HERE)
-
01-08-2011, 10:20 AM #463Senior Member
- Join Date
- May 2007
- Location
- South West Florida (Behind friendly lines but still in Occupied Territory)
- Posts
- 117,696
How to Make Shelters from a Parachute
A parachute canopy is a good material to use for a shelter because it is wind reisitant and versatile. Also, because of it's large size, they can be used to make shelters large enough for several people and/or equiptment. Teepes can serve as a signaling tool by focusing a small amount of light provided by a small fire or candle(s).
The Parachute Teepe
You can make a parachute teepe if you have a parachute and three poles. This type of shelter is fairly easy to construct and takes little time to do so. You will use all or part of the parachute's canopy as well at least 3 poles that are 10 to 15 feet long and about 2 inches in diameter.
To make the parachute teepe:- Lay three poles down on the ground and bind them together at one end.
- Stand the poles up and spread them apart to form a tripod. If you wish to use more poles for additional support and form, you can prop them up against the tripod. There is no need to bind the additional poles.
- Fold the parachute's canopy in half
- Determine which way the wind is blowing and plan to have the opening at least 90° from (perpendicular to) the average wind direction.
- Attach the canopy to your frame by securing one edge of the canopy to the top part of the pole closest to where you want to place the opening.
- Attach the rest of the canopy to the fame by circling your teepe and attaching the other end of the canopy to the same pole.
Alternate Parachute Teepe
This alternate way of constucting a parachute teepe involves using a parachut canopy, a sturdy tree with forking limbs, a long pole (about 20 feet long), and about 14 stakes or sharpened sticks.
To make a One-pole Teepe:- Attach the apex of the canopy to the pole
- Mark a circle on the ground that is about 12 feet in diameter
- Place the pole in a tree's forked limb and secure the bottom of the canopy to the ground with your stakes or sharpened sticks
One-Man Parachute Shelter
If you are alone, you can easily contruct a shelter with your parachute and three poles. One pole needs to be about 15 feet long, the other two poles should be about 10 feet long.
To make a one-man parachute shelter- Secure your 15 foot pole to a tree at about waist height.
- Place the other two poles on either side pointing in the same direction.
- Fold the canopy and lay it across the 15-foot pole so that there is the same amound of fabric on each side.
- Tuck the canopy under the two 10-foot poles and spread it out beneath the 15-foot pole to make a floor. Stake down the canopy near the 10-foot poles so that they will not slide together.
- Use whatever material remains to cover the entrance.
http://www.survivingnature.com/parachute.htmLast edited by AirborneSapper7; 02-01-2012 at 11:17 AM.
Join our efforts to Secure America's Borders and End Illegal Immigration by Joining ALIPAC's E-Mail Alerts network (CLICK HERE)
-
01-10-2011, 09:15 AM #464Senior Member
- Join Date
- May 2007
- Location
- South West Florida (Behind friendly lines but still in Occupied Territory)
- Posts
- 117,696
Creating A Safe Room
January 10, 2011 by Bob Livingston

In the event of a chemical, biological or radiological attack, a safe room is essential to survival. The safe room should ideally be a room in the interior of the home. If no interior room is available, choose one with as few external walls and windows as possible. An adjoining bathroom is also desirable.
To prepare the room, buy enough of the following to cover all windows and doors to the safe room area:
- Weatherstripping.
- Clear plastic sheeting at least 1 mil thick, preferably clear, and wide enough to cover windows.
- Scissors or other cutting tool.
- Duct tape.
- Caulk and caulk gun.
- Staple gun
- A portable HEPA (High Efficiency Particle Arresting) air filtration device.
When installing the plastic sheeting, use the staple gun and/or duct tape to hang it. In places where you use the staple gun, be sure to cover the staples with duct tape to seal off any holes or tears in the plastic.
You should also be sure you have access from your safe room to your stored food and water, or bring as much as possible into your room before you seal it off, since you don’t know how long you may have to be sealed inside.
http://www.personalliberty.com/survi...2011_01_10_PLA_Last edited by AirborneSapper7; 02-01-2012 at 11:18 AM.
Join our efforts to Secure America's Borders and End Illegal Immigration by Joining ALIPAC's E-Mail Alerts network (CLICK HERE)
-
01-12-2011, 04:59 AM #465Senior Member
- Join Date
- May 2007
- Location
- South West Florida (Behind friendly lines but still in Occupied Territory)
- Posts
- 117,696
Cooking Tips for Rehydration Methods of Dehydrated Vegetables
By Sarah Tidwell
Dehydrated food, though a mystery to some, constitutes an everyday commodity for army and military personnel. Preparing this type of product involves draining most of its water content. Though you can buy almost any food in a dehydrated form, fresh foods such as vegetables don't require extra flavoring; you can easily add spices during various cooking methods, however. Follow a few simple steps when rehydrating these foods in order to ensure a nutritious and tasty meal.
Preparation
Select the type of vegetables you want to cook with your meal and the time you want to have the meal on the table. This will determine the type of cooking method that best fits your schedule. If you want to cook the vegetables in the same pot as the meat, choose a produce that can withstand long cooking times without breaking down, such as carrots, potatoes and onions. These vegetables probably remind you of pot roast because cooks often heat them with the meat over a lengthy period of time. Their consistency enables them to maintain their shape without breaking apart and becoming too mushy.
Quick Cooking
Use a pressure cooker for the speedy preparation of dehydrated vegetables. Read the package of the produce for a water measurement. Because pressure cookers cook off water, also read the cooking time for that amount of water listed on the vegetable package. Because the dehydrated vegetables will soak in water while it evaporates in the pot, decrease the cooking time or add extra water. Add spices or flavorings when you add the water and vegetables in the beginning, in order to avoid opening the pressure cooker in the middle of its process. Avoid adding too many oils; when the water cooks away, the oil will remain and accelerate the cooking.
Lengthy Methods
If you have unlimited time to prepare the dehydrated vegetables, put them in a pot with meat or in the same pot as the main dish. This method allows the flavors of the main dish and vegetables to come together in the sauce. When you add liquid to the pot to begin preparation, put in extra to compensate for the liquid absorbed by the vegetables. Consider using a meat for vegetable stock as part of the liquid; the vegetables will soak in the flavors in the stock and exude a more intense flavor.
http://www.ehow.com/way_5753835_cooking ... ables.htmlLast edited by AirborneSapper7; 02-01-2012 at 11:18 AM.
Join our efforts to Secure America's Borders and End Illegal Immigration by Joining ALIPAC's E-Mail Alerts network (CLICK HERE)
-
01-12-2011, 05:05 AM #466Senior Member
- Join Date
- May 2007
- Location
- South West Florida (Behind friendly lines but still in Occupied Territory)
- Posts
- 117,696
UNIVERSITY OF CALIFORNIA COOPERATIVE EXTENSION PUBLICATION #31-411
There are three basic methods used to rehydrate foods:
Soak in liquid
Boil in water
Cook in liquid
Following are some general guidelines:
Do NOT add sat or sugar during the first five minutes of reconstitution as they hinder the water absorption process.
Foods that take the longest to dehydrate take the longest to rehydrate.
HOW TO SOAK IN LIQUID
Various fruit juices, yogurt, cordials and fruit liqueurs can be used instead of water to reconstitute foods. Place pieces of fruit in a shallow container and cover with a thin layer of liquid. The general rule is two cups of fruit to one cup of liquid. Add more liquid as needed.
Use only the amount of liquid necessary in order to avoid a water-logged, mushy product.
Fruit is usually reconstituted in a couple of hours. Refrigerate if a longer time is needed. To soften dried fruit for snacks (depending on personal preference), place one cup of fruit in a plastic bag, sprinkle with a few drops of water and refrigerate overnight.
Consommé, bouillon, vegetable juices or milk can be used instead of water. Refrigerate during time needed for moisture absorption. Allow plenty of time – from one to two hours, up to eight hours. You can freeze the leftover liquid for future use in soups, stews, gravies, leathers, meat pies, etc.
HOW TO BOIL IN WATER
To rehydrate fruit for pies or cobblers, place one cup of water per one cup of fruit in a pan and simmer until tender. Start with a smaller amount of liquid and add more as needed until the desired consistency is reached. To soften fruit for cookies or cakes, steam for several minutes, then cut into small pieces.
Place one cup of vegetables into one cup of boiling water and let stand, removed from heat, for 15 to 20 minutes. Then simmer for use in a stew, soup or casserole.
HOW TO COOK IN LIQUID
Dried foods can be cooked by three basic methods:
Slow cooker
Stovetop
Microwave oven
The amount of liquid needed will vary according to how the food is to be used. For souffles, pies, quick breads, doughs and batters, use two parts liquid to three parts dried food. For side dishes, fruit toppings, or compotes, use one part liquid to one part dried food. More water may be added during the cooking time.
For stovetop cooking, add fruits to the appropriate amount of boiling water, turn down heat and simmer for 10 to 15 minutes or until tender.
Dehydrating concentrates natural sugars, so taste before adding sweetener. Place dried vegetables in proper amount of water and bring to a boil. Reduce heat and simmer until tender.
For the slow cooker and microwave oven, use the same amounts of liquid as for stovetop cooking.
http://ucce.ucdavis.edu/files/filelibrary/1808/81.PDFLast edited by AirborneSapper7; 02-01-2012 at 11:19 AM.
Join our efforts to Secure America's Borders and End Illegal Immigration by Joining ALIPAC's E-Mail Alerts network (CLICK HERE)
-
01-14-2011, 10:00 PM #467Senior Member
- Join Date
- May 2007
- Location
- South West Florida (Behind friendly lines but still in Occupied Territory)
- Posts
- 117,696
3 Ways To Hide Valuables At Home
by Bill Rounds Esq. on January 10, 2011
We all have important documents that we need to keep track of. Lots of us have some things that are very expensive or even priceless that we never want to lose. You need to hide valuables somewhere. Storing these items can be tricky if we want to make sure that they aren’t lost, stolen, or confiscated. If you hire someone else to hold on to them for you, you add an extra layer of risk that they won’t keep their promise. A family Bible and old family photos are almost value-less in a damage calculation in a lawsuit. Here are some of the 3 best ways to discreetly hide your valuables at your own house.
We all have important documents that we need to keep track of. Lots of us have some things that are very expensive or even priceless that we never want to lose. You need to hide valuables somewhere. Storing these items can be tricky if we want to make sure that they aren’t lost, stolen, or confiscated. If you hire someone else to hold on to them for you, you add an extra layer of risk that they won’t keep their promise. A family Bible and old family photos are almost value-less in a damage calculation in a lawsuit. Here are some of the 3 best ways to discreetly hide your valuables at your own house.
Where NOT To Hide Valuables
Safe deposit boxes are a horrible place to keep your valuables. They have been known to be raided, and the contents sold due to nothing more than clerical errors, without informing the owners.
Keeping valuables “under your mattress” or in some other easy hiding place in your house is not a good idea either. Visitors might stumble upon your stash, burglars can find it pretty easily, even a search warrant could easily expose your hiding place.
Where You MIGHT Want To Hide Valuables
Some private vaults have a better reputation than most banks when it comes to anonymously and securely storing valuables. There are even some offshore options if you want better asset protection. You still have to trust a third party to honor the agreement and protect your stuff. Most vaulting companies will limit their liability in their storage agreement to hide valuables.

There are some at home options to hide valuables that involve third parties that still might be worth exploring. You could have a safe installed in your home. If you hire a contractor, you are taking the risk of sharing the existence and location of the safe with a third party, even if it is a hidden safe. If you go the cheap route and install a regular safe yourself, a burglar might find it, un-install it, and crack it later at their secret lair.
Hide Valuables At Home
Here are some alternatives that you can use to protect your stuff yourself and hide valuables at home.
1. Book Safe
Hiding in plain sight is a great way to throw off anyone who might be looking for your valuable documents or items. One of the most popular ways to hide valuables is using a book safe. They are easy and fun to make.

If you have gone “paperless” and don’t have many physical books anymore, you can use any object that you can mix in with others to hide your stuff. Hollowing out a Kindle seems a bit expensive, but maybe you can convert a box of Corn Flakes into a safe and stick it in your pantry, make a few hollow Christmas decorations and stuff them full of your precious coins and a copy of your will and stick them in the huge box with all of the other Christmas decorations. You can really use your imagination on this one.

2. Hidden Wall Compartment
Most homes are built with wood framing and drywall. This leaves a space about 15″ wide and 4″ deep and a few feet high between between wall studs and drywall. Poke a hole in the wall big enough to put your fire proof and water proof container with your priceless artwork and gold nuggets in between the walls. Most people have the skills to follow a simple do-it-yourself book on how to fix the hole in the drywall. A patch kit, some plaster and paint will cost you very little. Just remember that you can’t take these things in and out of the wall without breaking a new hole.
If you doubt your wall patching ability, you might choose a spot where the hole will be covered by a large appliance, or in some other spot where people won’t easily find it. The more creative the spot to hide valuables, the less likely it will be for someone else to find it, if they even know it exists.
If you are really handy, you might be able to build out a new wall to create more space or even a small room. Be careful whenever you are poking holes in the wall because there might be wires, pipes, and other surprises waiting.
3. Buried Treasure
If you are still not comfortable poking holes in your walls, you can pick up a shovel and play pirate with buried treasure. Use a solid, waterproof container to hold your valuables and bury them in the yard somewhere. To make it easier to locate later, put a clear landmark on top of it like a large rock or plant a bush. You can easily integrate that into your regular landscaping plans.

Be careful before you dig to check with the local authorities for any buried electrical, sewer, gas or water lines. Hitting one of those with a shovel is not as much fun as finding buried treasure.
Conclusion
Protecting your stuff on your own property can be practical, but it has the added benefit of letting you use your creativity. The more creative you get to hide valuables, the better it will probably be hidden. The only bad thing is you can’t show off your creativity to the neighbors.
RELATED POSTS:- Reverse SEO: 3 Ways To Hide In Plain Sight
- Keep Your Home Address To Yourself
- Make Your Home A Castle With Privacy Fencing

3 Ways To Hide Valuables At Home
Author: Contributing Author- January 13th, 2011
Comments 37
http://www.howtovanish.com/2011/01/3...ables-at-home/
Last edited by AirborneSapper7; 02-01-2012 at 11:24 AM.
Join our efforts to Secure America's Borders and End Illegal Immigration by Joining ALIPAC's E-Mail Alerts network (CLICK HERE)
-
01-14-2011, 10:06 PM #468Senior Member
- Join Date
- May 2007
- Location
- South West Florida (Behind friendly lines but still in Occupied Territory)
- Posts
- 117,696
How to Hide Your Valuables and Money from a Burglar http://www.associatedcontent.com/articl ... html?cat=6
Easy Secret Hiding Spots in Your Home Help Prevent Burglary http://www.associatedcontent.com/articl ... html?cat=6
How to Hide Valuables At Home http://www.ehow.com/how_5902116_hide-va ... -home.htmlLast edited by AirborneSapper7; 02-01-2012 at 11:25 AM.
Join our efforts to Secure America's Borders and End Illegal Immigration by Joining ALIPAC's E-Mail Alerts network (CLICK HERE)
-
01-14-2011, 10:16 PM #469Senior Member
- Join Date
- May 2007
- Location
- South West Florida (Behind friendly lines but still in Occupied Territory)
- Posts
- 117,696
MIS Defense Products | Safety - Security - Self Defense / Hiding Places for Valuables
Many many more items at the link
http://www.misdefenseproducts.com/Hidin ... c-272.html


Candle Safes for Hiding Valuables

Key Hiding Rock

Carpet Care - Novelty Safes

Coffee Can Jewelry Safes

Dog Food Cans with False Bottoms

Last edited by AirborneSapper7; 02-01-2012 at 11:26 AM.
Join our efforts to Secure America's Borders and End Illegal Immigration by Joining ALIPAC's E-Mail Alerts network (CLICK HERE)
-
01-14-2011, 10:23 PM #470Senior Member
- Join Date
- May 2007
- Location
- South West Florida (Behind friendly lines but still in Occupied Territory)
- Posts
- 117,696
Security Wall Safes to Conceal Valuables

http://www.misdefenseproducts.com/Secur ... c-389.html
Hollow Book Safes

http://www.misdefenseproducts.com/Hollo ... c-380.html

http://www.misdefenseproducts.com/Hidin ... c-272.html
Wall Clock - Concealment in the Open

http://www.misdefenseproducts.com/Wall- ... 19102.html
http://www.misdefenseproducts.com/Paint ... 19064.htmlLast edited by AirborneSapper7; 02-01-2012 at 11:26 AM.
Join our efforts to Secure America's Borders and End Illegal Immigration by Joining ALIPAC's E-Mail Alerts network (CLICK HERE)


 Reply With Quote


Jamaal Bowman Fully in Favor of Resettling Gaza Migrants in...
04-30-2024, 04:44 AM in illegal immigration News Stories & Reports