

Results 451 to 460 of 11539
 226Likes
LinkBacks (?)
-
12-26-2016, 11:32 AM
-
09-02-2016, 05:39 PM
-
whole garden made with pallets!! Love it!! | Pallets | Pinterest | Pallets, Pallets Garden and Wooden Pallets
Refback This thread03-06-2016, 11:30 AM -
10-20-2015, 05:29 PM
-
06-12-2015, 08:00 PM
-
02-26-2015, 01:58 PM
-
01-05-2015, 04:13 PM
-
12-19-2014, 10:19 AM
-
EMERGENCY: HUGE FEMA PANDEMIC EXERCISE IN USA IN NOVEMBER, INTERNET SHUT DOWN PART OF EXERCISE | Prepare4Survival
Refback This thread12-03-2014, 10:39 PM -
Off Grid World ? Ugly Duckling Shipping Container Home Built by Artist Is a Beautiful Swan on the Inside
Refback This thread11-25-2014, 03:10 PM -
11-17-2014, 10:59 PM
-
11-13-2014, 11:18 AM
-
11-09-2014, 02:54 PM
-
10-28-2014, 11:38 PM
-
10-26-2014, 05:54 AM
-
10-16-2014, 11:28 AM
-
10-03-2014, 01:25 PM
-
10-02-2014, 09:16 PM
-
09-26-2014, 07:00 PM
-
09-26-2014, 01:56 PM
-
09-19-2014, 04:46 PM
-
09-13-2014, 05:49 AM
-
09-05-2014, 01:52 PM
-
09-01-2014, 09:39 AM
-
08-30-2014, 06:29 PM
-
08-10-2014, 06:29 AM
-
08-04-2014, 05:07 PM
-
07-23-2014, 11:14 AM
-
New Evidence on Expiration Dates | Medical Preparedness | Doom and Bloom (TM) | Doom and Bloom (TM)
Refback This thread07-22-2014, 10:10 AM -
07-18-2014, 08:37 PM
-
07-15-2014, 04:57 PM
-
07-11-2014, 01:40 AM
-
04-22-2014, 11:14 AM
-
04-18-2014, 12:57 PM
-
04-18-2014, 10:10 AM
-
04-14-2014, 12:18 AM
-
04-12-2014, 02:28 AM
-
03-02-2014, 11:43 PM
-
12-24-2013, 11:59 PM
-
12-07-2013, 11:04 PM
-
kitchen | Cob
Refback This thread11-25-2013, 03:24 PM -
10-22-2013, 10:25 PM
-
Apple Pie Braid | Sweets
Refback This thread09-26-2013, 07:58 AM -
09-02-2013, 04:44 PM
-
5 Reasons Why You May have to Bug Out Even Though You Don’t Want to | The Apartment Prepper's Blog
Refback This thread08-23-2013, 03:20 PM -
06-27-2013, 06:30 AM
-
06-23-2013, 08:11 PM
-
06-17-2013, 11:21 PM
-
05-24-2013, 05:06 PM
-
To Eat / BASIC LIST / SUGGESTED ITEMS FOR LONG TERM SURVIVAL - Page 275 - ALIPAC
Refback This thread05-01-2013, 03:49 AM
Thread Information
Users Browsing this Thread
There are currently 9 users browsing this thread. (1 members and 8 guests)
 LinkBack URL
 About LinkBacks
-
01-06-2011, 03:09 AM #451Senior Member


- Join Date
- May 2007
- Location
- South West Florida (Behind friendly lines but still in Occupied Territory)
- Posts
- 117,087

Piton
From Wikipedia, the free encyclopedia
This article is about the rock climbing tool. For the Piton mountains, see Pitons.

Several pitons

Old angle pitons
In climbing, a piton (pronounced Pee'-ton, also called a pin or peg) is a metal spike (usually steel) that is driven into a crack or seam in the rock with a hammer, and which acts as an anchor to protect the climber against the consequences of a fall, or to assist progress in aid climbing. Pitons are equipped with an eye hole or a ring to which a carabiner is attached; the carabiner can then be directly or indirectly attached (through more equipment) to a climbing rope.
Pitons were the original form of protection and are still used where there is no alternative. Repeated hammering and extraction of pitons damages the rock, and climbers who subscribe to the clean climbing ethic avoid their use as much as possible. With the popularization of clean climbing in the 1970's, pitons were largely replaced by faster and easier-to-use clean protection, such as nuts and camming devices. Pitons are still found in place (as 'fixed' pitons) on some established free-climbing routes in places where nuts or cams do not work; and are used on some hard aid climbs.
http://en.wikipedia.org/wiki/PitonLast edited by AirborneSapper7; 02-01-2012 at 11:00 AM.
Join our efforts to Secure America's Borders and End Illegal Immigration by Joining ALIPAC's E-Mail Alerts network (CLICK HERE)
-
01-06-2011, 03:12 AM #452Senior Member
- Join Date
- May 2007
- Location
- South West Florida (Behind friendly lines but still in Occupied Territory)
- Posts
- 117,087
Rock Climbing Pitons

Last edited by AirborneSapper7; 02-01-2012 at 11:01 AM.
Join our efforts to Secure America's Borders and End Illegal Immigration by Joining ALIPAC's E-Mail Alerts network (CLICK HERE)
-
01-06-2011, 03:14 AM #453Senior Member
- Join Date
- May 2007
- Location
- South West Florida (Behind friendly lines but still in Occupied Territory)
- Posts
- 117,087
Pitons And Hammer
Use and description of pitons
Pitons are metallic wedges which we nail on the
rock's crevices. They are made of soft or hard steel.
Pitons come in a wide variety of shapes and sizes.
To name some:
Cassin pitons which are divided in vertical, horizontal and universal
Ring pitons with a ring, suitable for rappel
Very thin horizontal pitons for small crevices
U shaped pitons
S or Z shaped pitons
V and big V shaped pitons
Nail pitons for very thin crevices
Rock climbing hammerThe hammer is essential for nailing and unnailingweight of at least 1.5 pounds
the pitons. The rock climbing hammer must have:
handle at least 10 inches long
wide head
metallic body
handle with rubber dressing
hole at the edge of the handle
pointed head so you can use it to unnail pitons hole on the head for carabiners
If you are going to carry the hammer on your harness during a big route, it is useful to have a special hammer case.
Click here to see which is our recommended store for
buying pitons and a rock climbing hammer online.
http://www.rock-climbing-guide.com/pitons-hammer.htmlLast edited by AirborneSapper7; 02-01-2012 at 11:02 AM.
Join our efforts to Secure America's Borders and End Illegal Immigration by Joining ALIPAC's E-Mail Alerts network (CLICK HERE)
-
01-06-2011, 03:35 AM #454Senior Member
- Join Date
- May 2007
- Location
- South West Florida (Behind friendly lines but still in Occupied Territory)
- Posts
- 117,087
Jin-pole (made them with the CORP of Engineers to lift engine blocks and heavy loads far from any heavy crane)
From Wikipedia, the free encyclopedia
A jin-pole or gin pole is a rigid pole with a pulley on the end used for the purpose of lifting. The lower portion of the jin-pole is attached to the upper exterior of an existing tower or structure.
http://en.wikipedia.org/wiki/Jin-pole
Rigging a gin-pole (Small Version)
Gave it a try with what I had to hand - rigging a gin-pole.
Not a very impressive length pole and soon found that rope doesn't grip smooth square timber very well (thinking of Rolling Hitch gripping any cylindrical object). By hey - participating is all about finding these things!
And couldn't be bothered to grub around in the nettles to put the guy-line to the bottom of the left-hand-side pole (last picture) - just dropped a clove-hitch formed in the standing rope over the top of the post.
Anyway - always happier after achieving a rough-and-ready "version 1" than if it is all theoretical and unknown ahead of you.
So here it is - courtesy of friendly passing dog-walkers offering to take a photo.
The load is 4 buckets of water from the nearby stream poured into this building-site tub. So not a load you'd want to lift unaided!
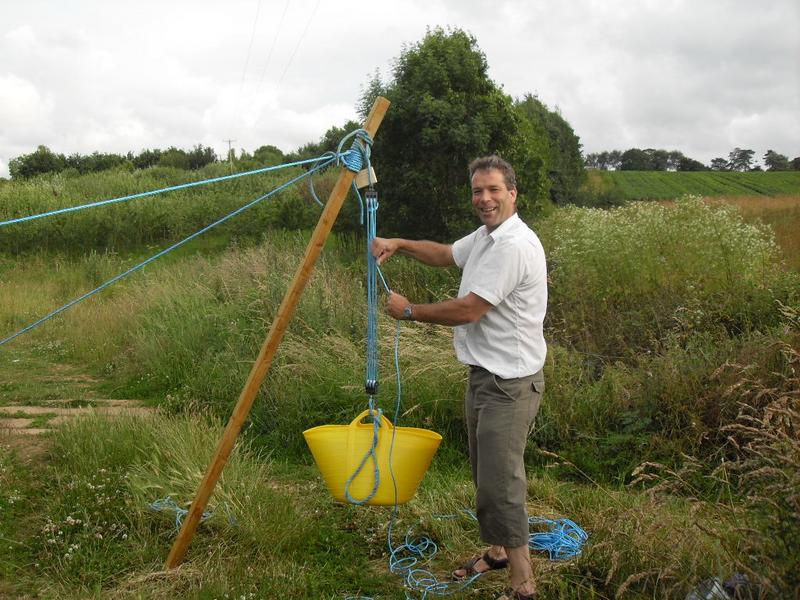
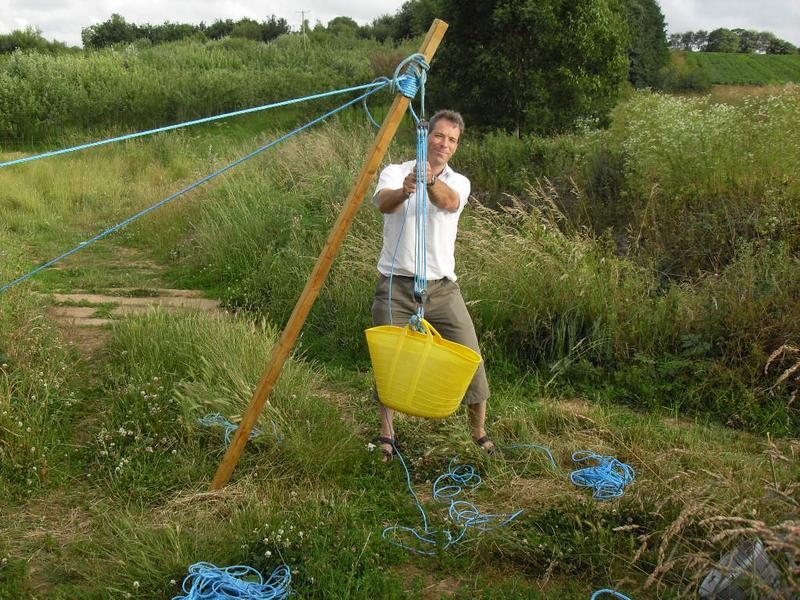
Knots used...
The lowest component is a "whipping" of rope around the square pole to try to grip and hold the pole - stop the structural knots above from slipping down the pole.
Moving upwards, the guy rope has a Constrictor Knot formed in the standing rope with I dropped over the top of the gin-pole and tightened-up as much as possible.
At the top there are a couple of Rolling Hitches to hold the stationary top-block (hadn't a short enough strop to do a useful Strop-Hitch on this small pole).
Now - I'm not saying that's how you should do it - that's what I improvised on the day for this awkward square smooth slippery timber...
(12 July 2009 Correct way to rig a gin-pole according to the American Military - external link Gin-pole at TPUB. http://www.tpub.com/content/constructio ... 51_177.htm This shows that the lashing ("whipping") of rope around the pole should itself suspend the top / stationary / shackle - block - and that the rope cannot be relied upon not to slip unaided - you need to nail cleats above and below the stack of knots.)
The blocks are small leisure sailing-boat blocks from a marine chandlers. This is a 3-by-3 setup, which should give a 6-to-1 mechanical advantage (it gives a 6-to-1 velocity ratio - you have to pull 6 times the length of rope out over the lead sheave for every 1 length the load moves - while friction reduces the true mechanical advantage below the velocity ratio). You must know the correct way to reeve (pass the rope around) the blocks!!! (USMil - Fig. 6-6 http://www.tpub.com/content/constructio ... 51_152.htm and Fig. 6-13 ) http://www.tpub.com/content/constructio ... 51_154.htm
(R Smith, 05 July 2009)
http://www.weldsmith.co.uk/tech/ropes_k ... npole.htmlLast edited by AirborneSapper7; 02-01-2012 at 11:03 AM.
Join our efforts to Secure America's Borders and End Illegal Immigration by Joining ALIPAC's E-Mail Alerts network (CLICK HERE)
-
01-06-2011, 03:39 AM #455Senior Member
- Join Date
- May 2007
- Location
- South West Florida (Behind friendly lines but still in Occupied Territory)
- Posts
- 117,087

form a clove hitch over the top of the pole next to the tackle lashing, and be sure the guy lines are aligned in the direction of their anchors. c. Lash a block to the gin pole about 2 feet from the base of the pole, the same as was done for the tackle lashing at the top, and place a cleat above the lashing to prevent slipping. This block serves as a leading block on the fall line which allows a directional change of pull from the vertical to the horizontal. A snatch block is the most convenient type to use for this purpose. d. Reeve the hoisting tackle and use the block lashed to the top of the pole so that the fall line can be passed through the leading block at the base of the gin pole. e. Drive a stake about 3 feet from the base of the gin pole. Tie a rope from the stake to the base of the pole below the lashing on the leading block and near the bottom of the pole. This is to prevent the pole from skidding while it is being erected. f. Check all lines to be sure that they are not tangled. Check all lashings to see that they are made up properly, and see that all knots are tight. Check the hooks on the blocks to see that they are moused properly. The gin pole is now ready to be erected. 2. Erecting. A gin pole 40 feet long can be raised easily by hand, but longer poles must be raised by supplementary rigging or power equipment. Figure 6-51 shows a gin pole being erected.Join our efforts to Secure America's Borders and End Illegal Immigration by Joining ALIPAC's E-Mail Alerts network (CLICK HERE)
-
01-06-2011, 03:56 AM #456Senior Member
- Join Date
- May 2007
- Location
- South West Florida (Behind friendly lines but still in Occupied Territory)
- Posts
- 117,087
Block and tackle
From Wikipedia, the free encyclopedia
http://en.wikipedia.org/wiki/Block_and_tackle

A block and tackle[1][2] is a system of two or more pulleys with a rope or cable threaded between them, usually used to lift or pull heavy loads.
The pulleys are assembled together to form blocks so that one is fixed and one moves with the load. The rope is threaded, or reeved, through the pulleys to provide mechanical advantage that amplifies that force applied to the rope.[3]
Hero of Alexandria described cranes formed from assemblies of pulleys. Illustrated versions of Hero's "book on raising heavy weights" show early block and tackle systems.[4]
[edit] OverviewContents
[hide]
Although used in many situations, they are especially common on boats and sailing ships, where motorized aids are usually not available and the task must be performed manually.

This block and tackle on a davit of the Mercator is used to help lower a boat.

Seamen aboard the now-defunct USNS Southern Cross freighter rigged this block and tackle to make heavy lifts during cargo operations.
A block is a set of pulleys or "sheaves" all mounted on a single axle. When rope or line is run through a block or a series of blocks the whole assembly is called a tackle.
[edit] Mechanical advantage
If frictional losses are neglected, the mechanical advantage of a block and tackle is equal to the number of parts in the line that either attach to or run through the moving block, or the number of supporting ropes. The formula is derived using virtual work in detail in the article mechanical advantage.
An ideal block and tackle with a moving block supported by n rope sections has the mechanical advantage,
 where FA is the hauling, or input, force and FB is the load.
The mechanical advantage of a tackle dictates how much easier it is to haul or lift the load. A tackle with a mechanical advantage of 4 (a double tackle) will be able to lift 100 lbs with only 25 lbs of tension on the hauling part of the line.
Ideal mechanical advantage correlates directly with velocity ratio. The velocity ratio of a tackle refers to the relative velocities of the hauling line to the hauled load. A line with a mechanical advantage of 4 has a velocity ratio of 4:1. In other words, to raise a load at 1 metre per second, the hauling part of the rope must be pulled at 4 metres per second.
[edit] Example Block and Tackle Configurations
Notice that there are two parts of the rope through each pulley in a block, and an additional part for the start of the rope that is attached to one of the blocks. If there are p pulleys in each of the blocks then there are 2p parts for one block and 2p+1 for the other block. This means if the block with the rope attachment is selected for the moving block, then the mechanical advantage is increased by one. This configuration requires the hauling rope to move in the same direction as the load.
The Gun tackle, Double tackle and Threefold purchase have the same number of pulleys in both blocks, one, two and three, respectively.

Various ways of rigging a tackle.[5]
For example, consider a block and tackle with two sheaves on both the moving block and the fixed block. One block has four lines running through its sheaves, and the other block also has four lines including the part of the line being pulled or hauled, with a fifth line attached to a secure point on the block. If the hauling part is coming out of the fixed block, the block and tackle will have a mechanical advantage of four. If the tackle is reversed, so that the hauling part is coming from the moving block, the mechanical advantage is now five.
In the diagram on the right the mechanical advantage of the tackles shown is as follows:
- Gun Tackle: 2
- Luff Tackle: 3
- Double Tackle: 4
- Gyn Tackle: 5
- Threefold purchase: 6
The formula used to find the effort required to raise a given weight is:
 where Fa is the force applied to the hauling part of the line (the input force), L is the weight of the load (the output force), N is the ideal mechanical advantage of the system (which is the same as the number of segments of line extending from the moving block), and eff is the mechanical efficiency of the system (equal to one for an ideal frictionless system; a fraction less than one for real-world systems with energy losses due to friction and other causes). If S is the number of sheaves in the purchase, and there is a roughly x% loss of efficiency at each sheave due to friction, then:[6][7]
 This approximation is more accurate for smaller values of S and x.[7] A more precise estimate of efficiency is possible by use of the sheave friction factor, K (which may be obtainable from the manufacturer or published tables[8]). The relevant equation is:[8]
 Typical K values are 1.04 for roller bearing sheaves and 1.09 for plain bearing sheaves (with wire rope).[8]
The increased force produced by a tackle is offset by both the increased length of rope needed and the friction in the system. In order to raise a block and tackle with a mechanical advantage of 6 a distance of 1 metre, it is necessary to pull 6 metres of rope through the blocks. Frictional losses also mean there is a practical point at which the benefit of adding a further sheave is offset by the incremental increase in friction which would require additional force to be applied in order to lift the load. Too much friction may result in the tackle not allowing the load to be released easily,[9] or by the reduction in force needed to move the load being judged insufficient because undue friction has to be overcome as well.
[edit] Rigging methods
A tackle may be
- "Rove to advantage" – where the pull on the rope is in the same direction as that in which the load is to be moved. The hauling part is pulled from the moving block.[5]
- "Rove to disadvantage" – where the pull on the rope is in the opposite direction to that in which the load is to be moved. The hauling part is pulled from the fixed block.[5]
The common wisdom prefers a block and tackle "rove to advantage." However, if the load is to be hauled against gravity, then there is a benefit to reeving the block and tackle to disadvantage, because in this case the weight of the individual can offset the weight of the load. On the other hand, if the load is to be hauled parallel to the ground, there is a benefit to reeving the block and tackle to advantage, because the pulling force is in the direction of the load movement allowing the individual to manage obstacles. It is important to notice that the mechanical advantage is different if the block and tackle is "rove to advantage" or "rove to disadvantage." The mechanical advantage will always be one greater when "rove to advantage" than when "rove to disadvantage."
[edit] More on mechanical advantage
A block and tackle, is characterized by the use of a single continuous rope to transmit a tension force around one or more pulleys to lift or move a load---the rope may be a light line or a strong cable. If the rope and pulley system does not dissipate or store energy, then its mechanical advantage is the number of parts of the rope that act on the load. This can be shown as follows.
Consider the set of pulleys that form the moving block and the parts of the rope that support this block. If there are p of these parts of the rope supporting the load W, then a force balance on the moving block shows that the tension in each of the parts of the rope must be W/p. This means the input force on the rope is T=W/p. Thus, the block and tackle reduces the input force by the factor p.

A gun tackle has a single pulley in both the fixed and moving blocks with two rope parts supporting the load W.
Separation of the pulleys in the gun tackle show the force balance that results in a rope tension of W/2.

A double tackle has two pulleys in both the fixed and moving blocks with four rope parts supporting the load W.

Separation of the pulleys in the double tackle show the force balance that results in a rope tension of W/4.
By adding a pulley to the fixed block of a gun tackle the direction of the pulling force is reversed though the mechanical advantage remains the same, Diagram 3a. This is an example of the Luff tackle.

Diagram 3: The gun tackle "rove to advantage" has the rope attached to the moving pulley. The tension in the rope is W/3 yielding an advantage of three.

Diagram 3a: The Luff tackle adds a fixed pulley "rove to disadvantage." The tension in the rope remains W/3 yielding an advantage of three.
[edit] References
- ^ "Tackle" can be
 /ˈteɪkəl/ in this usage.
 - ^ "Royal Canadian Sea Cadets - Master Lesson Plan - Phase Level Three = PO:Seamanship". pp. 2. http://www.rcsccwarrior.ab.ca/Resour...406.09_MLP.pdf. Retrieved 2009-12-27. "A tackle (pronounced taycle) is a purchase that has the following characteristics:"
- ^ Ned Pelger, ConstructionKnowledge.net
- ^ A. P. Usher, 1929, A History of Mechanical Inventions, Harvard University Press, (reprinted by Dover Publications 196
 .
. - ^ a b c MacDonald, Joseph A. Handbook of Rigging: For Construction and Industrial Operations. McGraw-Hill Professional. pp. 376. ISBN 978-0071493017. "Tackle may be rigged to advantage - where the pull on the rope is in the same direction as that in which the load is to be moved; or it may be rigged to disadvantage - where the pull on the rope is in the opposite direction of that in which the load is to be moved"
- ^ Notes on cargo work: Kemp and Young. 3rd Edition. ISBN 853090408 Page 4
- ^ a b Glerum, Jay O. (2007-04-03). Stage rigging handbook (3rd edition). Southern Illinois University Press. pp. 52–54 (320 pages total). ISBN 978-0809327416. http://books.google.com/?id=7yS4uno7...sec=frontcover.
- ^ a b c Recommended Practice on Application Care, and use of Wire Rope for Oil Field Service, Twelfth Edition. American Petroleum Institute. 2005-06-01. pp. 33. http://www.techstreet.com/standards/...uct_id=1221365.
- ^ Friction may mean that the rope in a tackle "bunches" and jams when the force is released if the tackle has too much friction for the load to balance, or that the tackle does not "lower" the load
- ^ sccheadquarters.com seamanship reference
- Rescue Technician: Operational Readiness for Rescue Providers, edited by Claire Merrick et al., published by Mosby, Inc., St. Louis, Mo., 1998, copyright held by Maryland Fire and Rescue Institute. ISBN 0-8151-8390-9 See Chapters 4 and 5, p. 41 and ff.
http://en.wikipedia.org/wiki/Block_and_tackleLast edited by AirborneSapper7; 02-01-2012 at 11:06 AM.
Join our efforts to Secure America's Borders and End Illegal Immigration by Joining ALIPAC's E-Mail Alerts network (CLICK HERE)
-
01-06-2011, 04:54 AM #457Senior Member
- Join Date
- May 2007
- Location
- South West Florida (Behind friendly lines but still in Occupied Territory)
- Posts
- 117,087
How a Block and Tackle Works
by Marshall Brain
Please copy/paste the following text to properly cite this HowStuffWorks article:
Brain, Marshall. "How a Block and Tackle Works" 01 April 2000. HowStuffWorks.com. http://science.howstuffworks.com/transp ... pulley.htm 05 January 2011.
1. Introduction to How a Block and Tackle Works http://science.howstuffworks.com/transp ... pulley.htm
2. Other Force/Distance Tradeoffs http://science.howstuffworks.com/transp ... ulley1.htm
3. Lots More Information http://science.howstuffworks.com/transp ... ulley2.htm
4. See all Engines & Equipment articles http://science.howstuffworks.com/transp ... -equipment
Â*Â*If you have ever looked at the end of a crane, or if you have ever used an engine hoist or a come-along, or if you have ever looked at the rigging on a sailboat, then you have seen a block and tackle at work. A block and tackle is an arrangement of rope and pulleys that allows you to trade force for distance. In this edition of How Stuff Works we will look at how a block and tackle works, and also examine several other force-multiplying devices!
Understanding the Block and Tackle
Imagine that you have the arrangement of a 100 pound (45.4 kilogram) weight suspended from a rope, as shown below:

In the above figure, if you are going to suspend the weight in the air then you have to apply an upward force of 100 pounds to the rope. If the rope is 100 feet (30.5 meters) long and you want to lift the weight up 100 feet, you have to pull in 100 feet of rope to do it. This is simple and obvious.
Now imagine that you add a pulley to the mix, as shown below:

Does this change anything? Not really. The only thing that changes is the direction of the force you have to apply to lift the weight. You still have to apply 100 pounds of force to keep the weight suspended, and you still have to reel in 100 feet of rope in order to lift the weight 100 feet.
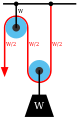
The following figure shows the arrangement after adding a second pulley:

This arrangement actually does change things in an important way. You can see that the weight is now suspended by two pulleys rather than one. That means the weight is split equally between the two pulleys, so each one holds only half the weight, or 50 pounds (22.7 kilograms). That means that if you want to hold the weight suspended in the air, you only have to apply 50 pounds of force (the ceiling exerts the other 50 pounds of force on the other end of the rope). If you want to lift the weight 100 feet higher, then you have to reel in twice as much rope 0- 200 feet of rope must be pulled in. This demonstrates a force-distance tradeoff. The force has been cut in half but the distance the rope must be pulled has doubled.
The following diagram adds a third and fourth pulley to the arrangement:


In this diagram, the pulley attached to the weight actually consists of two separate pulleys on the same shaft, as shown on the right. This arrangement cuts the force in half and doubles the distance again. To hold the weight in the air you must apply only 25 pounds of force, but to lift the weight 100 feet higher in the air you must now reel in 400 feet of rope.
A block and tackle can contain as many pulleys as you like, although at some point the amount of friction in the pulley shaÂ*fts begins to become a significant source of resistance.
VIDEO: Check out videos of extreme engineering. http://videos.howstuffworks.com/science ... aylist.htm
http://science.howstuffworks.com/transp ... pulley.htmLast edited by AirborneSapper7; 02-01-2012 at 11:06 AM.
Join our efforts to Secure America's Borders and End Illegal Immigration by Joining ALIPAC's E-Mail Alerts network (CLICK HERE)
-
01-06-2011, 05:07 AM #458Senior Member
- Join Date
- May 2007
- Location
- South West Florida (Behind friendly lines but still in Occupied Territory)
- Posts
- 117,087
OTHER EXPEDIENT WEAPONS
You can make other field-expedient weapons such as the throwing stick, archery equipment, and the bola.
Throwing Stick
The throwing stick, commonly known as the rabbit stick, is very effective against small game (squirrels, chipmunks, and rabbits). The rabbit stick itself is a blunt stick, naturally curved at about a 45-degree angle. Select a stick with the desired angle from heavy hardwood such as oak. Shave off two opposite sides so that the stick is flat like a boomerang (Figure 12-5). You must practice the throwing technique for accuracy and speed. First, align the target by extending the nonthrowing arm in line with the mid to lower section of the target. Slowly and repeatedly raise the throwing arm up and back until the throwing stick crosses the back at about a 45-degree angle or is in line with the nonthrowing hip. Bring the throwing arm forward until it is just slightly above and parallel to the nonthrowing arm. This will be the throwing stick's release point. Practice slowly and repeatedly to attain accuracy.

Archery Equipment
You can make a bow and arrow (Figure 12-6) from materials available in your survival area. To make a bow, use the procedure described under Killing Devices in Chapter 8.

While it may be relatively simple to make a bow and arrow, it is not easy to use one. You must practice using it a long time to be reasonably sure that you will hit your target. Also, a field-expedient bow will not last very long before you have to make a new one. For the time and effort involved, you may well decide to use another type of field-expedient weapon.
Bola
The bola is another field-expedient weapon that is easy to make (Figure 12-7). It is especially effective for capturing running game or low-flying fowl in a flock. To use the bola, hold it by the center knot and twirl it above your head. Release the knot so that the bola flies toward your target. When you release the bola, the weighted cords will separate. These cords will wrap around and immobilize the fowl or animal that you hit.
http://www.wilderness-survival.net/weapons-3.php
Return to Field Expedient Weapons, Tools, and Equipment http://www.wilderness-survival.net/chp12.phpLast edited by AirborneSapper7; 02-01-2012 at 11:07 AM.
Join our efforts to Secure America's Borders and End Illegal Immigration by Joining ALIPAC's E-Mail Alerts network (CLICK HERE)
-
01-06-2011, 05:10 AM #459Senior Member
- Join Date
- May 2007
- Location
- South West Florida (Behind friendly lines but still in Occupied Territory)
- Posts
- 117,087
FIELD-EXPEDIENT WEAPONS, TOOLS, AND EQUIPMENT
As a soldier you know the importance of proper care and use of your weapons, tools, and equipment. This is especially true of your knife. You must always keep it sharp and ready to use. A knife is your most valuable tool in a survival situation. Imagine being in a survival situation without any weapons, tools, or equipment except your knife. It could happen! You might even be without a knife. You would probably feel helpless, but with the proper knowledge and skills, you can easily improvise needed items.
In survival situations, you may have to fashion any number and type of field-expedient tools and equipment to survive. Examples of tools and equipment that could make your life much easier are ropes, rucksacks, clothes, nets, and so on.
Weapons serve a dual purpose. You use them to obtain and prepare food and to provide self-defense. A weapon can also give you a feeling of security and provide you with the ability to hunt on the move.
# Clubs http://www.wilderness-survival.net/weapons-1.php
# Edged Weapons http://www.wilderness-survival.net/weapons-2.php
# Other Expedient Weapons http://www.wilderness-survival.net/weapons-3.php
# Lashing and Cordage http://www.wilderness-survival.net/weapons-4.php
# Rucksack Construction http://www.wilderness-survival.net/weapons-5.php
# Clothing and Insulation http://www.wilderness-survival.net/weapons-6.php
# Cooking and Eating Utensils http://www.wilderness-survival.net/weapons-7.php
http://www.wilderness-survival.net/weapons-3.phpLast edited by AirborneSapper7; 02-01-2012 at 11:07 AM.
Join our efforts to Secure America's Borders and End Illegal Immigration by Joining ALIPAC's E-Mail Alerts network (CLICK HERE)
-
01-06-2011, 05:19 AM #460Senior Member
- Join Date
- May 2007
- Location
- South West Florida (Behind friendly lines but still in Occupied Territory)
- Posts
- 117,087
How to make a Tri-Blade Boomerang http://www.youtube.com/watch?v=29PkdSkTIPE
Nuances of boomerang design / flight http://www.youtube.com/watch?v=lUA4s6gWHNE
Last edited by AirborneSapper7; 02-01-2012 at 11:08 AM.
Join our efforts to Secure America's Borders and End Illegal Immigration by Joining ALIPAC's E-Mail Alerts network (CLICK HERE)


 Reply With Quote


Colorado Passes Bill Allowing Residents To Sue Federal...
05-09-2026, 12:14 AM in General Discussion