

Results 491 to 500 of 11801
 226Likes
LinkBacks (?)
-
12-26-2016, 11:32 AM
-
09-02-2016, 05:39 PM
-
whole garden made with pallets!! Love it!! | Pallets | Pinterest | Pallets, Pallets Garden and Wooden Pallets
Refback This thread03-06-2016, 11:30 AM -
10-20-2015, 05:29 PM
-
06-12-2015, 08:00 PM
-
02-26-2015, 01:58 PM
-
01-05-2015, 04:13 PM
-
12-19-2014, 10:19 AM
-
EMERGENCY: HUGE FEMA PANDEMIC EXERCISE IN USA IN NOVEMBER, INTERNET SHUT DOWN PART OF EXERCISE | Prepare4Survival
Refback This thread12-03-2014, 10:39 PM -
Off Grid World ? Ugly Duckling Shipping Container Home Built by Artist Is a Beautiful Swan on the Inside
Refback This thread11-25-2014, 03:10 PM -
11-17-2014, 10:59 PM
-
11-13-2014, 11:18 AM
-
11-09-2014, 02:54 PM
-
10-28-2014, 11:38 PM
-
10-26-2014, 05:54 AM
-
10-16-2014, 11:28 AM
-
10-03-2014, 01:25 PM
-
10-02-2014, 09:16 PM
-
09-26-2014, 07:00 PM
-
09-26-2014, 01:56 PM
-
09-19-2014, 04:46 PM
-
09-13-2014, 05:49 AM
-
09-05-2014, 01:52 PM
-
09-01-2014, 09:39 AM
-
08-30-2014, 06:29 PM
-
08-10-2014, 06:29 AM
-
08-04-2014, 05:07 PM
-
07-23-2014, 11:14 AM
-
New Evidence on Expiration Dates | Medical Preparedness | Doom and Bloom (TM) | Doom and Bloom (TM)
Refback This thread07-22-2014, 10:10 AM -
07-18-2014, 08:37 PM
-
07-15-2014, 04:57 PM
-
07-11-2014, 01:40 AM
-
04-22-2014, 11:14 AM
-
04-18-2014, 12:57 PM
-
04-18-2014, 10:10 AM
-
04-14-2014, 12:18 AM
-
04-12-2014, 02:28 AM
-
03-02-2014, 11:43 PM
-
12-24-2013, 11:59 PM
-
12-07-2013, 11:04 PM
-
kitchen | Cob
Refback This thread11-25-2013, 03:24 PM -
10-22-2013, 10:25 PM
-
Apple Pie Braid | Sweets
Refback This thread09-26-2013, 07:58 AM -
09-02-2013, 04:44 PM
-
5 Reasons Why You May have to Bug Out Even Though You Don’t Want to | The Apartment Prepper's Blog
Refback This thread08-23-2013, 03:20 PM -
06-27-2013, 06:30 AM
-
06-23-2013, 08:11 PM
-
06-17-2013, 11:21 PM
-
05-24-2013, 05:06 PM
-
To Eat / BASIC LIST / SUGGESTED ITEMS FOR LONG TERM SURVIVAL - Page 275 - ALIPAC
Refback This thread05-01-2013, 03:49 AM
Thread Information
Users Browsing this Thread
There are currently 1 users browsing this thread. (0 members and 1 guests)
 LinkBack URL
 About LinkBacks
-
02-08-2011, 09:30 AM #491Senior Member


- Join Date
- May 2007
- Location
- South West Florida (Behind friendly lines but still in Occupied Territory)
- Posts
- 117,087
Choosing Dark Roast Coffee May Boost Antioxidant Intake
February 8, 2011
by Personal Liberty News Desk
Next time the barista poses the question of light or dark roast, coffee-drinkers might be doing themselves a nutritional favor by going for the latter as it has been shown to contain more antioxidants.
Research conducted at the University of British Columbia has shown that the high temperatures at which beans are roasted to produce dark roast coffee are responsible for the beverage's antioxidant levels.
Coffee contains polyphenols which are antioxidants also found in red wine and certain teas. Antioxidants help eliminate harmful free radicals, substances which have been linked to cancer and other diseases.
Previous research from scientists at the University of Scranton has shown that coffee is a top source of the disease-fighting compounds. The study concluded that the beverage has higher levels of antioxidants than any other food or beverage, according to an article on MSNBC.com.
However, it should be noted that excessive levels of caffeine can put stress on the heart and lead to anxiety or hypertension. So, enjoy dark roast in moderation and try to include lots of fruits and vegetables to further boost antioxidant intake.
http://www.personalliberty.com/news/cho ... 02_08_PLA_[PI110208]&rrid=238434262Last edited by AirborneSapper7; 02-01-2012 at 11:56 AM.
Join our efforts to Secure America's Borders and End Illegal Immigration by Joining ALIPAC's E-Mail Alerts network (CLICK HERE)
-
02-08-2011, 11:37 PM #492Senior Member
- Join Date
- May 2007
- Location
- South West Florida (Behind friendly lines but still in Occupied Territory)
- Posts
- 117,087
Food, and Storage of Food Storage: The Foodsaver Vacuum System
http://canadafreepress.com/index.php/article/33087Last edited by AirborneSapper7; 02-01-2012 at 11:57 AM.
Join our efforts to Secure America's Borders and End Illegal Immigration by Joining ALIPAC's E-Mail Alerts network (CLICK HERE)
-
02-09-2011, 05:15 PM #493Senior Member
- Join Date
- May 2007
- Location
- South West Florida (Behind friendly lines but still in Occupied Territory)
- Posts
- 117,087
Easiest Peanut Butter Fudge http://allrecipes.com/Recipe/Easiest-Pe ... etail.aspx
Peanut Butter Balls Recipe "Buckeyes" http://joyofbaking.com/candy/PeanutButterBalls.html
Oatmeal Cookies Recipe http://www.joyofbaking.com/OatmealCookies.htmlLast edited by AirborneSapper7; 02-01-2012 at 11:57 AM.
Join our efforts to Secure America's Borders and End Illegal Immigration by Joining ALIPAC's E-Mail Alerts network (CLICK HERE)
-
02-09-2011, 05:17 PM #494Senior Member
- Join Date
- May 2007
- Location
- South West Florida (Behind friendly lines but still in Occupied Territory)
- Posts
- 117,087
Homemade Candy Recipes
These vintage homemade candy recipes are taken from one of Mom's old recipe scrapbooks, circa 1923.
Buttermilk Candy
Boil together 2 cups sugar, 1 cup buttermilk, and butter size of a walnut until it forms a soft ball in water. Remove from the fire and beat until creamy. Pour into buttered pans and cut in squares when cool. --The Farmer's Advocate, circa 1915
Candied Orange Peel
Carefully cut orange peel in strips, place in saucepan in cold water, and bring to boil. Repeat process three times, then measure orange peel and add equal quantity of sugar and hot water to cover, and cook until pulp is translucent. Remove from syrup; roll in sugar; place on plates to dry.
Children's Raisin Candy
One cup powdered sugar, 2 tablespoons cocoa, 2 tablespoons melted butter, and enough boiling water to mix stiff. Flavour with 1/2 teaspoon vanilla. Take a little of the mixture on the end of a teaspoon and form into a ball, taking 2 raisins to each ball, and press together until nearly flat. If white candy is preferred leave out cocoa. --Fruits and Candies, circa 1920s
Candy Kisses
Two cupfuls powdered sugar, the whites of 3 eggs, 2 cupfuls coconut, 2 teaspoonfuls baking powder; mix all together; drop upon buttered paper and bake until slightly brown in a brisk oven. --Lee's Priceless Recipes, 1895
Panocha
Two pounds of brown sugar, two-thirds cup of milk, butter size of a walnut. Boil about twenty minutes, then take off stove and beat and add one-half pound chopped walnuts.
Wenham Wopsies
Did you know that brothers Will Keith Kellog and Dr. John Harvey Kellog invented cornflakes in Battle Creek, Michigan back in 1894?
Whites of 2 eggs beaten stiff, 2-1/2 cups corn flakes, 1/2 cup coconut, 1 scant cup of sugar and a little vanilla. Mix well and bake on heated tins in moderate oven. --Fruits and Candies, circa 1920s
Penuchle Favourite
Three cups brown sugar, 1 cup cream, 1 teaspoon butter. Boil without stirring until a little dropped in cold water will harden like glass, then take off the stove and stir rapidly. Flavour with vanilla or any other extract liked. Nuts may be added. Pour on buttered plates and cut in squares when it is hard. --The Farmer's Advocate, circa 1915
Homemade Candy Recipes
These old fashioned candy making recipes are taken from "The Times Cook Book, No. 2" published by the Times-Mirror Co., Los Angeles, in 1905.
Many Californian women proudly submitted their favorite candy making recipes to the Times in hopes of winning the newspaper's Prize Recipe Contests.
Honey Candy Recipe
This simple recipe for honey candy must have been a prize winner. The candy is sooooo good!
One pint of white sugar, water sufficient to dissolve it, and 4 tablespoons honey. Boil till brittle; pull white when cooling.
Cream Candy Recipe, or Panocha
This easy recipe for cream candy makes a delicious, old-time panocha candy.
One cup of coarsely chopped walnuts, 2 cups of light-brown sugar, 1 cup of pulverized sugar, 1 cup of sweet milk, 1 tablespoonful butter. Cook until it will form a little ball by testing it in a shallow dish of water, then remove from fire, and add the walnuts, and flavor with teaspoonful of vanilla; beat until it is creamy and turn out in buttered platter; cut in squares. This is a delicious cream candy. --Hazel Rooklidge
Patience Candy Recipe
This homemade candy recipe is taken from Grandma McIlmoyle's old handwritten recipe book, circa 1912.
Grandma frequently exchanged recipes with her friends and family, and she recorded them in small notebooks, or scribblers, as they were called. You will love this old-time pecan candy recipe. It was sometimes called patience candy because making it requires constant stirring and thorough beating -- patience.
3 cups granulated sugar, 2 cups milk, pecans, and butter. Place 1 cup sugar in iron skillet and melt to a light brown. When melted add 1 cup milk. [Then add remaining milk and sugar.] Boil until it forms soft ball in cold water. Remove from fire, add butter and pecans, and beat thoroughly. Pour on buttered dish or oiled paper and cut in squares. Use about 1/4 pound of butter and as many pecans as desired. Be sure to cook over slow fire.
Treat Yourself To Nostalgic Candies
Did you know that you can buy almost all your favorite retro candies from childhood online at the Candy Crate store?
Just click on the Candy Crate banner and prepare to be amazed at what's available. Nostalgic candies make a great gift for any occasion.
These vintage homemade candy recipes all make delicious candy. Why not pick a couple and get your friends and family involved in making a big plate of old-fashioned candies?
If it's summertime, munch on a plateful of homemade treats while sitting on the back porch gazing up at the night sky and trying to pick out Vega, Deneb and Altair, the three bright stars that make up the Summer Triangle.
If it's wintertime, enjoy your homemade candy while sitting in front of a warm, crackling fire playing your family's favorite board game.
Either way, you'll get to experience a perfect, old-fashioned evening. I hope you enjoy trying these delicious homemade candy recipes.
http://www.homemade-dessert-recipes.com ... cipes.htmlLast edited by AirborneSapper7; 02-01-2012 at 11:58 AM.
Join our efforts to Secure America's Borders and End Illegal Immigration by Joining ALIPAC's E-Mail Alerts network (CLICK HERE)
-
02-09-2011, 05:21 PM #495Senior Member
- Join Date
- May 2007
- Location
- South West Florida (Behind friendly lines but still in Occupied Territory)
- Posts
- 117,087
Candy Recipes
Make your own candy with our great homemade candy recipes.
Who doesn't like making and eating candy? There are so many seasons and holidays that wouldn't be the same without the candy! You can easily find bulk candy online and order enough to satisfy your sweet tooth for a while. Candy is sweet but it can also give you cavities so make sure to enjoy in healthy moderation!
14 Minute Maple Candy
4 cups maple syrup
1 cup cream
1/4 cup butter
1 cup nut meats, chopped
1 teaspoon lemon extract
Cook the maple syrup, cream, and butter for 9 minutes after the boiling point is reached. Remove from heat, add the nut meats and extract and stir for 5 minutes. Pour into buttered pans and when cool, cut into squares.
From: Culinary Arts Institute Encyclopedic CookBook
--------------------------------------------------------------------------------
2 Minute Microwave Fudge
This fudge will take a teeny bit longer than two minutes before it's ready to eat, but prep time is a snap!
1/2 cup butter
3 1/2 cups powdered sugar
1/2 cup cocoa
1/4 cup milk
1 tsp. vanilla
1/2 cup chopped nuts
Place ingredients (except nuts) in bowl; do not mix. Microwave on high power for two minutes. Beat with electric mixer until smooth. Fold in nuts. Pour mixture into buttered 8x8 dish. Refrigerate 15 to 20 minutes until set.
--------------------------------------------------------------------------------
Almond Joy Bars
4 c. shredded coconut
1/4 c. light corn syrup
1 pkg. (11 1/2-oz) milk chocolate chips
1/4 c. vegetable shortening
26 whole natural almonds (about 1 oz.)
Line two large cookie sheets with waxed paper. Set large wire cooling rack on paper; set aside. Place coconut in large bowl; set aside.
Place corn syrup in a 1 c. glass measure. Microwave on high (100%) 1 minute or until syrup boils. Immediately pour over coconut. Work warm syrup into coconut using the back of a wooden spoon until coconut is thoroughly coated.
Using 1 level measuring tablespoon of coconut, shape into a ball by squeezing coconut firmly in palm of one hand, then rolling between both palms. Place 2 inches apart on wire racks. Let dry 10 minutes. Reroll coconut balls so there are no loose ends of coconut sticking up.
Place milk chocolate and shortening in a 4-cup glass measure or 1 1/2 quart microwave-safe bowl. Microwave on high 1 to 2 minutes or until mixture can be stirred smooth and is glossy; stirring once or twice.
Working quickly, spoon 1 level measuring tablespoon of the chocolate over each coconut ball, making sure chocolate coats and letting excess chocolate drip down onto waxed paper. While chocolate coating is still soft, lightly press whole almond on top of each. Let stand to set or place in refrigerator.
Store in a single layer in airtight container. Keeps best if refrigerated.
Makes 26.
--------------------------------------------------------------------------------
Bailey's Irish Cream Truffles
12 oz Semi-sweet chocolate chips
1/4 cup Heavy cream
1 tbsp Butter
2 Egg yolks
1/4 c Baileys Irish Cream
In a heavy saucepan, over low heat, melt chocolate until smooth. Add Bailey's Irish cream and heavy cream and stir together until thoroughly combined. Whisk in egg yolks, one at a time - this will cause the truffles to thicken. Whisk in butter. Refrigerate until firm - at least two hours.
With spoon or melon baller, make small balls of the truffle mixture. Roll in your choice of toppings - sugar, powdered sugar, finely chopped nuts, coconut, cocoa, sprinkles, etc.
--------------------------------------------------------------------------------
Butter Cream Mints Recipe
1/2 cup butter
1 tsp salt
2/3 cup sweetened condensed milk
7 cups powdered sugar, sifted
peppermint extract to taste
food coloring
Cream butter and salt together until well blended. Add milk. Add sugar (powdered). Mix well, then remove from bowl and knead to mix well. Add flavor. Divide into separate batches for each color desired. Add a few drops of coloring at a time until desired color is reached, kneading to mix well. You can now roll in balls, roll into logs and then slice.
--------------------------------------------------------------------------------
Candied Walnuts
1 pound walnut halves
1 cup white sugar
2 tsp ground cinnamon
1/4 tsp salt
6 tbs milk
1 tsp vanilla extract
Preheat oven to 350F. Spread nuts in a single layer over a baking sheet. Roast for approximately 8 to 10 minutes, or until the nuts start to turn brown and the smell of roasting nuts fills the kitchen.
Stir together sugar, cinnamon, salt, and milk in a medium saucepan. Cook over medium-high heat for 8 minutes, or until the mixture reaches the soft ball stage of 236F. Remove from heat, and stir in vanilla immediately.
Add walnuts to sugar syrup, and stir to coat well. Spoon nuts onto waxed paper, and immediately separate nuts with a fork. Cool, and store in airtight containers.
--------------------------------------------------------------------------------
Caramel Candy
1 C. butter
1 16-ounce pkg (2 1/4 C). packed brown sugar
1 14-ounce can sweetened condensed milk
1 C. light colored corn syrup
1 tablespoon vanilla
1. Butter an 8x8x2- or 9x9x2-inch baking pan. Set aside
2. In a heavy saucepan, melt butter over low heat. Add brown sugar, sweetened condensed milk, and corn syrup. Mix well. Cook and stir over medium-high heat until mixture boils. Continue to boil at a moderate, steady rate for 20 minutes. (DO NOT let the mixture get to a foaming boil. This will make the caramels too hard.)
3. Remove saucepan from heat. Stir in vanilla. Quickly pour mixture into prepared pan. Let caramels cool to room temperature. Use a buttered knife to cut. If the caramels are too soft to cut, refrigerate until firm.
4. Wrap each piece in waxed paper (NOT plastic wrap!) for a lovely presentation.
For MORE listings of Caramel Candy Recipes, visit our Caramels Recipe Page
--------------------------------------------------------------------------------
Cherry Fudge
16 ounces Milk Chocolate Coating
1/2 cup Evaporated Milk
2 Tbsp. Butter
1/4 cup Maraschino Cherries, drained and chopped
2 drops Almond Oil
1/2 cup Nuts, optional
Melt chocolate in Pyrex measuring cup on defrost in microwave. Add butter and evaporated milk and blend. Add cherries, almond oil and nuts, if used and mix well. Pour into buttered 8 inch square pan and set in fridge till firm.
--------------------------------------------------------------------------------
Chocolate Chip Cookie Brittle
1 cup butter or margarine
1 1/4 teaspoons vanilla extract
1 teaspoon salt
1 cup granulated sugar
2 cups sifted all-purpose flour
1 (6 ounce) package chocolate chips
1 cup nuts
Combine butter, vanilla extract and salt. Add sugar. Blend flour. Add chocolate chips and nuts. Press to ends of jellyroll pan (15 x 10 x 1-inch). Bake at 375 degrees F for 20 to 25 minutes or until golden brown. Completely cool and break into pieces.
--------------------------------------------------------------------------------
Chocolate Truffles
2 T unsalted butter
1/3 c heavy cream
12 oz bittersweet chocolate
1 cup cocoa for dusting
Chop the bittersweet chocolate into small bits. In a small pan, warm the cream and butter until it is almost boiling. At the same time, heat water in a double boiler. When the cream mixture is hot, put the chopped chocolate in the top of the double boiler, slowly pour the hot cream over the chocolate and whisk until the chocolate melts and is smooth. Remove from heat at the earliest possible moment, as leaving it on too long will cause the chocolate to become grainy.
Refrigerate for 2 hours. Scoop out mounds and roll into small balls. Into a doubled paper lunch sack pour the cocoa and all the truffle balls. Close the sack tightly with your fist, then turn it upside down several times to coat truffles with cocoa. Pour the truffles out gently into a large sieve, shake gently a few moments over a large bowl to catch the loose cocoa, then pour the truffles into a bowl. Put about 5 truffles at a time back into the sieve and shake them back and forth until there is no more loose cocoa on them or in the bottom of the sieve. This removes all loose cocoa plus it gives the truffles' surface a nice texture.
It's best to keep truffles refrigerated, but they will keep unrefrigerated for up to two days.
--------------------------------------------------------------------------------
Coffee Chip Fudge
1 1/2 cup firmly packed brown sugar
1 1/2 cup sugar
1 cup milk
1/2 cup half & half
2 tablespoons light corn syrup
2 tablespoons instant coffee granules
1/8 teaspoon salt
3 tablespoons butter or margarine - softened
1 teaspoon vanilla extract
1 (6 oz) pkg semi-sweet chocolate morsels
1/2 cup chopped pecans
Preparation
Combine sugars with milk, half & half, corn syrup, coffee and salt in a large heavy saucepan. Bring to a boil over medium heat, stirring constantly. Continue cooking without stirring to the soft ball stage (234 degrees). Remove from heat then add the butter and vanilla extract. Do not stir. Cool to 110 degrees, beat until fudge loses its gloss and begins to thicken. Add chocolate morsels and pecans, stir just to mix. Pour into a buttered 9 inch square pan. Cool and cut into 1 1/2 inch squares. Yields about 3 dozen.
--------------------------------------------------------------------------------
Easy Microwave Peanut Butter Chocolate Fudge
With only three ingredients and your microwave you can satisfy your (or anyone else's) craving for peanut butter fudge in just minutes.
12 oz. semisweet chocolate chips
12 oz. peanut butter
14 oz. sweetened condensed milk
In a 1-1/2 quart microwave-proof bowl, melt chocolate and peanut butter on high power for three minutes. Stir well. Add milk and stir until well blended. Pour mixture into 8x8 dish lined with waxed paper. Refrigerate to chill. Makes approximately 42 pieces.
--------------------------------------------------------------------------------
Foolproof Peanut Butter Fudge
3 cups sugar
2/3 cup milk
1/4 cup white Karo syrup
2 tbsp butter
Bring above ingredients to full boil and let boil for 3 1/2 minutes stirring occasionally. Add 12 oz peanut butter (Jif peanut butter is the best) and 7 oz jar marshmellow. Mix well and pour into buttered pans and cool. Cut into squares.
--------------------------------------------------------------------------------
Fudgy Scotch Ring
Submitted by Rosa
1 package of Nestle chocolate chips
1 package of Nestle butterscotch chips
(6 oz package of each type of chips)
1 cup chopped walnuts
1 cup walnut halves
1 tsp. vanilla
1 can Eagle Brand sweetened condenced, non evaporated milk.
Put chips and milk in top of double boiler, Melt until mixture begins to thicken.
Remove from heat, add vanilla and chopped nuts. Let cool for about an hour. Line bottom of ROUND pan with the walnut halves. Spoon fudge on top of the nuts to form ring. top with chopped nuts if desired.
Cool in fridge until ready to serve,this may take a few hours to over night
--------------------------------------------------------------------------------
Gumdrops
Cut into shapes you like.
1 pkg Powdered fruit pectin (a 3/4 ounces)
3/4 cup Water
1/2 tsp Baking soda
1 cup Sugar
1 cup Light corn syrup
2 tsp Imitation Strawberry extract*
Red food coloring*
enough Granulated sugar to coat
Combine fruit pectin, water and baking soda in a medium-size pan. (Note, mixture will foam) Combine sugar and corn syrup in large saucepan. Place both saucepans over high heat.
Cook, stirring alternately until foam disappears from fruit pectin mixture and sugar mixture boils rapidly for 5 minutes. Pour fruit pectin mixture into boiling sugar mixture in a thin stream until all pectin is added. Boil, stirring constantly 1 minute longer.
Remove pan from heat. Stir in extract and a few drops of coloring. Immediately pour mixture into and 8x8x2 inch pan. For fancier shapes spoon mixture into tart or similar little pans. Allow to stand at room temperature (do NOT refrigerate) about 3 hours or until candy is cool and firm.
Cut gum drop mixture into fancy shapes with small cutters or into cubes with a knife dipped in warm water. Roll in granulated sugar.
* green ones substitute oil of anise for strawberry extract and greed food coloring for red. yellow ones substitute oil of lemon and yellow food coloring red ones substitute oil of clove for strawberry extract Makes about 1 1/4 pound.
--------------------------------------------------------------------------------
Homemade Marshmallows
1 cup sugar
1 tsp. vanilla
1/2 cup Hot water
1 Tbs. gelatin
1/4 cup cold water
a few grains salt
Soften gelatin in cold water. Combine sugar and hot water. Boil to soft ball stage (236-23 degrees Add gelatin and salt. Beat until stiff. Add flavoring. Beat again thoroughly. Pour into pan which has been dusted with powdered sugar. Dust top surface, with powdered sugar. allow to stand until stiff enough to hold it shape. cut into squares. roll in powdered sugar. Let stand until firm. Store marshmallows in a glass jar. (a 9 x 9 pan should work for this )
--------------------------------------------------------------------------------
Homemade Marshmallows II
3 cups white sugar
1/4 cup corn syrup
1/4 teaspoon salt
3/4 cup water
2 teaspoons vanilla extract
1 cup confectioners' sugar for dusting
1 Generously coat a 9x13 dish with cooking spray.
2 In a large saucepan, combine sugar, corn syrup, salt and water. Heat to between 234 and 240 degrees F (112 to 116 degrees C), or until a small amount of syrup dropped into cold water forms a soft ball that flattens when removed from the water and placed on a flat surface. Remove from heat and beat with an electric mixer until stiff peaks form, 10 to 12 minutes. Stir in vanilla. Pour into prepared pan.
3 Chill in refrigerator 8 hours or overnight. To cut, loosen edges with a knife. Dust surface with confectioners' sugar, and turn out onto a waxed paper lined surface. Dust with confectioners' sugar again and cut with a knife.
NOTE: These are delicious homemade marshmallows. If you wish, add a few drops of food coloring with the vanilla. Prep Time: approx. 30 Minutes. Cook Time: approx. 12 Minutes. Ready in: approx. 8 Hours . Makes 24 large marshmallows (24 servings).
--------------------------------------------------------------------------------
Honey Tea Lollipops
1 cup sugar
6 tablespoons honey
2 tablespoons glucose
8 tablespoons strong brewed tea
Non-stick cooking spray
Lollipop molds
Lemon rinds
Mint leaves
Lollipop sticks
Combine the sugar, honey, glucose and brewed tea in a small saucepan fitted with a candy thermometer and cook on high heat.
While cooking the candy syrup, occasionally wash down the pan sides using a clean brush dipped in water to prevent crystallization.
Without stirring, cook until mixture reaches 310 degrees or hard crack on the candy thermometer.
Spray lollipop molds lightly with non-stick cooking spray. Place lemon rinds and mint leaves in each section. Place lollipop sticks into mold.
Remove the pot from the heat and dip it into an ice bath for 15 seconds to stop the cooking. Remove the pot from the ice bath.
To avoid air bubbles, swirl hot candy syrup in both directions, being careful not to over mix.
Pour the syrup into the molds 2/3 of the way full and cool at least 20 minutes. Remove from molds.
--------------------------------------------------------------------------------
Microwave Peanut Brittle
Takes 10 minutes from start to finish!
In a 1 1/2 qt bowl place the following:
1 cup sugar
1/2 cup peanuts
1/2 cup Karo syrup
Mix well. Cook on High for 4 minutes. Stir quickly Cook on high another 4 minutes, take out and add
1 teaspoon butter or margarine
1 teaspoon baking soda
Place these 2 ingredients in very quickly (have premeasured)
Stir thoroughly and quickly...Pour onto buttered pan. Set aside and allow to cool then crack into pieces.
Makes 1 LB of Peanut Brittle
--------------------------------------------------------------------------------
No Bake Candy Bar Squares
3 tablespoons butter
2 cups semi-sweet chocolate chips
1 cup milk chocolate chips
1 cup peanut butter
4 cups Rice Krispies
3 cups mini marshmallows
In large saucepan combine butter and chocolate chips. Melt over lowest heat until completely melted and smooth. Stir in peanut butter until completely mixed in. Remove from heat.
Add crisp cereal and mini marshmallows and stir to combine. Press on bottom of buttered 13x9 inch pan. Refrigerate until cool. Cut into squares, and store in the fridge.
P.S. These are scrumptious just as they are, but I thought adding about a half-cup of peanuts would be a nice addition too.
--------------------------------------------------------------------------------
No Fail Fudge
2 pounds powdered sugar
1/2 c cocoa
1/2 t salt
1/2 c milk
2 T vanilla
2 sticks butter
Combine everything but butter in 3 qt. microwaveable dish. Slice butter onto top and do not mix. Microwave for 5-6 minutes, or until butter is melted. Stir well, pour into plastic lined 9x12 pan and refrigerate.
--------------------------------------------------------------------------------
Ohio Buckeyes Candy
1 16-18 oz jar creamy peanut butter
4 cups powdered sugar
1 cup (2 sticks) soft butter or margarine (leave at room temperature for an hour or two to soften)
1 12 oz bag chocolate chips
1/2 cake paraffin wax (found in canning section, yes, it's safe for eating)
Combine peanut butter, sugar and softened butter/margarine in very large bowl. Mix well, and roll into small balls about 1 inch in diameter. If balls are soft after shaping, refrigerate until hardened a bit.
Melt chocolate and paraffin together in double boiler or in small, deep bowl in the microwave, being careful not to overcook and burn the chocolate.
Use a toothpick or bamboo skewer to dip peanut butter balls in melted chocolate, leaving very top of balls without chocolate to look like a real buckeye. Set buckeyes on cookie sheets lined with waxed paper. Let cool, then remove and place in cookie tins (lined with plastic wrap).
--------------------------------------------------------------------------------
Peanut Butter Fudge
4 cups granulated sugar
1 cup milk
1/4 cup light corn syrup
Pinch salt
1 pint (16-ounces) peanut butter (creamy or crunchy, you pick)
1 teaspoon vanilla
Combine sugar, milk, corn syrup and salt in heavy saucepan. Bring to a boil and boil for 5 minutes. Remove from heat. Add peanut butter. Bring to a boil and boil 3 minutes. Remove from heat. Add vanilla. Beat until stiff and spread into buttered dish.
--------------------------------------------------------------------------------
Peanut Snowballs
3 cup peanuts, finely chopped
1 can sweetened condensed milk
icing sugar
Combine peanuts and milk in a saucepan. Cook and stir over low heat until the mixture is golden brown, forms a ball and pulls away from sides of pan (about 10 minutes). Cool to room temperature, about 1/2 hour. Form into 1 inch balls. Roll in icing sugar.
--------------------------------------------------------------------------------
Quick and Easy Peanut Butter Fudge
1 (10 ounce) package peanut butter chips
1 tablespoon oil
Combine in microwave safe bowl and heat for 60 seconds. Stir. If not completely melted, heat for a few more seconds until melted. Stir.
ADD:
1 can sweetened condensed milk (Eagle Brand or Store Brand)
1/2 teaspoon vanilla
Mix well and pour into a greased 8 x 8 inch pan. Chill.
NOTE: Make Chocolate Peanut Butter Fudge by using 1 large package milk chooclate chips and a package of peanut butter chips along with 2 tablespoons of oil. Follow above directions. Add 2 cans of sweetened condensed milk and 1 teaspoon vanilla. Use a 10 x 10 inch pan. DELICIOUS!
NOTE: This type fudge is not only quick & easy it is never grainy.
--------------------------------------------------------------------------------
Quick and Easy Peanut Butter Fudge II
1 cup evaporated milk
2 cups brown sugar
2 cups granulated white sugar
1 stick butter or margarine
Cook to soft ball stage. Remove from heat and add 1 cup peanut butter. Beat well and add 1 teaspoon vanilla. Pour into a buttered 8x8 pan. Cool, cut into squares.
--------------------------------------------------------------------------------
Snickers Fudge
BOTTOM LAYER
1 cup milk chocolate chips -- 6 oz
1/4 cup butterscotch chips
1/4 cup creamy peanut butter
FILLING
1/4 cup butter
1 cup sugar
1/4 cup evaporated milk
1 1/2 cups marshmallow cream
1/4 cup peanut butter
1 teaspoon vanilla
1 1/2 cups chopped salted peanuts
CARAMEL LAYER
14 oz pkg caramels
1/4 cup whipping cream
ICING
1 cup milk chocolate chips -- 6 oz
1/4 cup butterscotch chips
1/4 cup creamy peanut butter
Combine the first 3 ingredients in a small saucepan; stir over low heat until melted and smooth. Spread onto the bottom of a lightly greased 13X9X2 in. pan. Refridgerate until set.
For filling, melt butter in a heavy saucepan over medium-high heat. Add sugar and milk. Bring to a boil; boil and stir for 5 min. Remove from heat; stir in the marshmallow creme, peanut butter and vanilla. Add peanuts. Spread over first layer. Refrigerate until set.
Carmel Layer: Combine caramels and cream in a saucepan; stir over low heat until melted and smooth. Spread over the filling. Refrigerate until set.
Icing: In another saucepan, combine chips and peanut butter; stir over low heat until melted and smooth. Pour over the caramel layer. Refrigerate for at least 1 hour. Cut into 1 in. squares. Store in the refrigerator. Yield 8 dozen pieces.
--------------------------------------------------------------------------------
Snow Candy Recipe
1 lb white bark candy
1 lb salted nuts
2 cups crispy rice cereal
Melt candy in a double boiler. Add nuts and cereal. Mix well. Spoon onto waxed paper. Refrigerate until firm. Break into pieces and store in air tight container.
--------------------------------------------------------------------------------
Triple Chocolate Fudge
3-1/3 cups granulated sugar
1 cup butter or margarine
1 cup dark brown sugar, packed
1 12-oz. can evaporated milk
32 large marshmallows, cut in half
2 cups (12 oz.) semi-sweet chocolate chips
2 7-oz. chocolate candy bars, broken into pieces
2 1-oz. square semi-sweet chocolate, coarsely chopped
1 tsp. vanilla
2 cups chopped pecans (walnuts can be substituted)
In a large saucepan, mix sugar, butter, brown sugar and milk. Cook over medium heat until sugar has dissolved, stirring often.
Bring to a boil, cook at a rapid boil for 5 minutes, stirring constantly.
Remove from heat and add marshmallows. Stir until they have melted. Stir in the chocolate chips until they melt. Add chocolate bar and baking chocolate pieces, stir until they melt.
Add vanilla and pecans, mix until well blended.
Pour into a greased 15"x10"x1" pan. Chill until firm. Cut into squares.
Yield: Approx. 5-1/2 pounds of fudge.
--------------------------------------------------------------------------------
Vanilla Caramels
2 cups granulated sugar
2 tablespoons butter
1 cup milk
1 teaspoon vanilla extract
Boil sugar, butter and milk to firm-ball stage, 245 degrees F. Do not stir after sugar is dissolved. Pour onto a buttered platter, let cool, then beat until creamy. Add vanilla extract and chopped nuts or cherries, if desired. Press into buttered pans. When firm, cut into squares. Wrap in wax paper.
--------------------------------------------------------------------------------
White Chocolate Truffles
1-1/2 cups (10 ounces) chopped white chocolate or white chocolate chips
1/4 cup whipping cream
1/2 teaspoon vanilla
1/2 cup chopped macadamia nuts or toffee, or chocolate decors
1. Place chocolate in small bowl. Place whipping cream in small saucepan. Simmer over medium-high heat until heated through, stirring constantly with wooden spoon. Pour over chocolate, stir once.
2. Cover bowl; let stand 3 to 5 minutes. Uncover; stir until chocolate is melted and mixture is smooth. Stir in vanilla and liqueur, if using. Cover. Refrigerate 15 minutes or until mixture is firm enough to hold its shape.
3. Place level tablespoonfuls mixture on plate. Cover; refrigerate 2 hours or until fudgy, but not soft.
4. Place nuts or toffee in medium bowl. Roll each tablespoon chocolate mixture into ball. Roll in nuts to evenly coat. (Warm hands and room temperature quickly soften chocolate, making it difficult to form balls. Keeping chocolate chilled prevents sticking.)
5. Store tightly covered in refrigerator up to 3 weeks. Serve chilled or let stand at room temperature 15 to 20 minutes before serving.
http://www.kitchencraftsnmore.net/recipe007.htmlLast edited by AirborneSapper7; 02-01-2012 at 11:58 AM.
Join our efforts to Secure America's Borders and End Illegal Immigration by Joining ALIPAC's E-Mail Alerts network (CLICK HERE)
-
02-13-2011, 12:47 AM #496Senior Member
- Join Date
- May 2007
- Location
- South West Florida (Behind friendly lines but still in Occupied Territory)
- Posts
- 117,087
Raising Chickens
What do you need to raise chickens? – The Basics of raising chickens.
Before the days of Walmart, raising Chickens was a pretty normal thing to see. Even in the city people would keep chickens as a way to have fresh eggs and control bug problems.
With more people turning towards organic foods and backyard gardens, raising chickens is starting to increase in popularity again. From knowing where your food came from to making sure your family has fresh food during an emergency there are a number of reasons that people are deciding to raise chickens.
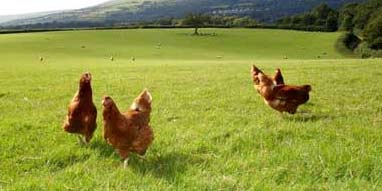
Benefits of raising your own chickens:- Fresh Eggs – Up to 200 a year per Hen
- Fresh Organic food free of pesticides and chemicals.
- Chickens are a great way to keep bugs from infesting your garden
- They produce good nitrogen-rich manure that, when mixed with your compost is great for plants.
- Great for weed control.
While there are a couple breeds of chickens that produce eggs and meat, most chickens are bred either for their meat or for their eggs.
For the beginner we recommend either buying a couple of young female chickens that have just started to lay eggs or a few baby chicks that have already hatched. You could also buy fertilized eggs and keep them in an incubator until they hatch, but baby chicks are easier when you’re just starting out.
What to feed your chickens:
The taste of your chickens meat and eggs has a lot to do with proper feeding and watering.
Water – Each hen will drink approximately 2 cups of water per day. It’s very important to always have a fresh supply of water for your chickens.
Food – Chickens need 3 basic things:
Grains – Wheat, corn & oats.
Greens – Greens can be made up of grass, weeds and other fresh vegetables from your garden.
Protein – During the summer months most of the protein that your chickens need can come from bugs. If supplementation is needed you can use soybeans, fish meal, worms, milk and or meat.
Homemade Chicken Feed Recipe:
You can purchase chicken feed from just about any feed store, but making it yourself can save money and ensure that you know what your chickens are eating.
2 Parts corn meal
3 Parts soft white wheat
3 parts hard red winter wheat
1 Parts oat groats
2 Parts sunflower seeds
1 Parts split peas
1 Parts lentils
1 Parts sesame seeds
1 part quinoa
1/2 Parts flax seed
1/2 part kelp
Chicken Coop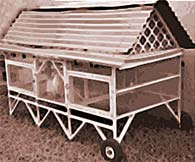
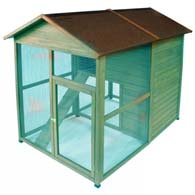 A chicken coop doesn’t have to be overly complicated or expensive. In fact a decent coop can be made with materials that you probably already have.
The basic Chicken coop is made up of some wood, a couple feet of chicken wire and either wood shavings or straw for easy cleanup.
Also, if you have the room we suggest enclosing a large area so your chickens can roam free and feed off the bugs and grass.
Resources for Raising Chickens
Books:
- Raising Chickens For Dummies
- Keeping Chickens: The Essential Guide
- Storey’s Guide to Raising Chickens: 3rd Edition (Storey’s Guide to Raising Series)
- Chickens In Your Backyard: A Beginner’s Guide
- Chicken Coop, Portable, for 3 to 5 hens
- Premium Backyard Small Animal Hutch
- Premium Plus Penthouse – Large – Natrl
http://offgridsurvival.com/raisingchickens/Last edited by AirborneSapper7; 02-01-2012 at 12:00 PM.
Join our efforts to Secure America's Borders and End Illegal Immigration by Joining ALIPAC's E-Mail Alerts network (CLICK HERE)
-
02-13-2011, 12:57 AM #497Senior Member
- Join Date
- May 2007
- Location
- South West Florida (Behind friendly lines but still in Occupied Territory)
- Posts
- 117,087

Survival Websites
Off Grid Survival’s Huge list of survival websites and blogs.
The key to survival is knowledge and all of these websites can help you gain the skills you need to survive any situation.
http://offgridsurvival.com/survivalwebsites/Survival Blogs & Survival Websites Preparedness Blogs & Preppers Websites Food Storage & Survival Cooking Websites & Blogs Self Sustained Living & Homesteading Bushcraft Survival & the Economy Last edited by AirborneSapper7; 02-01-2012 at 12:01 PM.
Join our efforts to Secure America's Borders and End Illegal Immigration by Joining ALIPAC's E-Mail Alerts network (CLICK HERE)
-
02-13-2011, 01:52 PM #498Senior Member
- Join Date
- May 2007
- Location
- South West Florida (Behind friendly lines but still in Occupied Territory)
- Posts
- 117,087
SHTF Survival: A Person Is Only As Good As Their Tools
Tess Pennington
ReadyNutrition.com
February 10th, 2011

In my quest for efficiency, a dear friend reminded me how important it was to have good, quality tools. “With the right tools,” he said, “a person can finish the job in half the time it would take with average tools.” That statement really got me thinking how important it is to have quality tools in a SHTF situation.
Good, quality tools are a sound investment that can last a lifetime if properly cared for. However, they do come at a price. Yes, a person can save a few bucks here and there on cheaper supplies, but the price could come at a cost. It could be an indicator of the lack of craftsmanship or sub par quality of the tool. In my opinion, in a dire situation, our tools are just as much part of our life line as our food and water.
Tools for a SHTF can be used to help chop firewood, build a shelter, fix fencing, cut back terrain and maintaining gardens. Many can find good tools at their hardware stores or local home and garden centers. Some preppers who are looking for Amish crafted tools can look at these websites Lehman’s, or Cottage Craftworks to find what they need.
- Bolt cutters
- Sledge hammer
- Crowbar
- Hammer
- Multi tool
- Knife
- Axe with a sharpening device
- Wedge to help in cutting firewood
- Hand saw with extra blades
- Machete
- Fencing pliers
- Wood saw
- Paracord
- Shovel
- Cordless drill set
- Gardening tools
- Emergency water filtration system with extra filters
Having these tools on hand will help any person with their day to day chores in a homestead environment. But remember to have parts such as extra blades, sharpening tools and lubricants such as WD-40 to keep these solid investment items up to par. If a tools needs extra parts, invest in those when purchasing the tool.
Author: Tess Pennington
Web Site: http://www.readynutrition.com/
Date: February 10th, 2011
Related Categories: Preparedness, Reserve Supplies
Related Reading:- Week 22 of 52: Hardware Tools (List 2)
- Get Prepped Newsletter: September 30, 2011
- Essential Tools Around the Retreat
- Week 16 of 52: Survival Tools
- SHTF Survival: 10 Survival Tools That Should Be In Your Survival Pack
http://readynutrition.com/resources/...ools_10022011/
Last edited by AirborneSapper7; 02-01-2012 at 12:04 PM.
Join our efforts to Secure America's Borders and End Illegal Immigration by Joining ALIPAC's E-Mail Alerts network (CLICK HERE)
-
02-13-2011, 01:59 PM #499Senior Member
- Join Date
- May 2007
- Location
- South West Florida (Behind friendly lines but still in Occupied Territory)
- Posts
- 117,087
Micro Farming
Homemade Paper Pots http://readynutrition.com/resources/hom ... _06012011/
9 Things to Consider Before You Ever Grow a Survival Garden http://readynutrition.com/resources/con ... _12112010/
10 Easy Survival Seeds to Grow http://readynutrition.com/resources/10- ... _09112010/
Improve Your Soil Naturally http://readynutrition.com/resources/imp ... _22102010/
Grow Against the System http://readynutrition.com/resources/gro ... _05102010/
A Guide To Creating a No-Till Garden http://readynutrition.com/resources/a-g ... _26092010/
3 Ways to Utilize Fallen Leaves http://readynutrition.com/resources/3-w ... _06092010/
Garden Health Checklist From the Vegetable Gardener’s Bible http://readynutrition.com/resources/gar ... _19082010/
Making a Worm Farm http://readynutrition.com/resources/mak ... _19082010/
10 Ways To Make Your Trash Work For You http://readynutrition.com/resources/10- ... _21062010/Last edited by AirborneSapper7; 02-01-2012 at 12:04 PM.
Join our efforts to Secure America's Borders and End Illegal Immigration by Joining ALIPAC's E-Mail Alerts network (CLICK HERE)
-
02-14-2011, 12:13 PM #500Guest
- Join Date
- Aug 2009
- Posts
- 9,256
The 10 Essentials for Outdoor Adventures
by Chris on November 15, 2010 · 19 comments
in Health & Sports
Every man has a different idea of what constitutes a ânecessityâ


 Reply With Quote


Democrats For Pond Scum 2026!
06-21-2026, 11:38 AM in illegal immigration Announcements