

Results 681 to 690 of 8348
 210Likes
Thread Information
Users Browsing this Thread
There are currently 8 users browsing this thread. (0 members and 8 guests)
 LinkBack URL
 About LinkBacks
-
04-20-2011, 11:23 AM #681Senior Member


- Join Date
- May 2007
- Location
- South West Florida (Behind friendly lines but still in Occupied Territory)
- Posts
- 117,696

Bee Keeping
By Nick-LaDieu
April 8, 2011
http://www.saveourskills.com/Last edited by AirborneSapper7; 01-12-2012 at 05:10 AM.
Join our efforts to Secure America's Borders and End Illegal Immigration by Joining ALIPAC's E-Mail Alerts network (CLICK HERE)
-
04-20-2011, 11:27 AM #682Senior Member
- Join Date
- May 2007
- Location
- South West Florida (Behind friendly lines but still in Occupied Territory)
- Posts
- 117,696
Building Top Bars 1/2 http://www.youtube.com/watch?v=KnLpk5hM ... re=related
Building Top Bars 2 of 2 http://www.youtube.com/watch?v=3f8A_6N9 ... A61F171844
more how too videos on the right side of the page
more detailed videos at the bottom of the pageLast edited by AirborneSapper7; 01-29-2012 at 11:14 PM.
Join our efforts to Secure America's Borders and End Illegal Immigration by Joining ALIPAC's E-Mail Alerts network (CLICK HERE)
-
04-20-2011, 11:45 AM #683Senior Member
- Join Date
- May 2007
- Location
- South West Florida (Behind friendly lines but still in Occupied Territory)
- Posts
- 117,696
Building your Top Bar Hive - Learning Beekeeping http://www.youtube.com/watch?v=LQIf_sw1 ... 44&index=3
Honey harvest Tutorial - Crush and Strain 1 of 2 http://www.youtube.com/watch?v=4R0jJAhR ... 44&index=4
Honey harvest Tutorial - Crush and Strain 2 of 2 http://www.youtube.com/watch?v=xAZoI9gg ... 44&index=5
Learning Top Bar Hive Beekeeping - Fixing Comb 1/2 http://www.youtube.com/watch?v=myBsToAM ... 44&index=6
Learning Top Bar Hive Beekeeping - Fixing Comb 2/2 http://www.youtube.com/watch?v=r-GwRxh9 ... 44&index=7
Solar Wax Melters for beekeepers http://www.youtube.com/watch?v=2FUhAYDM ... 44&index=8
Learning Top Bar Hive Beekeeping - Pests 1/2 http://www.youtube.com/watch?v=pCPNa3mT ... 44&index=9
Learning Top Bar Hive Beekeeping - Pests 2/2 http://www.youtube.com/watch?v=uCInx28f ... 4&index=10
Learning Top Bar Hive Beekeeping - Comb managment 1/2 http://www.youtube.com/watch?v=xv-SWG_d ... 4&index=11
Learning Top Bar Hive Beekeeping - Comb Managmenet 2 of 2 http://www.youtube.com/watch?v=g09erBKr ... 4&index=12
Tidbits on Top Bar Hives http://www.youtube.com/watch?v=M7_L1c0C ... 4&index=13
Top Bar Hive Spring inspection - 1 of 3 http://www.youtube.com/watch?v=_7xFhAuz ... 4&index=14
Top Bar Hive Spring Inspection 2 of 3 http://www.youtube.com/watch?v=NM86FXXE ... 4&index=15
Top Bar Hive - Spring Inspection 3 of 3 http://www.youtube.com/watch?v=rIGi2VIO ... 4&index=16
Inspecting Top Bar Beehive - Part 1 of 2 http://www.youtube.com/watch?v=Li6Dquq2 ... 4&index=17
Inspecting Top Bar Beehive - Part 2 of 2 http://www.youtube.com/watch?v=PgexIpP1 ... 4&index=18
Making Top Bar Hive Cutout Frames http://www.youtube.com/watch?v=uIj78zig ... 4&index=19
Top Bar Hive comb collapse http://www.youtube.com/watch?v=oZfKBw3l ... 4&index=20
Building your Top Bar Hive - Learning Beekeeping http://www.youtube.com/watch?v=LQIf_sw1 ... 4&index=21
Last edited by AirborneSapper7; 01-12-2012 at 05:37 AM.
Join our efforts to Secure America's Borders and End Illegal Immigration by Joining ALIPAC's E-Mail Alerts network (CLICK HERE)
-
04-20-2011, 11:51 AM #684Senior Member
- Join Date
- May 2007
- Location
- South West Florida (Behind friendly lines but still in Occupied Territory)
- Posts
- 117,696
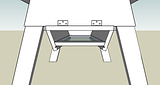
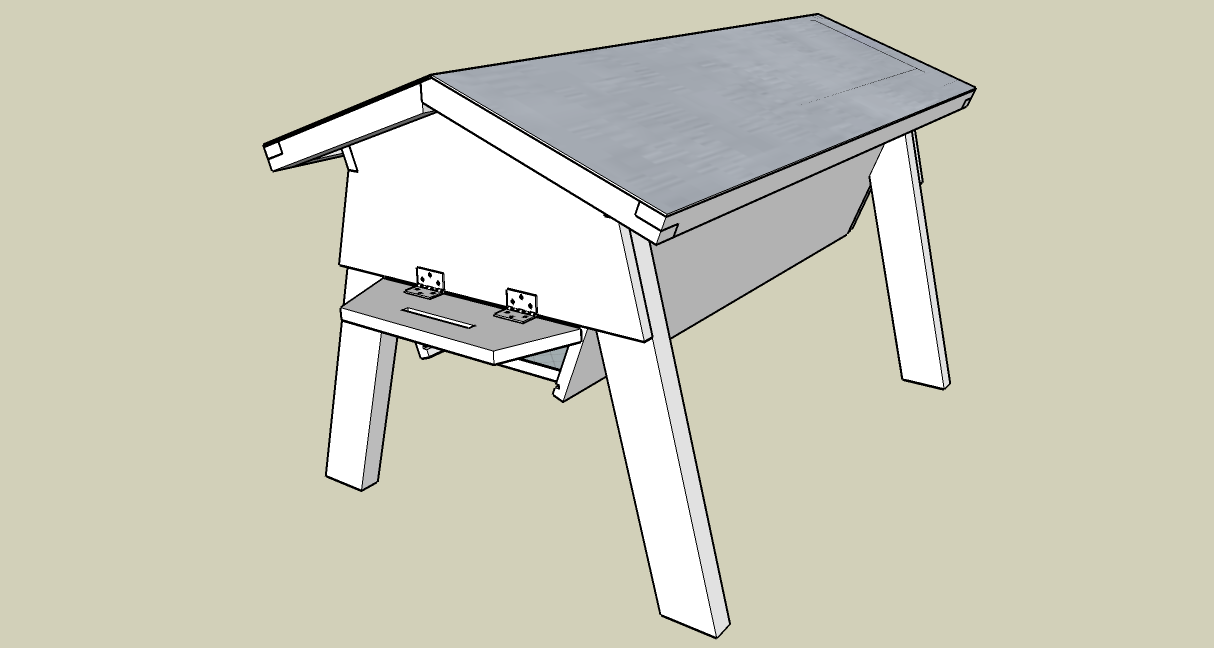
My Top-bar Hives Design http://topbarbees.wordpress.com/about/design/
Part of the fun of starting beekeeping in top-bar hives was designing my own. Unlike Langstroth hives, there is no standard top-bar hive. I looked at the top-bar hives on the web, and came up with the features that I wanted to include. Some of the sites that I found most useful in designing my top-bar hives were Dennis Murrell’s site, Michael Bush’s site, Leonard Barton’s site, and Michael Thomas’s site.
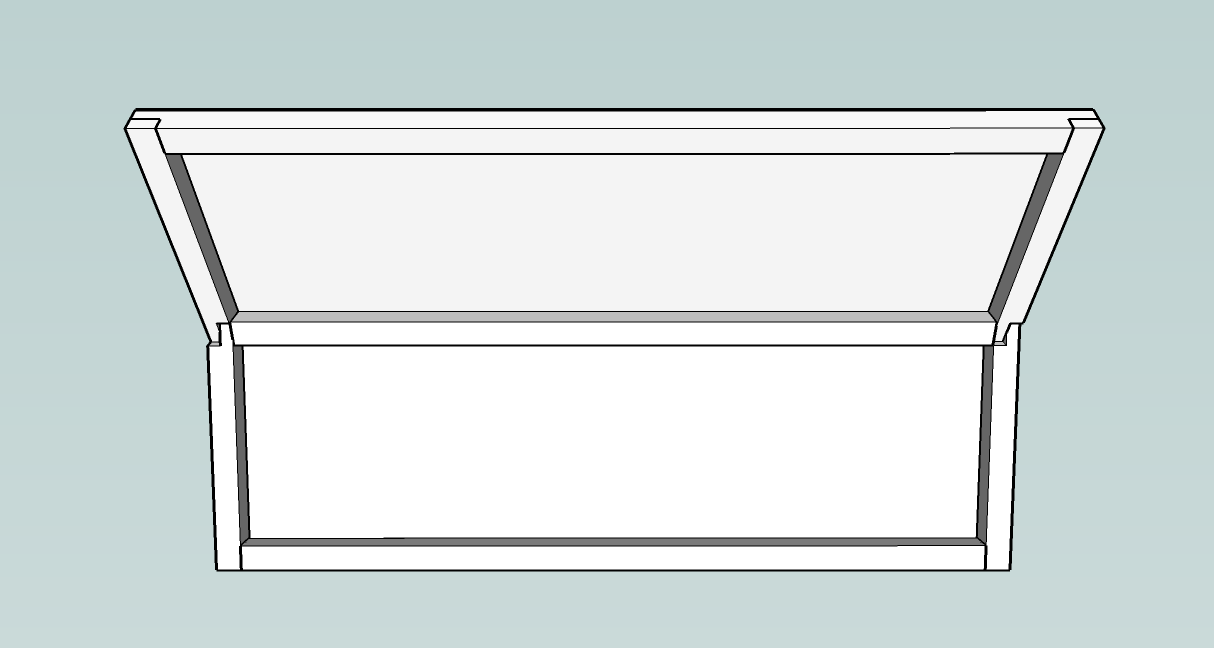
I used Google’s free SketchUp. Its a simple to use, and allows you draw and design in 3D. It was first valuable in designing the hives. It nice to be able to see how thing look in 3D and how all the parts fit together. I went through about 7 or 8 major redesigns (essentially starting over with the new ideas added in). In the end, I ended up with a hive design that I liked. It may not be the simplest top-bar hive design, but its not overly complicated or hard to build, is reasonably cheap to build, and has lots of nice features. Once I started actually building, SketchUp became valuable again. The 3D model acted like blueprints and I could measure any parts dimensions and angles. I have uploaded the full plans to Google’s 3D Warehouse. My hive plans are available there under the name of “Kawayanan’s Kenyan Top-Bar Hive“.
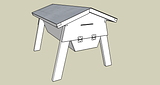
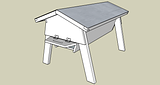
Here are the major features:
- Its a Kenyan top-bar hive, so it has sloped sides (sturdier comb shape, and easier to remove)
- Built in legs (removable if needed)
- Sloped roof that I covered in aluminum flashing
- Upper entrance (ventilation and safer from critters like mice, skunks, etc.)
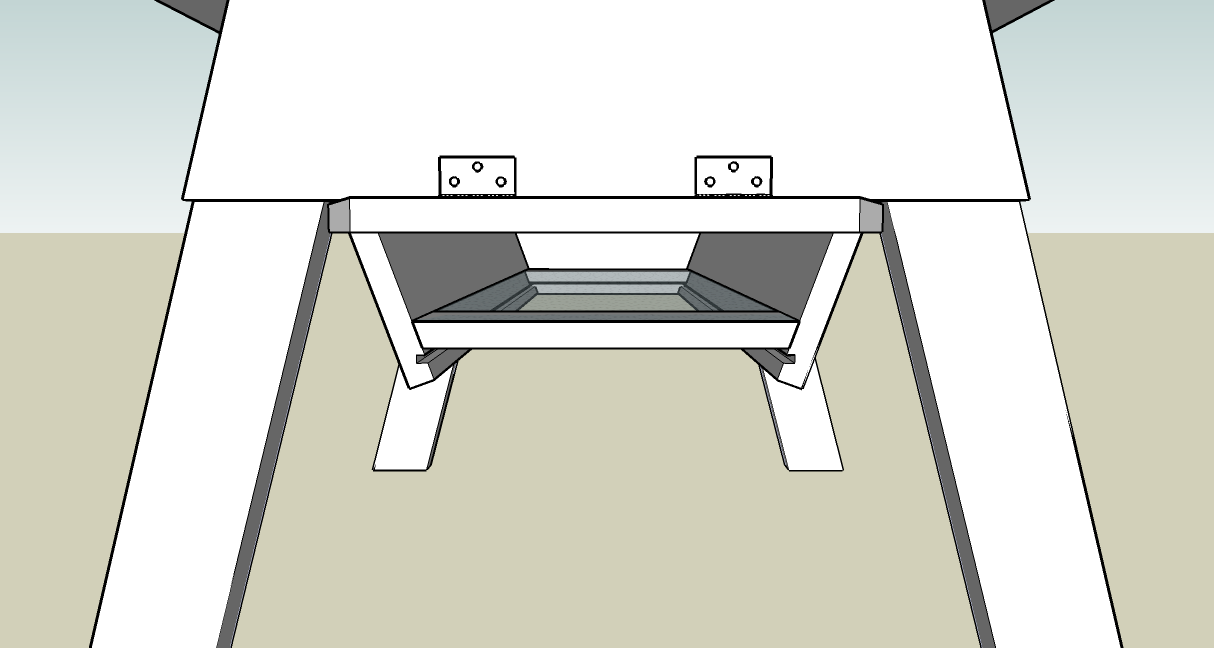
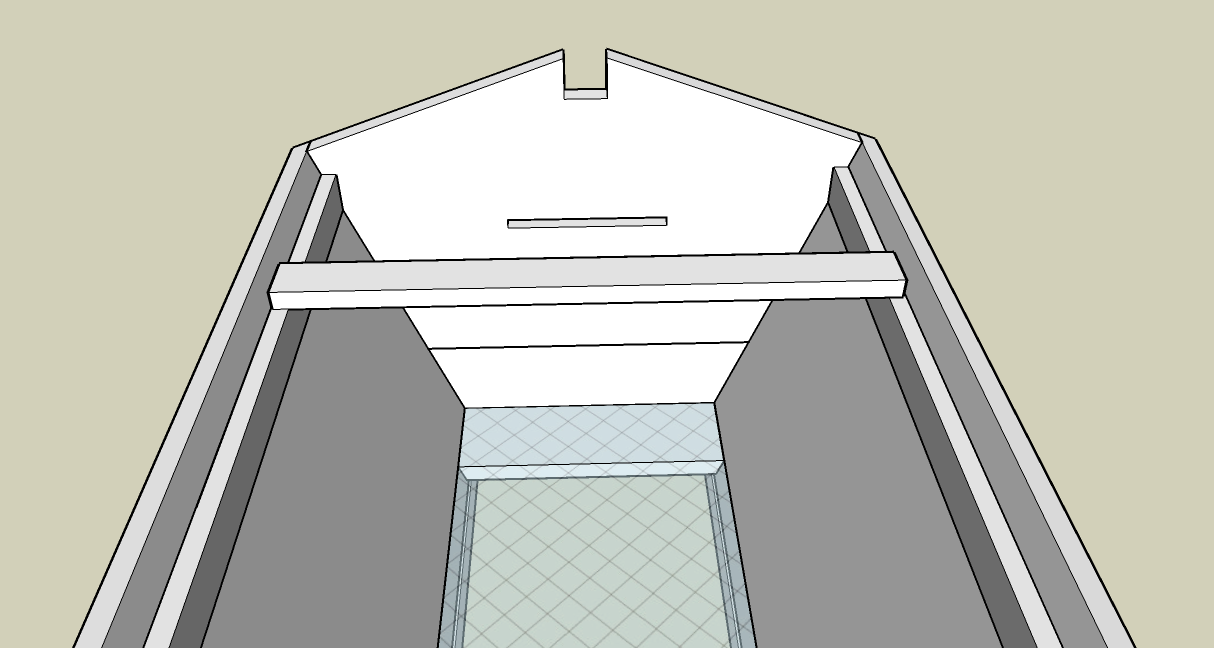
- Clean out doors at the front and back
- Screened bottom with a removable bottom board
- Slot in the rear to use a standard entrance feeder with access only through the hive (less chance or robbing)
- The main body of two hives can be made from one 8′x4′ 3/4″ plywood sheet with the rest made mainly of 2×4′s or 2×2′s (reasonably inexpensive)
- I think it look nice


In addition, in the 3D model of my design I included a layout of all the 3/4″ plywood body parts on a 8′x4′ sheet. This shows how you can cleanly get two full hives worth of parts from one sheet.

Here is a rough list of all the lumber and parts needed to complete 2 full hives:
- 1 4′x8′ 3/4″ sheet of plywood (for the sides and ends)
- 2 8′ pressure treated 2×4′s (or 10′ depending on how long you want the legs)
- 12 8′ 1×2′s for the 60 top-bars (I think thats probably about right, but I will most likely make more to have a few extra)
- 4 8′ 2×2′s for the roof frame
- 1 4′x8′ sheet of panel board for the roof and removable bottom board (I actually got tile board because it has a nice white finish on one side)
- 2 10′x20″ rolls of aluminum flashing to cover the roof (for a nice weather resistant and shiny top)
- 1 8′ 2×4 to make the ridge pole of the roof
- 2 linear feet of 36″ wide #8 hardware cloth for the screened bottom
- 8 hinges for the clean out doors (and some sort of latch to keep them shut)
- nuts and bolts to attach the legs
- screws, nails, staples, and wood glue
I’ve had a few question about how to use my model. First off, you need to download the model from Google’s 3D Warehouse (my model is found here). You will also need Google Sketchup to read the file and get the measurements. I have version 6, and the screen shots below are from that version.
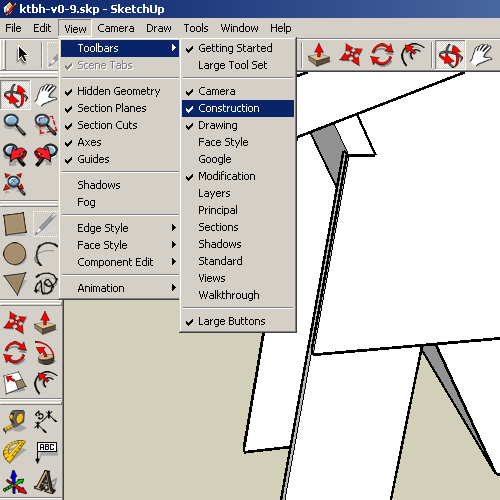
After you install Sketchup, you can open my model. Each part of the hives is a separate component, so you can take it apart and measure each piece individually. There are two tools you will need to get all the measurements and angles, the “tape measure” and the “protractor”. To easy access to these tools, you can make the Construction toolbar active (under View-Toolbars-Construction).

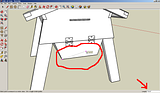
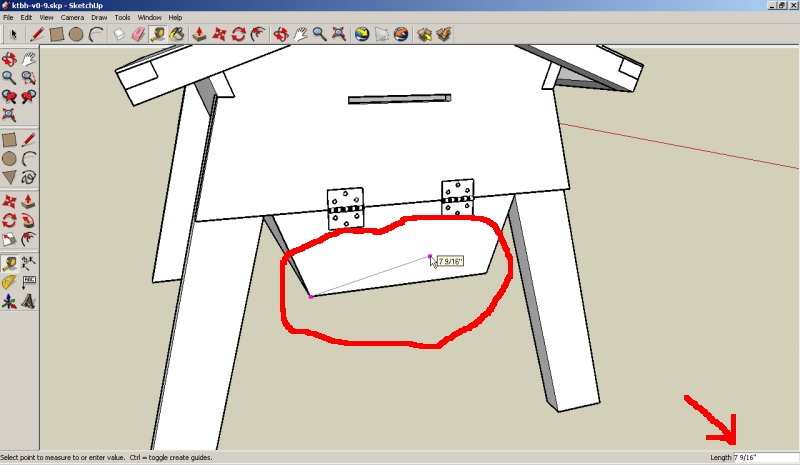
The construction toolbar is at the bottom left of the picture. First, lets look at the “tape measure”. Its the button that looks like a tape measure.
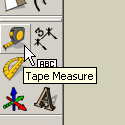
When you click on it, your mouse pointer should start to look like a tape measure too. All you need to do to measure any object is to click at one end of what you are measuring, then click at the other end. You will probably see the measurement by the mouse pointer when you make the second click, but you will also see it at the bottom right of the Sketchup window. If you make the first click, you can also read the distances without a second click if you stop moving the mouse pointer at any point (the measurement should be given both at he mouse pointer and at the bottom right of the window).
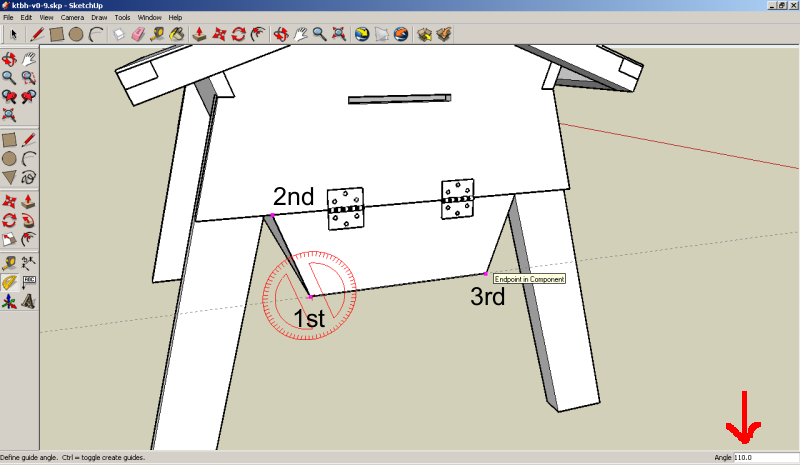
The protractor tool is locate right near the tape measure tool in the Construction toolbar.
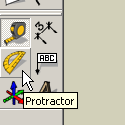
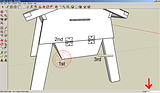
When you click on this, your mouse pointer will become a circular protractor. Move the over the center point of the angle you want to measure. The protractor circle can be on multiple faces of an object, so move it a little until its on the correct face, and at the center point of the angle to be measured (in my example below, I am measuring the angle of the bottom of the clean-out door), marked with a “1st”). Then click once on that point. Next, click along one side of the angel you want to measure (in my example below I clicked on the endpoint of the edge – labeled with a “2nd”). Then, click on the other side of the angle you are measuring (marked “3rd” in my example). Now, the angle measurment is located in the bottom right of the Sketchup window. Thats it.
You should be able to do this with any piece, and get at the measurements you would need to build the hives. I kept my laptop with me, open to the model while building so that I could easily check any measurements as I went. If you want to learn a bunch more about how to use Google Sketchup, you can start by doing the Tutorials that are include with it. You can find them under the “Help” menu. Ther are also links to online help.
To read the construction of my hives, check here.
http://topbarbees.wordpress.com/about/design/
----------------------------------------------------------------------------------------------------------
How To Build A Top Bar Hive http://www.lulu.com/product/ebook/how-t ... e/15321150Last edited by AirborneSapper7; 01-29-2012 at 11:16 PM.
Join our efforts to Secure America's Borders and End Illegal Immigration by Joining ALIPAC's E-Mail Alerts network (CLICK HERE)
-
04-20-2011, 11:53 AM #685Senior Member
- Join Date
- May 2007
- Location
- South West Florida (Behind friendly lines but still in Occupied Territory)
- Posts
- 117,696
Make Your Own Gravity Fed Home Water Filtration System
By Cash | March 30, 2011 | DIY Projects
Note from Nick: Thanks to Cash for contributing this great article. I personally own the Royal Berkey system from Jeff “The Berkey Guy” at Directive 21 and think it is a great addition to any home from both a practical standpoint and aesthetic standpoint, however if you have been looking to make a quick little project and save some money this is a great way to make your own Berkey-Style water filter. Not to mention that home filtration is a basic prep I think everyone should have. If you end up getting the fitlers from Jeff over at Directive 21 please tell them that you are purchasing because of Save Our Skills and that would help to support the efforts of this website.
Thank you! - Nick LaDieu
By Cash Olsen from KD5SSJ Solder Paste, Solder Tools and Solder Kits
I just made a water filtration system similar to the commercial units, cost about $100.
There is nothing real difficult, drills and hole saw. I have seen the details of a similar system, elsewhere. The major difference in my unit is that I used a Gamma lid in the top bucket for easy access to the filter elements and clean out of any silt and debris. The top bucket to bottom lid is carefully sealed with silicon caulk to make sure that no unfiltered water can dribble down the outside of the top bucket when being filled. The bottom bucket has a replacement spigot purchased for other water containers.
I purchased 4 sterasyl ceramic filter and installed two in this filter and will save two for future replacement. The filters are the same as used in the commercial units. Cost was $35 dollars each. So my total cost comes in right about $100. All the specifications of my bucket would also be the same as a commercial unit because the critical components are the same.
This was what my 5 gallon filter looks like.
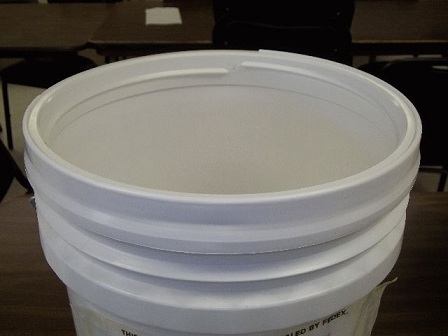
This is the first bucket with the Gamma lid mounting ring attached. This should be done first because it must be driven on with a rubber mallet or hammer with wood to protect the ring from marring. This requires about 6 -7 sharp raps of the mallet around the ring with the lid removed.
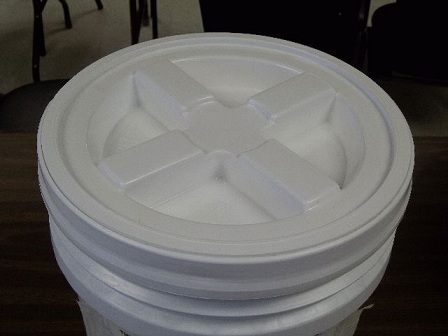
This is the bucket with the Gamma lid in place. This should be removed for further assembly.
The next step is to mount a normal lid to the bottom of the bucket. This is rather critical. First apply a bead of silicon bathtub caulking around the inside recess of the lid so that when the bucket is set into it it will seal the bucket to the lid. Then apply another bead of silicon bathtub caulking around the bottom of the bucket just above the lid. This is important because you don’t want any contaminated water which might run down the side of the top bucket to be able to get into the lower bucket, that’s why it needs a very good water tight seal. Allow the silicon caulk to dry at least overnight, the instructions say that it is shower ready in 3 hours but this only means that the surface is skimmed over.
I measured 3″ from the center of the lid to the and marked two places, one on either side of the center. Use as small drill bit < 1/8″ (0.125″) and drill two pilot holes at each of the marked places. Drill as straight and perpendicular to the lid, as possible, through the lid and into the bottom of the bucket. Using the 1 1/2″ (1.50″) hole saw, picture 100_0117.JPG, enlarge the the whole in the bucket lid in both places. Using a 1/2″ (0.500″) drill bit drill two holes through the bottom of the bucket. The plastic lid and bucket are very easy to drill but be careful not to enlarge the 1/2″ hole size because this will only make it more difficult to seal the filter candle to the bucket in the next step.

From the top of the bucket mount the Sterasyl filters in the bucket. The rubber seal goes on the bottom of the filter and to the bottom of the bucket. Thread the wing nut onto the threads of the filter from the other side of the lid as shown in picture 100_0106 and tighten it good by hand. I used rubber gloves while installing the filter candles so as to avoid oils and other contaminants on the ceramic surface. There is a significant gap between the bottom of the top bucket and the lid, this is why it’s necessary to get a good seal and also the enlarged hole to give access to the wing nut.
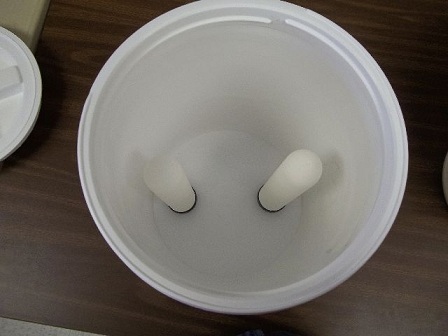
shows the filter candles mounted in the top bucket. Picture 100_0112.JPG is a closer view of one candle mounted in the top bucket.
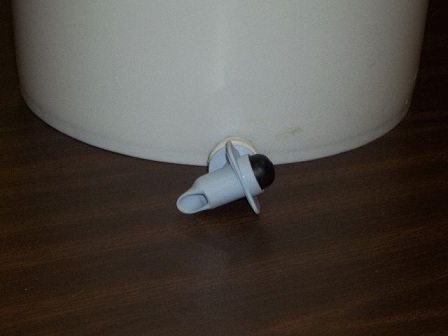
shows the bottom bucket with the drain cock, I have not yet mounted it at the time of this picture. Drill an appropriate hole for the grommet and mount it very near the bottom of the second (lower) bucket.
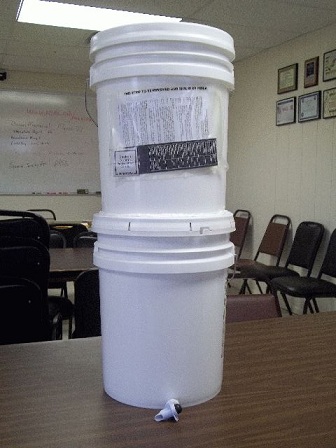
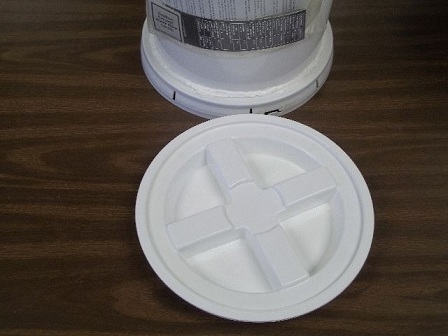
Shows the finished 5 gallon filter completed stack. I removed the locking ring and I have not yet determined if I want to seat the lid on the second bucket. I have found it to be very handy to be able to unstack the system and carry each bucket by it’s bail handle.
I purchased the buckets and lids (including Gamma lid) from BayTecContainers.com and I purchased the 4 x Doulton Super Sterasyl Ceramic Filter Candle 10″ @ $35.00 10 Long Mount W9121709 total including shipping was $141.99 from www.FiltersFast.com . I have a spare set of ceramic filters for replacement. I’m sure that there are other sources for all of the components.
Note from Nick: I talked with Cash and he agreed that Super Sterasyl Ceramic filters from Directive 21 was a better deal (saving about $10)
Follow the instructions with your filters candles for the initial use and restarting after prolonged lack of use.
Remove the Gamma lid to fill the top bucket and replace it loosely while the filtration is taking place. At the rate of 1 liter per hour (gravity feed) for each filter you should expect 5 gallons (18.9 liters) to take about 9 1/2 to 10 hours, or 10 gallons per day (two 5 gallon runs in 24 hours).
If you have any questions or suggestions, please leave a comment below.
http://www.saveourskills.com/gravity...tration-systemLast edited by AirborneSapper7; 01-29-2012 at 11:17 PM.
Join our efforts to Secure America's Borders and End Illegal Immigration by Joining ALIPAC's E-Mail Alerts network (CLICK HERE)
-
04-20-2011, 12:01 PM #686Senior Member
- Join Date
- May 2007
- Location
- South West Florida (Behind friendly lines but still in Occupied Territory)
- Posts
- 117,696
Worm Digest - Commercial Earthworm Farming
http://www.wormdigest.org/content/view/214/2/
all of these are links
Latest News
New Event Calendar Added
What a Can of Worms!
Earthworms in the Garden
How Much Earth Could an Earthworm Move
Effects of Cropping and Tree Density
Working with Worms
Coelomic Fluid Proteins as Basic Components
The Search for Innate Immune Receptors
Earthworms Help Solve Waste Problem
Worm Revolutionaries
Keeping Your Soil Healthy
Soil Improvement with Organic Materials
Is There Signaling During Earthworm Immunity?
A Simulation Model of Earthworm Invasions:
Secrets of Organic Rose Plant Gardening
Nitrogenous Waste Excretion by Earthworms
Introduction of Exotic Earthworms
Inter-And Intraspecies Relationship Relationships in Earthworms
Influence of Earthworm Activity
Earthworms from a Sand Dune Ecosystem
Most Popular
Young Person's Guide to Vermicomposting
Earthworm Biology
Worm Bin Critter Gallery
The Mighty Worm
Vermiculture Industry in Circular Economy
Worm Therapy: a New Treatment for IBD?
Rare Earthworm Discovery
India's Bio Fertilizer Firms on High as West Stresses Organic Foods
Earthworms in the Garden
Of Enzymes, Worms and Cancer
Ice Worms: They're Real, and They're Hot
Worm Study May Help Humans Live 120 Years
Worm Digest in Transition
The Worm Composting Toilet
'Zombie' Worms Found in North Sea Shallows
What happened to Real Food?
What a Can of Worms!
Earthworms Help Beijingers Dispose of Trash
Jonah and his Whale of Earthworms
The Kiwi Killers
http://www.wormdigest.org/content/view/214/2/Last edited by AirborneSapper7; 01-29-2012 at 11:24 PM.
Join our efforts to Secure America's Borders and End Illegal Immigration by Joining ALIPAC's E-Mail Alerts network (CLICK HERE)
-
04-20-2011, 12:13 PM #687Senior Member
- Join Date
- May 2007
- Location
- South West Florida (Behind friendly lines but still in Occupied Territory)
- Posts
- 117,696
Surviving Civilization on the Homestead

http://sshomestead.com/
Show No. 120 DIY Top Notch Incubator
Show No. 119 Potato Breeding Stuff You Never Knew
Show No. 118 Queen Eats Raccoon, SURPRISE!
Show No. 117 Earthships
Show No. 116 Boiling Frogs
Show No. 115 Homestead Computer Geek
Show No. 114 Cheap Easy Mushroom Growing
Show No. 113 Cayenne Tastic
Show No. 112 Johnny Maxs BIG Theory
Show No. 111 Asian Soil Secrets
Show No. 110 Old Man, Young Gardener
Show No. 109 Heirloom Seeds to Love
Show No. 108 Winter Dreaming of Spring
Show No. 107 Food Production Systems DVD Review
Show No. 106 B17 Cancer Cure or Quackery
Show No. 105 Bamboo
Show No. 104 Drought Tolerant Plants
Show No. 103 Improving Soil Naturally
Show No. 102 Thanksgiving & 100 Year Old Catsup
Show No. 101 Homestead Christmas Gift Ideas
Archived Shows 1 - 100 >>>
http://sshomestead.com/Last edited by AirborneSapper7; 01-29-2012 at 11:25 PM.
Join our efforts to Secure America's Borders and End Illegal Immigration by Joining ALIPAC's E-Mail Alerts network (CLICK HERE)
-
04-20-2011, 12:17 PM #688Senior Member
- Join Date
- May 2007
- Location
- South West Florida (Behind friendly lines but still in Occupied Territory)
- Posts
- 117,696
Last edited by AirborneSapper7; 01-29-2012 at 11:26 PM.
Join our efforts to Secure America's Borders and End Illegal Immigration by Joining ALIPAC's E-Mail Alerts network (CLICK HERE)
-
04-20-2011, 12:25 PM #689Senior Member
- Join Date
- May 2007
- Location
- South West Florida (Behind friendly lines but still in Occupied Territory)
- Posts
- 117,696
Last edited by AirborneSapper7; 01-29-2012 at 11:26 PM.
Join our efforts to Secure America's Borders and End Illegal Immigration by Joining ALIPAC's E-Mail Alerts network (CLICK HERE)
-
04-20-2011, 12:28 PM #690Senior Member
- Join Date
- May 2007
- Location
- South West Florida (Behind friendly lines but still in Occupied Territory)
- Posts
- 117,696
Last edited by AirborneSapper7; 01-29-2012 at 11:33 PM.
Join our efforts to Secure America's Borders and End Illegal Immigration by Joining ALIPAC's E-Mail Alerts network (CLICK HERE)


 Reply With Quote


Number of American teens being arrested for HUMAN SMUGGLING on...
04-19-2024, 10:20 PM in General Discussion