

Results 7,501 to 7,510 of 11195
 226Likes
LinkBacks (?)
-
12-26-2016, 11:32 AM
-
09-02-2016, 05:39 PM
-
whole garden made with pallets!! Love it!! | Pallets | Pinterest | Pallets, Pallets Garden and Wooden Pallets
Refback This thread03-06-2016, 11:30 AM -
10-20-2015, 05:29 PM
-
06-12-2015, 08:00 PM
-
02-26-2015, 01:58 PM
-
01-05-2015, 04:13 PM
-
12-19-2014, 10:19 AM
-
EMERGENCY: HUGE FEMA PANDEMIC EXERCISE IN USA IN NOVEMBER, INTERNET SHUT DOWN PART OF EXERCISE | Prepare4Survival
Refback This thread12-03-2014, 10:39 PM -
Off Grid World ? Ugly Duckling Shipping Container Home Built by Artist Is a Beautiful Swan on the Inside
Refback This thread11-25-2014, 03:10 PM -
11-17-2014, 10:59 PM
-
11-13-2014, 11:18 AM
-
11-09-2014, 02:54 PM
-
10-28-2014, 11:38 PM
-
10-26-2014, 05:54 AM
-
10-16-2014, 11:28 AM
-
10-03-2014, 01:25 PM
-
10-02-2014, 09:16 PM
-
09-26-2014, 07:00 PM
-
09-26-2014, 01:56 PM
-
09-19-2014, 04:46 PM
-
09-13-2014, 05:49 AM
-
09-05-2014, 01:52 PM
-
09-01-2014, 09:39 AM
-
08-30-2014, 06:29 PM
-
08-10-2014, 06:29 AM
-
08-04-2014, 05:07 PM
-
07-23-2014, 11:14 AM
-
New Evidence on Expiration Dates | Medical Preparedness | Doom and Bloom (TM) | Doom and Bloom (TM)
Refback This thread07-22-2014, 10:10 AM -
07-18-2014, 08:37 PM
-
07-15-2014, 04:57 PM
-
07-11-2014, 01:40 AM
-
04-22-2014, 11:14 AM
-
04-18-2014, 12:57 PM
-
04-18-2014, 10:10 AM
-
04-14-2014, 12:18 AM
-
04-12-2014, 02:28 AM
-
03-02-2014, 11:43 PM
-
12-24-2013, 11:59 PM
-
12-07-2013, 11:04 PM
-
kitchen | Cob
Refback This thread11-25-2013, 03:24 PM -
10-22-2013, 10:25 PM
-
Apple Pie Braid | Sweets
Refback This thread09-26-2013, 07:58 AM -
09-02-2013, 04:44 PM
-
5 Reasons Why You May have to Bug Out Even Though You Don’t Want to | The Apartment Prepper's Blog
Refback This thread08-23-2013, 03:20 PM -
06-27-2013, 06:30 AM
-
06-23-2013, 08:11 PM
-
06-17-2013, 11:21 PM
-
05-24-2013, 05:06 PM
-
To Eat / BASIC LIST / SUGGESTED ITEMS FOR LONG TERM SURVIVAL - Page 275 - ALIPAC
Refback This thread05-01-2013, 03:49 AM
Thread Information
Users Browsing this Thread
There are currently 3 users browsing this thread. (1 members and 2 guests)
 LinkBack URL
 About LinkBacks
-
03-03-2023, 12:34 PM #7501Senior Member


- Join Date
- Aug 2018
- Posts
- 88,064
PrepWithMike: Agricultural Ivermectin and how to use a volumetric pipette
HRR - WHO 'TREATY' TO ASSERT GLOBAL MEDICAL DICTATORSHIP - SITUATION UPDATE MIKE ADAMS MAR.03.2023

If you're gonna fight, fight like you're the third monkey on the ramp to Noah's Ark... and brother its starting to rain. Join our efforts to Secure America's Borders and End Illegal Immigration by Joining ALIPAC's E-Mail Alerts network (CLICK HERE)
-
03-04-2023, 09:41 PM #7502Senior Member
- Join Date
- Aug 2018
- Posts
- 88,064
I Grew Potatoes in 5 Different Containers and This Happened
I GREW POTATOES IN 5 DIFFERENT CONTAINERS AND THIS HAPPENED

 FEDERATION OF IRISH PATRIOTS
FEDERATION OF IRISH PATRIOTS
1488 subscribersIf you're gonna fight, fight like you're the third monkey on the ramp to Noah's Ark... and brother its starting to rain. Join our efforts to Secure America's Borders and End Illegal Immigration by Joining ALIPAC's E-Mail Alerts network (CLICK HERE)
-
03-04-2023, 11:57 PM #7503Senior Member
- Join Date
- Aug 2018
- Posts
- 88,064
If you're gonna fight, fight like you're the third monkey on the ramp to Noah's Ark... and brother its starting to rain. Join our efforts to Secure America's Borders and End Illegal Immigration by Joining ALIPAC's E-Mail Alerts network (CLICK HERE)
-
03-04-2023, 11:58 PM #7504Senior Member
- Join Date
- Aug 2018
- Posts
- 88,064
If you're gonna fight, fight like you're the third monkey on the ramp to Noah's Ark... and brother its starting to rain. Join our efforts to Secure America's Borders and End Illegal Immigration by Joining ALIPAC's E-Mail Alerts network (CLICK HERE)
-
03-05-2023, 12:01 AM #7505Senior Member
- Join Date
- Aug 2018
- Posts
- 88,064
If you're gonna fight, fight like you're the third monkey on the ramp to Noah's Ark... and brother its starting to rain. Join our efforts to Secure America's Borders and End Illegal Immigration by Joining ALIPAC's E-Mail Alerts network (CLICK HERE)
-
03-05-2023, 12:06 AM #7506Senior Member
- Join Date
- Aug 2018
- Posts
- 88,064
If you're gonna fight, fight like you're the third monkey on the ramp to Noah's Ark... and brother its starting to rain. Join our efforts to Secure America's Borders and End Illegal Immigration by Joining ALIPAC's E-Mail Alerts network (CLICK HERE)
-
03-05-2023, 02:08 PM #7507Senior Member
- Join Date
- Aug 2018
- Posts
- 88,064
Food storage tips: How to turn a trash can into a root cellar
Friday, March 03, 2023 by: Zoey Sky
Tags: DIY, emergency food, food freedom, Food storage, food supply, homesteading, how-to, preparedness, prepper, prepping, prepping projects, root cellar, self sufficiency, survival, sustainable living, trash can
3,640VIEWS
 (Natural News) Root cellars are ideal if you need an effective method for long-term food storage and preservation. It will help keep food fresh and protect your stockpile from spoilage, pests and other common threats.
If you have the budget, you can build a large root cellar on your property to maximize storage space.
But if space or money is an issue, you can build a simple root cellar with a new trash can and some dirt. (h/t to AskAPrepper.com)
How to make a trash can root cellar
Follow the steps below if you want to make a root cellar using a trash can. (Related: Prepping skills: 15 Food storage and preservation methods to learn before SHTF.)
You will need:
- A trash can or steel drum. Use a brand-new and clean galvanized or stainless steel garbage can or steel drum.
- A power drill
- Plastic sheeting. This will help extend the lifespan of the can or drum. Sturdy plastic sheeting can also help keep out pests.
- Rocks or cinder blocks. These materials are optional, but using them will help create a raised shoulder and ensure that runoff water after it rains doesnt enter the can or drum.
- Corrugated sheet or covering. This will help protect the soil over the can. You can cover a corrugated sheet with old pieces of shade net.
- Equipment like a shovel for digging the hole and a wheelbarrow to move the rocks or cinder blocks. If the area has stubborn tree roots, you will need an ax.
Steps:
Choose the site for your root cellar
Try to locate a spot that never gets direct sun. If you decide on an area with soft ground, it will be easier to dig the hole quickly.
 Avoid a low-lying area because heavy rain could cause a temporary dam or large puddle that will submerge your drum and ruin the food inside.
Turn the can upside down and use the power drill to carefully make several ventilation holes in the bottom of the trash can.
Place the trash can or steel drum
Mark the outermost circumference of the drum and clean any weeds in the area for approximately one foot in width. Start digging the hole.
Make sure the trash cans top six to 12 inches is above the soil line. You will create a shoulder so the trash can be entirely isolated, but raising the lid will ensure that the trash can does not become submerged.
Measure the depth you need to gain on the shovels handle. This can help you keep track as you continued to set up the trash can root cellar.
Cover the trash can in plastic sheeting then place it put in the hole
You can use an old paint drop sheet as a protective tube for the can or drum. Place the covered trash can inside the hole.
Cover the entire top of the drum so none of the dirt ends up inside the drum.
Cover the trash can to protect against water damage
Once the trash can is secured, cover it with corrugated sheeting and old shade netting to keep the water away and hide it from looters.
Shade net is a lightweight knitted polyethylene fabric that helps protect plants from the sun. Its material is rot- and mildew-resistant and it doesnt become brittle.
Shade net is water permeable and it offers superior ventilation, making it a great addition to your trash can root cellar.
You also need to make sure that the trash can root cellar is hidden well so others wont be able to find it when supplies become scarce.
Benefits of having a root cellar
Root cellars are a great way to store and preserve food on your homestead. The underground room will provide a dark environment that helps maintain the freshness and nutritional value of the food in your stockpile.
Once you learn how to control the temperature and humidity in a root cellar, you can slow down or stop food perishability altogether. This makes even a small trash can root cellar one of the best ways to stockpile food for long-term storage and emergency preparedness.
The darkness in the root cellar will also help protect the food from sunlight, which can accelerate the breakdown of food nutrients.
Typical items stored in a root cellar include:
- Canned goods
- Dried meats
- Fruits
- Grains
- Nuts
- Vegetables
You can also use a root cellar to store other food items like butter, cheese, eggs, beer and wine. Plan ahead and rotate your supply regularly to keep food and items in the root cellar fresh.
If you have a backup power source on your homestead, you can also store food in a fridge.
Preventing moisture in a trash can root cellar
If you store fresh produce that has not been dried, moisture inside the trash can or steel drum may cause issues.
Generally, a root cellar needs proper ventilation to maintain a proper temperature and humidity level.
Good air circulation helps prevent mold, mildew and other organisms that cause spoilage from developing on stored food. Without proper ventilation, the air in a root cellar can become stale, which creates a hospitable environment for these organisms.
Proper ventilation can help prevent root vegetables like potatoes and onions from sprouting in the root cellar. If you build a root cellar in an extra room on your property, you can achieve proper ventilation by using a fan to move air in and out.
For a garbage can root cellar, you can install a small vent or drill holes at the top of the root cellar or at the bottom of the garbage can.
Keeping the air dry without ventilation
If you cannot provide any ventilation for the trash can root cellar, take additional steps to dry the air inside it. Do this by adding completely dry wood shavings or newspaper inside a root cellar to wick up moisture and dry the air.
Alternatively, you can use straw or hay. Wood shavings can absorb moisture, making it easier to maintain the desired humidity levels.
Use newspapers to line surfaces or shelves inside the root cellar. The newspaper will help absorb water.
Both materials are inexpensive, so they are ideal for building a root cellar on a budget.
More tips for storing food in a root cellar
Once you install the trash can root cellar, keep these tips in mind to extend the shelf life of food that you will store in it:
Shake off loose dirt from vegetables instead of washing it off. Many root-cellar vegetables store better this way, but leaving them wet can encourage rot.
Carrots and beets are easy to store. Brush off any loose dirt, clip foliage back to about an inch above the root and store the vegetables in boxes of moist sand or peat moss.
Handle vegetables carefully. Even slightly rough treatment can cause invisible bruising, which makes the produce start decomposing.
Stock a root cellar as late in the season as possible. If possible, chill the produce in the fridge before putting it in the trash can root cellar.
Several vegetables like onions, potatoes, pumpkins and winter squash must be cured for several days in warm temperatures before going into storage.
Most fruit breathes, but others like apples and pears must be wrapped in paper to slow the release of ethylene gas. This gas can cause spoilage in other produce in the root cellar.
Check your vegetables regularly. Remove vegetables with any signs of rot to ensure that the rest of the produce in the root cellar isnt also going bad.
Check out Foodstorage.news for more tips on how to hide and store food before SHTF.
Watch the video below to learn how to water glass eggs for long-term storage.
This video is from the snobbish prepper channel on Brighteon.com.
More related stories:
Food storage tips: How to store vegetables if you dont have a root cellar.
Upcycling for preppers: How to turn a broken freezer into a mini root cellar.
Food storage tips: How to prep for life without a fridge.
Sources include:
AskAPrepper.com
SurvivalFood.com
OrgaKart.com
Almanac.com
Brighteon.com
Food storage tips: How to turn a trash can into a root cellar NaturalNews.comIf you're gonna fight, fight like you're the third monkey on the ramp to Noah's Ark... and brother its starting to rain. Join our efforts to Secure America's Borders and End Illegal Immigration by Joining ALIPAC's E-Mail Alerts network (CLICK HERE)
-
03-05-2023, 02:53 PM #7508Senior Member
- Join Date
- Aug 2018
- Posts
- 88,064
Home gardening basics: How to make seed starting mix and start your own seedlings
Friday, March 03, 2023 by: Zoey Sky
Tags: green living, home gardening, homesteading, how-to, off grid, organic farming, organics, preparedness, prepper, prepping, seed starting mix, seedlings, survival, sustainable living, tips
3,200VIEWS
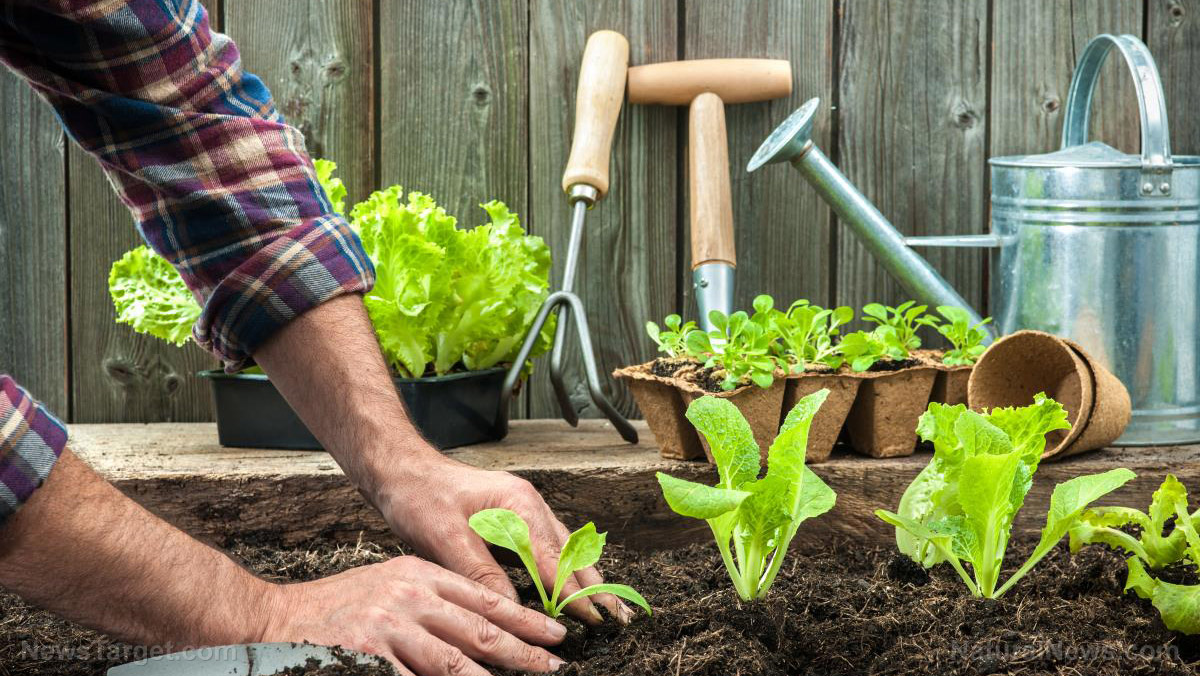 (Natural News) If you want to get a head start on the gardening season but are worried about spending more money, learn how to make a seed starting mix.
Knowing how to start seedlings can also help you get one step closer to a thriving garden without breaking the bank. (h/t to TheOrganicPrepper.com)
Benefits of making your own seed starting mix and starting your own seedlings
If money isnt an issue or youre a gardening newbie looking for a convenient option, you can buy supplies like commercial mixes and seedlings at the garden center.
But if youre worried about going over your budget, you can start your own seedlings. Doing this means you can also choose your preferred varieties.
Although garden centers will offer plant varieties that grow well in your area, they might not have what youre looking for if you want to try something more exotic. (Related: Home gardening basics: Knowing when to start seeds indoors.)
How to make DIY seed starting mix
Before you make your own seed starting mix, learn about the qualities of a good mix:
Lightness
Having a light starting mix means plant roots can easily grow through it.
This is why experts dont recommend using garden soil and compost as seed starters themselves. Both are too heavy, but they are a great base for your own starting mix.
Water retention
Seed starting mix with good water retention ensures that tiny roots dont dry out easily.
You can use either coco coir or leaf mold to ensure that your mix has good water retention.
Drainage
Seed starting mix with proper drainage ensures that plant roots dont stay too wet and rot.
Use sand, perlite or vermiculite for this purpose. Note that sand will make the mix a bit heavier.
Nutrition
Nutrition ensures that small seedlings have something to grow on. Using compost and leaf mold can help give your seedlings the nutrients they need to grow strong.
There are 10 basic plant nutrients, but many commercial mixes often limit themselves to NPK (nitrogen, phosphorus and potassium).
To make a nutrient-rich seed starting mix, use ingredients like finished animal manure, worm castings or plant food.
Common recipes for DIY seed starting mix are one part drainage material, two parts water retention material, two parts fine-grained compost and 1/2 part nutrition material.
Depending on how much seed starting mix you want to make, you can use basic measuring tools like yogurt cups and ice cream buckets. Use a sieve to break up chunks and a sturdy container with a good lid to keep your seed starting mix in.
Use the three ingredients below in the specified quantities to make a good all-around potting mix for starting seeds. Since all parts are measured by volume, you can use any tool to measure your ingredients. You can get all ingredients at most nurseries and garden stores.
Two parts compost
Use either your own garden compost or buy some. Break up any clumps with your hands or a gardening trowel.
Screen the compost until it has a fine texture. Screening or sieving involves running it through a screen made of hardware cloth to separate out any materials that havent broken down yet.
The compost will slowly release nutrients into the mix to help feed the seedlings as they grow.
2 parts coir (coconut fiber) or leaf mold
If you are using a block of coir, soak it in water first. This will make it fibrous and easier to pull apart.
You can also use well-rotted leaf mold. Using coir or leaf mold adds bulk to the seed starting mix and helps to retain moisture.
One part perlite
Perlite makes the mix lighter and helps prevent it from becoming too wet. As mentioned previously, you can use sand but the mixture will be heavier.
After measuring all the ingredients, mix them thoroughly.
After preparing a batch of seed starting mix, store it for later use in a lidded container or old potting soil sacks with the top rolled down and secured. Store the mix in a dry, cool place.
How to start seeds
Follow the tips below to learn how to start your own seeds:
Dont plant seeds too deeply or they wont sprout
Theres a limited amount of food (endosperm) in the seed and the plant must reach the light to make more food for growth.
Whatever method you use, dont plant too deeply. Check the seed packet for the appropriate planting depth.
Try using heat mats
Heat mats are affordable and they can help your seeds germinate quickly. You will also benefit from using a heat mat in colder climates.
Start frost-sensitive plants like peppers and tomatoes anywhere from mid-March to April 1, when its still around 20 F outside.
Even inside, plants dont like that cold. Use heat mats to help seeds germinate.
Germinate seeds in a wet paper towel
Make sure youre planting good seeds by germinating them in a wet paper towel before planting.
With this method, you first wet a paper towel and put some seeds between the layers along with an identifying marker like popsicle sticks or store-bought plant labels. Wrap the paper towel layers in plastic and turn on the heat mat.
Alternatively, you can use flat plastic food containers or a Ziploc bag.
City compost is free, but you dont always know whats in it
Some gardeners send their diseased plants to the city compost pile, which may or may not be hot enough to kill organisms that cause diseases. If you use city compost, you may be exposing your plants to diseases.
Dont try to pasteurize your own mix
The oven method doesnt always work well, but putting a mushroom mix in an old pillow case and sterilizing it on the stove for one hour is more effective.
You shouldnt use seed starting mixes to grow plants over the long term
DIY mixes are great for helping plants develop good root systems so the plants will grow quickly once they come in contact with good soil.
Dont grow your plants in a seed starting mix over the long term. Remember that seedlings are usually transplanted at about eight weeks, including hardening time.
Harden seedlings before transplanting
Seedlings that havent been hardened will eventually die.
Plants grown indoors must first be acclimated to direct sun, wind and rain exposure. This is done by keeping them outdoors for increasing amounts of time in one to two weeks.
For example, you can start by leaving a seedling for one hour in direct sun. Do this for two days, then double the exposure time every couple of days until the plants can be left outdoors overnight.
If nighttime temperatures are still 40 F or so, you can benefit from using a collapsible greenhouse. Buy one can make it from a bit of plastic and some PVC. You can also use cold frames.
Wear protective gear
Starting seed mix exposes you to very finely-grained particles that are easily inhaled. Protect yourself from the materials youre using to make the mix by wearing a mask and working in a well-ventilated area.
Gloves will protect your hands if you are using coco coir and peat moss. Both ingredients are slightly acidic and can hurt your hands.
Use hot water treatment for disease management
If you didnt buy your seeds, prevent contamination by disease-causing organisms by giving the seeds a hot water treatment.
Save money on your home garden and grow a wider variety of plants by making your own seed starting mix and learning how to start seedlings.
Watch the video below for more tips on how to start seeds.
This video is from the Pop Up Homestead channel on Brighteon.com.
More related stories:
Home gardening tips: How to start tomatoes from seed.
Home gardening tips: How to grow onions from seed.
Seed starting 101: 4 Good reasons to start seeds indoors.
Sources include:
TheOrganicPrepper.com
Almanac.com
Hort.Extension.wisc.edu
Brighteon.com
Home gardening basics: How to make seed starting mix and start your own seedlings NaturalNews.comIf you're gonna fight, fight like you're the third monkey on the ramp to Noah's Ark... and brother its starting to rain. Join our efforts to Secure America's Borders and End Illegal Immigration by Joining ALIPAC's E-Mail Alerts network (CLICK HERE)
-
03-06-2023, 11:14 AM #7509Senior Member
- Join Date
- Aug 2018
- Posts
- 88,064
Mar 05, 2023Which gun should I pick for the Zombie Apocalypse??
WHICH GUN SHOULD I PICK FOR THE ZOMBIE APOCALYPSE??

 American Gun ChicAmerican Gun Chic
721 subscribersIf you're gonna fight, fight like you're the third monkey on the ramp to Noah's Ark... and brother its starting to rain. Join our efforts to Secure America's Borders and End Illegal Immigration by Joining ALIPAC's E-Mail Alerts network (CLICK HERE)
-
03-06-2023, 11:21 AM #7510Senior Member
- Join Date
- Aug 2018
- Posts
- 88,064
Feb 10, 2023
My Unique Home Shooting Range ~ Thunder Gun Range ~ (Conroe, TX)
MY UNIQUE HOME SHOOTING RANGE ~ THUNDER GUN RANGE ~ (CONROE, TX)

American Gun Chic
American Gun Chic
721 subscribersIf you're gonna fight, fight like you're the third monkey on the ramp to Noah's Ark... and brother its starting to rain. Join our efforts to Secure America's Borders and End Illegal Immigration by Joining ALIPAC's E-Mail Alerts network (CLICK HERE)


 Reply With Quote

DOT threatens to revoke North Carolinas CDL authority
01-09-2026, 10:25 AM in illegal immigration News Stories & Reports