

Results 10,041 to 10,050 of 11944
 226Likes
LinkBacks (?)
-
12-26-2016, 11:32 AM
-
09-02-2016, 05:39 PM
-
whole garden made with pallets!! Love it!! | Pallets | Pinterest | Pallets, Pallets Garden and Wooden Pallets
Refback This thread03-06-2016, 11:30 AM -
10-20-2015, 05:29 PM
-
06-12-2015, 08:00 PM
-
02-26-2015, 01:58 PM
-
01-05-2015, 04:13 PM
-
12-19-2014, 10:19 AM
-
EMERGENCY: HUGE FEMA PANDEMIC EXERCISE IN USA IN NOVEMBER, INTERNET SHUT DOWN PART OF EXERCISE | Prepare4Survival
Refback This thread12-03-2014, 10:39 PM -
Off Grid World ? Ugly Duckling Shipping Container Home Built by Artist Is a Beautiful Swan on the Inside
Refback This thread11-25-2014, 03:10 PM -
11-17-2014, 10:59 PM
-
11-13-2014, 11:18 AM
-
11-09-2014, 02:54 PM
-
10-28-2014, 11:38 PM
-
10-26-2014, 05:54 AM
-
10-16-2014, 11:28 AM
-
10-03-2014, 01:25 PM
-
10-02-2014, 09:16 PM
-
09-26-2014, 07:00 PM
-
09-26-2014, 01:56 PM
-
09-19-2014, 04:46 PM
-
09-13-2014, 05:49 AM
-
09-05-2014, 01:52 PM
-
09-01-2014, 09:39 AM
-
08-30-2014, 06:29 PM
-
08-10-2014, 06:29 AM
-
08-04-2014, 05:07 PM
-
07-23-2014, 11:14 AM
-
New Evidence on Expiration Dates | Medical Preparedness | Doom and Bloom (TM) | Doom and Bloom (TM)
Refback This thread07-22-2014, 10:10 AM -
07-18-2014, 08:37 PM
-
07-15-2014, 04:57 PM
-
07-11-2014, 01:40 AM
-
04-22-2014, 11:14 AM
-
04-18-2014, 12:57 PM
-
04-18-2014, 10:10 AM
-
04-14-2014, 12:18 AM
-
04-12-2014, 02:28 AM
-
03-02-2014, 11:43 PM
-
12-24-2013, 11:59 PM
-
12-07-2013, 11:04 PM
-
kitchen | Cob
Refback This thread11-25-2013, 03:24 PM -
10-22-2013, 10:25 PM
-
Apple Pie Braid | Sweets
Refback This thread09-26-2013, 07:58 AM -
09-02-2013, 04:44 PM
-
5 Reasons Why You May have to Bug Out Even Though You Don’t Want to | The Apartment Prepper's Blog
Refback This thread08-23-2013, 03:20 PM -
06-27-2013, 06:30 AM
-
06-23-2013, 08:11 PM
-
06-17-2013, 11:21 PM
-
05-24-2013, 05:06 PM
-
To Eat / BASIC LIST / SUGGESTED ITEMS FOR LONG TERM SURVIVAL - Page 275 - ALIPAC
Refback This thread05-01-2013, 03:49 AM
Thread Information
Users Browsing this Thread
There are currently 3 users browsing this thread. (0 members and 3 guests)
 LinkBack URL
 About LinkBacks
-
06-26-2025, 03:51 AM #10041Senior Member


- Join Date
- Aug 2018
- Posts
- 97,635

- Home
- Homesteading
- Gardening
- Canning
- Chickens
- Recipes
- Food Storage
- Health
- Emergency Preparedness
- Natural Remedies
How to Make Natural Healing Dandelion Salve Recipe
- Home
- Natural Remedies
- How to Make Natural Healing Dandelion Salve Recipe

Melissa Francis
June 19, 2014
Natural Remedies, Salves
dandelion, healing, salve
How to Make Natural Healing Dandelion Salve Recipe
This wonderful step by step tutorial of how to make a natural healing dandelion salve recipe can be used to relieve pain in sore muscles. It is amazing how nature can provide so many options for helping so many different ailments if we have the knowledge of where to look and prepare concoctions without harmful chemicals.
Montana homesteader
Click here to read How to Make Natural Healing Dandelion Salve Recipe:
http://montanahomesteader.com/make-dandelion-salve/

- Home
- Shop
- Events
- About
- Beekeeping
- Chickens
- Forage
- Grow
- Homesteading
- homeschooling
- Make
- Preserve
- Recipes
- vermicomposting
Homesteading · Make
How to Make Dandelion Salve and Dandelion Infused Oil
June 1, 2014152 Comments
Disclosure: This post may contain affiliate links. Please see our Privacy Policy and Disclosure Statement.Learning how to make dandelion infused oil and dandelion salve is so easy!
We’re only about a month into our gardening season here in Montana and already my hands are dry and chapped. I’ve been using a variety of lotions and skin creams to replenish the moisture in the rough skin on my hands but have had little success in finding a lasting solution.
I decided to create my own skin nourishing dandelion infused oil and salve. This stuff is simply amazing! It is easy to make, low cost and leaves my hands feeling soft and nourished for hours.
I’ve also used dandelion salve and infused oil on my achy lower back after a long day of gardening and it helps soothe my sore muscles. The best part? I was able to use a little beeswax from our new honey bees!

I’ve read quite a few articles this spring about foraging and eating dandelions. One article I read listed the health benefits from the various parts of a dandelion plant.
I was intrigued that the flowers have pain relieving properties and can also be used as a massage oil. I started making infused oils a few years ago but had never tried dandelion infused oil. We have plenty of dandelions around our property so foraging would be easy.
There are a lot of recipes floating around the internet for homemade balms, salves and lotions. My frustration with a lot of them is that they include a lot of ingredients I don’t have on hand.
I’ve almost invested in some of these products but couldn’t ever bite the bullet and do it. Often these products can be expensive and not something I’ll use often enough to make the investment.
What I love about this recipe I created is that it includes some pretty simple ingredients that most people already have at home or can purchase for a low cost.
Making and using all natural skin care products doesn’t have to be expensive!
Jump to:
Making Dandelion Infused Oil
Making infused oils is fairly simple. To make dandelion infused oil, you need to harvest a bunch of dandelion flower heads.
I cut them off the stem as high as I could to minimize the amount of green foliage being harvested. I wasn’t quite sure how many to harvest, so I filled a large bowl.
This ended up being about four cups of fresh dandelion heads.
I read several different articles about making dandelion infused oil and one thing everyone mentioned was being mindful of the high water content in dandelion flowers.
To minimize getting a bunch of icky sludge in your infused oil, dry the flower heads out for a day or two. I spread them out on a cloth inside a cardboard box lid and sat them on top of our chest freezer for two days.
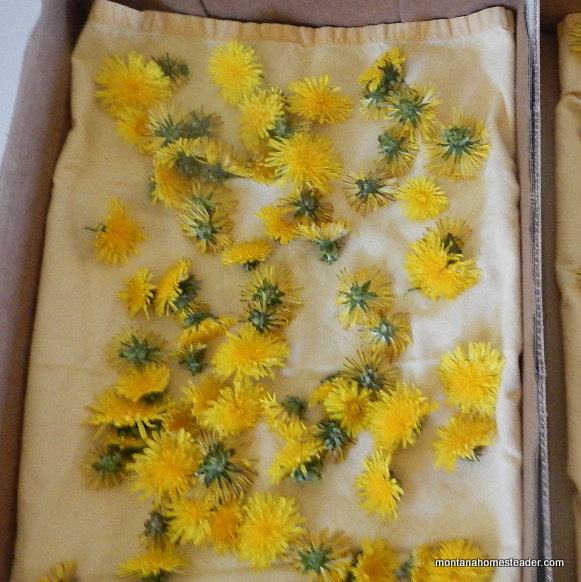
Once the dandelion flowers have dried a bit, pack them into a glass jar. I used a pint size canning jar and had just enough space for all the flowers. Next pour olive oil into the jar.
Make sure the dandelion flowers are all completely covered with oil. Place a lid on the jar.
There are two ways to infuse oil. The way I first learned several years ago was the slow infusion method that I learned from this amazing book.
This method requires sitting the jar of oil out of direct sunlight for four to six weeks. If you want a speedier process, you can heat the oil in a jar on the stove.
I opted for this method since I was anxious to make some salve and heal my dried out skin.
I put a small pot on the stove with a few inches of water in the bottom. Then I sat the glass jar of oil and flower heads in the pan and turned it on medium.
Once the water heated up but not boiling, I turned it off and let the jar sit in the pan of water until it all cooled off. Then I put the jar in the cupboard to continue infusing.
My jar infused for well over a week. This was mainly because I was so busy working in the garden I didn’t have time to make the salve!
The infused oil could actually be used after two or three days. After it is done infusing, strain the flowers from the oil.
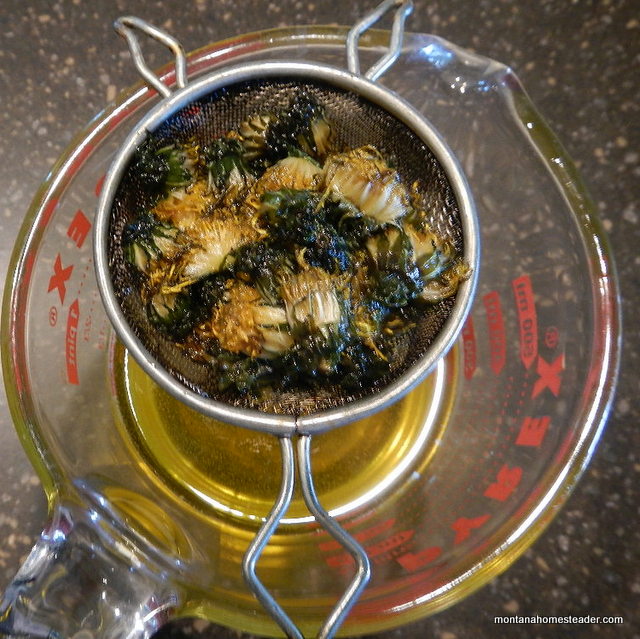
I use a small fine mesh sieve and press the flowers down into the sieve to press out as much oil as I can. Compost your flowers and the infused oil is now ready to use!
Making Dandelion Salve
Making salve is an easy project if you have the supplies handy. I have a lot of the supplies on hand since I’ve been making homemade lip balm and selling it in our Etsy shop for the last couple years.
This recipe will make a large batch (a little less than 1.5 cups). If you want a smaller batch, reduce the quantities but keep the proportions the same.
This salve can feel a bit greasy when you first put it on. I’ve found that after 15-20 minutes the greasiness goes away and my hands just feel so soft.
I put a generous scoop of dandelion salve on my hands before I go to bed and just love how soft my skin feels when I wake up!
Supplies Needed to Make Dandelion Salve:
-16 oz of infused dandelion oil
-2 oz coconut oil (this is the kind we use)
-2 oz of beeswax (We render our own beeswax to use and sell it in our Etsy shop here)-OPTIONAL: 10-15 drops of lavender essential oil (or whatever scent you prefer!)
Directions for Making Dandelion Salve
Step 1:
Place the beeswax and coconut oil in a glass jar or measuring cup. Sit a pan on the stove with several inches of water in it. Sit the glass jar down in the pan and heat on low/medium.

Step 2:
Once the beeswax and coconut oil are melted, carefully stir in the infused dandelion oil. Our house was cool when I made this, so when I poured the dandelion oil in some of the wax started hardening up. If this happens for you, keep heating the mixture until it is all melted again.
Step 3:
Add in essential oil if you prefer and stir well. The dandelion oil does have a dandelion scent but I I love the scent of lavender so chose to use this essential oil as an added scent.
Step 4:
Carefully remove the glass jar from the pan. I wanted one big jar of dandelion salve so the jar I mixed it in was the jar I let it cool off in. If you want smaller containers of salve, pour the mixture into smaller containers. Allow the salve to cool.
This dandelion salve has a firm consistency. Since there is coconut oil in it, as soon as you scoop some into your hands it softens and melts.
This creates an easy to spread salve. I started out using this just on my hands but then started using it for rough, cracked skin on my feet. I also use it to nourish dry skin on my arms and legs.
After making a big batch of dandelion salve, I had some dandelion infused oil left over. Since the infused oil is to help with pain relief, I filled an empty amber glass bottle to use for massage oil.
When we have aches and pains in our back or feet, I can use this massage oil to naturally help with pain relief.
After spending the whole day transplanting seedlings from our greenhouse into the garden on Saturday, my lower back was so achy I could hardly walk.
I rubbed dandelion infused oil on my lower back and felt some relief. It didn’t make all the aches and pains go away, but it did lessen the pain.
Whoever said dandelions are weeds and should be destroyed must never have tried a dandelion salve or massage oil. This stuff is amazing!
Learn More about Foraging for Dandelions and Wildcrafting
Interested in learning more about foraging for dandelions, other wild edibles and how to use them? I highly recommend the Herbal Academy Botany & Wildcrafting Course.
The course is online and self-paced so you can take it whenever and wherever works for you! I’ve taken several courses through the Herbal Academy and love the high quality courses I can learn online from our rural homestead.
 Do you love dandelions and want to find more ways to use them? Check out our other dandelion posts:
Here’s more dandelion inspiration from the Nerdy Farm Wife with 12+ things to make with Dandelion flowers. Who knew dandelions could be used for so many wonderful things!
What do you like to make with dandelions?
updated March 2023
How to Make Dandelion Salve and Dandelion Infused Oil - Montana HomesteaderIf you're gonna fight, fight like you're the third monkey on the ramp to Noah's Ark... and brother its starting to rain. Join our efforts to Secure America's Borders and End Illegal Immigration by Joining ALIPAC's E-Mail Alerts network (CLICK HERE)
-
06-26-2025, 04:08 AM #10042Senior Member
- Join Date
- Aug 2018
- Posts
- 97,635
If you're gonna fight, fight like you're the third monkey on the ramp to Noah's Ark... and brother its starting to rain. Join our efforts to Secure America's Borders and End Illegal Immigration by Joining ALIPAC's E-Mail Alerts network (CLICK HERE)
-
06-26-2025, 05:25 PM #10043Senior Member
- Join Date
- Aug 2018
- Posts
- 97,635
- Home
- Homesteading
- Gardening
- Canning
- Chickens
- Recipes
- Food Storage
- Health
- Emergency Preparedness
- Natural Remedies
Remote Tripwire Alarm Project – Emergency Preparedness
- Home
- DIY Projects
- Remote Tripwire Alarm Project – Emergency Preparedness
Melissa Francis
November 29, 2013
Build It, DIY Projects, Emergency Preparedness
alarm, Remote, Tripwire
Make these inexpensive trip wires that will send you an alarm if an intruder sets one off so that you will have plenty of advance notice that someone is coming.
A tripwire is one of the most basic ways to set up a simple security system.
Make Magazine online website shares a do it yourself project of how to make a ” Remote Tripwire Alarm ” .
 makezine
Click here to read how to build this project yourself:
http://makezine.com/projects/remote-tripwire-alarm/
Remote Tripwire Alarm Project - Emergency Preparedness - The Homestead SurvivalIf you're gonna fight, fight like you're the third monkey on the ramp to Noah's Ark... and brother its starting to rain. Join our efforts to Secure America's Borders and End Illegal Immigration by Joining ALIPAC's E-Mail Alerts network (CLICK HERE)
-
06-26-2025, 05:34 PM #10044Senior Member
- Join Date
- Aug 2018
- Posts
- 97,635

- Explore
- Learn
- Experience
- Participate
- Shop
- New
- All Stories
- Magazine Projects
- Board Guide
- Make:cast
- Magazine Issues
- Maker Faire
- Ask Make:
Projects from Make: Magazine
Remote Tripwire Alarm
- Time Required: 38 Hours
- Difficulty: Moderate
- Print this Project
By Jason Poel Smith
September 9th, 2013
A tripwire is one of the most basic ways to set up a simple security system. You run a line across a pathway. Then when someone walks through the line, it activates an alarm. This kind of system is easy to set up and is fairly effective. But there is always room for improvement.
The most inconvenient thing about a classic tripwire alarm is that it requires you to run a physical line from the tripwire to the alarm. This makes it difficult to set up a system where the alarm is far away or inside a building. To get around this problem, I designed a simple remote alarm system that uses a small radio transmitter to activate the alarm wirelessly. So in this project, I am going to show you how to make a simple remote tripwire alarm.
Project Steps
Select a Wireless Transmitter/Reciever
Next


The first thing that you need to do is select a small transmitter to activate the alarm. Just about any radio transmitter can work. I decided to use a wireless doorbell because it was small, battery powered and it is easy to program them so that multiple transmitters can activate one receiver. Some other examples of transmitters that can also work are things like walkie ralkies or garage door openers.
Add Wires to the Switch on the Transmitter
NextPrevious


The only modification that you need to make to the transmitter is to solder some extension wires to the button terminals so that it can be activated by an external switch. In most cases you will need to remove the circuit board from the housing in order to access the button terminals.
Take two small piece of wire (at least three inches long) and strip the insulation off both ends. Then solder one wire to each side of the button. If your button has four terminals, you need to solder the wires to two terminals that are not connected when the button is not being pressed. You should use a multimeter to check which terminals are normally connected and which ones aren’t.
Create a Switch That Will be Activated By the Tripwire
NextPrevious


In order to activate the transmitter you need an electrical switch that will react to the tripwire being pulled. I decided to make a spring loaded switch from a clothespin and a couple of machine screws.
Start by disassembling the clothespin. Then drill a hole in the end of both wood pieces that is the same diameter as your machine screws. Insert the machine screws through each hole with the head of the screws on the inside of the clothespin. Tighten a nut on the back side of each wood piece to secure it in place. Then add a second nut onto each screw. This will be used to attach the wires from the transmitter. You may also want to drill a small hole in the opposite end of each piece to attach a line when hanging the tripwire. Once you are done modifying both wood pieces, reassemble the clothespin.
Now you need to attach the wires from the transmitter to the clothespin switch. To do this, take the free end of the the wires, and wrap them around the machine screws between the two nuts. Then tighten the outer nuts onto the wire to hold them in place. Now whenever the clothespin switch is closed, it will activate the transmitter.
Setup the Tripwire
NextPrevious


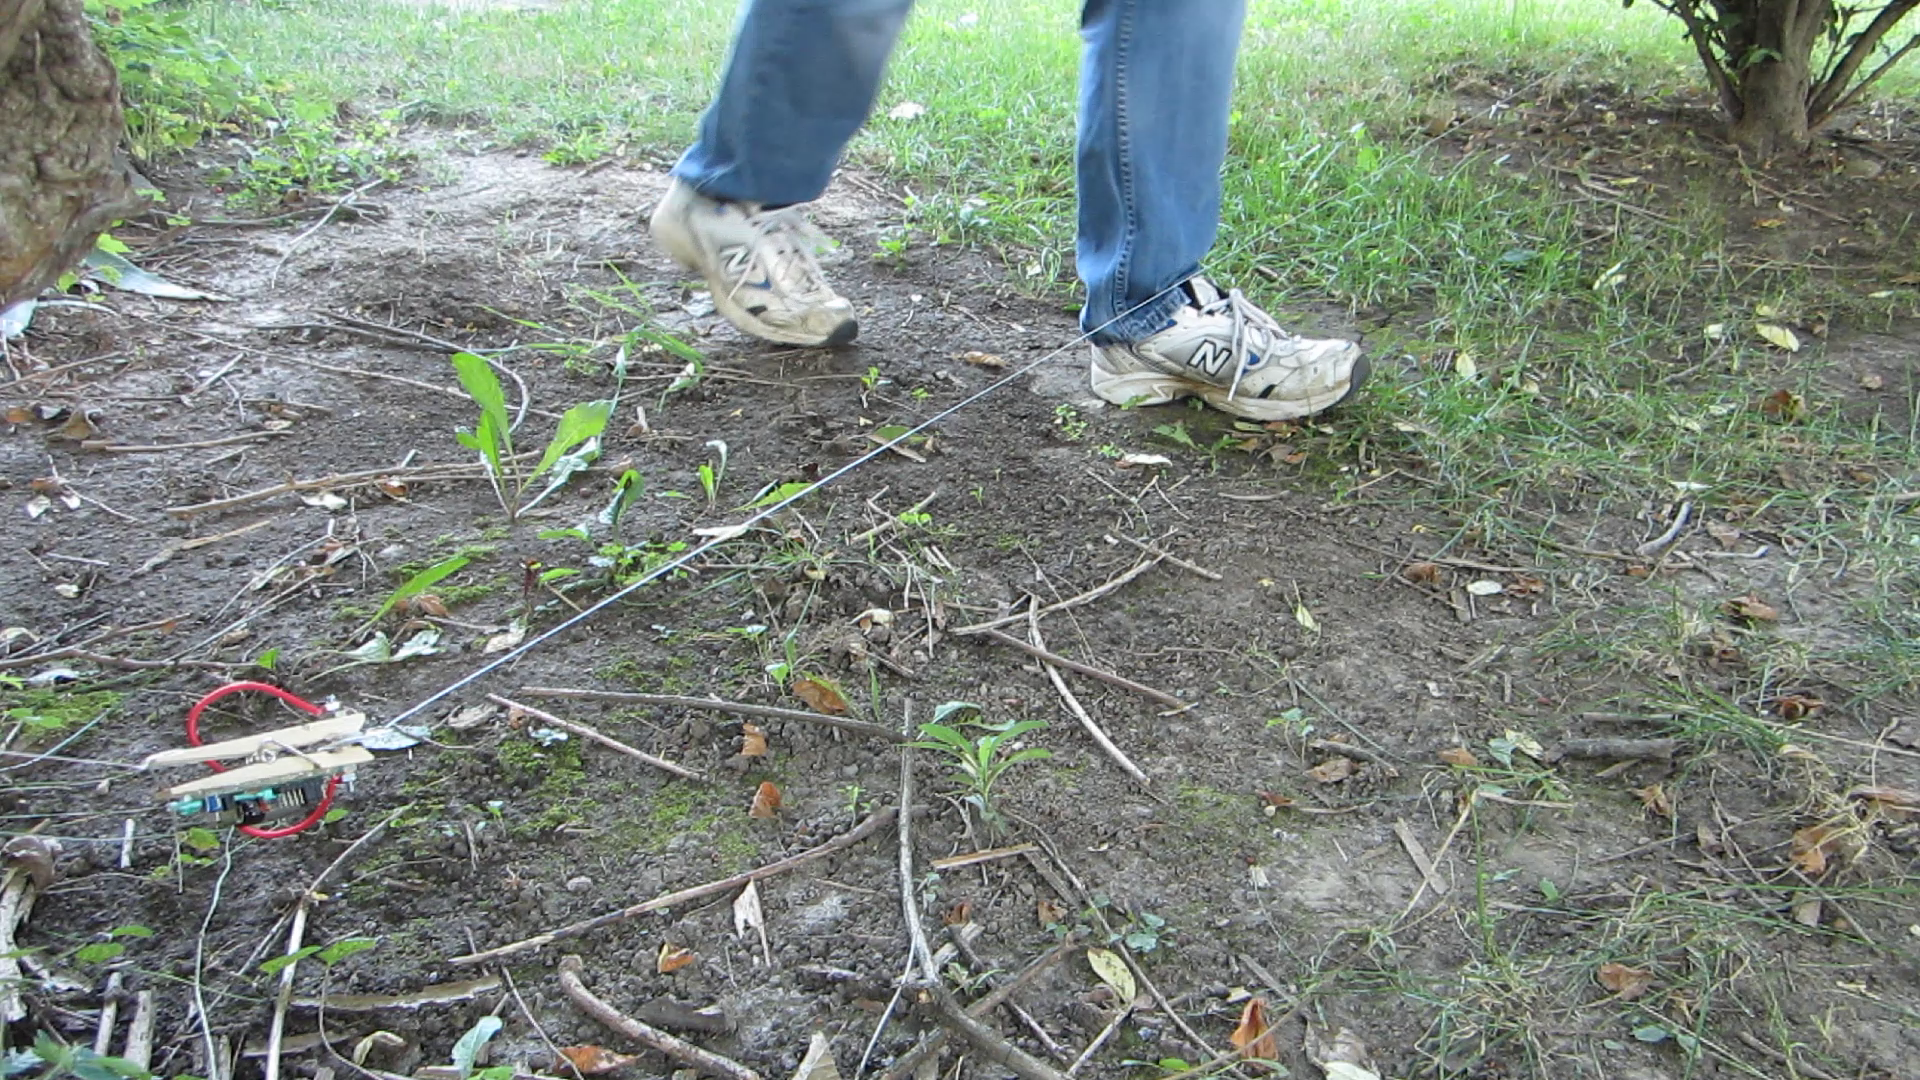
First decide where you want to place the trip wire. Look for a location where traffic is restricted to a narrow path such as a hallway if you are indoors or an opening in thick vegetation if you are outside. Also look for areas where you can easily mount the line on both sides. You want the tripwire to be about one foot off the ground.
First cut of a short piece of line that will support the transmitter. Tie one end to the hole on the back of the clothespin. Then tie the other end to some fixture that is near the pathway.
Cut a second piece of line that is long enough to go across the pathway. Add a little extra length for any knots that you need to make to secure it in place. Tie one end to something on the opposite side of the path from the first piece. Then take the free end over to the clothespin.
You can connect the two pieces by putting the free end of the fishing line between the screws on the clothespin. If the fishing line is too thin to keep the screws separated, then you can add a small piece of plastic onto the end of the line.
How the Alarm Works
NextPrevious


Once your tripwire is in place, your alarm is ready to use. When someone crosses the tripwire, it will pull the line out from between the screws of the clothespin switch. This will connect the terminals of the button on the transmitter and it will send a signal to the receiver. The receiver will then play its tone to alert you that there is an intruder.
Keep in mind that your doorbell has a limited range. You don’t want to have the receiver too far away and miss the intruder. You should always test each tripwire with the receiver in its intended location.
Optional: Change How the Receiver Alerts You
NextPrevious


The receiver will normally play its standard ringtone as the alarm. If you would prefer to have a different notification, there are several ways that you can change it.
One option is to simply change the ringtone. You can check out this project where I use a small recording module to make custom ringtone for a doorbell. There is also the option of simply purchasing a wireless doorbell that lets you upload your own MP3’s to use as ringtones.
If you want to be more stealthy, you could also have the receiver alert you by turning on a light instead of using sound. The easiest way to do this is to just replace the speaker with an LED. Start by marking each wire to keep track of which one was connected to the positive/negative terminals of the speaker. Then cut the speaker wires at the speaker terminals and remove the speaker from the housing. Now all you have to do is connect the speaker wires to an LED and a series resistor. To find the value of the resistor that you need, do the following. Subtract the LED’s operating voltage from the voltage of the receiver’s battery pack. Then take the result and divide it by the operating current of the LED. (example: (4.5V-3.0V)/0.020A=75ohm resistor) When connecting the LED and resistor to the speaker wires, be sure to match the polarity of the LED. The longer lead of the LED needs to be connected to the positive speaker wire.
Optional: Setup Multiple Tripwires and Transmitters
Previous


Most wireless doorbells have an array of pins and jumpers that lets you set the frequency or security code for the doorbell. This lets you change the settings if you are getting interference from your neighbors. This also lets you have multiple transmitters or multiple receivers for your house. You can use this feature to setup multiple tripwires.
If you want each tripwire to set off a different alarm, then you need to make sure that each transmitter and receiver pair is set to a different frequency. This kind of system will tell you specifically which tripwire has been set off.
If you want to have multiple tripwires all set off a single master alarm, then you need to make sure that all the transmitter/receiver pairs are all set to the same frequency. This kind of system has the advantage of being easier to monitor. You can have a single receiver that you carry around with you. Or you can have multiple receivers in several places throughout your secret base so that you will always hear one when it goes off.
From the Shed: New Arrivals

Oxocard Pixelmatrix Cartridge
$30.00

Make: Oxocard Innovator Kit
$79.95

Oxocard Synthesizer Cartridge
$35.00

Get Make: Magazine
$19.99
TaggeddoorbellhackMFsecuritysecurity systemtripwire
Jason Poel Smith
My name is Jason Poel Smith. I have an undergraduate degree in Engineering that is 50% Mechanical Engineering and 50% Electrical Engineering. I have worked in a variety of industries from hydraulic aerial lifts to aircraft tooling. I currently spend most of my time chasing around my new baby. In my spare time I make the how-to series "DIY Hacks and How Tos."
Remote Tripwire Alarm - Make:
If you're gonna fight, fight like you're the third monkey on the ramp to Noah's Ark... and brother its starting to rain. Join our efforts to Secure America's Borders and End Illegal Immigration by Joining ALIPAC's E-Mail Alerts network (CLICK HERE)
-
06-26-2025, 05:50 PM #10045Senior Member
- Join Date
- Aug 2018
- Posts
- 97,635
Everything You Ever Wanted To Know About Meat: 28 Tips and Tutorials
Cambria Bold
(Image credit: The Kitchn)
How do you cook and shred a pork shoulder? How do you carve a roast chicken? How do you check the temperature on a turkey? What’s the secret to crispy skin? What’s the best way to package meat before freezing? The answers to all these, plus many, many more in our definitive tips, tricks, and techniques guide to MEAT.
Cooking Tutorials, Techniques, and Tips
• How to cook a turkey.
• How to cook moist and tender chicken breasts every time.
• How to cook and shred a pork shoulder.
• How to grind your own meat in the food processor.
• How to make meatballs.
• How to cook steak in the oven.
• How to cook and brown ground beef.
• How to sear meat.
• How to cook great ribs in the oven.
• How to roast a chicken (and then how to carve it)
• How to grind your own sausage.
• How to choose the best meat for beef stew.
• How to tell when your steak is done.
• How to brine meat.
• How to determine how much meat you should have per person.
• How to check the temperature on a turkey.
• The difference between braising and stewing.
Crispy Sweet Potato Fries
Flavoring, Freezing, and Thawing Tips
• For the best flavor, grill meat before braising.
• For the perfect steak, first freeze it solid, then cook for an hour.
• For crispy skin, season meat under the skin.
• How to package meat for freezing.
• How to freeze and thaw meat.
• The best way to reheat meat? Do it in a cast iron skillet.
Shopping and Prep
• A shopping guide to cheap cuts of beef.
• What to do if you don’t have a roasting rack.
• Find cheaper chicken at the meat counter.
• What to look for when shopping for beef.
It’s Reader Request Week at The Kitchn!
This post was requested by honeybun.
Originally published 11.8.2012.
Everything You Ever Wanted To Know About Meat: 28 Tips and Tutorials | The KitchnIf you're gonna fight, fight like you're the third monkey on the ramp to Noah's Ark... and brother its starting to rain. Join our efforts to Secure America's Borders and End Illegal Immigration by Joining ALIPAC's E-Mail Alerts network (CLICK HERE)
-
06-27-2025, 05:35 AM #10046Senior Member
- Join Date
- Aug 2018
- Posts
- 97,635
Survival Sherpa
Helping each other on the climb to self-reliance and preparedness…the Survival Sherpa way…One step at a time.

How to Make Firebricks (fire logs) and Wood Stove Logs for Free!
Posted on July 24, 2014 by Survival Sherpa
Today we’re proud to present another DIY project from a fellow Doing the Stuff Networker. Jamie Burke is a master at repurposing trash and junk. His latest project shared on our DTSN Facebook Group not only saves money, but would be very useful both now (free is always good) and after a SHTF event.
If you’d like to see more of how he and our other members are Doing the Stuff, join us on our journey to self-reliance and preparedness!
Here’s Jamie’s down and dirty tutorial…

Firebricks and Wood Stove Logs Tutorial
This process only requires: Two buckets, a drill (or stabbing weapon), piece of wood (or bottom of another bucket), kinda a custom drill bit, water. + your TRASH!
Out of all of the physical spam you receive in the mail, leaves you rake, dead foliage, paper towel rolls, paper plates, napkins, beer boxes, egg cartons, etc., etc., etc., (any biomass material you can think of) – why not turn it into useable logs for your furnace, campfire, or cooking? Just don’t use the plastic coated things.
I’ve seen ‘devices’ you can buy that makes ‘newspaper logs’, but they never seem efficient, require you to pre-shred, take way too much time and the logs are not very solid. This is a much better method and doesn’t really cost anything.
Step 1
Get two 5 gal buckets. $3 each at walmart. Drill a lot of holes in it, about 2 inches down from the lips and around 3/16 size-ish. I used a soldering iron. You can use a screw driver and stab holes all in there. Go around all the bucket and on the bottom. [Todd’s note: Buckets can be had for free at bakery’s and construction sites]

Holy bucketStep 2

Un-holy and holy
Place the holy bucket inside the other normal bucket. Start putting your papers, leaves, bio material in it. Add your water and fill’r up. Doesn’t really matter if you have too much water. You can leave these buckets of water setup by the mailbox, then just walk by and toss stuff in.

Don’t judge my trashStep 3
You need a custom drill bit, which I have. A good thing to do is find an old table saw blade and weld it to s shaft of steel. This is “the hardest” part of this setup. Drill away and in seconds you will have a nice pulpy wet mess.

Drill attachment turns it into mulchStep 4

New and improved stirring attachment/zombie slayer
Next, pull out the holy bucket and let it drain. I put the draining bucket on top of the other bucket to save the water – you can re-use the same water many times.

Reuse this water for your next batchStep 5
You should have a press that goes far down into the bucket to press out the remaining water. I found a bucket that someone cut the bottom off.. well perfect. But you will probably want to place a bucket down on some wood, trace around the base and cut out that piece of wood to use as a press.

Pulp on the left. Found this next to my house (press). Or just trace a bucket on wood and cut out the wood piece for a press.Step 6
Set your press inside the bucket over the pulp. Then I set the re-used water bucket inside of that bucket (because water is heavy). That will work over time. I also sat on it.. put my anvil on it.. and stood in it. It’s pretty quick. whatever heavy you have for the top.

Step 7
Now once most the water is pressed out – take it out to a sunny/dry place. Turn over the bucket and tap on the top. It will take some time to dry, depending on your location. We live in the desert so this will happen fast. If you want it to dry faster, cut these logs as you would a pizza, into sections.

The wet fire cake ready for drying
Once dry, these will burn a long time.. and cost you ~ nada.

Free firebricks dried in the desert!
Todd’s note: Hope you enjoyed Jamie’s tutorial. He’s a fine example of people who have traded theory for ACTION! Come check out all the other folks busy Doing the Stuff!
If you try it yourself, we’d like to know how it turns out.
Keep Doing the Stuff of self-reliance,
Todd
P.S. – You can also keep up with the Stuff we’re Doing on Twitter, Pinterest, Google +, YouTube and Facebook page… and over at the Doing the Stuff Network on Pinterest, Google +, and Facebook.
P.P.S – If you find value in our blog, Dirt Road Girl and I would appreciate your vote on Top Prepper Sites! You can vote daily by clicking here or on the image below. Check out all the other value-adding sites while you’re there…

Thanks for Sharing the Stuff!
Copyright: Content on this site (unless the work of a third-party) may be shared freely in digital form, in part or whole, for non-commercial use with a link back to this site crediting the author. All links in articles must remain intact as originally posted in order to be republished. If you are interested a third-party article, please contact the author directly for republishing information.
How to Make Firebricks (fire logs) and Wood Stove Logs for Free! | Survival Sherpa
If you're gonna fight, fight like you're the third monkey on the ramp to Noah's Ark... and brother its starting to rain. Join our efforts to Secure America's Borders and End Illegal Immigration by Joining ALIPAC's E-Mail Alerts network (CLICK HERE)
-
06-27-2025, 05:42 AM #10047Senior Member
- Join Date
- Aug 2018
- Posts
- 97,635
80+ Recipes For Home Canning: {Fruits & Vegetables}
Food Preservation
26 comments
This collection highlights garden fresh produce that is pickled, packed in syrups or just in water and I’ve sorted them alphabetically (by vegetable or fruit item) so it will be easy to find what you’re looking for.
This handy reference sheet lists dozens of different tutorials and recipes for canning assorted fruits and vegetables. I’ve handpicked these from around the net and focused on featuring those that are for long term storage (though there are a small number that go straight to the refrigerator, these are noted).
 It's Satisfying To Stock Up The PantryIf you’re more interested in jams, jellies and spreads, many have been already organized on this page: 100 Jams, Jellies & Marmalades.
Note: As with all the tips and lists here on Tipnut, this page will be updated as I come across new goodies so you may want to bookmark this page for reference.
Freebie Alert: Label your freshly packed and sealed jars with these free printables.
*Some recipes are similar to each other but still included because of the tips, slight ingredient tweaks or quality of tutorial each has to offer. Have fun!
Apples:
- Spiced Apples: Apples are grated (including peels), ingredients include sugar, Ceylon cinnamon, ground ginger, freshly grated nutmeg, ground cloves, Citric Acid. From Mrs. Wheelbarrow’s Kitchen.
Asparagus:
- Herbed Pickled Asparagus: Yields 4 pints, ingredients include white wine vinegar, water, granulated sugar, pickling or Kosher salt, fresh oregano and fresh marjoram. From Small Measure.
- Pickled Asparagus & Fiddleheads: Ingredients include thinly sliced onion, fresh asparagus, fresh fiddleheads, white wine vinegar, water, sugar, mustard seeds, coriander seeds, black peppercorns, whole allspice, dried chilies, pickling or Kosher salt. From Backyard Farms.
- Pickled Asparagus With Lemon: Yields 6 – 12 oz jars. Ingredients include white vinegar, water, pickling salt, mustard seeds, peeled garlic cloves, sliced & seeded lemon. From My Pantry Shelf.
- Pickling Asparagus: Made with asparagus spears, white wine vinegar, water, dill seed, chili flakes, sea salt, sliced shallot, sliced garlic and wild garlic flowers (optional). From Laundry Etc.
- Pickled Asparagus: Yields 3 or 4 pint jars. Ingredients include distilled white or white wine vinegar (5% acidity), salt, slivered garlic, dill seed (optional), hot pepper flakes, whole allspice (optional), cumin seed (optional), coriander seed (optional). From The New York Times.
- Pickled Asparagus: Yields approximately 2 pints, ingredients include thick asparagus tips (4″ long), rice vinegar (4% acidity), water, Kosher salt, sugar, pickling spice and peeled garlic cloves. From Piccante Dolce.
- Spicy Pickled Asparagus: Yields 1 – 12 oz jar, ingredients include white vinegar, pickling salt, red pepper flakes, coriander seeds, mustard seeds, garlic cloves. From Sustainable Pantry.
Beets:
- How To Pickle Beets: Packed with a hot brine made of apple cider vinegar, sugar, whole cloves, whole anise berries and cinnamon sticks. From The Bower Family Happenings.
- Pickled Beets: Yields 4 pints. Made with small beets, cider vinegar, sugar, water, small whole onions (peeled), pickling salt, caraway seeds and mustard seeds. From Planet Green.
- Pickled Beets: Made with cider vinegar, brown sugar and beet juice (cooking water). From Brooke’s Food Blog.
- Red or Golden Pickled Beets: (for refrigeration) Makes 2 quarts. Ingredients include coriander seeds, yellow mustard seeds, dill seed, whole allspice, fenugreek seeds, whole cloves, crushed red pepper flakes, fresh bay leaves, white wine vinegar, dry white wine, sugar and coarse salt. From Martha Stewart.
- Pickled Beets: Beets are cooked until fork tender then packed with a boiling sugar and vinegar mix. From Sense and Simplicity.
- How To Make Pickled Beets: Beets are cooked, drained and skins are rubbed off before packing with brine (white vinegar, water, granulated sugar and pickling spice). From Playing In The Dirt.
Cabbage:
- Traditional Method For Making Sauerkraut: {Plus Tips}: Can be canned, frozen or refrigerated. From Tipnut.
- Turkish Fermented Cabbage: (refrigerate) Yields approximately 2 & 1/2 quarts. Ingredients include shredded white head cabbage, sea salt, minced garlic, minced ginger, aleppo pepper (or Korean, or Hungarian paprika & cayenne powder), sugar, water. From Tigress In A Pickle.
Carrots:
- Vietnamese Carrot & Radish Pickle: Ingredients include white vinegar, filtered water, sugar, grated ginger, julienned carrots, julienned dense radish (daikon or watermelon), whole star anise. From Married…with Dinner.
- Pickled Dill Carrots: Yields 5 pints, made with dill seeds, garlic cloves, water, vinegar and pickling salt. From Craving Greens.
- Spicy Pickled Carrots: Yields 5 pints. Made with 4 lbs. of carrots, water, white vinegar (5% acidity), apple cider vinegar (5% acidity), kosher salt, garlic clovers, sliced jalapeno (1 slice per jar), brown mustard seeds, celery seeds, coriander seeds, allspice berries, ground allspice, turmeric. From Hitchhiking to Heaven.
- Canning Carrots: Yields 7 pints. Ingredients include white vinegar, filtered water, pickling or canning salt, garlic cloves, fresh dill heads (or dried dill seeds), hot pepper flakes (optional) and 1-inch sticks of peeled carrots. From Local Kitchen.
- Spicy Pickled Carrots: Made with fresh, peeled carrots, distilled white vinegar, water, sugar, canning salt, dill seed, garlic cloves and hot pepper flakes. From Well Preserved.
- Pickled Carrots With Habanero: Yields 12 pints. Ingredients include 10 pounds of multi-colored carrots (cleaned and quartered), cider vinegar, water, salt, honey, coriander seeds, black pepper, sprigs of thyme and habanero slices. From Winebook Girl.
Cauliflower:
- Pickled Cauliflower, Carrots & Red Bell Pepper: Yields approximately 3 pints, ingredients include coriander seeds, black or brown mustard seeds, cumin seeds, cider vinegar, crushed & peeled garlic, fresh ginger, yellow onion, sugar, Kosher salt, black peppercorns, ground turmeric, crushed red pepper flakes, cauliflower florets, sliced carrots and diced red bell pepper. From Fine Cooking.
- Pickled Cauliflower: Makes 4 quarts, ingredients include coriander seeds, fennel seeds, mustard seeds, dried hot chilies, dried thyme, white vinegar, water and pickling or Kosher salt. From Hunter Angler Gardener Cook.
- Pickled Cauliflower: Ingredients include coriander seeds, turmeric, cumin seeds, black mustard seeds, bay leaves, dried chile de arbols (split), carrot, red onion, white wine vinegar (at least 5% acidity), sugar and Kosher salt. From Saveur.
Cherries:
- Preserved Cherries: Ingredients include pitted Bing cherries, water, salt, sugar, lemon juice, almond extract. Process in a water-bath canner for long term storage. From The Washington Post.
- Cherries In Wine: Yields 4 pints, ingredients include red wine, sugar, orange juice, whole cloves, orange zest and pitted Bing cherries. From Orange County Register.
- Pickled Sour Cherries: (refrigerate for up to one year) Ingredients include white vinegar, water, sugar, peppercorns, bay leaves, sour cherries. from David Lebovitz.
- Pickled Cherries with 5 Spice Blend: (refrigerate) Yields 2 quarts, ingredients include sweet or sour cherries (stems and pits intact), cherry vinegar or red wine vinegar, sugar, salt, Szechuan peppercorns, cinnamon sticks, bay leaves, star anise, whole cloves and whole fennel seeds. From She Simmers.
Cucumbers:
- See this list of homemade pickles and this tip sheet for troubleshooting tips.
Figs:
- Fig Pickles: Yields about 8 pints. Ingredients include sugar, water, vinegar, cinnamon, whole allspice and whole cloves. From National Center for Home Food Preservation.
Green Beans: (Plus a couple for yellow or wax beans)
- Hot Dilly Beans: Ingredients include cayenne pepper, whole garlic cloves, heads of dill, distilled vinegar, pickling or Kosher salt and water. From Lori’s Lipsmacking Goodness.
- Lemon Spiced Bean Pickle: Makes 3 pints, ingredients include green beans (or a 50/50 mix of green and yellow beans), cider vinegar, water, pickling salt, granulated sugar, pickling spice, lemon rind. From Sidewalk Shoes.
- Canning Green Beans: Pressure canning: tightly packed jars of fresh green beans are topped with salt then boiling water poured over to fill jars (cold pack method), sealed then processed in a pressure canner. From Krista’s Kitchen.
- Lemon Rosemary Pickled Green Beans: Makes 6 half-pints, ingredients include water, white wine vinegar, kosher or pickling salt, sugar, garlic cloves, rosemary sprigs and strips of lemon zest. From The Washington Post.
- Pickled Green Beans: Makes 10 pints, ingredients include crushed red pepper flakes, mustard seeds, dill seed, garlic cloves, vinegar, water and salt. From Homestead Revival.
- Dilly Beans: Ingredients include trimmed green beans, cayenne pepper, dill seed, garlic cloves, white vinegar, water and pickling salt. From Food in Jars.
Yellow String Beans or Wax Beans:
- Sweet & Sour Wax Beans: Makes 4 pints. Ingredients include 1-inch pieces of wax beans, white vinegar, sugar, celery seed, ground ginger, dried summer savory or basil, bay leaves. From The Crispy Cook.
- Pickled Yellow Wax Beans: (single jar, store in refrigerator) Ingredients include garlic cloves, coriander seed, small hot chili, black peppercorns, bay leaf, white wine vinegar or apple cider vinegar, dry white wine, water, Kosher salt and sugar. From The Amateur Gourmet.
Onions:
- Golden Crunchy Pickled Onions: Yields 12 pints. Onions are sliced into 1/4″ thick rings and packed with cloves, peppercorns, mustard seed and celery seed. Syrup ingredients include vinegar, water, sugar, salt, turmeric and cinnamon. From Foodie With Family.
- Sweet Onion Pickles: Ingredients include thinly sliced red onions, apple cider vinegar, water, Kosher salt, sugar, white mustard seed, peppercorns and coriander seed, celery seed, caraway seed, cloves and a bay leaf. From Voodoo & Sauce.
Peaches:
- Brandied Peaches: Makes 2 pints, peaches are packed with syrup (water and sugar) then topped with brandy. From The New York Times.
- Peaches In Lavender Syrup: Yields 6 quarts and made with white peaches, water, sugar (to make a light syrup) and dried lavender flowers. From Saving The Season.
- Spicy Bourbon White Peach Pickles: Makes between 2 and 3 half pint jars. Ingredients include granulated sugar, brown sugar, white vinegar, apple cider vinegar, bourbon, water, cinnamon sticks, fresh ginger root, red pepper flakes, yellow mustard seeds and cloves. From Leena Eats.
- Georgia Pickled Ginger Peaches: Makes approximately 2 quarts, ingredients include vitamin C tablets (crushed), distilled white vinegar, sugar, knot of ginger (sliced into coins), cinnamon sticks, ground allspice and whole cloves. From Tigress Can Jam.
- Niagara Peaches in Cardamom Vanilla Bean Syrup: Made with Niagara or medium-sized southern peaches, water, granulated sugar, vanilla bean and cardamom pods. From Piccante Dolce.
- Texas Peach Pickles: Makes 6 to 7 pints, ingredients include small texas peaches (peeled, pitted and halved), lemon juice or crushed vitamin ca tablets, distilled white vinegar, organic cane sugar, knob of ginger (peeled and left whole), whole cloves, whole allspice and cinnamon sticks. From The Cosmic Cowgirl.
- Rum & Syrup Packed Peaches: Ingredients include white sugar and water for a light syrup and a tablespoon of rum per 1 litre jar. From Putting Up With The Turnbulls.
- How To Can Peaches: Yields about 32 pints and made with a bushel of peaches, sugar and water (for syrup). From Shiny Cooking.
Pears:
- Vanilla Pears: Ingredients include sugar, water, cinnamon sticks, whole vanilla beans and whole cloves. From Stitch and Boots.
- Canned Pears With Star Anise: Ingredients include syrup (1:2 sugar, water), lemon juice and star anise. From Doris and Jilly Cook.
- Spiced Canned Pears: Made with a bushel of firm, ripe pears, sugar, water, cinnamon sticks, ground cinnamon, freshly grated nutmeg, whole star anise. Makes about 14 quarts or 28 pints. From Straight from the Farm.
- Belgian Pears: Pears are simmered several hours with white granulated sugar and white wine vinegar before packing in jars. From The Cottage Smallholder.
- Canned In Vanilla Syrup: Yields 4 quarts, made with citric acid (or lemon juice), firm Bartlett pears, sugar, water, vanilla bean, peppercorns and brandy (optional). From Put Up or Shut Up.
- Canned Pears: Gives tips for canning firm pears vs. ripe, soft pears. Made with lemon juice, medium syrup (water and sugar). From Mostly Foodstuffs.
- Mulled In Red Wine: Yields 2 (32 ounce) jars. Granulated sugar, dry red wine, lemon juice, handful of cloves, cinnamon stick and star anise. From Creating Nirvana Today.
Peas:
- Sugar Snap Pea Pickles: (refrigerate) Yields 1 pint, ingredients include distilled white vinegar, cold water, canning salt, turbinado or raw sugar, sliced garlic cloves, red pepper flakes, white peppercorns, mustard seeds, coriander seeds and sugar snap peas with strings removed. From eat.repeat.
- Pressure Canning Peas: Fresh garden peas are shelled, packed in jars and topped with salt and boiling water. Processed in a pressure canner (basic instructions plus video tutorials). From Homestead Acres.
Peppers:
- Savory Pickled Peppers: Ingredients include white vinegar, water, sugar, olive oil, diced onion, diced carrots, peppers, dried oregano, bay leaves. From The Kitchn.
- Fire Roasted Peppers In Red Wine Vinegar: Yields 3 pints. Made with sweet peppers (first charred on a hot woodfire or beneath the broiler), red wine vinegar, water, sugar, non-iodized salt, whole garlic cloves and good olive oil. From Saving the Season.
- Pickled Hot Cherry Peppers: Yields 2 quarts and 1 pint, ingredients include hot cherry peppers, garlic cloves, bay leaves, whole black peppercorns, white-wine vinegar, water, sugar and coarse salt. From Martha Stewart.
- Pound of Pickled Peppers: Ingredients include both sweet and hot peppers (such as banana, fresno and jalapeno), an onion, cider vinegar, water, sugar, salt, bay leaf, coriander, cumin seeds, dried oregano, garlic cloves and black peppercorns. From Sippity Sup.
Plums:
- Whole Plums In Honey Syrup: Made with honey, water, cinnamon sticks, a vanilla bean and star anise. From Food In Jars.
- Canned In Syrup: Whole plums are packed in a medium syrup (2:1 water, sugar) and processed in a hot water bath. From Mostly Foodstuffs.
Potatoes:
These must be pressure canned (for safety) and there’s not much variation in prepping (wash potatoes, cube, pack in jars, top with salt and hot water then process). Here are a couple tutorials to get you started:
- How To Can Potatoes: From No Ordinary Homestead.
- Canning Potatoes: From Becky’s Farm Life.
Pumpkin, Squash & Zucchini:
- Chunky Zucchini Pickles: Yields 6 (500mL) jars. Ingredients include finely chopped onions, pickling or canning salt, granulated sugar, Clearjel (or cornstarch), dry mustard, ground ginger, ground turmeric, water, white vinegar, red bell pepper. From Putting Up With The Turnbulls.
- Pattypan Pickles: Yields 2 pints. Made with pattypan squash or a mix of yellow & green zucchini, pickling salt, garlic cloves, fresh ginger, lemon zest, black peppercorns, coriander seeds, chile flakes, dried Thai pepper. Brine: water, white vinegar, cider vinegar, pickling salt and raw sugar. Processed in a boiling water bath. From Local Kitchen.
- Canned Squash or Pumpkin: (pressure canning) Squash or pumpkin is cubed then blanched, packed in jars then topped with boiling water before processing. From Your Home Kitchen Garden.
- Pumpkin Pickles: Made with lemon, sugar, cider vinegar, fresh ginger (peeled and finely chopped), cinnamon sticks, black peppercorns, salt, sugar pumpkin. From Reader’s Digest.
Radishes:
- Radish Relish: (can be stored for up to one year) Ingredients include distilled white vinegar, sugar, Kosher salt, whole coriander, cumin seed, yellow mustard seed, shredded radishes (2 pounds), diced onion, a knob of ginger (peeled and grated), minced garlic cloves. From Baking with Lisa.
- Pickled Radishes: (refrigerate) Yields 1 pint, ingredients include red wine vinegar, granulated sugar, water, salt, yellow mustard seed (or brown), dash of coriander, whole black peppercorns and a dried bay leaf. From Canning with Kids.
Tomatoes:
 To remove skins, see this tip sheet: How To Skin Tomatoes: {Step By Step}
- Tomatoes Packed In Water: Instructions for both raw-pack and hot-pack methods, canned with bottled lemon juice or citric acid and salt (optional). From The Bitten Word.
- Canning Crushed Tomatoes: Makes about 4 quarts, tomatoes are peeled first, cut in quarters, mashed and heated before canning (with either citric acid, bottled lemon juice or 5% acidity vinegar). From Hippo Flambe.
- Canning Roasted Tomatoes: First roasted (tomatoes, garlic, rosemary, thyme, olive oil) then canned (lemon juice or balsamic vinegar).
- Grandma’s Canned Tomatoes: Yield is 4 quarts, made with tomatoes (3 lbs for each quart you want to make), Kosher salt and lemon juice. From food52.
- Canning Tomatoes: This recipe includes packing tomatoes with herbs, chiles, spices (optional). From Chow Times.
- Canned Tomatoes: Makes 4 quarts or 8 pints, use plum or small Jersey tomatoes, coarse salt and citric acid. From Whole Living.
- Pickled Green Tomatoes: Try Romas, grape or cherry tomatoes, canned with garlic, olive oil (optional), pickling spice, spicy peppers, fresh dill and powdered alum. From Andrea Meyers.
- Pickled Green Tomatoes: Ingredients include jalapeno chile, cumin seeds, peppercorns, celery seed, dill seed, minced garlic, white vinegar and sea salt. Makes 2 pints or 1 quart. From Homesick Texan.
- You’ll find a few recipes for canning salsa here.
- Looking for ways to use up a bounty of green tomatoes? See this list here.
Related Posts


80+ Recipes For Home Canning: {Fruits & Vegetables}
If you're gonna fight, fight like you're the third monkey on the ramp to Noah's Ark... and brother its starting to rain. Join our efforts to Secure America's Borders and End Illegal Immigration by Joining ALIPAC's E-Mail Alerts network (CLICK HERE)
-
06-27-2025, 05:50 AM #10048Senior Member
- Join Date
- Aug 2018
- Posts
- 97,635
- Home
- Homesteading
- Gardening
- Canning
- Chickens
- Recipes
- Food Storage
- Health
- Emergency Preparedness
- Natural Remedies
How To Make an Emergency Sanitation Porta Potty Toilet
- Home
- Emergency Preparedness
- How To Make an Emergency Sanitation Porta Potty Toilet

Melissa Francis
July 29, 2014
Emergency Preparedness
camping, disaster, emergency, Porta Potty, Sanitation, toilet
This how to make and emergency sanitation porta potty toilet is simple and inexpensive way to deal with body waste functions during a disaster when the water service to your home has been interrupted.
Materials needed:
- 1 – pool flotation noodle (Found at the 99 cent store)
- 1 – 5 gallon bucket (Home Depot – 2.79
- 1 – white tall kitchen bag (scented ones would be a bonus for this use)
- 1 – roll of toilet paper
Directions:
Slit the pool noodle halfway through the whole length of the pool noodle.
Place a tall white kitchen bag over the rim of the 5 gallon bucket.
Place the pool noodle along the top of the 5 gallon bucket securing the tall white kitchen trash bag in place.
Firmly pull one side of metal handle on the 5 gallon bucket off, thread a roll of toilet paper onto the metal handle and replace back into the handle base notch.
Puget Sound Preppers came up with this great idea, bless them for it.
With simple modifications, this could be an excellent camping porta potty toilet as well.
Cut off the bottom of the 5 gallon bucket and do not use a tall white kitchen trash bag.
Dig a shallow hole, use bucket for personal body waste needs, remove bucket and fill dirt back in hole covering waste. This adds more stability for elderly and small children, instead of squatting. Personally as a woman, I am so tired of accidentally peeing on my foot after waking up and crawling out of my tent at the crack of dawn. (True story – I am not a morning person)
Puget Sound Preppers

If you're gonna fight, fight like you're the third monkey on the ramp to Noah's Ark... and brother its starting to rain. Join our efforts to Secure America's Borders and End Illegal Immigration by Joining ALIPAC's E-Mail Alerts network (CLICK HERE)
-
06-27-2025, 05:56 AM #10049Senior Member
- Join Date
- Aug 2018
- Posts
- 97,635
If you're gonna fight, fight like you're the third monkey on the ramp to Noah's Ark... and brother its starting to rain. Join our efforts to Secure America's Borders and End Illegal Immigration by Joining ALIPAC's E-Mail Alerts network (CLICK HERE)
-
06-27-2025, 05:59 AM #10050Senior Member
- Join Date
- Aug 2018
- Posts
- 97,635
If you're gonna fight, fight like you're the third monkey on the ramp to Noah's Ark... and brother its starting to rain. Join our efforts to Secure America's Borders and End Illegal Immigration by Joining ALIPAC's E-Mail Alerts network (CLICK HERE)


 Reply With Quote



Email List Changeover & 38 days from disaster
09-27-2026, 11:26 AM in illegal immigration Announcements