

Results 10,091 to 10,100 of 11510
 226Likes
LinkBacks (?)
-
12-26-2016, 11:32 AM
-
09-02-2016, 05:39 PM
-
whole garden made with pallets!! Love it!! | Pallets | Pinterest | Pallets, Pallets Garden and Wooden Pallets
Refback This thread03-06-2016, 11:30 AM -
10-20-2015, 05:29 PM
-
06-12-2015, 08:00 PM
-
02-26-2015, 01:58 PM
-
01-05-2015, 04:13 PM
-
12-19-2014, 10:19 AM
-
EMERGENCY: HUGE FEMA PANDEMIC EXERCISE IN USA IN NOVEMBER, INTERNET SHUT DOWN PART OF EXERCISE | Prepare4Survival
Refback This thread12-03-2014, 10:39 PM -
Off Grid World ? Ugly Duckling Shipping Container Home Built by Artist Is a Beautiful Swan on the Inside
Refback This thread11-25-2014, 03:10 PM -
11-17-2014, 10:59 PM
-
11-13-2014, 11:18 AM
-
11-09-2014, 02:54 PM
-
10-28-2014, 11:38 PM
-
10-26-2014, 05:54 AM
-
10-16-2014, 11:28 AM
-
10-03-2014, 01:25 PM
-
10-02-2014, 09:16 PM
-
09-26-2014, 07:00 PM
-
09-26-2014, 01:56 PM
-
09-19-2014, 04:46 PM
-
09-13-2014, 05:49 AM
-
09-05-2014, 01:52 PM
-
09-01-2014, 09:39 AM
-
08-30-2014, 06:29 PM
-
08-10-2014, 06:29 AM
-
08-04-2014, 05:07 PM
-
07-23-2014, 11:14 AM
-
New Evidence on Expiration Dates | Medical Preparedness | Doom and Bloom (TM) | Doom and Bloom (TM)
Refback This thread07-22-2014, 10:10 AM -
07-18-2014, 08:37 PM
-
07-15-2014, 04:57 PM
-
07-11-2014, 01:40 AM
-
04-22-2014, 11:14 AM
-
04-18-2014, 12:57 PM
-
04-18-2014, 10:10 AM
-
04-14-2014, 12:18 AM
-
04-12-2014, 02:28 AM
-
03-02-2014, 11:43 PM
-
12-24-2013, 11:59 PM
-
12-07-2013, 11:04 PM
-
kitchen | Cob
Refback This thread11-25-2013, 03:24 PM -
10-22-2013, 10:25 PM
-
Apple Pie Braid | Sweets
Refback This thread09-26-2013, 07:58 AM -
09-02-2013, 04:44 PM
-
5 Reasons Why You May have to Bug Out Even Though You Don’t Want to | The Apartment Prepper's Blog
Refback This thread08-23-2013, 03:20 PM -
06-27-2013, 06:30 AM
-
06-23-2013, 08:11 PM
-
06-17-2013, 11:21 PM
-
05-24-2013, 05:06 PM
-
To Eat / BASIC LIST / SUGGESTED ITEMS FOR LONG TERM SURVIVAL - Page 275 - ALIPAC
Refback This thread05-01-2013, 03:49 AM
Thread Information
Users Browsing this Thread
There are currently 5 users browsing this thread. (0 members and 5 guests)
 LinkBack URL
 About LinkBacks
-
06-29-2025, 12:38 AM #10091Senior Member


- Join Date
- Aug 2018
- Posts
- 91,782
To make farmer cheese from one gallon of whole milk, you can follow these steps 1 2 3 4 5:
- Use whole milk for better results.
- Add vinegar or lemon juice to the milk to help it separate into curds and whey.
- Strain the curds through a cheese cloth or cheese bag.
- Press the curds to remove excess liquid.
- Let it sit at room temperature for a few hours to develop a firm texture.
If you're gonna fight, fight like you're the third monkey on the ramp to Noah's Ark... and brother its starting to rain. Join our efforts to Secure America's Borders and End Illegal Immigration by Joining ALIPAC's E-Mail Alerts network (CLICK HERE)
-
06-29-2025, 12:45 AM #10092Senior Member
- Join Date
- Aug 2018
- Posts
- 91,782
*Beefing up the Bug Out Trailer*
By: Ahab
26 October 2006
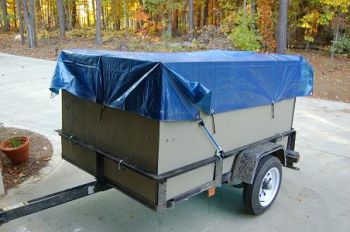
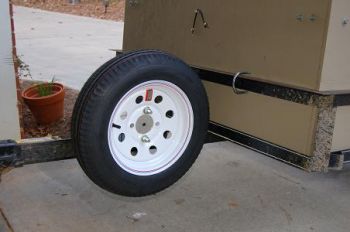
First of all, lets take a look at the two trailers below us. Which one is going to attract more attention traveling down the road? Which one is maybe going to attract the wrong kind of attention, the kind that might want to follow such a prepared individual and see where they are going and what other goodies might be at the destination?
One trailer can haul more stuff. One trailer protects the things being hauled from not only curious eyes, but weather and wind.
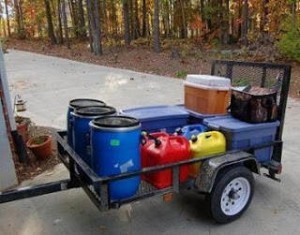
The trailer was converted by the clock in fifteen minutes, and at the end of this article Im going to share a brainstorm that hit me that should knock at least five more minutes off that brief set up time.
The cost of this project was about $70 total. Below is the material used.
The walls are made from 5/16" plywood, about $10 per sheet at the local Lowes. The thin material was used so its light to move from storage to the trailer when setting it up. To weatherproof the plywood, I bought a "wrong color" can of stain at Lowes for $5. They usually have a table in the paint department of paints and stains that were mixed to the wrong color for someone, and they sell it cheap! This gallon of stain usually goes for $30!! The tarp is a 6x10 lightweight, there are some U-bolts and four angle brackets with nuts and bolts to attach them to the plywood and form the leading corners.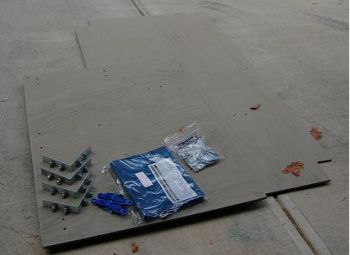
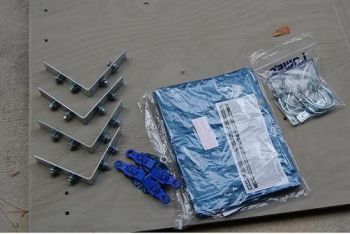
Assembly is very quick.
Step 1: Place the plywood pieces in the trailer.
Step 2: I used drilled holes to make sure I lined up the front piece with the appropriate side piece so the angle brackets would match the pre-drilled holes. Then the angle brackets are bolted into position finger tight.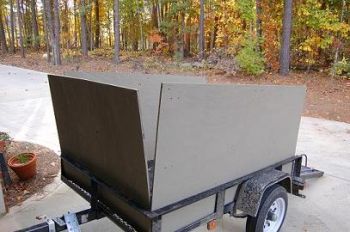
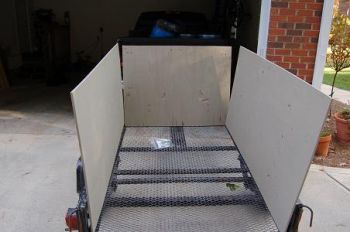
Step 3: The u-bolts were attached around the frame, and through the plywood where they were affixed with wing nuts. The u-bolts were cut down a bit so that the ends of the bolts wouldnt damage any of the material being moved in the trailer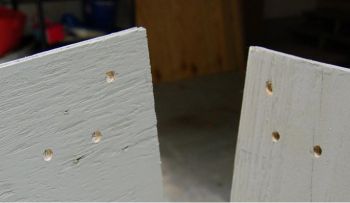
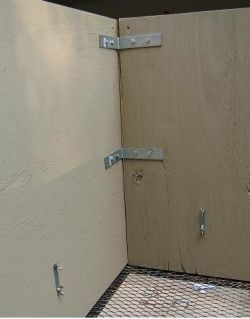
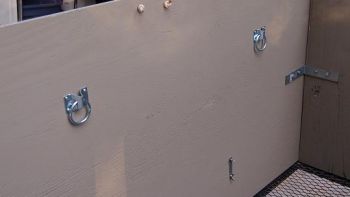
Behold, the walls are complete, tighten down the corner bolts and the plywood is now quite rigid and well attached to the frame of the trailer at the bottom at six points.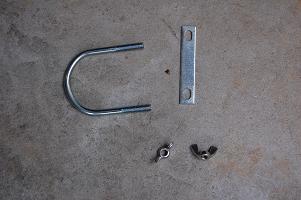
Step 4: Attach tarp. Note that in this picture, attachment points have been screwed into the plywood on the sides (and in the front) to attach bungee cords to tension the tarp. Apply other bungees as needed to wind-proof the tarp. Loading can be done after the tarp is on in case of bad weather. Then close ramp, drape tarp over it and bungee.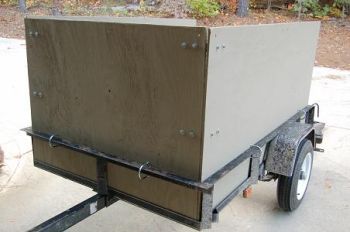
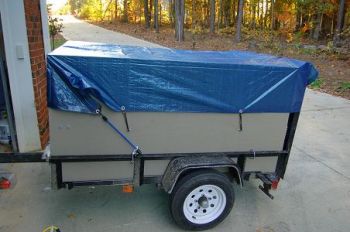
Since I had it out, I added a few extras to the trailer to make it a bit more friendly.
Rope handles attached to
each piece of plywood to
make them easier to carry
and hang up. Mounting rings inside to help secure loads. Spare tire!!
And thats it!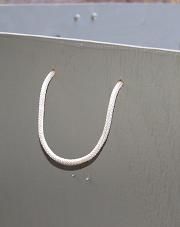
THE TIME SAVER. - The u-bolts can be the most frustrating part of assembly. Cutting them short does help protect the loads inside, but plywood likes to bend, and this can make getting enough of the bolt through to catch it with the wing nut tricky, especially if you are putting this together solo. It hit me that HVAC chase zip-ties would do the exact job and would be very much faster to affix. These ties can be found at Lowes or any home improvement / hardware store. They are about 36" long and 3/8" wide. They are amazingly strong! Thread one or two from the outside through the top hole for each mounting point. Then go in the trailer and run all the zip ties back out through the lower hole, and then go back out of the trailer to fasten all of the ties. This will quickly secure the walls, and youre done!
Ahab
Beefing up the Bug Out TrailerIf you're gonna fight, fight like you're the third monkey on the ramp to Noah's Ark... and brother its starting to rain. Join our efforts to Secure America's Borders and End Illegal Immigration by Joining ALIPAC's E-Mail Alerts network (CLICK HERE)
-
06-29-2025, 01:09 AM #10093Senior Member
- Join Date
- Aug 2018
- Posts
- 91,782
How to Can, Freeze, Dry and Preserve Any Fruit or Vegetable at Home
Dried fruit snacks
PickYourOwn.org - Find a pick-your-own farm near you! Then learn to can and freeze!
Farm tours

Pick-your-own produce
Looking for How to Can, Freeze, Dry and Preserve Any Fruit or
Vegetable at Home in 2025? Scroll down this page and follow the links. And if you bring home some fruit or vegetables and want to can, freeze, make jam, salsa or pickles, see this page for simple, reliable, illustrated canning, freezing or preserving directions. There are plenty of other related resources, click on the resources dropdown above. If you are having a hard time finding canning lids, I've used these, and they're a great price & ship in 2 days.
If you have questions or feedback, please let me know! There are affiliate links on this page. Read our disclosure policy to learn more.
How to Can, Freeze, Dry and Preserve Any Fruit or
Vegetable at Home
Canning, Freezing, Preserving Recipes Contents:
- General Directions and guides about home canning, preserving, safety, tips, etc.)
Recipes / directions:
- Jam and jelly directions and recipes (and Jam and jelly questions and answers )
- Canning anything that can be safely canned at home!
- Juices: Canning fruit and vegetable juices
- Freezing directions
- Pie fillings (making home canned pie fillings)
- Sauces, Salsas, Syrups, Fruit Butters and Chutneys (from applesauce, apple butter, to salsa, syrups, etc, can any sauce)
- Broths and Stocks
- Soups - canning vegetable and meat soups at home (see this page for tomato soup)
- Pickling - more than just cucumbers
- Drying / food dehydrating
- Ice cream, gelato and sorbets
- Meats - how to can poultry, venison, beef, chili, fish, crabs, clams, rabbit, turkey, etc.
- Desserts, cookies, cakes, pies and treats
- Homemade Liqueurs - make your own Kahlua, Amaretto, Bailey's etc, for 1/4 the cost
- Other recipes - Pies, roasted peppers, basil pesto, cakes and much more
- Popcorn: how to store, how it pops, best varieties to grow or pop, etc. Dried fruit snacks
Home Canning: General directions
- Why you should use a canner and how to choose one.
- Summary of approved home food preserving methods
- Canning methods that are considered to be unsafe: steam, microwave, dishwasher, oven, or just sealing the jars without further processing?
- Overview and step by step guide to water bath canning (for acidic foods; jams, jellies, applesauce, fruits)
- Overview and Step by step guide to pressure canning (for low acid foods: beans, corn, meats, etc.)
- If you are new to home canning - see these do's, don'ts and tips
- Why shouldn't I just can my own recipe or change these recipes?
- Frequently asked questions about canning
Home Canning Safety
- Food safety - what is botulism?
- Table of the pH and/or acidity of common fruits, vegetables, grains, breads and common food products
- This page provide basic facts regarding food poisoning and pathogenic microorganisms and natural toxins related to home food preservation (canning, bottling, drying, jams, salsas, pickling, sauces, etc.). Look up any pathogen (botulism, salmonella, Staph, etc.) and find out what it does and how to prevent it.
- This month's question answered: What causes canning jars to break in the canner?
- Home canning breads: the dangers of home canned breads
Frequently Asked Questions
Preserved fruit products
- Frequently asked questions about freezing
- NEW! Why did the lids buckle?
- Frequently asked questions about freezing
- What are the differences between jams, jellies, preserves, butters, conserves, etc.?
- How long can I store___ or How long will ___ (fruit or vegetable) stay good in the fridge, freezer, basement, etc.
- Nutritional Content of Fresh Fruits and Vegetables Compared with Canned
- New: Making baby food at home
- Using artificial sweeteners and sugar substitutes in place of sugar
- Using honey in place of sugar
- Using Agave Nectar in place of sugar
- NEW! USDA Food Grades -Ever wonder what was "Grade A"? And why you don't see grade B? How to select different foods, including fresh, frozen and canned? Wonder no more with this one-page guide!
All about Canning Equipment and Supplies
- Equipment and supplies News stories about home canning and preserving
- We also have a page about pressure canners:
- Buying guide to choosing a Pressure Canner
- Washing and prepping your pressure canner,
- Pressure canner annual maintenance tips
- Free replacement manuals for pressure canners
- Replacement parts for pressure canners.
- Food Strainers for Canning and Cooking
- NEW! Label Templates! Click here for labels your can download, edit and customize in Microsoft Word and print on standard Avery label paper for your own jars!
General Canning know-how
- Glossary of Home Preserving (Canning, Freezing, Jam & Jelly-Making, Pickling and Drying) Terms
- How much do I need to pick? Yields and conversion tables
- General Canning tips
- Why do I need a canner?
- Are there commercial kitchens or community canning facilities I can use?
- How can I test or examine my jars to see if they sealed properly or have spoiled?
- FAQs - Canning questions and answers: Answers to common questions and problems
- Acid content of common fruits and vegetables
- Canners and canning supplies: descriptions, photos, prices and ordering information
- Pressure canning: how it is different from water bath canning and how to use one!
- Hot Pack or Raw Pack? Which is Best in Home Canning?
- How do I fix a jam or jelly that turned out too runny?
- All about pectin - what it is, how it works, types, etc.
- Canning without sugar
- Questions and answers to many questions about home canning, freezing and making other preserves!
- Why jars don't seal and how to correct it.
- Can I Sell My Home-Canned Jams and Other Preserves?
- Comparison of the costs of various cooking methods (stove, gas oven, electric oven crockpot, etc.)
- Substituting lemon juice for vinegar[COLOR=#FFFFFF
Picking tips
Easy and Illustrated Canning, Preserves and Jam Directions
Jams, Preserves, Marmalades, Conserves and Jellies:
You should use a water bath canner
jams and jelly questions and answers
Making Jams and Jellies from Frozen Fruit
NEW! What are the differences between jams, jellies, preserves, butters, conserves, etc.?
What's wrong with using paraffin or inversions methods?
- Berry jams(strawberry, triple berry, raspberry, blackberry, loganberry, mixed berry, etc.)
- Apple jelly
- Apricot jam.
- Aronia Jam NEW
- Aronia Jelly NEW
- Blackberry jam
- Blackberry jelly
- Blueberry jam
- Blueberry jelly
- Cherry jam and cherry preserves
- Cherry jelly
- Crabapple jelly
- Cranberry conserve
- Currant jelly (red, black or white currants)
- Fig jam
- Fig-strawberry jam
- Fig-strawberry jam, made with Jell-O gelatin
- FROG Jam (fig-raspberry-orange-ginger)
- Grape jelly from fresh grapes
- Grape jelly from grape juice (canned, bottled or frozen)
- Honeysuckle jelly
- Jalapeno pepper jelly
- Jelly - from bottled or frozen fruit juices
- Kiwi jam
- Kudzu Jelly - yes, you really can make a jelly from Kudzu flower
- Kumquat jam or marmalade
- Loquat jelly
- Mango jam
- Mango-raspberry jam
- Medlar jelly
- Mulberry jam
- Muscadine or scuppernong jelly
- Onion marmalade
- Orange marmalade
- Peach or Nectarine jam
- Pear jam and pear jelly
- Pepper Jelly, hot or sweet, including chilies, jalapeno, and pimiento
- Persimmon jelly
- Pineapple jam
- Plum Jam
- Plum jelly
- Pomegranate jelly
- Quince jam or preserves
- Raspberry jam
- Rhubarb-strawberry jam!
- Saskatoon jam
- Saskatoon jelly
- Strawberry jam (with pectin) (uses less sugar or honey and less cooking)
- Strawberry jam (without pectin) (requires much more sugar and cooking)
- Strawberry (and other berry) jams without sugar
- Strawberry jelly
- Strawberry-rhubarb jam!
- Tomato Preserves
- Watermelon jelly
- Other jam recipes and jelly recipes.
- What happens if my jam or jelly doesn't gel? Remaking cooked runny jam or jelly instructions can be found on this page
- Foam in Home Jam Making - What It Is and What To Do About It!
Fresh vegetables
Fruit Honeys
Ice Cream, Gelato and Sorbets with your own fruit
- Electric and Manual ice cream makers that require ice and salt:
- How to make ice cream with your own fruit! (strawberry, vanilla, chocolate, blueberry, peach, etc.)
- How to make Gelato
- How to make sugar-free, fat free ice cream (strawberry, vanilla, chocolate, blueberry, peach, etc.)
- How to make sugar-free, low fat ice cream (strawberry, vanilla, chocolate, blueberry, peach, etc.)
- How to make sugar-free, fat free coffee ice cream
- How to make sweet corn ice cream
- Coming in April: How to make frozen yogurt
- Coming in April: How to make sorbet
- Electric ice cream makers that have a bowl that must be frozen in your freezer:
- How to make ice cream with your own fruit! (strawberry, vanilla, chocolate, blueberry, peach, etc.)
- How to make Gelato
- How to make sugar free, fat free ice cream (strawberry, vanilla, chocolate, blueberry, peach, etc.)
- How to make sugar free, low fat ice cream (strawberry, vanilla, chocolate, blueberry, peach, etc.)
- How to make sweet corn ice cream
- Coming in April: How to make frozen yogurt
- Coming in April: How to make sorbet
- Ice cream makers and manuals
- Lost your manual? We have most manuals here free to download!
- Looking for an ice cream maker? See reviews and information to select one and great prices, too
Sauces, Salsas, Syrups, Butters, Vinaigrettes and Chutneys
You can use a water bath canner for these (except for spaghetti sauce with meat!):
- How to make applesauce - W
- How to make applesauce for a meal (not canning it) with NO special equipment
- How to make chunky applesauce
- Apple cider vinegar
- How to make apple butter - W
- How to make homemade, home-canned barbecue sauce (BBQ sauce) - W
- How to make Blueberry butter - W
- How to make blueberry syrup (it works for strawberries, raspberries and blackberries, too) - W
- Blueberry vinaigrette
- How to make cherry butter (this stuff is unbelievably good!)
- How to make chili sauce from your own tomatoes and peppers - W
- Home canning and freezing chocolate sauces
- How to make cranberry sauce - Perfect for thanksgiving and Christmas - bright, colorful, loaded with vitamin C and incredibly easy to make! - W
- NEW! Enchilada sauce (needs a Pressure Canner) - P
- How to make jellied cranberry sauce - W Now, make your own, no nasty store canned glop!
- How to make cran-applesauce - GREAT for the holidays - bright, colorful, not too sweet, not too tart and loaded with vitamin C! Kids love it! - W
- How to make Gazpacho.
- Horseradish sauce - refrigerator storage only photos coming shortly!
- Hot Sauce (like Tabasco Sauce)
- Lemon curd
- Lime curd)
- How to make GREAT mango chutney! - W
- How to make mango salsa - W
- Mint Sauce - for lamb! - W
- How to make peach butter - W
- How to make peach chutney - W
- How to make Peach salsa - W
- Peach syrup - W (also works for nectarines, apricots, plums, pluots, etc.)
- How to make fresh and SAFE homemade peanut butter (to eat fresh or store in the fridge or freezer)
- How to make pear sauce - W
- How to make pear butter - W
- How to make Pizza sauce - W
- How to make Raspberry Chipotle Sauce - W
- Raspberry vinaigrette
- NEW!How to make Taco Sauce - W
- How to make tomato salsa - W
- How to make salsa from your unripe, GREEN tomatoes! - W
- How to tomato salsa with cilantro - W
- How to make tomato sauce - Waterbath canner version
- How to make tomato sauce - Pressure canner version
- How to make tomato paste - W
- How to make Tomatillo salsa (or Green Tomato Salsa)
- How to make spaghetti sauce - without meat - W, P
- How to make spaghetti sauce - with meat - P
- Vinegar - apple cider vinegar
- Vinegar Making (Mississippi State University) (PDF 725 KB)
- Vinegar Fermentation (Loiusiana State University, Grad Student Thesis) (PDF 2.6 MB)
Canning miscellaneous fruits and vegetables
Fresh vegetables
Some of these require a Pressure Canner to prevent potential spoilage and food poisoning, due to the low acid content of the food. For others, you can use a water bath canner OR a Pressure Canner. I've noted what's required for each, below, following each entry, with
W for water bath,
P for Pressure canner, and
W, P for either may be used!
- Canning apples
- Canning Asian pears!
- Canning asparagus - P
- Canning fresh shelled beans
- How to can beets - P
- How to make home canned carrots - P
- How to can blueberries (and raspberries, blackberries, currants, dewberries, elderberries, gooseberries, huckleberries, tayberries, loganberries and mulberries.) - W, P
- How to can cherries - W, P
- How to can corn (hot pack method) - P
- How to can corn (raw pack method) - P
- How to can creamed corn (hot pack method) - P
- Canning elderberries - W
- How to can figs - make your own figs floating in a jar of light syrup or fruit
juice! - W, P - Candied figs - a tasty but high-sugar Southern treat
- How to make canned greens, like Spinach, Turnip Greens, Collards, Kale, Swiss Chard
- How to can green beans, yellow beans, snap beans, broad beans, etc. - P
- How to make canned dried beans and peas (from kidney beans, peas, lima beans, broadbeans, chickpeas, pole beans, etc.) - P
- How to Make Homemade Canned Baked Beans With Tomato or Molasses Sauce - P
- How to Make Homemade Canned Baked Beans With Back, Pork or Ham and Tomato or Molasses Sauce - P
- Elderberries - jams, jellies, syrups and more. (from Utah State)
- Fruit cocktail - can your own mixed fruit cocktail!
- How to make ketchup.. or if you prefer... How to make catsup - W, P
- SUPER-EASY homemade ketchup recipe
- How to can mangoes - W, P
- Mixed fruit - W, P
- Mixed fruit cocktail - W
- Mixed vegetables - P
- Mushrooms - P
- Olives - technically olives are pickled, but you can do it at home!
- How to can oranges, grapefruit, lemons, limes, tangerines, clementines and other citrus - W, P
- How to make canned pears! In sugar solution, water, fruit
juice or Stevia (in a prepared form like Truvia, it measures same as sugar; if you use another form, you will need do your own conversion) - or Splenda, if you prefer, ! - W, P - How to make your own home canned peaches, plums, cherries or nectarines (in a light sugar, regular sugar, natural fruit juice or no calorie sweetener solution) - W, P
- How to make canned spiced peaches - W, P
- How to can peas (English peas, Crowder peas, blackeye peas and purple hull peas) - P
- Boiled Peanuts! Now Southerners who move to other parts of the country can make their own home-canned boiled peanuts to eat later or give away as gifts
- How to can peppers (removing the skins)- P
- How to can peppers (leaving the skins on) - P
- How to can Hot peppers in oil - W
- How to make fresh basil Pesto (only fresh and frozen - this can't be home-canned)
- How to make canned Pineapple
- How to can potatoes - P
- How to home-can pumpkin (in a cooked, cubed form) and why you shouldn't home-can the pureed forms. Note: Pumpkin is difficult to can safely - it is a low acid food, so that rules out open water bath canning immediately. Pressure canners can be used, but according to the health authorities (like the National Center for Home Food Preservation) only if the pumpkin is cubed, rather than mashed. I usually just freeze the cooked pumpkin! - P
- How to make pumpkin pie from a whole, fresh pumpkin - the easy way! for fresh or frozen use
- More pumpkin recipes (roasting seeds, pumpkin soup, pumpkin bread, pumpkin cheesecake, pumpkin cookies, etc.) - fresh or frozen use
- Nuts - yes, you can "can" nuts Preserved fruit products
Canning nuts with a water bath canner
Canning nuts with a pressure canner - Quince - hot to can quince slices
- Rhubarb - how to can rhubarb
- How to can your own soups and chowders at home - P
- Stewed tomatoes - P
- Strawberries (canned strawberries, not jam).
- How to can sweet potatoes
- Tomatoes: How to ripen your green garden tomatoes indoors in the Fall and Winter.
- How to can tomato soup or tomato-basil soup - W, P
- How to can tomatoes using a water bath canner - W
- How to make roasted tomatoes, boiling water bath canner version - W
- How to make roasted tomatoes, pressure canner version - P
- How to can tomatoes using a Pressure Canner - P
- Diced, chopped or crushed tomatoes - W, P
- Winter squash (like butternut or rhubarb) (P)
- How to can Yams
Juices: canning fruit and vegetable juices
Best restaurants near me
- Juicers make the job a lot easier!
- Apple juice - make and bottle your own apple juice!
- Apple cider
- How to make fruit juice - mixed juices, cherry, blueberry, strawberry, raspberry, blackberry, other berries, etc. - W, P
- Elderberry juice - W, P
- How to make your own grape juice, scuppernong, juice, muscadine juice. - W, P
- How to make home-canned orange juice or other citrus juices
- How to make home-canned lemon juice or other citrus juices
- Peach, nectarine, plum, pluot or apricot juice
- Tomato juice (canned)
- Tomato juice (frozen)
- Mixed tomato-vegetable juice (like "V8")
- Making FROZEN Orange, Grapefruit, Tangerine or Mandarin Juice
- Making FROZEN lemon juice
Pie Fillings
- Apple pie filling - with or WITHOUT any added sugar! - W, P
- Blueberry pie filling - W, P
- Cherry pie filling
- Peach pie filling - W, P
- Strawberry pie filling - W, P
Pickling Recipes - Including Relishes, Peppers, Okra, Beans and more
Dried fruit snacks
You can use a water bath canner OR a Pressure Canner for these:
- Pickled asparagus - W, P
- Pickled beets - W, P
- Branston pickle relish (an English tradition)
- Pickled Brussels Sprouts (or Cauliflower) - W
- Bread and butter cucumber pickles - W, P
- Bread-And-Butter Zucchini pickles - W, P
- Pickled green beans - W, P
- Pickled Dill beans - W, P
- Pickled cabbage - W, P
- Pickled carrots - W, P
- Southern Chow-Chow (also called Piccalilli) - W, P
- Pickled corn relish - W, P
- Cucumber pickles (kosher dill, bread & butter, or processed etc.) using mixes - W, P
- Dill pickles, from scratch - W, P
- Old-fashioned fermented general store barrel dill pickles - W, P - (more photos coming)
- Pear relish
- Cucumber pickle relish! - W, P - This is the classic hamburger relish!
- No-canning-needed refrigerator cucumber pickles (kosher dill) - W, P
- How to Make Pickled Eggs (to store in the fridge!)
- Spiced Green tomatoes
- Low salt / reduced salt low calorie dill pickles.
- Low-salt bread and butter pickles
- Pickled Green Tomatoes - another pickled green tomato recipe, this one sweet
- Pickled garlic - W, P - (photos coming!)
- Hot relish (Dixie Relish, Fall Garden Relish)
- Mixed vegetable pickles (cauliflower, peppers, onions, celery, cucumber mix) - W, P
- Mustard beans (pickled mustard beans)
- Pickled dilled okra! - W, P
- Olives
- Pickled pearl onions - W
- Pickled onions (red or white) - W
- Pickled peaches (also nectarines, apricots, etc.) - W,P
- Pickled peppers - W, P
- How to make sauerkraut - homemade and naturally fermented! - W, P
- Pickled Three-Bean Salad - W
- Pickled watermelon rind - W, P
- Sweet Pickled Gherkins - W, P
- Sweet Pickles (quick recipe) - W, P
- Pickled green walnuts, a.k.a., pickled walnuts NEW!
- Zucchini pickles (dill) - W
- Zucchini pickles (bread-and-butter) W
FAQs:
- Click here for the page of frequently asked questions (with answers) about pickling and making pickles.
- Substituting lemon juice for vinegar
Freezing instructions
- How to freeze apples
- How to freeze asparagus
- How to freeze berries (blackberries, raspberries, gooseberries, tayberries, loganberries, saskatoons, cranberries, marionberries, boysenberries, etc.)
- How to freeze blueberries, saskatoons and huckleberries
- How to freeze strawberries
- How to freeze basil
- How to freeze beets
- How to freeze broccoli
- How to freeze Brussels Sprouts
- How to freeze green beans (and other beans) from your garden, farm, or store.
- How to freeze cabbage (any type)
- How to freeze cantaloupes, honeydew, watermelons and other melons
- How to freeze carrots from your garden
- How to freeze cauliflower
- How to freeze celery
- How to freeze corn (niblets style) from ears from your local farm
- How to freeze whole cob corn (corn on the cob) from ears from your local farm
- How to freeze eggplants
- Elderberries - freezing and other information
- How to freeze kale, collards and other greens - photos coming soon
- How to Freeze Lima Beans, Broad beans, Butter Beans and/or Pinto Beans
- How to freeze mangos
- How to freeze okra
- How to freeze orange, lemon, grapefruit or other citrus juices
- How to freeze peaches, plums, nectarines, figs and cherries
- How to freeze pears
- How to freeze peas (snap, English, snow and mangetout)
- How to freeze peppers
- How to freeze potatoes
- How to freeze pumpkin to use later in pumpkin pies and other pumpkin recipes!
- How to freeze Rhubarb
- How to freeze summer squash - zucchini, yellow squash, crookneck, scallop, pattypan, etc.)
- How to freeze sweet potato
- How to make Grilled Summer Squash with Feta - which you can freeze for the winter, or serve fresh!
- How to freeze tomatoes from you garden or the farm; for that fresh taste this winter!
- How to freeze turnips and parsnips
- How to freeze winter squashes (like Acorn, Banana, Buttercup, Butternut, Golden Delicious, Hubbard, Spaghetti Squash, etc.)
- How to freeze zucchini and other summer squash
- How to freeze breaded zucchini and other summer.
- Products: Vacuum Foodsealers for freezing, dried foods, and refrigerated foods - the FoodSaver line
Canning Broths, Stocks and Soups
- Vegetable broth
- Vegetable soups
- Vegetable stock
- Chicken soup, turkey soup (or other poultry and fowl)
- Chicken or Turkey Broth or Stock
- Beef, pork, venison soups
- Beef Broth or Stock
- Meat and/or Vegetable Soup
- Soups with meat
- Seafood soup (includes New England Clam Chowder and Manhattan Clam Chowder)
- Beef or venison broth or stock, WITH added vegetables
- Beef or Venison Broth or Stock without added vegetables
- Beef or venison stew
Canning Meats
These recipes come straight from the USDA. I haven't tried them myself. I'll admit I'm just not a fan of canned meat. But if that's your thing, here are the safe, lab-tested recipes:
Note: These require a Pressure Canner. There are no safe options for canning these foods in a boiling water canner.
Venison
Poultry
Meat Products
- Chili Con Carne
- Meat, Ground or Chopped
- Meat, Strips, Cubes or Chunks
- Beef Stock
- Meat and Vegetable Soup
- Mincemeat Pie Filling
Seafoods
- Clams
- Crab Meat, King and Dungeness
- Fish (pint jars, USDA)
- Fish (quart jars, University of Alaska Cooperative Extension Service)
- Fish, Smoked
- Oysters
- Tuna
Other Recipes for fresh or frozen use
- Canning your own chili con carne (with meat)
- How to make your own roasted peppers!
- How to make fresh basil Pesto
- Churros - Mexican doughnuts
- Coconuts
- Pumpkin pie from a fresh or canned pumpkin!
- St. Patrick's Day recipes
- Corned beef and cabbage
- Irish Stew
- Christmas Recipes!
- How to smoke a turkey
- How to roast a turkey
- Halloween recipes!
- Green tomatoes: what to do with your unripe green tomatoes!
Main course recipes
- Stovetop BBQ Pork Chops
- Smoked Baby Back Ribs
- Smoked Turkey
- Chicken Biryani
- Corned beef and cabbage (in a Crockpot / Slo-cooker)
- Lasagna (ground beef, turkey or Italian sausage)
- Natural Homemade Corned Beef and Cabbage
- Pot roast (beef)
- Roast leg of lamb
- Roast pork with sauerkraut
- Meatballs (Turkey, Beef and/or Pork)
- Tacos - made with ground beef, turkey, chicken
- Weiner Schnitzel or Jager Schnitzel - pan fried
- Weiner Schnitzel or Jager Schnitzel - air fried
Desserts, cookies, cakes, pies and treats
- Blake's Ambrosia - a GREAT tasting dessert, which is ALSO healthy!
- Apple Bread (also known as "Ellijay Apple Bread")
- Apple crunch - best of all! Moist, low sugar and using oats!
- Apple crisp - ever-popular, low sugar and using oats!
- Apple, blackberry, cherry, and/or peach cobbler
- World's best apple pie!
- Apple-blackberry, crumble - a English favorite (or favorite)
- Blueberry pie, recipe and directions and illustrated!
- Blueberry buckle coffee cake: illustrated directions for this great crumb-topping blueberry coffee cake
- Corn bread, or sweet corn muffins (like Chi Chi's)
- Corn fritters (a traditional Pennsylvania Dutch breakfast)
- Oatmeal-Raison Cookies - Healthy and Tasty
- Other easy directions to make blueberry desserts: cobblers, etc.
- Peach Cobbler directions - easy and great tasting!
- Peach pie
- Peach-blueberry pie
- Pecan pie
- Rhubarb-Strawberry pie
- Rhubarb Custard Pie
- Rhubarb crisp (like a crumble)
- Zucchini bread - a tasty use for that excess squash!
Miscellaneous food storage and preparation
Did I miss a recipe?
- And write me, if you want directions for something I've missed.
Easy Dehydrating Instructions
See the photos and links at right for a good and inexpensive food drier.
- Food drying basics and principles
- How to dry your own herbs
- Making your own chili powder
- How to make dried apple slices
- How to make Sun-Dried Tomatoes
- Food Dehydrators - models, specs and pricing information
- Fruit Leathers (Fruit Rollups) from fresh fruit
- Fruit leathers from frozen or canned fruit
- Drying Fruits (Colorado State University) pdf
- Fruits and Vegetables (University of Georgia) pdf
- Jerky
- Leathers and Jerkies (Colorado State University) pdf
- Mango Leather
- Packaging and Storing Dry Foods
- Peanuts
- Popcorn
- Pumpkin Seeds
- Sun Drying
- Sunflower Seeds
- Vegetable Leathers
- Vegetables (Colorado State University) pdf
- Vine Drying
See here for related tools, equipment, supplies on Amazon Nesco Food dryer - inexpensive and highly rated
Canning, Freezing and Drying Equipment and Supplies
- Books on canning, freezing, drying, preserving and jam making
- Canners, both water bath and pressure canners. Canners for glass top stoves?
- Strainers, pit removers, seed-skin-stem removers, jelly strainers, etc.
- Vacuum Foodsealers for freezing, dried foods, and refrigerated foods - the FoodSaver line
- Canning Lids and Rings,
- Canning jars,
- Canning mixes, pectin, etc.
Trivia
Other Detailed Canning, Freezing and Drying Guides and Recipes
- Comprehensive Canning Guides and Recipes - look here for recipes that you don't see above!
- FAQs - Answers to common questions and problems
- Free government and university publications about canning to download and print
Canning Books, Supplies and Accessories
These are my favorite essential canning tools, books and supplies. I've been using many of these for over 50 years of canning! The ones below on this page are just the sampling of. my preferred tools. but you can find much more detailed and extensive selections on the pages that are linked below.
- Strainers, pit removers, seed-skin-stem removers, jelly strainers, etc. All types, makes and prices (from $19 to $350)
- Selecting a KitchenAid mixer and attachments for home canning
- Vacuum Foodsealers for freezing, dried foods, and refrigerated foods - the FoodSaver line
- Cherry pitters reviews, prices and ordering
- Steam Juicers
- Food dehydrators - easy and fast to dry your own fruits, veggies, sun-dried tomatoes, etc.
The Ball Blue Book of Home Canning
The All New Ball Book Of Canning And Preserving: Over 350 of the Best Canned, Jammed, Pickled, and Preserved Recipes Paperback
This is THE book on canning! My grandmother used this book when I was a child.; It tells you in simple instructions how to can almost anything; complete with recipes for jam, jellies, pickles, sauces, canning vegetables, meats, etc.
If it can be canned, this book likely tells you how! Click on the link below for more information and / or to buy (no obligation to buy)The New Ball Blue Book of Canning and Preserving
Canning & Preserving For Dummies in Paperback
Canning and Preserving for Dummies by Karen Ward
This is another popular canning book. Click here for more information, reviews, prices for Canning and Preserving For Dummies
Of course, you do not need to buy ANY canning book as I have about 500 canning, freezing, dehydrating and more recipes all online for free, just see Easy Home Canning Directions.
Home Canning Kits
McSunley 21.5 quart Water Bath Canner, Stainless Steel See here for related tools, equipment, supplies on Amazon
See here for related tools, equipment, supplies on Amazon See here for related tools, equipment, supplies on Amazon
I have several canners, and my favorite is the stainless steel one at right. It is easy to clean and seems like it will last forever. Mine is 10 years old and looks like new.
The black ones are the same type of standard canner that my grandmother used to make everything from applesauce to jams and jellies to tomato and spaghetti sauce.
This complete kit includes everything you need and lasts for years: the canner, jar rack, Jar grabber tongs, lid lifting wand, a plastic funnel, labels, bubble freer, It's much cheaper than buying the items separately. It's only missing the bible of canning, the Ball Blue Book.
You will never need anything else except jars & lids (and the jars are reusable)!
The complete list of canners is on these pages:
- Water bath canners - Good for acidic foods, like applesauce, pickles, salsa, jams, jellies, most fruits
- Pressure canners - needed for low and non-acidic foods, like canned vegetables (corn, green beans, etc), and meats
- Canners for glass top stoves if you have a glass or ceramic stove
- Canners for induction stovetops

Pressure Canners
If you plan on canning non-acidic foods and low acid foods that are not pickled - this means: meats, seafood, soups, green beans corn, most vegetables, etc., then you ABSOLUTELY must use a Pressure Canner.
Of course, you can use a pressure canner as a water bath canner as well - just don't seal it up, so it does not pressurize. This means a Pressure Canner is a 2-in-1 device. With it, you can can almost ANYTHING.
There are also other supplies, accessories, tools and more canners, of different styles, makes and prices, click here!
Canning Supplies Starter Kit - Canning Jar Lifter, Canning funnel, Scissor Tongs, more
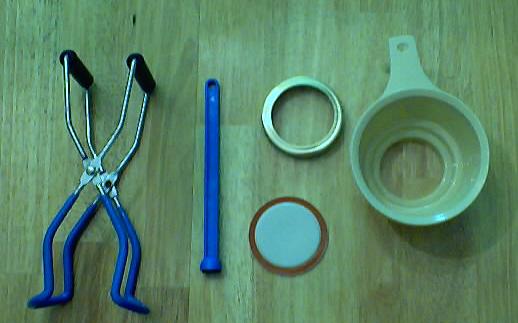
Basic Canning Accessories
From left to right:
- Jar lifting tongs to pick up hot jars
- Lid lifter - to remove lids from the pot of boiling water (sterilizing )
- Lids- disposable - you may only use them once
- Ring - holds the lids on the jar until after the jars cool - then you remove them, save them and reuse them
- Canning Jar funnel - to fill the jars
Strainers
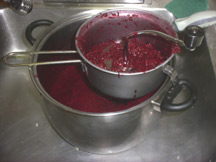
These are very useful for making sauces like applesauce, tomato sauce, spaghetti sauce, jellies, etc. Below are my favorites. The complete list is on these pages:
- Strainers, pit removers, seed-skin-stem removers, jelly strainers, etc. All types, makes and prices (from $19 to $350)
- Selecting a KitchenAid mixer and attachments for home canning
See here for related tools, equipment, supplies on Amazon
Inexpensive Old School Strainers: hand cranked Foley Food Mills
- The hand-cranked Foley food mill (see this page or clock the ad box) has been used for well over 100 years in homes all over America (and variants around the world). It is effective and inexpensive, and ideal for small batches. However, if you need to make many quarts, you will sure end up with tunnel carpel syndrome or some other repetitive strain injury.
Norpro 1951 Manual Food Strainer and other brand stariners, with optional motors; (almost identical to Victorio V250, Villaware and Roma models, all discontinued)
This is The next step up from the Foley food mill. First, it's far more ergonomic, and its handle is easier to use. Next, it works in continuous mode rather than batch mode. So you can do much larger volumes easily. Finally, It has an optional motor, so you can. remove the manual labor. It also offers many different size strainers to use for different types of berries, vegetables and fruit.
See the seller's website for more information, features, pricing and user reviews!
- A Johnny, Weston or Oxo strainer (about $60 - $100, see further down the page) or
- This trainer is. simply a more upscale and improved version of the one above.
- See this page for more information, reviews, descriptions of other strainers and supplies or to order!
Find this item (B09WDKLMPW) on Amazon
See here for related tools, equipment, supplies on Amazon See here for related tools, equipment, supplies on Amazon
See here for related tools, equipment, supplies on Amazon
See here for related tools, equipment, supplies on Amazon
KitchenAid - Best Large Volume Strainers
If you're going to do large volumes of fruit or vegetables , or do it year after year, then. you really should think about getting a higher end kitchen. utility device. Kitchen aids are the cream of the crop. Once you buy one of these, you keep at the rest of your life and it gets handed down to the next generation. . My sister is using one she inherited from my mother 25 years ago, who got it in the 1940s as a wedding gift. So, although the initial cost is high, they literally last for many lifetime. So the cost on an annual basis is pretty trivial, especially when you consider the cost of therapy and treatment for. the repetitive strain injuries you will get from manual cranking day after day. Add to that of course the cost of therapy for the emotional injuries you'll get from going insane, standing there hand cranking something for hours.
KitchenAid's with a sieve/grinder (with the attachments, costs about $400, but it lasts a lifetime and is fast and easy to use - I can make 100 quart jars of applesauce per day with one of these).
See here for related tools, equipment, supplies on Amazon See here for related tools, equipment, supplies on Amazon See here for related tools, equipment, supplies on Amazon See here for related tools, equipment, supplies on Amazon See here for related tools, equipment, supplies on Amazon See here for related tools, equipment, supplies on Amazon
FREE Illustrated Canning, Freezing, Jam Instructions and Recipes
Don't spend money on books. that you don't need to. Almost everything you can find in some book sold online or in a store is on my website here for free. Start with the Easy Home Canning Directions below. That is a master list of canning directions which are all based upon the Ball Bblue book, the National Center for Home Food Preservation and other reputable lab tested recipes. Almost every recipe I present in addition to being lab tested com. is in a step by step format with photos for each step and complete. explanations. that tell you how to do it, where to get the supplies and pretty much everything you need to know. In addition, there almost always in a PDF format so you can print them out and use them while you cook.
[ Easy Home Canning Directions]
[FAQs - Answers to common questions and problems]
[Recommended books about home canning, jam making, drying and preserving!]
[Free canning publications to download and print]
Lids, Rings, Jars, mixes, pectin, etc.
Need lids, rings and replacement jars? Or pectin to make jam, spaghetti sauce or salsa mix or pickle mixes? Get them all here, and usually at lower prices than your local store!
Get them all here at the best prices on the internet!


Looking for canning equipment and supplies?
Water bath canner with a jar rack
Electric pressure canner
Pressure canners for gas, electric and induction stoves: Presto 23Qt or T-fal 22Qt
Canning scoop (this one is PERFECT)
Ball Blue book (most recent version)
Jars: 8oz canning jars for jams
Lids: Regular canning lids
Wide mouth canning lids
Find Other types of farms:
Easter egg hunts
Children's consignment sales
Farm markets and roadside stands
Road trips and camping resources
Local Honey, apiaries, beekeepers
Local Meat, Milk and Eggs
Consumer fraud and scams information
Home canning supplies at the best prices on the internet!
Maple Syrup Farms, sugarworks, maple syrup festivals
Environmental information and resources
Farms For Your Event for birthday parties, weddings, receptions, business meetings, retreats, etc.
Festivals - local fruit and vegetable festivals
Pumpkin patches and corn mazes
Christmas Tree Farms and lots
Get the most recent version of the Ball Blue Book
With this Presto 23 quart pressure canner and pressure cooker, you can "can" everything, fruits, vegetables, jams, jellies, salsa, applesauce, pickles, even meats, soups, stews. Model 01781
You can make jams, jellies, can fruit, applesauce, salsa and pickles with water bath canners, like this Granite Ware 12-Piece Canner Kit, Jar Rack, Blancher, Colander and 5 piece Canning Tool Set
Disclosure: As an Amazon Associate I earn from qualifying purchases.
Want to make a donation?
Pickyourown.org does not charge either farmers or consumers! I do all of the research, updating, writing, programming, web design for this website and all the related farm, family and consumer protection websites myself (full list here). If you'd like to make a donation to help me pay to keep the website going, please make a donation to me (a.k.a. Benivia) through our secure donation processor. Just click the button below and follow the instructions:
How to Can, Freeze, Dry and Preserve Any Fruit or Vegetable at HomeIf you're gonna fight, fight like you're the third monkey on the ramp to Noah's Ark... and brother its starting to rain. Join our efforts to Secure America's Borders and End Illegal Immigration by Joining ALIPAC's E-Mail Alerts network (CLICK HERE)
-
06-29-2025, 01:24 AM #10094Senior Member
- Join Date
- Aug 2018
- Posts
- 91,782

How to make Acorn Coffee
May 28, 2014 by Matt
Heres another really simple recipe for you to bear in mind for Autumn time when acorns are out in their numbers. Although a recipe for acorn coffee this drink doesnt really resemble a taste anything like coffee, but it is still a very warming and nutritious, comforting drink to have on a cold winters evening.
If eaten raw acorns have a really bitter taste and will leave a funny astringent feeling in the mouth, some people presumed that they were poisonous to eat but they just dont taste that good and so its best to process them before making use of them.

Acorns are a plentiful food usually, especially after a wet year, and there is rarely an acorn shortage in the UK. For this acorn coffee recipe you wont need a set amount of acorns, but a couple of handfuls should provide you with several servings of this drink.
Boil the acorns, shell included, for about 20 minutes. After this time you should let the acorns cool before trying to peel them from their hard outer shell. By boiling them you make peeling them easier and reduce their bitterness slightly. After removing the shell, peel off their outer skin.
Next you need to split the acorns, which you can do with a knife or pestle and morter type implement. Put the split acorns in a warm area to dry for about 24 hours. An airing cupboard or warm kitchen worktop is an ideal place to remove moisture from the acorns.
Finally you need to grind the split acorns up, if you can use a coffee grinder then use one, if not then just try to grind them as finely as possible. Place the grounded acorns onto a baking sheet and either place under a grill or in an oven to roast them until dark brown. You need to pay close attention to stop them from burning.
Place around 3 tablespoons of the ground acorns in a cup of boiling water, like you would usually do with coffee beans. Add some milk and a small amount of sugar, and the acorn coffee is ready to drink.
CategoriesNuts & Seeds
Tags acorn coffee, acorns, coffee, wild coffee
Welcome to Foraged Foods
How to make Elderflower Champagne
How to make Acorn Coffee | Foraged Foods
If you're gonna fight, fight like you're the third monkey on the ramp to Noah's Ark... and brother its starting to rain. Join our efforts to Secure America's Borders and End Illegal Immigration by Joining ALIPAC's E-Mail Alerts network (CLICK HERE)
-
06-29-2025, 01:44 AM #10095Senior Member
- Join Date
- Aug 2018
- Posts
- 91,782
Eating Well with Foraged Food
Jump To:
When we think of survival food, there are some standard meals that often come to mind: MREs, wild berries and roots, and wild-caught fish.
It’s not the kind of spread that would impress your mother-in-law, that’s for sure.
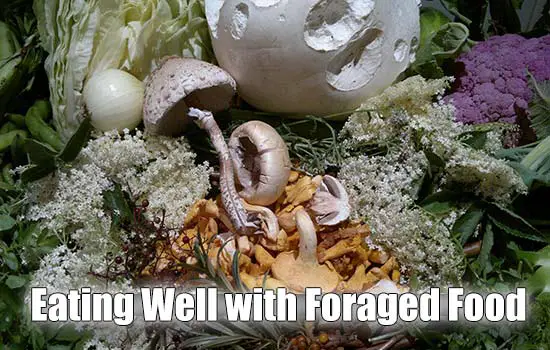
Well, I’m writing this to tell you that it doesn’t have to be that way! You can eat well with the food you’ve got on hand, even if it’s the kind of food you found under a rock in your backyard.
I think, in any survival situation, varied and interesting meals are a lot more important than you’d think.
What would sap your desire to live more than having to eat dehydrated apple pie day-in and day-out? If that’s what I’d have to look forward to during the zombie apocalypse, I’m gonna take my chances with the zombies.
The following are some great recipes that are easy to put together with foraged foods, listed in order from easiest to most complicated. Yes, eventually dandelion jelly might feel like a luxury, but trust me – it’s a luxury that’s worth the effort.
Acorn Griddlecakes
Did you know that you can easily process acorns into flour? It takes a bit of work, but by using techniques that have been refined for centuries by First Nations people, you can have a great supply of nutritious, protein-rich flour to use for everything from bread to gravy.
For a great primer on cold-leaching your acorns to make flour, check out this informative post.
Acorn griddlecakes are incredibly easy to make, and you can scale this recipe up if you’d like to. Just take 2 cups of acorn flour and add ½ tsp salt and ¾ cup of water.
Mix it up into a batter and put it aside for an hour to solidify. Heat up a pan with a pat of butter or lard, then pour about a half cup of batter onto it once it’s hot. Brown the cakes on both sides like you would with pancakes.
Refried Hopniss
Hopniss is a plant that seems like it’s half-potato, half-legume.
Fittingly, its nickname is “potato bean.” Both its beans and tubers are edible, though personally, I think the tuber is the best part. When young, the tubers are oval-shaped and light yellow in color, with thin skins that are easy to peel.
Dandelion Jelly
This is one of my favorite jellies to put on my dandelion bread.
Once your dandelions blossom in the late spring, harvest about 4 cups of the flowers. (You might have to ask your neighbors if you can steal their blossoms, too!).
Separate the petals from their green bases with some sharp scissors, then pour boiling hot water over the petals and steep them for a few hours. Strain the liquid through a fine mesh colander or coffee filter.
Boil the liquid with lemon juice and sugar to taste, then add a box of pectin. Let it boil for about two more minutes. It tends to become a murky yellow-green, which I prefer because it feels more au naturel. Distribute the mixture into sterilized jars, then seal and share with your loved ones.
Soleil Ho works for Knife Depot, and writes on a wide range of topics related to practical survival skills: using wild edibles, shopping for survival knives, foraging, field preparation of game, and more.

By Author SHTFPreparedness
Posted on Last updated: May 24, 2024
Categories Food & Water
Eating Well with Foraged Food - SHTFPreparednessIf you're gonna fight, fight like you're the third monkey on the ramp to Noah's Ark... and brother its starting to rain. Join our efforts to Secure America's Borders and End Illegal Immigration by Joining ALIPAC's E-Mail Alerts network (CLICK HERE)
-
06-29-2025, 01:47 AM #10096Senior Member
- Join Date
- Aug 2018
- Posts
- 91,782
If you're gonna fight, fight like you're the third monkey on the ramp to Noah's Ark... and brother its starting to rain. Join our efforts to Secure America's Borders and End Illegal Immigration by Joining ALIPAC's E-Mail Alerts network (CLICK HERE)
-
06-29-2025, 01:57 AM #10097Senior Member
- Join Date
- Aug 2018
- Posts
- 91,782
1000+ FREE Canning Recipes
1 Comment
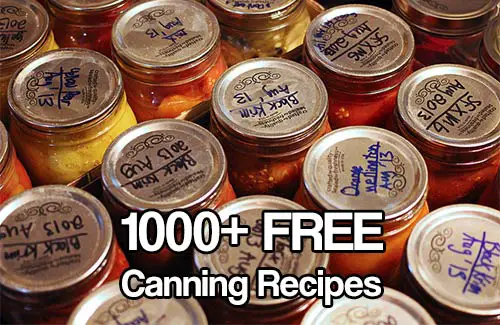
Image Credit: Andres Rodriguez cc 2.0
Are you just starting to can? Are you a seasoned canner?
We all could do with more canning recipes, the site I came across has over 1000 recipes for you to browse and download for free.
There are recipes for sauces, jellies, healthy food, and even puddings.
Canning food is not just for the preppers among us, this is a great way to save a lot of money and become less reliant on the supermarkets.
My grandma was not a prepper, but she canned till the day she died. And one of my favorite canning recipes was my mothers canned meatballs. Yes, you can can meatballs!
This is a great source and my go-to site for any canning recipes.
If you have any recipes you would like to share with us, please head on over to our Facebook page and leave them there, we always love to hear from our readers.
By Author SHTFPreparedness
Posted on Last updated: May 18, 2024
Categories Recipes
1000+ FREE Canning Recipes - SHTFPreparednessIf you're gonna fight, fight like you're the third monkey on the ramp to Noah's Ark... and brother its starting to rain. Join our efforts to Secure America's Borders and End Illegal Immigration by Joining ALIPAC's E-Mail Alerts network (CLICK HERE)
-
06-29-2025, 02:04 AM #10098Senior Member
- Join Date
- Aug 2018
- Posts
- 91,782
DIY $20 Outdoor Cob Oven for Great Bread and Pizza

- Workshops
- Natural Building Essentials
- Japanese Plastering Workshop
- Japanese Carpentry Workshop
- Timber Frame Workshop
- Dry Stone Wall Workshop
- About Us
- For Hire
- Contact Us
- Blog
 Cob Oven Update! (1/26/2015): This $20 cob oven article has been the most popular entry on my website since I originally posted it. Its been 5 years since I wrote it, and weve made significant improvements to the original design, resulting in a much better outdoor pizza oven.
I highly recommend reading the Better Outdoor Pizza Oven Plans if youre interested in building one of these for yourself. The instructions there are much more detailed, too. Heres the original article for posterity
I must admit, Im a bit of a breadhead. Few things are as exciting to me as freshly baked bread with a dab of butter, or hot and greasy scallion pancakes, or fluffy and airy naan, or a pizza fresh from the hearth of a wood-fired cob oven. (That last one trumps all the others.) I thrive on bread. I love eating it, and of course I love making and baking it, too.
 Earlier in the year, the idea of baking in the outdoors in a wood-fired oven became something of a romanticized (in every positive sense of the word) notion to me. It was soon obvious that I should build a cob oven, which would be fairly easy and quick to build, and quite cheap, too. Compared to masonry ovens, which can cost hundreds or thousands of dollars and usually require pretty intense materials in their construction, a cob oven can be made from very simple, locally available materials. (Although it must be said that masonry ovens undoubtedly have a longer lifespan!)
So I picked up a copy of Kiko Denzers Build Your Own Earth Oven, a little gem of a book covering the construction of cob ovens from the ground up. And in July, after I settled into my new house, I knew it was time to start building this oven I had been dreaming about, so I could finally make pizza the way it was meant to be baked: on a super hot brick hearth.
How To Build an Outdoor Pizza Oven
 The Foundation
With little more than some clay, sand, sawdust, brick, some recycled beer bottles and old cinder blocks, I had everything I needed to make my own oven. After familiarizing myself with Kikos design, I began building the foundation for my version from the reclaimed cinder blocks and a few chunks of urbanite. A foundation raises the oven off of the ground and places it at a more convenient working height. (A hearth 40″ off the ground is a good average working height.)
The Fire Brick Oven Hearth
An insulating layer of beer bottles in a sawdust/clay mortar was assembled on top of the foundation in a ring of cob and beneath the firebrick hearth. The hearth, a simple arrangement of 17 recycled firebricks, would serve as the bottom of the cob oven, where breads and pizzas would bake directly. The hearth bricks were carefully laid on a thin bed of sand, so that they could be gently tapped to be firm and level.
Sizing the Cob Oven

(Laying out the beer bottles, and later, filling in with sawdust/clay mortar)
I chose to construct a 22.5″ diameter oven, deciding that anything bigger would be beyond my current needs, and after using it, its definitely proven to be the perfect size. You can fit three medium-sized loaves of bread, or one or two small personal-sized pizzas in it at once. And at this small size, the entire mass can be heated to about 700 degrees in two hours of solid firing with good wood.
Making a Brick Arch Doorway and Cob Dome
Before building the actual dome, I made an arched doorway with some reclaimed red brick, mortared with a sand/clay mix. (The doorway is a little narrow at 12 inches wide, but so far everything Ive wanted to fit has slid right in. And it cant make really big pizzas, but Im liking the smaller sized pies.) The cob dome (nothing more than a mix of sand and clay at a 3:1 ratio) was carefully built up around a moist sand form covered with wet newspaper and up against the brick arch. The sand was piled out of the doorway after the dome had dried a bit.
One more note about the door: the door is a critical 63% of the cob dome height, or 10″ high. (The dome is 16″ high, which is Kikos recommendation for cob ovens across the board.) This one measurement is the most critical because it allows the oven to actually draw. You see, the door is left open while the oven is firing, so that cool air is drawn in, and hot air and smoke can pass out the top half of the door. (Larger ovens frequently have a chimney, or you can make a simple firing door to help with draw, too.)

(Tracing the brick arch to make a cardboard form, setting the bricks on the cardboard form)


(Finishing touches on the clay/sand mortar between bricks, then making a smooth sand form)


(Four inches of cob go up around the sand form, and later, the sand is dug out out the dome [interior view])
Cob Dome Insulation and Plaster
A several inch thick (between 2″-4″) layer of insulation (a mix of sawdust and clay slip) went over the whole dome. This layer helps to keep the heat longer, allowing for longer heat and longer bakes. Cob ovens built strictly for pizza dont require such a layer, and more serious bread bakers may want to double up on insulation thickness, since it will allow for the baking of many loaves. Finally, a thick layer of earthen plaster covers and protects the whole thing.
That is pretty much the whole oven. Pretty simple, huh? Kikos book is a fantastic resource for how to build your own, and I highly recommend it. I didnt work on the oven very inconsistently (due to weather, etc.), but I imagine it took less than a week of actual construction between April and I. (And much of the time is spent waiting for things to dry, too.)

(2-4 inches of sawdust/clay insulation is built up, and next is the nearly finished product with earth plaster and a door)
Baking Pizza in Your New Outdoor Oven
There is nothing quite like wood-fired bread and pizza. Feeding the oven with wood, and watching the fire burn is an awesome experience. When the draw is just right, you can hear a low rumbling of the burning wood within the dome, which is rather powerful.
Other than being stupendous for baking tasty food, the oven is a great example of a simple technology that isnt dependent on fossil fuels for its building or use. You need only simple natural and recycled materials for its construction, and wood to keep it baking. Getting away from cooking with propane is certainly in my realm of interests, and the oven has proven itself to be an important piece of that goal. I hope to have another cob oven more integrated into our subcommunitys full-on kitchen once it is under construction. This oven encompasses many of my loves: baking, cob, wood energy, and the DIY philosophy. Not only that, it cost less than $20. (The firebricks were the only significant cost at $1 each.)
If you have any interest in baking, especially baking really damn tasty bread and pizza, or baking without propane or other fossil fuels, check out Kiko Denzers Build Your Own Earth Oven for complete details and how you can get started! I cannot recommend it enough.
Related
Twenty Pizzas Later September 4, 2013In "Cob Oven"
The Return of the Outdoor Cob Oven August 8, 2013In "Cob Oven"
New Cob Oven How-to Series Coming Soon! January 23, 2015In "Cob Oven"
Build Your Own $20 Outdoor Cob Pizza Oven | The Year of Mud
If you're gonna fight, fight like you're the third monkey on the ramp to Noah's Ark... and brother its starting to rain. Join our efforts to Secure America's Borders and End Illegal Immigration by Joining ALIPAC's E-Mail Alerts network (CLICK HERE)
-
06-29-2025, 02:12 AM #10099Senior Member
- Join Date
- Aug 2018
- Posts
- 91,782
How to Build a Better Outdoor Pizza Oven
January 25, 2015

Learn how to build this outdoor oven in this new how-to
Several years ago, I wrote about how to build (the now-infamous) $20 outdoor cob oven. That oven I built worked decently, produced a lot of delicious meals, and advanced my pizza baking fever to new heights. Since then, weve built several more outdoor pizza ovens, and each of them has been a great improvement upon the original.
This newer model is slightly bigger, allowing for easier access to the oven interior, it has even more food baking potential, and the insulation is vastly superior. This sucker gets hot, and stays hot for a long, long time. The oven has a small roof shelter, protecting it against the weather, and a chimney keeps smoke out of the face of the fire tender. Best of all the oven is still very inexpensive to build.
This is a very achievable, low cost, and effective oven that will not cost you thousands of dollars to build. Heres a look at the new and improved outdoor pizza oven plans and how you can build your own.
Oh Hey! Free Oven eBook
Did you know that you can download a free ebook version of these plans for easy reference? Sign up for our newsletter and get your free printable copy today. Thanks!
[swp-forms id=1403]The Better Outdoor Pizza Oven Plans: Overview
The oven I will propose and outline below is a highly insulated cob oven. For the uninitiated, cob is a combination of clay, sand, straw, and water. When dry, cob is extremely hard and durable, and highly capable of storing heat (given enough insulation.) The focus here is, of course, building with natural and recycled materials whenever possible. This oven is designed to be very inexpensive, consisting of materials that should be widely available.

A drying fire burns nicely in the nearly completed oven
The oven is no slouch in the baking department, either. With a 27″ diameter interior, you can comfortably cook two small pizzas at the same time while maintaining a small fire for cooking the toppings. Weve made up to 60 or more pizzas in a cob oven described below, and they still cooked in 3-4 minutes after several hours of use. Needless to say, this sucker is very insulated. Not to mention, the range of other baking possibilities is vast bread, roasts, pies, cookies, etc. are all fair game, assuming you have the gumption to prepare all those foods and harness the tremendous heat from the oven. This is much more than a just an outdoor pizza oven this is a highly versatile, powerful baking tool.
Ok, lets get on with the building plans
Did You Know? Before We Get Started
I dont know about you, but I learn best from hands-on experiences. This spring, well be building a cob oven mockup in our Natural Building Essentials Workshop. Its the perfect little project to learn how to make and work with cob. Well be covering a lot of other fundamental natural building skills, too. Check out the details here!
Dont Just Throw it Anywhere: Siting Your Oven
Siting your oven is an important consideration, and can make the difference between an oven that you rarely touch because its too far and isolated from your home or main kitchen, and an oven that creates its own positive space with ample room to prepare food for baking and to gather eager friends around for a big pizza party.
Questions to consider include: how close will it be to your existing indoor or outdoor cooking space? Will there be enough room to build around it later, if need arises for space to seat your growing posse of pizza-loving guests? How close is your firewood storage? What kind of shelter will you construct? Once your oven is built, it aint moving. These suckers are permanent fixtures.
Build a Sheltering Roof
If you live in anything but a dry desert climate, I am going to insist that you build a sheltering roof to protect your cob oven. Rain and moisture can quickly take a toll on an oven made of mud, and firing anything but a perfectly dry oven will be an exercise in futility why spend more fuel and time drying your oven when it already takes a couple of hours to get the cob up to baking temperatures? An oven that continually gets wet will require a whole lot of on-going maintenance work, as well. It makes excellent sense to go ahead and build the shelter before you start the oven, too this way you can safely protect your work while construction is happening. (Its also difficult to do framing work around the obstacle that is the oven itself.)

The absolute minimum shelter I consider necessary for a cob oven is represented here if you afford it, dont skimp on protecting your oven
The absolute minimum shelter I consider acceptable for the oven I will describe below is about 7x8′. (These dimensions are for the frame the roof overhang will add another 2′ to each dimension.) This is what we recently built for friends, based strictly on the limited materials they had on hand. In an ideal world, I would factor in at least two feet of roof protection on each side of the oven, and additional space for a prep table to roll your pizza and bread dough, stage other food to be cooked, etc.
Local weather conditions will dictate how you design your roof, but the simplest solution is a lean-to shed roof with enough overhang to protect the oven and the frame itself. The options for a sheltering roof are literally limitless, and it can be as simple and austere, or extravagant and beautiful as you want it to be. Whatever you decide, just make sure the roof extends as least enough to protect the oven from blowing rain. Again, space for food prep is highly recommended as well. Youll be much happier this way.
Dig a Drainage Trench
Cob ovens are extremely heavy. A foundation helps support the weight, raise the oven off of the ground to a comfortable working height, and should include sufficient drainage to protect the oven from freeze/thaw and other moisture damage.
To that effect, you need to go down before you go up. Start off by measuring a circle as large as your desired oven. My recommendation is a 27″ diameter oven. (Note: that means the interior cooking space is 27″.) For a 27″ oven, youll need a foundation much larger than that, however. Factor in another 8″ for the cob dome itself (4″ thickness around the entire sand form), 16″ for insulation, 3″ for plaster, and another 4″ for the diameter you may lose as your foundation grows taller and tapers inward. Thats about a 58″ diameter foundation.

An 18″ deep gravel bed for draining water away from the oven site daylight drain is pictured in lower left corner and covered with soil
Youll want to mark out your desired size on the ground, and dig down, removing all the topsoil in place. Ideally, you would dig down as far as your local frost line, but you may choose to go less depending on what is convenient. If you dont expect to have your oven around for the next 100+ years, it may be less important to dig that far down, and perhaps get at least 18-24″ deep to deal with 95% of all threats of freeze/thaw damage. (If you live in a southern climate, it may not even be a concern. Lucky you, in that case.)
Either way, dig a hole as deep as you deem appropriate, and dig a connecting trench downslope that will carry water away from the foundation. The trench should exit the ground at daylight, meaning the trench needs to be as long as necessary to be able to exit at the surface of the soil. Put a 4″ perforated pipe in there for the best drainage, or simply backfill it with gravel. The deeper you dig your hole, the further youll have to dig your daylight drain. The greater the slope on your land, the less distance youll have to cover. Make sense?
Backfill your new hole with gravel. Gravel is an excellent drainage medium. Any water that finds its way under the oven will fall easily through the gravel, and then be carried away from the site once it hits the bottom of the hole, and finds the daylight drain. Be sure to tamp every 6″ of gravel dont just dump it all in there at once! Tamping ensures that the oven will not settle in any unpredictable ways. You could also stick a perforated pipe under the oven to ensure optimal drainage.
Building a Solid Foundation
The foundation, as stated above, serves several functions. Its also an opportunity to define the character of your oven. Stone is an excellent, timeless choice, either dry stacked or mortared. In areas without stone, brick or busted concrete (a.k.a., urbanite) make good alternatives. If you have a bunch of homeless cinder blocks around, that could work equally well, though they arent as attractive as the other options. Other options could include a wood crib, designed like a log cabin with notches on the corners and backfilled with rubble or gravel (but make sure the wood is insulated from the heat of the oven, in this case), recycled tires filled with busted up junk . be creative.
 The start of a simple dry stack stone foundation

A 36″ tall dry stacked stone foundation this foundation represents quite a bit of material
We opt for stone wherever possible, and build up at least 18″, but preferably 36″. In cases where we dont have enough stone to go the full height (more on that in a minute), the remaining height can be built up with cob. The stone is dry-stacked around the perimeter of the drainage hole, and filled in the center with all manner of crappy broken bricks and busted concrete. That stuff will never be seen again, so the center of the foundation is a good way to use your worst material.

Junky rubble (broken bricks and cinder blocks, etc.) make for great fill in the center of the foundation
A 40″ height is a recommended average hearth height, so your foundation should be nearly three feet tall. (The hearth insulation and firebricks will make up the last few inches.) That ends up being quite a fair bit of material! Dont underestimate how much stone or rubble youll need.

You can use cob to make up the difference in your desired foundation height, as seen here
Insulating the Cooking Hearth
Insulating the cooking hearth is crucial to taking full advantage of the blazing heat of your oven. You can use several materials, or a mix. We use either a combination of beer bottles and dry perlite, or straight perlite.
The advantage of using beer bottles is their wide availability, of course. Using straight perlite without bottles eliminates the need to cap the insulation layer with cob (which will leech at least some heat from the firebrick hearth). Perlite also offers excellent insulation values but is dusty and synthetic, and obviously more expensive than throwaway bottles. The choice is yours, however. I have not noticed a significant performance difference between using a bottle and perlite mix compared to straight perlite.

Beer bottles make for a very cheap method of insulating the firebrick hearth
A good 4″ layer of insulation is an okay minimum, though you may want to aim for a full 6″. (In my firing experience, 4″ seems adequate for the job. By adequate I mean that one oven we built with this method still demonstrated excellent heat retention in the hearth.) Build up a thin cob wall all around the perimeter of the oven foundation to contain the insulation material up to the height of your desired insulation level.
Note: If you did not use any cob to bring up your foundation height earlier, youll want to create a nice level surface with at least an inch or two or material prior to this containment ring step, as well.
Spread your beer bottles within the cob containment ring, and be sure that none are touching. The less they touch, the less chance something will shatter down the line. Once they are arranged, go ahead and dump your perlite, and please do make sure you are upwind of the dust!

Perlite takes up the space between beer bottles
The next step can be eliminated if you use straight perlite: go ahead and use some cob to cap the insulation. Try to use as little as possible an inch will do it. You should simultaneously create a nice level plane for the firebrick hearth. A trowel should help in establishing a smooth surface. Try your best to eliminate low spots this cap doesnt have to be 100% perfect, but the closer to level the better, of course.

Using cob to make a thin, flat surface for the firebrick hearth a trowel aids in smoothing the cob
At this point, I would wait until the cob cap fully dries before preceding. It shouldnt take long with a day or two of sun and wind. If you dont wait, you risk the chance of your firebrick hearth settling.
Build a Fire Brick Hearth
Fire brick is a block of refractory ceramic that is much more capable of withstanding high temperatures than typical red building brick. They range in cost from $1-$3 each brand new, but its likely you can find some used with a bit of searching. Check craigslist, or get in touch with local potters who may have some extra lying around from a kiln build. Ive been able to get recycled bricks for $1, and new bricks for as little as $1.35 each. Be sure to get bricks that are at least 2 1/4″ thick, if not 2 1/2″. (That 1/4″ doesnt seem to make a huge difference, but work with what you can get!)
Fire bricks make a lovely hearth capable of withstanding a very hot fire, and they store heat that will help bake your pizzas through the power of conduction. Laying them out is very simple, as they do not need any mortar.

Setting the firebrick for the hearth, ensuring a level surface
Determine the center of your oven, and mark it with a scratch or twig. Youll want your entire hearth pushed forward of center, as the tongue bricks should overhang the front edge by an inch or so. Using some sifted sand free of pebbles, lay out a thin, level bed for your firebricks. (You can run sand through a 1/16″ window screen to remove pebbles and larger particles.) You will need 18 bricks for your cooking surface, and another four for the tongue/door support. Line up and center the tongue bricks, and try to hang them off the edge by a good inch or so. (This will make it easier to hold an ash can under the hearth when sweeping coals out later.)
You can lay out the remaining 18 bricks as I did in the image above, or do 3 rows of 6 bricks each. P.S.: the reason 27″ makes a great oven size is that you are using the maximum surface area of the fire brick. Fire brick dimensions are 4.5″x9″, so 6 bricks x 4.5″ wide = 27″ wide.
When placing fire brick, be sure that you slide them downward into position. Do not get sand between the bricks. Use the butt end of a hammer to set them and to make tiny level adjustments. Your bricks should be level and flat the flatter the hearth (meaning, no brick corners jutting up), the better your cooking experience will be. You dont want your crusts or bread getting caught up on anything.
Dont be afraid to start from scratch if need be setting the hearth doesnt take much time, and once its set, its set. Theres no changing things later.
Continue Reading the Better Outdoor Pizza Oven Plans
Click here for Part 2 of How to Build a Better Outdoor Pizza Oven!
If you're gonna fight, fight like you're the third monkey on the ramp to Noah's Ark... and brother its starting to rain. Join our efforts to Secure America's Borders and End Illegal Immigration by Joining ALIPAC's E-Mail Alerts network (CLICK HERE)
-
06-29-2025, 02:24 AM #10100Senior Member
- Join Date
- Aug 2018
- Posts
- 91,782

Search
Natural Remedies
Vinegar of the Four Thieves Health Tonic Recipe

Katie Wells
February 6, 2020
Reading Time: 3 minutes
This post contains affiliate links.
Read my affiliate policy.
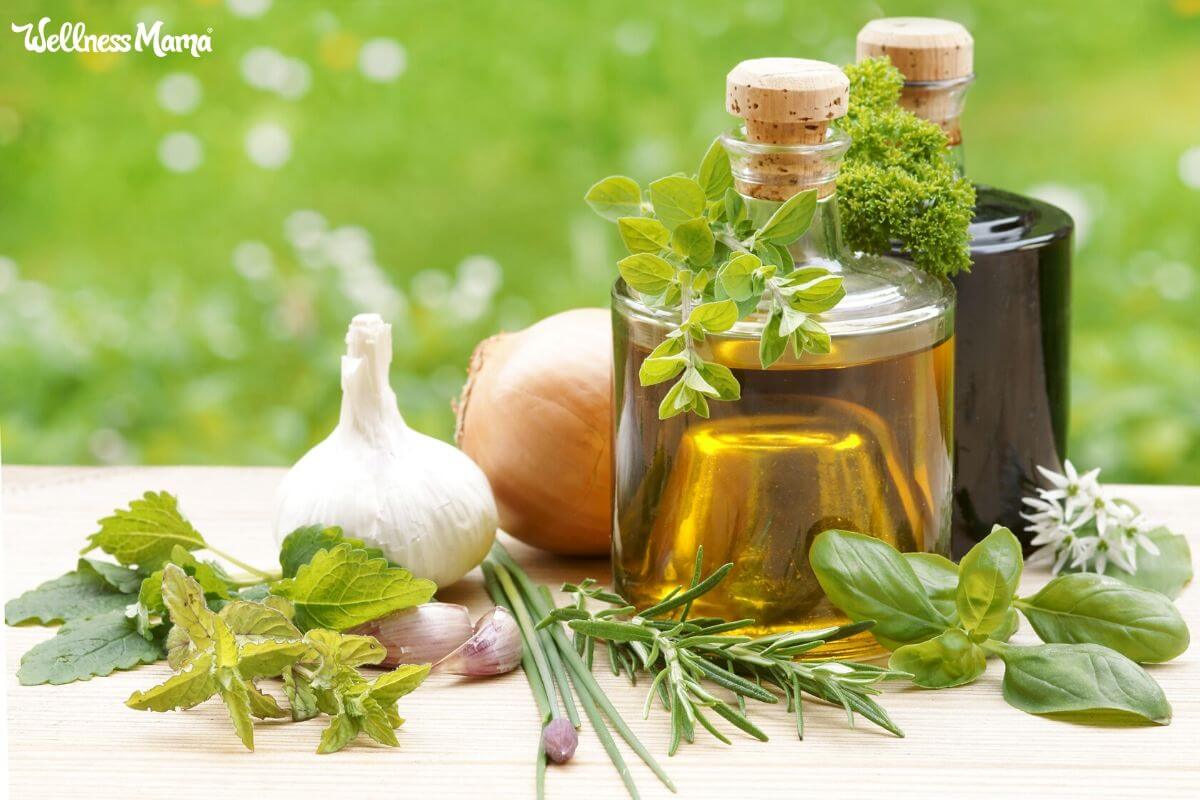
Wellness Mama » Blog » Natural Remedies » Vinegar of the Four Thieves Health Tonic Recipe
I mentioned the Vinegar of the Four Thieves when talking about natural bug spray alternatives, but this health tonic is so much more! This herbal tincture is easy to make and works for so many purposes (more on that below). We use it both internally for illness and externally for a natural insect repellant.
The Legend of the Four Thieves
And if youre wondering about the name
According to legend, the Vinegar of Four Thieves came from a specific combination of herbs used by four thieves during the Bubonic Plague.
The story goes that four thieves, one of whom was an herbalist, robbed the homes of many who had died of the plague. Eventually caught and brought to trial, the thieves were released in return for the recipe for the tonic that they credited with protecting them from the plague.
The thieves survived, as did the legend and the recipe for their herbal vinegar.
Though we hopefully wont ever need this remedy for anything as serious as the plague, it still serves as a valuable remedy against many illnesses and is a powerful disinfectant and bug spray.
Uses for Four Thieves Vinegar
This recipe centers around herbs that have been known for their antibacterial, antiviral, antiseptic, and antifungal properties for centuries (and science backs it up). Just combine with apple cider vinegar and let sit until it reaches potency.
Here are a few of the ways I use it:
- Insect Repellent As I mentioned before, this vinegar makes a very effective (though strong smelling!) natural insect repellent. If you make it to this strength, just put 1/4 cup of the vinegar in an 8-ounce spray bottle and fill the rest with water. Spray on skin, clothes, etc. when in heavily insect-infested areas. We store in the fridge to minimize the vinegar smell and make more refreshing.
- As a Soak Ive had some people report really good success using this vinegar as a soak or topical spray for foot or nail fungus.
- Illness In cases of illness, the Vinegar of the Four Thieves is very helpful in quick recovery. Adults can take 1 TBSP several times a day (dilute in water!!) and kids can take 1 teaspoon several times a day (well diluted in water/herbal tea).
- Room Disinfectant/Freshener When a family member is sick, dilute this with 1 part water and put in a spray bottle to make a potent disinfectant to be used on surfaces or sprayed in the air.
- Dandruff Diluted and used on the scalp, this remedy is also said to be effective against dandruff.
- Cleaning This vinegar makes an effective natural disinfectant spray for use in house cleaning. But be warned its not a subtle scent!
Dont say I didnt warn you: the Vinegar of the Four Thieves smells awful and tastes almost as bad, but it is very effective against a variety of ailments. My kids complain (a little), but they know it will help get them feeling better fast!
Print
4.18 from 17 votes
Vinegar of the Four Thieves Health Tonic Recipe
A potent recipe for an herbal remedy, insect repellent, and disinfectant spray.
Prep Time10minutes mins
Infusing Time42days d
Author: Katie Wells
Materials
- 2 TBSP thyme
- 2 TBSP dried rosemary
- 2 TBSP dried sage
- 2 TBSP dried lavender
- 2 TBSP dried mint
- 4-8 cloves garlic (minced, optional)
- 4 cups organic apple cider vinegar with the Mother
Instructions
- In a large glass jar, combine all the dried herbs and garlic, if using.
- Pour the vinegar over the herbs and garlic and seal tightly. The vinegar is strong enough to corrode some metal lids, so in this case, consider putting plastic wrap or a plastic bag on top and then putting the lid on.
- Leave in a cool, dark, place for 6-8 weeks, shaking daily if possible.
- After 6-8 weeks, strain the herbs out using a small strainer and store the tonic in smaller jars for easy use.
Notes
Most herbs can be found locally, but are also available online.
Need More Natural Remedies?
Here is my list of favorites I do make myself and always keep on hand:
- How to Make Elderberry Syrup (Potent Cold + Flu Remedy)
- Spicy Fire Cider Recipe & Natural Cold Remedy
- How to Make Your Own Natural Vapor Rub
- Multivitamin Tincture Recipe
Add this strangely named vinegar remedy to your list and enjoy its potent benefits!
This article was medically reviewed by Dr. Lauren Jefferis, board-certified in Internal Medicine and Pediatrics. As always, this is not personal medical advice and we recommend that you talk with your doctor or work with a doctor at SteadyMD.
What is your best natural health remedy? Will you try this herbal vinegar? Share below!

About Katie Wells
Katie Wells, CTNC, MCHC, Founder of Wellness Mama and Co-founder of Wellnesse, has a background in research, journalism, and nutrition. As a mom of six, she turned to research and took health into her own hands to find answers to her health problems. WellnessMama.com is the culmination of her thousands of hours of research and all posts are medically reviewed and verified by the Wellness Mama research team. Katie is also the author of the bestselling books The Wellness Mama Cookbook and The Wellness Mama 5-Step Lifestyle Detox.
Vinegar of the Four Thieves Health Tonic Recipe | Wellness MamaIf you're gonna fight, fight like you're the third monkey on the ramp to Noah's Ark... and brother its starting to rain. Join our efforts to Secure America's Borders and End Illegal Immigration by Joining ALIPAC's E-Mail Alerts network (CLICK HERE)


 Reply With Quote


Former Plainfield mayoral candidate Henrilynn Ibezim. (Photo:...
05-03-2026, 12:49 PM in Non-Citizen & illegal migrant voters