

Results 10,101 to 10,110 of 10955
 226Likes
LinkBacks (?)
-
12-26-2016, 11:32 AM
-
09-02-2016, 05:39 PM
-
whole garden made with pallets!! Love it!! | Pallets | Pinterest | Pallets, Pallets Garden and Wooden Pallets
Refback This thread03-06-2016, 11:30 AM -
10-20-2015, 05:29 PM
-
06-12-2015, 08:00 PM
-
02-26-2015, 01:58 PM
-
01-05-2015, 04:13 PM
-
12-19-2014, 10:19 AM
-
EMERGENCY: HUGE FEMA PANDEMIC EXERCISE IN USA IN NOVEMBER, INTERNET SHUT DOWN PART OF EXERCISE | Prepare4Survival
Refback This thread12-03-2014, 10:39 PM -
Off Grid World ? Ugly Duckling Shipping Container Home Built by Artist Is a Beautiful Swan on the Inside
Refback This thread11-25-2014, 03:10 PM -
11-17-2014, 10:59 PM
-
11-13-2014, 11:18 AM
-
11-09-2014, 02:54 PM
-
10-28-2014, 11:38 PM
-
10-26-2014, 05:54 AM
-
10-16-2014, 11:28 AM
-
10-03-2014, 01:25 PM
-
10-02-2014, 09:16 PM
-
09-26-2014, 07:00 PM
-
09-26-2014, 01:56 PM
-
09-19-2014, 04:46 PM
-
09-13-2014, 05:49 AM
-
09-05-2014, 01:52 PM
-
09-01-2014, 09:39 AM
-
08-30-2014, 06:29 PM
-
08-10-2014, 06:29 AM
-
08-04-2014, 05:07 PM
-
07-23-2014, 11:14 AM
-
New Evidence on Expiration Dates | Medical Preparedness | Doom and Bloom (TM) | Doom and Bloom (TM)
Refback This thread07-22-2014, 10:10 AM -
07-18-2014, 08:37 PM
-
07-15-2014, 04:57 PM
-
07-11-2014, 01:40 AM
-
04-22-2014, 11:14 AM
-
04-18-2014, 12:57 PM
-
04-18-2014, 10:10 AM
-
04-14-2014, 12:18 AM
-
04-12-2014, 02:28 AM
-
03-02-2014, 11:43 PM
-
12-24-2013, 11:59 PM
-
12-07-2013, 11:04 PM
-
kitchen | Cob
Refback This thread11-25-2013, 03:24 PM -
10-22-2013, 10:25 PM
-
Apple Pie Braid | Sweets
Refback This thread09-26-2013, 07:58 AM -
09-02-2013, 04:44 PM
-
5 Reasons Why You May have to Bug Out Even Though You Don’t Want to | The Apartment Prepper's Blog
Refback This thread08-23-2013, 03:20 PM -
06-27-2013, 06:30 AM
-
06-23-2013, 08:11 PM
-
06-17-2013, 11:21 PM
-
05-24-2013, 05:06 PM
-
To Eat / BASIC LIST / SUGGESTED ITEMS FOR LONG TERM SURVIVAL - Page 275 - ALIPAC
Refback This thread05-01-2013, 03:49 AM
Thread Information
Users Browsing this Thread
There are currently 6 users browsing this thread. (0 members and 6 guests)
 LinkBack URL
 About LinkBacks
-
06-29-2025, 02:28 AM #10101Senior Member


- Join Date
- Aug 2018
- Posts
- 86,889
 Projects
Contests
Teachers
Log In
Sign Up
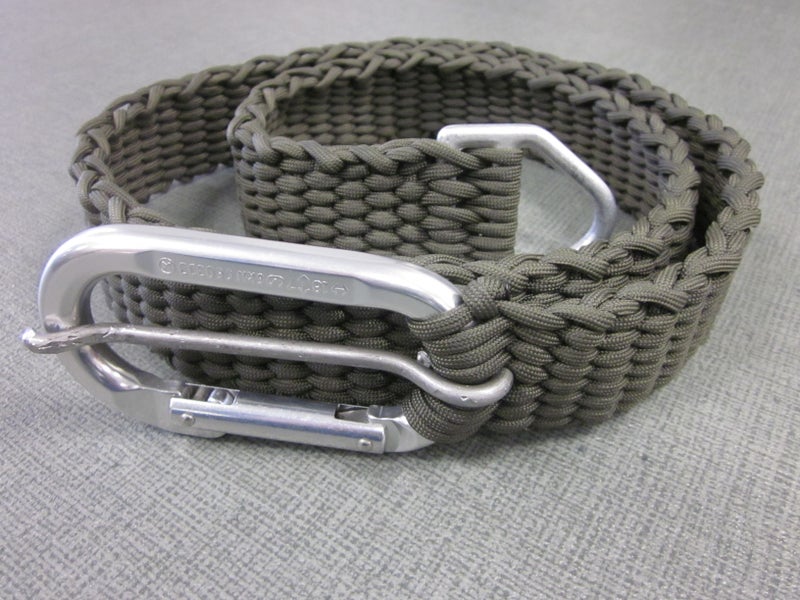
Paracord Belt With Carabiner Buckle
By mobiobi in OutsideParacord
365,364
1,925
30Featured

Save PDF
Introduction: Paracord Belt With Carabiner Buckle
 11 More Images
(More of on this and other belt/buckle designs at http://mobiobione.wordpress.com/para...e-3-0-and-3-1/)
This is what you end up with - A one and three quarter inch wide paracord belt with a removable 3000lb carabiner at one end and a 2500lb triangle D-ring at the other. The webbing should be good for around 7000lb, with the seven down and back runs. The whole belt comes apart with a quick undo of the knot hidden behind the D-ring, giving you just over 100' of paracord.
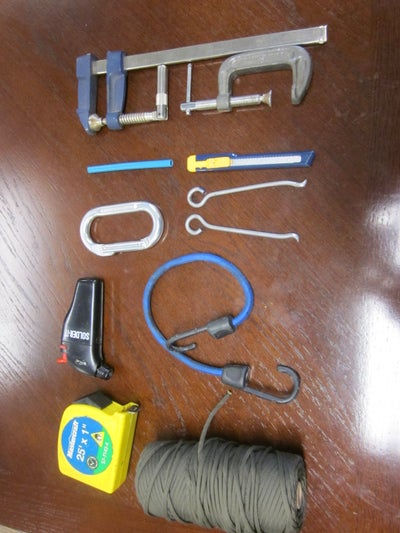
The first pic is most of what you need to make one, more or less, including the table, or a board, or something to but the clamps on.
Oval carabiners seem to work well, the second pic is a 4"X2" 18kN Black Diamond. The cross-pin is made from 3/16" steel rod from any hardware store, etc. This one was bent around a half inch bolt in a bench-mounted vice.
Pic three is my setup. The belt will shrink from the initial length as you make it. This one is 53.5", which shrinks down to 44". The carabiner is initially tied tight to the clamp at this end, as it seems easier to set up that way. Once you get going, replace the tie with a bungie cord, so the belt can shorten as it wants to. The whole idea is to pack as many crossing runs into your length as possible, and having the bungie mounted end will help with that.
Next you can see here the cord run up from the spool on the floor, back and forth 7 times, then tied at the top of the carabiner. Be sure to get your cross-pin in the right spot here.
The weave is done by crossing the runs between each other, front one to the back and back ones to the front, using the pen, or rod or whatever you have (maybe better pictures on my other page, http://mobiobione.wordpress.com/emer...e-belt-by-obi/ ) then running a loop up through them and leaving the top of that loop for the next loop to go through. About this far along if you switch to the bungie, it will allow the belt to shorten, while holding it in place to work on. You'll probably need to check almost every time to be sure your lines don't get crossed at the end you're not working on. I did one for my son initially trying to do it flat on the table with only one end secured, and it didn't go so well, so I went back to this.
I started out using whatever I had handy, which was this pen body, and then this extra cross-pin. I tried other stuff, but the square end on the pen coupled with it's hollow body(which allows a loop of cord to be fed into it and then pulled through, handy for the tight ones as you near the end), and the little hook on the cross-pin actually made for a good set of tool for this. Something my old friend Captain Danimal Dan would call "Accidental Excellence".
The last one is tricky to get through. I used the hook to work down from the top, then stuck the pen onto it, and worked it back through, then put a loop of cord into the pen and pulled it through.
Now you go back and tighten up the slack in the crossings,
and as this D-ring is a little wider than my carabiner, I took the free end and wove it, kinda figure-8 through the D-Ring until the extra space was filled, finishing off by feeding the end behind the loops of cord on the D-ring.
I fed a single line of inner strand around the ends so I can take the carabiner out and not have everything fall apart.
There you go! Style and function, all in one handy 48", multi-thousand pound tow strap, that you can rappel down a cliff if you need to. Nothing gets better than that...accept maybe another coffee...
Oh, I added a mini Nitize S-biner to the side to hold the D-ring in place. Just thread some gutted cord through however makes sense.
Paracord Belt With Carabiner Buckle (with Pictures) - InstructablesIf you're gonna fight, fight like you're the third monkey on the ramp to Noah's Ark... and brother its starting to rain. Join our efforts to Secure America's Borders and End Illegal Immigration by Joining ALIPAC's E-Mail Alerts network (CLICK HERE)
-
06-29-2025, 02:37 AM #10102Senior Member
- Join Date
- Aug 2018
- Posts
- 86,889

Homemade V8 Tomato Juicing Recipe
- Home
- Juicing & Smoothies
- Homemade V8 Tomato Juicing Recipe

Melissa Francis
August 18, 2014
Juicing & Smoothies
Homemade, juice, Juicing, Tomato, Tomato Juice, Tomatoes, V8
This homemade V8 tomato juicing (juice) recipe is nutritious, healthy, easy to make and fabulously delicious to drink.
Ingredients:
- 2 Ripe Tomatoes
- 3 Radishes
- 1/2 Lemon (peeled)
- 1/4 of a Medium Beet
- 1/2 cup Spinach
- 1/4 cup Loose Parsley
- 3 Stalks Celery (leave tops on)
- 1 Red Pepper (remove seeds)
- 1/2 a Cucumber (peel it, if it has a wax coating)
- A large pinch of Sea Salt & Black Pepper
Homemade V8 Tomato Juicing Recipe
Juicer: Chop vegetables, run through juicer, season (salt & pepper) and enjoy !
Blender: Chop vegetables, blend until smooth, strain (optional) season (salt & pepper) and enjoy !
Tomato juice improves your digestive system. It has been known to prevent constipation, especially when blended with spinach juice. The mixture activates the liver and contains a great deal of fiber which helps prevent constipation. Tomato juice is also a natural antiseptic and can prevent diarrhea and common infections. Some also find it effective for prevent kidney and gall stones.
Drink it alone in the morning to start your day or add it to a cocktail in the evening to relax from your day.
Homemade V8 Tomato Juicing Recipe - The Homestead Survival
If you're gonna fight, fight like you're the third monkey on the ramp to Noah's Ark... and brother its starting to rain. Join our efforts to Secure America's Borders and End Illegal Immigration by Joining ALIPAC's E-Mail Alerts network (CLICK HERE)
-
06-29-2025, 02:43 AM #10103Senior Member
- Join Date
- Aug 2018
- Posts
- 86,889
If you're gonna fight, fight like you're the third monkey on the ramp to Noah's Ark... and brother its starting to rain. Join our efforts to Secure America's Borders and End Illegal Immigration by Joining ALIPAC's E-Mail Alerts network (CLICK HERE)
-
06-29-2025, 02:46 AM #10104Senior Member
- Join Date
- Aug 2018
- Posts
- 86,889
DIY Uber Match
By Survivor 002 in Bug Out, Camping, DIY, Frugal, Homesteading, Hunker Down Prepping, Off Grid, Prepping, SHTF, Survival, Tutorials
Share the knowledge!DIY Uber Match
 Image Source: practicalprimitive.comThese DIY matches rock…The are indeed the uber of matches. This project is really easy and really cheap. Stop spending 5 or 6 bucks on store fire starters when you can make these bad boys for a 1/3 of the cost. The Uber Match is simple to make, highly water and wind resistant. Great for emergencies especially in bad weather or when you want a fire quick and aren’t well practiced at the art of fire starting. You will impress everyone with your speedy campfire on your next camping trip and if it happens to be an unplanned camping trip done during a bug out you will be everyone’s hero by creating fire quickly to warm those that are cold injured and hungry. Making them now while you’re in a nice dry calm environment is only wise. Too learn how to create the uber match check out the instructions at the link below and be the fire-starting hero.
DIY Uber Match - The Prepared Page
Last edited by Airbornesapper07; 06-29-2025 at 02:51 AM.
If you're gonna fight, fight like you're the third monkey on the ramp to Noah's Ark... and brother its starting to rain. Join our efforts to Secure America's Borders and End Illegal Immigration by Joining ALIPAC's E-Mail Alerts network (CLICK HERE)
-
06-29-2025, 02:52 AM #10105Senior Member
- Join Date
- Aug 2018
- Posts
- 86,889
If you're gonna fight, fight like you're the third monkey on the ramp to Noah's Ark... and brother its starting to rain. Join our efforts to Secure America's Borders and End Illegal Immigration by Joining ALIPAC's E-Mail Alerts network (CLICK HERE)
-
06-29-2025, 03:30 AM #10106Senior Member
- Join Date
- Aug 2018
- Posts
- 86,889
How to Potty Train Your Puppy Using a Bell
Co-authored by Pippa Elliott, MRCVSLast Updated: June 6, 2025 Approved
- Setting Up a Routine for Your Puppy |
- Crate and Potty Training Your Puppy |
- Bell Training Your Puppy |
- How Do You Potty Train Your Puppy? |
- Video |
- Expert Q&A |
- Tips |
- Warnings
When you get a new puppy, housebreaking can become a big problem in your house. You can save time, energy, and stress by teaching your dog to use a bell when it needs to go outside to use the bathroom. Combine bell-training with a regular schedule and crate training for the best results.
Part1Setting Up a Routine for Your Puppy
- 1

Understand the importance of a schedule.[1] Your puppy needs to be on a schedule that you control. By regulating his feeding, sleeping, playing, and bathroom schedule, you help him fit comfortably into your life. The routine will bring him comfort, and youll have fewer accidents down the road.
- 2

Establish an eating routine.[2] Most puppies should get four meals per day until they are 12 weeks old. After that, they should get 2-3 meals a day until they reach adulthood. Feed your puppy the amount recommended on the label. Many labels give only the total amount a dog should eat during the day. Youll need to divide those amounts into portions throughout the day.
- To ensure the puppy grows well, feed him in meals instead of leaving food out at all times. If he doesn't finish his food within 15 minutes, pick up and remove the rest.
- Very small breeds often get low blood sugar (hypoglycemia). They should be fed four smaller meals spaced out to make sure their sugar levels are healthy throughout the day.
- 3

Set up a bathroom schedule.[3] Let the puppy outside to use the bathroom after every meal, play session, and nap or night's sleep. He'll need a few weeks to adjust to the schedule, so expect accidents at first. But as the puppy grows up, he'll be able to go for longer periods between bathroom sessions.
- Puppies 6-8 weeks old need to use the bathroom every hour during the day until they're housebroken. At night, you should let them out every 2-4 hours.
- Puppies 8-16 weeks old should be able to hold it for about two hours during the day and four hours at night.
- 4

Get your puppy on a regular sleep schedule.[4] This includes a regular bedtime that comes right after a bathroom break. Even when they're as young as eight weeks old, some puppies will sleep for a full eight hours during the night. Most, though, will need to use the bathroom at least once during the night. Do this 2-4 hours after putting your dog to bed.
- Its best to let the dog out every two hours the first night or two, just in case.
- Begin increasing the time between wake-ups from every two hours to every four hours over several days or weeks. This will depend on the breed and how much your puppy sleeps. Use your discretion.
- Daytime napping is important for puppies, but if you let him nap all day, he won't sleep at night!
- 5

Create a play schedule for your puppy.[5] Play-time is an important part of your puppy's development. During play, he'll learn that he's not allowed to bite or scratch, while working off his meals and growing strong and healthy. It also wears him out so he won't have excess energy that keeps him awake during scheduled nap or sleep times. A regular play schedule will keep him on his sleep schedule.
- Training sessions should be fun enough for the puppy to count as play-time!
- Keep your puppy safe while he plays. Help him avoid things like falling, getting stuck, or eating/chewing on things he shouldnt.
Part2Crate and Potty Training Your Puppy
- 1

Buy a crate for your dog. Crate training is the first step in potty training. Choose a crate with enough room for your dog to turn around comfortably. However, it shouldn't have so much room that he could use the bathroom in one corner and sleep in another. If your puppy learns to associate his crate with using the bathroom, he'll resist going into the crate to lay or sleep.
- In the first few weeks, expect accidents in the crate even if it's the right size for the puppy. Don't lose your patience, though! He's still learning.
- If your puppy is a larger breed, consider buying a crate with adjustable barriers that can be removed as the dog grows.
- 2

Get your puppy used to the crate.[6] Place the crate in a busy room in the house, where people gather often. The den or family room is a good location for crate training. Leave the crate door open so the puppy can explore it at his own pace, and treat him whenever he goes into the crate.
- After he's grown used to the crate, start closing the door and leaving him in it for longer periods of time. Crate him at night and anytime you arent home or able to watch him.
- You can move the crate between rooms, bringing it into the bedroom with you at night, for example. But always make sure it's somewhere your dog feels safe.
- 3

Assign a regular bathroom spot.[7] Take him to that same spot every time you take him out. If he associates going to the bathroom with a very specific place, he'll be less likely to have accidents in other places. It'll also make clean-up easier in the future because you'll know where he likes to go.
- 4

Limit the puppy's outdoor time. Minimize how much time he plays outside during the first 2-4 weeks of potty training. Playing with the dog outside in the middle of his potty training will confuse him about what he should do when he goes outside. When he's mastered potty-training, you can start spending more playtime outside with him.
- 5

Encourage your puppy to use the bathroom on command. Choose a specific word or phrase to serve command him to use the bathroom. "Bathroom" or "Go potty" are examples. When you take him outside, use that same phrase and the same tone of voice every time he goes to the bathroom. If your puppy uses the bathroom after you give the command, praise him with a lot of excitement and a treat.
- You might also choose a separate command specific to encouraging your dog to defecate. Young puppies need to defecate more often, so teaching a dog to associate a specific command with defecating can be useful.
- 6

Crate the puppy if he doesn't potty on command. This isn't a punishment, but a training tool. If your puppy doesnt use the bathroom within a few minutes of you giving the command, put him in his crate for 5-10 minutes. The dog may whine or cry when confined to the crate, but dont let them out.It will confuse the learning process.
- After 5-10 minutes have passed, take him back outside to use the bathroom and give the command again.
- Repeat the process until he makes an attempt to use the bathroom after you give the command.
- When he finally uses the bathroom, repeat the command and reward him with lots of praise and a treat, then let him back into the house to play.
Part3Bell Training Your Puppy
- 1

Incorporate the bell into potty training. Hang the bell by the door you use each time you take the dog out. It should hang low enough for your puppy to reach with his paw or nose. Use the bell only with a single door at first. You can move the bell or add more bells at other doors once the puppy understands how the bell system works.
- Very small breed dogs and very young puppies may not be able to hold it long enough to reach the door that leads outside. In that case, hang the bell wherever the dog spends the most time the living room, for example. You can move the bell to the outside door when the puppy can hold it a little longer.
- It helps to keep the dogs living area small during the stage until potty training is well established. You might use a puppy gate and attach a bell to it.
- 2

Teach your puppy to associate the bell with positive things.[8] If your puppy seems scared by the bell sound, you need to make him comfortable with the sound before using the bell as part of potty training. Hold out treats near the bell, and ring it when the dog comes to retrieve the treats. You might smear a little cheese or some other treat on the bell, and, when the dog touches the bell, reward him with an additional treat. Repeat this process until the dog knows to associate the bell with reward.
- 3

Teach the puppy to ring the bell himself.[9] When you are going outside on scheduled bathroom break, set him down next to the bell. Always open the door immediately after any hint of the bell ringing, and give lots of praise. There are a few different ways to train your puppy to ring the bell:
- Without ringing the bell yourself, tap your fingers on the wall or door next to it, and say "Outside." Your puppy should learn to jump up to your fingers, ringing the bell in the process.
- Hold a treat just behind the bell, and say "Outside." The puppys nose will ring the bell when he goes for the treat.
- Physically take your puppys paw, hit the bell with it, and say "Outside."
- Skip the bell training if youre rushing out for a bathroom emergency. Only use the bell with scheduled bathroom breaks.
- 4

Be consistent. Your puppy is very smart, and has a great sense of cause and effect. Anything he observes before the door opening/praise/treat will be seen as a cause of the desired effect. If you let variation creep into what your dog experiences before the door opens, he can become confused. Make it easy for him to learn what he needs to do to be let out. Keep it simple. For example, only use one of the methods outlined in the previous step don't mix and match.
- 5

Expand bell usage after the puppy has learned how to use it. You can either move the bell to different doors or hang a different bell by each exterior door. When you travel, take a bell with you so the dog can use it while on the road. Similarly, send the bell with your dog if he stays at another home while youre away on a trip. If you need to find a new home for your dog, let the new owners know he's bell trained, and encourage them to make a bell available at the new home.
How Do You Potty Train Your Puppy?
 Pippa Elliott, MRCVS
Veterinarian
Expert Answer
How to Potty Train Your Puppy Using a Bell (with Pictures)Last edited by Airbornesapper07; 06-29-2025 at 03:37 AM.
If you're gonna fight, fight like you're the third monkey on the ramp to Noah's Ark... and brother its starting to rain. Join our efforts to Secure America's Borders and End Illegal Immigration by Joining ALIPAC's E-Mail Alerts network (CLICK HERE)
-
06-29-2025, 03:55 AM #10107Senior Member
- Join Date
- Aug 2018
- Posts
- 86,889
18 Everyday Products You've Been Using Wrong
Your life has been a lie.
🔥View All 85 Comments
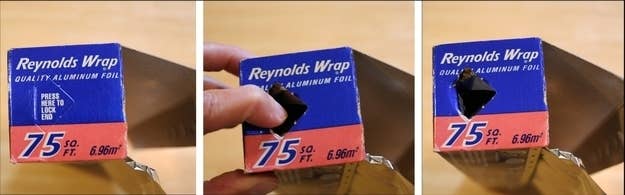
1. You've probably been ignoring this feature.
chicaandjo.com
Most aluminum foil boxes have press-in tabs that secure the roll in place, so you don't have worry about it flying out every time you rip off a sheet.
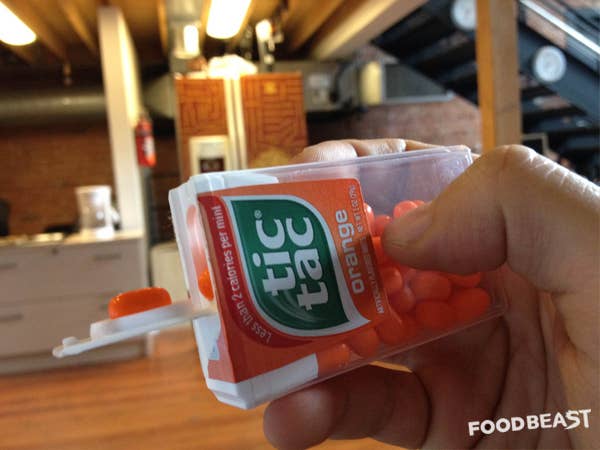
2. You've been dispensing Tic Tacs the hard way.
foodbeast.com
You know how when you violently shake a container of Tic Tacs into your palm it seems as though you always end up with zero or seven? Avoid that altogether by letting a mint gently glide into the tiny lid crevice.
more at the page link
18 Everyday Products You've Been Using Wrong
If you're gonna fight, fight like you're the third monkey on the ramp to Noah's Ark... and brother its starting to rain. Join our efforts to Secure America's Borders and End Illegal Immigration by Joining ALIPAC's E-Mail Alerts network (CLICK HERE)
-
06-29-2025, 04:06 AM #10108Senior Member
- Join Date
- Aug 2018
- Posts
- 86,889
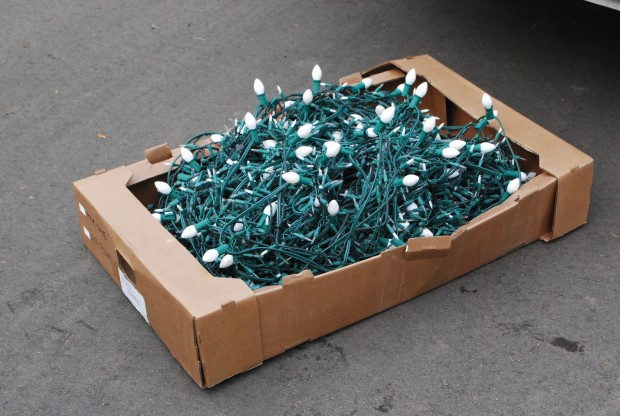
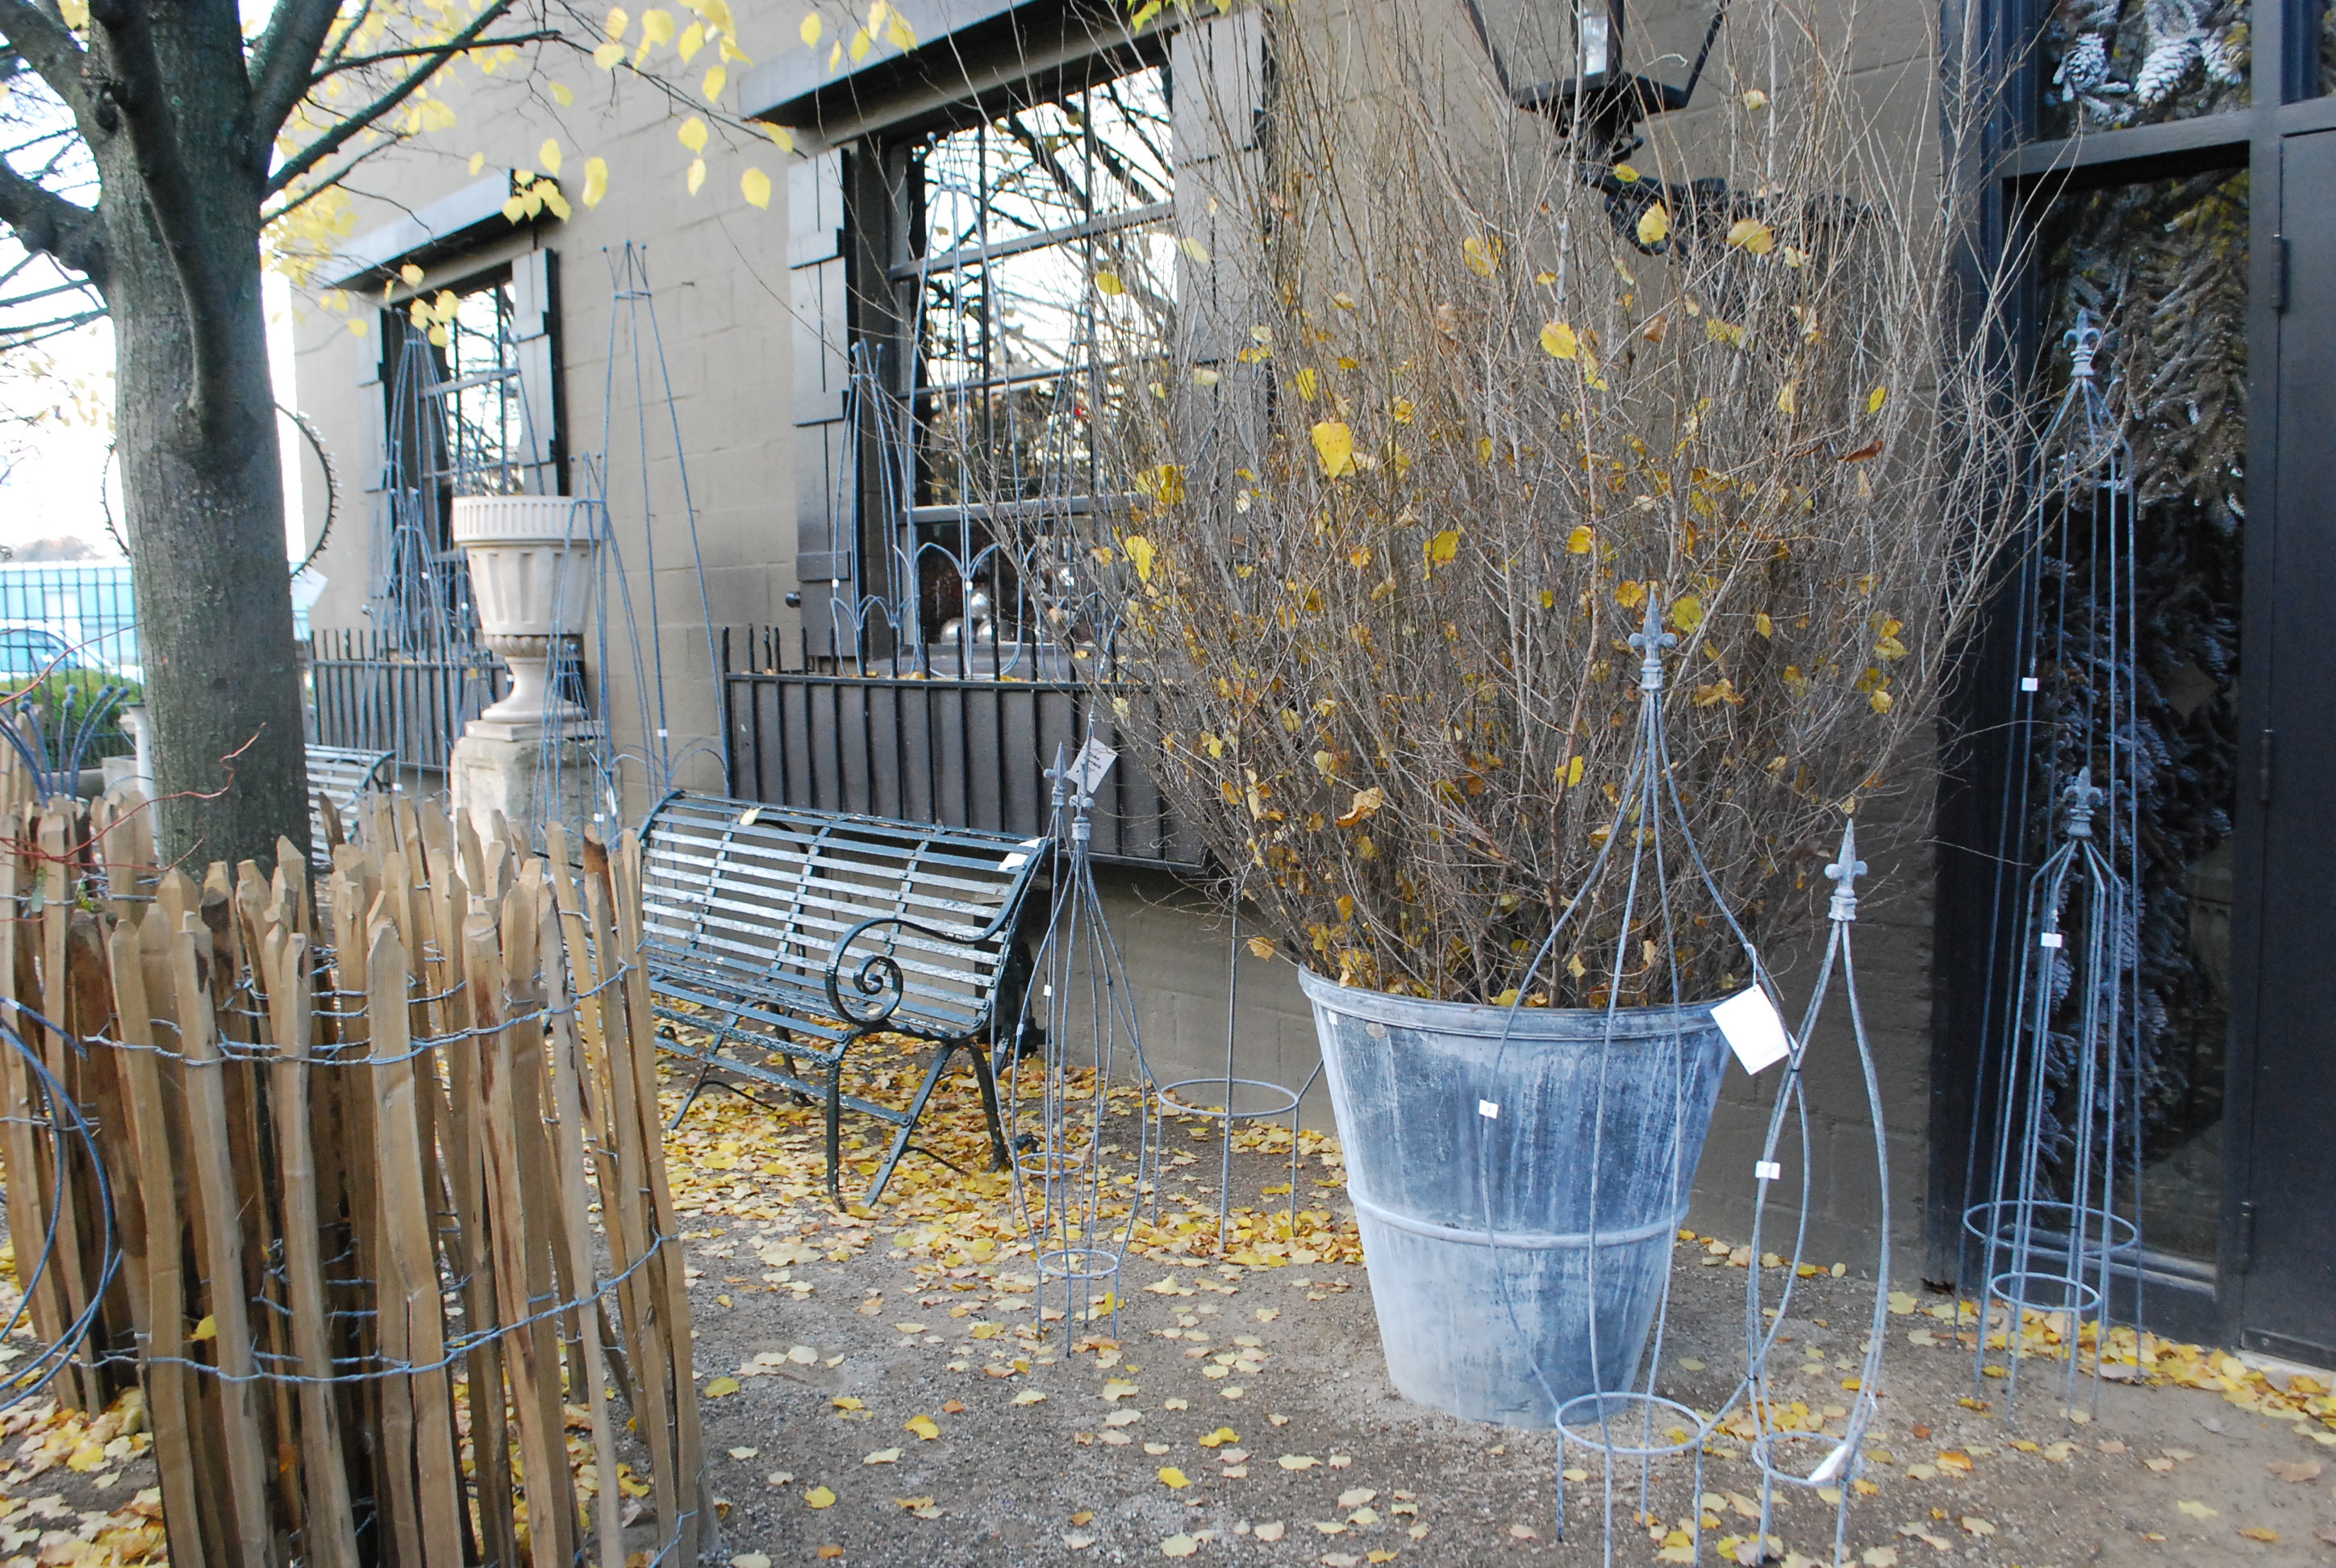
Fall Season Landscaping Container Lighting DIY Project
(Super Simple & Frugal)
At A Glance: Simple Ingredients

I am almost done with the holiday and winter work. Sometimes some of the best comes at the last. These pots could not be simpler-sticks and lights.


Posted on: December 17, 2012 14 Comments
Filed Under: container planting, Lighting, Winter Tagged With: winter containers, lighting containers
At A Glance: Simple Ingredients | Deborah Silver & Co.If you're gonna fight, fight like you're the third monkey on the ramp to Noah's Ark... and brother its starting to rain. Join our efforts to Secure America's Borders and End Illegal Immigration by Joining ALIPAC's E-Mail Alerts network (CLICK HERE)
-
06-29-2025, 04:17 AM #10109Senior Member
- Join Date
- Aug 2018
- Posts
- 86,889

Prepping & Survival
Self Reliance
Commentary
Health & Mindset
Courses & Books
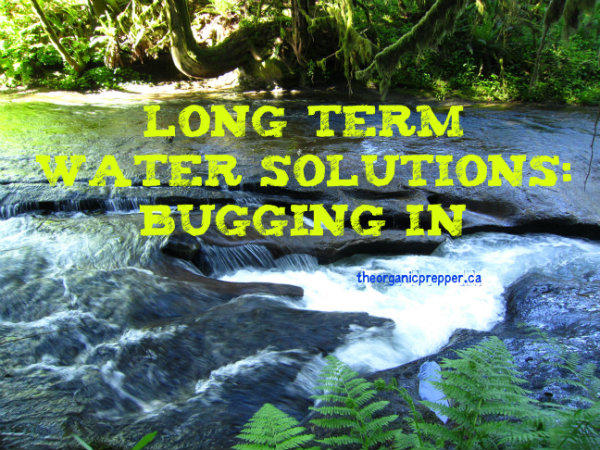
Long Term Water Solutions: Bugging In
Share
Tweet
Pin
Share
If you're new here, you may want to subscribe to my RSS feed. Thanks for visiting!
(Psst: The FTC wants me to remind you that this website contains affiliate links. That means if you make a purchase from a link you click on, I might receive a small commission. This does not increase the price you'll pay for that item nor does it decrease the awesomeness of the item. ~ Daisy)
Water is second only to oxygen in the hierarchy of survival. Without it, in 3 days, youll die. But it goes much further than that. Water is vital for basic sanitation, for growing more food, for raising livestock, for cooking, and for treating injuries. So even if you have enough to drink, without enough for those other needs, your chances arent good.
The solutions you choose for water should be based on whether your plans for long term survival are bugging out to a secondary or unknown location, or sheltering in place. This week well talk about solutions for bugging in.
There are several aspects to water that you should consider if your long term plans are to bug in at your current location. Many of these solutions can also be put into place if you have a secondary location to which you will travel in the event of a crisis.
Storage
First things first, you must store water. This is absolutely the initial step that people should be taking in their preparedness journey. The good news is, it is also one of the least expensive preparations. There are many different ways to put back a months supply of water. We store drinking water and water for pets and sanitation. Keep in mind that in the event of a disaster, even if water is flowing from the taps, it may not be safe to drink. Waterborn diseases like typhoid kill many people in the aftermath of natural disasters, sometimes causing more deaths than the disaster itself.
When I moved to this location, I bought spring water in one gallon jugs. We used this for drinking and cooking water (we are on municipal utilities and we dont trust the supply for consumption.) Once we emptied a one gallon jug, we then refilled it with tap water and stored it in the basement. This is our back-up supply for sanitation and for our pets. We have just over 300 gallons of tap water stored.
For drinking water storage, I purchased some of the large BPA-free 5 gallon jugs. We also have a top loading water dispenser
that can be used whether or not we have electrical power. I have gradually acquired a one month supply for 4 people of this water. In my basement, I have stored 30 of these jugs.
The standard advice for drinking water is one gallon per person per day. I like to add a little bit to that in order to have extra for cooking. Also keep in mind if you are working outside, particularly in hot weather, youll drink more than a gallon per day. Sick people and pregnant women also tend to hydrate more.
Water is heavy. Be sure when you choose a place to store it that you wont impair the integrity of your structure. For this reason, storing it all on one end of the attic might not be the best idea, depending on your situation. Also, keep in mind that extreme temperatures can cause plastic containers to break down. Depending on the type of plastic, this can leach harmful toxins into your water. If your water is subjected to freezing temperatures, it expands and can cause the containers to burst.
Learn more about water storage HERE.
Acquisition
This step is even more important than storage, particularly if a situation turns long-term. What are you going to do after that water storage runs out? You cant store a 30 year supply of water, in most cases. You have to be able to replenish your supply.
The best solutions are either a deep well or a natural spring on your property. Those will keep you in fresh, pure water indefinitely in most cases. Some exceptions are if the groundwater is contaminated due to a natural disaster like an earthquake or a manmade disaster like fracking.
Some naturally occurring sources to look for if you have yet to acquire your property are rivers, creeks, lakes, or ponds.
Keep in mind that you may be transporting the water from its source to your home. Look into back-up solar pumps for your well, and be sure that a manual pump is also available. If water is going to have to be carried for any distance, consider what type of conveyance will make the job easier. As people age or become injured, the job of carrying two buckets full several times a day will become a lot more physically strenuous. A sturdy wheelbarrow, pushcart, or wagon would make the task easier.
If your property doesnt have these natural resources you must plan a catchment system for rainwater. Depending on your area, you may want a cistern or other enormous amount of storage for the water you harvest. If you get frequent precipitation throughout the year numerous water butts at the corners of your structures may supply enough water for your needs, including supplementing your garden. (Be warned that the eco-police in some places believe that the government owns the water falling from the sky rainwater catchment is illegal in some states. Many may wish to disregard this flagrant insult to natural law.) You can learn more about rainwater harvesting HERE and HERE.
Purification
Bear in mind that the water from most natural sources MUST be filtered, so an investment in a high quality water filtration system is vital. I have a Big Berkey. I can only personally recommend Berkey because they are the products that I use myself. When you purchase your filtration system, go the extra step and also purchase extra elements and bits and pieces in the event that repairs are needed. I have enough elements to keep us in safe water for many years to come as well as the spare parts to replace the wear-and tear items like spigots and gaskets. There are also elements that can be purchased to remove the additives in municipal water, like fluoride, arsenic, and other toxic chemicals.
Its important not to just purchase a filtration system and leave it in your closet until its needed. Particularly if water is in short supply, you dont want to waste it as you try to figure out how to use your system or as you run a gallon through before using it for drinking water. Practice now while water is readily available.
Learn more detailed information about water purification HERE.
Conservation
Finally, if the availability of water is limited, you must make every effort to make it stretch as far as possible. I recently wrote about the drought situation on the West Coast and the toxic water due to a chemical spill in West Virginia. Our resources are finite and it doesnt pay to waste them. This would be even more true in a world without water as near as the closest kitchen sink. If you have to go to the well or the creek and haul every drop of water your family uses back to the house, you will have added impetus to make the most of it.
Installing systems in your home to make use of gray water and black water can help you make the most of every drop of that precious liquid.
Gray water can be used for watering plants, for example, and sometimes for cleaning depending on the origin of the gray water. Gray water is the water that comes from bathtubs, showers, and clothes washing. Systems can be devised that separate the disposal fo gray water and black water, and the gray water can be diverted for use in irrigating your garden. Learn more HERE.
Black water is the water from human waste, like toilet water or dish water, and contains bacteria and pathogens. There are some recycling systems that make black water acceptable for use in watering outdoor plants. Learn more HERE.
You can find more ideas for conserving water HERE.
What are your plans?
Everyones situation is different based on their setting, their personal needs, and their naturally available resources. The solutions that might work in the rainy Pacific Northwest would not be appropriate for those who live in the desert of Arizona. The three basic principals are the same wherever you are: you need some water stored for short-term emergencies, you need a way to replenish your supplies should the crisis become extended, you need to make your water safe, and you need to make it stretch as far as possible. The lists here are based on my familys situation and are by no means comprehensive or universal.
Its important now to look at your situation and come up with solutions that will work for you where you are right now. Do you have some ideas to share, particularly ones that are unique to your geographic setting? Please do so in the comments below.
Sources:
Learn more about preparing for a water crisis HERE and HERE.
Learn more about the contaminants in your water HERE.
Buy Berkey products HERE.
Learn more about establishing a long term water supply HERE.
Long Term Water Solutions: Bugging In - The Organic Prepper
If you're gonna fight, fight like you're the third monkey on the ramp to Noah's Ark... and brother its starting to rain. Join our efforts to Secure America's Borders and End Illegal Immigration by Joining ALIPAC's E-Mail Alerts network (CLICK HERE)
-
06-29-2025, 04:38 PM #10110Senior Member
- Join Date
- Aug 2018
- Posts
- 86,889
Projects
Contests
Teachers
Log In
Sign Up
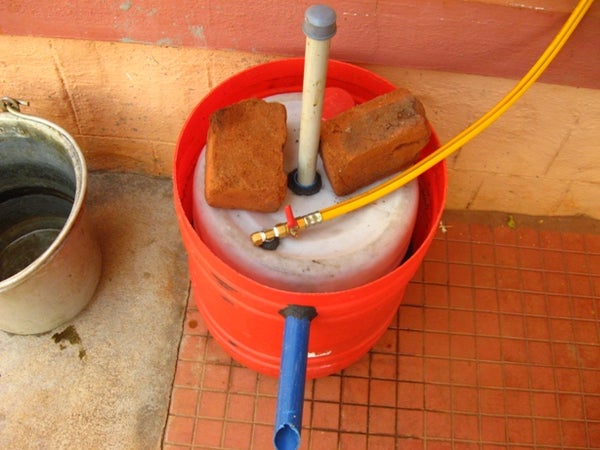
Mini Bio-gas Plant Using Food Waste, Decomposable Organic Material and Kitchen Waste
By antoniraj in WorkshopEnergy
1,041,008
812
1,748Featured
Save PDF
Introduction: Mini Bio-gas Plant Using Food Waste, Decomposable Organic Material and Kitchen Waste
 By antoniraj Follow
More by the author:


About: I like to make things more simple with easily available resources. My favorite quote: A human being should be able to change a diaper, plan an invasion, butcher a hog, conn a ship, design a building, write a More About antoniraj »
I have been searching for some method of using the food waste, decomposable organic material and kitchen waste efficiently, and came across information on producing bio-gas from organic waste.
The bio-gas produced from food waste, decomposable organic material and kitchen waste, consisting of methane and a little amount of carbon di oxide is an alternative fuel for cooking gas (LPG). Also, the waste materials can be disposed off efficiently without any odor or flies and the digested slurry from the bio-gas unit can be used as an organic manure in the garden.
Components of the Bio-gas Plant
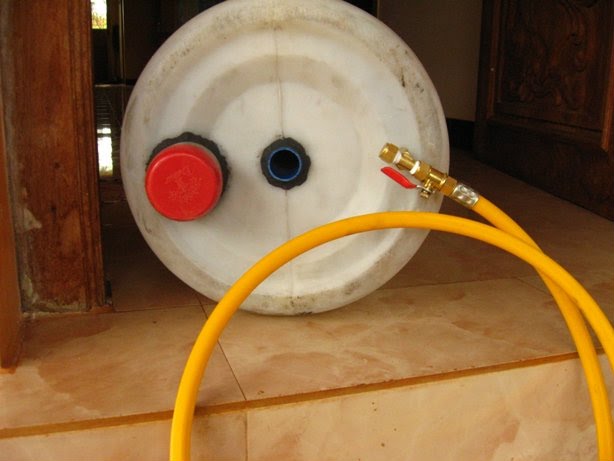
The major components of the bio-gas plant are a digester tank, an inlet for feeding the kitchen waste, gas holder tank, an outlet for the digested slurry and the gas delivery system for taking out and utilizing the produced gas.
This project is also useful for students to have a hands-on learning experience in constructing a Mini Bio-Gas Plant, using locally available material.
Material Required:
1. Empty PVC can 50 ltrs capacity: 1 No. (to be used as Digester Tank)
2. Empty PVC can 40 ltrs capacity: 1 no. (to be used as Gas Holder Tank) (Make sure the smaller can fits inside larger one and moves freely)
3. 64 mm dia pvc pipe: about 40 cm long (to be used for feeding waste material)
4. 32 mm dia pvc pipe: about 50 cm long (fixed inside gas holder tank as a guide pipe)
5. 25 mm dia pvc pipe: about 75 cm long (fixed inside the digester tank as a guide pipe)
6. 32 mm dia pvc pipe: about 25 cm long (fixed on digester tank to act as outlet for digested slurry)
7. M-seal or any water-proof adeshive
8. Gas outlet system: Please see Step 4 below for required materials and construction
Tools required
Do not require many tools here. A hack saw blade for cutting the cans & pipes and a sharp knife for cutting holes on the cans are all the tools we need.
Additional accessories
A single burner bio-gas stove or a Bunsen Burner used in school laboratories
Step 1:
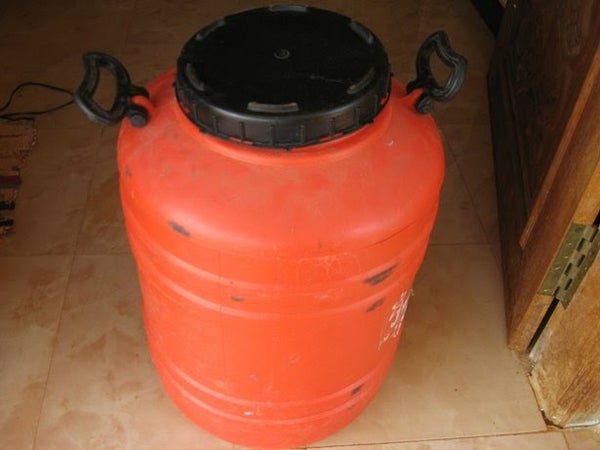
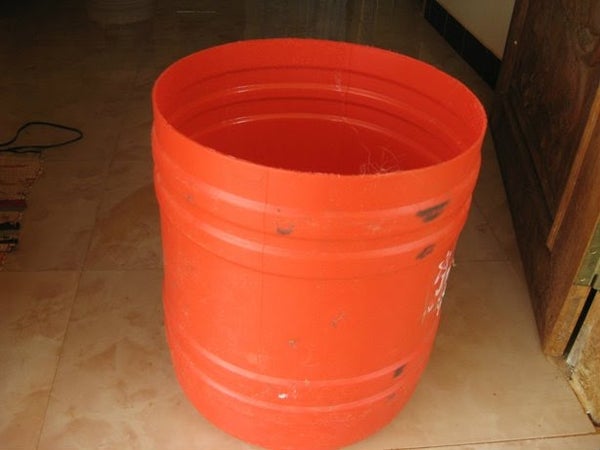
Bought this 50 ltrs capacity PVC can, which will act as the digester unit and removed the top portion of the can, by cutting it with a hack saw blade:
Step 2:
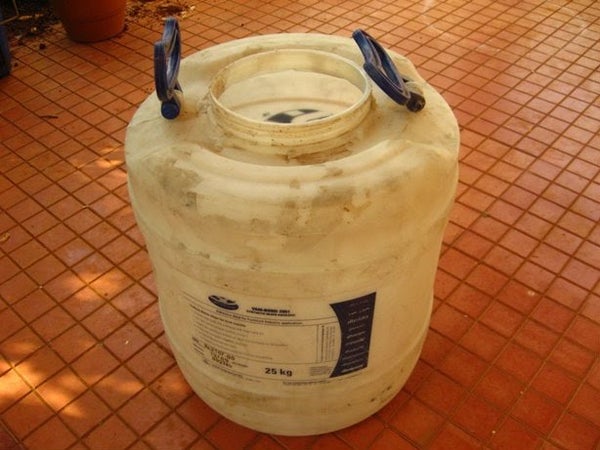
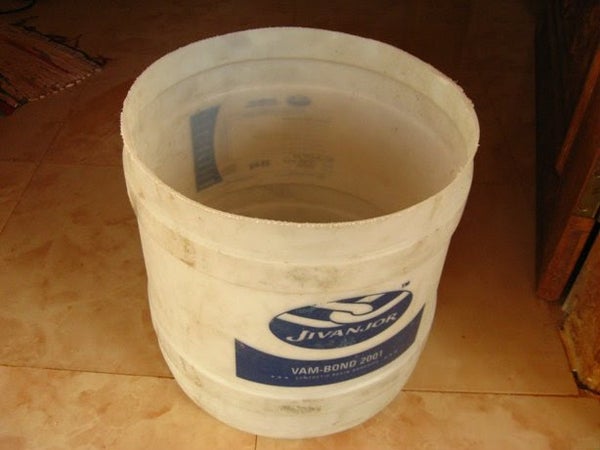
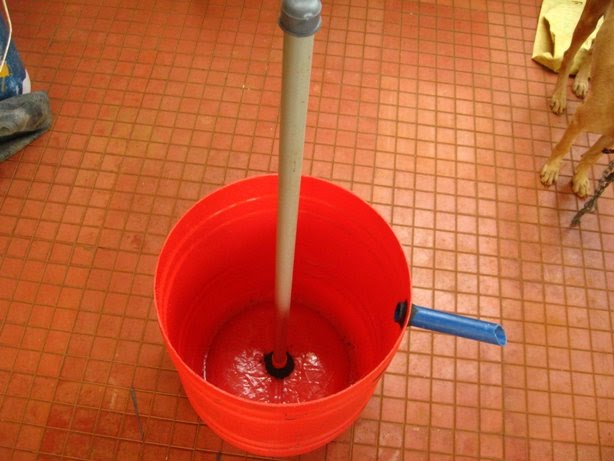
The smaller white can, which will act as the gas holder fits inside the red one. Here, again removed the top of the white can, also with the help of a hack saw blade:
Step 3:
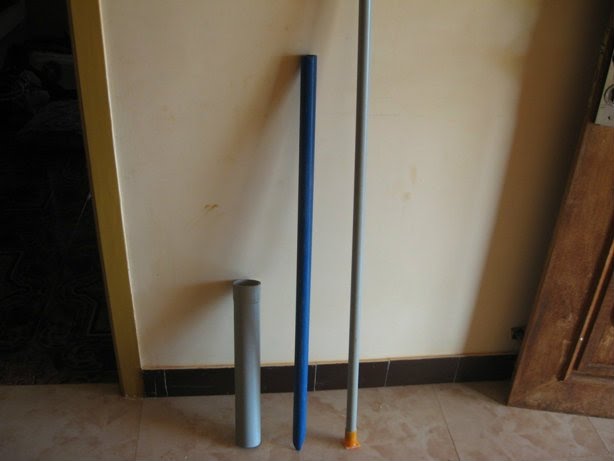
64 mm, 32 mm and 25 mm dia PVC pipes which will be used for feeding the kitchen waste, guide pipe for the gas holder and guide pipe fixed with the digestion chamber respectively. A small piece of 32 mm dia pipe will be used as outlet for the slurry:
Step 4:
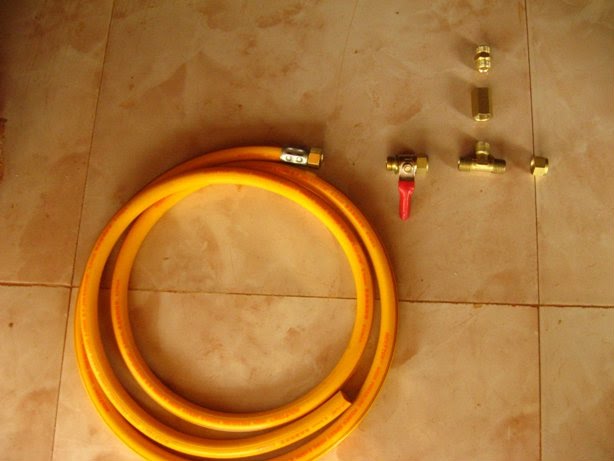
- items required for the gas delivery system: got these items from a hardware store
1. Ball valve : one no ( to adjust the gas flow)
2. 'T' joint : one no ( to connect the gas holder and the ball valve)
3. Cap to block one end of 'T' joint : one no
4. Coupling or Adapter : one no (to connect vertical end of 'T' in to the gas collector)
5. Nipple: one no (added to the coupling in to the gas collector)
6. Gas pipe (flexible) : two meters
7. Barb : one no (fitted with the gas pipe, to join with the Ball valve)
8. Clip : one no (used for crimping the barb with the gas pipe and make it leak-proof)
9. Teflon tape : one roll (used as thread tape in all joints)
Step 5:
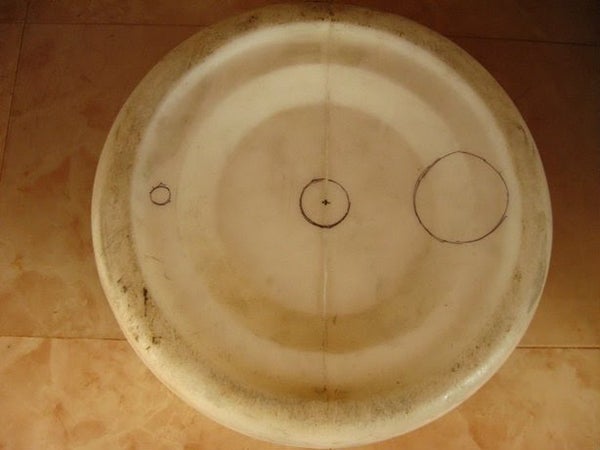
Here I have marked the cuts to be made in the bottom of the gas collection tank. The smaller hole on the left for gas delivery system, center hole for fixing the 32 mm guide pipe and 64 mm hole for fixing the waste feeding pipe on the right side. Made these holes with the help of a sharp knife and hack saw blade.
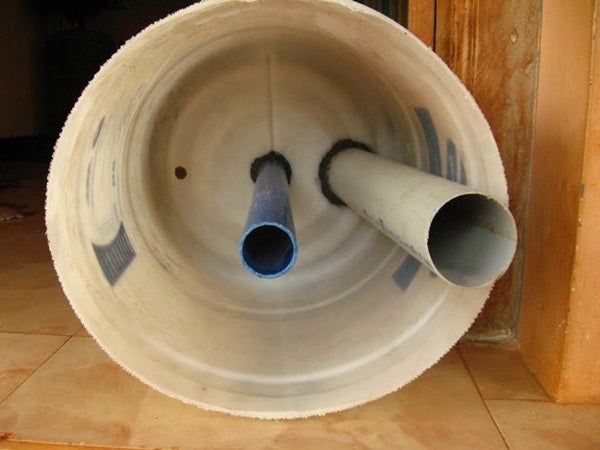
The next image is Inside of the gas holder showing the 32 mm guide pipe (center) and the 64 mm feeding pipe fixed with M-seal
Step 6:
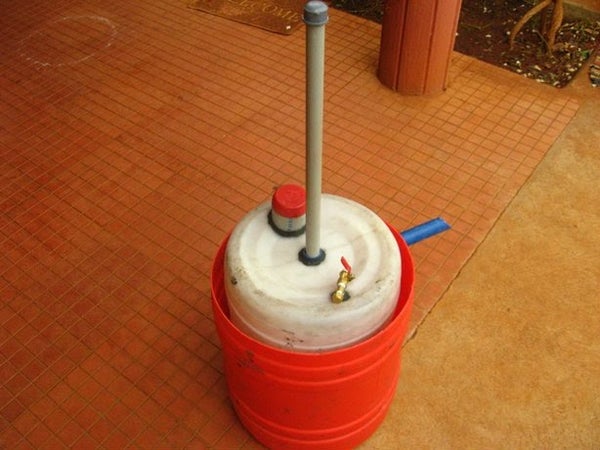
Top view of the gas holder showing the feeding pipe, central guide pipe and the gas delivery system: I have closed the feeding pipe withe an old lid (red one). This will facilitate opening the feed pipe only during feeding the system.
Step 7:
Digestion tank fitted with the central guide pipe and the outlet pipe for the slurry:
Step 8:
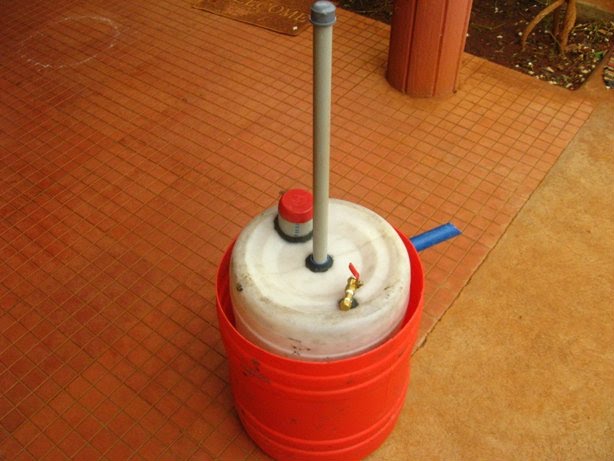
Completed unit. I have removed the gas pipe, so that the joints will get cured without any stress:
Wait for a day or two before feeding the system, allowing all joints to get cured and become leak-proof.
Initially, cow-dung mixed with water will be fed in to the system, which will start the gas formation process. Subsequently, food waste, decomposable organic material and kitchen waste will be diluted with water and used to feed the system. The gas holder will rise along the guide pipes based on the amount of gas produced. We can add some weight on top of the gas holder to increase the gas pressure. When we feed the system, the excess digested slurry will fall out through the outlet pipe, which can be collected, diluted and used as organic manure.
Initial production of gas will consist of oxygen, methane, carbon di oxide and some other gases and will not burn. These gases can be released to the atmosphere by opening the ball valve at least three / four times.
Subsequent gas will consist of about 70 to 80 percent methane and the rest carbon di oxide, which can be used in a single bio-gas burning stove or a Bunsen burner.
Total cost of this proto-type system is about one thousand Indian Rupees (about 20 dollars)
This is a basic prototype of a Bio-gas system using the food waste, decomposable organic material and kitchen waste to produce gas. An one thousand litre capacity Digestion tank will be sufficient for a small household for daily cooking purpose. The bigger commercial models provide a water seal between the digestion tank and gas holder tank.
You can get further information on kitchen waste based mini Bio-gas plant at the following links:
http://e-biogas.blogspot.in/
http://www.samuchit.com/index.php?op...id=8&Itemid=10
Step 9:
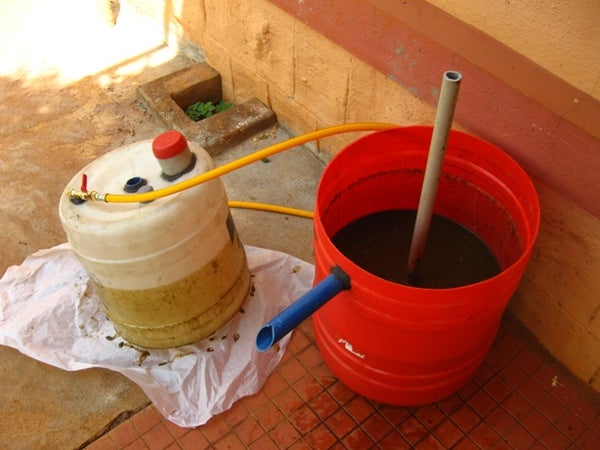

Charged the digester tank with cow dung diluted with water. Placed the gas holder tank and left it for two three days. The cow dung slurry started the process of gas forming.
Gas formation started and the gas holder tank gets lifted up. I have placed two bricks on top of the gas holder to get more gas pressure.
Step 10:
Note for students who are doing this as their School Project:
1. Take guidance from your teacher while using the gas in a stove or Bunsen burner.
2. Collect surplus food and wastage during lunch, dilute and feed the system.
3. Fruit peels, extracted tea powder, waste milk and milk products can also be used for feeding the system.
4. DO NOT USE eggshells, Onion peels or left-over bones in this system as they will affect the efficient functioning of the system
5. Plant some seedling
6. while feeding, collect the slurry from the outlet, feed the seedlings and watch them grow
Mini Bio-gas Plant Using Food Waste, Decomposable Organic Material and Kitchen Waste : 10 Steps (with Pictures) - InstructablesIf you're gonna fight, fight like you're the third monkey on the ramp to Noah's Ark... and brother its starting to rain. Join our efforts to Secure America's Borders and End Illegal Immigration by Joining ALIPAC's E-Mail Alerts network (CLICK HERE)


 Reply With Quote


Is Trump's Third World Immigration Ban A Precursor To The...
11-28-2025, 08:56 PM in illegal immigration News Stories & Reports