

Results 10,421 to 10,430 of 11756
 226Likes
LinkBacks (?)
-
12-26-2016, 11:32 AM
-
09-02-2016, 05:39 PM
-
whole garden made with pallets!! Love it!! | Pallets | Pinterest | Pallets, Pallets Garden and Wooden Pallets
Refback This thread03-06-2016, 11:30 AM -
10-20-2015, 05:29 PM
-
06-12-2015, 08:00 PM
-
02-26-2015, 01:58 PM
-
01-05-2015, 04:13 PM
-
12-19-2014, 10:19 AM
-
EMERGENCY: HUGE FEMA PANDEMIC EXERCISE IN USA IN NOVEMBER, INTERNET SHUT DOWN PART OF EXERCISE | Prepare4Survival
Refback This thread12-03-2014, 10:39 PM -
Off Grid World ? Ugly Duckling Shipping Container Home Built by Artist Is a Beautiful Swan on the Inside
Refback This thread11-25-2014, 03:10 PM -
11-17-2014, 10:59 PM
-
11-13-2014, 11:18 AM
-
11-09-2014, 02:54 PM
-
10-28-2014, 11:38 PM
-
10-26-2014, 05:54 AM
-
10-16-2014, 11:28 AM
-
10-03-2014, 01:25 PM
-
10-02-2014, 09:16 PM
-
09-26-2014, 07:00 PM
-
09-26-2014, 01:56 PM
-
09-19-2014, 04:46 PM
-
09-13-2014, 05:49 AM
-
09-05-2014, 01:52 PM
-
09-01-2014, 09:39 AM
-
08-30-2014, 06:29 PM
-
08-10-2014, 06:29 AM
-
08-04-2014, 05:07 PM
-
07-23-2014, 11:14 AM
-
New Evidence on Expiration Dates | Medical Preparedness | Doom and Bloom (TM) | Doom and Bloom (TM)
Refback This thread07-22-2014, 10:10 AM -
07-18-2014, 08:37 PM
-
07-15-2014, 04:57 PM
-
07-11-2014, 01:40 AM
-
04-22-2014, 11:14 AM
-
04-18-2014, 12:57 PM
-
04-18-2014, 10:10 AM
-
04-14-2014, 12:18 AM
-
04-12-2014, 02:28 AM
-
03-02-2014, 11:43 PM
-
12-24-2013, 11:59 PM
-
12-07-2013, 11:04 PM
-
kitchen | Cob
Refback This thread11-25-2013, 03:24 PM -
10-22-2013, 10:25 PM
-
Apple Pie Braid | Sweets
Refback This thread09-26-2013, 07:58 AM -
09-02-2013, 04:44 PM
-
5 Reasons Why You May have to Bug Out Even Though You Don’t Want to | The Apartment Prepper's Blog
Refback This thread08-23-2013, 03:20 PM -
06-27-2013, 06:30 AM
-
06-23-2013, 08:11 PM
-
06-17-2013, 11:21 PM
-
05-24-2013, 05:06 PM
-
To Eat / BASIC LIST / SUGGESTED ITEMS FOR LONG TERM SURVIVAL - Page 275 - ALIPAC
Refback This thread05-01-2013, 03:49 AM
Thread Information
Users Browsing this Thread
There are currently 1 users browsing this thread. (0 members and 1 guests)
 LinkBack URL
 About LinkBacks
-
07-27-2025, 04:56 AM #10421Senior Member


- Join Date
- Aug 2018
- Posts
- 93,524
How to make a TRIP-WIRE ALARM - YouTube
How to make a TRIP-WIRE ALARM
11M views
Apr 6, 2016
44K
MrGear
11.5M subscribers
If you're gonna fight, fight like you're the third monkey on the ramp to Noah's Ark... and brother its starting to rain. Join our efforts to Secure America's Borders and End Illegal Immigration by Joining ALIPAC's E-Mail Alerts network (CLICK HERE)
-
07-27-2025, 05:01 AM #10422Senior Member
- Join Date
- Aug 2018
- Posts
- 93,524
"Glow Stick Booby Trap" by Survival Solutions USA - YouTube
"Glow Stick Booby Trap" by Survival Solutions USA
10K views
Sep 16, 2013
92
Survival Solutions USA
191 subscribersIf you're gonna fight, fight like you're the third monkey on the ramp to Noah's Ark... and brother its starting to rain. Join our efforts to Secure America's Borders and End Illegal Immigration by Joining ALIPAC's E-Mail Alerts network (CLICK HERE)
-
07-27-2025, 05:12 AM #10423Senior Member
- Join Date
- Aug 2018
- Posts
- 93,524
 Projects
Contests
Teachers
Log InSign Up
10 HP Hovercraft
By mickydee in WorkshopWoodworking
525,785
999
248Featured

Save PDF
Introduction: 10 HP Hovercraft

 By mickydeeFollow
More by the author:


About: My name is Roland MacDonald, my friends call me Mac I am a retired but not bored engineer My great joy is my workshop, a two car garage with heat and air. I am a private pilot with 1800 hours flying time I hav… More About mickydee »
I was looking for a project that my Grandson and I could build. together. We decided on a hovercraft after watching a TV special. Knowing absolutely nothing about hovercraft we researched the web on the subject and found the Universal Hovercraft website to be the best source.
We had an old 10 HP Briggs horizontal shaft electric start engine from an old riding mower that looked like it would fit the bill. We bought the plans for their UH10F craft. We liked it because it only uses one motor. Most hovercraft use a separate motor for lift and thrust. This one directs approximately 1/3 of the thrust air to provide both lift and inflating the skirt. Most of the materials could be found at the local builders supply.
The only parts we needed to buy from Universal Hovercraft were the Plans, propeller, propeller hub, and the skirt material. Although it busted our $500 budget we decided to purchase their materials kit which included all the epoxy, fiberglass , screws, and glue. The skirt is the heart of this thing and we didn't want to save penny's on something this critical. It was a fun project for the both of us. It would be a great Father and Son project.
Step 1: TOOLS AND MATERIALS LIST

Tools required
Table saw to cut 4 X 8 Foam and plywood
Keyhole saw or saws all to cut openings for air ducts
Scroll saw for plywood duct and body peices
Shop vac for vacuum blanket
Two to four saw horses
Several plastic squeegees
Basic hand tools
Materials list
From home depot cost about $80
For the hull
1 sheet 1" white Styrofoam
4 sheets 2" blue construction foam 4 x 8
4 sheets 1 /8" plywood (doesn't have to be marine)
2 12' lengths 1 x 2 lumber( pine is fine)
Hardware kit from Universal Hovercraft $349
This kit contains every little thing you will need to complete this project including
Plans, fiberglass, skirt, glue , skrit screws,epoxy, and a 24' steering cable
DRIVE KIT from Universal Hovercraft $159
Includes propeller, hub, and bushings
MISC. $20
Small roll plastic sheeting 2 to 4 mills
Paint
Total cost of the project was around $600 plus the cost of a new or used motor.
Step 2: BUILDING THE HULL
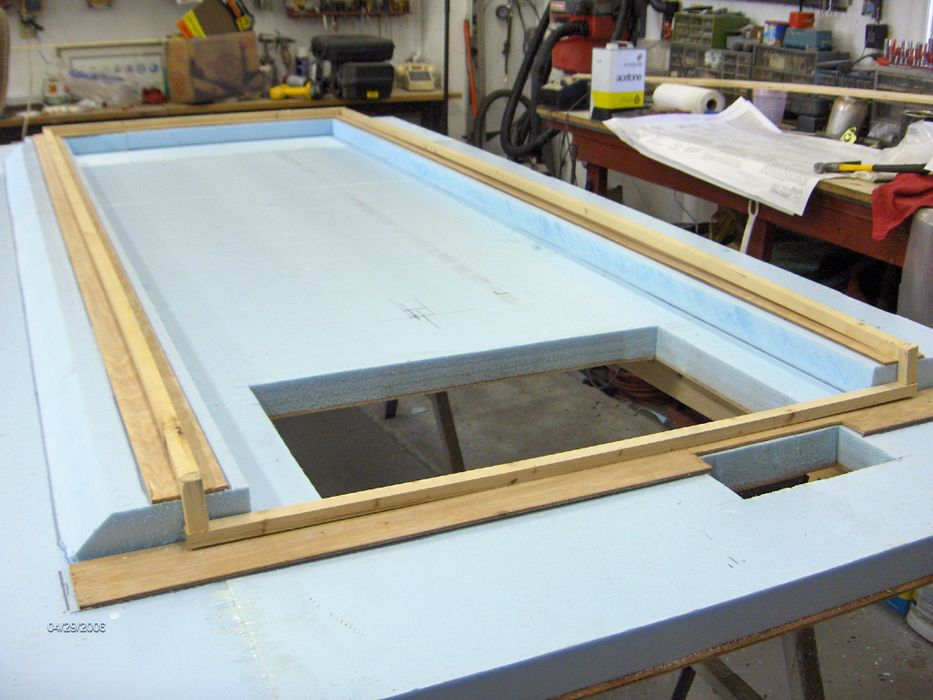
Cut the 2" foam to make a 5' X10' rectangle. This dimension will provide a floatation of 600 lbs. If you need to support more weight double up on the foam. It won't weight much more. Skin the top side with the 1/8" plywood. Cut and glue the plywood strips to the foam, and then glue the 1 x 2 strips to the plywood. With a scroll saw cut the two holes for the lift, and skirt air.Glue a 6" wide piece of plywood across the hull where you will instal the motor support post.
Step 3: VACUMN BAGGING
The underside of the hull must be waterproof . The entire underside is covered with fiberglass cloth and epoxy. This can get a little messy if you are not careful. It is important to get all the air bubbles out before it dries. A simple vacuum blanket pulls everything down tight. Don't let this scare you it is really quite easy. First cover the freshly epoxied fiberglass with a layer of thin plastic sheet. Then cover the sheet with a blanket.
This way the blanket won't stick to the fiberglass. Cover the blanket with a larger piece of plastic sheeting and tape it down to the floor all around the edges Make a small slit in the plastic and plug in the vacuum hose from your shop vac. Turn it on and watch the vacuum pull it down to the floor. If it won't pull a vacuum check for leaks in the tape. I ran the vacuum for about two hours and did a great job. When you take it apart the plastic will pull of easily as it will not stick to the fiberglass
Step 4: Underside of the Hull Is Now Complete

This is what the underside of the hull should look like
Step 5: MAKING THE DUCT

The duct is made from less dense 1" white Styrofoam. The plans show you how to lay out a curving arc that will wrap around the plywood plugs in the middle. Start by screwing together the two plywood discs to spacers the width of the duct. Wrap thee discs with a band of 1/8"plywood. After you cut the ducts to the proper shape (arc) Cut kerfs 3/4" deep all around the inside of the ducts so they will bend around the form easily. Be sure and maintain the exact centers of the discs. Later you will drill them out to the size of your motors crankshaft. Don't separate the duct from the form at this time. When it gets to be time to locate the duct to the hull these holes will let you mount the duct perfectly in line with your engine shaft. The plans go into great detail on this step and we didn't have any problems with it.
Step 6: MAKING THE MOTOR SUPPORT POST

Cut a 2 x 4 piece of pine to the length specified in the plans And put it in the hole cut into the hull (center line of craft) Use plenty of epoxy for this. Cut a base plate from 3/4" plywood for mounting the engine. Fit rear legs from pine and drill and screw braces everywhere you can. This will keep vibration to a minimum I used gorilla glue in every joint. I put epoxy lay ups all around the post for added strength.
Step 7: MOUNTING THE DUCT

Temporarily mount the motor in place and drill the plywood disc to the size of your crank shaft. Set the duct in place and align it up with the motor crank. Use shims to assure good alignment. When you are satisfied that it looks straight anchor the duct in place with spray can expanding foam. Put it on heavy as it can be shaped or removed easily with a knife or file. When it hardens you should have a rigid mounted duct that is aligned with the motor crank shaft lined up with the center of the duct. At this time you can remove the plywood discs from the duct by removing the screws that hold the spacers. It should pop right out.
Step 8: THE PROPELLER

You can buy the prop two ways, either finished or unfinished. You can save a lot of money by finishing your prop your self.
First slide the prop onto the crank without the hub to see if it fits inside the duct without binding. A duct is most efficient when the prop fits closely inside the duct. Be very careful when removing tip material, it's easy to cutoff but hard to put back . Once you have the tip clearance set you can begin to sand the blades with a power sander and finish by hand. Once you get it smooth you MUST balance it to avoid vibration.
Hang the prop on a rod held in a vise to see which blade is heavier than the other. Don't short cut by shortening the tips. Just keep sanding the blades. Most props are pretty close when they arrive so it is not an undaunted task. Once it is balanced give it a couple coats of paint to preserve it. It's a good idea to paint a white band at the tips for safety's sake. By now the foam is hard so you can cut the bottom of the duct with a sabre saw to conform with the openings in the hull for lift air. Now is a good time to trial fit the prop and hub to the motor to make sure it runs true inside the duct. The motor should be bolted down securely. Turn the prop over slowly by hand. Check for at least 1/8" clearance all around. You can adjust by putting small shims under the motor mounts if needed.
Step 9: BUILD THE AIR CHAMBER
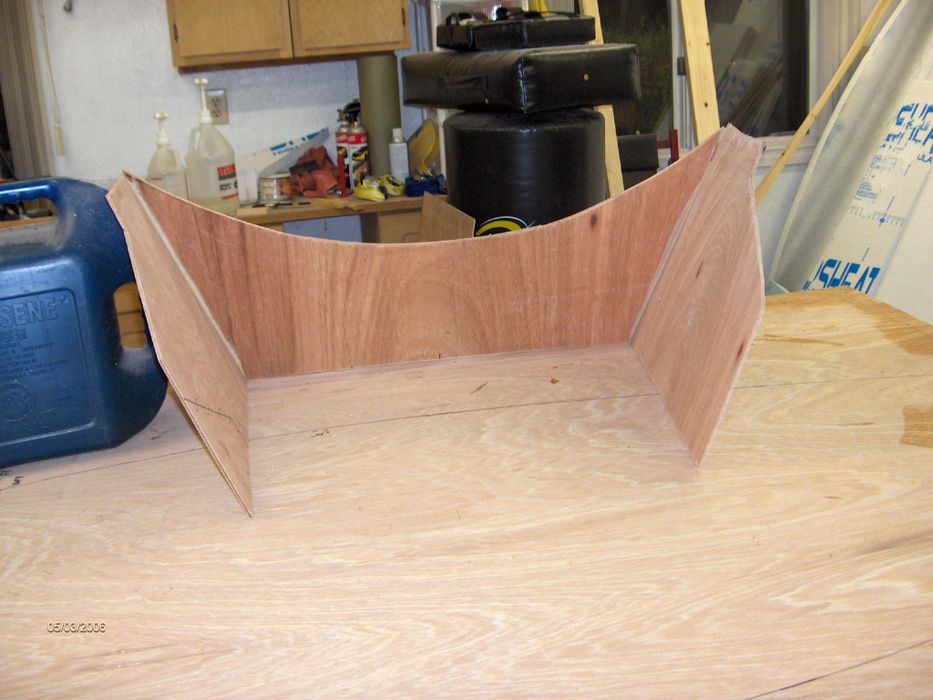
The purpose of the air chamber is to divide the air flow between lift and thrust. The picture doesn't show it in it's proper place. We just needed a flat area to glue and fiberglass it together It is made from 1/8" plywood
Step 10: Install the Air Chamber

Slide the three sided chamber in place and glue or fiberglass in place. I prefer to use fiberglass when ever possible. When the bond is set install the top of the box. You will probably have to put a weight on the rear to hold it tightly to the bottom frame. When it is dry fiber glass the edges and you are done with the air box
Step 11: THE RUDDERS


The rudders are cut from 1" foam. Drill holes in the top and bottom to fit dowel pins. Glue the dowel pin in the bottom. The top pin just drops in to allow for removal of the rudder. i used a belt sander to fashion an airfoil to make them lighter and more aerodynamic. Don't make them too thin. Cover the rudders with one layer of fiberglass to give them strength. Glue small drilled blocks at the top of the duct, and the air chamber to receive the dowel pins. Connect the two rudders together at the bottom dowel pin with a short length of aluminum or wood stock. This is where the steering cables are attached. Run the cables through the air box and route them through eyelets to the control stick. Don't terminate them yet until you build the body. We used a 2' long piece of
of 1" PVC for a control stick.
Step 12: MAKE IT LOOK GOOD WITH a BODY

Start by laying out the basic shape with a marking pen and screwing 3/4" stock to the line. The 1/8" plywood bends easily to conform to the shape. Next clamp and glue the 3/4" stringers to the top. Fit a 2 x 4 between the sides to form a dash board.This is a good time to attach the throttle cable to either the dash or the side strips. Later on we put a lanyard connected to the kill switch in the dash. This is a requirement if you want to run it in any sanctioned races. Cover the top with a plywood sheet and fit some scrap foam to form the nose piece. Run the steering cables through the sides and attach them to the stick. Make a little seat that feels comfortable. We padded ours with some foam and scrap vinyl. Paint the whole craft with a couple coats of any paint you may have laying around. We chose white because it stays cool even in direct sunlight. A little trim color makes it unique to you and really makes it stand out. Now that it is painted is a good time to add a screen to stop wayward hands and arms from geting into the prop area. That could ruin a good day. We had some left over wire fencing and fashioned a guard from that. We also added four lifting handles in the corners to aid in lifting it on and off a trailer.
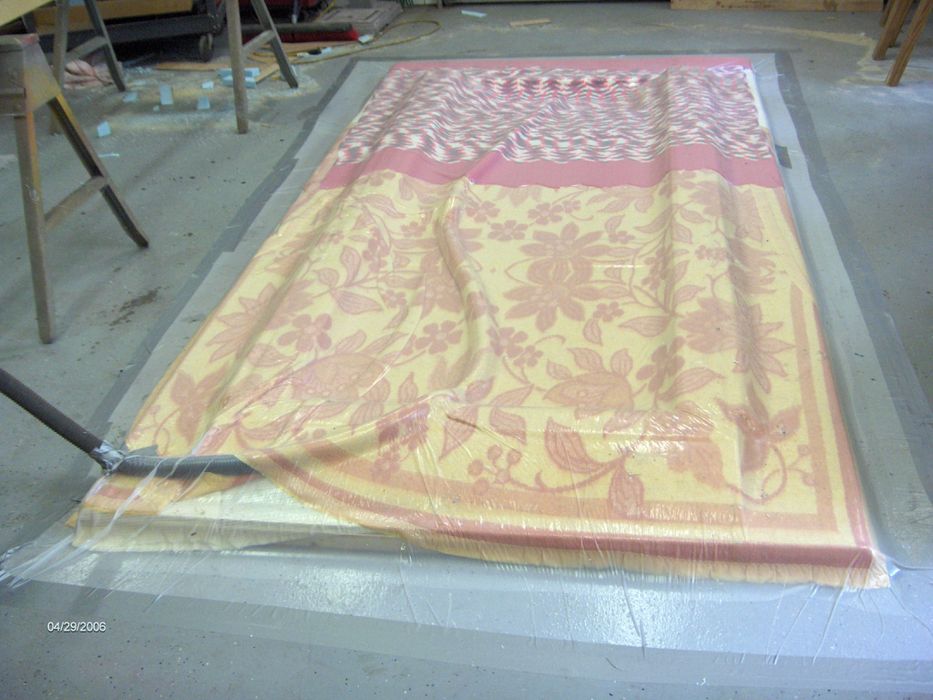
Step 13: THE SKIRT
I am sorry that I didn't take pictures of the skirt installation but the plans go into great detail on this step. I put the craft up on horses to make it easy to get at the inside attachment. The key to a good skirt is in the corners. They are over lapped and glued with the special glue tat is supplied by Universal Hovercraft. The skirt is held in place by 200 stainless screws and washers. The only tricky part is the screws around the rear of the air box. The skirt is very rugged and we have not had any trouble with it.
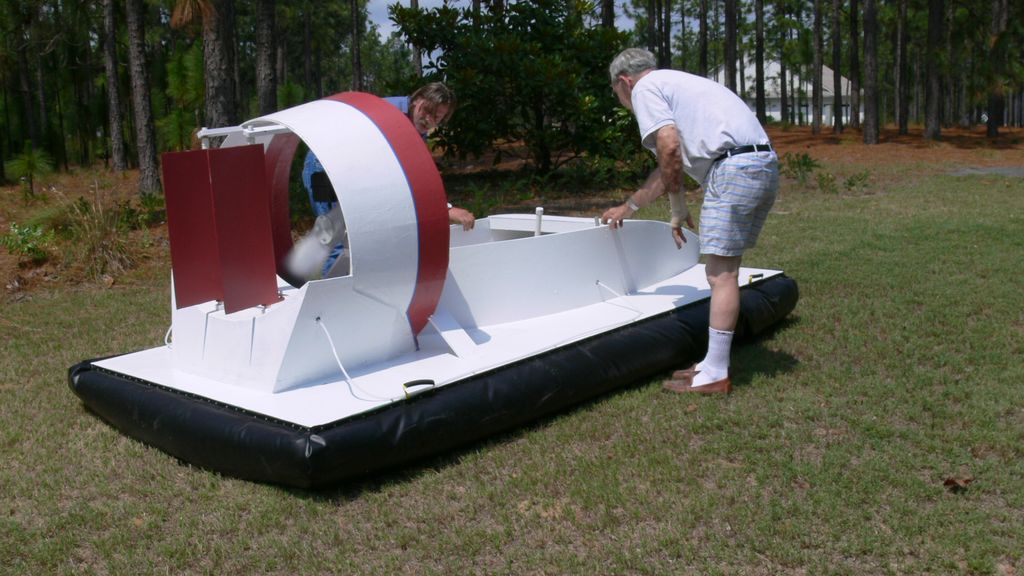
Step 14: THE BIG DAY THE TEST DRIVE

The first thing we did was to drag it outside and start it up to check on how it hovered. The skirt filled up with air at a little more than idle and we could push it around easily. We gave it more throttle and it began to move forward. My grandson got in first and drove it all around the back yard. It seemed to respond good to steering control but we learned that it tends to side slip if you are going too fast when you go into the turn. Next I got in and also had good results. Time for the water tests. We took the hovercraft to my best friends house, he lives on a 1000 acre lake and has a small beach to launch from. The craft floats well on it's own and with a person that weighs 200 lbs. I elected to be the test pilot and put on a life jacket for safety. Starting the engine brought it up to a nice hover. Increasing the throttle a bit started the craft moving forward and away from the beach. More throttle and it began to move forward more briskly. It seemed to handle really good. at full throttle until I tried my first turn. To my surprise I started to go sidewise and then backwards. With a little experience I learned to lean my body into the turns and reduce throttle slightly and was able to negotiate the turns much better. I don't know how fast I was going because I don't have a speed indicator, but I left a pretty good wake. Leaning forward seemed to increase the speed. When my grandson took his turn he seemed to go a little faster than me and he was riding more level than I was. I think maybe the seat should be a little more forward. We really had a blast and 8 or10 people of all sizes and weights tried it out. The heaviest guy weighed around 300 lbs. Although it floated well, he could not get the performance that we could. Under 225 lbs. was O.K.
We played for 2 hours and burned two tanks of gas and didn't have any problems. All in all it was a great test day, This craft is fun, easy to drive, and proved to be very safe. Our youngest pilot was 10 or 12 years old . My only other comment would be to install a quieter exhaust as the neighbors were not impressed with the noise. It attracted a lot of attention as many people had never seen a hovercraft before.
Step 15: A SHORT VIDEO
Some how I misplaced the longer video
HPIM0656
10 HP Hovercraft : 15 Steps (with Pictures) - Instructables
Last edited by Airbornesapper07; 07-27-2025 at 05:15 AM.
If you're gonna fight, fight like you're the third monkey on the ramp to Noah's Ark... and brother its starting to rain. Join our efforts to Secure America's Borders and End Illegal Immigration by Joining ALIPAC's E-Mail Alerts network (CLICK HERE)
-
07-27-2025, 05:20 AM #10424Senior Member
- Join Date
- Aug 2018
- Posts
- 93,524
Installing Two "Big Boy" Bomb Shelters "Side-by-Side" - YouTube
Installing Two "Big Boy" Bomb Shelters "Side-by-Side"
3.7M views
Oct 5, 2021
11K
Atlas Survival Shelters
638K subscribersIf you're gonna fight, fight like you're the third monkey on the ramp to Noah's Ark... and brother its starting to rain. Join our efforts to Secure America's Borders and End Illegal Immigration by Joining ALIPAC's E-Mail Alerts network (CLICK HERE)
-
07-27-2025, 05:24 AM #10425Senior Member
- Join Date
- Aug 2018
- Posts
- 93,524
Flir TK Scout Thermal Monocular Review - YouTube
Flir TK Scout Thermal Monocular Review
317K views
Oct 13, 2016
2.8K
sootch00
1.51M subscribersIf you're gonna fight, fight like you're the third monkey on the ramp to Noah's Ark... and brother its starting to rain. Join our efforts to Secure America's Borders and End Illegal Immigration by Joining ALIPAC's E-Mail Alerts network (CLICK HERE)
-
07-27-2025, 02:12 PM #10426Senior Member
- Join Date
- Aug 2018
- Posts
- 93,524
Master Carpenter Hack: How to Fasten Wood to Concrete with Standard Construction Screws - YouTube
Master Carpenter Hack: How to Fasten Wood to Concrete with Standard Construction Screws
1.7M views
Jan 17, 2017
27K
Next Level Carpentry
359K subscribersIf you're gonna fight, fight like you're the third monkey on the ramp to Noah's Ark... and brother its starting to rain. Join our efforts to Secure America's Borders and End Illegal Immigration by Joining ALIPAC's E-Mail Alerts network (CLICK HERE)
-
07-27-2025, 02:16 PM #10427Senior Member
- Join Date
- Aug 2018
- Posts
- 93,524
How to Install Tapcon Masonry Concrete Screws | Fasteners 101 - YouTube
How to Install Tapcon Masonry Concrete Screws | Fasteners 101
411K views
Feb 6, 2017
1.9K
Albany County Fasteners
37.4K subscribersIf you're gonna fight, fight like you're the third monkey on the ramp to Noah's Ark... and brother its starting to rain. Join our efforts to Secure America's Borders and End Illegal Immigration by Joining ALIPAC's E-Mail Alerts network (CLICK HERE)
-
07-27-2025, 02:21 PM #10428Senior Member
- Join Date
- Aug 2018
- Posts
- 93,524
Solo Overnight Building a Concrete Block Shelter In the Woods and a Ribeye Skillet - YouTube
#corporalscorner #shawnkelly #campinginthewoods
Solo Overnight Building a Concrete Block Shelter In the Woods and a Ribeye Skillet
477Kviews
Feb 13, 2022
24K
Corporals Corner
1.1M subscribersIf you're gonna fight, fight like you're the third monkey on the ramp to Noah's Ark... and brother its starting to rain. Join our efforts to Secure America's Borders and End Illegal Immigration by Joining ALIPAC's E-Mail Alerts network (CLICK HERE)
-
07-27-2025, 02:49 PM #10429Senior Member
- Join Date
- Aug 2018
- Posts
- 93,524

- Home
- Contact
- Categories
- T.P.P Disclaimer
- Equipment & Reviews
- T.P.P. Disclosure
- Mission Statement
- Privacy Policy
Why Keep Those Old Cook Books?
How Your local Grocer is Told to Prepare for Disaster
DIY Water Filter Distiller
- By Storm in Bugging In, DIY, Frugal, Hunker Down Prepping, Off Grid, Prepping, Recycle, SHTF, Survival, Water
Share the knowledge!
DIY Water Filter Distiller

Photo: ask a prepper
We all worry about clean water after any disaster manmade or natural. Water is the essence of life. No matter which in which country, state, or region you reside in, water is going to be a priority find during a crisis. You may think ahh but there is a lake just down the road, or it rains all the time here, etc.. But during a disaster you wont want to drink from any source without filtering it. No matter the crisis everything around you is more than likely become contaminated.
We should always be able to make our water safe and one way of doing it is to distill it.
This DIY distiller could make all the difference. See it and how you can make one yourself at our featured blog from Ask a Prepper linked below
How to Make Your Own Distiller at Home To Filter And Desalinate Water
 This is an aggregated site. Please be aware some of the sites we link you to could have pop ups. We have no control over them. However, we will never link you to a site that requires you to make any purchase to view the blog.
Please read our disclaimer. We provide you with information from various sites all over the world. The authors expressed opinion isnt necessarily that of The Prepared Page or its staff. Our intent is to bring you the information. Use your common sense and your own best judgment when using any information contained within the blogs.
While youre here check out some of those other posts you may find them interesting!!!
Some posts may contain affiliate links.
You may also like:
DIY Your Own Rain Barrel System
Convert a Work Van into a DIY Camper
DIY Vertical Garden Planter
12 Wild Medicinal Plants You Should Harvest This Fall
DIY Well Installation
18 Alternatives to a Root Cellar
DIY Biodiesel
25 Powerless Appliances for The Homestead Kitchen
DIY Water Filter Distiller - The Prepared Page
If you're gonna fight, fight like you're the third monkey on the ramp to Noah's Ark... and brother its starting to rain. Join our efforts to Secure America's Borders and End Illegal Immigration by Joining ALIPAC's E-Mail Alerts network (CLICK HERE)
-
07-27-2025, 02:55 PM #10430Senior Member
- Join Date
- Aug 2018
- Posts
- 93,524
- Home
- Contact
- Categories
- T.P.P Disclaimer
- Equipment & Reviews
- T.P.P. Disclosure
- Mission Statement
- Privacy Policy
10 Items to Include in Your Car Kit
500+ Camp Fire & Dutch Oven Recipes (Printable)
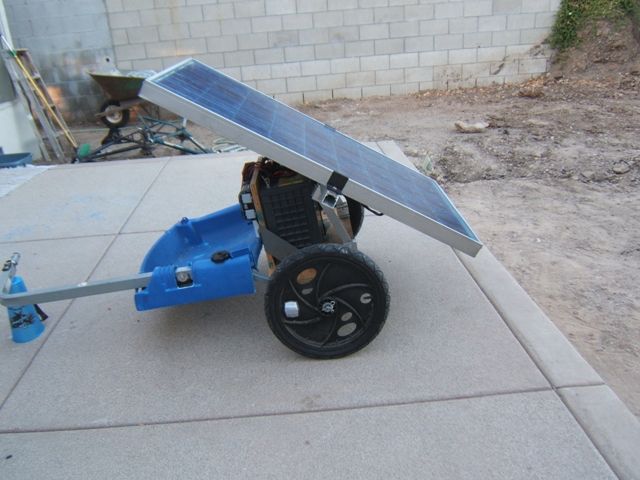
DIY Portable Solar Generator
Share the knowledge!
DIY Portable Solar Generator
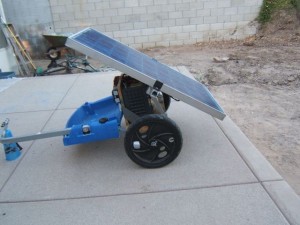
Photo from by veggiecycle
Solar power for a SHTF situation is going to be essential. These instructions are more of an overview for a simple system built with what was available. However, it is a good model for a simple Off Grid solar generator system thats got a little bit of kick behind it. The builder used the power from this trailer to operate several small appliances and odd things that we dont always have an power outlet available for like Christmas lighting.
This little generator can be attached to a bike for easier transportation the battery does give it more weight then you would want to carry. In an non-SHTF scenario think of how this could be used during football season for tailgating!
Post SHTF the ideas are unnumbered! For the instructions read at the titled link below
DIY Portable Solar Generator
 This is an aggregated site. Please be aware some of the sites we link you to could have pop ups. We have no control over them. However, we will never link you to a site that requires you to make any purchase to view the blog.
Please read our disclaimer. We provide you with information from various sites all over the world. The authors expressed opinion isnt necessarily that of The Prepared Page or its staff. Our intent is to bring you the information. Use your common sense and your own best judgment when using any information contained within the blogs.
While youre here check out some of those other posts you may find them interesting!!!
Some posts may contain affiliate links.
You may also like:
Convert a Work Van into a DIY Camper
18 Alternatives to a Root Cellar
DIY Biodiesel
DIY Vertical Garden Planter
12 Wild Medicinal Plants You Should Harvest This Fall
DIY Well Installation
DIY Ammo Box Grill
DIY Portable Solar Generator - The Prepared Page
If you're gonna fight, fight like you're the third monkey on the ramp to Noah's Ark... and brother its starting to rain. Join our efforts to Secure America's Borders and End Illegal Immigration by Joining ALIPAC's E-Mail Alerts network (CLICK HERE)


 Reply With Quote


Trump repeats call for Supreme Court to end automatic U.S....
06-11-2026, 11:05 PM in General Discussion