

Results 9,921 to 9,930 of 11801
 226Likes
LinkBacks (?)
-
12-26-2016, 11:32 AM
-
09-02-2016, 05:39 PM
-
whole garden made with pallets!! Love it!! | Pallets | Pinterest | Pallets, Pallets Garden and Wooden Pallets
Refback This thread03-06-2016, 11:30 AM -
10-20-2015, 05:29 PM
-
06-12-2015, 08:00 PM
-
02-26-2015, 01:58 PM
-
01-05-2015, 04:13 PM
-
12-19-2014, 10:19 AM
-
EMERGENCY: HUGE FEMA PANDEMIC EXERCISE IN USA IN NOVEMBER, INTERNET SHUT DOWN PART OF EXERCISE | Prepare4Survival
Refback This thread12-03-2014, 10:39 PM -
Off Grid World ? Ugly Duckling Shipping Container Home Built by Artist Is a Beautiful Swan on the Inside
Refback This thread11-25-2014, 03:10 PM -
11-17-2014, 10:59 PM
-
11-13-2014, 11:18 AM
-
11-09-2014, 02:54 PM
-
10-28-2014, 11:38 PM
-
10-26-2014, 05:54 AM
-
10-16-2014, 11:28 AM
-
10-03-2014, 01:25 PM
-
10-02-2014, 09:16 PM
-
09-26-2014, 07:00 PM
-
09-26-2014, 01:56 PM
-
09-19-2014, 04:46 PM
-
09-13-2014, 05:49 AM
-
09-05-2014, 01:52 PM
-
09-01-2014, 09:39 AM
-
08-30-2014, 06:29 PM
-
08-10-2014, 06:29 AM
-
08-04-2014, 05:07 PM
-
07-23-2014, 11:14 AM
-
New Evidence on Expiration Dates | Medical Preparedness | Doom and Bloom (TM) | Doom and Bloom (TM)
Refback This thread07-22-2014, 10:10 AM -
07-18-2014, 08:37 PM
-
07-15-2014, 04:57 PM
-
07-11-2014, 01:40 AM
-
04-22-2014, 11:14 AM
-
04-18-2014, 12:57 PM
-
04-18-2014, 10:10 AM
-
04-14-2014, 12:18 AM
-
04-12-2014, 02:28 AM
-
03-02-2014, 11:43 PM
-
12-24-2013, 11:59 PM
-
12-07-2013, 11:04 PM
-
kitchen | Cob
Refback This thread11-25-2013, 03:24 PM -
10-22-2013, 10:25 PM
-
Apple Pie Braid | Sweets
Refback This thread09-26-2013, 07:58 AM -
09-02-2013, 04:44 PM
-
5 Reasons Why You May have to Bug Out Even Though You Don’t Want to | The Apartment Prepper's Blog
Refback This thread08-23-2013, 03:20 PM -
06-27-2013, 06:30 AM
-
06-23-2013, 08:11 PM
-
06-17-2013, 11:21 PM
-
05-24-2013, 05:06 PM
-
To Eat / BASIC LIST / SUGGESTED ITEMS FOR LONG TERM SURVIVAL - Page 275 - ALIPAC
Refback This thread05-01-2013, 03:49 AM
Thread Information
Users Browsing this Thread
There are currently 2 users browsing this thread. (0 members and 2 guests)
 LinkBack URL
 About LinkBacks
-
06-21-2025, 03:16 AM #9921Senior Member


- Join Date
- Aug 2018
- Posts
- 93,977
Search
ADVENTURE
ROCK CLIMBINGRECOMMENDED GEAR
CANYONEERING
GEAR GUIDE
SCOUTING AND YOUTH GROUPS
SKITS
SONGS
FUNDRAISERS
SCOUTMASTER MINUTES
SERVICE PROJECT IDEAS
BACKPACKSABOUT US
BELAY DEVICES / HARDWARE
CAMERAS
CLOTHING
EMERGENCY GEAR
EVERYTHING ELSE
HARNESSES
HELMETS
ROPES
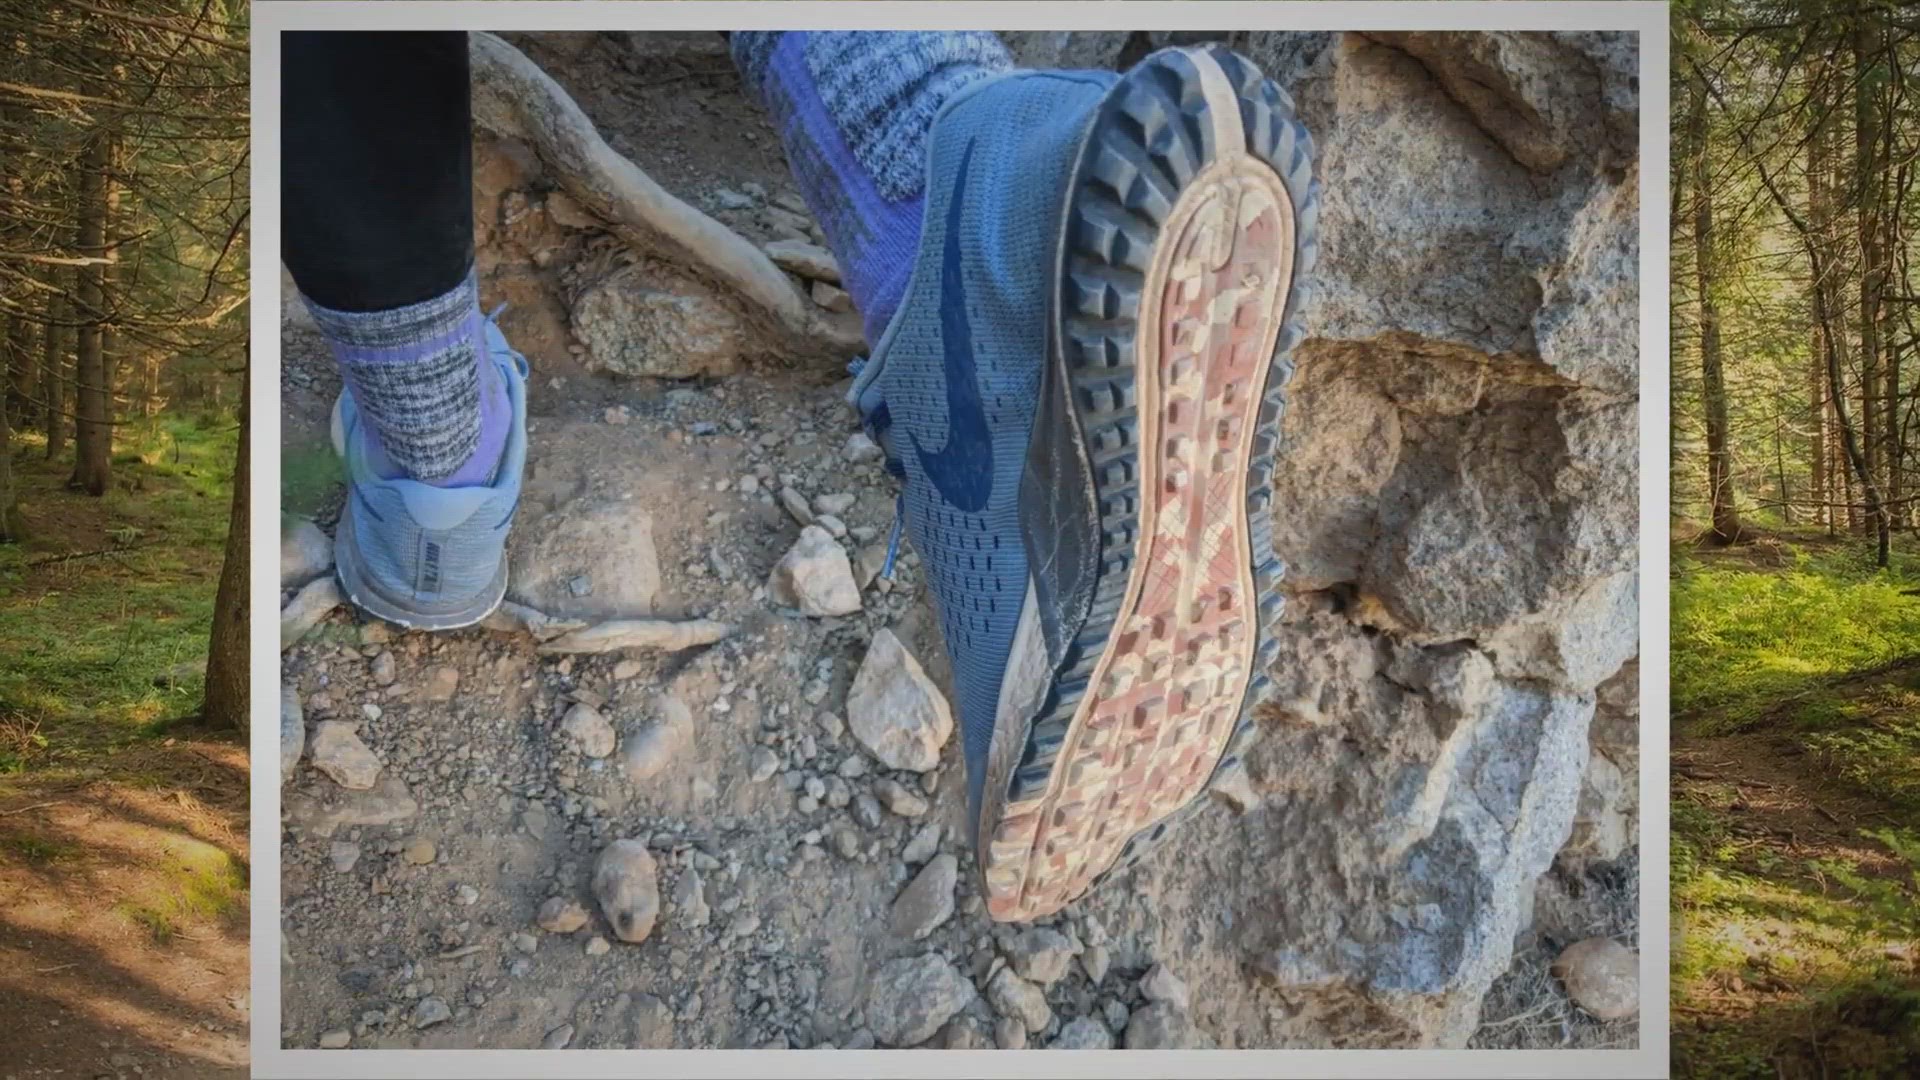
Why do Hikers use Walking Sticks? (And When Should You?)
Written by Jake Harmer
in Adventure, Gear Guide, Outdoor Gear
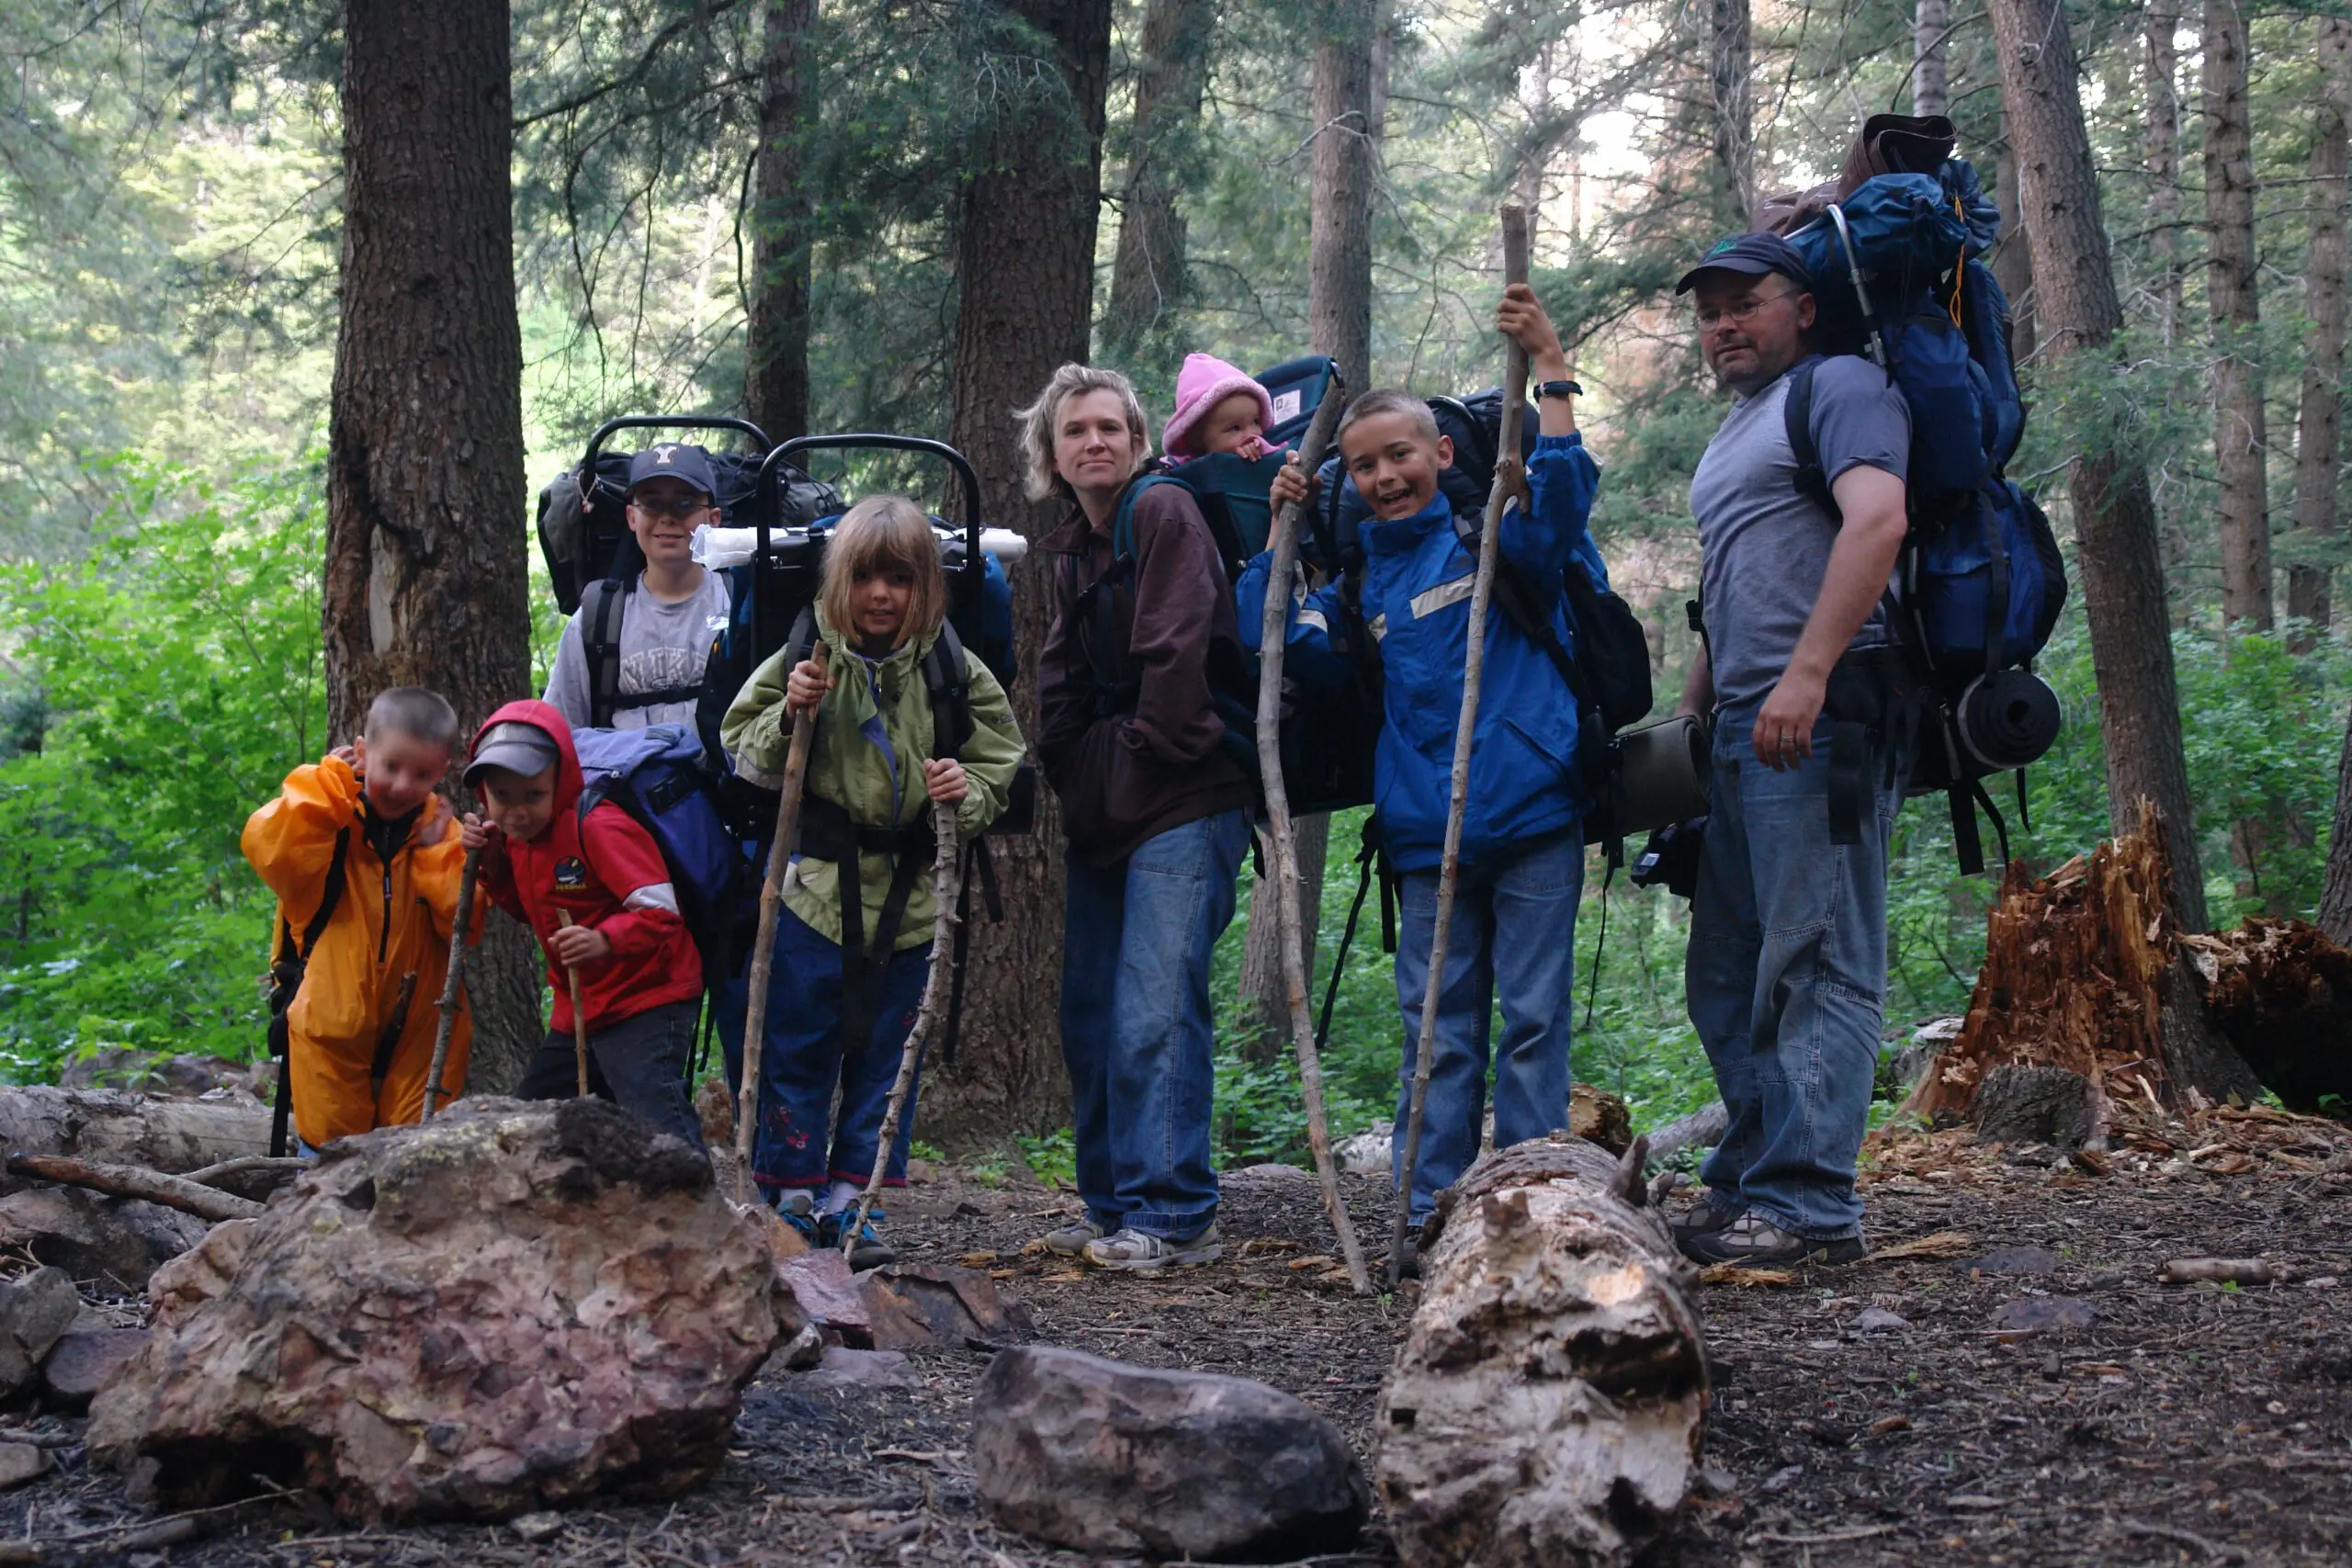
When you picture a hiker in your mind, or if youve ever drawn one, odds are you added a walking stick into his hand. If youve gone hiking though, you probably havent used a walking stick unless you pick up an actual stick from the trail or you do a hike like Zions Narrows where you rent gear. Walking sticks can be beneficial for hiking for certain people and in certain situations.
Hikers use walking sticks to help them balance on rough terrain, to help assure footing on slippery terrain, and to remove some of the impact off their knees. Hikers may only use walking sticks on certain hikes like when theres snow on the ground or the trail passes through rivers, or they might use walking sticks on all hikes as a fixed part of their kit.
Ill go into more detail below suggesting when its appropriate and even necessary to carry walking sticks with you on a hike so that they arent an additional annoyance or burden to the hiker.
What Hiking Sticks are Used For
There are three main reasons hikers may use walking sticks:
- For Balance on Rough Terrain
- To Help With Footing on Slippery Terrain
- To Lessen the Impact on Their Knees
Balance
When hiking on rough terrain like a scree field from a rock fall or a path less-traveled, it can be nice to go from two legs to four for balance. A hiking pole or pair of hiking poles can help you maintain your balance as you go from rock to rock and reduce the risk of twisting your ankle- or worse.
A good hiking stick is also really useful for maintaining balance if youve got a heavy backpack that affects your natural balance. You can use the trekking poles to keep your pack and back upright instead of needing to heroically engage your core every time you start to sway too far in one direction.
Slippery Terrain
Walking sticks are also invaluable when hiking through waterways, such as when completing Zion National Parks The Narrows. On hikes like this it can be very difficult or impossible to see what youre stepping on before you put your feet down.
Hiking poles make it so you can go a lot faster by adding another point of contact or two with the ground so if you unwittingly step on something that doesnt provide good traction you dont end up falling over. This same benefit is found when hiking in mud or snow, as it provides you with solid traction when the ground is unstable or slippery.
Lessen Impact
This one is especially relevant for older and heavier hikers- one of the biggest benefits is that you can use your arms to lessen the impact of each step on your legs and especially your knees. The impact is certainly less pronounced on a relatively flat hike (source ) or a hike upwards, but for a hike downhill this can make a big difference.This benefit is especially pronounced when hiking with a heavy pack or with increased body weight downhill, as the poles do more of the work (source
). It should be noted however, that although hiking poles lessen forces on your lower body, they have been found to increase forces on your upper body and cardiovascular system (source).
 Walking Sticks can help hikers balance a heavy pack
When to Use Walking Sticks for Hiking
There are benefits to using hiking poles in certain scenarios and for certain hikers. Theyre a really important piece of any hiking kit when hiking through water in streams or river beds. It can be hard to maintain sure footing when walking on a dry river bed; hiking through a running stream is worse.
Hiking poles are also extremely really useful when hiking in snow, especially if you dont have micro-spikes or crampons. Nice poles even have different types of points at the bottom for different types of terrain.
If youre someone who experiences knee issues, it definitely makes sense to test out hiking poles to see if they provide relief. For older hikers, walking sticks can be a great way to help provide added balance.
Pros and Cons of Hiking Sticks
If walking sticks didnt have any downsides, everyone would use them. The advantages are really that they improve stability and can help reduce impact on legs and joints. They can also be used as part of a kit for certain tarp shelters.
The main downside to using hiking sticks is the added weight of carrying them. They only weigh about a half a pound each, but that can be a lot over a long distance. This is especially significant backpacking where every ounce counts.
Many trekking poles collapse or telescope down for easy storage. If not, they can take up a lot of space and get in the way. The pointed ends always tend to catch on stuff.
If you choose to purchase a pair of hiking poles, the cost may be an additional barrier to an otherwise free activity. They arent incredibly expensive, usually between $20 and $70 new, but theyre probably not at the top of anyones list of necessary hiking gear.
Are Hiking Sticks Worth It?
Hiking poles arent very expensive, they dont weigh much, and collapse down to a manageable size, but the benefits are fairly minor as well. If you have knee problems or balance issues theyre a must-have, but otherwise theyll probably just sit in your garage untouched except for the occasional snowy hike or water hike.
Ive used them in the past, but got rid of them at some point and probably wont pick up another pair. If I think it would be helpful, such as when Im carrying a heavy pack or working through difficult terrain, I use a stick I find along the trail instead.
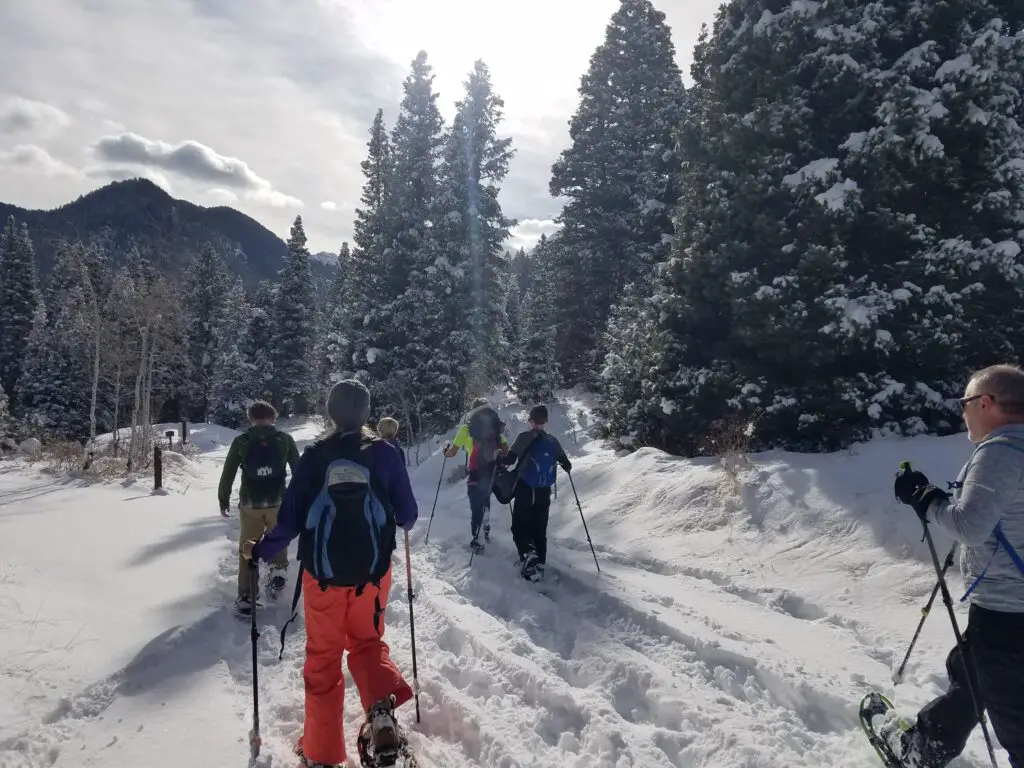 Trekking Poles are Especially Beneficial Hiking in Snow
Types of Hiking Sticks
Ive used the terms walking stick and hiking pole and trekking pole interchangeably throughout this article, but Id like to parse them out a little bit here. There are different types of hiking sticks that have advantages and disadvantages.
Trekking Poles were traditionally just like ski poles, with a solid shaft and small basket on the bottom for snow. Most models today include removable feet for different surfaces and can be collapsed telescope-style to reduce their inconvenient size.
Hiking Sticks are free, functional, and can be burned or abandoned when youre done with them. Or, if youre like my kids, you make a pile of them in the corner of the garage with one you bring home from every hike!
Nordic Poles are a specialized type of walking stick that are designed to be used to increase motion while walking. The functionality is pretty similar to a trekking pole, and they have adaptable feet like most trekking poles, but theyre supposed to be used to swing the upper body and propel it forward rather than just to support.
Related Questions
Why Do Hikers Carry Sticks? Hikers carry one or two sticks or hiking poles to help with their balance on difficult terrain, to lessen the impact on their knees during downhill sections, and of course, for the aesthetics. The benefits of hiking sticks are greater for hikers with knee problems and balance problems.
Why Do People Use Two Walking Sticks? Two walking sticks helps provide symmetry in a way that one does not. One walking stick can be used to lessen impacts or to help balance on one side of the body, but two serve to support the person further and provide balance to each side.
Sources:
Level Hiking: https://pubmed.ncbi.nlm.nih.gov/21083766/
Hiking with Heavy Packs: https://pubmed.ncbi.nlm.nih.gov/17218900/

Synthesis of Research 1980-2019: https://pubmed.ncbi.nlm.nih.gov/32980249/
Why do Hikers use Walking Sticks? (And When Should You?) Scoutorama
If you're gonna fight, fight like you're the third monkey on the ramp to Noah's Ark... and brother its starting to rain. Join our efforts to Secure America's Borders and End Illegal Immigration by Joining ALIPAC's E-Mail Alerts network (CLICK HERE)
-
06-21-2025, 03:29 AM #9922Senior Member
- Join Date
- Aug 2018
- Posts
- 93,977


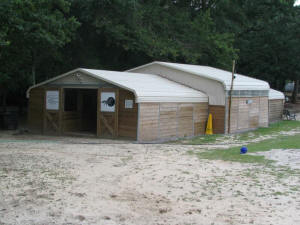
Who would have thought that something so simple would have been such a hit? We have had so many requests for information about our barn, that we have made a page just for it.
If you don't find what you're looking for here, just drop me an email and I'll do my best to assist you.
 [/FONT]To make this a quick loading page, I've created thumbnails for all the photos.
Just click on them to get a larger view.
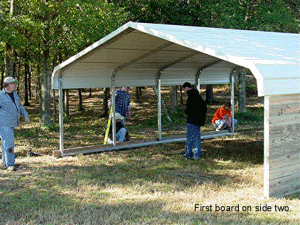
We started with an 18 x 20 carport by Cover All with 5' legs. Shannon is putting caulking on top of each board before the next board is attached. We enclosed the sides and ends with
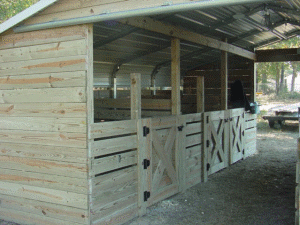
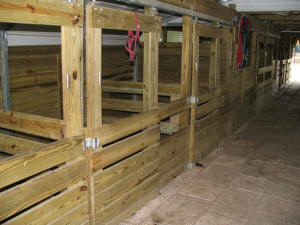
5/4" x 6" treated lumber.Dividers were built and stalls were created. Each stall is approximately 6 x 7. These may seem small, but our horses are in only twice a day for feeding. They are only left in overnight if they are ill or if the weather doesn't allow turnout. Even in a 6 x 7 stall our largest mare, 36" Brandi, can roll over and seems comfortable.
In this barn all the doors are swinging doors. In the newer barn all the doors are sliding doors.
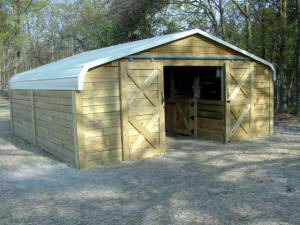
The end result...our first barn.....three 6 x 7 stalls, one 6 x 14 stall and one tack room. This also gives us a 6' aisle down the center. The 6 x 14 stall was used as a foaling stall for Vicki, our first pregnant mare. That stall was later converted back to two 6 x 7 stalls. in 2007 we had officially outgrown our original barn, so we added on.
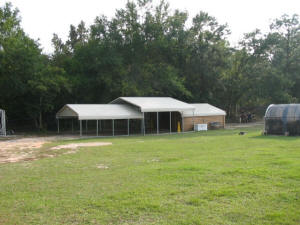
We added an additional 18 x 24 carport and in-between it we put a 24 x 20 carport with 7' legs. The 18 x 20 end would have six regular 6 x 7 stalls and the middle would be our foaling stalls and our newer, larger tack room. The foaling stalls have wireless cams, and are approximately 8 x 10 in size.We also changed the construction of the building. The original building took a great deal of time to construct as it was necessary to drill through each of the legs of the building to fasten on the boards, then the ends of the bolts needed to be sawed off for safety reasons. The end result was good, but the time involved was excessive.
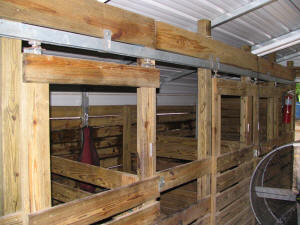
With the next two barns my husband decided to have U-channels built to mount to the legs. The U-channels were mounted on each leg and the boards were cut and slid down into the u-channels. Thus, there was minimal drilling, screwing, fastening of any kind. And, as the wood dries and shrinks, the weight of the boards above cause each board to settle, creating a tighter fit. These last two barns are much tighter than the first. The pole that you see outside is for my wireless cameras....all our electric is run underground. We also chose to use light panels at the top of the walls in the center barn, to increase the light in that area.
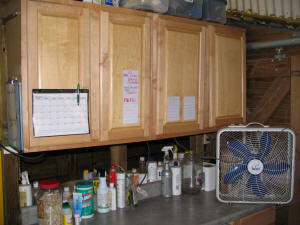
Our biggest challenge was leveling, and connecting the barns together. Once everything was completed, my husband surprised us with stone tile floors. It helps us keep the barn clean and it looks good. He didn't want anything permanent like concrete, so he went with the tile. The ground was leveled, the tiles placed and leveling sand was brushed over them. They can be moved or replaced easily.The photo to the left shows a closeup of the sliding doors. The photo above shows our tack room.
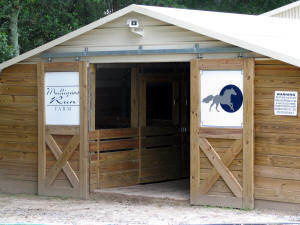
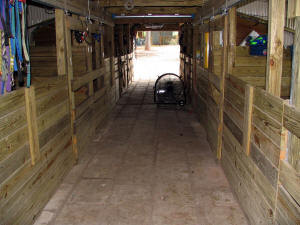
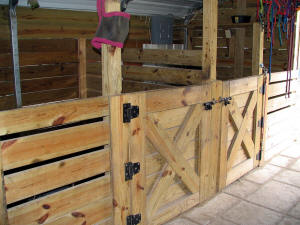
The East End of the barn once it was finished. The alleyway from the East End. The original barn with the swinging doors. The two additions have the sliding doors.
And, while my husband thinks we're done.....I'm hoping to add another 20 x 24 barn on this year. We'll see......
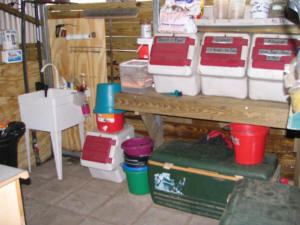

Another view of our tack room. We use large coolers to hold the beet pulp and the feed. They double as seating when the lids are closed. Close - of a corner U-Channel
Feel free to drop me an email if you have additional questions!
Mulligans Run Farm BarnIf you're gonna fight, fight like you're the third monkey on the ramp to Noah's Ark... and brother its starting to rain. Join our efforts to Secure America's Borders and End Illegal Immigration by Joining ALIPAC's E-Mail Alerts network (CLICK HERE)
-
06-21-2025, 03:38 AM #9923Senior Member
- Join Date
- Aug 2018
- Posts
- 93,977

Home
Hoem
steading
List of Homesteading Skills
DIY Projects
Build It
Household Tips
Gardening
Canning
Chickens
Recipes
Food Storage
Health
Emergency Preparedness
Natural Remedies
How to Make a Barn out of a Carport
Home
DIY Projects
How to Make a Barn out of a Carport

Melissa Francis
March 13, 2014
DIY Projects, Homesteading, Raising Livestock, Upcycling
animals, barn,carport, repurpose, Reuse, tiny home, Tiny Homes
This is an amazing upcycling DIY project of how to make a barn out of a carport to house farm animals. You could think of many different purposes for this project like a large shed, may even how the shell of a tiny home.
Carports can be found cheaply or by some miracle even for free on craigslist.org
 mulligansrun
Click here to read How to Make a Barn out of a Carport:
http://www.mulligansrun.com/ourbarn.php
If you're gonna fight, fight like you're the third monkey on the ramp to Noah's Ark... and brother its starting to rain. Join our efforts to Secure America's Borders and End Illegal Immigration by Joining ALIPAC's E-Mail Alerts network (CLICK HERE)
-
06-21-2025, 03:45 AM #9924Senior Member
- Join Date
- Aug 2018
- Posts
- 93,977
- Home
- Homesteading
- Gardening
- Canning
- Chickens
- Recipes
- Food Storage
- Health
- Emergency Preparedness
- Natural Remedies
How to Set Up Full Spectrum Grow Lights for Your Tomatoes

Bryan Thomas
June 3, 2025
Articles
No Comments on How to Set Up Full Spectrum Grow Lights for Your Tomatoes
Growing
tomatoes indoors or in low-light conditions can be challenging, but with the right setup, you can achieve a thriving harvest year-round. One of the most effective tools for indoor tomato cultivation is a full spectrum
grow light, which mimics natural sunlight to support healthy growth. Whether youre a hobbyist or a commercial grower, understanding how to properly install and use these
lights is key to maximizing yield and plant health.
In this guide, well walk you through the essentials of setting up full spectrum grow lights for tomatoes, covering everything from light placement to optimal spectrums. Well also explore why LED grow lights are becoming increasingly popular among growers and how selecting a reliable grow light manufacturer can significantly impact your indoor gardening success.
Why Tomatoes Need Full Spectrum Grow Lights
Tomatoes are sun-loving plants that require at least 6-8 hours of direct sunlight daily to produce juicy, flavorful fruits. However, when grown indoors or in greenhouses, natural light may be insufficient, especially during winter months. This is where full spectrum LED grow lights come inthey provide the necessary wavelengths for photosynthesis, flowering, and fruiting.
Unlike traditional lighting, full spectrum LEDs cover all stages of plant growth, from seedling to harvest. They emit a balanced mix of blue light (for vegetative growth) and red light (for flowering and fruiting), closely resembling the suns natural output. Many grow light manufacturers now design specialized fixtures for tomatoes, ensuring your plants receive the ideal light intensity and spectrum.
Choosing the Right Full Spectrum Grow Light
Not all grow lights are created equal, and selecting the best one for tomatoes can significantly impact your harvest. When shopping for a full spectrum LED grow light, consider factors like wattage, coverage area, PAR (Photosynthetically Active Radiation) values, and energy efficiency. High-quality lights from a trusted grow light supplier will often provide detailed specifications to help you make an informed decision.
For small-scale growers, a 200W-400W LED panel may suffice for a few plants, while commercial setups might require 600W+ fixtures or multiple light bars. Look for lights with adjustable spectrums if you want precise control over different growth stages. Additionally, reputable grow light manufacturers often include features like daisy-chaining (linking multiple lights together) and built-in cooling systems to prevent overheating.
Proper Placement and Hanging Height
Once youve chosen your grow light, the next step is positioning it correctly. Hanging height is crucialtoo close, and you risk burning the leaves; too far, and your plants may stretch weakly toward the light. A general rule is to keep LED grow lights 12-24 inches above tomato seedlings and 18-36 inches above mature plants, adjusting as needed based on light intensity.
For even light distribution, consider using reflectors or light movers, especially in larger setups. Some commercial growers prefer vertical farming systems, where lights are placed between rows of plants to maximize exposure. If youre unsure about the best setup, consulting a grow light supplier or manufacturer can provide tailored recommendations based on your growing space.
Setting the Right Light Schedule
Tomatoes thrive on consistency, and their light exposure should mimic natural day-night cycles. During the vegetative stage, aim for 16-18 hours of light per day to encourage strong stems and lush foliage. Once flowering begins, reduce light exposure to 12-14 hours to stimulate fruit production.
Many modern LED grow lights come with timers or smart controls, allowing you to automate the lighting schedule. This feature is particularly useful for busy growers or those managing large-scale operations. If youre sourcing lights from a grow light manufacturer, check whether their models include programmable settings for hassle-free adjustments.
Additional Tips for Growing Tomatoes Under Grow Lights
While proper lighting is essential, other factors also influence tomato growth under artificial lights. Temperature, humidity, and airflow should be monitored closely
LED lights produce less heat than HPS bulbs, but good ventilation is still necessary to prevent mold and mildew. Using a small fan can improve air circulation, strengthening plant stems.
Nutrient management is another key aspect. Since indoor
tomatoes rely entirely on you for nourishment, a balanced hydroponic or soil-based fertilizer will support healthy development. Some growers also use CO₂ supplementation in enclosed spaces to boost growth rates, though this is more common in commercial setups.
Why LED Grow Lights Outperform Other Options
Compared to traditional HID (High-Intensity Discharge) or
fluorescent lights, full spectrum LEDs offer several advantages:
- Energy Efficiency: LEDs consume 40-60% less electricity than HPS/MH lights, reducing operational costs.
- Longer Lifespan: Quality LEDs last 50,000+ hours, minimizing replacement frequency.
- Low Heat Output: Less risk of scorching plants, allowing lights to be placed closer.
- Customizable Spectrums: Some models let you tweak blue/red ratios for different growth phases.
Many grow light manufacturers now focus on smart LED systems with app-controlled settings, making indoor tomato cultivation more accessible than ever.
Final Thoughts
Setting up a full spectrum grow light system for tomatoes may seem complex at first, but with the right knowledge, its a highly rewarding endeavor. By selecting the appropriate lights, positioning them correctly, and maintaining optimal growing conditions, you can enjoy fresh, homegrown tomatoes regardless of outdoor weather.
If youre looking for high-quality fixtures, partnering with a reputable grow light supplier ensures you get durable, efficient lighting solutions tailored to your needs. Whether youre starting small or scaling up, the right setup will help your tomatoes flourishhappy growing!
Post navigation
Ultimate Guide to Predator-Proofing Your Chicken Coop
If you're gonna fight, fight like you're the third monkey on the ramp to Noah's Ark... and brother its starting to rain. Join our efforts to Secure America's Borders and End Illegal Immigration by Joining ALIPAC's E-Mail Alerts network (CLICK HERE)
-
06-21-2025, 06:05 AM #9925Senior Member
- Join Date
- Aug 2018
- Posts
- 93,977
🍏 How to Make & Preserve Homemade Apple Pectin
- Home
- Food Storage & Skills
- 🍏 How to Make & Preserve Homemade Apple Pectin

Melissa Francis
March 31, 2025
Food Storage & Skills
apple,pectin
Perfect for Jam-Making, Natural Preserving & Reducing Kitchen Waste
🍇 What Is Apple Pectin?
Apple pectin is a natural thickener made by simmering apples or their scraps until they release pectin into the water. This golden liquid is perfect for setting jams and jellies without relying on store-bought powders.
✨ Why Make It Yourself?
Benefit Why It Matters ♻ Zero Waste Use apple peels, cores & scraps ☕ Natural No artificial additives or preservatives 🍾 Flexible Adjust sugar content and cook time ❄️ Freezable or 🌂 Can-able Store long-term your way 🔧 Pantry Staple A must-have for home preservers
🍏 Best Apples to Use
✅ Best: Under-ripe, tart apples (like Granny Smith or crabapples)
⛔️ Avoid: Overripe, soft, or mealy apples
Tip: Mix red and green hard apples for balanced flavor and color.
🛋️ What Youll Need
Ingredients:
- Whole apples or clean apple scraps (peels, cores, stems)
- Just enough water to float them
Tools:
- Large pot 🍽️
- Cheesecloth or fine mesh strainer
- Large bowl or second pot
- Sterilized jars or freezer containers
- Labels (optional but satisfying!)
☕ Step-by-Step: How to Make Apple Pectin
- Prep Apples
Use either whole chopped apples or saved scraps. Add to a large pot with just enough water to barely cover them. - Boil & Simmer
Cover and bring to a rolling boil, then reduce heat and simmer gently for 1.5 to 2 hours. Apples should become soft, rosy-brown mush. - Strain Carefully
Line a strainer with sterilized cheesecloth over a large bowl. Pour in the apple mixture. DO NOT press the pulpthis keeps the pectin clear. Let it drain overnight. - Reduce the Liquid
Transfer the clear liquid back into a pot. Boil uncovered to concentrate until slightly thickened (3060 min).

⚖️ How to Test Pectin Strength (DO NOT CONSUME!)
Youll need:
- Chilled sample of your pectin
- Rubbing alcohol (for testing only)
✅ In a small bowl, mix a few spoonfuls of cooled pectin with rubbing alcohol. If it clumps into a jelly-like mass, its ready.
🚨 WARNING: This mix is toxic. Discard immediately after testing.
🧳 How to Preserve Apple Pectin
❄️ Freeze It
- Store in freezer-safe jars or ice cube trays
- Label and date
- Keeps up to 6 months
🌂 Can It
- Sterilize jars in boiling water (10 min)
- Pour hot pectin into hot jars (leave 1/2 inch headspace)
- Wipe rims, seal, and process in hot water bath (10 min)
- Cool, check seals, label, and store in a cool, dark place
☕ Bonus Tip: Save the Pulp!
Dont toss the leftoversuse them to make:
- Apple butter 🍯
- Applesauce 🥞
- Compost for your garden 🌿
🍪 Before You Use Homemade Pectin
- Taste a tiny bit from each jar before use. It should taste like mild apple juice.
- If it smells fermented or off, discard.
Enjoy a pantry staple thats natural, homemade, and beautifully frugal. Apple season just got a whole lot better. 🍏🍳
🍏 How to Make & Preserve Homemade Apple Pectin - The Homestead Survival
If you're gonna fight, fight like you're the third monkey on the ramp to Noah's Ark... and brother its starting to rain. Join our efforts to Secure America's Borders and End Illegal Immigration by Joining ALIPAC's E-Mail Alerts network (CLICK HERE)
-
06-21-2025, 06:11 AM #9926Senior Member
- Join Date
- Aug 2018
- Posts
- 93,977
how to
Home
PVC Innovation World
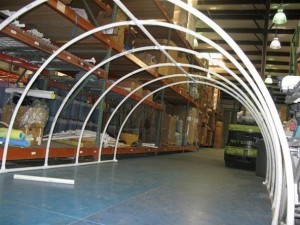
How to Make a Self-Watering Greenhouse (In-Depth Tutorial)
By Adam Withrow
Sep 29, 2011, 08:58 PM
I know it seems a little redundant to post this when I've already posted a video, but it is kind of hard to get more than a vague idea from the video alone. I hope this sheds a little more light on the subject. I'm sure it also seems like I'm beating this idea to death, but this one concept opens doors to further innovation. After I finish this article, I'm going to put another one up that shows a hinged, raised bed house and talk about some amazing things you can do from there.
Once the foundation of principles is laid, and with input from the community, I'll shed more light on the whole concept that I'm trying to push here. I want to see an open source, self-contained plant habitat that can be entirely controlled from an iPhone. I want to have full watering, nutrition, lighting and heat in a self-contained device, and I want it to be a wide open concept that anyone can use. Rather than becoming a manufacturer, I just want to see this happen. I think it'd be cooler if anyone could do it.
Yes, that is done in the shop, and yes, that's a weird environment to build a greenhouse. I do my materials prep, cutting and dry fitting in the workshop because I have every tool I might possibly need at my disposal. In truth, you don't need many tools to get this done.
Tools You Will Need
- Something to cut the pipe: Ratcheting pipe cutter, hand saw, band saw, compound miter saw, etc.
- Measuring Tape
- Marker for cut lines
- Something to bend the pipe. I'm using a 9' PVC Bendit, but you can also use a heat gun, blow torch (not recommended), car exhaust (not recommended), heat blanket, infrared heat box, etc.
- Cleaner, Primer and Cement
- Drill, Tap and Deburr tools to insert spray nozzles
(optional) Mallet
PVC Pipe is cheap no matter what gauge you use. I strongly recommend you use the largest diameter appropriate for the size of greenhouse you are trying to build. The thicker walls on larger pipes allow more surface area for the threads on the spray nozzles to grip. Bearing this in mind, even a large greenhouse with thick pipe should still be less than 200 bucks. A small hoophouse should cost you less than $50.
Materials You Will Need
- PVC Pipe in the gauge appropriate to the height of your greenhouse. Bigger houses take bigger pipes to last longer than a few years.
- Tees for the first and last ridge pieces as well as for the feet of every individual rib.
- Crosses for the ridge pieces that are not at the ends.
- (1) 4-way fitting and the fitting that connects to a garden hose.
- (3) 3-way fittings for the other three outside corners.
- Sheathing material such as polycarbonate, corrugated plastic, clear vinyl (pvc sheets), polyethylene, etc.
- Snap clamps and zip ties to attach the sheathing material to the frame without puncturing the pipes.
In order of assembly:
Draw out a simple plan so you can get a proper fitting and piece count.
Yes, I did misspell rigidity.

Determine the exact height and width that you want.
Length will be dealt with by the number of ribs you have on the greenhouse. Divide your width by 2, and that will give you the run number for every arc.

Draw the curve out.
This will need to be done where you will be setting up the form for duplicating your rib pieces. If you make height equal one half of the width, then you can just use a large sized compass to draw out a circular arc. Make sure your arcs complete a perfect 90 degree curve (unless you want to do something a little more intricate - the sky's the limit!) for easy fitting, or at least make sure you have a strategy for achieving the full 360 degrees to get around the loop.
Glue pieces of PVC .
The pieces must be one size larger than the pipe you are trying to bend down on the arc you've drawn. This will serve as your form. In this case, I was able to use the grooves in the concrete to determine the 90 degree curve.

Cut pipes to an appropriate length so you won't have too much waste.
You can use the straight cut-off pieces on the ridge beam and the sole plates of the walls. It helps to do a test bend first and then see how much you can safely cut off.
Heat up the whole length of the pipe.
The tool that I'm using here is definitely the easiest way I've found to do this. There are other methods out there, but with a nine foot bender, you can heat nine feet of pipe evenly at one time.

When the pipe is evenly heated, place it into the form.
Begin heating your next pipe. If you smooth the piece into the form, you will exactly duplicate the shape you are looking for.

Mark the pipe for cutting when it has cooled.
If you are using an in-pipe heat bender, by the time one piece is cooled, the next one will be ready to bend. In this case, I'm using the groove in the concrete as a marker so I put my cut lines in exactly the same place on every piece.

Once you've made all of your bends, cut the excess off of your pieces.
It is nice to mark and cut instead of trying to cut your pieces to the exact length before you do the bend. You do want to cut the major excess off before bending, but it helps to leave a little just to be sure everything is the same at the end. I'm using a band saw here, but you've definitely got options on what you use.

Cut all of your ridge and sole spacers.
They should be about 22 and 5/16" so that your ribs land 24" on center. Larger diameters of pipe will have smaller spacers, so be sure to check what actual length you need. The advantage to 24"centers is that most sheathing materials come in 4'x8' sheets, and this makes it so you don't have to cut them to make them center on the studs. Get all of your pieces except for the end spreaders together and prepare a space to dry fit. The number of pieces will vary based on how long you want your structure to be.

Dry fit all available pieces.
You can now measure from inside to inside on your ends to make the spreaders/drain connections for the bottom.

Cut and dry-fit the spreaders.
I ran out of pipe today, but I will upload a picture when I get a few more sticks, and I'll show how the hose interface hooks up as well. It's all pretty intuitive, and you should be able to figure it out, but I'll show it as soon as I have my materials in order.
Drill Holes with tap and die.
Fit watering nozzles into them.
Take apart the joints, one at a time, and clean, prime and cement them.
Allow the cement to cure for at least two hours and then reapply it to the outside of all joints. If you are completely confident that you cemented every joint perfectly, this is not necessary, but it does save you from coming back and recementing any leaks.
Allow this cement another two hours to cure.
Remove all nozzles, and flush the system for at least twenty minutes. Re-insert the nozzles, and the watering system and framing are ready to go.
Apply sheathing.
Use snap clamps along the sole plates and zip ties at the ridge and along the studs (ribs). In further installments, I'll show how to use PVC pipe to make the end walls and even a door. You can also use wood to stud up the ends, but I like to use PVC for the consistent look on the finish.
Tips
- Hot bending PVC is the best way to produce a bend because once it cools, it retains the shape perfectly and goes all the way back to its original hardness. There are a lot of plans that show cold, tension bending, and they are great, but they are almost impossible to integrate watering into. When PVC is heated, it takes on the consistency of a cooked spaghetti noodle, and it can be easily formed into any shape.
- If you want to get serious, use at least 2" pipe, and be sure it is the UV resistant type. After cementing the structure together, put the sole plates of the walls into a concrete footer. Be sure you can still connect and disconnect the hose, and make sure you can drain it when the cold comes.
- If you have the means, you can put the sole plates of the walls into the outside trenches of a concrete floor. If you integrate radiant heat into the concrete floor, you can use it all year long. As long as you don't let water freeze inside of the walls, even the self-watering function can be used through the winter.
- This article will be completed very soon, I just ran out of materials today.
Warnings
- PVC pipe can release harmful toxins when overheated. Be sure to heat only to the minimum temperature necessary for the malleability you need.
How to Make a Self-Watering Greenhouse (In-Depth Tutorial) << PVC Innovation World :: WonderHowTo
If you're gonna fight, fight like you're the third monkey on the ramp to Noah's Ark... and brother its starting to rain. Join our efforts to Secure America's Borders and End Illegal Immigration by Joining ALIPAC's E-Mail Alerts network (CLICK HERE)
-
06-21-2025, 06:15 AM #9927Senior Member
- Join Date
- Aug 2018
- Posts
- 93,977
- Home
- Homesteading
- Gardening
- Canning
- Chickens
- Recipes
- Food Storage
- Health
- Emergency Preparedness
- Natural Remedies
How to Make a Self Watering Greenhouse DIY Project
- Home
- DIY Projects
- How to Make a Self Watering Greenhouse DIY Project

Melissa Francis
March 15, 2014
DIY Projects, Gardening, Greenhouse
garden, green house
How to Make a Self Watering Greenhouse DIY Project
This step by step detailed tutorial of how to make a self watering greenhouse DIY project shares how to bend the PVC pipes, drill the holes to the release the water and cover with sheathing to create a frugal greenhouse. Once completed and attached to a garden hose the water will sprinkle down within the greenhouse from above.
 wonder how to
Click here to read
How to Make a Self Watering Greenhouse DIY Project:
greenhouse
http://pvc-innovation.wonderhowto.com/how-to/make-self-watering-greenhouse-in-depth-tutorial-0130203/
If you're gonna fight, fight like you're the third monkey on the ramp to Noah's Ark... and brother its starting to rain. Join our efforts to Secure America's Borders and End Illegal Immigration by Joining ALIPAC's E-Mail Alerts network (CLICK HERE)
-
06-21-2025, 06:45 AM #9928Senior Member
- Join Date
- Aug 2018
- Posts
- 93,977
- Home
- Homesteading
- Gardening
- Canning
- Chickens
- Recipes
- Food Storage
- Health
- Emergency Preparedness
- Natural Remedies
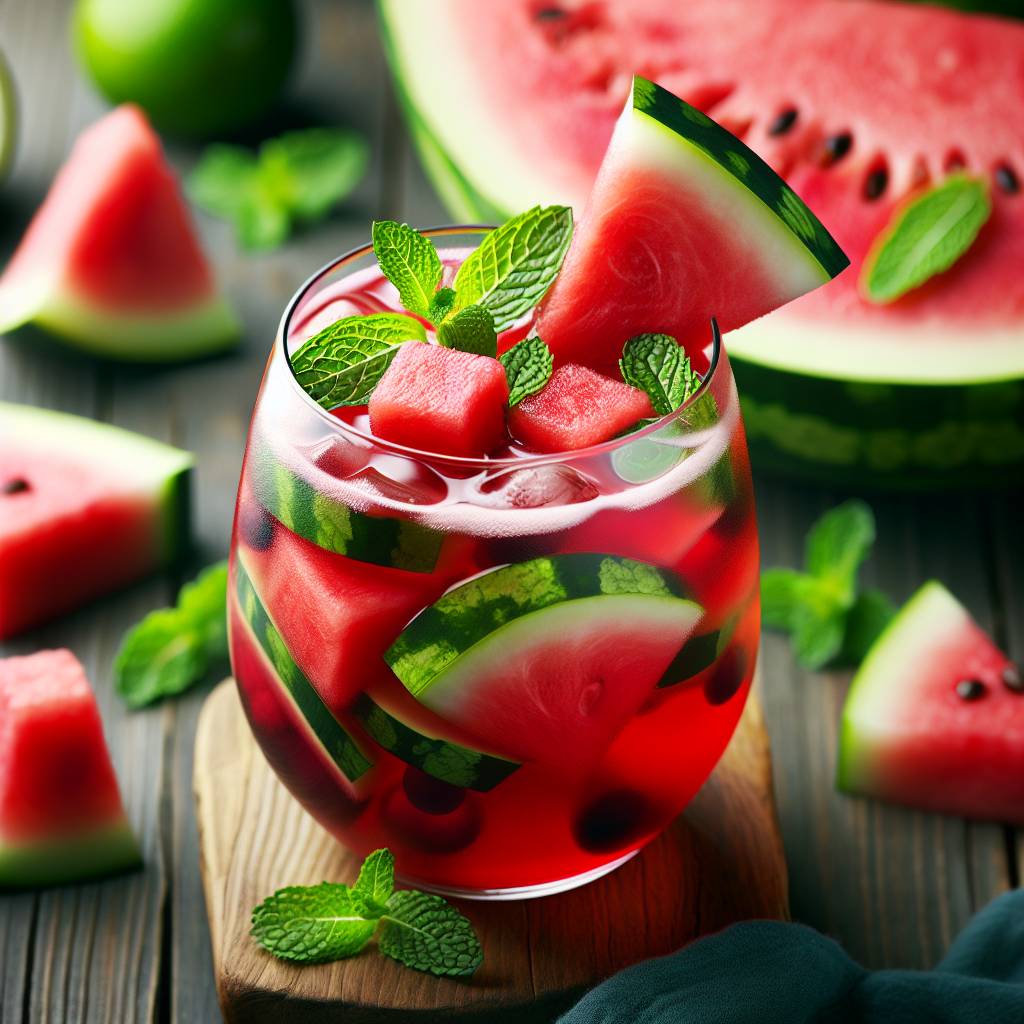
Watermelon Sangria Drink Recipe
Melissa Francis
March 15, 2014
Beverages, Recipes
Beverage,drink,sangria, watermelon
Watermelon Sangria Drink Recipe
This Watermelon Sangria recipe is as delicious as it is easy to make and can be enjoyed all year round not just at summer barbecues and picnics. This refreshing sangria has a light fruity citrus blend that will perk up your taste buds.
 ifoodtv
Click here to read how to make a Watermelon Sangria Drink recipe:
Watermelon Sangria Drink Recipe - The Homestead SurvivalIf you're gonna fight, fight like you're the third monkey on the ramp to Noah's Ark... and brother its starting to rain. Join our efforts to Secure America's Borders and End Illegal Immigration by Joining ALIPAC's E-Mail Alerts network (CLICK HERE)
-
06-21-2025, 09:57 AM #9929Senior Member
- Join Date
- Aug 2018
- Posts
- 93,977
121+ Skills for the Modern Homestead
Share
Share
20.2kPin
Preserving food? Check. Driving a tractor? Check. Milking a goat? Check.
For me, one of the most exciting aspects of modern-homesteading is learning new skills. When I first moved to Wyoming at the tender age of 18, I had an entire mental checklist of all the things I wanted learn and do.
And as I’ve morphed into a modern-day homesteader, that list has grown along with me.
There is something so empowering about learning how to do something new with your hands. Or mastering a skill that, at an earlier point in your lie, would have seemed completely foreign.
It’s actually quite addictive, really… Since we are at the start of a brand new year, I figure there’s no better time than to start making homestead plans.
So without further ado, may I present to you:
101 Skills for the Modern Homestead
(Keep in mind that no one person will likely master all of these skills. And some just aren’t applicable to certain situations. (I sadly won’t ever be harvesting maple syrup from my homestead… I know that.) But hopefully you can pick and choose some ideas to inspire you!)
1. Milk a goat, cow, or sheep.
2. Compost both kitchen scraps and animal manure.
3. Make the perfect pie crust.
4. Learn how to cook a whole chicken.
5. Grow a vegetable garden in your climate.
6. Know how to properly prune and graft a fruit tree.
7. Learn first-aid and CPR.
8. Know how to dehydrate foods to preserve for later use.
9. Give an animal an injection (the muscle, in the vein, or under the skin)
10. Assist with foaling, kidding, lambing, and/or calving.
11. Know how to assist an animal with a difficult birth.
12. Grow a windowsill herb garden.
13. Learn how to safely cut down a tree.
14. Make perfect sausage gravy from scratch.
15. Know how to drive a manual transmission and/or tractor.
16. Learn basic metal working skills and welding.
17. Master basic mechanic skills so you can fix your tractors and vehicles.
18. Change a tire and change oil.
19. Learn how to hunt wild game–both large and small.
20. Know how to properly handle, shoot, and clean a gun.
21. Learn the laws and regulations regarding hunting wild game in your area through a Hunter’s Safety course.
22. Learn how to humanely kill, gut, and clean an animal.
23. Know how to butcher an animal and the proper cuts of meat.
24. Learn how to kill and pluck a chicken.
25. Use a smoker to smoke cheeses, meat, bacon, hams, etc.
26. Learn how to fish.
27. Learn how to clean, fillet, and cook fish.
28. Learn how to tell if your chickens are molting.
29. Know how to tell if you can doctor an animal at home, or if it needs to be taken to the vet.
30. Dry laundry using a drying rack or clothesline.
31. Make your own laundry detergent.
32. Know how to build a fire.
33. Cook over an open fire or on a wood cookstove.
34. Make cheese–master simple soft cheeses and hard cheeses too.
35. Learn how to make yogurt.
36. Make sourdough bread and maintain your own starter.
37. Keep bees and harvest honey.
38. Make basic yeast dough which can be turned into loaves, rolls, buns, pretzels, etc.
39. Incubate fertilized eggs and hatch your own chicks.
40. Learn how to identify and manage a broody hen.
41. Learn how to cut, bale, and stack hay.
42. Make your own jellies and jams.
43. Master the art of intensive grazing so you can better manage your pastures.
44. Make your own soap.
45. Make your own candles.
46. Learn how to darn a sock.
47. Mend damaged clothes so they don’t have to be thrown away.
48. Sew clothing and fabric items from scratch.
49. Knit, quilt, or crochet
50. Learn the art of no-till gardening.
51. Learn how to candle eggs so you can tell if they are fertilized.
52. Cook outside with a dutch oven.
53. Heat your home with wood or other sustainable sources.
54. Trim the feet of your goats and sheep.
55. Learn how to build and fix fence.
56. Master basic carpentry skills so you can repair outbuildings or even build basic furniture pieces.
57. Learn how to tan a hide.
58. Learn how to save seeds.
59. Use a water bath canner to preserve foods.
60. Learn how to use lacto-fermentation to preserve foods.
61. Learn how to use a pressure canner and/or cooker.
62. Make your own sauerkraut.
63. Forage for wild edibles in your area.
64. Learn how to identify the difference between edible and poisonous mushrooms.
65. Learn how to identify the difference between harmless and venomous snakes in your area.
66. Grind your own wheat for baking.
67. Repurpose everyday items to save them from the landfill.
68. Learn how to sharpen a knife or ax.
69. Learn how to prepare for a blizzard.
70. Learn how to prepare for a wildfire.
71. Understand the basics of animal breeding.
72. Learn how to work together with your neighbors to accomplish more and foster a sense of community.
73. Know how to halter-break and train an animal.
74. Learn how to harvest, split, and stack firewood.
75. Learn how to make butter.
76. Learn how to use essential oils properly and safely.
77. Build/use a greenhouse or cold frame to extend your growing season.
78. Learn how to start seeds indoors.
79. Store food in a root cellar or in a cool basement.
80. Make your own vinegar.
81. Make your own skincare items.
82. Make your own cleaning supplies.
83. Learn how to make herbal extracts, infusions, poultices, and tinctures.
84. Learn how to render lard or tallow.
85. Learn how to chop ice.
86. Learn how to make and apply whitewash.
87. Tap trees for maple syrup.
88. Learn how to repair a roof.
89. Know how to humanely euthanize an animal.
90. Understand how to identify the weeds in your yard/pastures and figure out which ones are edible.
91. Learn how to back up a trailer.
92. Know how to purify water.
93. Learn how to make bone broth.
94. Know how to use non-electric lighting.
95. Put together a 72-hour kit for emergencies.
96. Learn how to cook eggs in a cast iron skillet without a sticky mess.
97. Put food scraps like eggshells, coffee grounds, apple peels, and whey to good use.
98. Make your own bacon and cured hams.
99. Know how to protect your livestock from predators.
100. Learn how to make your own chicken feed.
101. Live within your means and get out of debt.
And the list keeps growing! The following are from my lovely readers:
102. Learn about aquaponics or fish farming.
103. Make your own ammunition, or reload ammunition.
104. Shear a sheep and process the wool.
105. Learn how to spin wool.
106. Know basic plumbing skills (like unclogging a toilet!)
107. Learn how to install/use a composting toilet
108. Make your own paper.
109. Learn how to use vermiculture (composting with worms) to create nutrient-rich food for your garden.
110. Make your own fishing lures or spears.
111. Use alternative energy sources like solar or wind to power your homestead.
112. Implement natural pest control measures.
113. Learn how to tie a variety of basic knots.
114. Learn how to make and set traps.
115. Know how to clean, dress, stitch/staple a wound in the event of an emergency.
116. Learn how to weave.
117. Learn how to make natural dyes.
118. Understand how to propagate plants through root cuttings.
119. Learn how to clear pasture and brush.
120. Master the art of home brewing.
121. Learn how to make baskets.
OK– I know I missed some important ones! Leave a comment so I can keep adding to the list—->
121+ Skills for the Modern Homestead • The Prairie Homestead
If you're gonna fight, fight like you're the third monkey on the ramp to Noah's Ark... and brother its starting to rain. Join our efforts to Secure America's Borders and End Illegal Immigration by Joining ALIPAC's E-Mail Alerts network (CLICK HERE)
-
06-21-2025, 07:58 PM #9930Senior Member
- Join Date
- Aug 2018
- Posts
- 93,977
If you're gonna fight, fight like you're the third monkey on the ramp to Noah's Ark... and brother its starting to rain. Join our efforts to Secure America's Borders and End Illegal Immigration by Joining ALIPAC's E-Mail Alerts network (CLICK HERE)


 Reply With Quote


Democrats For Pond Scum 2026!
06-21-2026, 11:38 AM in illegal immigration Announcements