

Results 2,511 to 2,520 of 8458
 210Likes
Thread Information
Users Browsing this Thread
There are currently 9 users browsing this thread. (0 members and 9 guests)
 LinkBack URL
 About LinkBacks
-
10-13-2012, 04:31 PM #2511Senior Member


- Join Date
- May 2007
- Location
- South West Florida (Behind friendly lines but still in Occupied Territory)
- Posts
- 117,696
(if the video doesn’t show up, click here)
Installation
Installing a gamma seal lid isn’t too difficult. You can follow the instructions on the lid and hammer the ring onto your bucket with a rubber mallet then screw the lid into the ring. Or you can skip reading the directions and the rubber mallet hunt and just stomp on the edges like I show here:
(If the video doesn’t show up, click here)
Once the lid is on the bucket, it’s not coming off without a fight, so make sure you’re installing it on the bucket you want it on forever. Gamma seal lids are very sturdy, and for your most frequently accessed buckets are definitely worth the extra initial expense. Gamma seal lids can be found at most preparedness stores, some grocery stores, some hardware stores, and online at Amazon.
What are Gamma Seal Lids and How to Install Them » Food Storage and Survival
Join our efforts to Secure America's Borders and End Illegal Immigration by Joining ALIPAC's E-Mail Alerts network (CLICK HERE)
-
10-13-2012, 04:39 PM #2512Senior Member
- Join Date
- May 2007
- Location
- South West Florida (Behind friendly lines but still in Occupied Territory)
- Posts
- 117,696
Survivalist, prepper or homesteader, what’s the difference?
First, I would like to thank everyone that treated Angie’s first article so well. You guys were fantastic. You will never know how much I appreciate you.
I know the headline of this article is probably raising a few eyebrows right now. Most people believe that those three words mean the same thing. Unfortunately, for years those words meant ‘nut job’. I believe they are not the same, but do overlap in places.
I figure some people would say that is purely semantics, a play on words. I don’t believe that. I think they are three very different and distinct groups of people, with different skillsets and outlooks. I also believe that every one of us have all three of these archetypes inside.
The Survivalist
This is the first thing most people think of when someone talks about preparedness. They think of some lone person lurking in the woods with his head full of crazy, tin foil hat conspiracies. Unfortunately, this is really as far from real survivalists as possible.
A survivalist is someone that has decided to learn how to take care of themselves. While many survivalists like to go out on their own, most understand the need for having a group of like minded people around them. After all, there is safety in numbers. Many survivalists have military experience, meaning they learned some survival skills already.
In general, survivalists believe something can happen, or is going to happen at any time. They learn skills that are vital to surviving in different situations. For instance, they will learn how to go into the woods and survive with as little as they possibly can. They learn how to defend themselves in bad situations and gather as many skillsets as possible.
They look at events or situations and try to think about what they need to make it through. Many times they work on the assumption that ‘there is no help coming’, because, in many of the situations they see, help will arrive too late.
Survivalist skillsets include:
- Map reading/ way finding
- Compass reading
- Fire crafting
- Foraging
- Self defense
- Shelter making
- Water procurement and sterilization
- Hunting
The Prepper
Preppers come from every walk of life. They have awaken to the fact that something is wrong.
Many times, this starts as feelings of uneasiness that they can’t put their finger on. This is akin to the ‘fight or flight’ reaction that animals experience in times of stress. This usually results in massive studying/ searching the ‘net trying to understand what they are feeling. Many begin to buy “stuff”, usually in large quantities, and stockpile it.
Over time, or with the help of other preppers, they begin to learn and fine tune their approach to ‘getting ready’. They learn more about what is bothering them. They look around and realize that they are suddenly a minority, a small group of people that know and are getting prepared for the inevitability of a true SHTF scenario. They begin to create scenarios that they can explore and check their stores to make sure they are as close to being self reliant as possible.
They work to pay off their debts, because it doesn’t make sense to try to work toward self reliance and still be a slave to debt. Many look at every day items and try to work out other uses for them. Most of us, at this point, begin trying to tell friends and family what they have learned and what they are doing to make sure they are ready. This is the point in which we get labeled such colorful term as ‘crazy as a bed bug’, ‘nice but a little strange’ and worse.
Useful skillsets for preppers include:
- Carpentry
- Water sanitation
- Storage skills (yes, this is a skill. Trust me.)
- Mechanical repair
- Electrical systems troubleshooting/ repair
- Herb craft/ wild craft
- Gardening
The Homesteader
The homesteader is kind of a high level prepper. Homesteaders see that, in the long run, the best way to be prepared is to be able to be self sufficient. They get a place where they want to settle down and work towards that goal.
Many homesteaders create a small scale farm that will take care of themselves and their families.
They work towards creating a sense of community, because it ensures their chances of survival.
Most of them are past the point of trying to ‘help the world’. That doesn’t mean they aren’t willing and open to helping others looking to prepare. They learn skills that will make their life more self sustaining.
It isn’t out of place to find any of the following on a homestead: chickens, rabbits, hogs, a garden and/ or a green house.
Skillsets for the homesteader:
- Carpentry
- Winemaking
- Bee keeping
- Food preservation
- Gardening
- Permaculture concepts
- Beer making
This is just a small list of the differences and similarities between the three groups. There are plenty more.
So, where do you fit in? I know I have a little of all the above.
Thanks for taking the time to read my opinion. If you have any questions or comments, feel free to chime in.
Survivalist, prepper or homesteader, whatJoin our efforts to Secure America's Borders and End Illegal Immigration by Joining ALIPAC's E-Mail Alerts network (CLICK HERE)
-
10-13-2012, 04:41 PM #2513Senior Member
- Join Date
- May 2007
- Location
- South West Florida (Behind friendly lines but still in Occupied Territory)
- Posts
- 117,696
Tuesday, February 22, 2011
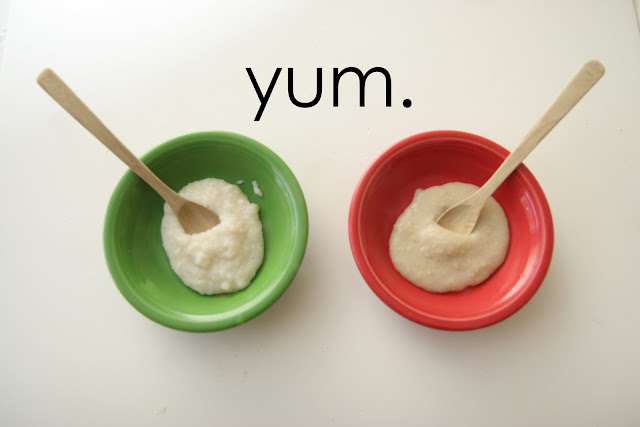
Homemade {Whole Grain} Baby Cereal
(If you stopped by from money saving mom, welcome! Feel free to check out more of homemade ginger!)
I was too intimidated to make homemade cereal for Lula, but I decided to take a stab at it the second time around.
Come to find out, it's super easy. I also love that it is so frugal and healthy since you are able to use whole grains and control what goes into it.
(I adapted much of my info from wholesomebabyfood.com )

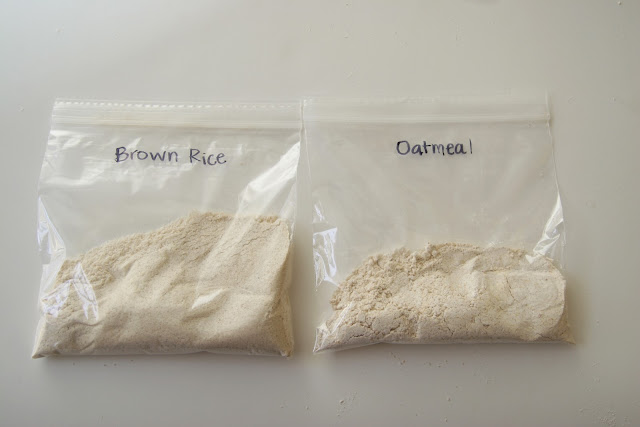
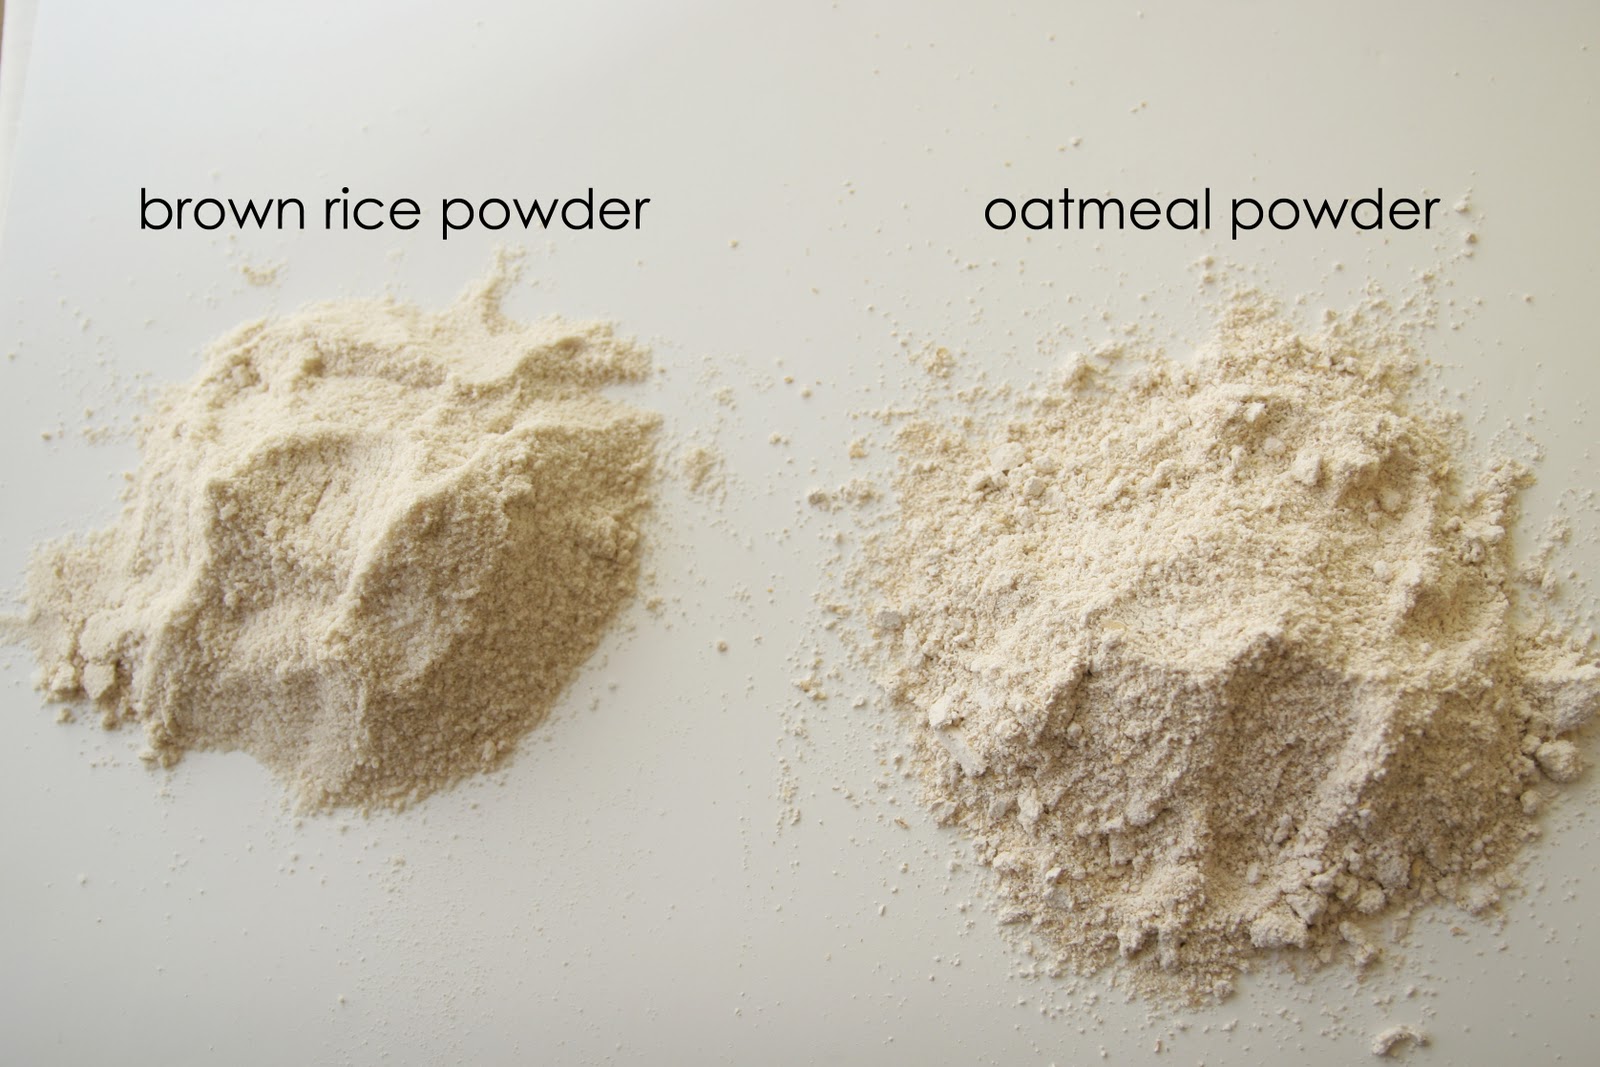
I made brown rice and oatmeal for Jane. All you need is brown rice and old fashioned rolled oats (not the quick cooking kind!)
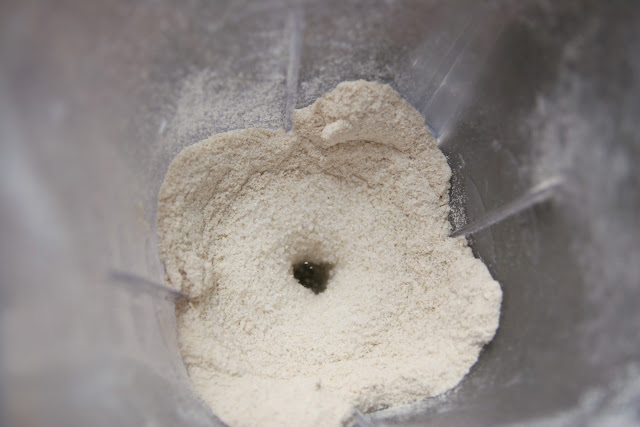
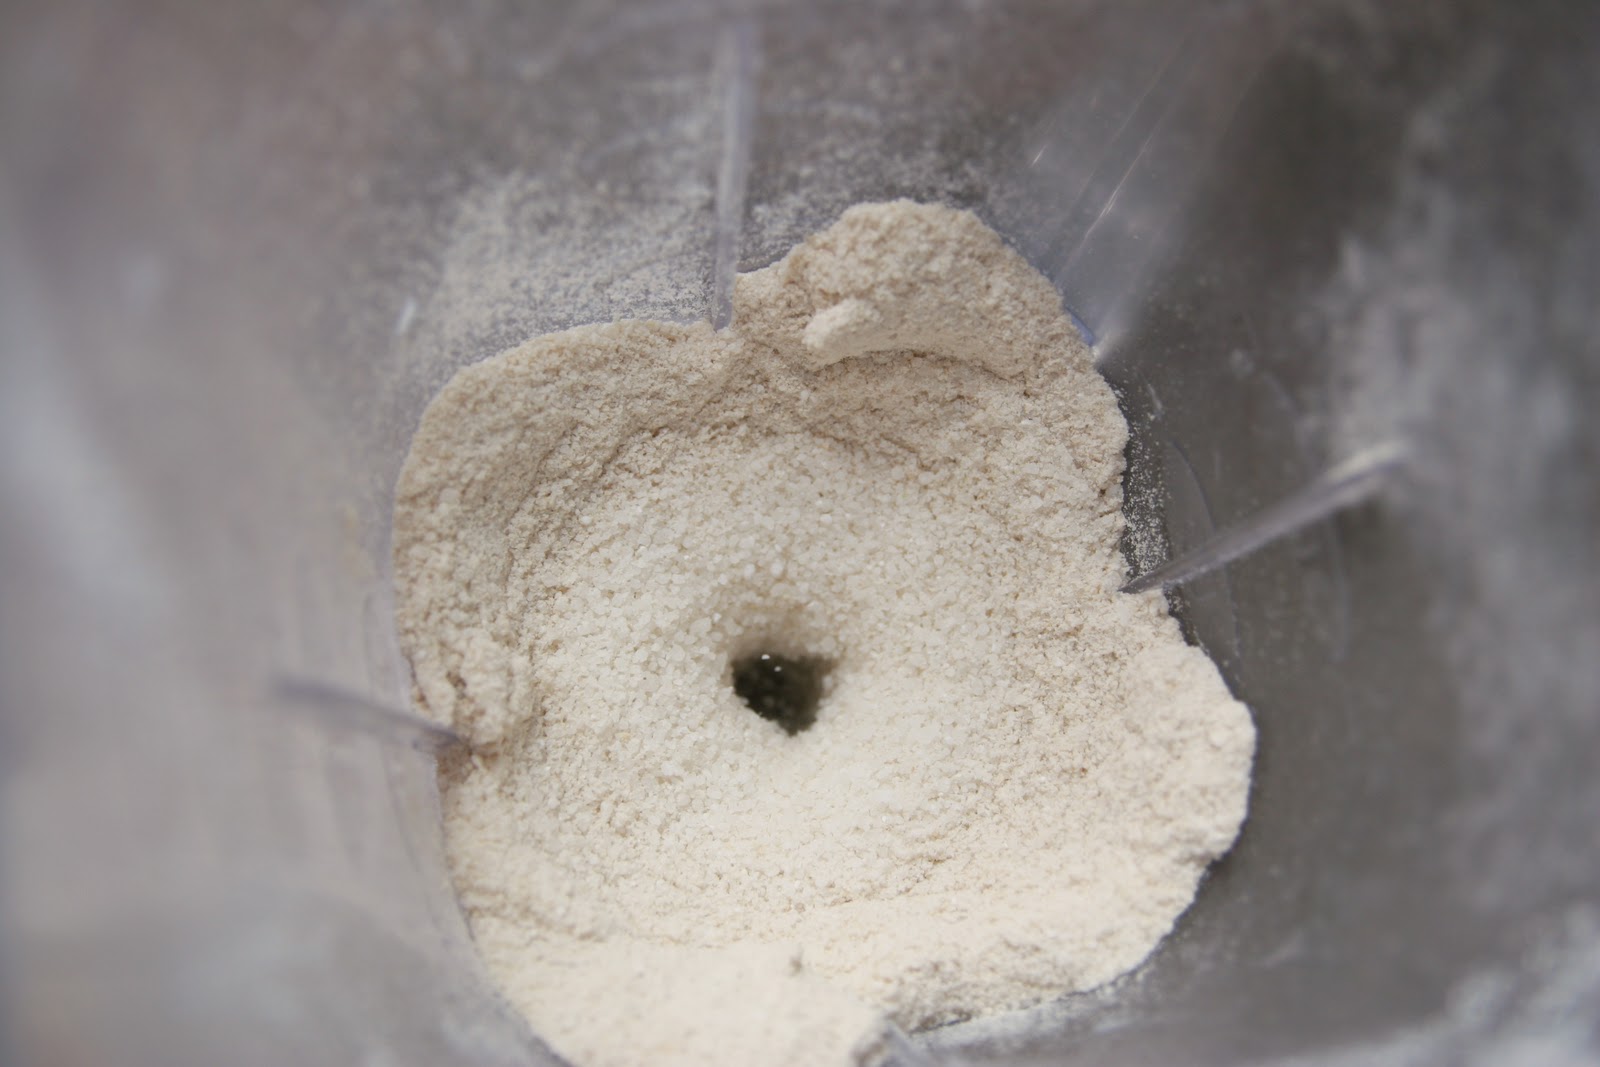
Grind the rice or oatmeal in the blender to make a fine powder. This will take a few minutes depending on how good your blender is. The rice is a little more difficult to get finely ground.

When you are finished, you should have rice powder and oatmeal powder.
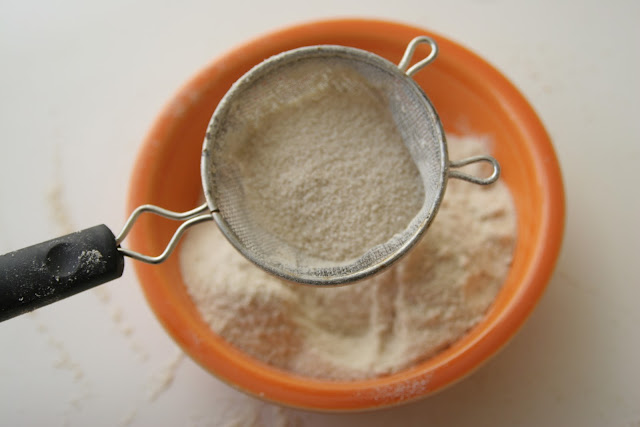
This step is not totally necessary, but you can sift the powder to make it even finer. I did this with the rice powder because my blender isn't great and there were still some chunks in it. I found the cereal came out much smoother in the end. But, you could skip this step if you want.

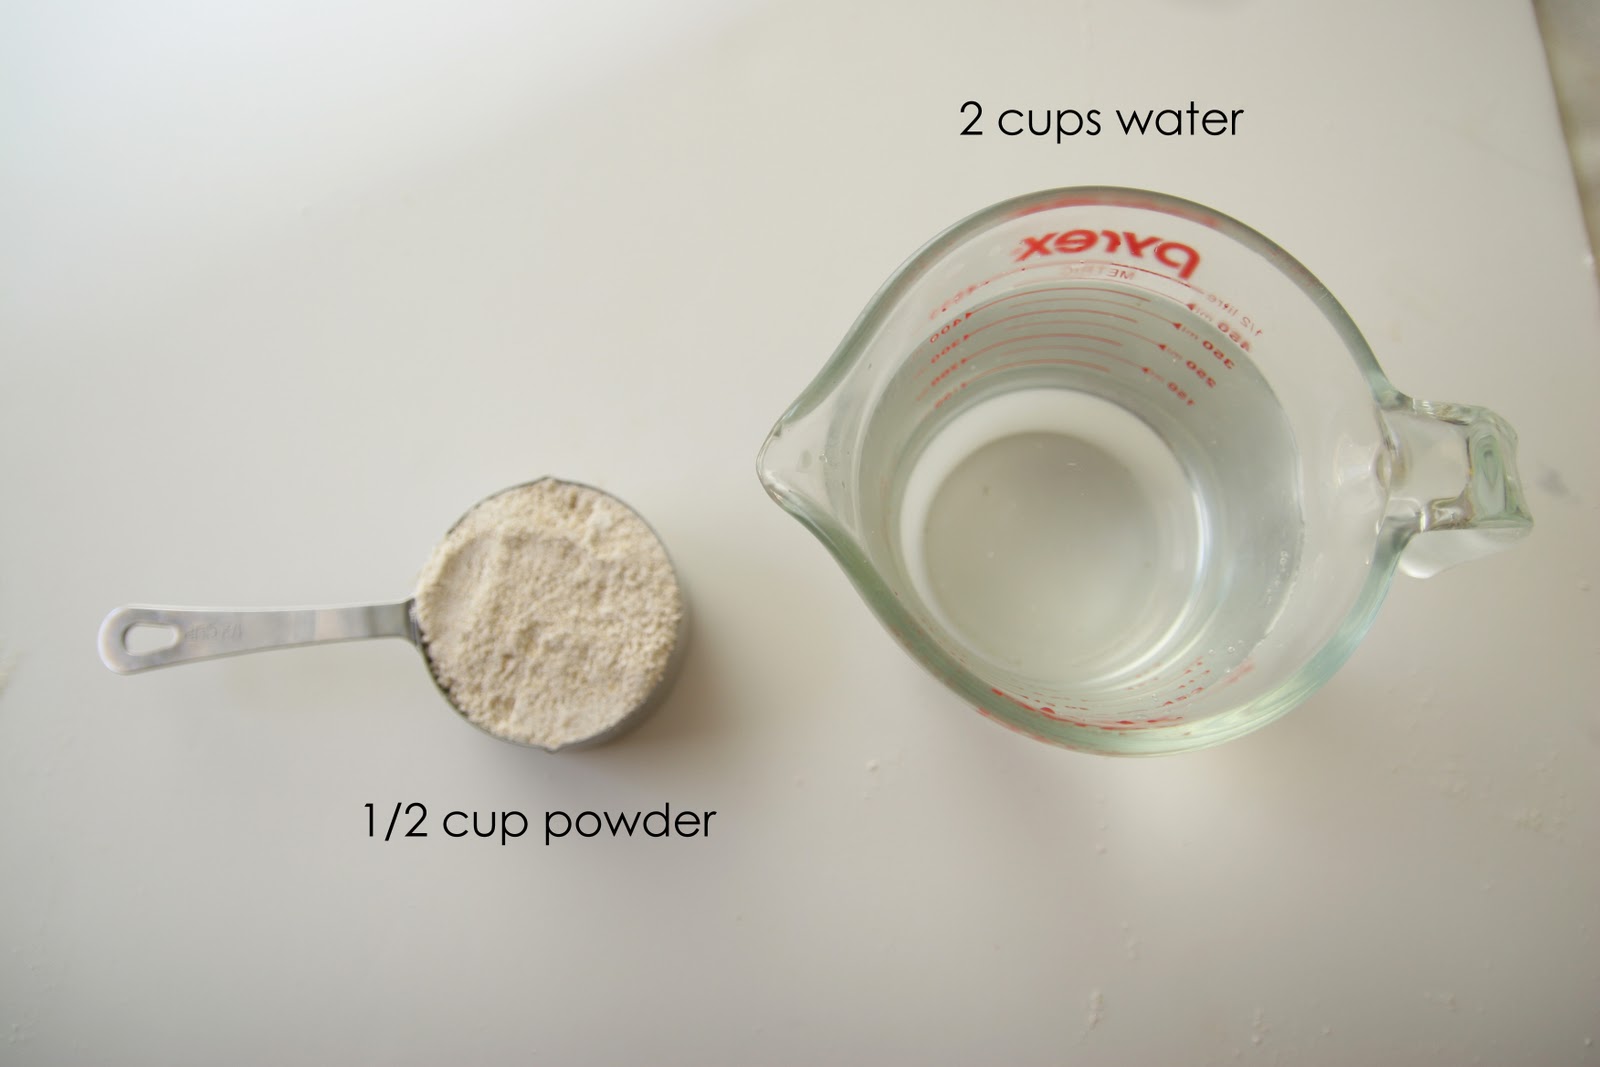
Most recipes I found called for 1/4 cup powder and 1 cup water, but I like to double it so that I have lots of extras that I can freeze.
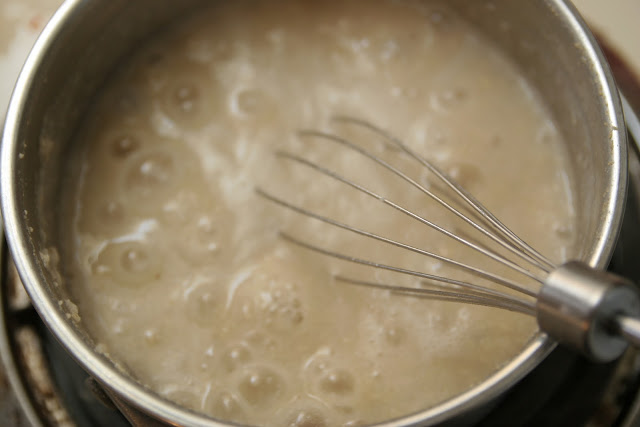
Boil 2 cups water and then add 1/2 cup of the powder. Whisk frequently for 10 minutes. Then, you are done!
You can save the extra powder for later.
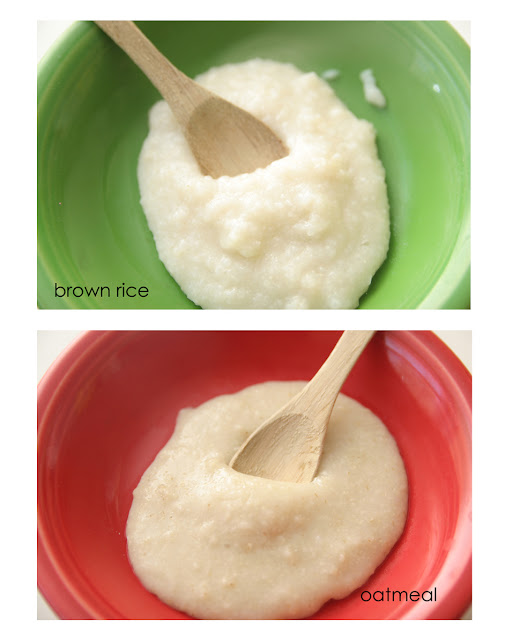
When it's done cooking, it should be a fairly smooth cereal. You can add breast milk, formula and/or pureed fruit. If you feel the cereal is still a bit too thick, you could blend it once it's done cooking.

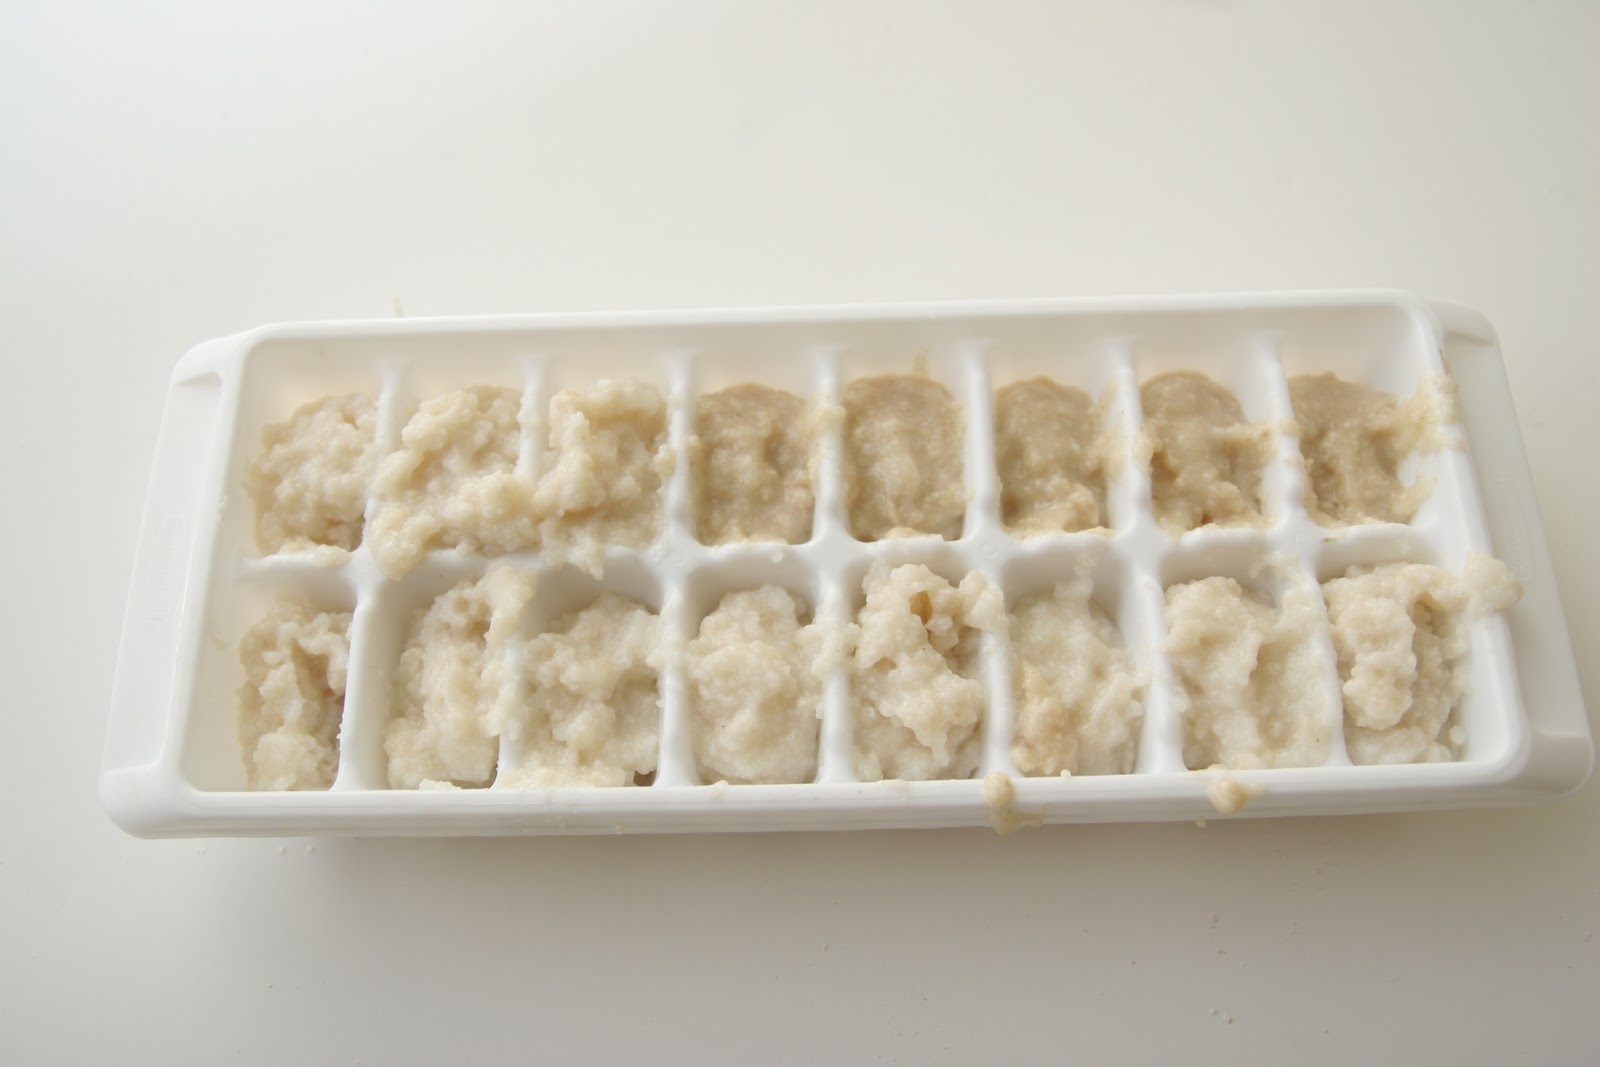
Stick a few servings in the fridge and put the rest in an ice cube tray to freeze. You could freeze the cereal by itself or mix it with a fruit and freeze. This is my first time freezing the plain cereal, so I will have to report back to you if the texture was weird after thawing it.
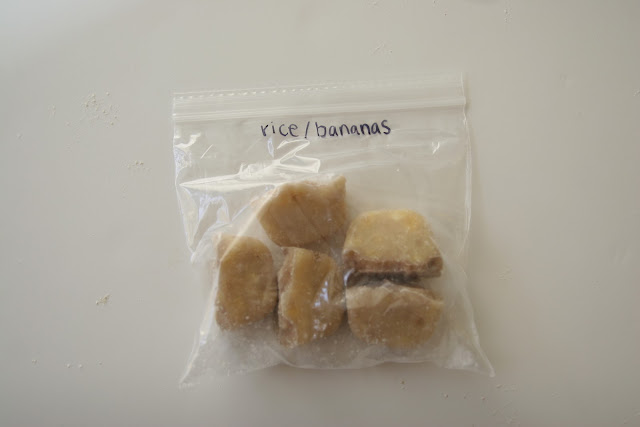
The banana/rice mixture turned out great once thawed. Once your ice cubes of cereal are frozen, pop the cubes in bags. One cube is one ounce.
Watch your baby enjoy!
*update! I found that the cereal is fine after thawing, but a tad on the "gummy" side. as long as you mix it with a bit of water after thawing, it's fine. however, after experimenting, my best recommendation is to mix the cereal with a fruit and then freeze. This produces best results after thawing!
* you can store the leftover oatmeal and rice powder in a dry, cool location. leftover prepared cereal needs to be stored in the refrigerator for up to 72 hours. Check out this website for more info about storage.
** If you are concerned about the fact that homemade baby cereal is not iron fortified, check out this great article!
homemade ginger: Homemade {Whole Grain} Baby CerealLast edited by AirborneSapper7; 10-13-2012 at 04:44 PM.
Join our efforts to Secure America's Borders and End Illegal Immigration by Joining ALIPAC's E-Mail Alerts network (CLICK HERE)
-
10-13-2012, 04:46 PM #2514Senior Member
- Join Date
- May 2007
- Location
- South West Florida (Behind friendly lines but still in Occupied Territory)
- Posts
- 117,696
Thursday, February 16, 2012
Frugal Living Day 16: Homemade Bread
On thing I've been doing for a few years now to save money, is make my own bread. I definitely go through spurts with this and consistently make it for months and then get lazy and start buying it for awhile. It does take a little planning to keep up with it. I've found that making a few loaves at a time and freezing them saves me tons of time. It's great to just pull a loaf out of the freezer and not have to think about making some or going to the store. Plus, it's nice to know exactly what's going in your bread...especially since it's come out in the news that not all things labeled "whole grains" are really what they claim to be.

This is the BEST whole wheat bread recipe I've found. A huge shout out to my friend, Bryanna for giving this to me. I don't know where it originated, but the bread comes out so light and soft every time...unlike the dozens of other whole wheat recipes I've tried. You can make the dough in a bread machine and then transfer it to loaf pans. Or, if you have a mixer (I wish I did!) you could make it that way.
I strongly encourage you to find a white whole wheat flour like this one:
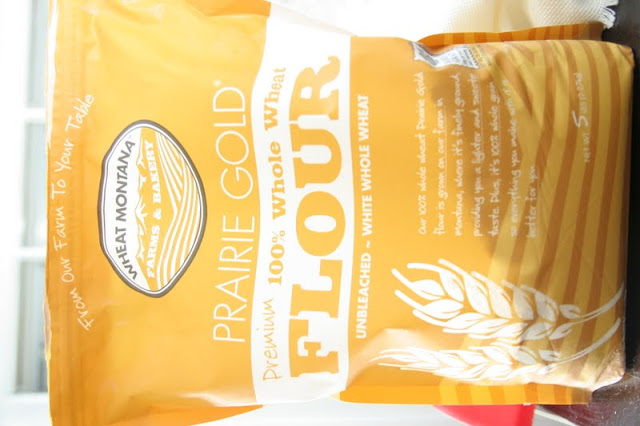
It's still 100% whole wheat, but will yield a lighter textured loaf.
(This recipe is not written for a bread machine. If you want to make it in your bread machine, I would recommend doing a 1/2 recipe and just making the dough. Then, transfer your dough to a loaf pan and follow the recipe from there. )
The BEST whole wheat bread
2 1/2 C. warm water
1 1/2 T. yeast
2 C. white whole wheat flour
Combine these in your mixer and let it sponge for 15 minutes.
Cover mixture with 1 Cup of flour * to protect it from the oil and honey. Add remaining ingredients slowly.
1/3 C. oil
1/3 C. honey
2 1/2 tsp. salt
1/4 Cup wheat gluten
3 Tbsp dough enhancer (optional...I buy mine online)
4-5 Cups fresh whole wheat flour (that # INCLUDES the one cup you added up above *
Add flour to mixer slowly until it begins to pull away from the sides of bowl. Dough should be smooth and elastic. so don't add too much flour
Knead 6-10 minutes on speed 1.
Form the dough into 2 loaves and place in greased loaf pans. Allow to rise until doubled in size (about 30-60 minutes). Bake for 25-30 minutes at 350. Allow to cool 10 minutes in pan before placing on cooling rack.
Considering that a good quality loaf of 100% whole wheat bread costs at least $3, this will save you a ton of money! I'm guessing this recipe costs about $1 a loaf.
homemade ginger: Frugal Living Day 16: Homemade Bread
You might also like:
Homemade bread using the bread machine
Homemade Whole Wheat Bread
Homemade Whole Wheat Bread
Join our efforts to Secure America's Borders and End Illegal Immigration by Joining ALIPAC's E-Mail Alerts network (CLICK HERE)
-
10-13-2012, 04:49 PM #2515Senior Member
- Join Date
- May 2007
- Location
- South West Florida (Behind friendly lines but still in Occupied Territory)
- Posts
- 117,696
Wednesday, October 10, 2012
PREPPING YOUR HOME FOR THE UNEXPECTEDhttp://conspiracyhq.com/prepping-your-home-for-the-unexpected/
FROM OUR BLOG PAGE
SUGGESTED MEDICAL SUPPLIES
http://homesteadsurvival.blogspot.com/p/suggested-medical-supplies.html
SUGGESTED PREPPING TOOLS
http://homesteadsurvival.blogspot.com/p/suggested-prepping-tools.html
SUGGESTED BULK FOODS FOR STORAGE
http://homesteadsurvival.blogspot.com/p/suggested-bulk-foods-for-storage.html
Join our efforts to Secure America's Borders and End Illegal Immigration by Joining ALIPAC's E-Mail Alerts network (CLICK HERE)
-
10-13-2012, 04:57 PM #2516Senior Member
- Join Date
- May 2007
- Location
- South West Florida (Behind friendly lines but still in Occupied Territory)
- Posts
- 117,696
PREPPING YOUR HOME FOR THE UNEXPECTED
Posted on October 10, 2012
By Mitty
 I was your typical American citizen over the past six decades who thought or did nothing to prepare my home for the unexpected. I was naive that nothing would ever happen to the ordinary life I was living from going to work, taking vacations and enjoying life.
I always figured that if I needed water, food or home needs that I could just run to the store.
About 4 years ago I finally woke up and started doing some researching on many issues going on with the universe, sun, earth, pollution, radiation, governments, losing civil rights, economy and war conflicts around the world. Soon I realized that the future could bring many hardships for ones survival.
I began thinking how can I protect my home if there is unexpected chaos in the near future. I know I can not rely on the government or anyone else except myself to stay alive. I have done lots of research on survival and as a former Marine it came easy that I must set forth a plan to survive in any ordeal that is dealt my way.
I know there will be other family members who will be dependent on me for their survival also.
They are still ignorant to what is happening through out the world and in the universe and care not to prep at all. Is that not ironic for as of now they think I have gone paranoid and crazy for prepping for the unexpected. Until I did my home work on all the issues I listed above did I realize I must change my perception of the world and prepare myself for the unexpected.
Did you know that change is the hardest behavior for a human to obtain?
I’ve made a list of items I feel that one should have in their home to be self sufficient and no need to rely on anyone for immediate survival.
THE FOLLOWING LIST IS IN ORDER STARTING WITH THE MOST ESSENTIAL ITEMS
1. WATER – Bottled water as much as you can store. Best to have is a gravity flow purifier that will give you clean drinking water from lakes, rivers, streams or rain. Filters in the gravity flow system will allow up to 6000 gallons of purified water through them. (Recommend 2 sets or more)
2. FOOD – Rice & Beans you can live on. Freeze dried foods, MRE’s will last for 30 years. Canned foods make sure they are not dented and stored under 71 degrees. They have found cans of food over 100 years old and still edible. (some nutrients were lost) Use plastic sealed food containers for all other package foods with oxygen absorbers to curtail any bacteria growth.
3. FIREARMS & SECURITY – You will need firearms to protect your food and water. A shotgun, rifle, pistol and plenty ammo. All doors and windows must be secured (deadbolts & bars) to detour easy access. Some preparers who say there is no need for a weapon are the most vulnerable having their food supply’s taken away.
4. LIGHTS & BATTERYS – Battery & cranked generator flashlights to see in the dark is a must.
Lanterns that run on battery’s and can be solar charged are nice and come in various sizes. Candles can cause a fire. Generator is nice to have but the fuel for it and noise can be an issue.
Keep battery’s in dry cool place for longer life. Solar rechargeable battery’s have longer usage.
5. COMMUNICATION DEVICES – Battery and self crank generated radios, CB’s and Short Wave radios will be useful, so you know whats going on in your community and the world. Hopefully transmitting stations and others have back up generators to transmit. Walkies talkies are good for your immediate circle to communicate if one must leave the home for supply’s.
6. MEDICAL SUPPLYS – Stock up on medical supply’s. If you become sick or injured you will be your only source to control of fix the injury or illness. Antibiotics (3) different kinds will be a necessity. Prescription medication if you can not stock up on them check on getting herbal or other remedies that can be used for your condition. A alternative drug and health book will guide you in the correct methods to use.
7. WASTE DISPOSAL AND HYGIENE – You must have ways to stay clean and dispose of garbage and human waste. You will not be able to flush your toilet. I have fitted bags that I will use inside my toilet and then remove the waste away from my home. Stock up on sanitizing hand packets, toilet paper and waterless soaps. Most people do not realize that poor hygiene issue will cause the body to break down and spread diseases.
8. HEAT FOR COOKING AND WARMTH – For people who live in cold climates like me I have a Propane heater to use for inside ( Highest room upstairs is designated for the warm room) Carbon dioxide can be an issue, certain heaters can be used inside plus have a carbon dioxide detector built in for your safety. Propane stoves are a must to boil water and cook food. If possible having extra cords of wood if you have a fireplace or outside fire pit. Blankets and sleeping bags will also be an necessity.
This list is just a basic start for one to prep their home for the unexpected. I have been preparing for years to have my home being self sufficient for me to live in without depending on anyone for my survival. Having some items listed is better than none. If anyone has questions or want more details and information on what to buy, use or obtain for prepping their home, the Bunker Outlet is a good place to start.
Any questions or more detail, post a comment and I will reply back to you.
PREPPING YOUR HOME FOR THE UNEXPECTED | Conspiracy HQJoin our efforts to Secure America's Borders and End Illegal Immigration by Joining ALIPAC's E-Mail Alerts network (CLICK HERE)
-
10-13-2012, 05:06 PM #2517Senior Member
- Join Date
- May 2007
- Location
- South West Florida (Behind friendly lines but still in Occupied Territory)
- Posts
- 117,696
 Seven ways to use honey for whatever ails you
Saturday, October 06, 2012 by: J. D. Heyes
(NaturalNews) Lots of us may like to use a little honey as a sweetener for our morning coffee, toast or tea, but there are several uses for this tasty little treat - in its pure, raw, non-pasteurized form, it can do more than just bring a smile to our face.
Manuka honey as the new 'superfood.' What is Manuka honey, scientifically known as Leptospermum Scoparium?
Well, it is honey that is produced by bees that pollinate Manuka trees, which grow almost exclusively in the East Cape region of New Zealand. Because it's a bit of a rarity, it also tends to be pricier but according to Britain's Telegraph newspaper, a recent survey of people who bought it showed that 58 percent believed it to be better than ordinary honey - even if they didn't really know why.
This might be why. Manuka honey has a long reputation for offering a number of health benefits. For New Zealanders, local honey containing local pollen can help reduce the effects of hay fever, but for everyone else, Manuka honey has antiviral and antibacterial actions, which is why lots of people familiar with this superfood's qualities down it at the first hint of a cold or sore throat.
"According to doctors, Manuka honey's high sugar content creates a waterless environment in which the bacteria that are infecting a wound are unable to survive. Also, thanks to the presence of an enzyme called glucose oxidase, it is acidic, which apparently adds to its unique antibacterial properties," the Telegraph said.
"The therapeutic potential of uncontaminated, pure honey is grossly underutilized," says Peter Molan, director of the Honey Research Unit at the University of Waikato in New Zealand. "It is widely available in most communities and although the mechanism of action of several of its properties remains obscure and needs further investigation, the time has now come for conventional medicine to lift the blinds off this 'traditional remedy' and give it its due recognition."
Honey as a natural energy booster. Do you down an energy bar or drink during your hectic day? Try a spoonful of honey instead; it's been proven to deliver a significant boost of energy to athletes performing strenuous exercise.
"Numerous studies have singled out carbohydrates as a critical nutrient in endurance exercise," says Richard Kreider of the University of Memphis Exercise and Sport Nutrition Laboratory. "Most of the studies to date have shown supplementation with glucose to provide the extra staying power. We were pleased to find that honey, a 'cocktail' of various natural sugars, performed just as well."
Forget the fancy facial creams. Raw honey is exceptional for your face and skin, according to research. Try a "Gentle Honey Wash" consisting of a dollop of honey mixed with two tablespoons of warm water in the palm of your hand, then gently massage the mixture into your face or skin.
"Honey has long been valued in Asia for its natural medicinal properties. Combined with rice bran, honey is used there to treat diaper rash and even acne. Honey is also an excellent treatment for dry skin as it stimulates good circulation and helps to seal in moisture," says holistic skin care expert Ettia Tal.
You can even make your own honey moisturizer, says travel and food writer Anna Brones: "If you've got a handful of sweet smelling herbs -- think lavender -- laying around and ready to be used, why not use them for your own homemade honey lotion? Warm honey over a saucepan until it gets to a liquid consistency. Pour honey over herbs and cap tightly; the ratio you want to use is one tablespoon of herbs per eight ounces of honey. Let sit for a week and then mix one teaspoon of liquid into an eight ounce bottle of unscented lotion."
Having trouble sleeping? "A spoonful of honey before bed (by itself or in a cup of warm herbal tea) is a natural sleep remedy that can help you relax and fall asleep faster," writes Natural News' Elizabeth Walling.
Suppress that cough and throat irritation. Pure, non-pasteurized honey is an excellent elixir for common wintertime ailments like coughs, colds and sore throats.
"Honey helps with coughs, particularly buckwheat honey. In a study of 110 children, a single dose of buckwheat honey was just as effective as a single dose of dextromethorphan in relieving nocturnal cough and allowing proper sleep," writes health enthusiast and researcher Diana Herrington.
Boost your immune system with this natural antibiotic. According to recent research, defensin-1, a protein added to honey by bees, possesses antibacterial properties and could be used against drug-resistant bacteria. This bee-produced protein "could one day be used to treat burns and skin infections and to develop new drugs that could combat antibiotic-resistant infections," says a summary of the research published in the Journal of the Federation of American Societies for Experimental Biology.
Balance the five elements "Honey has been used in ayurvedic medicine in India for at least 4000 years and is considered to affect all three of the body's primitive material imbalances positively," says Herrington. "It is also said to be useful useful in improving eyesight, weight loss, curing impotence and premature ejaculation, urinary tract disorders, bronchial asthma, diarrhea, and nausea."
Sources:
http://www.telegraph.co.uk
http://www.scientificamerican.com
http://innovativehealingtouch.com
Use raw honey for health, skin, hair, and more
http://www.huffingtonpost.com
10 Health Benefits of Honey | Care2 Healthy Living
http://www.healthcanal.com
Seven ways to use honey for whatever ails you
Articles Related to This Article:
• Honey and its many benefits to overall health and wellness
• The healing power of honey: From burns to weak bones, raw honey can help
• Planning to Lose Weight This Year? Supplement With Honey
• Healthy Honey Offers Many Benefits
• Knocking Out Superbugs With Antimicrobial UMF Honey
• Nature's sweetener - The health benefits of honey
Last edited by AirborneSapper7; 10-13-2012 at 05:09 PM.
Join our efforts to Secure America's Borders and End Illegal Immigration by Joining ALIPAC's E-Mail Alerts network (CLICK HERE)
-
10-13-2012, 05:14 PM #2518Senior Member
- Join Date
- May 2007
- Location
- South West Florida (Behind friendly lines but still in Occupied Territory)
- Posts
- 117,696

Skills That Pay the Bills:
Self-employment for Homesteaders
You finally did it! You managed to get away from the madness of urban life and build your own homestead. Now you raise your own meals; you take care of the land, buildings, livestock and a home. That sweet taste of freedom and accomplishment that homesteading brings is beyond compare to your old way of life. But, you still have that 8-5 grind and, chances are, you now spend extra time in a daily commute from your homestead to the place where you serve that 8-5 grind. The quest for the almighty dollar drives you to keep up that grind in the pursuit to meet your financial needs. However, could your homestead enable you to leave that grind? Is there a hidden opportunity lurking within all the labor you have invested in your homestead? Is it possible that your homesteading skills are offering you an alternative way to make a living? Has self-employment become a viable option for you?
If the self-employment option is calling and you desire to leave the rat race of the corporate world behind then the first thing you need to do is to simply brainstorm. Begin by making list of all the skills that you have, including the new ones that you earned while working to build your homestead. Things at which you probably became adept could qualify as light construction or handyman-type skills. Other areas in which you may have gained skills are fencing and livestock care. In the process of gaining and practicing these skills, did you obtain tools and equipment that you now own? If you purchased your own tools, they can now assist you in helping to plan your self-employment future. Many dreams of self-employment are lost due to lack of equipment and supplies so make a list of any and everything that you already possess that could help you to achieve your goals.
Next, make sure of any rules or regulations that exist in your area concerning the type of work that you are considering. You can usually find all state laws and regulations, including any licensing requirements, on your state government web site. Also make sure to check with county authorities and any other government entities so that you might be working within their boundaries. Research and make sure of anything that might be a legality affecting your future career. Remember, preparation pays off in the long run and if you are considering more than one idea, you will need this information to compare and contrast.
You have been researching what would be the best way for you to make a break from the corporate grind, now you need see how you can make your ideas fit into a work niche so that you can get started on your way to self-employment.
Take a close look at what opportunities seem to be the most plentiful around you and look at which of your strongest skill sets fit into these opportunities. Handyman is a broad scope job description, if you choose to exercise several of your learned skills at the same time then perhaps this is an option for you. A self-employed handyman really has no limits, however some jobs a handyman has to do may not be all that appealing, so carefully think about what opportunities are available in your area.

At some point on your homestead adventure you have probably had to construct a fence to keep in your livestock or perhaps more like keep the predators out. This skill can be of great value, as a lot of people would rather pay to have them installed rather than build the fences themselves. This particular job requires a good truck and trailer and a few tools but it does have drawbacks that must be considered. Such as the travel required if you want to have steady fence building work. It may also require a lot of up front cost in purchasing supplies. This type consideration may not be a problem for some but a problem for others so try to look at all possible scenarios.
Another popular skill learned in homesteading that can be transferred into self-employment is landscape and tractor work. In your quest to build your homestead did you level any ground for a foundation? Or move rocks and trees from a field to make it a useful pasture? What about building a driveway or water feature? If you have your own tractor and dirt-working equipment perhaps landscaping or dirt work is an excellent opportunity for you to break into the world of self-employment.
If dirt work is not something that interests you, perhaps you became well acquainted with woodcutting when designed your own homestead. Do you provide firewood for yourself each winter limiting your need for gas and or electric heat? Is a chainsaw one of your favorite tools to operate? If any of this sounds appealing to you then perhaps you should look into opportunities available to cut and sell firewood. Possibly you have enough extra space that you can make a lot for customers on your homestead to come to you for their wood purchases or perhaps you have a truck and or trailer available to be able to provide home delivery to customers for an extra fee.
Firewood is usually sold by the rick or cord so you need to have this information and set up some type of measuring system to provide wood in the right measurements. If you have plenty of wood and know of places to cut more for free, or at low cost, then woodcutting could be the perfect form of self-employment for you.
Maybe all these previous ideas just sound too much like work to you and you are looking for something more along the lines of livestock. This area can be a little touchy so make sure what kind of livestock services that you want to offer and that they do not encroach on things that require a licensed veterinarian to treat.
There are several options still available in this area that do not require a veterinarian to do. Examples are shearing of sheep and goats. Also hoof trimming on sheep, goats, cattle and horses are usually covered by others and veterinarians. Many individuals that want to get into this field have portable working equipment and tools that load on a truck and trailer and travel site to site to complete the job. This type option might not be enough work on its own for fulltime but there are those that make it a fulltime option by increasing the area or territory that they cover on a routine schedule.
These are just some the skills and options that homesteading has helped to foster into self-employment opportunities for others. Use these as ideas to develop more of your own ideas; a little imagination is all it takes to get started. If you spend time thinking about your favorite aspect of what you have learned and accomplished then you will be able to develop a basic plan to reach self-employment.
Congratulations! You have come up with an idea to use your homesteading skills to become self-employed. What is the next step? Once you have made up your mind what you want to do, you will need a customer or service base to get started on your new career path.

The fastest and best way to get the word out is to advertise that your service is now available to the public. Start with area where you live, try making flyers that state what you are offering and that have a contact number for potential customers to speak with you. These flyers can be handed out person-to-person, posted at local area venues, or mailed all ways are a few of the options available. Next you might consider placing an ad in the local newspaper or classified services paper that can be obtained within the areas that you want to offer your service or product. Always remember that word of mouth is a free way to advertise and often the one that brings about the most business if the word is good!
Depending on what type of self-employment you are planning, you might wish to invest in insurance as self-protection for you and your work. One of the most important types of insurance for the self-employed is liability insurance. This type of insurance protects you and your assets if something were to happen to someone else’s property while you are on the job.
Vehicle insurance of the commercial type is good to find out about if you are using a vehicle, trailer, or even a tractor as an everyday part of your self-employment. There are several costs and options available for both commercial vehicle and business liability insurance so make sure and look into this before deciding what type and where to purchase it.
Talking with others that made the switch to self-employed life has given me an inside look to the average income of various self-employment opportunities. The following is a list of average incomes from those out making their dreams come true. Keep in mind these prices are variable depending on the area, hours, expenses and many other things not necessarily foreseeable for this article.
- House Cleaning or nanny $250-300 weekly
- Lawn or Landscaping $500-$1000 weekly
- Farrier $400-$600 weekly
- Fence building $300-800 weekly
- Handyman $250-$500 weekly
- Window washer $250-$600 weekly
- Custom Hay bailing $300-$600 weekly
Now it’s time for you to get started on the path that leads you away from the daily 8-5 grind and marries up your financial future with your homesteading future. The start is always a little rocky but just like that wooded, rocky land on which you started your homestead, it will develop and grow with time and effort. Call your friends and neighbors and offer them the first chance at your new service or product; after all, you’re working for yourself, now.
"Skills That Pay the Bills: Self-employment for Homesteaders" by Regina Anneler page one
Last edited by AirborneSapper7; 10-13-2012 at 05:19 PM.
Join our efforts to Secure America's Borders and End Illegal Immigration by Joining ALIPAC's E-Mail Alerts network (CLICK HERE)
-
10-13-2012, 05:50 PM #2519Senior Member
- Join Date
- May 2007
- Location
- South West Florida (Behind friendly lines but still in Occupied Territory)
- Posts
- 117,696
Top 5 Reasons Why Cast Iron Is The Greenest Choice For Non-Stick Cooking
Dependable, that’s what cast iron is. It will last for centuries if properly cared for, and it has a natural non-stick surface that’s eco-friendly.
When I was a bride, my Granny gave me two of her cast iron skillets. A tiny, 6 inch one for making cornbread for two; and a 12 inch skillet for everything else. She told me all I’d ever need to be a good cook was those two skillets, a sauce pan, a stock pot and a casserole dish. And in a pinch, she said, I didn’t really even need the casserole.

Cast iron has been around for hundreds of years. Before fancy teflon cookware was even a notion, cast iron was the standard for good cooks everywhere. Dependable, that’s what cast iron is. It will last for centuries if properly cared for, and it has a natural non-stick surface that’s eco-friendly. You can bake a pan of cornbread, scramble some eggs, make your favorite vegetarian black bean chili or sear a perfect steak. Cast iron cookware is the definition of all-purpose.
If you don’t already have a cast iron skillet, here are a few reasons to go to your nearest resale shop or garage sale and begin looking for one. You won’t regret it.
Top 5 Reasons Why Cast Iron Cookware Is So Green...
Cast iron is naturally non-stick. Properly seasoned (see below) nothing will stick to it. Cast iron eliminates the need for the costly, toxic chemicals used to create the non-stick surfaces in modern cookware.
Eco-easy clean up. All cast iron cookware requires for clean up is hot water and a stiff brush, so you avoid any harmful chemicals in detergent or solvents.
Cast iron can take the heat. It can withstand much hotter temperatures and will distribute the heat more evenly than traditional cookware. And since it holds heat well, you can use less energy to cook. Plus it’s perfect for outdoor cooking. Just remember that cast iron gets hot. so use an oven mitt when handling a hot pan.
It’s a great upcycling opportunity. Don’t ever worry about buying a cast iron skillet or other cast iron cooking vessel—like a dutch oven—from a resale shop or garage sale. Even if it looks rusty and dirty, it can be cleaned and re-seasoned and continue on cooking, forever.
It’s good for you. Cast iron cookware leaches small amounts of iron into food, so you get a little extra iron each time you use it. Almost anyone, especially women in their child bearing years, will benefit from this.
How To Properly Season Cast Iron Cookware
First, wash your cast iron cookware. This is the only time you will need soap to clean it, but you want to be sure you remove any dust or dirt. If you have a brand new cast iron piece, you will need to do this to remove the wax coating that is on it to keep it from rusting until it’s seasoned.
Coat your piece in some type of oil. Cast iron has a porous surface. The seasoning process will fill and smooth the surface to make it non-stick. Some type of oil is used to facilitate this process. I use Crisco vegetable shortening. Traditionalists would use lard. You can use plain old cooking oil, too, but you will get better results with Crisco. You want to coat the entire cooking surface with the shortening. Don’t glob it on, but every nook and cranny should have a nice, medium layer of shortening. Use about as much as you would use to coat a cake pan for baking.
Bake it in the oven. Next, you just pre-heat your oven to 350 degrees and put your cast iron pan in for an hour or so. After heating, turn off the oven and let it cool completely while still in the oven. Then it’s ready to go!
Heating the cookware creates the oxidation that prevents rust and makes the surface non-stick. Some cast iron users advocate heating the pan slightly before applying the Crisco to ensure that the pan is completely dry and to open the pores of the pan before seasoning. Not a bad idea, but remember cast iron gets HOT. Use oven mitts.
Newly seasoned cast iron will take on a dark brown coating. After long use, it will become glossy black. The non-stick properties of the pan will increase with time and use, so use your cast iron often. Remember, seasoning is a process. Even though cast iron can be used immediately after the first seasoning, your cookware will get better and better over time.
How do I re-season a used cast iron piece? If you buy a cast iron piece second hand, the process is still basically the same to re-season it, with one exception. First wash it in hot soapy water, as above. Then I put it in my oven on the highest setting (or on the self-cleaning setting if you have one) and let it bake for a few hours without any oil or shortening. This will remove any rust and the old seasoning. Let it cool, then follow the steps above to re-season.
Caring For Your Cast Iron Cookware
After each use, clean your piece with very hot water and scrub with a stiff brush to remove any particles left behind. Don’t use soap, it will remove the seasoning. After you scrub the pan, give it a light coating with some Crisco or vegetable oil and store it in the oven. Why? Because the oven will have less moisture, this will help keep your cast iron from ever rusting. Plus, each time you use your oven is an opportunity to further season your pan. Even if you take your cast iron pan out while using your oven, give it a light coating of shortening before putting it back in the warm oven. Especially if it’s a new piece, this will help develop the seasoning further.
I have treasured those skillets Granny gave me, and I’ve added to my collection over the years. A dutch oven in 1989 and a griddle just last year. At a garage sale in Los Angeles about 15 years ago, I bought a giant, deep skillet that turned out to be called a Texas skillet. (An omen, I guess since I live in Texas now. ) I love my cast iron cookware. I’m guessing you will, too.
Top 5 Reasons Why Cast Iron Is The Greenest Choice For Non-Stick Cooking | GreenopolisLast edited by AirborneSapper7; 10-13-2012 at 05:52 PM.
Join our efforts to Secure America's Borders and End Illegal Immigration by Joining ALIPAC's E-Mail Alerts network (CLICK HERE)
-
10-13-2012, 05:57 PM #2520Senior Member
- Join Date
- May 2007
- Location
- South West Florida (Behind friendly lines but still in Occupied Territory)
- Posts
- 117,696
Sunday, October 7, 2012
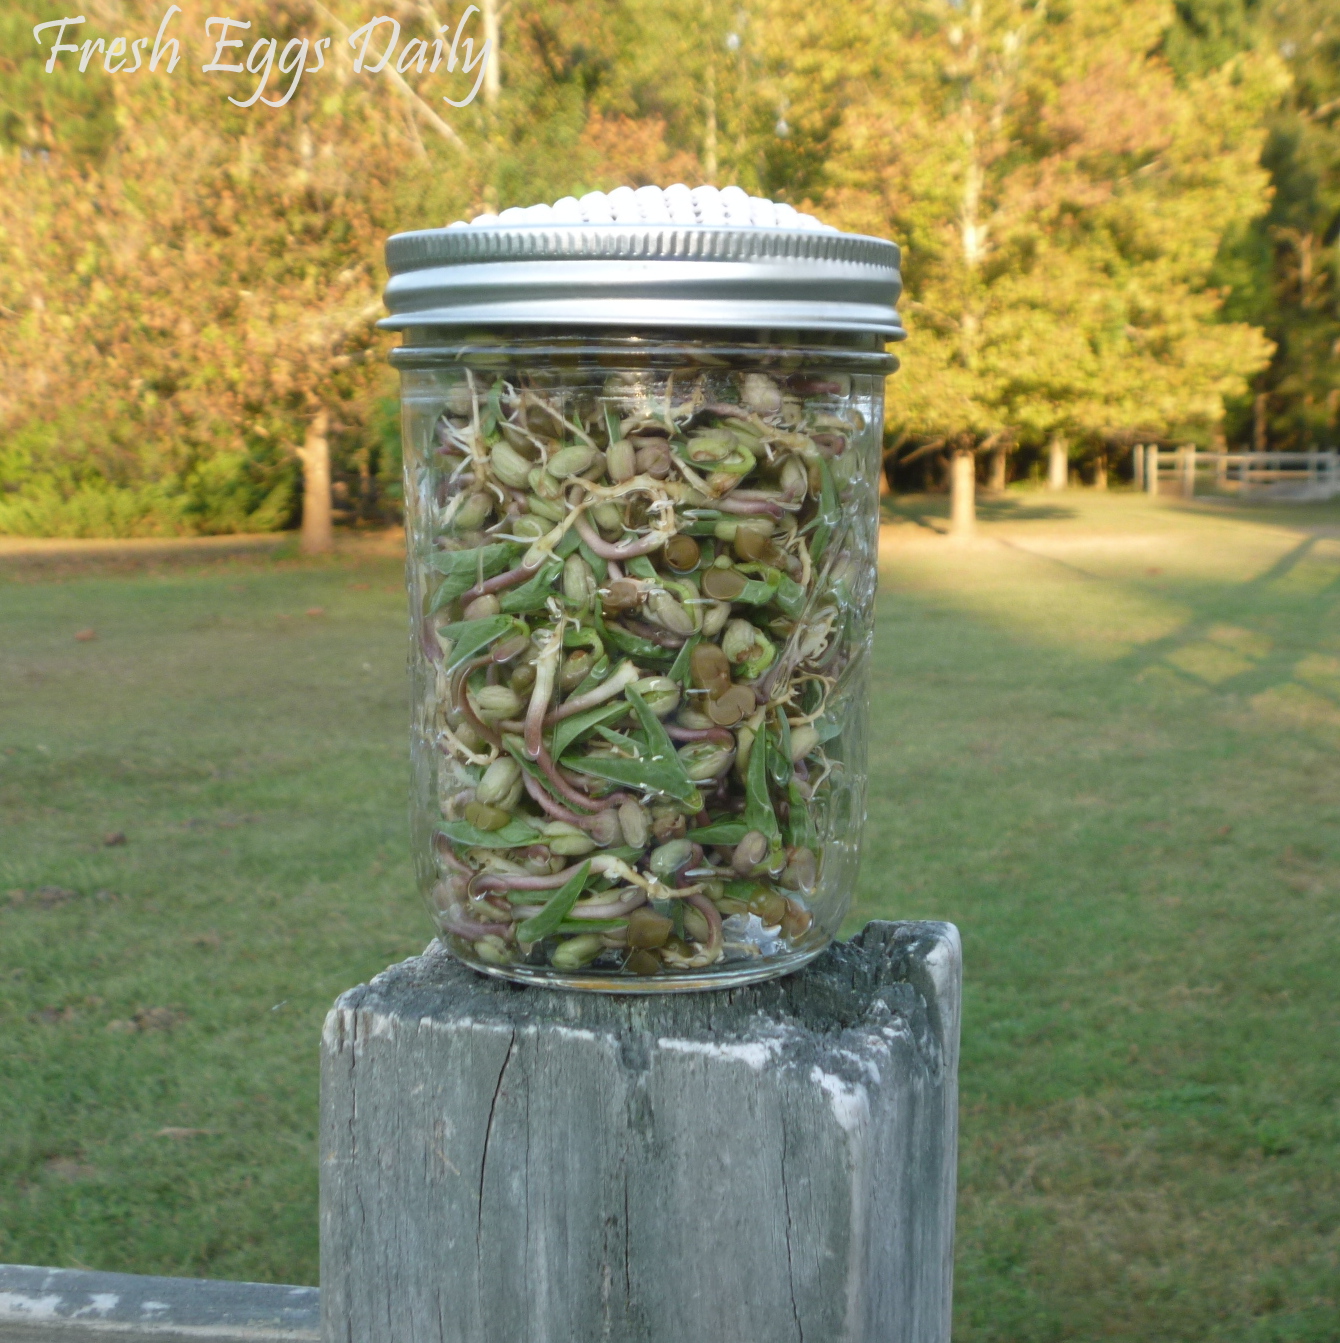
Growing Sprouts for your Chickens

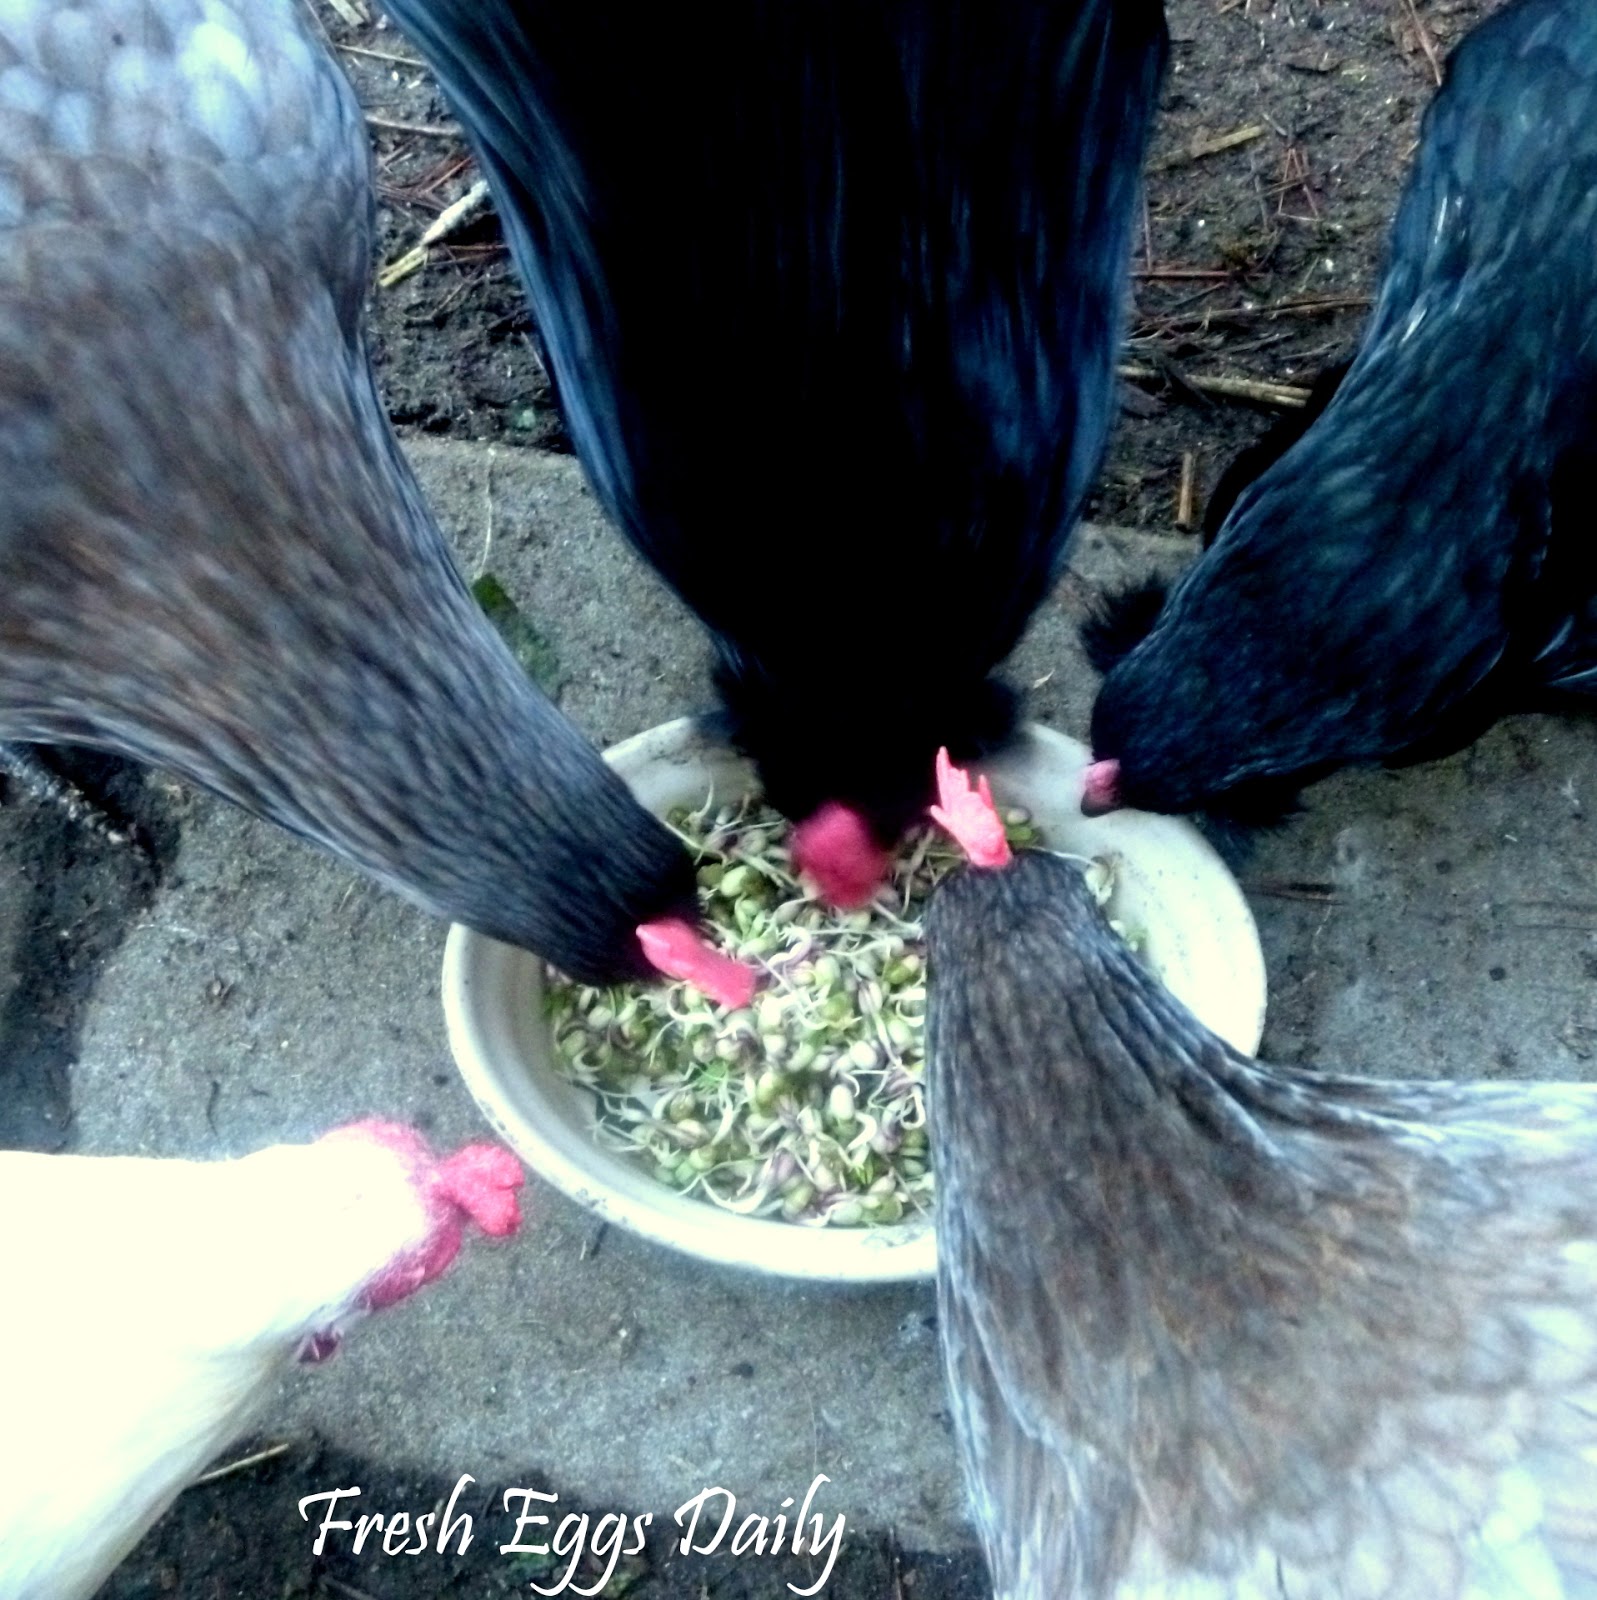
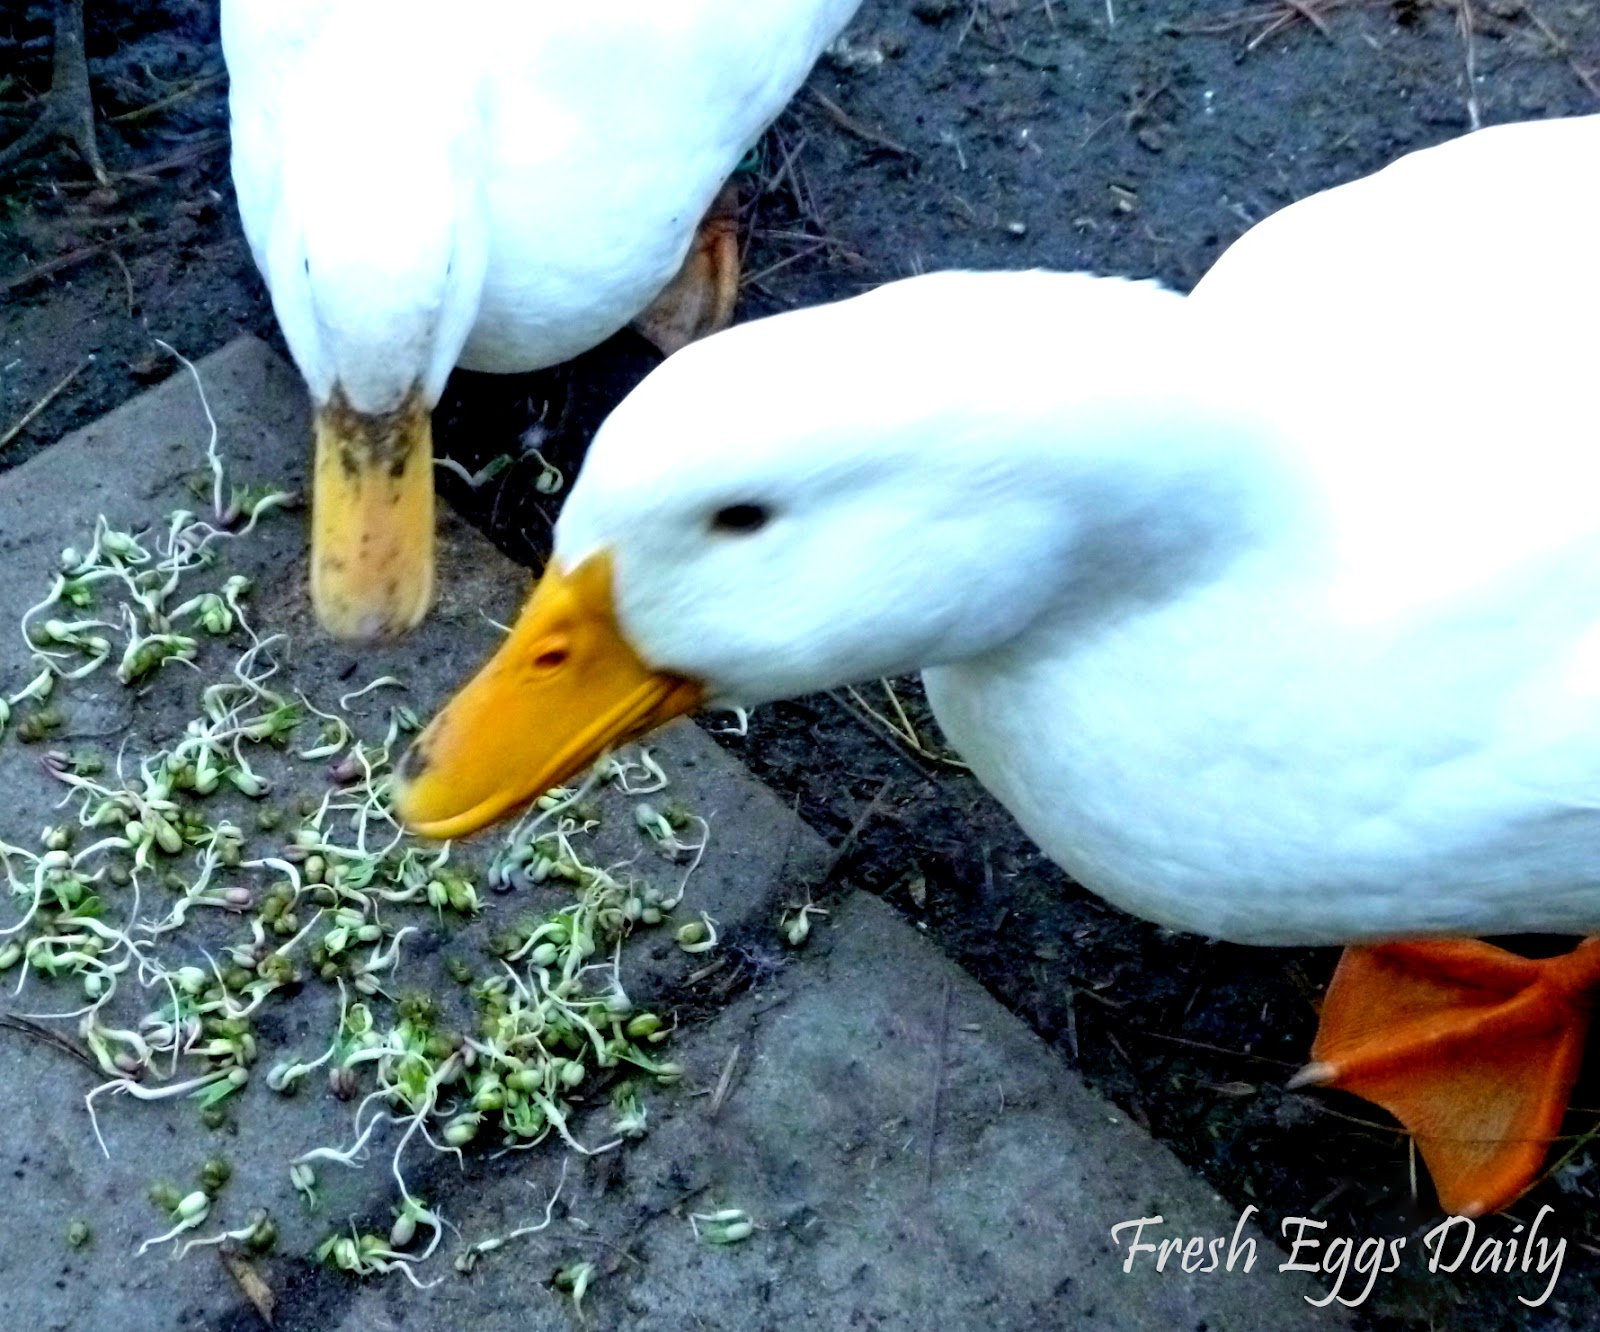
I remember growing up as a kid my Mom would have jars of alfalfa and other types of sprouts up in the kitchen cupboard. Yes, it was the 70's and yes, she was into healthy eating (whole wheat bread, unsalted natural peanut butter and tofu) way before it was en vogue. A woman ahead of her time, she inadvertently gave me an idea for healthy treats for our chickens this winter !
I've been trying to think of inexpensive, healthy treats for them since now with more than thirty chickens and ducks, it's just too expensive to buy them produce at the grocery store like I used to do when we only had eight. Turns out, sprouts are extremely nutritious and easy to grow.
If YOU have also been wondering what you can give to your chickens for healthy treats this winter when they can't get out to forage, and when produce isn't plentiful, why not sprout some seeds or beans for them? It's inexpensive and give the chickens much-needed nutrition when they can't be out eating grass and weeds.

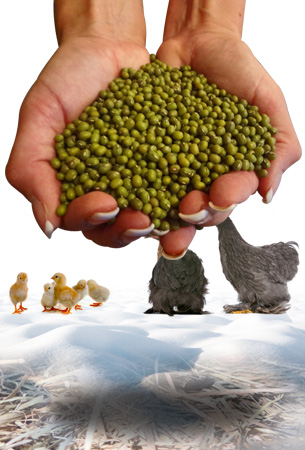
You can sprout all kinds of things: clover, alfalfa, mung beans, peanuts, lentils, peas, quinoa, radish, mustard seeds, grains, clover, oats, garbanzo beans, sunflower and pumpkin seeds, among others. Check your local health food store or online for organic beans and seeds for sprouting.
(Caution: dried beans contain a toxin called hemaglutin and should never be fed RAW to chickens, however cooking or sprouting destroys the toxin. I would still suggest avoiding the larger beans such as lima, kidney and the like, and stick with grains, seeds and smaller beans like mung or lentil instead)
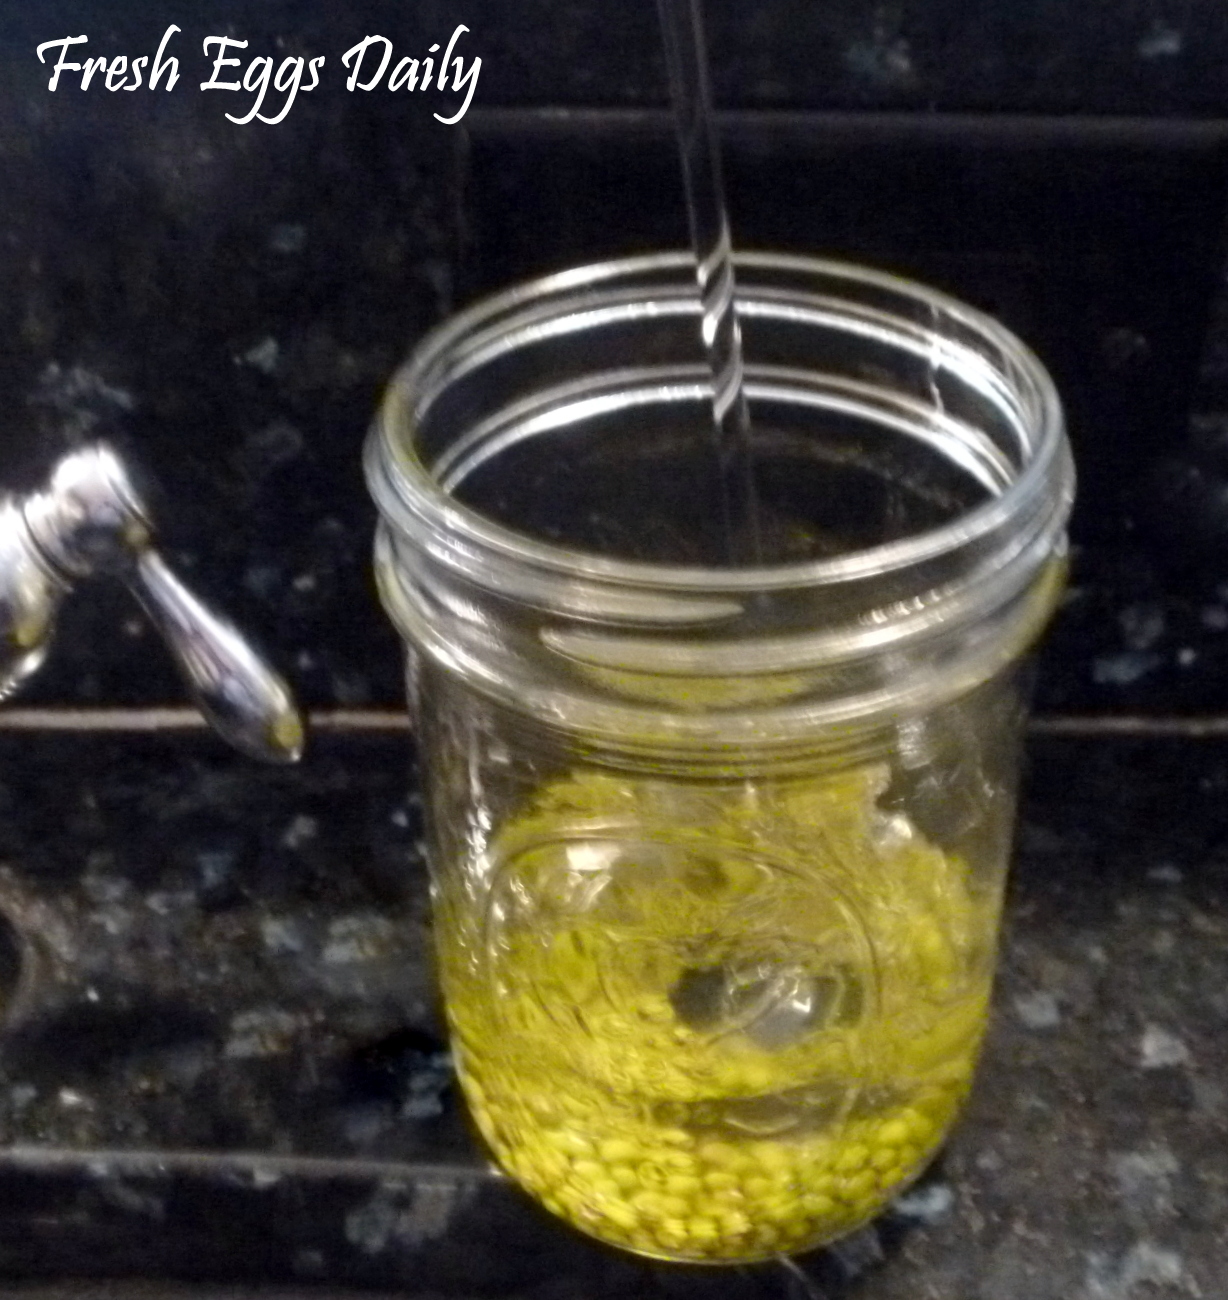
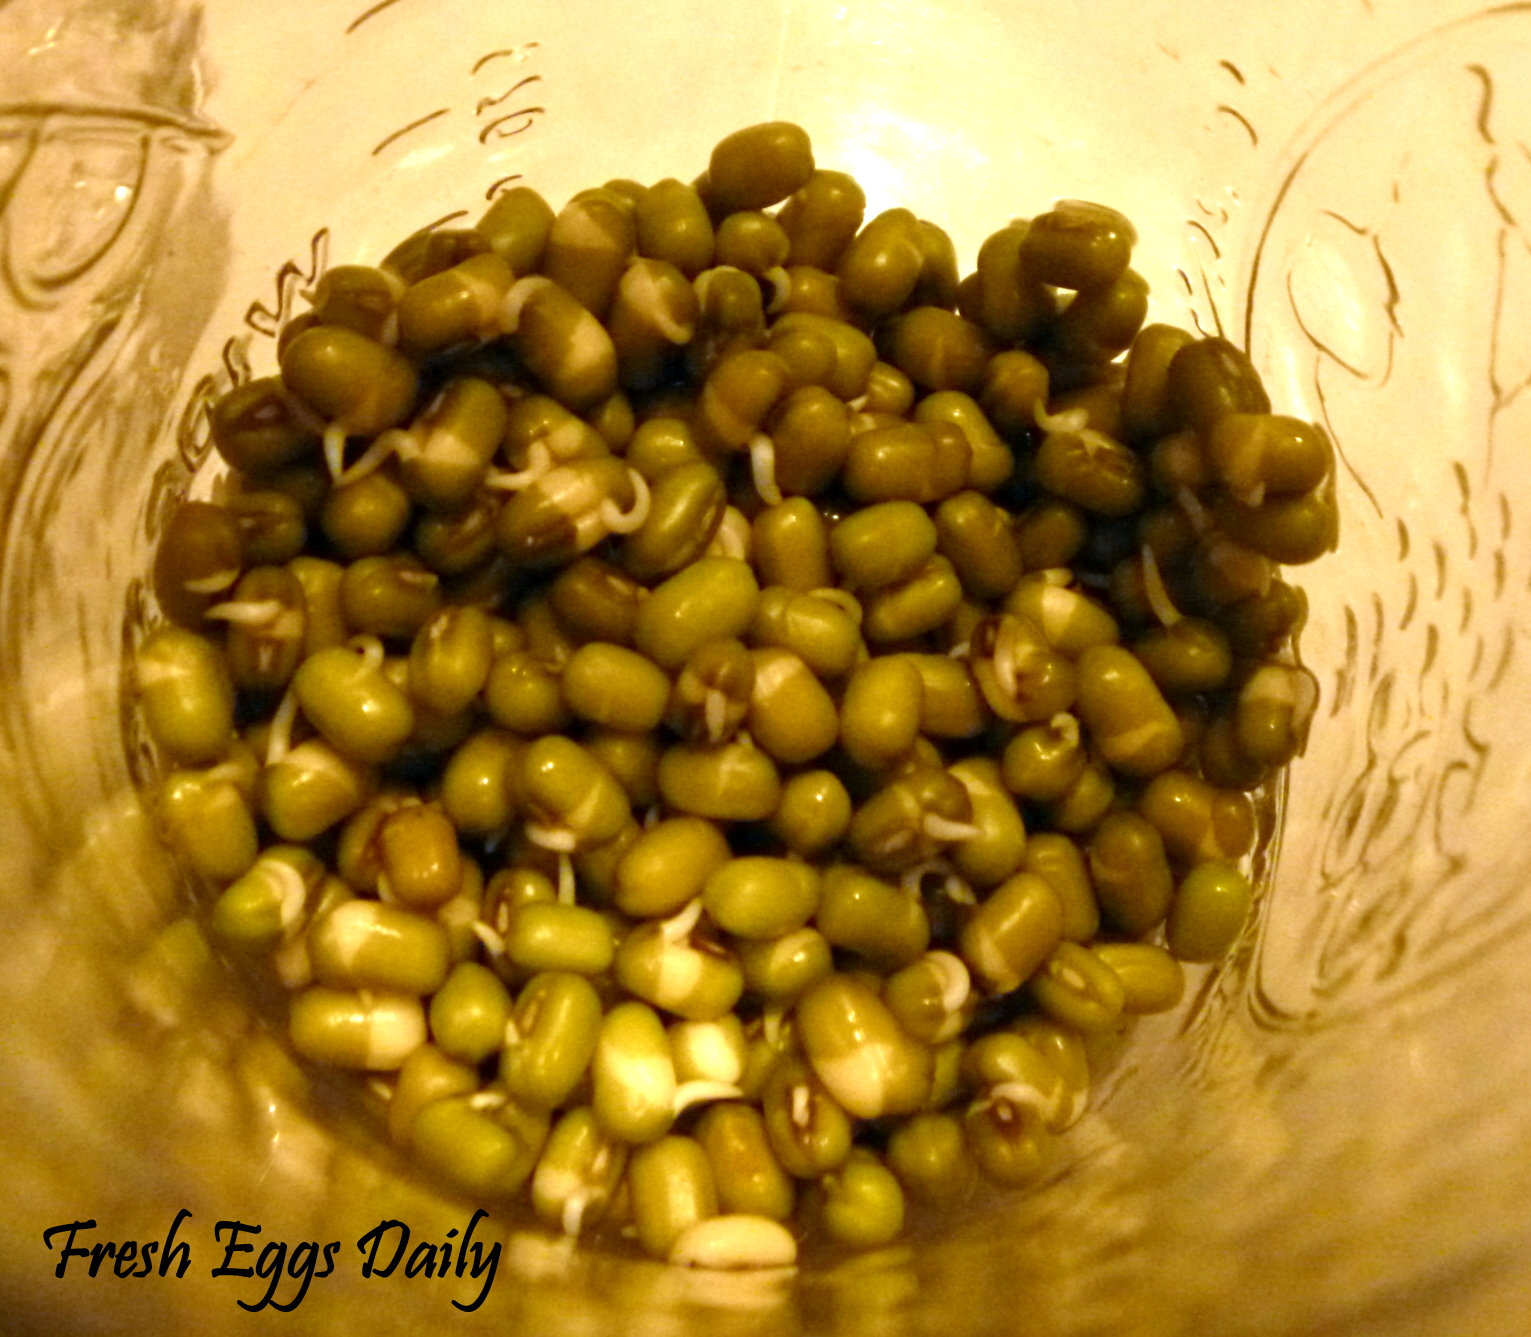
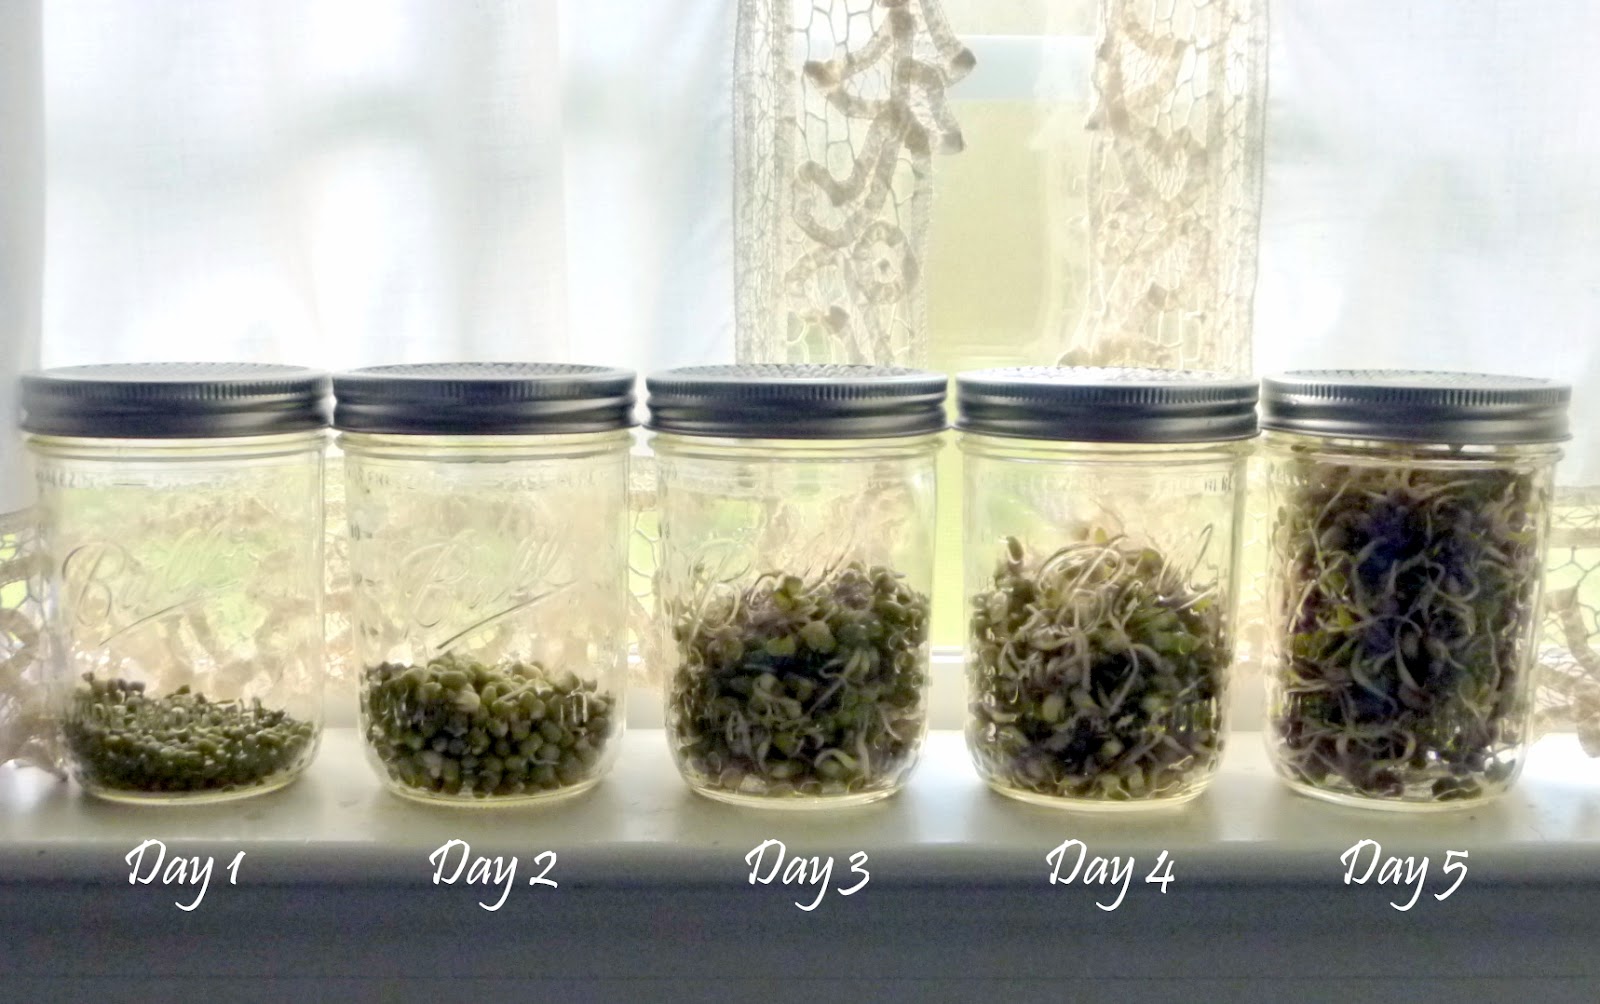
I recently sprouted some mung beans for our chickens. Here's what I did:
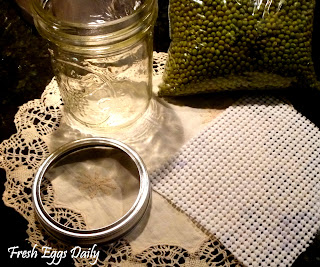
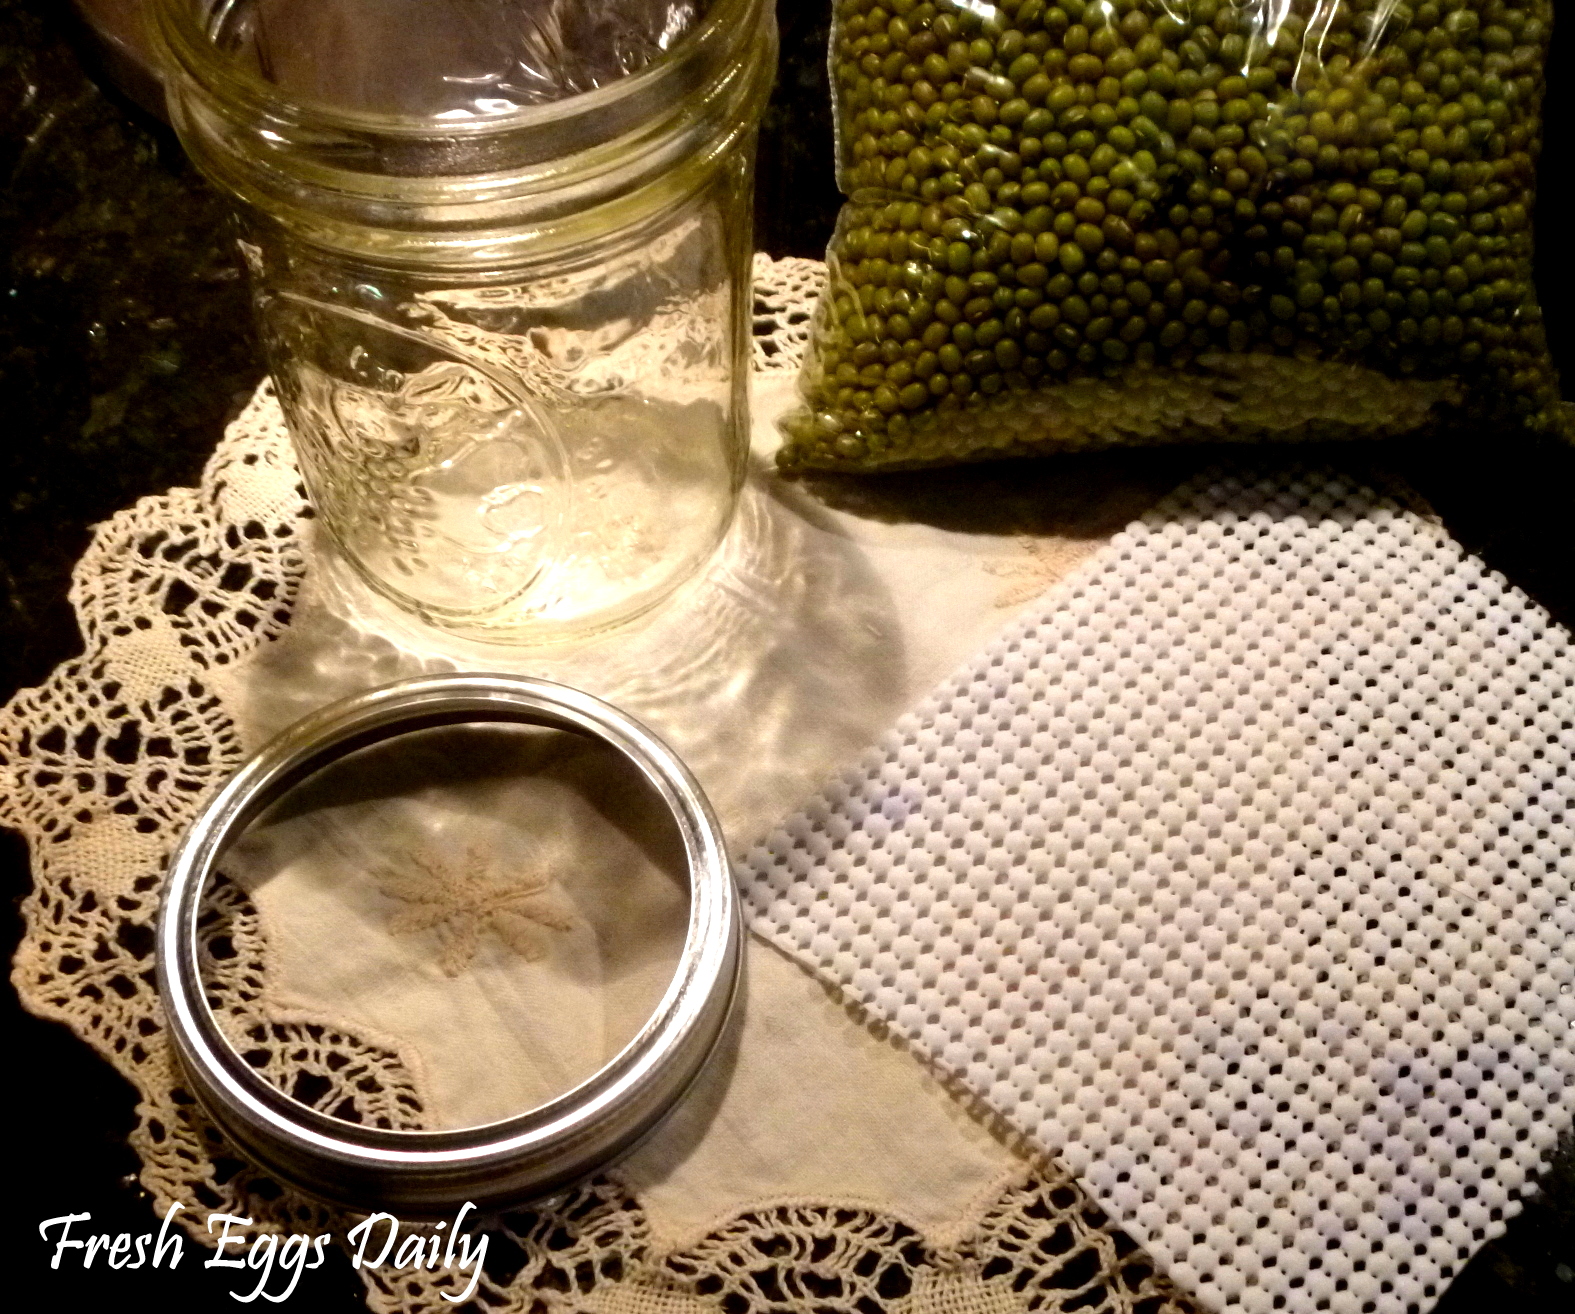
Materials Needed
Pint or quart canning jar with lid
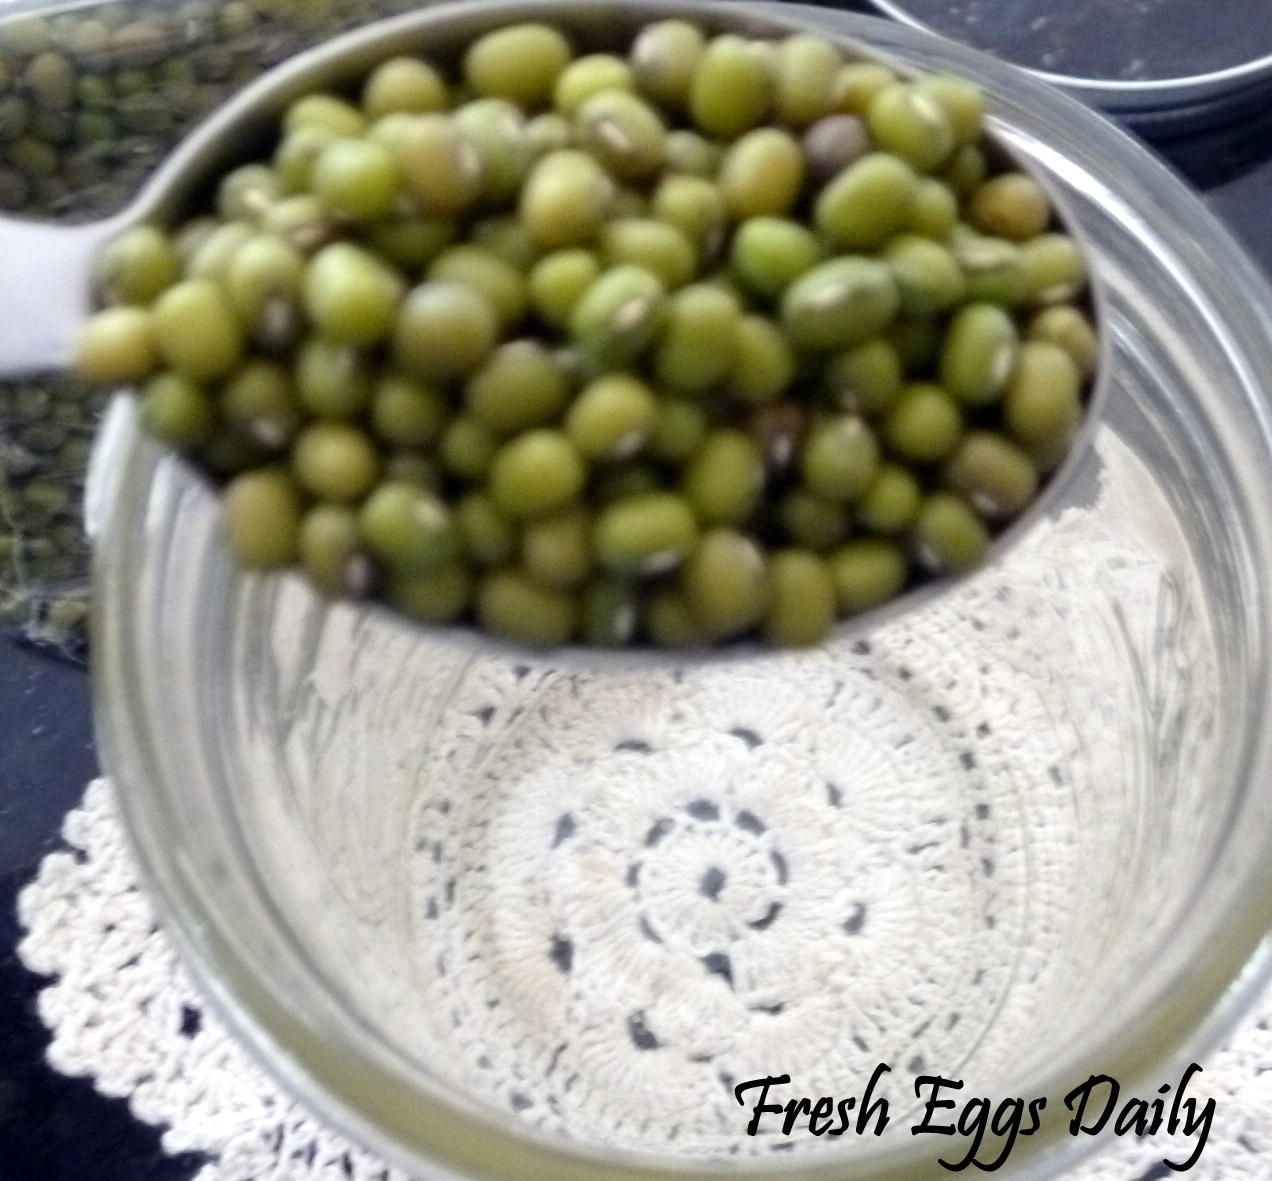
1 rounded Tablespoon of mung beans (or other sprouting beans or seeds - organic is best)
Small piece of rubber shelf liner
Grapefruit Seed Extract or White Vinegar (optional)
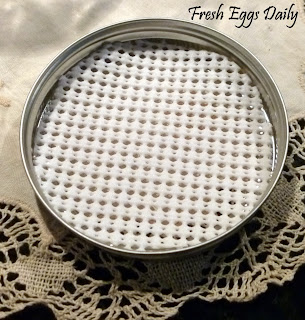
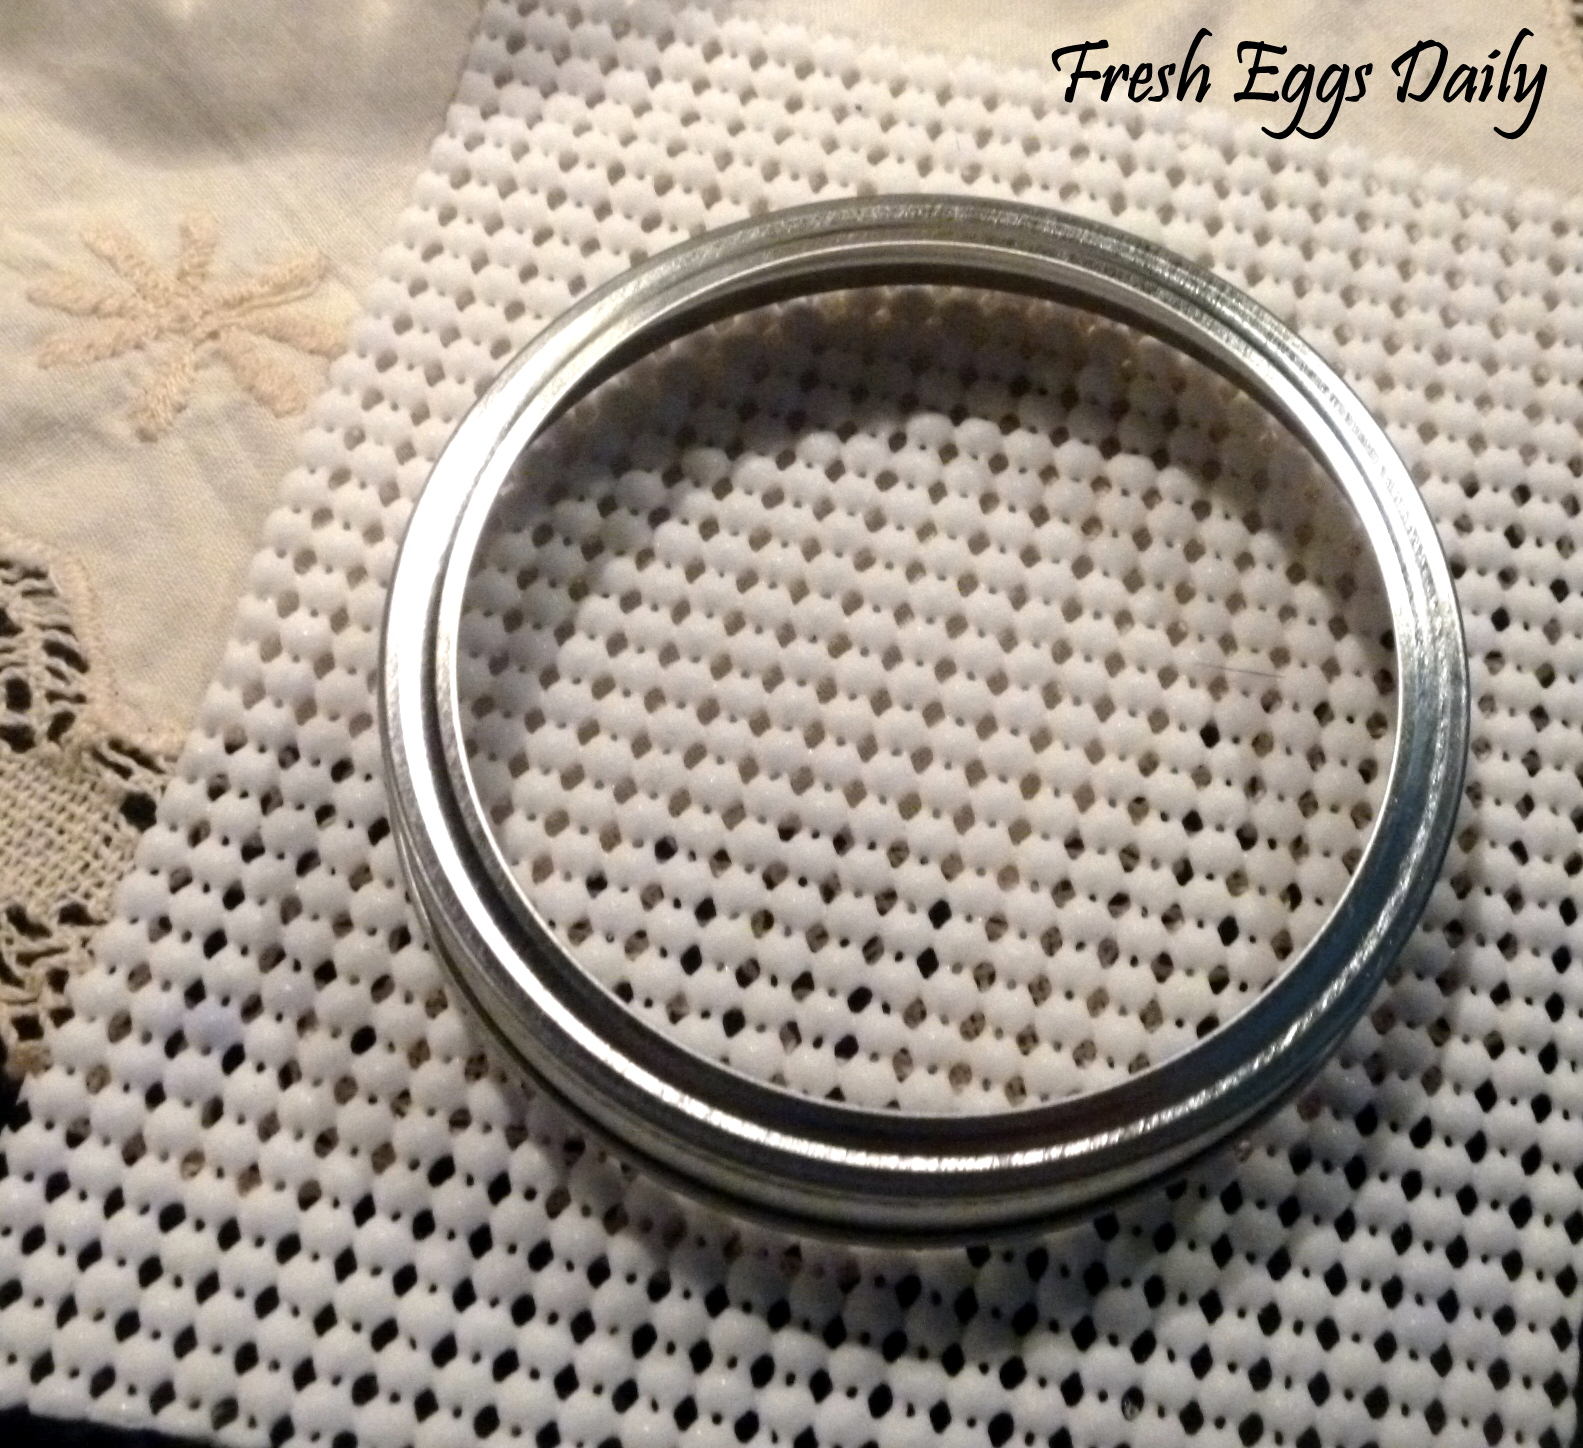
Cut the shelf liner to fit inside the ring part of the jar. This allows air to circulate inside the jar. You can buy pre-made sprouting lids, but this way is easy and inexpensive and works just as well.
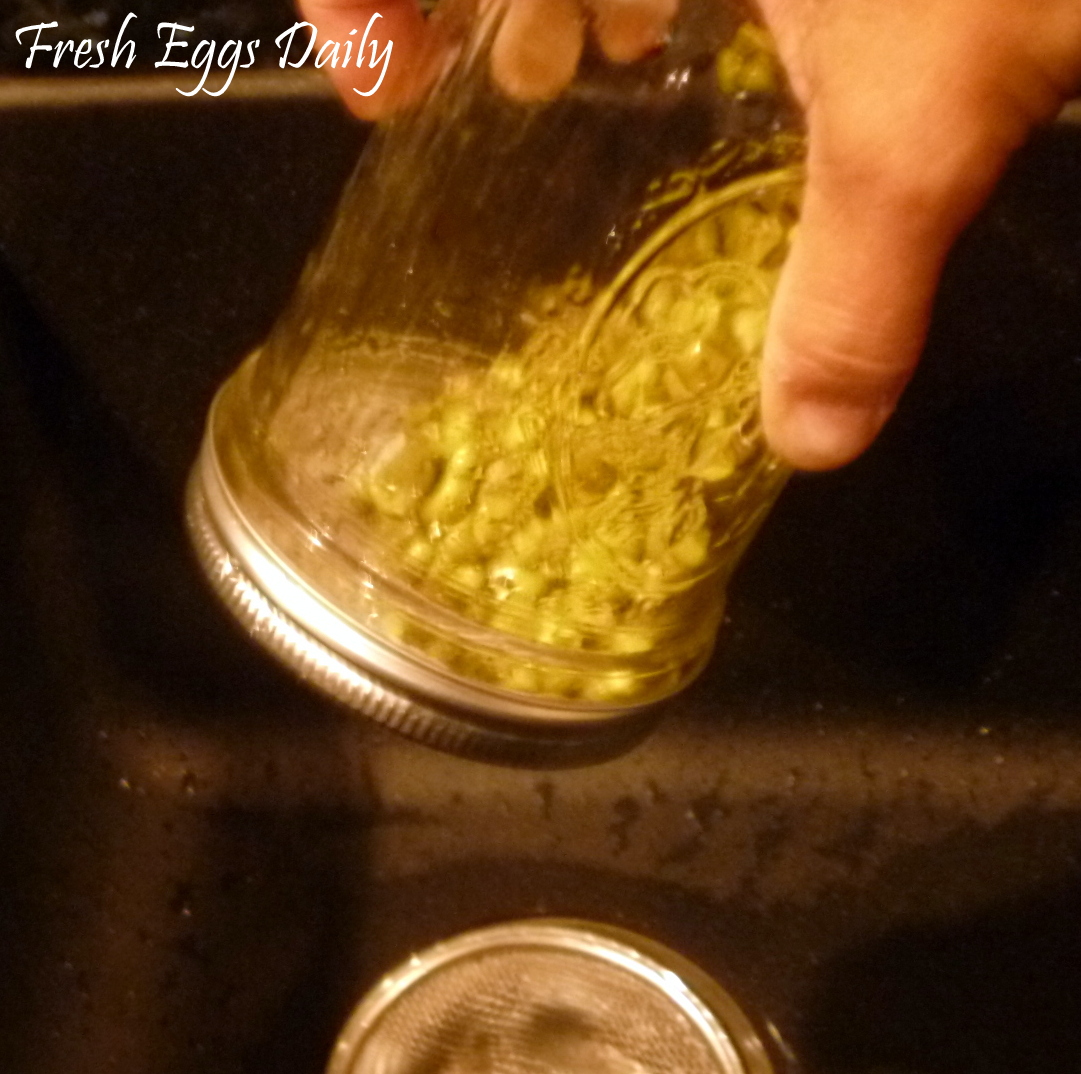
Let soak for about 8 hours and then drain the water. Refill the jar with plain tap water and swirl the beans to rinse them well and then drain again. Hold the jar upside down and shake a few times to be sure all the water has drained out. (Alternatively, you can set the jar upside down in a bowl at an angle or in your dish drainer rack until all the water has drained.)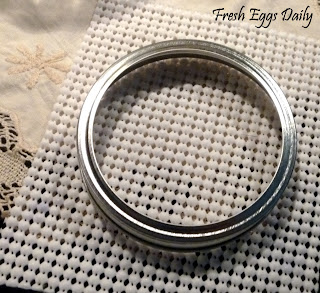
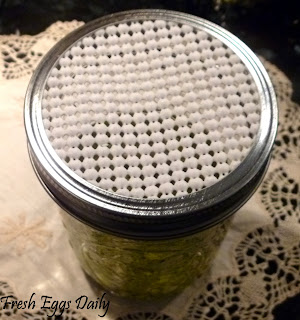
Pour one rounded Tablespoon of beans into the jar and cover with cool tap water (optional: add a few drops of Grapefruit Seed Extract or White Vinegar as a sanitizer).

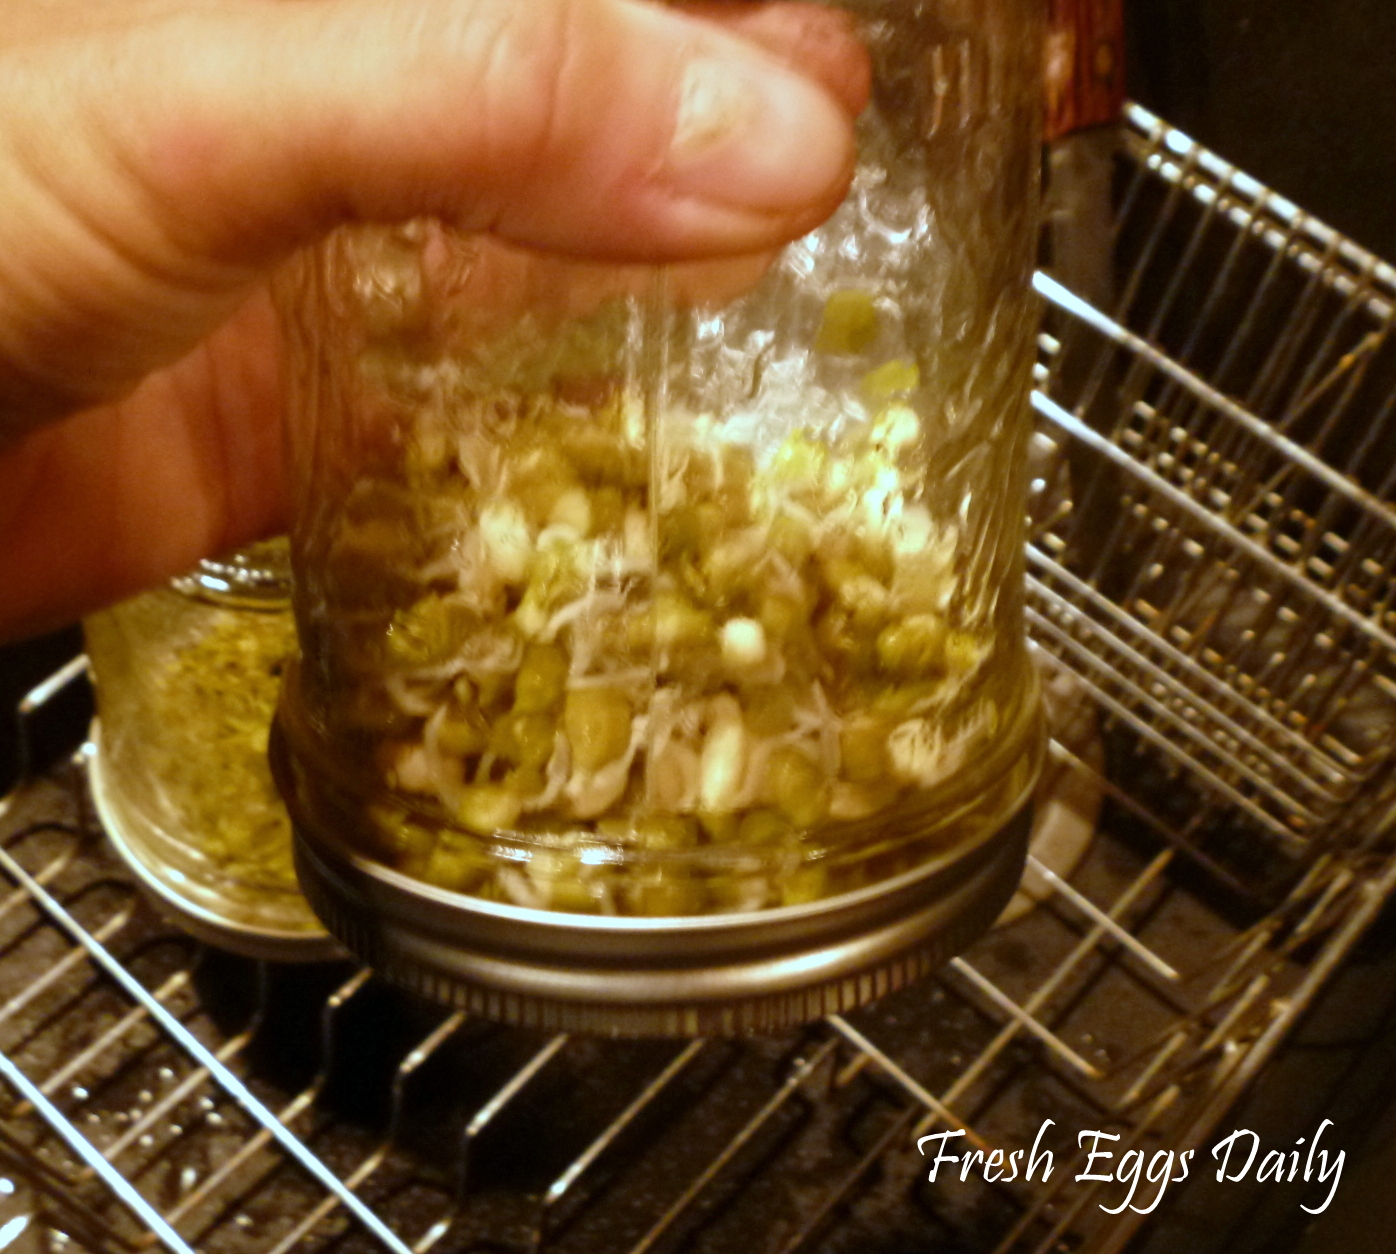
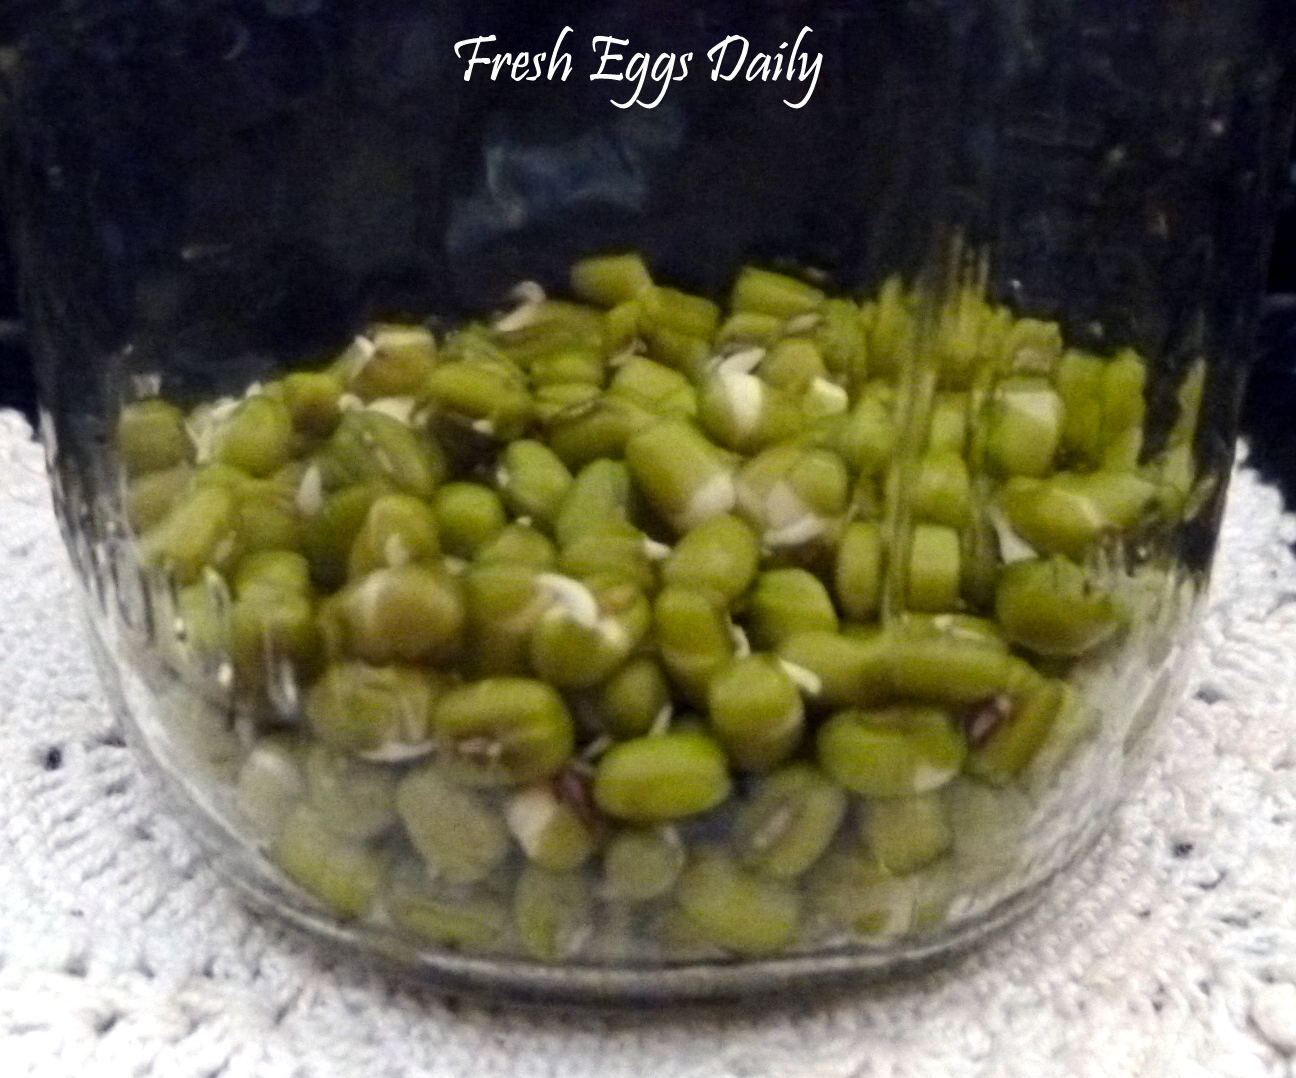
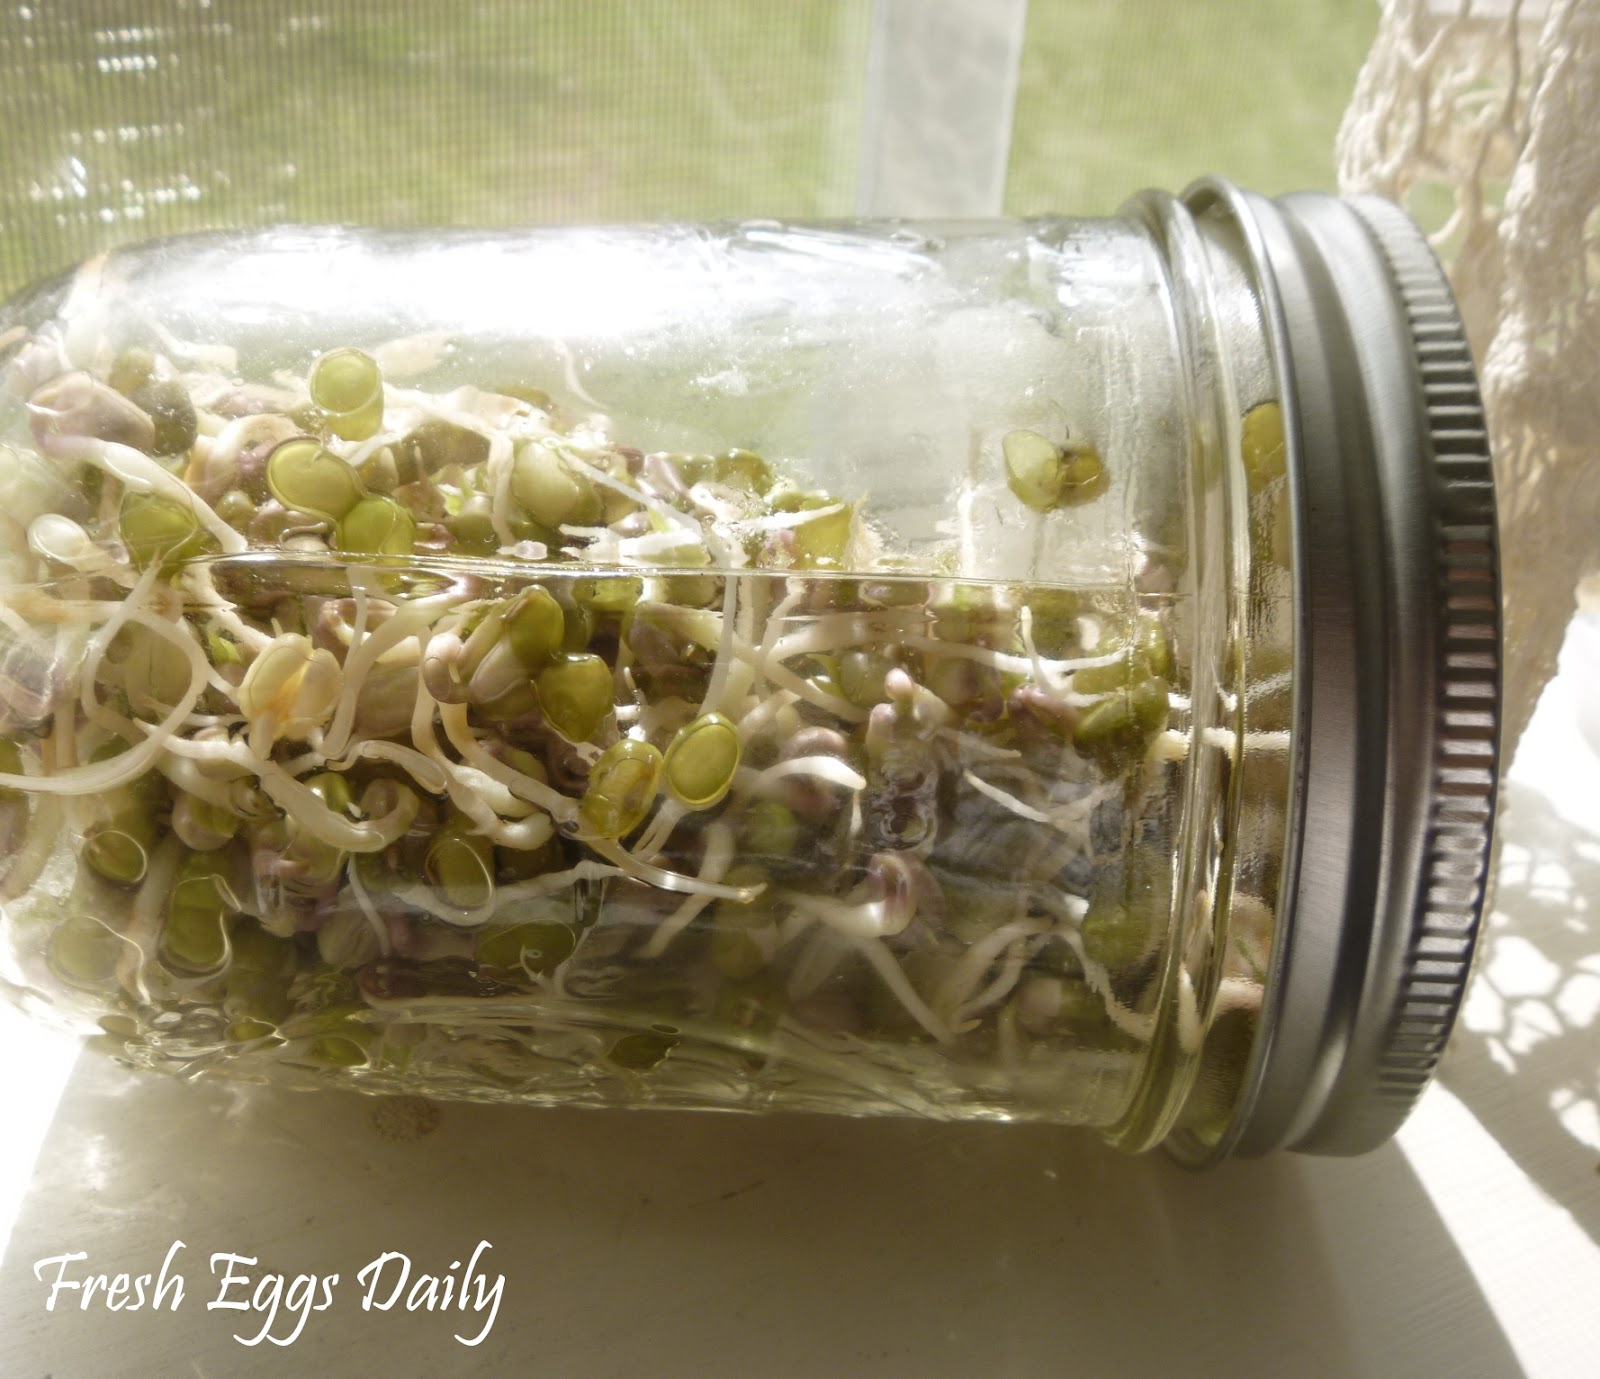
Continue to rinse and drain the sprouts twice daily until they are done. The mung beans took five days until nice green leaves had grown and the sprouts were done and ready to be eaten.
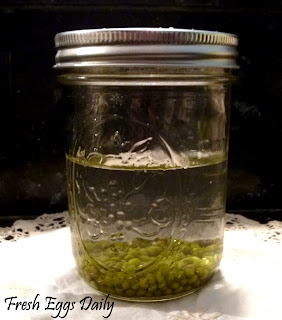


Set the jar on the counter in a spot with low light and continue to rinse and drain twice a day for several days. All you are doing is keeping the beans moist. Be sure to drain the jars well of all water each time you rinse.

By the second day you should see sprouts starting.

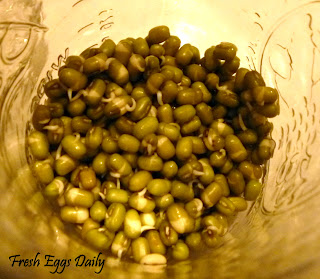
Once the beans have cracked open and started to sprout, move the jar to a sunny location, but not in direct sunlight - a southern exposure windowsill is perfect, to allow the sprouts to green up a bit.
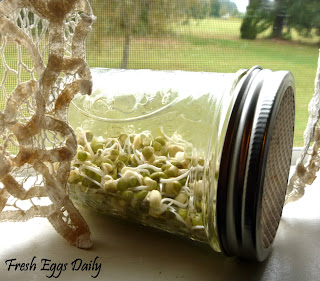


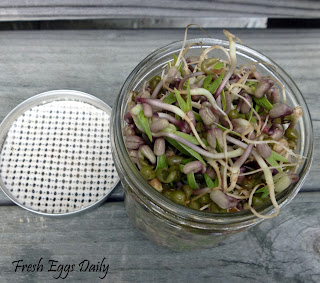
It's as easy as that, and both your chickens and ducks will love them. Sprouted seeds and grains are actually more nutritious than either feeding them whole or grinding them into feed. Try a different kinds to see which are your flocks' favorites.


I am planning on keeping five jars going all the time this winter, starting a new one each morning so one jar is ready to eat each day, for a constant healthy treat source for our flock.
JOIN US ON FACEBOOK
Buying Source:

Purchase Organic Mung Beans from SHOP THE COOP!
Fresh Eggs Daily: Growing Sprouts for your Chickens
This article is shared at No Ordinary Homestead, The Morris Tribe, The Healthy Home Economist, The Better Mom, Homestead Barn Hop, The Backyard Farming Connection, Growing Home, Frugal Days, Sustainable Ways, A Purposeful Mom,
Last edited by AirborneSapper7; 10-13-2012 at 06:02 PM.
Join our efforts to Secure America's Borders and End Illegal Immigration by Joining ALIPAC's E-Mail Alerts network (CLICK HERE)


 Reply With Quote


Jamaal Bowman Fully in Favor of Resettling Gaza Migrants in...
04-30-2024, 04:44 AM in illegal immigration News Stories & Reports