

Results 9,721 to 9,730 of 10762
 226Likes
LinkBacks (?)
-
12-26-2016, 11:32 AM
-
09-02-2016, 05:39 PM
-
whole garden made with pallets!! Love it!! | Pallets | Pinterest | Pallets, Pallets Garden and Wooden Pallets
Refback This thread03-06-2016, 11:30 AM -
10-20-2015, 05:29 PM
-
06-12-2015, 08:00 PM
-
02-26-2015, 01:58 PM
-
01-05-2015, 04:13 PM
-
12-19-2014, 10:19 AM
-
EMERGENCY: HUGE FEMA PANDEMIC EXERCISE IN USA IN NOVEMBER, INTERNET SHUT DOWN PART OF EXERCISE | Prepare4Survival
Refback This thread12-03-2014, 10:39 PM -
Off Grid World ? Ugly Duckling Shipping Container Home Built by Artist Is a Beautiful Swan on the Inside
Refback This thread11-25-2014, 03:10 PM -
11-17-2014, 10:59 PM
-
11-13-2014, 11:18 AM
-
11-09-2014, 02:54 PM
-
10-28-2014, 11:38 PM
-
10-26-2014, 05:54 AM
-
10-16-2014, 11:28 AM
-
10-03-2014, 01:25 PM
-
10-02-2014, 09:16 PM
-
09-26-2014, 07:00 PM
-
09-26-2014, 01:56 PM
-
09-19-2014, 04:46 PM
-
09-13-2014, 05:49 AM
-
09-05-2014, 01:52 PM
-
09-01-2014, 09:39 AM
-
08-30-2014, 06:29 PM
-
08-10-2014, 06:29 AM
-
08-04-2014, 05:07 PM
-
07-23-2014, 11:14 AM
-
New Evidence on Expiration Dates | Medical Preparedness | Doom and Bloom (TM) | Doom and Bloom (TM)
Refback This thread07-22-2014, 10:10 AM -
07-18-2014, 08:37 PM
-
07-15-2014, 04:57 PM
-
07-11-2014, 01:40 AM
-
04-22-2014, 11:14 AM
-
04-18-2014, 12:57 PM
-
04-18-2014, 10:10 AM
-
04-14-2014, 12:18 AM
-
04-12-2014, 02:28 AM
-
03-02-2014, 11:43 PM
-
12-24-2013, 11:59 PM
-
12-07-2013, 11:04 PM
-
kitchen | Cob
Refback This thread11-25-2013, 03:24 PM -
10-22-2013, 10:25 PM
-
Apple Pie Braid | Sweets
Refback This thread09-26-2013, 07:58 AM -
09-02-2013, 04:44 PM
-
5 Reasons Why You May have to Bug Out Even Though You Don’t Want to | The Apartment Prepper's Blog
Refback This thread08-23-2013, 03:20 PM -
06-27-2013, 06:30 AM
-
06-23-2013, 08:11 PM
-
06-17-2013, 11:21 PM
-
05-24-2013, 05:06 PM
-
To Eat / BASIC LIST / SUGGESTED ITEMS FOR LONG TERM SURVIVAL - Page 275 - ALIPAC
Refback This thread05-01-2013, 03:49 AM
Thread Information
Users Browsing this Thread
There are currently 1 users browsing this thread. (0 members and 1 guests)
 LinkBack URL
 About LinkBacks
-
05-27-2025, 10:30 AM #9721Senior Member


- Join Date
- Aug 2018
- Posts
- 84,426
Breaking the Chains on BrightU: How to survive a chemical or nuclear attack without help from the government
05/27/2025 // Jacob Thomas // 210 Views
Tags: badpollution, chaos, chemical attack, chemical violence, Collapse, contamination, dioxin, dirty bombs, disaster, East Palestine, emergency water, homesteading, nuclear attack, off grid, panic, preparedness, prepper, prepping, SHTF, survival, tips, toxic fumes, train derailment, water supply

- In Episode 10 of "Breaking the Chains: Decentralize Your Life," Mike Adams and Kristen Meghan exposed flaws in official responses to crises like the East Palestine train derailment, where residents were misled about safety after a toxic chemical burn.
- Authorities used flawed air sampling methods, skipped critical dioxin testing and wore improper gear, leaving the town dangerously contaminated.
- Seal homes (HVAC off, plastic sheeting), stockpile water and decontaminate after exposure (Tyvek suits, outdoor clothing removal, immediate showers) as a survival strategy for airborne toxins.
- Follow "time, distance, shielding" (shelter 2+ weeks), test surfaces with M9 detection paper and use potassium iodide/selenium for thyroid protection.
- Assume water is unsafe post-disaster, use Berkey/reverse osmosis filters and store emergency water.
In Episode 10 of "Breaking the Chains: Decentralize Your Life," aired May 26, Mike Adams and Kristen Meghan, a former Air Force industrial hygienist and exposure scientist, exposed the fatal flaws in official disaster responses, from toxic train derailments to nuclear threats and shared critical survival strategies for when catastrophe strikes. "The government is never your savior," Meghan warned.
When East Palestine, Ohio, was engulfed in toxic fumes after a train derailment in 2023, residents were given just four minutes' warning before a controlled burn released a plume of carcinogenic dioxins. Officials assured them it was safe but Meghan, who investigated the disaster firsthand, said they were lied to.
"They used passive air sampling instead of active, wore the wrong protective gear and didn't test for dioxins initially," she revealed. Here's Meghan's advice for surviving airborne toxins (wildfire smoke, chemical spills or nuclear fallout):
- Seal your home Turn off HVAC systems to prevent outside air intake. Use plastic sheeting and duct tape to cover windows, doors and vents.
- Stockpile water Fill bathtubs, buckets and containers immediately, since groundwater may soon be contaminated.
- Decontaminate after exposure If you must go outside, wear a Tyvek suit or even a cheap rain poncho. Strip contaminated clothing outside, shower immediately and discard exposed items.
"Treat it like blood on you, you can't see it, but it's there," Meghan warned. If a dirty bomb or nuclear detonation occurs, official guidance is dangerously incomplete. Meghan stressed:
- Time, distance, shielding Stay indoors for at least two weeks (iodine-131's half-life is eight days).
- Test for radiation Use $3 M9 or MA paper (military-grade detection strips) to check surfaces.
- Supplement wisely Potassium iodide (for thyroid protection) and selenium can help mitigate radiation damage, but dosage is critical.
"The government won't tell you this, but you can test your own environment," Meghan said. "Grab a trash bag, swipe the inside and use detection paper to check for contamination." From hexavalent chromium (a single tablespoon can poison a small lake) to cesium-137 (a radioactive isotope used in dirty bombs), water supplies are vulnerable. Yet, most treatment plants dont filter heavy metals or pharmaceuticals just chlorinate to kill microbes. Meghan's solution:
- Berkey or reverse osmosis filters for home use.
- Store emergency water in food-grade barrels.
- Assume contamination after any major disaster even if officials say otherwise.
From 9/11's "safe air" lies to East Palestine's toxic cover-up, Meghan argued that self-reliance is the only option. "They told people to shelter in place but didnt explain how. They said the water was safe but didnt test for the worst toxins. You have to take control."
"The government failed East Palestine. Don't let it fail you," Meghan urged. "Prepare now because when disaster hits, you're on your own." For more survival strategies, follow Kristen Meghan on X (@KristenMeghan) and visit Brighteon.ai for AI-powered disaster preparedness tools.
Want to know more?
Whether you are seeking healing for yourself, your family or your community, "Breaking the Chains" is an urgent invitation to confront what's been holding you back and gain liberation. This powerful resource is also featured at MY575e.com, where personal transformation meets purpose. It is a part of a growing movement to equip individuals with the courage, clarity and community needed to live free.
If you want to learn more about how you can regain your independence, want to view the presentations at your convenience, or learn at your own pace, you can purchase the "Breaking the Chains: Decentralize Your Life" package here. Upon purchase, you will get instant and unlimited access to 10 "Breaking the Chains: Decentralize Your Life" videos, five bonus videos, four podcasts by Mike Adams and an exclusive liberation toolkit you can use to help regain your independence.
Sources include:
BrighteonUniversity.com 1
BrightU.com
MY575e.com
BrighteonUniversity.com 2
Breaking the Chains on BrightU: How to survive a chemical or nuclear attack without help from the government NaturalNews.com
If you're gonna fight, fight like you're the third monkey on the ramp to Noah's Ark... and brother its starting to rain. Join our efforts to Secure America's Borders and End Illegal Immigration by Joining ALIPAC's E-Mail Alerts network (CLICK HERE)
-
05-28-2025, 05:46 AM #9722Senior Member
- Join Date
- Aug 2018
- Posts
- 84,426
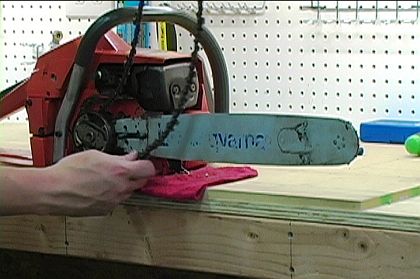
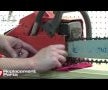
How to Replace a Chainsaw Chain
By toolrepair in WorkshopTools
Introduction: How to Replace a Chainsaw Chain

By toolrepaireReplacementParts.com Follow
About: We are the ULTIMATE in supplying you with replacement parts from over 60 name brands, and creating award winning How To Articles and Repair Videos. eReplacementParts.com is #1 when it comes to figuring out e… More About toolrepair »
Because it's a normal part of chainsaw use and ownership, knowing how to correctly replace a chainsaw chain can save tool users time and money.
Even though the steps for a chain replacement are simple and can take less than five minutes, it's important to point out a few repair details that can make all the difference between a chain that's installed correctly and an incorrectly installed chain.
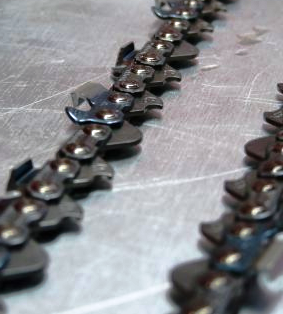
Of course, the first step toward a proper chainsaw chain replacement is getting a matching replacement chain for your chainsaw.
To learn how to match chainsaw chains for compatibility, please read our article: Chainsaw Chain Measurements, Sizes, and Types. Continue below for chainsaw chain replacement steps.
Steps to Replace a Chainsaw Chain
Other chainsaw designs may be a little different than that of the chainsaw we use here as an example, but chainsaw designs are similar enough for the steps in this article to help most chainsaw owners regardless of the model they own.
The only tool needed for this repair is the scwrench that most likely came with your chainsaw. Otherwise, a flat head screwdriver and a socket wrench will do just fine.
Step 1: Remove the Old Chainsaw Chain

1. Remove the guide bar side panel.
The side plate on most chainsaws will most likely be held on by two nuts.
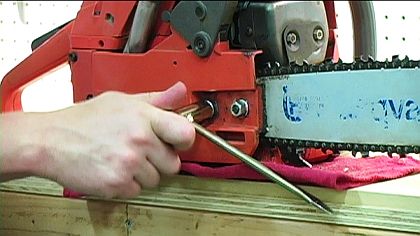
Using a chainsaw wrench or wrench, unscrew the nuts and remove the plate to access the chain.
A chainsaw's brake is sometimes attached to the guide bar side plate, like the chainsaw in our example.
If your chainsaw's brake is attached to its side plate, make sure to unlock the brake before removing sprocket the plate. Removing the side plate with the brake in the locked position can make it difficult or impossible to reinstall.
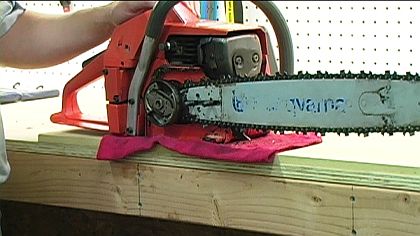
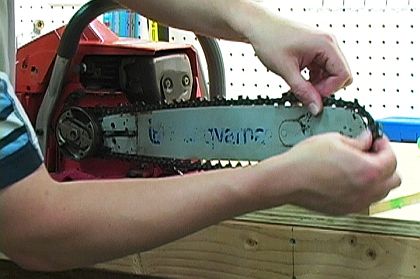
Step 2: Release the Chain Tension

The old chain is ready to be removed now that the sprocket plate is off of the saw. Pull the nose of the chainsaw's bar away from the chainsaw to release it from the tensioner.
Step 3: Remove the Old Chainsaw Chain

The chain will easily remove from the guide bar with all that slack in it.
Pull the drive links out of the guide bar and slip the other end of the chain around the clutch drum.
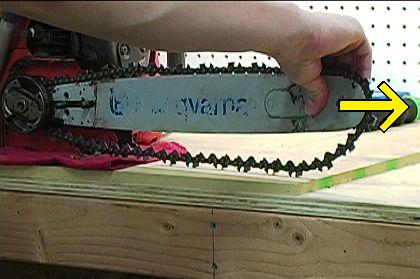
Step 4: Loosen the Tensioning Screw

Locate the tensioning screw on the inside side of the guide bar and loosen it a little. This will make installing the new chain easier.

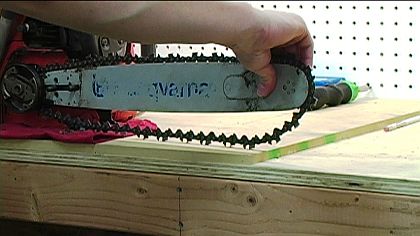
Step 5: Thread the New Chain Onto the Saw

Carefully thread your new or recently sharpened chainsaw chain around the chainsaw's clutch drum, making sure that the drive links engage in the sprocket.
Thread the rest of the drive links into the guide bar and around its nose.
Step 6: Align the Guide Bar

With the chain properly threaded along the clutch drum and guide bar, put some tension into it by pulling on the nose of the guide bar away from the chainsaw.
While pulling the guide bar, make sure to seat it onto the saw's adjustment pin.

Step 7: Replace the Side Plate

The side plate is ready to go back on as long as the guide bar is properly positioned beneath.
Replace the plate and the nuts that hold it into position, but do not tighten the nuts down all the way yet. The guide bar must be allowed to move a little while the chain is tightened to the correct tension.
Step 8: Tighten the Chain to the Correct Tension

Use the tensioning screw to the side of the guide bar to adjust the tension on the chainsaw chain.
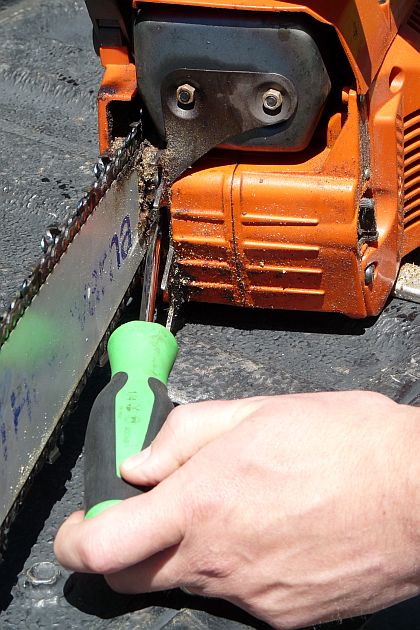
To read about correct chainsaw chain tension, see our article: How to Tighten a Chainsaw Chain.
Step 9: Finish Tightening the Side Plate Nuts

The chainsaw chain replacement is now complete.
Conclusion Has your chainsaw chain seen its last sharpening? Visit our Chainsaw Chains page to find a matching replacement chain for your saw.
eReplacementParts.com is here to provide the quality tool parts ordering and shipping services that tool owners need, and the information tools to help them get the most out of their powered products.
To get started with another chainsaw repair, visit our Chainsaw Parts page or type your saw's model number in the search field at the top of the page.
How to Replace a Chainsaw Chain : 9 Steps - Instructables
Last edited by Airbornesapper07; 05-28-2025 at 05:48 AM.
If you're gonna fight, fight like you're the third monkey on the ramp to Noah's Ark... and brother its starting to rain. Join our efforts to Secure America's Borders and End Illegal Immigration by Joining ALIPAC's E-Mail Alerts network (CLICK HERE)
-
05-28-2025, 06:21 AM #9723Senior Member
- Join Date
- Aug 2018
- Posts
- 84,426
Profile
toolrepair
 7036 South High Tech Drive Midvale, Utah 84070
 Joined September 16th, 2010
 22Instructables
 2,470,807Views
 12Comments
 95Followers
We are the ULTIMATE in supplying you with replacement parts from over 60 name brands, and creating award winning How To Articles and Repair Videos. eReplacementParts.com is #1 when it comes to figuring out exactly what parts you need for your repair. We provide you with parts replacement diagrams, and interactive guides that help you pin point a specific part, and know how to replace it. eReplacementParts.com
Instructables (22)
Collections (0)
Instructables

26 12K

43 233K

27 205K

27 8.8K

18 51K

15 256K

24 12K

131 397K

3 6.0K

6 213K

3 1.7K

4 7.7K

9 4.8K

45 567K

3 4.0K

12 119K
5 11K

14 289K

9 42K

8 11K

4 12K
1 994
If you're gonna fight, fight like you're the third monkey on the ramp to Noah's Ark... and brother its starting to rain. Join our efforts to Secure America's Borders and End Illegal Immigration by Joining ALIPAC's E-Mail Alerts network (CLICK HERE)
-
05-28-2025, 06:29 AM #9724Senior Member
- Join Date
- Aug 2018
- Posts
- 84,426
Top Storage Crops: How to Store Fruits and Vegetables
Tips on curing and storing onions, potatoes, leeks, cabbage, apples, squash and other produce that will last all winter.
By Barbara Pleasant
Facebook
Pinterest
X
 Milan - stock.adobe.com
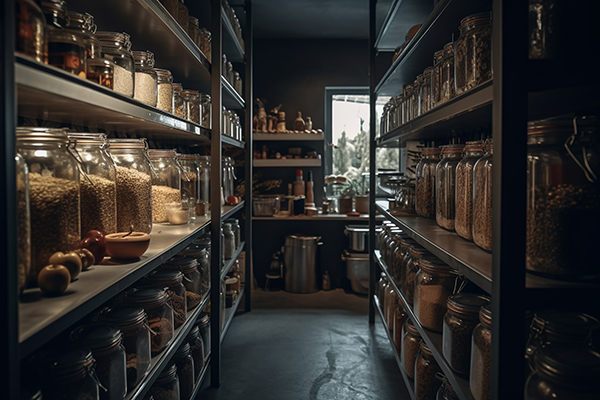
Learn how to store fruits and vegetables, such as how to store potatoes from garden, in ways that best extend your harvest, and which crops to grow to keep you and your family fed through the winter.
Here in southwest Virginia, my partner and I take pride in growing and storing most of our fruits and vegetables. Knowing where our food comes from gives us confidence in its goodness, plus we save about $5,000 a year through our gardening and food storage efforts. There is another benefit, which is the utter convenience of having a self-provisioned home. In early winter when our stores are full, I feel like Im living in a well-stocked organic grocery store.
We bring many years of experience to this quest, and were still learning. Measured by weight, stored garden crops make up more than half of our overall harvest, with every onion and potato just about as fresh as it was the day it came from the garden. Our mix of storage vegetables and fruits varies from year to year and weve learned that putting by storage crops is something anyone can do even if your produce comes from the farmers market. By making use of cold storage spots in your basement or garage, and perhaps adding a seasonal second refrigerator, you can use our cool storage and cold storage crop charts for winter eating using simple, time-tested methods.
Sleeping Quarters for Storage Crops
Success with storage crops hinges on finding methods that convince the crops that they are enjoying a natural period of dormancy in unusually comfortable conditions. This typically involves slowing physiology by controlling respiration (usually by lowering temperature) or providing moisture so crisp root vegetables sense they are still in the ground. Some staple storage crops, such as garlic, onions, and shallots, need dry conditions to support prolonged dormancy.
Most storage crops need to be cured to enhance their storage potential. During the curing process, potatoes and sweet potatoes heal over small wounds to the skin, garlic and onions form a dry seal over the openings at their necks, and dry beans and grain corn let go of excess moisture that could otherwise cause them to rot. Harvesting, curing, and storage requirements vary with each crop see the cool storage and cold storage crop charts for full details. In my experience, harvesting and curing vegetables properly leads to much more flexibility when it comes to long-term storage conditions.
Root Storage: How to Store Potatoes From Garden

Image KEITH WARD
A spare dresser in a cool room can provide convenient storage space.
Seeking out good food storage spots in your home or on your property can lead to interesting discoveries. Take how to store potatoes from garden, for example. When we asked the MOTHER EARTH NEWS Facebook community to share favorite ways for storing potatoes in winter, we received dozens of great ideas, including these:
- Place cured potatoes in a burlap bag, tuck the bag into a plastic storage bin left open a wee bit, and keep in an unheated basement.
- Line plastic laundry baskets with newspapers, with potatoes arranged in layers between more newspapers. Place the packed, covered baskets in an unheated garage.
- In the basement, make short towers of potatoes by stacking them between layers of open egg cartons. Cover the towers with cloth to protect the potatoes from light.
- Place sorted potatoes in cloth grocery bags that have been lined with black plastic bags, and store in a cold space under the stairs. A similar method: Sort different potatoes into paper bags, then place the bags in milk crates to prevent bruising.
- Use an old dresser in a cool room or basement for storing potatoes in winter. Leave the drawers partially open for ventilation.
- In a shady spot outdoors, place a tarp over the ground and cover it with an inch of loose straw. Pile on potatoes and cover with more straw, a second tarp, and a 10-inch blanket of leaves or straw.
- Bury a garbage can horizontally so that its bottom half is at least 12 inches deep in the soil. Place potatoes in the can with shredded paper or clean straw. Secure the lid with a bungee cord, and cover with an old blanket if needed to shade out sun.
Here in Virginia, we have vole issues that require us to harvest our early spuds promptly, so my buried garbage can gets plenty of use for storing potatoes. Buried coolers or even buried freezer bodies (with machinery removed) can work in the same way.
Storing Crisp Root Vegetables
Theoretically, root vegetables that grow well below ground can be mulched over in fall and dug as needed in winter. This often works well with parsnips, but most gardeners would risk losing much of an overwintered carrot or beet crop to wireworms, voles, or other critters. Repeated freezing and thawing of the surface soil damages shallow-rooted turnips and beets. Its always safer (and more convenient) to harvest root crops, clean them up, and secure them in cold storage. In Zones 7 and warmer, youll probably need a second refrigerator, as you wont have naturally cooled spaces that stay below 40 degrees Fahrenheit in winter. In colder winter climates, you have several options:
Bins, buckets or trugs packed with damp sand or sawdust and stashed in cold spots around your homestead, such as under your basement stairs or in an unheated garage or storage shed. This method works amazingly well if you can find a place with temperatures in the 32- to 40-degree range. Every few weeks, dump out containers and repack them, eating any roots that are showing signs of softening.
The previously described method of storing potatoes in a buried garbage container or other quick outdoor root cellar works well for root vegetables, but youll need a second one (or a buried cooler) for roots that need moist conditions. Pack these in damp sand or sawdust to maintain high humidity.
Working outside the fridge, the biggest challenge in storing crisp roots is maintaining high humidity without promoting molds and soft rots. Thats where packing materials, including damp sawdust or damp sand, come in handy. Sawdust is clean and lightweight, and the residue can be shaken out into the garden. Sand weighs more but is reusable simply dry it in the sun and return it to a bucket or bin until you need it in the fall.
A seasonal second refrigerator is worth considering if you have a lot of carrots or beets to store, live in a climate too warm for underground storage, or want to store root vegetables to sell or trade later.
When preparing to store carrots, beets, and other root vegetables in plastic bags in the refrigerator, sprinkle in a few drops of water as you pack each bag. Ideally, a few drops of condensation should form inside the bags after they have been well-chilled in the fridge.
Storing Squash

Image PHOTO: KEITH WARD
Winter squash keep well in a cool bedroom.
Now for something really easy: storing winter squash. The hard rinds of winter squash protect them from drying out, so all they need is a cool spot where you can check them from time to time. Look for signs of mold, and promptly consume squash that have developed minor blemishes, such as discoloration or soft spots.
Some types of winter squash store longer than others, so its important to eat them in proper order.
Squash and pumpkins classified as Cucurbita pepo tend to keep for only two to three months. These include acorn squash, delicata or sweet potato squash, spaghetti squash, and most small pumpkins. Eat these first.
Buttercup and kabocha squash (C. maxima) will keep for four months under good conditions, but after two months the fruits should be watched closely for signs of softening or mold. Many squash pie devotees bake up all questionable buttercups in early winter and stash the mashed squash in the freezer. This is a wise move, because its far easier to make a pie or batch of muffins if you have frozen squash purée waiting in your freezer than it is to face down a squash the size of your head.
The smooth, hard rinds of butternut squash (C. moschata) help give them the longest storage life (often six months or more), so butternuts should be eaten last. We grow more butternuts than any other winter squash because they are such a cinch to store.
How to Store Fruits and Vegetables: Use a Second Fridge

Image KEITH WARD
Apples and pears store best in a second refrigerator.
As owners of six mature fruit trees, we couldnt manage our harvest without a second refrigerator for storing apples and pears. Our Asian and DAnjou pears will last to December, with apples going a bit longer but only if they are refrigerated in containers that retain moisture. So we plug in an old, semi-retired refrigerator in August, then clean it out and turn it off in January. We dont mix fruits and veggies in the same fridge, because fruits give off so much ethylene gas that they can cause vegetable crops to deteriorate in wacky ways.
The Environmental Protection Agency (EPA) doesnt exactly approve of second refrigerators, in part because most Americans already maintain more refrigerator space than they need. A more serious issue is the age of many second refrigerators and freezers. Newer models are often three times more efficient than older ones. According to the EPAs Energy Star statistics, a refrigerator from the 1970s can cost an extra $200 a year to operate, while a 1980s vintage refrigerator may cost $70 more to run compared with a new model.
We will eventually upgrade our elderly, part-time fruit fridge to an efficient Energy Star model, but meanwhile, it earns its keep. Storing apples in a refrigerator often greatly improves their flavor, which is definitely the case with our midseason Enterprise apples three weeks in the fridge changes their flavor from good to spectacular. Sometimes how you store a crop is just as important as how you grow it.
I dont mean to make self-provisioning sound too easy. Only top-quality produce should be stored, and every season some crop I planned to store either fails or doesnt make the grade. These losses are soon forgotten as August and September whiz by in a blur, with one food storage project after another. Then October comes and were amazed at what we have: a basement brimming with homegrown winter squash, onions and garlic; a well-stocked pantry with organic dried beans, peppers and canned goods; and the fridge and freezer full, save for enough space for two turkeys grown by local farmers. If this is not the good life, I dont know what is.
How to Store Fruits and Vegetables: Charts by Temperature

Image KEITH WARD
Uproot leeks, cabbage and Brussels sprouts and place in damp sand.
20 Vegetables and Fruits that Store for Two Months or More
- Apple
- Dry beans
- Beet
- Cabbage
- Carrot
- Celeriac
- Celery
- Grain corn
- Garlic
- Leek
- Onion
- Parsnip
- Pear
- Potato
- Pumpkin
- Rutabaga
- Shallot
- Sweet potato
- Turnip
- Winter squash
Crops for Cool Storage (45 to 60 degrees)
These easy-to-store crops are best kept in a cool place, which could be a basement, an unheated bedroom, root cellar, or an attached garage.
- Gather dry bean pods as they dry to tan and plants turn yellow, but before pods shatter. Dry whole pods in a warm, dry place until crisp. Shell beans and continue drying in open containers at room temperature for two weeks. Store in airtight jars in a cool, dark place. Freezing dried beans kills any insects present.
- Gather grain corn ears after the plants and husks dry to tan, but before the weather turns cool and damp. Remove husks. Dry ears in a warm, well-ventilated place for at least a week. Continue to dry until half of the kernels fall when ears are twisted between two hands. Store whole, dry ears in boxes or bins in a cool, dry place. Bring batches into a warm spot near radiant heat for a few days to lower moisture content, which will make it easier to remove kernels.
- Dig garlic then pull when plant is still 60 percent green. Fewer than six leaves should appear healthy. Cure in a warm (80 degrees Fahrenheit or warmer), well-ventilated place for at least two weeks. Trim back tops to 4 inches, and then cure another week. Trim again before storing. Store in boxes or mesh bags in a cool place with moderate humidity, such as a cool basement.
- Pull onions when at least half of the tops are dead or have fallen over. Avoid harvesting in wet weather. Cure in a warm (80 degrees or warmer), shady, well-ventilated place for a week. Trim back tops, and then cure two weeks more. Trim again before storing. Store in boxes or mesh bags in a cool place with moderate humidity.
- Harvest potatoes before soil temperatures fall below 55 degrees to minimize bruising. Protect from sun. Wash only to remove clods of soil. Cure in a cool, dark, moist place (55 to 60 degrees) for two to three weeks. Store in closed boxes or cloth-covered baskets in a cool place with moderate humidity, or store in buried containers.
- Cut ripe pumpkin fruits from the vine, leaving a short stub of stem attached. Wipe with a damp cloth to remove soil. Cure in a well-ventilated place with warm room temperatures (70 to 80 degrees) for one to two weeks. Store in bushel baskets or on shelves in a cool place with moderate humidity.
- Pull shallots when the tops are at least half-dead. Avoid harvesting in wet weather. Cure in a warm (80 degrees or warmer), well-ventilated place for a week. Trim back tops, and then cure two weeks more. Store in boxes or mesh bags in a cool place with moderate humidity.
- Dig sweet potatoes while the weather and soil are still warm, at least a month before your first fall frost. Cure in a warm (85 degrees or warmer), humid place for 1 to 2 weeks until all skin wounds have healed. For perfect conditions, place jugs of hot water into a large cooler. Store at cool room temperature (55 to 60 degrees) and moderate humidity. Avoid chilling.
- Cut ripe winter squash fruits from the vine, leaving a short stub of stem attached. Wipe with a damp cloth to remove soil. Cure in a well-ventilated place with warm room temperatures (70 to 80 degrees) for one to two weeks. Store in bushel baskets, shallow containers or on shelves in a cool place with moderate humidity.
Crops for Cold Storage (32 to 45 degrees)
Very low refrigerator temperatures (32 to 35 degrees) prolong the storage life of these fruits and vegetables, but many can also be stored in slightly higher temperatures using time-tested, low-tech methods. According to Iowa State University, these crops can be stored for at least two months when provided proper conditions.
- Harvest apples when seeds are dark brown and fruits come away with a moderate tug. Choose mid- and late-season apples for storage. Sort carefully to remove blemished fruits. Wrap best fruits individually in paper. Promptly refrigerate to slow the ripening process. Store in refrigerator or another very cold place, in perforated plastic bags or waxed boxes to maintain high humidity. Check weekly.
- Harvest beets before hard freeze. Trim tops to one quarter-inch, but do not trim roots. Wash in cool water. Pat dry. Refrigerate beets in plastic bags or pack in damp sand in a sealed container and store in a cold basement, garage or root cellar.
- Harvest cabbage before outermost leaves start losing color, or before hard freeze. Remove outer leaves. Refrigerate in plastic bags or plant trimmed cabbage heads with roots attached in buckets of damp sand in a root cellar or cold greenhouse.
- Harvest carrots before hard freeze. Trim tops to one half-inch. Wash gently in cool water. Pat dry. Refrigerate in plastic bags. Refrigerate or pack in damp sand in a sealed container and store in a cold basement, garage or root cellar. Sensitive to ethylene gases given off by apples and other fruits.
- Harvest celeriac before hard freeze. Trim tops to one quarter- inch and cut off long roots. Shake off soil but do not wash. Refrigerate in plastic bags. Refrigerate or pack in damp sand in a sealed container and store in a cold basement, garage or root cellar. Sensitive to ethylene gases given off by apples and other fruits.
- Before hard freeze, lift celery plants with soil attached to roots. Transplant to a shallow bin or bucket, or a bed in a cold greenhouse. Keep celery roots moist to wet, but keep foliage dry. Harvest stalks as needed by cutting them with a sharp knife. Store celery in a cool garage or greenhouse and harvest stalks until only small hearts remain. Plants that make it through winter can be replanted outdoors in spring. Established plants are often hardy to Zone 7 and do not require lifting.
- Dig, and then pull leeks before hard freeze. Transplant to a shallow bin or bucket, or a bed in a cold greenhouse. Trim back tops by half their length after transplanting. Move to a cold place where the roots will not freeze. Store leeks in a cool garage or greenhouse and harvest as needed until they are gone. Replant trimmed-off roots to a tray of lightly moist soil. Most will grow into new plants.
- Leave some parsnips in the ground to dig in early spring. Harvest most before hard freeze. Trim tops to one half-inch, wash in cool water. Pat dry. Refrigerate in plastic bags. Parsnips can be kept refrigerated in plastic bags, or packed in damp sand in a sealed container and stored in a cold basement, garage or root cellar. Sensitive to ethylene gases given off by apples and other fruits.
- Pick pears as green fruits turn a lighter shade of green. Seeds should be medium to dark green, with fruits quite hard. Cure in a cool, 40- to 50-degree place for a week to promote even ripening. Sort carefully to remove blemished fruits. Wrap best fruits individually in paper. Store in refrigerator or very cold place, below 40 degrees, in perforated plastic bags or waxed boxes to maintain high humidity. Check weekly.
- Harvest rutabaga before hard freeze. Trim tops to one half-inch; also cut off taproot. Wash in cool water. Pat dry. Refrigerate in plastic bags in the refrigerator. Rutabagas can be kept refrigerated, or packed in damp sand in a sealed container and stored in a cold basement, garage or root cellar. Sensitive to ethylene gases given off by apples and other fruits.
- Harvest turnips before hard freeze. Trim tops to one half-inch, but do not trim roots. Wash in cool water. Pat dry. Refrigerate in plastic bags. Refrigerate or pack in damp sand in a sealed container and store in a cold basement, garage or root cellar. Sensitive to ethylene gases given off by apples and other fruits.
Contributing editor Barbara Pleasant gardens in southwest Virginia, where she grows vegetables, herbs, fruits, flowers and a few lucky chickens.
Top Storage Crops: How to Store Fruits and Vegetables Mother Earth NewsIf you're gonna fight, fight like you're the third monkey on the ramp to Noah's Ark... and brother its starting to rain. Join our efforts to Secure America's Borders and End Illegal Immigration by Joining ALIPAC's E-Mail Alerts network (CLICK HERE)
-
05-29-2025, 05:29 AM #9725Senior Member
- Join Date
- Aug 2018
- Posts
- 84,426
Self Watering Vertical Garden With Recycled Water Bottles
By tiero in LivingGardening
285,307
2,428
Introduction: Self Watering Vertical Garden With Recycled Water Bottles

 By tieroFollow
More by the author:


About: I'm a geologist More About tiero »
Here how i made my vertical vegetable garden, starting from used big water bottles as planters. An automatic watering system keep the right moisture, collecting water in excess, using power from pv panels and a little wind turbine (vawt)
Step 1: 3d Project

The green wall is composed by 72 water bottles cut and placed upside-down on a wooden shelf.
Two independent water reservoir are present: the main is placed on the side of the building and composed by eight 200 liters barrels linked together, for collecting rain water. The second one is composed by three plastic "new jersey" street barriers, that can contain 80 - 100 liters each, placed under the shelf.
The circulating system is composed by two 12v pumps, powered by a hybrid power system, a vawt turbine in conjunction with two 10w pv panels.
Energy is stored in a 12v car battery via charge controller and a timer regulate the watering cycle (at this moment the set up is 1 min at 7 am and 1 minute at 7 pm.
Water is pumped from second reservoir to the top of the shelf, into a PVC pipe ( Dia 4 cm) where i drilled eighteen 3 mm holes (one for each planter of the first row). After moisten the first row, water goes down to the rows below until go back to the starting tank.
With hand activated valve i can refill the second reservoir with rain water from blue barrels.
Step 2: Planter Design


 9 More Images
Last year I obtained from my friend Ricky a hundred of 18l PET bottles round and square shaped, ideal for my project.
The prototype of planter was a cut bottle filled with 1/3 of expanded clay and 2/3 of soil. To prevent the mixing of the clay, i decided to use felt bags sew from a mat bought on the internet. This solution create an air gap between the internal wall of the bottle and the soil, adding some aeration to the system. This bag are reusable and permit to remix the soil after harvest.
To obtain a little reserve or water in the planter i used a piece of pvc pipe ( 4 cm dia) sealed inside the bottle neck with rubber bands, but after some try i discover a better way to do the job, using the plastic cap of the bottle and a piece of hose.
To protect the PET bottle and roots from direct sun, i cut a juta net, found on ebay for few euros. This natural material give the bottle a rural/vintage look. To hold the mat i used a juta cord.
Step 3: Frame


 3 More Images
The shelf is build in cheap pine wood, 12 plank 200x35x5 cm and 4 timbers 10x10 cm, 300 height.
Step 4: Watering System


 6 More Images
two cheap 12vdc pumps are set to lift water from the "new jersey" one minute at 7 am e one at 7 pm, enough to keep the right moisture of the planters.
Step 5: Power


 15 More Images
Step 6: Vegetables


 3 More Images


 Second Prize in:Instructables Green Design Contest
View Contest
 Participant in:Great Outdoors Contest
View Contest
1 Person Made This Project!
 dmoonen made it!
Did you make this project? Share it with us!
Log in to post an I Made It
Recommendations
 Amazing Sweet Leaf Herb - 100% Natural & Healthy Zero Calorie Sweetenerby Rhonda Chase Design in Health
78
7.2K
 Krite Creature Costume From Critters Movie 1986by DAZMAKER in Costumes & Cosplay
35
13K
 Sound Sleuth 7.1.4 Mixing Rigby DJJules in Music
86
10K
Green Earth
Contest

Big and Small
Contest

Make it Temporary
Architecture Student Contest
Self Watering Vertical Garden With Recycled Water Bottles : 6 Steps (with Pictures) - InstructablesIf you're gonna fight, fight like you're the third monkey on the ramp to Noah's Ark... and brother its starting to rain. Join our efforts to Secure America's Borders and End Illegal Immigration by Joining ALIPAC's E-Mail Alerts network (CLICK HERE)
-
05-31-2025, 09:41 PM #9726Senior Member
- Join Date
- Aug 2018
- Posts
- 84,426
Health Ranger Report: Stefan Verstappen discusses community prepping and survival wisdom
05/31/2025 // Kevin Hughes // 100 Views
Tags: bug out bag, bugout, chaos, Collapse, community resilience, covid-19, democide, fearmongering, food self-sufficiency, gardening, Health Ranger, Health Ranger Report, medical supplies, medications, Mike Adams, operational security, panic, preparedness, Preppers, prepping, self-reliance, SHTF, Stefan Verstappen, supply chain disruptions, survival, survival kits
- Stefan Verstappen's interest in preparedness began during the Cold War, influenced by nuclear threat fears and early exposure to survivalism (e.g., building a bug-out bag at age 12). He critiques "fear porn" from governments/media but credits it for fostering self-reliance.
- Events like the Wuhan coronavirus (COVID-19) and geopolitical tensions have normalized prepping, with retailers like Costco selling survival kits. Despite increased awareness, many lack basic skills (e.g., repairs, tire changes), highlighting the need for education in self-sufficiency.
- Verstappen warns of "democide" (governments killing citizens), citing 239 million deaths in the 20th century. Preparedness is framed as pragmatic, not paranoid, given historical patterns of systemic violence.
- Success hinges on operational security (OpSec) and democratic cooperation (e.g., shared tasks like gardening, security and medical care) weekly community meetings and skill-sharing foster unity and mutual support.
- Stockpile at least a year's food supply, then transition to gardening/livestock for long-term sustainability. Medical preparedness is critical; communities should form teams to address supply chain disruptions.
In a world increasingly fraught with uncertainty, the concept of preparedness has shifted from the fringes of society to a more mainstream acceptance. This evolution served as the focal point of the conversation between the Health Ranger Mike Adams and Stefan Verstappen, a renowned expert in community prepping and survival strategies, on the "Health Ranger Report."
Verstappen, a Canadian author and researcher, shared his personal journey into the world of prepping. Growing up during the Cold War era, the looming threat of nuclear war was a constant source of anxiety. This fear, coupled with the availability of fallout shelters as a home-buying option in the 1960s, ignited his interest in survivalism at a young age.
By the age of 12, Verstappen was already assembling his first bug-out bag, a testament to his early commitment to preparedness. Reflecting on his upbringing, Verstappen highlighted the pervasive fearmongering of the time, which he refers to as "fear porn."
The government and media of the era often exaggerated threats, leaving a lasting impression on his generation. However, this environment also fostered a mindset of self-reliance and preparedness that has guided him throughout his life.
The conversation then shifted to the changing perception of prepping in contemporary society. Verstappen noted that the once-fringe concept has gained significant traction, especially in the wake of events like the Wuhan coronavirus (COVID-19) pandemic and rising geopolitical tensions. The normalization of prepping is evident in the availability of survival kits at retailers like Costco, indicating a broader societal shift toward preparedness.
Adams echoed this sentiment, pointing out the irony: Many people remain woefully unprepared despite increased awareness of potential threats. He highlighted the lack of practical skills among younger generations, who often lack even basic knowledge, such as changing a tire or repairing clothing. This observation underscores the importance of Verstappen's work in promoting self-reliance and community resilience.
The threat of democide and the importance of preparedness
Stefan introduced the concept of "democide," a term he uses to describe the alarming historical trend of governments murdering their own citizens. Citing conservative estimates of 239 million deaths attributed to democide in the last century, he emphasized the need for individuals to be vigilant and prepared for the worst-case scenarios. This perspective is not rooted in paranoia but in a pragmatic understanding of history and human nature.
Adams agreed, noting that the greatest threat to individuals often comes from their own governments. He also highlighted the irony that while people are increasingly aware of potential dangers, they remain unprepared for them. This disconnect underscores the urgent need for education and community-building efforts like those championed by Verstappen.
Verstappen emphasized the importance of community in times of crisis. He shared insights from his own experiences in forming communities, highlighting the challenges and keys to success. One of the critical factors he identified is operational security, which involves keeping the community's activities and location under the radar to avoid unwanted attention.
He also stressed the importance of a democratic and cooperative approach within the community. Verstappen's community meets weekly, with members volunteering their time and skills to various tasks such as gardening, medical care and security. This collaborative model ensures that everyone contributes and benefits, fostering a sense of unity and shared purpose. (Related: Water, gardening, community and more: 11 Important tips for preppers.)
The role of food and medicine in preparedness
When asked about the most critical aspects of preparedness, Verstappen emphasized the importance of food self-sufficiency. He advocated for stockpiling at least a year's supply of food and gradually transitioning to self-sustaining practices like gardening and raising chickens. This approach not only ensures a reliable food source but also promotes a deeper connection to the land and a more sustainable lifestyle.
Medicine was another crucial area of focus. Verstappen stressed the need for individuals to have access to essential medications and medical supplies, highlighting the potential for supply chain disruptions in times of crisis. His community has established a medical team to address these needs, further underscoring the importance of collective action and resource-sharing.
As the interview concluded, Verstappen reiterated the importance of taking proactive steps toward preparedness. He encouraged individuals to start small, focusing on building food reserves and acquiring essential skills. He also emphasized the value of mentorship and community-building, urging people to seek out like-minded individuals and work together toward common goals.
"Being prepared is an intelligent thing to do. And our ancestors or grandparents, they were preppers. They had to figure out how to survive. And they had to do a lot of things that modern preppers do, stockpile food for months, they had to learn canning and preserving, and purifying their own water," Verstappen said. "So, begin with focusing on becoming as self-sufficient in food."
Follow Survival.news for more news about prepping and survival strategies.
Watch the full interview between Stefan Verstappen and the Health Ranger Mike Adams below.
This video is from the Health Ranger Report channel on Brighteon.com.
More related stories:
Community preparedness: Building networks for support and resources.
Preparedness 101: Avoiding common prepping pitfalls for survival success.
Prepping 101: Three important lessons for beginners.
How to get your community moving towards food independence.
Sources include:
Brighteon.com
FormingCommunities.com
Related Topics
bug out bag bugout chaos Collapse community resilience covid-19 democide fearmongering food self-sufficiency gardening Health Ranger Health Ranger Report medical supplies medications Mike Adams operational security panic preparedness Preppers prepping self-reliance SHTF Stefan Verstappen supply chain disruptions survival survival kits
Health Ranger Report: Stefan Verstappen discusses community prepping and survival wisdom NaturalNews.comIf you're gonna fight, fight like you're the third monkey on the ramp to Noah's Ark... and brother its starting to rain. Join our efforts to Secure America's Borders and End Illegal Immigration by Joining ALIPAC's E-Mail Alerts network (CLICK HERE)
-
06-01-2025, 01:49 AM #9727Senior Member
- Join Date
- Aug 2018
- Posts
- 84,426
20 Home Remedies For Cracked Heels + Causes & Prevention Tips
Tread without caution with natural options to heal that cracked skin on your heels.
Medically reviewed by Dr. CP Thajudheen, MD
Written by Shaheen Naser, MSc
Edited by Anjali Sayee, BTech
Fact-checked by Swathi E, MA (English Literature)
Last Updated on Nov 14, 2024
✔ Evidence Based
Our editorial process ensures that the information we provide is well-researched and reliable. Learn about our commitment to quality in our editorial policy.

Image: Shutterstock
Cracked heels arent a big deal for most people, but they can be uncomfortable if theyre deep. These cracks can also cause bleeding. Home remedies for cracked heels focus on nourishing the skin and hydrating it to prevent further cracking and speed up the healing process.
Cracked heels are also known as heel fissures and are a frequent foot problem. According to a poll done by NPD, cracked heels affect 20% of US individuals aged 21 and above (1). They affect both children and adults and appear to be more severe in women. You need to understand the causes of cracked heels to know how to treat them. Dehydration, bad shoes, and certain medical conditions can make cracked heels worse. This guide shares some remedies that will help keep your feet healthy. This article discusses various natural remedies you can use to help heal your cracked heels. Keep reading.
In This Article
- What Causes Dry, Cracked Feet?
- Key Takeaways
- Remedies To Get Rid Of Cracked Heels
- What Causes Cracked Heels?
- What Are The Symptoms Of Dry, Cracked Heels?
- Tips To Prevent Cracked Heels
- Infographic: Essential Oils For Cracked Heels
- Illustration: Home Remedies For Cracked Heels + Causes & Prevention Tips
- Community Experiences
What Causes Dry, Cracked Feet?
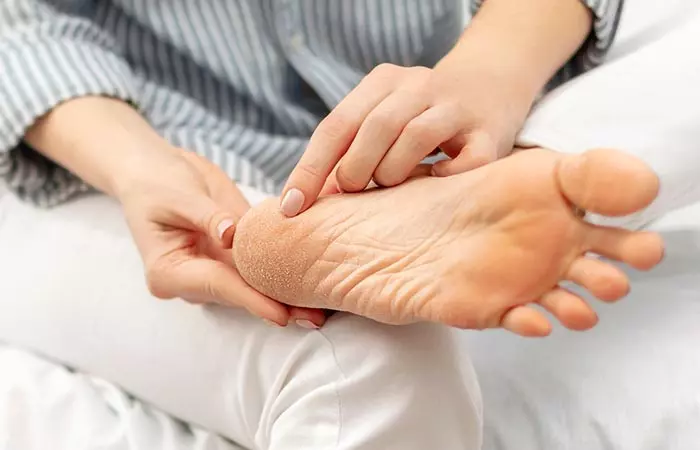 Image: Shutterstock
The skin on the soles of the feet tends to become drier as there are no oil glands present there. This dryness causes the skin to crack. Lack of moisturization, overexposure to pollution, and medical conditions, such as eczema, diabetes, thyroid, and psoriasis lead to dry and cracked feet. Read on to learn more about the home remedies for treating cracked heels.
A study conducted on 203,813 participants found the prevalence ranging from 3.6% among those aged 18 to 34 to 8.3% among those aged 75 and older. Furthermore, eczema was higher in Asian (6.5%) and White (6.2%) participants compared to Black (5.1%) and Hispanic (4.1%) participants.
Key Takeaways
- Dryness, pollution, or medical conditions can cause cracked heels.
- Wearing comfortable socks and shoes can prevent cracked heels.
- A foot mask containing salt, rose water, and glycerine is good for smooth, moisturized feet.
- Scrubbing your feet regularly helps remove dead skin cells and keep your feet soft and clean.
- Using oils to massage your heels improves circulation and provides hydration. You can use coconut oil to get rid of rough, dry skin and heal cracked feet.
Remedies To Get Rid Of Cracked Heels
1. Salt, Glycerine, And Rose Water Foot Mask
Rose water
contains antioxidants that prevent cell damage. It also has anti-inflammatory properties that may help relieve dry and irritated skin (2), (3). Glycerine is an effective humectant that helps your skin retain its natural moisture levels (4). These properties can help moisturize cracked heels.
You Will Need
- 1 tablespoon of salt
- 2 tablespoons of glycerine
- 2 teaspoons of rosewater
- Warm water
- Pumice stone/foot scrubber
What You Have To Do
- Add raw salt, one tablespoon of glycerine, and one teaspoon of rosewater to a basin filled with warm water. Soak your feet in this mixture for about 15-20 minutes.
- Scrub your heels and the sides of the feet with a pumice stone or a foot scrubber.
(Or)
- Mix one teaspoon of glycerine, and one teaspoon of rosewater and apply it on your cracked heels. Since this will be a sticky mixture, you can wear a pair of socks and leave them on overnight.
- Wash off with lukewarm water in the morning.
How Often You Should Do This
Repeat this for a few days.
2. Vegetable Oil
Studies show that vegetable oils like almond oil and jojoba oil contain emollient properties, along with antimicrobial, antioxidant, anti-inflammatory, and wound-healing properties.
They act as nutritional building blocks for healthy skin. These potent qualities of vegetable oils can help treat cracked heels (5).
You Will Need
2 teaspoons of vegetable oil
What You Have To Do
- Wash your feet and dry them with a clean towel. Apply a layer of vegetable oil on the affected area.
- Wear a pair of thick socks and leave them on overnight.
- Wash your feet in the morning.
How Often You Should Do This
Do this daily before going to bed.
3. Banana and Avocado Foot Mask
Avocado contains vitamins A, E, and omega fatty acids and other nutrients that promote wound healing
(6). Banana works as a moisturizer. These properties may help treat cracked heels.
You Will Need
- 1 ripe banana
- 1/2 avocado
What You Have To Do
- Blend a ripe banana and half an avocado.
- Apply this thick, creamy paste over your heels and feet.
- Keep it on for 15 to 20 minutes and then wash off your feet with lukewarm water.
How Often You Should Do This
Do this daily.
4. Petroleum Jelly
Petroleum jelly helps restore moisture to dry and cracked heels. It reduces water loss from the outer skin. This keeps your skin hydrated and soft (4). Woolen socks help trap the bodys heat and increase the effectiveness of the mixture.
You Will Need
- 1 teaspoon of Vaseline
- Moisturizer
- Pumice stone
- Lukewarm water
What You Have To Do
- Soak your feet in warm water for about 15-20 minutes.
- Use the pumice stone to scrub any hard or dry skin. Pat your feet dry.
- Apply moisturizer to the affected area.
- Apply Vaseline over it to lock in moisture.
- Put on a pair of woolen socks. Keep them on overnight and wash your feet in the morning.
How Often You Should Do This
Do this regularly before going to bed.
5. Paraffin Wax Natural Remedy
Paraffin wax acts as a natural emollient that helps soften your skin. It is an effective treatment for cracked and sore heels (7).
You Will Need
- 1 tablespoon of paraffin wax
- 2-3 drops of mustard/coconut oil
What You Have To Do
- Mix paraffin wax with mustard oil or coconut oil.
- Heat the mixture in a pan until the wax melts properly.
- Allow this mixture to cool down to room temperature. Apply it to your feet before going to bed and wear a pair of socks.
- Wash off in the morning.
How Often You Should Do This
1-2 times a week before going to bed.
Caution: Do not dip your feet in the wax when it is hot. If you have diabetes, do not try this treatment.
6. Honey
Honey is a natural antiseptic that helps heal cracked feet, and its soothing properties help revitalize the skin (8).
You Will Need
- 1 cup honey
- Warm water
What You Have To Do
- Mix one cup of honey in half a bucket of warm water.
- Soak your feet for about 15-20 minutes in the water-honey mixture.
- Scrub off gently.
How Often You Should Do This
Do this regularly for soft and supple feet.
7. Rice Flour
Rice flour can help exfoliate
, purify, and remineralize the skin, making it satin-smooth and soft (9).
You Will Need
- 2-3 tablespoons of ground rice
- 1 teaspoon of honey
- 3-4 drops of apple cider vinegar
What You Have To Do
- Mix two to three tablespoons of ground rice with a few drops of honey and apple cider vinegar to make a thick paste.
- If your heels are extremely dry and cracked, you can add a teaspoon of olive oil or sweet almond oil to the mixture.
- Soak your feet in warm water for 10 minutes and gently scrub it with the paste to remove dead skin cells from your feet.
How Often You Should Do This
Apply this foot scrub 2 times a week.
8. Olive Oil
Olive oil
has nourishing properties that make your skin soft and supple (10). However, it is not suitable for all skin types. Therefore, do a patch test before using it on the affected area.
You Will Need
1 tablespoon of olive oil
What You Have To Do
- Apply some olive oil with the help of a cotton ball and gently massage your feet in a circular motion for 10-15 minutes.
- Wear a pair of thick cotton socks and wash off after an hour.
How Often You Should Do This
Do this daily.
9. Oatmeal Remedy
Oatmeal has anti-inflammatory and moisturizing properties that help get rid of dead skin on your feet and soften the skin (11).
You Will Need
- 1 tablespoon of powdered oatmeal
- 4-5 drops of olive oil
What You Have To Do
- Mix the powdered oatmeal and olive oil to make a thick paste.
- Apply this paste to your feet, especially over the heels and any cracked parts. Leave it on for about half an hour.
- Rinse with cold water and pat dry.
How Often You Should Do This
Do this every alternate day.
10. Sesame Oil
Sesame oil has nourishing, moisturizing, and skin barrier repairing properties (12). This helps soften and soothe dry and cracked feet.
You Will Need
4-5 drops of sesame oil
What You Have To Do
- Apply sesame oil to your heels and any other cracked parts.
- Massage well until it is absorbed by the skin.
How Often You Should Do This
Do this daily before going to bed.
11. Coconut Oil
Coconut oil moisturizes dry skin and also helps get rid of dead skin cells (13). It can penetrate to the deeper layers of the skin and nourish them (14).
You Will Need
- 2 tablespoons of coconut oil
- A pair of socks
What You Have To Do
- Apply coconut oil liberally on your feet.
- Slip on the socks and go to bed.
- Shower as usual in the morning.
How Often You Should Do This
Repeat this for a few days.
 Quick Tip
Opt for cold-processed, unrefined, extra-virgin coconut oil. Pure oils contain more nutrients than processed coconut oil.
12. Listerine Soak
Soaking your feet in Listerine can soften the hardened dead skin and make it easier to be scrubbed off. Listerine is also an antiseptic and soothes the skin because of the phytochemicals like menthol and thymol that are present in it. However, there is no scientific evidence to back these effects.
You Will Need
- 1 cup Listerine
- 1 cup white vinegar
- 2 cups of water
- A basin
- Foot file or pumice stone
What You Have To Do
- Soak your feet for 10-15 minutes in the liquid mix containing the above-mentioned ingredients.
- Remove your feet and scrub them using the foot file or pumice stone to slough off the dead skin.
- Rinse with clean water, pat dry, and moisturize.
How Often You Should Do This
Repeat this every day for 3-4 days until the dead skin wears off.
13. Baking Soda
Baking soda is a commonly used exfoliant (15). It removes dead cells and also soothes the skin. However, this remedy is better to avoid if you have deep fissures which appear like wounds.
You Will Need
- 3 tablespoons of baking soda
- Warm water
- A bucket
- Pumice stone
What You Have To Do
- Fill two-thirds of the bucket with warm water and add the baking soda. Mix well until the baking soda dissolves in the water.
- Soak your feet in this mixture for 10 to 15 minutes.
- Remove your feet from the soak and scrub gently with the pumice stone.
- Rinse with clean water.
How Often You Should Do This
Do this 2 times a week.
14. Apple Cider Vinegar
The mild acids present in ACV act as chemical exfoliators (16). They help soften the dry and dead skin and reveal fresh and healthy skin.
You Will Need
- 1 cup apple of cider vinegar
- Warm water
- A basin
What You Have To Do
- Fill the basin with enough water to soak your feet in about three to four cups.
- Add the apple cider vinegar and mix well.
- Soak your feet in the water for about 15 minutes and scrub to remove the dead skin from your feet.
How Often You Should Do This
Repeat this the next day or after a days gap, if required.
15. Epsom Salt
Epsom salt softens the skin and also soothes tired feet (17). It also improves skin barrier function, reduces inflammation, and keeps your skin hydrated (18).
You Will Need
- 1/2 cup of Epsom salt
- Warm water
- A foot basin
What You Have To Do
- Fill the foot basin with water and mix Epsom salt in.
- Soak your cracked feet in this for 15 minutes. Scrub to remove dead skin.
How Often You Should Do This
Repeat this 2-3 times a week.
16. Aloe Vera
Aloe vera soothes dry and dead skin. It heals the ridges and cracks that have formed by increasing collagen synthesis. The amino acids present in it help soften the skin (19).
You Will Need
- Aloe vera gel
- Lukewarm water
- Foot basin
- A pair of socks
What You Have To Do
- Soak your feet in lukewarm water for a few minutes.
- Pat dry and apply aloe vera gel liberally on your feet.
- Wear socks and leave the gel on your feet overnight.
How Often You Should Do This
Repeat this every night for 4-5 days.
17. Tea Tree Oil
Tea tree oil helps reduce inflammation
(20). It also has wound-healing properties that help in healing the cracks. Coconut oil (or love oil) moisturizes dry skin and heals cracks.
You Will Need
- 5-6 drops of tea tree oil
- 1 tablespoon coconut oil or olive oil
- A pair of socks
What You Have To Do
- Mix the tea tree oil and coconut oil (or olive oil).
- Apply the blend to the cracked feet and massage for a minute or two.
- Cover your feet with socks overnight.
How Often You Should Do This
Do this every night before going to bed.
Caution: Do not use tea tree oil directly as it can lead to rashes.
18. Pumice Stone
The rough surface of the pumice stone can easily scrape off the dead skin to reveal healthy and soft skin. You can try soaking your feet in chamomile tea to help with the process.
You Will Need
- Pumice stone
- Warm water
- A basin/tub
What You Have To Do
- Soak your feet in warm water for 10 to 15 minutes.
- Scrub your feet gently with the pumice stone to remove the dead skin cells.
- Rinse with water and pat dry. Do not forget to moisturize your feet.
How Often You Should Do This
Do this once daily.
Caution: Do not scrub too harshly with the pumice stone as it can damage the healthy layers of the skin.
19. Vitamin E Oil
Vitamin E oil nourishes and hydrates the skin and makes your heels smooth and soft (21).
You Will Need
Vitamin E capsules
What You Have To Do
- Make a hole in about three to four capsules and collect the oil present inside in a bowl.
- Apply this oil to the affected area and massage it in for a minute.
How Often You Should Do This
Reapply vitamin E oil 2-3 times a day.
20. Shea Butter
Shea butter hydrates, nourishes, and moisturizes the skin (22). It also possesses healing properties and improves various skin conditions related to dryness because of its vitamin A and vitamin E content.
Ingredients
- 1-2 tablespoons organic shea butter
- A pair of socks
How To Do
- Apply shea butter on your feet and massage them for a minute or two so that it is absorbed easily.
- Slip on some socks and leave the shea butter on overnight.
How Often Should You Do This
Repeat this for a few nights for soft heels.
Quick Tip
Mango and Avocado butter are good substitutes for shea butter.
Apart from these home remedies, you can also try a few OTC measures to ensure your skin receives optimum healing. Liquid bandages are one of the best options available on the market to treat cracked heels.
When applied to dry, cracked heels, a liquid bandage forms a protective barrier that aids in moisture retention and accelerates the healing process. It helps prevent further splitting and infection, thus reducing the pain associated with cracked heels. Clean and dry the affected area before applying it. Ensure you allow the product to dry completely. While it is not a long-term solution, liquid bandages can offer relief and promote healing.
With proper care, it takes about 7-14 days to see the first signs of healing. This depends on how severely your heels are cracked. If you have skin issues like psoriasis and eczema, or medical conditions like diabetes and hormonal imbalance, visit your doctor immediately to avoid adverse effects.
Ariane, a YouTuber, discusses how she prevents cracked heels with a proper step-by step DIY pedicure. She uses a callus and cuticle remover to remove hard skin, then soaks her feet in an Epsom salt bath for 10 mins and finishes off by applying a thick moisturizer on the damp skin. She adds, So, although exfoliating is important, moisturization is just as important, if not more, because it would actually prevent your skin from getting so dehydrated. So if your heels or bottoms of your feet do have a tendency to crack, this is definitely going to prevent that from happening (i).
Check out the causes of cracked heels below.
What Causes Cracked Heels?
 Image: Shutterstock
There are many factors responsible for dry, cracked heels. There are no oil glands present in the skin of your heels. Thus, if proper care is not taken, they get dry, thereby causing the skin to crack and bleed. Other reasons for cracked heels are:
- Skin conditions, like psoriasis and eczema.
- Medical conditions, like thyroid, diabetes, and hormonal imbalance.
- Exposing heels to pollution.
- Excessive walking and standing on hard floors for long.
What Are The Symptoms Of Dry, Cracked Heels?
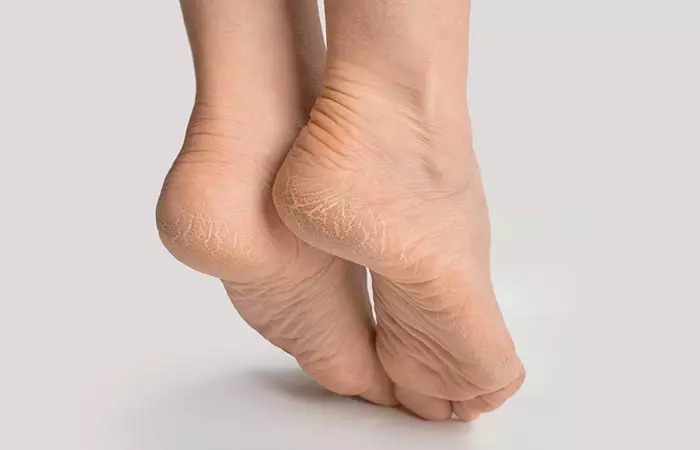 Image: Shutterstock
The symptoms of dry and cracked heels are:
- Dryness around the heel area and in the area on the underside of your feet, just below the toes.
- Red and flaky patches of skin.
- Skin peeling in thin strands.
- Cracks and ridges in the skin.
- Itchiness
- Bleeding from the cracks.
- Discharge from the cracks due to a developed infection.
Prevention is better than cure. There are many home remedies and lifestyle tips to prevent cracking of heels. Take a look.
Tips To Prevent Cracked Heels
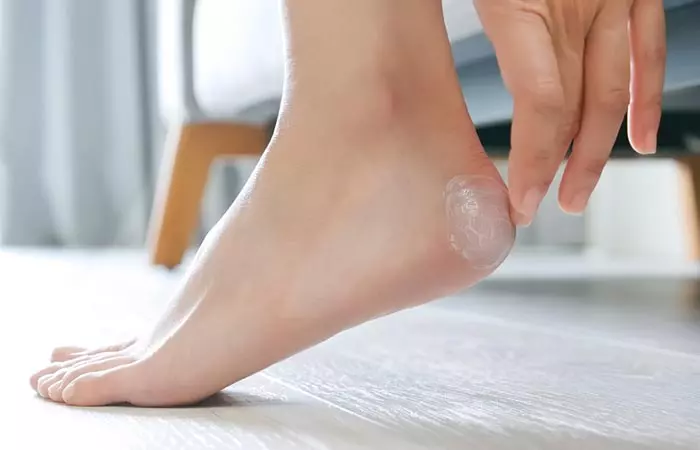 Image: Shutterstock
- Proper moisturization is the first step to prevent dry heels.
- Wearing comfortable shoes, refraining from excessive walking, and avoiding overexposure to pollution are the easiest ways to prevent cracked heels.
- Scrubbing your heels regularly with pumice stone and dipping them in warm salt water or water with lemon juice added to it can keep them clean and soft.
- Relaxing your feet and indulging in foot massages with oil also prevents dryness and cracked heels.
- Drink plenty of water to keep your skin hydrated and supple.
Infographic: Essential Oils For Cracked Heels
Cracked heels can be painful and need to be taken care of to mitigate the risk of infections or other complications. Along with plant oils, certain essential oils like lavender oil and peppermint oil can help in healing cracked heels and providing protection against fungal or bacterial infections.
Check out the infographic below to learn more about the best essential oils you can use in foot soaks or DIY foot creams to heal broken and dry heels.
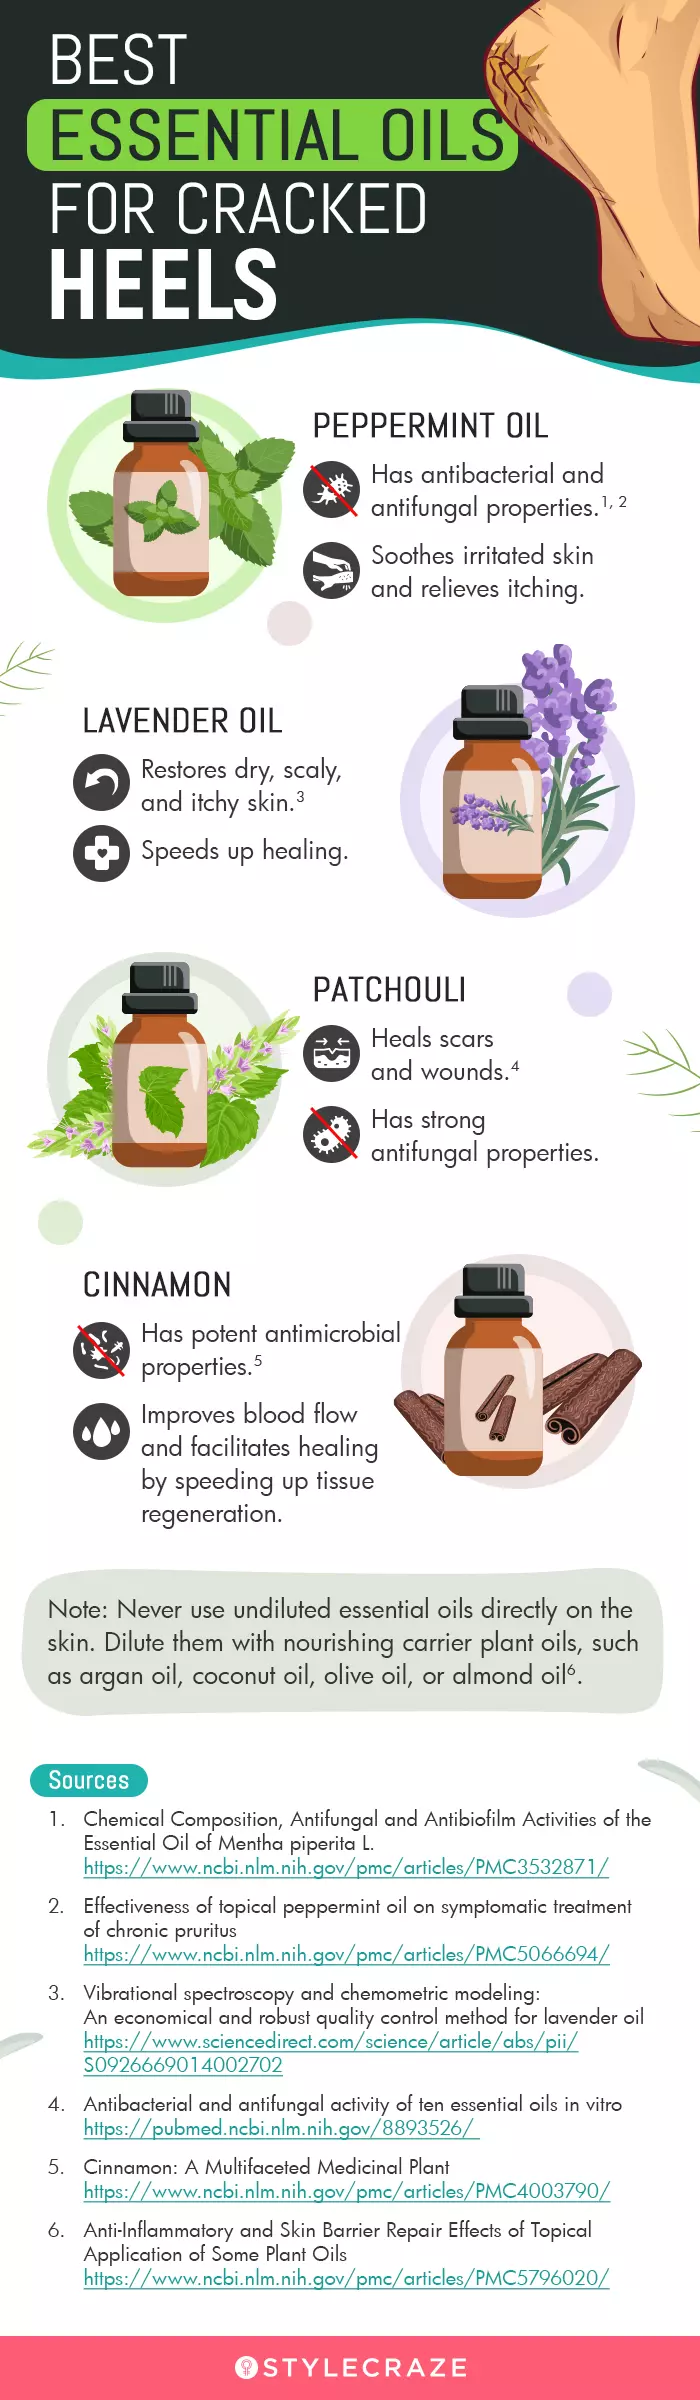
Illustration: StyleCraze Design Team
Cracked heels or heel fissures can not only be uncomfortable and unsightly but may also cause bleeding and increase the risk of health complications and infections. As the heels of the feet do not contain oil glands, the skin tends to get dry, and a lack of moisturizer application, exposure to pollutants, and certain medical conditions like diabetes, eczema, thyroid, and psoriasis can worsen the problem. You can apply different home remedies to help the healing process. Rosewater, glycerine, oatmeal, rice flour, petroleum jelly, paraffin wax, honey, and aloe vera are a few ingredients that you can use to make home remedies for cracked feet. In addition, keep your feet well moisturized, avoid exposing them to pollution, de-stress your feet, take foot massages using natural oils and treat underlying medical conditions to prevent dry and cracked heels. However, some of the home remedies may not work if there is skin bleeding due to the occurrence of skin fissures. They are painful and may require further medical assistance from a professional.
Now that you know how to get rid of cracked heels, what are you waiting for? Try out these home remedies for cracked heels and see the difference.
Frequently Asked Questions
Does diabetes cause cracked heels?
Yes, diabetes is one of the causes of cracked heels (23). Uncontrolled blood sugar levels damage the nerves of the feet, which leads to dry skin. As there are no oil glands present on the skin of the feet, they are usually dry. The thick dry skin on the heels, known as callus, can develop heel fissures. As it is overly dry, it cracks and bleeds. People with diabetes are prone to serious infections from cracked heels that are difficult to treat. Hence, taking good care of the feet and treating cracked heels in the initial phase is advisable for individuals with diabetes.
How long will it take to cure cracked heels?
With proper care and relaxation, it takes about 7-14 days to see the first signs of healing. This depends on how badly your heels are cracked, skin issues, like psoriasis and eczema, or medical problems, like diabetes and hormonal imbalance.
How to heal cracked feet overnight?
Apply a heavy, oil-based moisturizer to your feet and slip on a pair of thin cotton socks. Keep it on overnight and scrub off the softened dead skin cells using a pumice stone and lukewarm water in the morning.
Why do only heels crack but not other parts of the feet?
As there are no oil glands on the skin of your feet, this area tends to become dry. The skin on the heels is thick and dry, and with excessive activity, it tends to bleed and crack. Standing on a cold or hard floor for long, intensive walking, and being overweight are some of the reasons heels crack. The middle part of the foot is hollow and well secured. Most of the bodys weight is borne by the heels. As they are dry and bloated, they tend to crack easily. At times, these cracks go deep and start bleeding.
Can a particular diet help improve the condition of cracked heels?
The deficiency of Vitamin E, calcium, iron, zinc, or omega-3 fatty acids may lead to cracked heels. You can include these nutrients in your diet to improve the condition of cracked heels.
Can home remedies for cracked heels be used in conjunction with other foot care treatments?
Yes. In fact, you must use moisturizing foot care treatments after remedies, such as soaks, scrubs, and wash-off masks as they can have a drying effect on the skin. These remedies are natural so you may use even leave-on remedies, such as aloe vera, vitamin oil, and shea butter with your treatments unless instructions on the product advises against it.
Are there any risks or potential side effects associated with using home remedies for cracked heels?
It depends on what ingredients are used in the remedies and if you are allergic to those ingredients. Always do a patch test when using an unfamiliar ingredient in your remedies.
Illustration: Home Remedies For Cracked Heels + Causes & Prevention Tips

Image: Stable Diffusion/StyleCraze Design Team
Cracked Heels Treatment Home Remedies To Get Rid Of Dry & Cracked Feet
Discover the amazing home remedy to remove cracked heels fast overnight! Get great results with this simple and easy solution. Scroll down to watch the video.
Home Remedy to Remove Cracked Heels Fast "OVERNIGHT" - Great Results
Personal Experience: Source
StyleCraze's articles are interwoven with authentic personal narratives that provide depth and resonance to our content. Below are the sources of the personal accounts referenced in this article.
i. DIY Pedicure For Cracked Heels | How To Treat Cracked Heels At Home
https://www.youtube.com/watch?v=u-3UCMq9gzs
References
Articles on StyleCraze are backed by verified information from peer-reviewed and academic research papers, reputed organizations, research institutions, and medical associations to ensure accuracy and relevance. Read our editorial policy to learn more.
- National Foot Health Assessment 2012 Institute for Preventive Foot Health.
https://www.ipfh.org/images/research..._June_2012.pdf - Boskabady, Mohammad Hossein et al. Pharmacological effects of rosa damascena. Iranian Journal of Basic Medical Sciences 14,4 (2011): 295-307.
https://www.ncbi.nlm.nih.gov/pmc/articles/PMC3586833/ - Thring, Tamsyn Sa et al. Antioxidant and potential anti-inflammatory activity of extracts and formulations of white tea, rose, and witch hazel on primary human dermal fibroblast cells. Journal of Inflammation (London, England) 8,1 27.
https://www.ncbi.nlm.nih.gov/pmc/articles/PMC3214789/ - Sethi, Anisha et al. Moisturizers: The Slippery Road. Indian Journal of Dermatology 61,3 (2016): 279-87.
https://www.ncbi.nlm.nih.gov/pmc/articles/PMC4885180/ - Guidoni, M et al. Fatty acid composition of vegetable oil blend and in vitro effects of pharmacotherapeutical skin care applications. Brazilian Journal Of Medical And Biological Research = revista brasileira de pesquisas medicas e biologicas 52,2 e8209.
https://www.ncbi.nlm.nih.gov/pmc/articles/PMC6376324/ - Dreher, Mark L, and Adrienne J Davenport. Hass avocado composition and potential health effects. Critical Reviews In Food Science And Nutrition 53,7 (2013): 738-50.
https://www.ncbi.nlm.nih.gov/pmc/articles/PMC3664913/ - Mahajan, P. M., et al. Wax therapy for dry feet in leprosy. Indian journal of leprosy 4 (1995): 383-388.
https://pubmed.ncbi.nlm.nih.gov/8849915/ - Burlando, Bruno, and Laura Cornara. Honey in dermatology and skin care: a review. Journal of Cosmetic Dermatology 12,4 (2013): 306-13.
https://pubmed.ncbi.nlm.nih.gov/24305429/ - Beretta, Silvia, et al. Fermented Rice Flour in Pediatric Atopic Dermatitis. Dermatitis2 (2015): 104-106.
https://home.liebertpub.com/publicat...s/672/overview - Ciinauskas, Vytis, et al. Skin penetration enhancement by natural oils for dihydroquercetin delivery. Molecules9 (2017): 1536.
https://www.ncbi.nlm.nih.gov/pmc/articles/PMC6151382/ - Pazyar, Nader et al. Oatmeal in dermatology: a brief review. Indian Journal of Dermatology, Venereology and Leprology 78,2 (2012): 142-5.
https://pubmed.ncbi.nlm.nih.gov/22421643/ - Pathak, Niti et al. Value addition in sesame: A perspective on bioactive components for enhancing utility and profitability. Pharmacognosy reviews 8,16 (2014): 147-55.
https://www.ncbi.nlm.nih.gov/pmc/articles/PMC4127822/ - Agero, Anna Liza C, and Vermén M Verallo-Rowell. A randomized double-blind controlled trial comparing extra virgin coconut oil with mineral oil as a moisturizer for mild to moderate xerosis. Dermatitis : Contact, Atopic, Cccupational, Drug 15,3 (2004): 109-16.
https://pubmed.ncbi.nlm.nih.gov/15724344/ - Lima, E B C et al. Cocos nucifera (L.) (Arecaceae): A phytochemical and pharmacological review. brazilian Journal Of Medical And Biological Research = Revista Brasileira De Pesquisas Medicas E Biologicas 48,11 (2015): 953-64.
https://www.ncbi.nlm.nih.gov/pmc/articles/PMC4671521/ - Quandt, Sara A et al. Home Remedy Use Among African American and White Older Adults. Journal of the National Medical Association 107,2 (2015): 121-9.
https://www.ncbi.nlm.nih.gov/pmc/articles/PMC4631220/ - Kapuscinska, Alicja, and Izabela Nowak. Use of organic acids in acne and skin discolorations therapy (Online) 69 374-83.
https://pubmed.ncbi.nlm.nih.gov/25811473/ - Rudolf, R D. The use of Epsom salts, historically considered. Canadian Medical Association journal 7,12 (1917): 1069-71.
https://www.ncbi.nlm.nih.gov/pmc/articles/PMC1584988/ - Gröber, Uwe et al. Myth or Reality-Transdermal Magnesium?. Nutrients 9,8 813.
https://www.ncbi.nlm.nih.gov/pmc/articles/PMC5579607/ - Surjushe, Amar et al. Aloe vera: a short review. Indian Journal of Dermatology 53,4 (200
 : 163-6.
https://www.ncbi.nlm.nih.gov/pmc/articles/PMC2763764/ - Pazyar, Nader, et al. A review of applications of tea tree oil in dermatology. International journal of dermatology7 (2013): 784-790.
https://pubmed.ncbi.nlm.nih.gov/22998411/ - Keen, Mohammad Abid, and Iffat Hassan. Vitamin E in dermatology. Indian Dermatology Online Journal 7,4 (2016): 311-5.
https://www.ncbi.nlm.nih.gov/pmc/articles/PMC4976416/ - Israel, Malachi Oluwaseyi. Effects of topical and dietary use of shea butter on animals. Am J Life Sci5 (2014): 303.
https://www.researchgate.net/publica...ter_on_animals - Mishra, Satish Chandra et al. Diabetic foot. BMJ (Clinical research ed.) 359 j5064.
https://www.ncbi.nlm.nih.gov/pmc/articles/PMC5688746/
20 Home Remedies For Cracked Heels + Causes & Prevention TipsIf you're gonna fight, fight like you're the third monkey on the ramp to Noah's Ark... and brother its starting to rain. Join our efforts to Secure America's Borders and End Illegal Immigration by Joining ALIPAC's E-Mail Alerts network (CLICK HERE)
-
06-01-2025, 02:17 AM #9728Senior Member
- Join Date
- Aug 2018
- Posts
- 84,426
If you're gonna fight, fight like you're the third monkey on the ramp to Noah's Ark... and brother its starting to rain. Join our efforts to Secure America's Borders and End Illegal Immigration by Joining ALIPAC's E-Mail Alerts network (CLICK HERE)
-
06-01-2025, 02:22 AM #9729Senior Member
- Join Date
- Aug 2018
- Posts
- 84,426
If you're gonna fight, fight like you're the third monkey on the ramp to Noah's Ark... and brother its starting to rain. Join our efforts to Secure America's Borders and End Illegal Immigration by Joining ALIPAC's E-Mail Alerts network (CLICK HERE)
-
06-01-2025, 02:23 AM #9730Senior Member
- Join Date
- Aug 2018
- Posts
- 84,426
If you're gonna fight, fight like you're the third monkey on the ramp to Noah's Ark... and brother its starting to rain. Join our efforts to Secure America's Borders and End Illegal Immigration by Joining ALIPAC's E-Mail Alerts network (CLICK HERE)


 Reply With Quote


New York Post 270.4K Followers Supreme Court allows Trump admin...
10-03-2025, 09:46 PM in General Discussion