

Results 9,791 to 9,800 of 11786
 226Likes
LinkBacks (?)
-
12-26-2016, 11:32 AM
-
09-02-2016, 05:39 PM
-
whole garden made with pallets!! Love it!! | Pallets | Pinterest | Pallets, Pallets Garden and Wooden Pallets
Refback This thread03-06-2016, 11:30 AM -
10-20-2015, 05:29 PM
-
06-12-2015, 08:00 PM
-
02-26-2015, 01:58 PM
-
01-05-2015, 04:13 PM
-
12-19-2014, 10:19 AM
-
EMERGENCY: HUGE FEMA PANDEMIC EXERCISE IN USA IN NOVEMBER, INTERNET SHUT DOWN PART OF EXERCISE | Prepare4Survival
Refback This thread12-03-2014, 10:39 PM -
Off Grid World ? Ugly Duckling Shipping Container Home Built by Artist Is a Beautiful Swan on the Inside
Refback This thread11-25-2014, 03:10 PM -
11-17-2014, 10:59 PM
-
11-13-2014, 11:18 AM
-
11-09-2014, 02:54 PM
-
10-28-2014, 11:38 PM
-
10-26-2014, 05:54 AM
-
10-16-2014, 11:28 AM
-
10-03-2014, 01:25 PM
-
10-02-2014, 09:16 PM
-
09-26-2014, 07:00 PM
-
09-26-2014, 01:56 PM
-
09-19-2014, 04:46 PM
-
09-13-2014, 05:49 AM
-
09-05-2014, 01:52 PM
-
09-01-2014, 09:39 AM
-
08-30-2014, 06:29 PM
-
08-10-2014, 06:29 AM
-
08-04-2014, 05:07 PM
-
07-23-2014, 11:14 AM
-
New Evidence on Expiration Dates | Medical Preparedness | Doom and Bloom (TM) | Doom and Bloom (TM)
Refback This thread07-22-2014, 10:10 AM -
07-18-2014, 08:37 PM
-
07-15-2014, 04:57 PM
-
07-11-2014, 01:40 AM
-
04-22-2014, 11:14 AM
-
04-18-2014, 12:57 PM
-
04-18-2014, 10:10 AM
-
04-14-2014, 12:18 AM
-
04-12-2014, 02:28 AM
-
03-02-2014, 11:43 PM
-
12-24-2013, 11:59 PM
-
12-07-2013, 11:04 PM
-
kitchen | Cob
Refback This thread11-25-2013, 03:24 PM -
10-22-2013, 10:25 PM
-
Apple Pie Braid | Sweets
Refback This thread09-26-2013, 07:58 AM -
09-02-2013, 04:44 PM
-
5 Reasons Why You May have to Bug Out Even Though You Don’t Want to | The Apartment Prepper's Blog
Refback This thread08-23-2013, 03:20 PM -
06-27-2013, 06:30 AM
-
06-23-2013, 08:11 PM
-
06-17-2013, 11:21 PM
-
05-24-2013, 05:06 PM
-
To Eat / BASIC LIST / SUGGESTED ITEMS FOR LONG TERM SURVIVAL - Page 275 - ALIPAC
Refback This thread05-01-2013, 03:49 AM
Thread Information
Users Browsing this Thread
There are currently 2 users browsing this thread. (0 members and 2 guests)
 LinkBack URL
 About LinkBacks
-
06-07-2025, 03:42 PM #9791Senior Member


- Join Date
- Aug 2018
- Posts
- 93,795
How To Survive A Pandemic | Survival Kit Supplies
Home / PANDEMIC / How To Survive A Pandemic | Survival Kit Supplies
ByKen J.Last Update02/23/20250 Comments
Pandemic Survival Kit | How To Survive
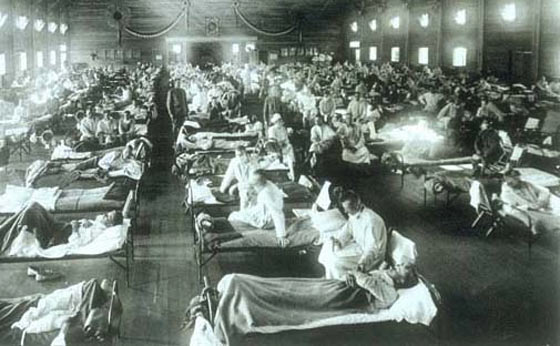
A severe pandemic may incapacitate a significant portion of the population. When a percentage of people are dying, it will get real. Real scary. Can you survive a pandemic? Yes you can. Heres how to survive a pandemic
Take a deep breath, read through this entire article with its recommendations. Make your own decisions and choices. Be prepared.
(jump to list)
Stay away from people
This may sound easy. But its not. Not at all. Why? Because theres so many of us, and close proximity is inevitable. At first, people will believe that it wont affect them. It will be business as usual. Going to work. Daycare. School. Errands. The grocery store. You name it
The simple truth is to avoid proximity to other people, until its over. Easier said than done.
A severe pandemic may cripple infrastructure supply-chains, like groceries and things you need at home for a pandemic. Panic buying, people who are sick not going to work, or even self isolation or quarantine.
Are you ready and able to self quarantine for 7, 14, or more days? Worst case, could you remain isolated for weeks or even a month or more?
This article is re-published and updated for your information, given the recent publicity of the coronavirus outbreak which is evidently spreading in parts of Asia at this time. Though the article applies generically to any severe pandemic outbreak.
Surviving a pandemic is a matter of ISOLATING YOURSELF from OTHER INFECTED PEOPLE until it has run its course. At worse, this could be many weeks, month(s) or even longer (though absolute worst case).
Since you may not know which people may be infected (showing no symptoms yet), you will need to stay away from everyone outside of your home sphere for maximum mitigation. Therefore in order to be fully prepared, you must have the ability to self quarantine. To not go out where other potentially infected people are. This includes going to work, grocery shopping, etc..
You must have everything that you need already at home.
People going about their business
During the onset of a severe and deadly pandemic, most people will not fully realize the ramifications. They will continue to go about their daily habitual routines of going to work, the grocery store, etc. They may be exposing themselves to the potential mortal consequences of a deadly pandemic.
Almost every transmissible disease has an incubation period during which time the person is infected but not yet showing signs of disease. Quite often, a person can be contagious for one to several or more days before exhibiting symptoms. Thats a problem!
Incubation Period
The incubation period of an infectious disease is the time between infection and symptom onset. Many viral infections will manifest themselves within a period of 3 5 days, and most within 10 14.
Ebola virus incubation potentially up to 21 days. Incubation period for Pneumonic plague is 1 3 days. Bubonic plague is 2 6 days. Up to 4 days for severe Coronavirus. (for example)
UPDATE: COVID-19 Coronavirus is said to be asymptomatic (no symptoms) for up to 14 days while shedding virus. 24 days has also been reported. It is apparently highly contagious during all that time!
Bugging in | Staying Home
If it ever gets real bad, the tough part will be deciding at what point to bug in, or stay home. Why? Because your employer will probably want you at work. If you choose to stay home, you might be risking your job (at least at first). Theres no clear answer. It will be an individual choice based on whats going on out there.
list
The following is a starter-list of preparedness items, focused to do with pandemic survival. In reality there is much more to consider than this list. But hopefully it will set you in a direction to begin considering your options, should you ever need them
Again, the key is to have enough supplies to hunker down without having to be around other people. Though some supplies are specific to the potential health realities of sick people.
PANDEMIC SURVIVAL KIT LIST
This is to get you thinking about a pandemic shopping list. Things you need at home. Food for a pandemic.
Food, Water, Consumables
Firstly, be sure to have enough of the basics to remain at home for weeks, maybe longer, without having to go out and resupply. Its a simple concept. But in reality most people dont keep enough food and supplies to make it beyond a week.
FOOD SUPPLY. Its not terribly difficult to build up a supply that will last 1 month a good initial preparedness target for each and all members of the household. Then 3 months.
There are reputable emergency food companies that sell kits of varying quantities (days). I like the ready made food buckets because they are quick and easy. But thats just a starting point.
Augason Farms 30-Day Emergency Food Storage
Wise Company Emergency Food Supply
Augason Farms Lunch & Dinner Food Bucket
An excellent family operated and well established business in emergency preparedness who distributes several quality brands of emergency food is Ready Made Resources. I recommend that you check them out too. Tell em you came from Modern Survival Blog
(UPDATE) New Article: Food To Survive Pandemic For 90 Days
(UPDATE) Coronavirus concerns: Listen, if youre an amazon prime member, you can mitigate the risk of going to the grocery store among other potentially infected people. You can get just about any grocery delivered to your door. This might make sense for some of you, at least temporarily until threat of pandemic has subsided.
GROCERIES at amzn
Water & Food (Prepping & Preparedness)
WATER FILTER. Clean, pure drinking water without bacteria or virus. An essential preparedness item is a quality gravity water filter, such as one of the Berkey models from USABerkeyFilters. I use their filters exclusively. The Best.
WATER STORAGE. Though were not expecting shutdown of water infrastructure, its always a good idea to have some water storage at home. Cases of bottled water. And/or water-specific storage containers. For example, these Samson Stackers.
TOILET PAPER. Can you ever have enough backup TP? Plus, when sick, youre going to go through lots more than normal. On average, most use ~2 rolls/week/person. How about 5 per week? Thats ~60 rolls for 3 months per person.
KLEENEX / TISSUES & PAPER TOWELS. Get enough for 90 days so you dont have to go out to the store and risk contagion from the pandemic. Paper towels ideal for sanitary / surfaces cleanup and disinfection with antiseptics.
Pandemic-specific Survival Kit Supplies
Protection for at home, or away from home. Surfaces may become contaminated with virus. Virus may become airborne via droplet or even aerosol transmission (worst case). These are the things that you need to think about, and to protect yourself from. The things you can do to mitigate the issues associated with virus and contamination.
Firstly, good hygiene habits. Wash your hands. Especially after being out in public places. It may seem silly to describe how to, but read this to do it right.
Dont touch eyes, nose, or mouth without having washed your hands first! Especially after having been in public places (e.g. grocery store?). Its hard not to touch your face!
LIQUID BLEACH. Regular liquid bleach for sanitation and disinfection (have enough of it).
Read: Disinfectant Bleach-Water Ratio.
NITRILE EXAM GLOVES. Several boxes of disposable gloves. Example: Nitrile Exam Gloves
CHEMICAL RESISTANT GLOVES. These are thicker. Use them to protect hands while mixing / applying a batch of disinfecting bleach/water. Also for dealing with dangerous wastes (Wells Lamont).
FACE MASKS. Provides some protection from particulates entering your respiratory system. Rated at least for N95, like these from amzn. Note as of this update (FEB-2020), most are sold out due to coronavirus. But check back later
RESPIRATOR MASK. The next step up. Quality respirator mask such as this one: 3M P100 having replaceable filter cartridges.
FACE SHIELD. It will help protect the eyes, nose, and mouth while in close proximity to an infected person (e.g. while treating). Example: Safety Works Adjustable Headgear
DISPOSABLE COVERALL SUIT. Such as the DuPont Tyvek Suit (several).
HAND SANITIZER. Use it for quick hand sanitizing after any public or patient exposure . It must have at least 60% alcohol active ingredient antiseptic (70% even better). Though you should wash hands often with soap and water. Search hand sanitizer on amzn.
HEPA AIR FILTER. HEPA filters for in-house air filtration. Virus will latch on to sneeze/cough globules. Aerosol transmission would be even worse (this coronavirus has been said to exhibit this). A HEPA air filter at home will help to catch this.
VOMIT BAGS. Sorry, gross I know. But if someone at home gets sick, these sure make it a bit easier to deal with. (Weve been using this type of bag). It has a convenient closure method to minimize exposure twist and secure bag into the notched ring. We first saw them at our local hospital.
DISINFECTING WIPES. Keep surfaces disinfected at home. Also, (tip!) grocery stores have this near their carriages / baskets. Use them! Wipe down the handles. Search Disinfecting Wipes on amzn.
LIQUID SOAP | HAND SOAP. An aggressive formula soap such as Dawn Ultra. Have enough hand soap (i.e. pump bottles).
MEDICATIONS. Enough of whatever you may be taking. Also consider those which may help alleviate symptoms if someone were to get sick at home.
FLU SYMPTOM MEDICINES. Make sure that you already have enough in your house. Fever reducers (Ibuprofen, Tylenol). NyQuil, DayQuil. Whichever of this type of relief has worked for you in the past. Just make sure you have a supply.
ELECTROLYTE REPLACEMENT. If someone becomes sick, they may dehydrate (not good!). So keep some electrolyte replacement, such as this one from Vitalyte.
IMMUNE SYSTEM BOOSTERS. Get enough sleep. Keep your body strong. Eat right. With that said, there are boosters and supplements. Such as the following (view on amzn),
Elderberry Gummies with Vitamin C & Zinc (Kids)
Elederberry Gummies with Vitamin C & Zinc (Adults)
Vitamin C Powder
ISOLATION ROOM. You might consider the materials necessary to set up a temporary isolation room in case someone at home gets sick with this virus. This may include a separate HEPA filter for the room. An adequate supply of nitrile gloves and masks for in-and-out. Maybe even a portable toilet for the room.
If you are very serious about an isolation room, you might have a look at CBRN protection by way of a professional isolation tent for quarantine or protection mode. CoronavirusTent.com
PORTABLE TOILET. For provisional isolation room, if you need to set one up. (Self-Contained Toilet).
The Takeaway | How to Survive a Pandemic
The world is ill-prepared for the fight against severe pandemic outbreaks. The Plague, Ebola, MERS, SARS, avian flu and other illnesses could re-emerge at any time. We live in a world of high speed transportation (worldwide). There are more people than ever, and things could spread fast.
While the list above is not complete for an overall pandemic preparedness plan, it should get you to thinking about your own preparedness. Search Modern Survival Blog for further ideas and opinions regarding prepping & preparedness.
Feel free to add your additional suggestions below
The first chunk of comments below are relevant to earlier posting regarding Ebola.
Jump to comments surrounding the Coronavirus which begin about (here) down the page.
Continue reading: Mind-blowing Exponential Growth Parallels with a Pandemic
How To Survive A Pandemic | Survival Kit Supplies
If you're gonna fight, fight like you're the third monkey on the ramp to Noah's Ark... and brother its starting to rain. Join our efforts to Secure America's Borders and End Illegal Immigration by Joining ALIPAC's E-Mail Alerts network (CLICK HERE)
-
06-09-2025, 03:23 AM #9792Senior Member
- Join Date
- Aug 2018
- Posts
- 93,795

Amazing Homemade Natural Toothpaste Recipe
- Home
- Natural Beauty Recipes
- Amazing Homemade Natural Toothpaste Recipe
Melissa Francis
January 13, 2014
Natural Beauty Recipes
amazing,oothpaste,tooth brush
Get the cleanest feeling teeth of your life with this homemade toothpaste recipe…. your teeth will sparkle !
Ingredients:
4 Tablespoon coconut oil (anti-viral & anti-inflammatory)
1/2 teaspoon coral calcium (to remineralize)
1/2 Teaspoon Himalayan sea salt (to remineralize and polish off stains)
1 Tablespoon raw honey (anti-bacterial & anti-inflammatory)
2 drops cinnamon essential oil (anti-bacterial)
5 drops peppermint essential oil (anti-bacterial).
Warm coconut oil and honey then add all remaining ingredients.
Pour into a 4oz quilted wide mouth mason jar.
Amazing Homemade Natural Toothpaste Recipe - The Homestead SurvivalIf you're gonna fight, fight like you're the third monkey on the ramp to Noah's Ark... and brother its starting to rain. Join our efforts to Secure America's Borders and End Illegal Immigration by Joining ALIPAC's E-Mail Alerts network (CLICK HERE)
-
06-09-2025, 03:33 AM #9793Senior Member
- Join Date
- Aug 2018
- Posts
- 93,795
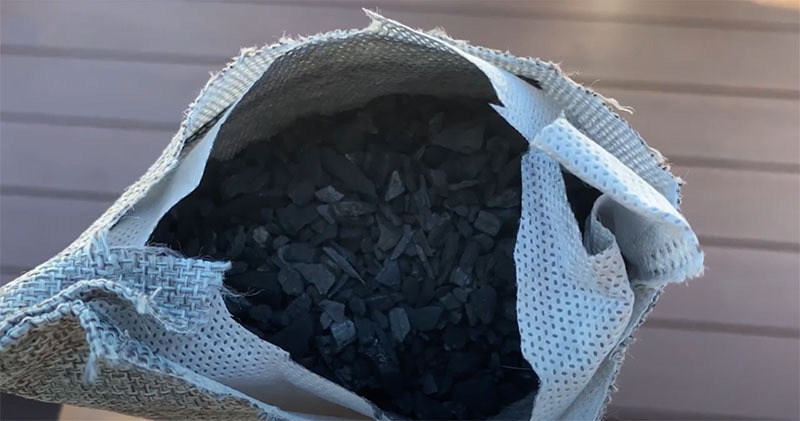
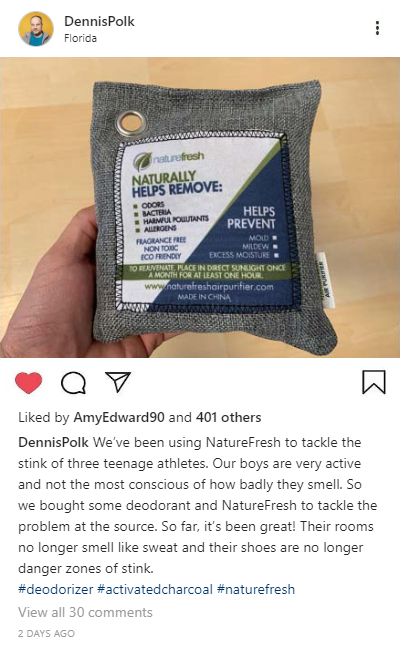
Scatter Charcoal Throughout Your Home And Watch What Happens Overnight
Brian Finnerty | Friday, May 30, 2025


Reports of a strange trend have been making waves in certain online circles with a reported million Americans taking part.
Millions of Americans have started to scatter charcoal throughout their homes.
However, if it were just that, then this trend would not have made so many waves.
At the center of this trend is a special kind of charcoal.
Theres a specific kind of activated bamboo charcoal that has been seemingly breathing new life into homes.
The specially formulated charcoal has three unique properties that people are taking advantage of.
- It attracts and draws in airborne particulates like dust, allergens, mold spores, moisture, and smells.
- The tiny structure of the charcoal is like a net, so anything that gets sucked in is trapped.
- The charcoal has a natural ability to clean the air by passive filtering.
So whats with this new life hack of scattering charcoal throughout your house?
Well heres the thing, its not new at all!
This practice is actually one that can trace its roots hundreds of years ago. Buddhist monks would scatter activated bamboo charcoal around their monasteries to cleanse the air around them and get rid of any impurities and toxins floating around.
This practice is said to be a big reason why the average lifespan of monks was so much higher than the average person. But this practice died out.
Why?
Because the conditions required to create the special activated bamboo charcoal that monks used became rare and hard to get.
Its never really been available for the masses until recently.
A company by the name of NatureFresh has managed to create a viable method to create the specially formulated activated bamboo charcoal at larger scales.
Each NatureFresh Air Purifying Bag contains enough activated bamboo charcoal to cleanse the air of any room up to 90 sqft and it lasts for 2 years.
It's so simple to use, all you have to do is place a NatureFresh bag in the desired area, and you'll start to notice a big difference in the air you breathe within 12 hours.
Using their Cleancast Binchotan method for the first time, NatureFresh is able to mimic the exact conditions required to create this ancient activated bamboo charcoal.
Since theyve gone public with their product, millions of others have gotten in on the trend.
Thanks to their surging popularity, many Americans have discovered new ways to use it, declaring it the best life hack of 2025.
Here are just a few ways people are turning the NatureFresh bamboo activated charcoal bags into their own life hacks
Life Hack #1: "It's like a mouse trap for mold toxins"
Tammy S, mother of two young kids from Los Angeles, had a big mold problem in her home.
"I didn't want my kids exposed to mold, and even after it was cleaned up, my kids were still getting headaches and coughing from the mold spores floating in the air."
She says NatureFresh was the best hack shed ever come across!
I placed NatureFresh bags in my living room, the kids bedrooms, the hallway and the kitchen. After one day, I could literally notice the stale air become fresher. After 1 week, my kids stopped getting headaches and stopped coughing!
Life Hack #2: Turn your dusty house into a fresh air paradise without lifting a finger
Long-term exposure to dust and air pollution accelerates brain aging and increases the risk of dementia even in healthy elderly people with no underlying disease.
Thats why, after 50 years, Lynda McCarthy finally decided to do something about her dusty house.
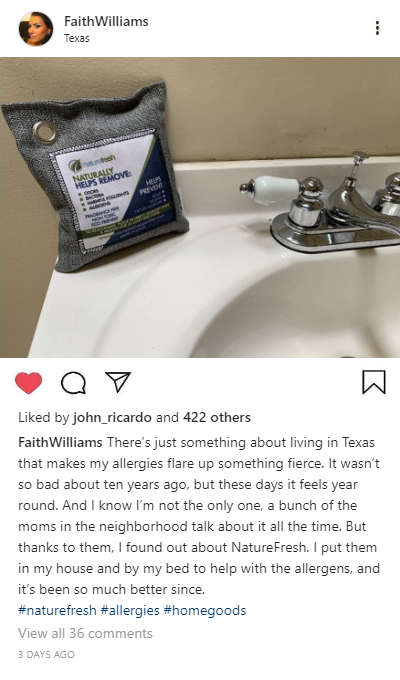
The next morning let me tell you I woke up to what felt like much fresher and crisper air in the house. Most important: it helped me reduce my allergy symptoms. No sneezing, no irritated eyes... not so much as a single sniff.
When these little bamboo activated charcoal bags first arrived, Ill admit, I stared at them in disbelief. Now, weeks later, "I thank NatureFresh every day for helping to get the stuffiness out of my house."
Life Hack #3: Say goodbye to smelly trashcans and stinky closets
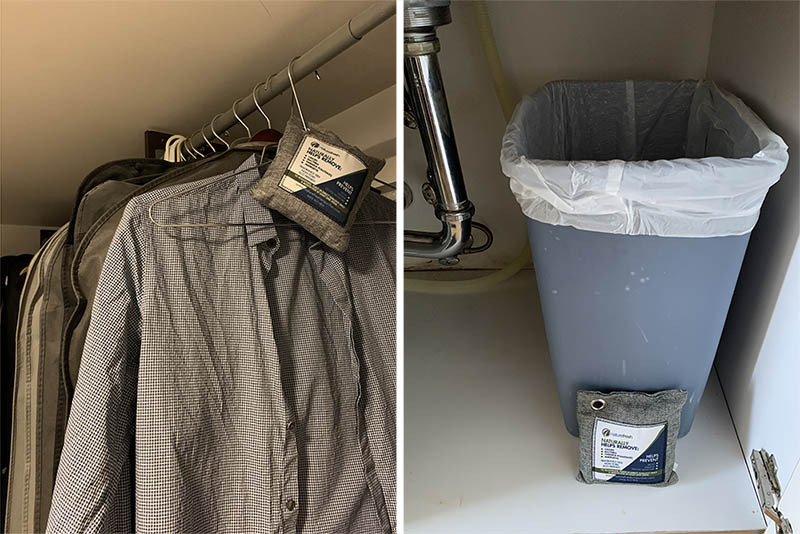
If you have offensive odors that you want to get rid of, try placing a NatureFresh bag next to the source of the odor. It has been said to work wonders on everything from smelly trashcans to stinky closets to even clearing out a room filled with cigarette smoke.
So I bought NatureFresh, and I started with his closet. I dropped off a few bags there, and then I made sure to keep some in his underwear and socks drawers. Within days I felt like the entire apartment had cleared up. I was so happy!
But what did other customers have to say online?
I did some digging to see what people from all backgrounds were saying about NatureFresh. Here are just some of what people are saying:
It even has thousands of happy followers, some of whom have shared their thoughts:
M
Mitch L. Verified Buyer

04/20/25
NatureFresh has been an unexpected boon in my life. I have some pretty big concerns about mold since we get no airflow through the bathroom but since putting some NatureFresh bags behind the toilet, Ive noticed a remarkable improvement!
H
Harold R. Verified Buyer
05/08/25
Good for getting rid of dust. Helps keep my lungs clear
W
Wendy A. Verified Buyer
05/22/25
I thought it was kinda goofy because youre just putting charcoal all over the place, but it really helped. Like unironically a good product so i guess i felt like i had to give a good review
So naturally, I had to try it myself
Having interviewed so many people and having done so much research, I wanted to get in on the fun for myself.
So there were three main things I wanted to tackle. I live in an older apartment so I had some issues with
- Mold
- Moisture
- And Dust
The mold and moisture was a big problem in my bathroom since we had absolutely zero circulation there.
With three people using one tiny bathroom, it ends up getting too humid which results in mold growth.
Its to the point where you can definitely feel the air getting thicker and heavier. Its kind of gross.
And after reading about how mold spores can easily travel throughout the rest of your house, I wanted to get rid of the problem ASAP.
So I placed a couple NatureFresh charcoal bags throughout the bathroom. One went on top of the water reservoir for the toilet and the other I just let sit on top of the counter.
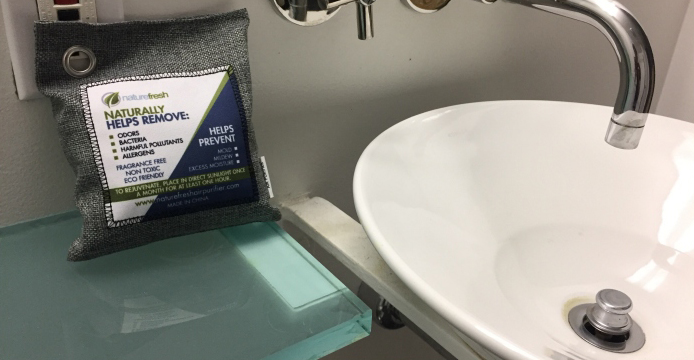
And after 24 hours
Notable difference! The bathroom didnt feel as stuffy and I could feel a distinct decrease in humidity.
And after 1 month
I saw a decrease in mold growth, and in certain areas, a complete disappearance of mold growth.

The NatureFresh bags had handily sucked in both the moisture and the mold spores, completely limiting their growth!
It was even so effective as to just eliminate mold colonies!
So with moisture and mold taken care of, what about dust?
When I first moved into my apartment, the landlord hadnt done any cleaning whatsoever.
There was dust everywhere. But the carpet, in particular, was gross.
I vacuumed best I could, but there was still an awful amount of dust getting kicked up from the carpet with even the slightest wind.
Anytime I opened the window, I could see the sunlight penetrating through thick clouds of dust.
So I placed NatureFresh bags in my hallway and living room and watched.
Over the course of one week, I saw less and less dust get kicked up into the air.
And after a month, I saw nothing. I vacuumed my carpet to kick up some more dust and to suck up whatever was left, but I saw nothing.
It was miraculous! Those monks really had something going for them I tell you what!
Final Thoughts
NatureFresh is definitely the most interesting and most useful lifehack Ive seen in a really long time.
I ended up saving more than $500 on repairs and services that I would have had to shell out money for to get rid of these problems!
I mean a decent size dehumidifier would have been something like $150.
Getting the mold cleaned off would have been like another $300.
And getting a good carpet clean would have been like another $250!
I highly recommend these crazy bamboo charcoal if youre dealing with allergies, dust, mold, moisture, or smells!
Ive gone ahead and bought six more bags to give to my grandparents and friends.
UPDATE
UPDATE Monday, June 09, 2025 - Ever since NatureFresh was featured online, an incredible amount of buzz has been generated and has since sold over 763,419 bags. Due to its popularity and positive reviews, the company is so confident in their product that they are now offering a 90 day satisfaction guarantee and are offering their 50% off discount while supplies last. To see if they are still available click the button below.
naturefreshpurifier.com/blog/charcoal.php?affId=FAA74003&c1=us&c2=charcoal_kwin tent&fid=10&gad_source=5&gad_campaignid=1838622042 9&gclid=EAIaIQobChMI1t2Lx-fjjQMVeLKDCB1ZByUsEAEYASAAEgLoEfD_BwEIf you're gonna fight, fight like you're the third monkey on the ramp to Noah's Ark... and brother its starting to rain. Join our efforts to Secure America's Borders and End Illegal Immigration by Joining ALIPAC's E-Mail Alerts network (CLICK HERE)
-
06-09-2025, 04:02 AM #9794Senior Member
- Join Date
- Aug 2018
- Posts
- 93,795

- Recipes
- By Ingredient
- By Course
- By Ingredient
- Healthy Eating
- About
- My Favorites
Campfire Hobo Stew
Campfire Paella Foil Packet
Bacon-wrapped Chicken Medallions
Mom's Bacon Corn Chowder
Bacon-wrapped dates with lemon thyme vinaigrette
Chicken Carbonara with Bacon and Spaghetti
Maple Bacon Pork Loin
Bacon Wrapped Cinnamon Rolls
Campfire Bacon
SAVE TO FAVORITES
This post may contain affiliate links which help support Zestuous.
132.1K SHARES
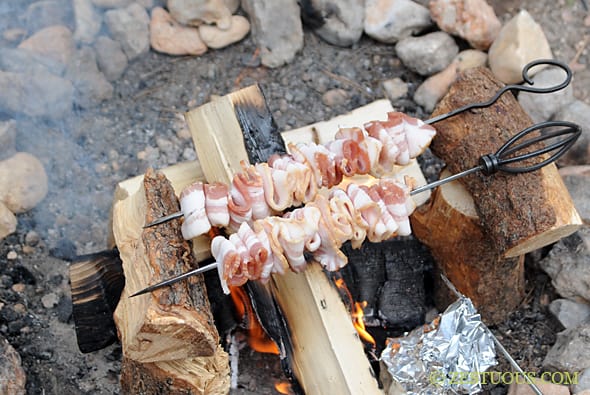
This is a recipe (or really more of a technique) that I discovered while camping a few weeks ago.
I vowed to make recipes using only foil and skewers, and no way was I going to give up bacon in the process. If you can put a marshmallow on a stick, by God, you can put bacon on a stick.
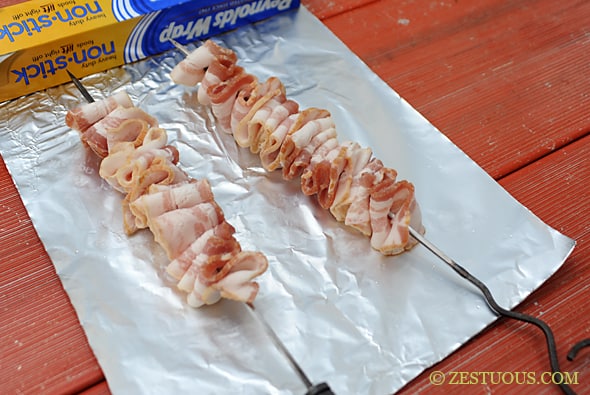
The secret to getting your bacon evenly crispy is to weave each strip onto a skewer, leaving a gap between weaves. Then, continue weaving more strips on the skewer, leaving a few inches empty at the end.
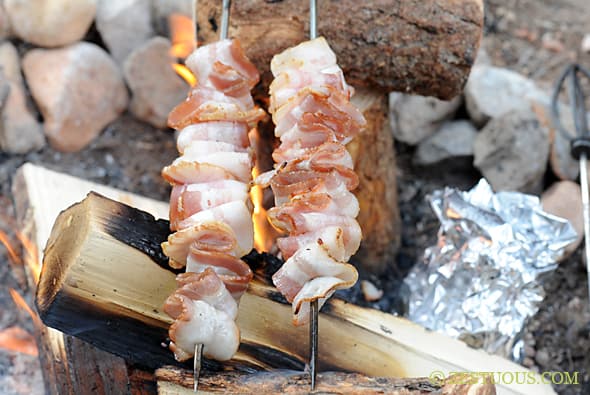
Prepare a campfire and set two logs or rocks on each side of the flames so you can rest the skewers on the logs/stones over the flames.
Rotate the skewers every 5 or so minutes to ensure even cooking and browning. You might get a few flare-ups thats just a bacon grease fireworks celebration. If it gets too out-of-hand, have a squirt bottle with water near by to put out some hot spots.

Your bacon should be crispy, ready and extra smoky in about 30 minutes.
What a happy campfire breakfast!
SHOW ALL
Explore More
Campfire Hobo Stew
Campfire Paella Foil Packet
Mom's Bacon Corn Chowder
Bacon-wrapped dates with lemon thyme vinaigrette
Chicken Carbonara with Bacon and Spaghetti
Maple Bacon Pork Loin
Bacon-wrapped Chicken Medallions
Bacon Wrapped Cinnamon Rolls
Bacon-wrapped Scallops in Hollandaise
Bacon Maple Syrup
Pumpkin Spice Latte Baked French Toast with Bacon Pecan Maple Syrup
Bacon Apple Fritters
Bacon Egg and Pimento Cheese Muffin
Cheesy Bacon Popovers
Mystery Box 1: Tomato & Potato Bacon Chowder with Oyster Crackers
Bacon Bourbon Smoked Turkey
Apple Ale Bacon Jam
Brown Sugar Chili Bacon
Bacon Flour Tortillas
Bacon Ranch Chicken (in the slow cooker)
Bacon Pumpkin Seeds
Steak Sandwich with Saucy Mama Horseradish Bacon
Blueberry Fire Pit Flapjacks with Maple Blueberry Syrup
Easy German Pancake Recipe
Shrimp Patties with Garlic Lime Aioli
Campfire Bacon | Zestuous
If you're gonna fight, fight like you're the third monkey on the ramp to Noah's Ark... and brother its starting to rain. Join our efforts to Secure America's Borders and End Illegal Immigration by Joining ALIPAC's E-Mail Alerts network (CLICK HERE)
-
06-09-2025, 04:35 AM #9795Senior Member
- Join Date
- Aug 2018
- Posts
- 93,795
 Projects
Contests
Teachers
Log In
Sign Up
Build Yourself a Portable Home - a Mongolian Yurt
Video at the page link Build Yourself a Portable Home - a Mongolian Yurt : 9 Steps (with Pictures) - Instructables
By davidbuzz in OutsideCamping
1,118,369
2,489
271Featured
Introduction: Build Yourself a Portable Home - a Mongolian Yurt


Yurt/Gher Construction 101
A guide to Building Yurts...or more specifically, how I built mine!
Based on Knowledge Gained from "Doing it Myself", and reading about it on-line.
I've now built three yurts, for myself and friends, and we go camping in Luxury in these a few times a year.
If you like the outdoors, but you hate having to crawl around in pokey little tents then this one's for you!
We sleep two of us in luxury in this tent, in a full queen-sized bed! Of course, sleeping on the floor, like a plastic tent, you could probably sleep 20 people, easily!.
We have dedicated hanging space for our clothes so they don't crumple or anything, and lockable boxes for our belongings (or a lock on the door works too!)
When we invite other camping-inclined friends over for a party in our tent, we can confortably fit 15-20 people in, sitting around on cushions and lounging on the bed and on the rugs on the floor... now that's what I can a party tent!
If you like pictures, please be sure to have a look at step 9 - it's got over 50 assembly photos on that step alone !
Step 1: Overview of the Parts and Process.!


I'm going to cut right to the chase, and assume you know the following (in principle):
1) What a yurt is, and what it's made from.
2) How all the components should look when together.
If you've ever seen a yurt in the flesh, or photo's, or read a bit about them, that's enough.
As you can see from the photo/s, there are a few major components, so I'm going to write about each of these in turn, with some background info, and how to make them, and after that I'll show you how it all comes together for the assembly!
- Dimensions and background.
- Timber Components
- wall
- roof
- door.
- Metal Components
- roof hub
- bolts, pins, pegs.
- canvas components
- wall
- roof
- roof cap
- Assembly!
below are a few sample pictures of some components, just for intereste sake:
Step 2: Dimensions and Background
Over all DImensions:
Tent Diameter: approx 15' ( 5 meters) across.
Tent Height: approx 10' (3 meters) in the centre, and 5'6" ( 1.6m) at the edges.
My Yurt Components (A reference guide for later) :
Wall Timbers: 8'(2400mm)long x 6mmx35mm Slats (see below) Quantity: 70ish
Wall Bolts: 1" or 1&1/2" long x 1/4(6mm) bolts Quantity: almost 300
Main Roof Supports: 8'(2400mm) x 45mmx35mm Beams Quantity: 8
Secondary Roof Supports: 8'(2400mm) x 45mmx16mm Beams Quantity: 8
All roof supports and wall slats are cut-down from 90x35 F8 or F12 pine framing timber - see below for details.
Roof 'HUB': Constructed from metal (see later steps)
Wall Canvas: 8oz canvas - preferably "proofed", but I used untreated and unbleached canvas and treated it myself (see details in later steps)
Roof Canvas: 12oz canvas - MUST be "proofed" (water proofed, and anti-mound treated) ...don't use 8oz or you'll regret it. If you can find a really strong and properly treated 10oz canvas(I couldn't), then that will probably do, but it might sag a little.
UNRELATED ASIDE: If I was going strictly "traditional" I wouldn't be using zinc plated bolts
(or any bolts), I'd be lashing saplings together not using machine-sawn timber, I'd be using
natural felt made from sheep and yak fur mixed and pressed with oils (linseed and boiled
animal fats) not water proofed and anti-mould treated canvas. I wouldn't have a tarpaulin on
the floor, it would be dirt, and there would be a rock-surrounded fire-place inside the tent
for warmth (and smoke). The door would always point south, the north inside wall would have
a religious idol/importance. The men and visitors would always sit/sleep on the west, the
women and children on the east, you would always stop for a meal when passing, you would
always ask 'How are you?' '..And your family?' '..And your flock is fat and well?' (and the
answer would always be yes even if it's not true) I'm not THAT anal about "traditional"
form nor am I a "historical" nazi.
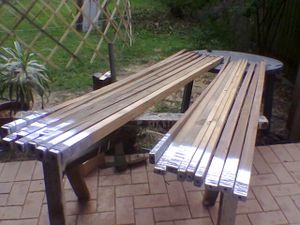
Step 3: Timber Components - the Wall


 3 More Images
How I decided on the size:
Some designs I saw specified 1&1/2"x1/4" OR 1"x1" OR 1&1/5"x1/2" sizes.
I figured that the smallest size would be lighter and would be strong enough if I had the slats
"overlap" enough, and I saw at least 3 sets of plans that used 1/4" thick slats, so I used
that size.
As it turns out, the flexibility of the thin slats is really good for portability as it allows the yurt wall to be rolled-up rather than split into sections and layed out flat.
I thnk 5-6mm is OK, but only if your timber is not prone to breaking, and has natural flexibility in it. Other timber batches do require 7-8mm. In all three tents that I've made, I've always used pine, because it's easily available, and cheap, but there are differing qualities, and using the lowest quality pine (once, in my second tent) did result in more damage occuring, more easily, so I prefer the higher grade/s now.
The extra 2mm might not sound like much, but it'll make a big difference while still giving
the flexibility...or you could leave it that thin and use a slightly harder timber than pine
(eg meranti)...pine is probably as soft as it comes, so anything comercially available will
be stronger than pine. If you don't have pine locally, use whayever softwwood it is that your house frames are normally made out of.
What size I ended up using:
I used approx 6mmx35mm (1/4"x1&1/2") cut from 90x35mm pine construction timber.
Using a "thin kerf" saw blade in a standard circular power saw I was able to cut 9 or 10 slats from
each 90x35 length, so I cut up 8 lengths into about 80 slats, and this gave me some spares
to allow for the more than occassional knot in the timber which weakened the slat and/or
caused it to snap. Don't throw out broken slats as these are used around the door where
the slats must be shorter.
The structure is quite flexible with such thin slats ..it's quote strong enough tho, so if you are after a LIGHT and easy to carry wall structure then go for 6mm, a reasonably sized guy (me!) can easily carry my entire wall structure when it's rolled up into one 8' long 300mm across cylinder.
I've seen other designs that said when they rolled their walls up they rolled up to 2' (600mm) across, so either mine is more flexible/lighter or I rolled it tighter, or both.
Length of timber was 8' because the slats are angled at 45 degrees when setup, giving a wall
height of approx 5'6", which is adequate for anyone 'normal' (if you are 6'6" tall u might like
slightly taller walls).
My timber yard is aimed more at the commercial market, and they sell in
3.0,4.8 or 6.0 metre lengths only...which is great, I just bought the 4.8 lengths and asked them to
cut them down the middle (to 2.4m or 8') "so I can transport them easier in my car".
How I cut it:
I mounted the circular saw upside down (with the blade parallel to the wall) onto a "saw table"
which I made up temporarily from a few scraps of timber I had lying around. The table top
needs to be almost twice as long as the timber you are cutting "longwise". The table I jigged up
was about 4 meters long.
I then screwed a "running board" to the top of the 'table', parallel to the saw blade, so that it was 6mm (or your prefered slat width) behind the saw blade.
Remember that the saw itself is actually underneath the table, and has the blade sticking up
through a slot that you sawed in the table just for this purpose!.
Don't use your dining table for this! DANGER: dont ever try this at home! Using an exposed saw blade like this is a definite danger. If you like your fingers DO NOT go anywhere near the saw while it is running.
In order to switch the saw on/off and keep it on without holding the trigger in all the time, I
plugged it into a powerboard that had built-in switches, and used these to switch on/off, I then
used a "zip-tie" around the handle to keep the trigger "on" permanently.
In order to keep the timber that is being cut hard up against the timber running board( and hence
make sure that the slats are consistent in width - which is important), I added a little swinging
pivot to the table near the saw blade, and hung a heavy weight off the pivot with a piece of thin
rope.
It was arranged such that the strip of timber that made up the pivot pushed up against the
front edge of the timber being cut, and the counter-weight (in my case a large lump of hardwood,
but a house brick or 2 would also do) pulled on one end of the rope with the other end tied to
the pivot.
The overall result is that the weight on the rope pushes the 'pivot' timber, and
that in turn holds the timber being cat hard against the running board. If none of this makes
sense to you, thats OK, don't worry about it, just find a willing volunteer, give them a "push
stick" and charge them with the responsibility of holding/pushing the timber hard against the
running board while you feed it along the length of the timber being cut.
See the picture below if this is all still to much. It really quite simple, it's just hard to describe.
(SIDE NOTE: a "push stick" is a piece of scrap timber at least a metre long (or 2) than anyone
working with a table saw should be using at all times that they are anywhere near the saw. It
is used to push the piece of timber that is being cut, so that you can push it right up to and
through the saw blade without worrying about things like loosing fingers, etc, having your grip
on something slip and 'whoops there goes that hand'. The end of the 'push stick' is sacrificed
to the god of the power-saw as it becomes sliced and diced up...better it than your fingers!)
Calculating the Quantity of slats required:
A number of factors are involved... 1) how many bolt holes (ie overlapping slats) you have in
each slat. 2) how big you want the finished tent to be, and 3) how many roof supports you want to have.
1) number of bolt holes can be between 5 and 10 per slat. I have seen examples of 5,7, 8 and 10.
The person/plans I saw that said they used 5 later said they had modified their plan by adding
intermediate holes, and converted the 5 to a 9 hole. I figured that I'd pick a middle figure
out of 5,8 and 10. I used 8 holes, layed out thus:
first hole : 3"(75mm) from one end (the top)
next 7 holes: 1'(300mm) in from the last
leaving : 9"(225mm) between the last hole and the other end (the bottom)
This gives a "grid" when assembled whose sides are 1' (300mm) in length.
My finished tent is approx 15' diameter. It seems that most designs I could get my hands on a based around a 15" tent (or close to) as it is quite large enough to normally sleep say 6 or 8, and
this makes it perfect for two or three and leave lots of room to spare.
Some maths: lets assume we want a tent of around 15'(4.5m) diameter, and we are using 8 bolt holes separated by one foot into an 8' slat as described above. When the slats are assembled we will also assume that they are angled at 45 degrees. This results in a wall height of around 5'6" with the slats at 45 degrees.
The angle of the roof will mean that the centre of the tent is over 7' tall (more on that later), so if you are more than 5'6" tall, don't worry, youll only have to duck when going thru the door.
If the slats are at 45deg. then they will be forming diamond shapes in the wall grid that are actually completely square. the width of these "squares" across the diagonal (ie horizontal to the ground) is (using pythagoras) square-root of 2, or 1.41' (424mm).
In order to get a tent that is 15'(4.5m) round you need a circumference of 3.14x15' (3.14x4500mm) ie: 47.1' (14.13m). with each 'square' being 1.41'(424mm), that means we need 33.65 of them to go the entire way round the circumference.
Each square takes two slats, so we need 67.3 (must be multiples of 2) rounded to 68 slats for the entire tent. That said, we haven't allowed for the door yet, or taken into consideration how the roof sits on the top of the walls, but you get the idea....next, the doors etc....
If we make the door 2x1.41' or 2.82' (846mm) wide, then it's an nice even figure, and we can
simply reduce the number of required slats by 4 to 64. (the door taking up the space that those
slats would have take up).
Since the roof supports have to have their lower end supported onto a point where the slats
intersect, then we must be able to divide the number of 'squares' around the tent evenly by
the number of roof supports we decide to use.(or suffer un-evenly spaced roof supports - eek!)
When building my yurt, I forgot this next bit of the step, so every time I put the roof onto the walls, the roof suports never quite sit right as I have to put them onto the nearest intersection , which isn't exactly spaced out. Oh well, it still works well, just not quite as neat.
The neat way: Lets say we decide the roof is to have 8 primary supports that hold up the centre ring, and 8 secondary(smaller cross section) supports that are for stopping the canvas sagging, so we end up with 16 supports.
In order to divide the number of roof slats up evenly into the number of wall 'intersections',
we must have either 16,32,48,64 or 80 'squares' around the yurt (counting the door as two for the
sake of the math). Since we figured that we we going to have '33.65' (rounded to 34) squares
(see above), then we were pretty close to the required 32 that we have just said we must use. Of course, you could also change the number of roof supports to match the walls, rather than change the number of wall slats to match the roof supports. Say you've done what I did, and built your walls, then realising that the number of roof supports you cut is wrong, it's easier to cut another roof support or two than it is to change the wall structure...so long as you haven't built your center 'hub' yet, otherwise it's easier to add or remove a few slats from the wall.
So, the decision I made was to have 16 roof supports, meaning 32 'squares' (two of them
are the door), so with 30 actual squares (32 minus two for the door), we should need 60
slats (plus or minus a few to be cut up either side of the door), and have a resulting tent
size of just a smidgen smaller than we originally said.
The final size is 32x1.41' or 45.12'(13536mm) circumference, and 14.37'(4310mm) diameter
if you keep the "diamonds" perfectly square. Just push the walls out a little more, and make
them a couple of inches shorter, and you still have the 15'-16' tent you started with.
Phew!.
SIDE NOTE: other plans I've seen vary the roof supporting structures from 5 to 45, so there is a
lot of variation here. The upper end of the range is most likely for areas that experience
snow, or that are using extremely thin roof supports, or that like the idea/neatness that
comes from having a roof support on the top of every single wall 'intersection' - ie where
two wall slats join at the top hole, the lower end is possibly for those using a very heavy
canvas, or a smaller tent size that doesn't need as much 'support' to stop sagging) My original
planned roof used 8 as I was goinf for maximum portability, minimum weight, but I modified the
roof before I had even finished building the yurt to be 16 as stated above, and this is a much
better result for minimal weight gain - the secondary supports don't really have to hold much
weight at all, just some canvas. It's the primary ones that hold up the ring. Some other plans
don't use two types of roof support, but instead opt for all of them to be load bearing. This
works too, and will probably give you a roof ring that you can do chin-ups from without any
problems. I hang entire wardrobes of garb from mine with no problems.
Drilling the holes into the slats:
Use a drill press, or be VERY careful to make sure you drill straight thru.
Every plan I read said that a drill press was a good idea. I didn't use one, I was just really careful, and mine worked, but if you are "powertool-impaired" like some of my friends (hi Wolfe!) then you must use a drill press, or get one of your non-impaired friends to do it.
Because the timber I'm using is soft (pine) and gives a bit due to how thin it is, I was able
to get away with the holes being up to 3 or 4 mm off center by the time they came out the other
side of the the 90x35 (drilled thru the 90), but I really strongly recommend taking your time
and getting the holes really straight as it makes lining up the bolts so much easier.
Be accurate and consistent in your measurements when marking them onto your timbers before you drill too as this is also really important.
Assembling the walls:
I've seen plans that specified rivetting, tying with cord, cotterpins, and bolts.
Bolts are so much easier then rivets, and so much stronger than cord or cotterpins. Just make sure that you either use self-locking nylon nuts , or deliberately damage the end of the bolt thread after putting the nut on (this stops the nuts coming off in-transit and getting lost).
I just hit the thread end of the bolt with a hammer a bit as it's cheaper than nylon nuts
(go to the hardware store and check the price difference for yourself - if you are on a tight
budget you'll do what I did).
If you are building a yurt/ger then you've obviously seen how the walls are put together so I
wont bore you any more. It's just a case of inserting 300 odd bolts thru the right holes, putting
all the nuts on (no need to tighten them - actually tightening them is very bad!), and then
making sure the nuts won't come off easily after you damage the thread a bit.
The only assembly point that is ESSENTIAL is that all the slats angled one way are *inside* the circle, and all the slats angled the other way are outside the circle, otherwise the frame won't fold-together in a scassor-like fashion.
Like I metioned, my holes were sometimes up to 5 mm off in places, but the timber has plenty of 'flex' in it so I just encouraged it a bit with a hammer where necessary, and made it fit.
(don't hit the timbers to hard or you'll break the slats before you even start).
Near the doors, the slats must get shorter by one hole at a time, I fiddled with the shape of the
timbers where they joined onto the door frame, just because I wanted a neat finish. Everyone does their doors differently as it depends what you want.
Traditionally (in the 1600's and earlier) the monguls would have just had felt 'flap' doors, not solid timber hinged ones, but I've seen quite a few that go the solid door (and it's popular in mongolia nowdays!) as it makes for a very secure structure, and is pretty cool.
Mine is a extremely simple frame made from (suprise suprise) 90x35mm pine framing timber. Two lengths the height of the finished wall (5'6"), and two of the desired door width (2.82' or 846mm). I made the simplest possible door frame, and the door is a canvas drapery that I hang over the space. I did that because I wanted portability, and a big solid door seemed like a real pain to carry around. To do similar, I suggest using a large timber screw called a coach screw, two in each corner of the door, , and drill a hole through them, and screw them together.
Other options might be :
1) a 'door' that is still canvas/cloth covered, but is actually
made of lattice like the walls, this is portable and secure, I'm sure you could make a lock for
it somehow.
2) on one plan I saw recently on the web (it might be in the URLs listed below, I
don't remember) had a "double" door, by that I mean solid "french" doors. Two
half-width doors with one hung from each side. It's more portable, and still solid. I'll
probably do this way eventually.
Step 4: * Timber Components - the Roof!


 6 More Images
Main roof supports:
Cut up the roof supports from 90mmx35mm (just like everything else).
4x2400mm lengths, each cut down the middle makes the 8 primary supports.
2x2400mm lengths, each cut into 4 makes the 8 secondary supports.
I live in a snow-free zone. If you are going to be snowed on you'll probably want a greater
roof pitch (eg make them 9' or 10' long instead of 8' long) AND stronger beams.
Roof/height Support lengths/pitch/angle:
A 15' diameter tent has a radius from the centre of 7&1/2' (which is shorter than the 8' length
of the recommended roof supports), When the roof is angled, the pitch is slightly longer than
the straight radius, so with a bit of math, depending on the actual pitch and size you choose, you might find that 8' is actually to short to reach the centre, or perhaps a bit long. That's ok because it doesn't have to reach the centre. The centre contains a 'hub' that can be anywhere from 1'(300mm) to 3'(900mm) across.
I could say I figured out the exact roof pitch I wanted, used some more math to get the required length of the supports, then used that to figure the size of the ring I needed if the
supports were 8'(2400mm) long, but I didn't. I decided I wanted a 1&1/2' (450mm) ring, and
that I didn't care what pitch the roof ended up at, so long as it wasn't flat.
I stood in the back yard with a half-assembled yurt and no centre ring, put a ladder in the middle, and propped the top ends of the roof supports on the top of the ladder (a 10' ladder I think), and
guestimated that it would be fine.
I built the ring and I put it together, and it's close enough. I could increase the pitch a little, but heck it works the way it is, so why change it?
You do it however you like.
My First yurt was assembed this way, and it assembles fine, but it's more of an art to put together than a science. The next two yurt/s actually turned out a bit smaller (13-14' foot diameter), so I actually found it was necessary to cut up to a 20cm(6") off the roof timbers, so that they don't hang-out-over the edge of the yurt. That's OK too, and I find these are actually easier to assemble!.
Roof Support Connections:
Joining the roof supports to the centre 'hub' is detailed in the hub section, but joining the bottom of the roof supports to the top of the walls can be done in a number of fashions:
1) the first method I used, and the one I currently still use on my first yurt (but don't recommend) involves tying them down. Drill a 6mm hole thru/across the bottom end of the roof supports about 30-40mm (1&1/2") from the end, and tie a loop of strong woven cord (eg 4-5mm nylon venetian blind cord) that is about 150mm (6") across through that loop. The loop can then just be tied around top of the wall , when the support sits on the wall. I currently do that, and also extended the loop with about 450mm (1&1/2') of cord that can be lashed to the wall further down so the joint is secure (this bit works well enough).
2)What I did on yurt numbers 2 and 3 was to use a steel "pin" on the top of the wall, and have a holedrilled into the rool timbers at an angle matching the pitch of the roof. the steel pin on the frame goes into the hole on the roof timber, and creates a joint. have a look at the pictures, and you'll see what I mean.
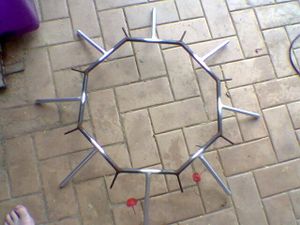
Step 5: Metal Components - the Roof Hub


Roof Hub Options:
The whole purpose of the 'hub' is simply a way of connecting the centre of the roof all together
while also giving a centre 'vent' or 'port' for circulation/ventilation/smoke/watching the stars.
1)Traditionally it would have been a ring of saplings that the roof saplings were lashed to, but that's not something that's easy to dissassemble, and reassemble.
2)Today the most common form (I've seen it in other yurts) is a 3 layer "laminate" ring made of two layers of ply and a middle layer of wedge shaped timbers, the result being that there are squares to push the roof poles into. (the roof poles need to have an angle cut into them to use this form). I have seen this form work well and would recommend it if you have timber skills,but not metal working skills, but I did not use it myself.
3) A timber "ring" formed by building a vertical laminate up from long thin lathes of timber
which are steamed and bent into a ring, and glued and clamped together, with more lathes of timber being added into the inside of the 'ring' until it has a thick-enough profile/width.
This is lighter than 1), doesn't require the roof supports to be weakened by cutting onto an angle,
(only rounded off to fit the large holes that are then drilled into the ring laminate), and is
probably the best form to use if you ignore the construction. It's just really hard to make and
get it to work right.
4) Finally, The form I ACTUALLY used: I own a welder, and have reasonable metal working skills, so I made a 450mm (1&1/2') ring from solid metal 15mm rod (actually an ocatagon, but it looks like a circle if you don't look to closely!), and off of that I welded 8 large (15mm round) 'prongs', and 8 smaller 8mm round 'prongs' (one for each of the 16 roof supports), I arranged these so that they were angled down at the same pitch as the roof is supposed to be (whatever you worked it out to be for yout tent, I just guessed).
To join the roof timbers to this steel "star", I then VERY CAREFULLY drilled a very deep 16mm or a 9mm hole long-ways straight into the end of the roof supports/timbers. (I bought 2 spade bits(16&9mm) and a "spade bit extender" in order to drill a really deep hole.
I drilled about 200mm into the timber end for the large supports, and made the large 'prongs' 220mm long, and 100/120mm for the smaller 'prongs' ).
The idea is that the roof supports slide over the 'prongs', and produce a very strong joint. This
works really well, and I found it easy enough to make.
I made this joint up..I've never seen anyone else use this method on their yurts/plans..I just
guess no one's thought of doing it this way before...or they don't like it because it's not
"traditional" enough for them.
My 'hub' (the first yurt) is really rusted - because it was recycled steel in the first place, but the newer yurts I made were painted with zinc-impregnated (rust inhibiting) paint, which keeps them looking reasonable.
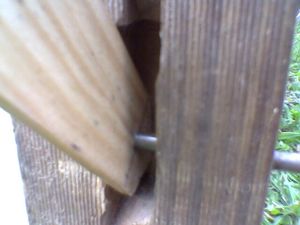
Step 6: Metal Components - - Bolts, Pins, Pegs.


The remaining metal components that need to be manufactured in some way or another are:
Metal Pins
- for pinning the doorframe to the wall lattice. these are just bent steel 6mm (1/4") rod. they need to be removable so that the yurt can be dis-assembled, and re-assembled easily. I made the ones in the picture from a piece of mild steel 150mm long, with a 50mm (2") handle/bend at one end.
Newer ones I actually make by purchasing galvalised tent pegs (just like the one shown), and cutting them in half. It's easier, and they don't rust so much.
The 3rd picture shows a close-up of the pin assembled through part of the wall lattice and door frame/s.
Bending them is actually really easy with one end in a bench vice and hitting the other end with a hammer (start lightly, don't rush it, or you'll create cracks).
Roof Eyelets, and Hooks.
- the hooks are actually an option, but something I find makes it easier to assemble the finished roof.
At each of the 16 points around the roof edge where the timber/s point to (ie equidistant), your should put a brass "puch-through" eyelet which is large enough to lace your cord through.
Every second of these should have an "S-hook" fitted (see the second picture for mine) so that you can easily hook tie-down rope through it when you are assembling the yurt. I custom-made mine out of large calvanised nails, bent into a funny U shape, such that the head of the nail will not fit through the brass eyelet in the tent, but the shank will.
Bending them like this, I can permanently fit them to the roof, and not lose them, but can still lace the rope around the open end easily.
Pins for connecting walls to roof
Look closely at the last picture in this set, and you'll see that the vertical part of the "pin" appears to join onto the nut/bolt that goes through the wall lattice X. It's actually all the same bolt, just a long one, with the head cut off.
The bolt is a 1/4"(6mm) diameter, 120mm long bolt with thread on about 1inch of the shank.
By threading a nut on as far as it will go, and bending it almost exactly where the thread stops next to the nut, you get a L-shaped pin which is threaded on the short-section, and has the nut permanently locked into the "corner" (due to the distortion of the thread that occurs while bending the bolt right next ot it).
It's actually quite easy (just bend a bolt)...it's just hard to explain.
These special L-shape bolts are used in-place-of the short bolts at the top edge of the roof, but only on every second joint. (where the timbers sit).
Step 7: Canvas Components - the Wall!


 5 More Images
Buy a piece of canvas that's as long as your tent is round, including the door, plus a bit spare - perhaps 30cm( 1').
The simple version (my first method) :
I didn't have to do anything else to mine apart from hem the two raw ends, and put a few brass eye-lets into the hemmed ends. To keep it up, it just has the top few inches hung over the wall,
and held in place by the weight of the roof supports (bull-dog clips during assembly).
At the door, the canvas end is just taken thru the door, and string/light rope is used to lash
from the eye-lets in the end seam back to the lattice on the inside of the wall, which holds
the canvas tight around the outside of the wall when these are tightened a bit. The wall itself
can then act a little like a "tension band" ..the tensioning ropes are still a must though!.
The longer version (my perferred method now) :
background: my yurt's are constructed such that when all the timber frames are together, and the roof timbers are fitted, the top edge of the wall/lattice has a roof timber fitted on every second X joint. This leaves every second bolted joint free, and accessable for hanging the wall from.
To do this, I sew a reinforcing to the canvas just below the point that would be matched onto the joint in the wall, and sew a wodden "toggle" , via a strong nylon cord into the reinforcing. The wall canvas can then just be hitched-up onto the wall timbers, and hung there from the wooden toggles.
This gives a result that is invisible from the outside of the tent, easy to erect in a repeatable way, and still within the spirit of the construction.
Note about Tensioning ropes:
These tension ropes/cords (I use two bands, each of 3mm woven venetian blind cord) must be
permanently fitted to the timber walls before the camvas walls and roof are put on. I will go into how these cords are tied to the wall at the end of the Instructable. During test assembly though, you can just wrapt them round the whole yurt, and at least the top one must be partially tightened, or the timber lattice walls will fall down. This must be done before any weight is put on them like when you put the the roof timbers us, or the wall canvas is put on.
Step 8: Canvas Components - Roof

Roof Canvas Construction:
Buy 16 metres of roof canvas at approx 6' wide, and cut/sew it as per the picture below.
Notice how there are two sections 1800(6') wide, these are the full width of the canvas. The two smaller rectangles (top, and bottom) are from the same length of canvas, just split down the middle to half their width.
The "wedge" that is shown missing needs to be cut out and sewn up so that the roof canvas becomes "cone" shaped. to match your roof pitch.
I actually find it easier to just assmemble the whole timber structure in the back yard at this point, and hang the completed flat circle onto the framework/roof. Using a stepladder, and lots of strong pins, I can then pin the roof so that it's clear exaclty how much canvas (the wedge shape) needs to be removed, leaving the roof as a "good fit".
For the simple version:
Do a final Trim, and hem of the outer edge only after you have removed the "wedge" and sewed that bit up, located the roof on the structure again, and finally walked round the outside with a piece of chalk drawing a line where you think the hem should go. I didn't, and no matter how I tried to make it an exact circle, the hems are still a bit uneven. Oh well.
For the more complicated (but preferred) version:
I sew a flat and straight "band" of canvas, about 20cm (6") wide, all the way around the roof edge. This fabric is deliverately NOT curved to match the roof, it is instead straight to match the walls, and it hangs from the bottom of the roof, down the walls, and fully covers-over the wall->roof joint making is really wind/rain/sleet/bug/insect proof.
This also gives a nice professional finish to the outside of the yurt.
I only did this in my 3rd yurt, for which I forgot to take pictures, but believe me, it's really good having a nice air/wind-tight seal there ( my current yurt, the oldes one doesn't have this, and gets a bit drafty). Most of the pictures in this instructable are from my second yurt, which has "dagging" (ie zig-zag square shapes) around the roof edge, this was at the request of the "new owner", and is a bit prettier, but also less traditional, and not as airtight as the 3rd yurt with a solid band.
FINALLY: Don't throw out that "wedge" that you cut out from the yurt.... Cut the biggest equilateral triangle or circle that you can from it, and use that as the "cap" to go over your vent hole.
You'll need at least 24' (8m) of cord/rope to hold that 'cap' in place (three ropes that go from
the tips of the triangle or edge of the circle out to the the walls to be tied off.)
Step 9: Assembly - Putting It All Together/up

 57 More Im
The best way is to just give it a go and try putting it up. Expect the first few times you do it
to take quite a while. You'll need two or 3 people, but no more. I can do it on my own now, but
it's still easier with two.
Follow along through the pictures below for a detailed step-by-step pictographic guide with text hints. Seriously, looking at all the pictures is worth it - there are about 50 of them on this step! That's gotta be worth more than 1000 words.
Hints:
*) You'll need a "tension" cord/band (or even two) to go right round the top (and optionally
the middle) of the wall. It's important that you put this in place before you put the roof
supports on. Some people use a band of canvas that is a few inches wide, I use a 3mm venetian
blind cord round the top and middle of the wall (a thicker slat might not need two tensioners).
I use two tensioners just to reduce the slight "bow" in the walls after everything is in place.
I bought a complete 100m roll of cord and it was cheaper than buying 40m at the by-the-metre
price, so I have plenty for things like tying the roof down.
- you can fit the tensioner cord permanently to the timber walls, by tying it onto each bolt-head all the way round the wall, which is a great idea, and makes putting it up so much easier too! See the pictures for details.
*) put(or keep) the tensioning cords/ropes in place before even getting the canvas out of the car. I
always forget them, and then have to take the wall canvas off again in order to put them on. You can put them under, or over the wall canvas, I always prefer under, but others use over, it doesn't really matter, and is just cosmetic.
*) If the wind is light, hang the wall canvas over the walls before putting the roof supports on, and hold it in place with bull-dog clips (or stitch little pockets for the canvas to hang from). If the wind is strong, the wall canvas can act like a sail, and blow your tent away, so leave the canvas untill you have the weight of the roof timber/s to hold it down.
*) Put the centre ring up by putting in 3 opposing main supports first, the ring will then
hold itself up, and the person who was holding it up will not get such sore arms. Try not to stand under the centre-ring very much while assembling it, because getting hit in the head with a large heavy object (if it falls down unexpectedly) is unpleasant and dangerous.
*) Start to pull the roof canvas over the roof, and at the same time have one or two people
inside the tent with long poles (borrow a couple of minor roof supports for this if necessary),
get them to use the poles to push the canvas up and over the roof. It's easier than trying to
just drag it over with ropes.
*) Get a tarp, or large black-plastic dropsheet for your floor, you won't regret it. Cut a circle
about 3/4-1' (~200-300mm) larger all round than your tent, and fold the sides up inside your tent to
prevent water getting into the tent. I origninally used 2500mm wide black-plastic "concrete underlay" plastic sheet (as it was cheaper than a 15' square tarp) and joined it together down the middle with
that wide-brown "duct-tape". It sticks to that black plastic like glue, and is waterproof
enough to survive a month underwater if necessary. The longevity of the black plastic isn;t great though ( a dozen uses or more over 5 years) before the ground/rocks tear it up) , so having a tarpaulin floor is good, which is what I now use - I found a local canvas and tarpaulin supplier who made it to-measure for the circular shape for only $AU100 (about $US150) .
*) In anything except nil-wind conditions you definitely will want to take along a few tent pegs, I use 8 or them, placed in the ground directly as the bottom of the walls, and roped to the roof. (ie tie the edge of the roof canvas to the tent pegs) by putting the eye-lets and S-hooks every so soften around the roof hem, and zig-zagging the tie-down rope between these eyelets with the S-hooks and the tent-pegs set at the same spacing around the bottom of the wall. You end up with this nice regular tringular pattern visible around the edges of the yurt.
*) Otherwise (ie in nil-wind conditions) you can hold the roof canvas down with a noughts-and-crosses # pattern of ropes across the roof.
*) take three times as much 'cord' or 'rope' as you think you'll need, use it for:
- tensioning rope/s (about 15m per tensioner - I use two, so 30m)
- zig-zag tie-downs (roughly every meter round peremeter means 35-40m) or # roof ties (roughly 25-30m)
- cap ties (about 8m or more)
- tying wall canvas in place (either side of the door) (about 5 m)
(I bought 100m and use just about all of it somewhere. I even managed to not have to cut it, so it's
still useful for other things for the other 350 days of the year)
Now, the assembly pictures! There are a LOT of these, in the order of assembly, so just have a look!


1 Person Made This Project!
Did you make this project? Share it with us!
Log in to post an I Made It
Recommendations
 DIY Solar Mason Jar Lampby opengreenenergy in Camping
1
173
16K
 Discover a New Mushroom Speciesby chainie in Backyard
51
7.7K
 Homemade Worm Composter (for a Few Bucks)by Creative Mom CZ in Backyard
58
3.8K
Colors of the Rainbow
Contest

Mad Hatter
Contest

Make it Wearable
Engineering Student Contest

You must be logged in to post a comment or add an I Made It.
Log In
271 Comments
 howeville
4 years ago
Build Yourself a Portable Home - a Mongolian Yurt : 9 Steps (with Pictures) - InstructablesIf you're gonna fight, fight like you're the third monkey on the ramp to Noah's Ark... and brother its starting to rain. Join our efforts to Secure America's Borders and End Illegal Immigration by Joining ALIPAC's E-Mail Alerts network (CLICK HERE)
-
06-09-2025, 04:41 AM #9796Senior Member
- Join Date
- Aug 2018
- Posts
- 93,795
Projects
Contests
Teachers
Step-by-step
We make it easy to learn how to make anything, one step at a time. From the stovetop to the workshop, you are sure to be inspired by the awesome projects that are shared everyday.
Made By You
Instructables are created by you. No matter who you are, we all have secret skills to share. Come join our community of curious makers, innovators, teachers, and life long learners who love to share what they make.
A Happy Place
Making things makes people happy. We can't prove it, but we know it to be true. Find your happy place, and join one of the friendliest online communities anywhere.
Explore Projects
Circuits
 A Device That Simply Turns Pages by NovemberKou in Arduino
 Shadow Clock - Projecting Time With 3D Printing and ESP's by DIY Machines in Clocks
 The SwarmTurret: Wifi Controlled Foam Dart Turret by meub in Raspberry Pi
 Lizard: 3D Printed RC Race Car by TRDB in Remote Control
Workshop
 OpenShower: Waste Ends Here by blanyaShowers in Energy
 Pinwheel Charcuterie Board by rschoenm in Woodworking
 How I Built My OWN Electric Guitar (Ibanez Style) by PietroBoza in Woodworking
 Quadcopter Landing Pad With Telescoping Legs for Uneven Ground by marwood in Woodworking
Craft
 Instructables Robot Laser Battle Scene in Unity by iasarmientoj in Digital Graphics
 Locked Out: the Illusion of Freedom by Iloke Alusala in Digital Graphics
 How to Make a DIY Radio Controlled Soda Can Airplane: Transform Aluminum Cans Into an RC Flyer by sodacanmodels93643 in Reuse
 Simple Canvas Backpack by bekathwia in Sewing
Cooking
 Choux Au Craquelin (Homemade Cream Puffs) by Yumchief in Dessert
 JELLO Jellyfish Aquarium by Jeromina in Dessert
 Strawberry Lava-Filled Chocolate Crinkle Cookies in Pressure Cooker by curlmoohi in Cookies
 Jello Roll Ups - Jello Pinwheels by Penolopy Bulnick in Dessert
Living
 Mid-Century Modern Styled Laser Cut Pendant Light Fixture by Flipping the Flip in Decorating
 Assistive Typing Tools for Amputated Fingers, Designed to Enable Fluent and More Comfortable Typing on a Keyboard. by roeiwe in Assistive Tech
 Amazing Sweet Leaf Herb - 100% Natural & Healthy Zero Calorie Sweetener by Rhonda Chase Design in Health
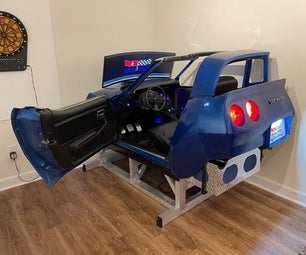 Virtual Vette - Racing Simulator Built From Wrecked Corvette by WoodAirGrille in Video Games
Outside
 Homemade Worm Composter (for a Few Bucks) by Creative Mom CZ in Backyard
 Bike Helmet Ear Warmers by fridator in Sewing
 Cretaceous Concrete by Rob Salmon in Backyard
 Design Your Own E-Bike Upgrade by tylon22 in Bikes
Teachers
If you're gonna fight, fight like you're the third monkey on the ramp to Noah's Ark... and brother its starting to rain. Join our efforts to Secure America's Borders and End Illegal Immigration by Joining ALIPAC's E-Mail Alerts network (CLICK HERE)
-
06-09-2025, 04:48 AM #9797Senior Member
- Join Date
- Aug 2018
- Posts
- 93,795
If you're gonna fight, fight like you're the third monkey on the ramp to Noah's Ark... and brother its starting to rain. Join our efforts to Secure America's Borders and End Illegal Immigration by Joining ALIPAC's E-Mail Alerts network (CLICK HERE)
-
06-09-2025, 04:57 AM #9798Senior Member
- Join Date
- Aug 2018
- Posts
- 93,795
5 Basic Survival Skills You Need When Bugging Out
Resources, Urban & Wilderness Survival
As we mentioned in our How to Make a Bug Out Plan post, the more skills you have, the more self reliant you are and the higher your chances for survival become. Here we are going to discuss some basic survival skills and teach you how to best utilize them to protect yourself and your loved ones when disaster strikes.
Basic Survival Skills
When you are out on your own without the support net of a healthy society, these are the traits and basic survival skills you need to master in order to succeed.
1. Positive Mental Attitude
This is actually more important than any of the other basic survival skills because when you are relying on your ability to wring survival from your surroundings, once you give up hope you are done. There are many amazing stories of people who have survived avalanches, fires, floods, and being isolated for extended periods and making it through thanks to an undying will to survive. They are ordinary people who would simply not quit. Keeping a positive mental attitude will give you the strength to never give up on yourself no matter the circumstances.
Some ways to instill this mentality are:
- Set goals for yourself These may be daily or even hourly goals such as making it to the next hilltop or obtaining a meal from your surroundings. Make sure they are achievable and objective based. Every goal you accomplish will be a psychological boost for you and will build confidence in your basic survival skills.
- Focus on what you can change If a major disaster has struck, focusing on the unfairness of the resulting situation or the loss that has occurred will not help you. However, focusing on building a shelter or staying dry will help immensely. Concentrating your efforts to make your situation better will help you both in the long and short term. Ignore the big picture and focus on improving your immediate situation.
- Keep hydrated and nourished This will give you the energy to persevere in the face of adversity. A steady water and food supply are extremely important. You will not be looking to feast daily but meeting your basic calorie and hydration needs will be enough to keep you going. 2400-3600 Calories per day is a good amount to aim for. Additionally, if this requirement is squared away it will allow you to focus more on recovery efforts or finding help.
- Be outwardly positive Positivity creates more positivity. Showing fellow survivors that you are with that you have a positive mental attitude will prevent the group being dragged down under the weight of the disaster. Be the seed that grows into higher morale for your team.
2. Water
Beyond your own internal fortitude, water is the most important resource you require. Finding it and knowing how to make it fit for consumption are two of of the most important basic survival skills you can learn.
- Know how to look for signs of water. This may be looking where plants are growing, where terrain slopes or contours into a natural water trap, or observing animal movements to see where they are finding their water supply.
- If you are able to map a route as a part of your Bug Out Plan, identifying likely sources for water along the way will be a massive boon.
- Understand how to treat water to make it fit for consumption. Drinking contaminated water can be deadly.
- Filtration this consists of passing water through very fine membranes to remove particles and some pathogens. Some viruses may still make it through even the finest filters available.
- Purification treating water with either chemicals such as iodine or UV light sources. This neutralizes all pathogens but does not eliminate particles.
- Boiling This is a type of purification as it kills all pathogens but does not remove particles. Water should be kept at a rolling boil for at least 1 minute to sterilize it.
- Because of the separate benefits of both filtration and purification it is recommended that you use both methods to be 100% sure of water safety. The most basic way to do this is to pour water through a cloth and then boil it. However a more effective approach is to pass it through a filter device such as the MSR MiniWorks EX Microfilter and then purify it using tablets or a SteriPen. These items should be considered mandatory requirements for any list of Bug Out Bag Essentials.
- Be able to exploit rainfall if possible. This may include catching it in a poncho or container if available.
- Utilize a Solar Still This can be purchased here or fashioned out of your survival gear. A Solar Still uses the suns heat to evaporate liquid and then recapture it as clean water.
- Understand how much water you need A person can survive 72 hours without water. It is however recommended that someone who is active consumes 75% of their weight in ounces daily. So if you weigh 150 lbs then you should be drinking about 113 ounces (3.31 liters) of water per day.
 A Home Made Solar Still3. Food
- Hiking with your Bug Out Bag loaded with essential survival gear will cause you to burn 400-500 calories in an hour. To keep your body working as an efficient machine it is important to keep it fueled up.
- First off, ration what food you have with you. You are concentrating on survival, not feasting. Eat small portions when you are hungry but do not over do it.
- Supplement your rations with foraged sustenance from your surroundings. This means you will need to learn what edible plants are around and how to harvest them. Also learn where these plants grow. Does a particular berry grow around water holes? Does a high calorie plant prefer the shade? Learn these aspects to understand where to look for sustenance. Some plants are only edible after cooking or boiling, learn what you need to do with your local flora to make it palatable. Additionally, learn what is hazardous or poisonous to eat to avoid making yourself sick!
- Understand what types of animals inhabit your area. This includes possible predators to avoid and prey to seek out. Learn what environments these animals inhabit. Is there a particular fish that likes eddies and whirlpools? Target these spots to find them. Does an animal in your area like to eat a particular plant? Placing snares in the vicinity of these plants would be ideal. If you do not know how to operate a firearm, a slingshot may be a good option for you. There are many options for slingshots, such as The Scout Hunting Slingshot or learn how to make one here. Also learn how to prepare these animals for cooking. This includes skinning and butchering animals and filleting fish. We have embedded the below videos as a tutorial in these basic survival skills.
Basic Survival Skills: How to Fillet a Fish
How to Fillet a Fish (Walleye)
Basic Survival Skills: How to skin a squirrel
<span style="box-sizing: border-box; font-weight: 600;">
Field Dressing Squirrel
Basic Survival Skills: How to Butcher a Deer
Deer Hunting: Field Dressing and Quartering
4. Shelter
A well prepared person will have a means of sheltering themselves from the elements as a part of their Bug Out Contents List. However, a TOTALLY prepared person will also have learned survival shelter building as one of their basic survival skills. A survival shelter does not need to be complicated or fancy but it should keep rain/snow out, keep heat inside, and be easily cobbled together from local materials.
- A survival shelter can be built from most anything debris from collapsed buildings, trees and leaves, animal hides, or a tarp or poncho
- Consider bringing paracord and a saw or hatchet when building your Bug Out Bag Contents List as these can be your best friends when building a shelter. With these items you can make a survival shelter out of just about anything in very little time.
- If you do not have paracord, zip ties, duct tape, or another binding material, primitive rope can be improvised from strips of tree bark, small green saplings or branches, and vines.
- A basic survival shelter could consist of building a frame from long rigid materials such as tree branches or 2×4s and laying a poncho or tarp over it.
- If you cannot use your poncho or tarp for this, layer brush on to the frame sloping away towards the ground to insulate for warmth and keep moisture out. See the picture below for a general idea of this.
Store Bought Survival Shelters A Shelter Made On the Trail
 Image Credit: simonov on Flickr
5. Fire
Fire can provide many things when in a survival situation and both building and maintaining one are essential basic survival skills. A fire will give a morale boost, provide heat and light, and enable you to purify water and cook food.

- The basic requirements to build any fire are to give it air, fuel, and an ignition source.
- Air A fire consumes air hungrily and it is important to build it in a way that allows air to flow into the combustion. Do not smother a fire by putting too much fuel onto it.
- Fuel This is what actually burns in a fire and can be sourced from many places. If a branch or stick snaps cleanly it is dry and will burn well. If it bends and splinters it is still green and will smoke and smother a fire.
- Ignition Source this can be a lighter, matches, or a fire starter that you bring with you. You should however learn more primitive means of fire starting as one of your basic survival skills in the event that these items cannot be sourced. See the video below for one simple method.
- A fire is build in successive layers of increasingly larger wood. You start with tinder, which is very small, dry, and catches easily. Examples of tinder are tree bark, dryer lint, coconut husk, and pine needles. From tinder you go up to kindling which is generally twigs up to the diameter of your little finger. Next is fuel wood which is in sizes up to your thumb. Continue to add more wood gradually until you have a fire large enough to ignite logs. These logs are what will produce the majority of your coals in a fire pit.
- The opposite technique is to build what is known as an Upside Down Fire This has large logs at the bottom and tapers to fuel wood, kindling, and then tinder at the top. An upside down fire allows you to build your cooking fire and then let it burn down without having to babysit it and can be great in makky outdoors situation. Check out my in-depth instructional guide to learn how to build an Upside Down Fire here.
- Learn how to use a fire to cook food. Coals are a far better method of cooking food than a naked flame. Coals will produce a more even heat and allow you to control the rate at which your food cooks, rather than having some parts seared with the inside raw. A naked flame is however better at boiling water.
- The most commonly used types of fires are called a Teepee and a Log Cabin, which are pictured below.
- A Dakota Fire Pit is another type that is less widely used than these but more efficient. See the image below for how a Dakota Fire Pit works.
Teepee Fire Log Cabin Fire  Image Credit: mikemol on flickr
 Image Credit: geraldford on flickr

Basic Survival Skills: Dakota Fire Pit

Basic Survival Skills: Making a fire without matches
How To Make a Fire By Rubbing Sticks
Conclusion
There is no doubt that learning basic survival skills will significantly increase your chances of success. Putting in some time now to teach yourself these basic survival skills will make you better prepared and help you provide for yourself and your family when disaster strikes. As with your bug out bag contents or bug out plan, you should tailor your survival skill set to match your environment. To learn what you need to master in order to survive in a cold weather setting have a look at our article on cold weather survival tips. We mentioned several survival tools in this article that partnered with your skills will make your struggle far less daunting including paracord, a hatchet, saw, and fire starter. To see how these items will affect your overall survival kit and see what other items you can add to your Bug Out Bag list, check out our Free Bug Out Bag Planning Tool. Remember, chance favors the well prepared.

Your Thoughts
If you thought this post was helpful, please Like, +1, or Share it using the social media buttons at the top of the page! What do you think of these basic survival skills? Is there a survival tactic that you would recommend? Please let us know in the Comments Section below, thanks!
Basic Survival Skills - The Bug Out Bag GuideIf you're gonna fight, fight like you're the third monkey on the ramp to Noah's Ark... and brother its starting to rain. Join our efforts to Secure America's Borders and End Illegal Immigration by Joining ALIPAC's E-Mail Alerts network (CLICK HERE)
-
06-09-2025, 05:02 AM #9799Senior Member
- Join Date
- Aug 2018
- Posts
- 93,795
If you're gonna fight, fight like you're the third monkey on the ramp to Noah's Ark... and brother its starting to rain. Join our efforts to Secure America's Borders and End Illegal Immigration by Joining ALIPAC's E-Mail Alerts network (CLICK HERE)
-
06-09-2025, 05:03 AM #9800Senior Member
- Join Date
- Aug 2018
- Posts
- 93,795
If you're gonna fight, fight like you're the third monkey on the ramp to Noah's Ark... and brother its starting to rain. Join our efforts to Secure America's Borders and End Illegal Immigration by Joining ALIPAC's E-Mail Alerts network (CLICK HERE)


 Reply With Quote


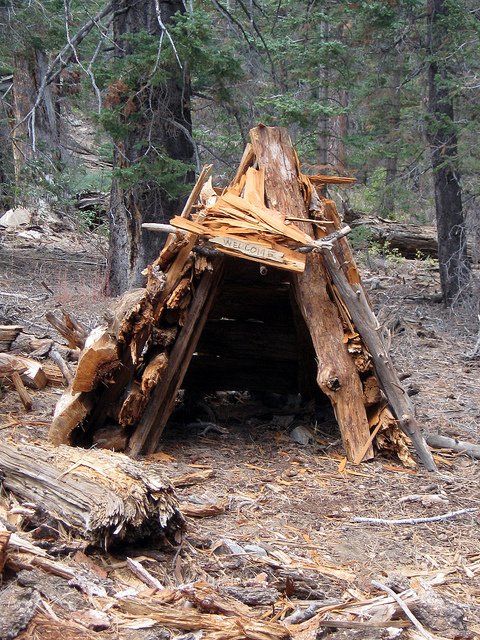


Britains Rape Gang Scandal Inquiry Report: A National Reckoning...
06-17-2026, 04:56 PM in General Discussion