

Results 9,801 to 9,810 of 11754
 226Likes
LinkBacks (?)
-
12-26-2016, 11:32 AM
-
09-02-2016, 05:39 PM
-
whole garden made with pallets!! Love it!! | Pallets | Pinterest | Pallets, Pallets Garden and Wooden Pallets
Refback This thread03-06-2016, 11:30 AM -
10-20-2015, 05:29 PM
-
06-12-2015, 08:00 PM
-
02-26-2015, 01:58 PM
-
01-05-2015, 04:13 PM
-
12-19-2014, 10:19 AM
-
EMERGENCY: HUGE FEMA PANDEMIC EXERCISE IN USA IN NOVEMBER, INTERNET SHUT DOWN PART OF EXERCISE | Prepare4Survival
Refback This thread12-03-2014, 10:39 PM -
Off Grid World ? Ugly Duckling Shipping Container Home Built by Artist Is a Beautiful Swan on the Inside
Refback This thread11-25-2014, 03:10 PM -
11-17-2014, 10:59 PM
-
11-13-2014, 11:18 AM
-
11-09-2014, 02:54 PM
-
10-28-2014, 11:38 PM
-
10-26-2014, 05:54 AM
-
10-16-2014, 11:28 AM
-
10-03-2014, 01:25 PM
-
10-02-2014, 09:16 PM
-
09-26-2014, 07:00 PM
-
09-26-2014, 01:56 PM
-
09-19-2014, 04:46 PM
-
09-13-2014, 05:49 AM
-
09-05-2014, 01:52 PM
-
09-01-2014, 09:39 AM
-
08-30-2014, 06:29 PM
-
08-10-2014, 06:29 AM
-
08-04-2014, 05:07 PM
-
07-23-2014, 11:14 AM
-
New Evidence on Expiration Dates | Medical Preparedness | Doom and Bloom (TM) | Doom and Bloom (TM)
Refback This thread07-22-2014, 10:10 AM -
07-18-2014, 08:37 PM
-
07-15-2014, 04:57 PM
-
07-11-2014, 01:40 AM
-
04-22-2014, 11:14 AM
-
04-18-2014, 12:57 PM
-
04-18-2014, 10:10 AM
-
04-14-2014, 12:18 AM
-
04-12-2014, 02:28 AM
-
03-02-2014, 11:43 PM
-
12-24-2013, 11:59 PM
-
12-07-2013, 11:04 PM
-
kitchen | Cob
Refback This thread11-25-2013, 03:24 PM -
10-22-2013, 10:25 PM
-
Apple Pie Braid | Sweets
Refback This thread09-26-2013, 07:58 AM -
09-02-2013, 04:44 PM
-
5 Reasons Why You May have to Bug Out Even Though You Don’t Want to | The Apartment Prepper's Blog
Refback This thread08-23-2013, 03:20 PM -
06-27-2013, 06:30 AM
-
06-23-2013, 08:11 PM
-
06-17-2013, 11:21 PM
-
05-24-2013, 05:06 PM
-
To Eat / BASIC LIST / SUGGESTED ITEMS FOR LONG TERM SURVIVAL - Page 275 - ALIPAC
Refback This thread05-01-2013, 03:49 AM
Thread Information
Users Browsing this Thread
There are currently 3 users browsing this thread. (0 members and 3 guests)
 LinkBack URL
 About LinkBacks
-
06-09-2025, 05:08 AM #9801Senior Member


- Join Date
- Aug 2018
- Posts
- 93,439
The Ingenious Way South Korea Unclogs Toilets
뻥투 변기 스티커 뚫어뻥 화장실 막혔을때 뚫는법 변기뚫는방법 (Pongtu) pongtu korean drain cleanerIf you're gonna fight, fight like you're the third monkey on the ramp to Noah's Ark... and brother its starting to rain. Join our efforts to Secure America's Borders and End Illegal Immigration by Joining ALIPAC's E-Mail Alerts network (CLICK HERE)
-
06-09-2025, 05:15 AM #9802Senior Member
- Join Date
- Aug 2018
- Posts
- 93,439
 Projects
Contests
Teachers
Log In
Sign Up
Home Made Hen Dust Bath From Pallets
By joey24dirt in WorkshopPallets
21,680
234
8Featured
Introduction: Home Made Hen Dust Bath From Pallets


 By joey24dirtFollow
More by the author:


About: Hands on lad with the ability of making something from nothing, sometimes! More About joey24dirt »
I've kept a group of hens for a few years now and have found that if I keep my girls happy, they will keep me happy by producing tasty eggs. So as well as keeping them fed and watered they also like the opportunity to take a bath, a dust bath!
This instructable gives you an idea of how to turn unwanted pallets into a happy hen dust bath!
Enjoy.
Step 1: Gathering Materials

So for this dust bath you will need 3-4 pallets of the same size. That's basically all you need other than wood screws and hand tools.
Step 2: The Strip Down

So you need to select the best pallet that you have and keep it to one side. This will be used as the main frame for the bath. With the rest of the pallets carefully strip them down so you have the straight boards ready to be used again.
Oh also with the pallet you have saved you need to remove the centre boards and blocks. Leave the outer ones in place.
Step 3: Rearranging


Now you're all set to arrange the boards on the base and sides of the pallet you saved. Just space them and cut them to suit. All pallets are different so yours may be slightly different dimensions to the ones I used. Same principle though.
Step 4: Fill With Dirt!!


Now you have your bath all that's left to do it to fill it with dirt and let the hens at it. Eventually I'll make a tarpaulin cover to keep the dirt dry so that the hens have access to dry dirt all year round.
Home Made Hen Dust Bath From Pallets : 4 Steps (with Pictures) - InstructablesIf you're gonna fight, fight like you're the third monkey on the ramp to Noah's Ark... and brother its starting to rain. Join our efforts to Secure America's Borders and End Illegal Immigration by Joining ALIPAC's E-Mail Alerts network (CLICK HERE)
-
06-09-2025, 06:44 AM #9803Senior Member
- Join Date
- Aug 2018
- Posts
- 93,439

The Hidden Blueprints of Ancient Acoustic Technology - Michael Tellinger 2025
The Hidden Blueprints of Ancient Acoustic Technology - Michael Tellinger 2025
Thursday, June 5, 2025 11:26
The Hidden Blueprints of Ancient Acoustic Technology - Michael Tellinger
888If you're gonna fight, fight like you're the third monkey on the ramp to Noah's Ark... and brother its starting to rain. Join our efforts to Secure America's Borders and End Illegal Immigration by Joining ALIPAC's E-Mail Alerts network (CLICK HERE)
-
06-10-2025, 08:24 AM #9804Senior Member
- Join Date
- Aug 2018
- Posts
- 93,439
Building with Earthbags:
An Adventure in Root Cellar Construction
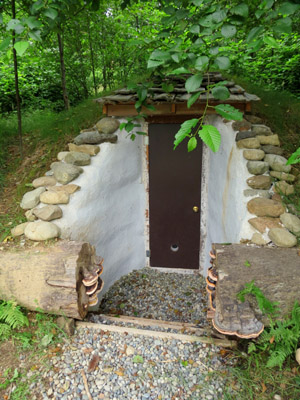
By Steve Nicolini
We have finally completed our 4 years-and-running earthbags building project. We wanted a natural cold storage for all of the root crops we grow here in the western foothills of Washingtons Cascade Mountain range.
This is a wonderful alternative to conventional construction. They are much less expensive and much more ecologically friendly.
The story of our earthbag root cellar begins with a man who loved to dig. This man could often be found digging the hole for our root cellar. The sound of his shovel and pickaxe would only be drowned out by his grunts and groans as he dug deeper and deeper into the earth, pulling out gigantic rocks (that would one day edge our garden beds).
The mans perseverance and work ethic was so inspiring I decided to jump in. One day, we were throwing shovels full of dirt from the 8 ft. deep x 11 ft. wide hole in the ground when the man said, Okay. That is deep enough. It was time to review our notes on building with earthbags and design our cellar.
The materials needed:
- Earthbags (enough to complete your structure)
- Barbed wire
- Strong wood for door/window forms
- Drainage and foundation material (we used gravel and perforated pipe)
- Some straight pieces of wood or metal or plastic to make a compass.
- Baling twine
- Tampers (full pounders and quarter pounders)
- Levels
- Measuring tapes
- Big Old Coffee cans
The first thing we did was lay out the drainage and foundation, which are essential for any structure. Around the outside of the bottom of the hole we laid a 4 in. perforated pipe on a 4% grade down and out of the structure. We then dumped in a 1 ft. depth of large rounded gravel and tamped it to level. This gravel would be our foundation and our floor.
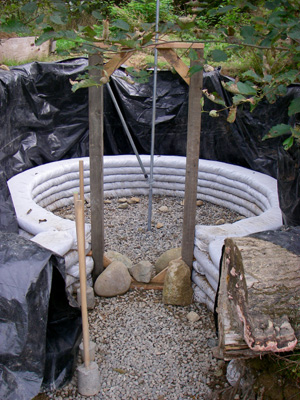
The next step was to find the exact center of our round structure-to-be and set our compass. We used some old chain link fence parts with an L-bracket lashed onto them to make our compass. It was essential for creating a perfectly round structure. It also aided us in the decrease in radius with each rising course of earthbags.
Laying down courses of earthbags requires quite a bit of moving and shaking. We called up our friends to come help with the dance. (You should have a lot of friends if you want to build an earthbag structure.)
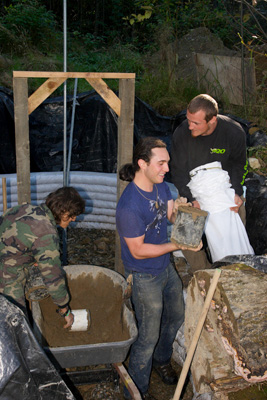
The Process of Building with Earthbags:
It goes something like this:
1) Filler fills coffee can with subsoil, being careful to not include living topsoil, vegetation, and sharp stones
2) Pourer dumps dirt into the mouth of the earthbag, which is held by the Layer
3) Layer moves and shakes the dirt down into the earthbags and sets the bag into its resting position (this was my favorite thing to do)
4) Repeat until full course is laid
5) Tamper tamps down the course with a full pounder
6) Barber nails down two lengths of barbed wire across course (this was my least favorite )
The first two courses of our structure had somewhere between a 10 and 20% mix of concrete in with the dirt. After those two it was just the dirt that came out of the ground.
Be More Prepared For Your Next Outdoor Adventure!

I am not going to get into the geometry used to indicate the reduction in radius length with each course of earthbags. When you are designing your structure, you should reference Earthbag Building, by Kaki Hunter and Donald Kiffmeyer. Just know that with each course there is a decrease in the radius of the course that is exponentially larger than the previous decreases.
Our buttress walls are just straight sections of earthbag interlocked in with the main structure at the door form. Each course of the buttress wall decreased in length to parallel the slope of the hillside.
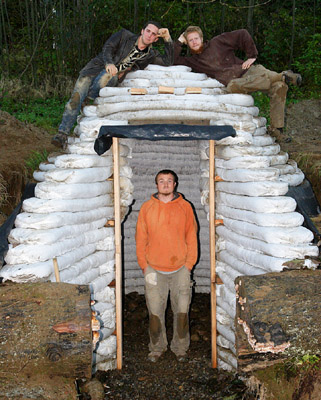
After all the filling and tamping and laying and barbing, we had finally enclosed the structure. We then proceeded to cover it with two layers of really thick polyethylene. Then we backfilled with the rest of the soil and buried the beast.
It wasnt until the following year that the earthbag layers were plastered. We used a traditional lime plaster for these two reasons: a wall made of earth needs to breathe (cement stucco doesnt let out water vapor) and lime holds up to moisture very well (the cellar is underground, making it pretty moist). I learned the plastering process from The Natural Plaster Book: Earth, Lime, and Gypsum Plasters for Natural Homes by Cedar Rose Guelberth and Dan Chiras.
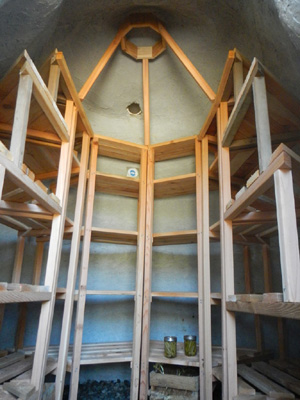
The shelves we built were an architects dream and a builders nightmare. Regardless, they turned out pretty good (thanks for the design, Jamie). Our main considerations in shelf design were airflow and space utilization. In retrospect, it would have been more beneficial to incorporate shelf brackets into the earthbags themselves versus building freestanding shelves.
So far we have about a dozen jars of pickled peas, half dozen jars of pickled radishes, and a crate of potatoes in the cellar. After the harvest this year it should get at least ½-full.
By the way, a big part of why we love homesteading & permaculture skills so much is because they are a natural extension of learning about wilderness survival (both fields are all about self-sufficiency and working with nature to satisfy needs). An understanding of survival not only helps you become a better permaculturist, it empowers you with life-saving outdoor skills to keep you safe when out in nature. Right now you can get a free copy of our mini survival guide here, where you'll discover six key strategies for outdoor emergencies, plus often-overlooked survival tips.
Recommended Earthbag Resources:
Earthbag Building by Kaki Hunter and Donald Kiffmeyer
What is Superadobe - CalEarth
Related Courses:
Permaculture Courses at Alderleaf

About the Author: Steve Nicolini is an experienced permaculturist and wilderness skills instructor. He taught at Alderleaf for a number of years. Learn more about Steve Nicolini.
Building with EarthbagsIf you're gonna fight, fight like you're the third monkey on the ramp to Noah's Ark... and brother its starting to rain. Join our efforts to Secure America's Borders and End Illegal Immigration by Joining ALIPAC's E-Mail Alerts network (CLICK HERE)
-
06-10-2025, 09:18 AM #9805Senior Member
- Join Date
- Aug 2018
- Posts
- 93,439
15 Free Picnic Table Plans In All Shapes and Sizes
By Stacy Fisher
Updated on 11/16/23
:max_bytes(150000):strip_icc():format(webp)/picnic-table-plans-1357133_round3-146342a4b9c747489f50df27e2372c41.png)
Credit: Illustration: The Spruce / Alison Czinkota
01of 15Use these free picnic table plans to build a picnic table for your backyard, deck, or any other area around your home where you need seating. Building a picnic table is an easy task that makes the perfect weekend project without breaking the bank.The picnic table plans include plans for traditional, octagon, hexagon, round, folding, small, and large picnic tables. You'll have no trouble finding a free picnic table plan to fit your space and style.These free picnic table plans include everything you need to build a picnic table including a materials and tools list, a cut list, step-by-step written building directions, diagrams, and photos. Some of the plans even include videos and user-submitted photos.If you like these free picnic table plans, you'll also like free woodworking plans to help you build benches, Adirondack chairs, tree houses, and more.
Weekend Picnic Table Project
:max_bytes(150000):strip_icc():format(webp)/diy-diva-free-picnic-table-plans-57f3cea43df78c690f522c28-5bfd90ea46e0fb00264270b5.jpg)
Credit: DIY Diva at Black Feather Farm
Here's an easy picnic table plan that will get you a traditional and sturdy picnic table in your backyard by the end of the weekend. It's a nice update on this older picnic table plan by Popular Mechanics. Clear pictures and a video will help you build this easy picnic table.Weekend Picnic Table Project from DIY Diva at Black Feather Farm
02of 15
Free Picnic Table Plan
:max_bytes(150000):strip_icc():format(webp)/instrcutables-5b23f5680e23d90036196cb0.jpg)
Credit: Instructables
Here's a great looking picnic table that was built only with two by fours. It's a large table that will seat your whole family. The plans include lots of diagrams, building directions, color photos, and materials and cut lists. Free Picnic Table Plan from Instructables
03of 15
X Leg Picnic Table with Pipe Trestle
:max_bytes(150000):strip_icc():format(webp)/lemonthistle-d72bc03d17e14caab946b42fcde533e1.jpg)
Credit: Lemon Thistle
This free picnic table plan includes how to make an X-leg picnic table so that instead of having a traditional wood trestle, a pipe trestle has been used. Here it's being used out on a deck but still needs the important waterproofing for being outdoors. It comes out to 72 inches long and 40.5 inches wide making it perfect for a larger space, either indoors or out. This is a straight-forward project that takes a small handful of power tools, making it perfect for the advanced beginner or intermediate wood worker.
X Leg Picnic Table with Pipe Trestle from Lemon Thistle
04of 15
DIY Patio Table With Built-In Drink Coolers
:max_bytes(150000):strip_icc():format(webp)/patio-table-witih-built-in-drink-coolers-Kruses-Workshop-on-Remodelaholic-5bfd9171c9e77c0051854b50.jpg)
Credit: Remodelaholic
Create the ultimate backyard picnic table with this free plan for a patio table and benches. The patio table has ice boxes built into the center of it so you can keep all your beverages on ice and at arms reach. There is a materials list, cut list, step-by-step building directions, diagrams, and color photos to make this dream table a reality.DIY Patio Table With Built-In Drink Coolers from Remodelaholic
Continue to 5 of 15 below
05of 15
Octagon Picnic Table
:max_bytes(150000):strip_icc():format(webp)/ana-white-free-picnic-table-plans-57f3ce465f9b586c35bde083-5bfd919cc9e77c0026f63814.jpg)
Credit: Ana White
If you'd like to build an octagon picnic table then here's the plan for you. The completed tabletop will be 64" wide. Included in this free octagon picnic table plan are a materials and tools list, cut list, instructions, and user tips and comments.Octagon Picnic Table from Ana White
06of 15
Free Picnic Table 2X6 Plan
:max_bytes(150000):strip_icc():format(webp)/plates-of-food-on-picnic-table-near-lake-543197607-57f3cf935f9b586c35bfbcf7-5bfd92f846e0fb00518655a9-5bfdd63b4cedfd0026019898.jpg)
Credit: Ronnie Kaufman / Larry Hirshowitz / Getty Images
This is a traditional A-frame picnic table plan where the legs, bench, and table tops are all made from 2X6s. Use the material list to gather your supplies and use the diagrams and instructions to build yourself this classic picnic table.Free Picnic Table 2X6 Plan from MyCarpentry
07of 15
Free Picnic Table Plan for Kids
:max_bytes(150000):strip_icc():format(webp)/ana-white-kids-free-picnic-table-plans-57f3cfcd5f9b586c35c0119e.jpg)
Credit: Ana White
This easy to build picnic table will fit the bigger kids, and even a small adult can sit comfortably on it. You'll find dimensions, instructions, cut list, and a material list as well as dozens of pictures of the finished picnic table.Free Picnic Table Plan for Kids from Ana White
08of 15
Free Outdoor Picnic Table Plan
:max_bytes(150000):strip_icc():format(webp)/family-having-meal-in-countryside-103061488-57f3d0563df78c690f54b2f1-5bfd93554cedfd0026028266-5bfdd65746e0fb00510cb82f.jpg)
Credit: Monty Rakusen / Cultura RM / Getty Images
Here's a free picnic table plan from Wayne of Woods that will give you a nicely finished picnic table you can leave unfinished, stain, or paint. There are plenty of pictures and step-by-step instructions to make sure that this picnic table turns out just how you'd like it to.Free Outdoor Picnic Table Plan from Wayne of Woods
Continue to 9 of 15 below
09of 15
Preschool Picnic Table
:max_bytes(150000):strip_icc():format(webp)/ana-white-free-picnic-table-plans-57f3d1753df78c690f573070-5bfd93a84cedfd0026029295.jpg)
Credit: Ana White
If you are looking to build a kids' picnic table, then this plan for a Preschool Picnic Table from Ana-White may be just what you're looking for. Diagrams, a materials and tools list, a cut list, and instructions are included in this free kids picnic table plan. It's also available as a PDF download.Preschool Picnic Table from Ana White
10of 15
Free Picnic Table Plan
:max_bytes(150000):strip_icc():format(webp)/grandmother-daughters-and-granddaughters-11-13-at-family-barbecue-200205889-001-57f3d1393df78c690f56ae83-5bfd93ec46e0fb0051d88a10-5bfdd67a46e0fb00261755e6.jpg)
Credit: Ryan McVay / Getty Images
This Old House has a free picnic table plan available that will help you build a classic American picnic table with attached benches. With this plan, you can expect to spend 4 hours and under $100.Three steps of this picnic table plan will take you through cutting the frame parts, building the frame, and finishing the benches and top of the table.Free Picnic Table Plan from This Old House
11of 15
Large Picnic Table Plan
:max_bytes(150000):strip_icc():format(webp)/-yna-straumen-521022870-57f3d2633df78c690f59243a-5bfd943ec9e77c0026724254.jpg)
Credit: Bo Zaunders / Getty Images
BuildEazy has a free picnic table plan available that builds a larger than a normal sized traditional picnic table. It can seat up to eight adults. Almost ten pages of detailed directions, as well as videos and user photos, are included in this free picnic table plan.Large Picnic Table Plan from BuildEazy
12of 15
Free Folding Picnic Table Plan
:max_bytes(150000):strip_icc():format(webp)/high-angle-view-of-friends-enjoying-backyard-barbecue-579977967-57f3d3913df78c690f5be728-5bfd94b7c9e77c0026f6d4b5.jpg)
Credit: Granger Wootz / Getty Images
You won't believe your eyes at this plan for a folding picnic table that converts from two separate bench seats into a picnic table.Besides the normal instructions and diagrams, you can even watch a video to see how to build this folding picnic table.Free Folding Picnic Table Plan from BuildEazy
Continue to 13 of 15 below
13of 15
Traditional 6 Foot Picnic Table Plan
:max_bytes(150000):strip_icc():format(webp)/empty-picnic-table-at-sea-shore-against-cloudy-sky-595511611-57f3cdce3df78c690f50f5de-5bfd91d846e0fb0026d4010e-5bfdd5fcc9e77c0026041250.jpg)
Credit: Corrina Joel / EyeEm / Getty Images
Here's a free picnic table for a 6-foot long traditional picnic table. All you'll need is a saw, drill, screwdriver, wrench, and lumber. This 14-page picnic table plan will provide you with a materials list, written instructions, and lots of diagrams.Traditional 6 Foot Picnic Table Plan from Bob's Plans
14of 15
Free Hexagon Picnic Table Plan
:max_bytes(150000):strip_icc():format(webp)/ana-white-hexagon-free-picnic-table-plans-57f3cf2d3df78c690f52f080-5bfd921e46e0fb00269d2d87.jpg)
Credit: Ana White
If you're looking for something different than a regular picnic table, then you'll want to check out this free picnic table plan from Ana White. This is a free hexagon picnic table plan that is a very nice update to the traditional rectangle picnic table and is perfect for a small space. It features an octagon table top and size large benches. You'll only need to buy a handful of 2x4s and 2x6s to build this unique picnic table. You can even have the boards cut at the hardware store so you're all ready to build.You'll find clear illustrations, well-written instructions, a complete materials and tools list, and even pictures of the picnic tables people have made from this plan along with user comments. This is an intermediate to advanced plan, so you'll need to have some woodworking experience if you want to tackle it.Free Hexagon Picnic Table Plan from Ana White
15of 15
Free Picnic Table Plan With Separate Benches
:max_bytes(150000):strip_icc():format(webp)/picnic-table-set-for-meal-outdoors-549593731-57f3cf4b3df78c690f531a30-5bfd928146e0fb0026d422d6-5bfdd61946e0fb00265041da.jpg)
Credit: PhotoAlto / Frederic Cirou / Getty Images
This free picnic table plan will seat six to eight adults comfortably. The separate benches make sure that everyone has enough legroom to be comfortable. This free PDF picnic table plan includes eight pages of a tools and supplies list, cut list, diagrams, and building steps.
Free Picnic Table Plan With Separate Benches from Yellawood
Explore more:
More from The Spruce Crafts
:max_bytes(150000):strip_icc():format(webp)/birdhouses-background--614492376-80292bac81584db8b317186c1b687619.jpg)
15 DIY Birdhouse Plans and Ideas
:max_bytes(150000):strip_icc():format(webp)/Variouscoffee-GettyImages-938993594-76d8377c5a2a463cb901416753f527d8.jpg)
How to Naturally Dye Fabric with Coffee
:max_bytes(150000):strip_icc():format(webp)/EasyFriendshipBracelets-8625eeab0b4142e28f04ad7333055cb3.jpg)
15 Easy Friendship Bracelets
:max_bytes(150000):strip_icc():format(webp)/diy-roman-shades-12-4795044cd59440fb967f63f3a8ae9742.jpg)
11 DIY Ideas for Roman Shades
:max_bytes(150000):strip_icc():format(webp)/macrame-bracelet-12-7233a865fa6a45b8b0d85f23d3ad2f32.jpg)
12 Macrame Bracelet Patterns
:max_bytes(150000):strip_icc():format(webp)/ChevronFriendshipBracelet13-a24114433d394edd9a5db0edc0c93504.jpg)
How to Make a Chevron Friendship Bracelet
:max_bytes(150000):strip_icc():format(webp)/GettyImages-183229798-5a81c7d41f4e130037b0a948.jpg)
7 Free Router Table Plans
:max_bytes(150000):strip_icc():format(webp)/free-coffee-table-plans-1357114-FINAL-f9608fe391444d1ba32437887ef69d20.jpg)
20 Free DIY Coffee Table Plans
:max_bytes(150000):strip_icc():format(webp)/free-bench-plans-1357108_final3-e601235be36c4b6fbc0de37f9e622ab7.jpg)
14 Free and Easy DIY Bench Plans
:max_bytes(150000):strip_icc():format(webp)/thecraftedlife-10638fee50d2448caa4b94ca3e09854e.jpg)
11 Free DIY Craft Table Plans
:max_bytes(150000):strip_icc():format(webp)/farmhouse-5bfc4b7bc9e77c00587e2a02.jpg)
9 Free Entertainment Center Plans
:max_bytes(150000):strip_icc():format(webp)/free-desk-plans-1357117_FINAL-8c191266b07443e5996fefd8d28ab473.png)
16 Free DIY Desk Plans
:max_bytes(150000):strip_icc():format(webp)/art-craft-supplies-on-blue--green-and-coral-on-blue-background-184268679-5c890f01c9e77c0001423007.jpg)
14 Hacks to Get the Most Out of Hobby Lobby Sales and Coupons
:max_bytes(150000):strip_icc():format(webp)/free-bunk-bed-plans-1357110_final3-7eb6dcc5062c4812954e7375a6d3ac58.jpg)
8 Free DIY Bunk Bed Plans
:max_bytes(150000):strip_icc():format(webp)/free-adirondack-chair-plans-1357104_final-6bb5f1348e9c48f5a12456564e63abd6.png)
14 Free Adirondack Chair Plans
:max_bytes(150000):strip_icc():format(webp)/GettyImages-123998840-4c9f45ed33f04fd99b315ca057935d1c.jpg)
12 Free DIY Tree House Plans
If you're gonna fight, fight like you're the third monkey on the ramp to Noah's Ark... and brother its starting to rain. Join our efforts to Secure America's Borders and End Illegal Immigration by Joining ALIPAC's E-Mail Alerts network (CLICK HERE)
-
06-11-2025, 12:04 AM #9806Senior Member
- Join Date
- Aug 2018
- Posts
- 93,439
Emergency medicine: Essential first aid skills for survival
06/10/2025 // Evangelyn Rodriguez // 180 Views
Tags: Burns, CPR, emergency medicine, first aid, homesteading, off grid, preparedness, prepper, prepping, severe bleeding, SHTF, survival, survival medicine, survival skills, tips, wound care

- First aid is critical immediate action in emergencies can save lives when professional help is delayed.
- Preppers should master key first aid skills, such as giving CPR to sustain oxygen flow to vital organs and stopping severe bleeding.
- Knowing how to clean and close wounds properly is also important to prevent infections and ensure healing.
- Providing immediate care for burns helps minimize damage to the skin and surrounding tissue, relieves pain and helps prevent infection.
- Training is vital practice regularly and take courses to stay prepared.
Accidents, injuries and medical emergencies can happen anywhere, and when professional medical help is delayed or unavailable, the ability to administer immediate aid can mean the difference between life and death. Learning essential first aid skills is no longer optional for preppers and survivalistsit's a necessity.
From stopping severe bleeding to treating burns and performing CPR, these skills empower individuals to act decisively in emergencies. With proper training, even those without medical backgrounds can stabilize injuries, prevent complications and buy crucial time until professional help arrives.
Here are four crucial first aid skills every prepper should learn: (h/t to PreppersWill.com)
CPR: A lifesaving technique
Cardiopulmonary resuscitation (CPR) is a cornerstone of emergency response and is used when someones heartbeat or breathing has stopped. Whether due to cardiac arrest, drowning or trauma, immediate CPR can sustain oxygen flow to the brain and vital organs.
Key steps:
- Check responsiveness Tap the person and shout. If unresponsive, call for help.
- Begin chest compressions Place your hands on the center of the chest, then push hard and fast (100-120 compressions per minute).
- Provide rescue breaths Tilt the head back, pinch the nose and deliver two breaths after every 30 compressions.
Without CPR, brain damage can occur within minutes. Regular training ensures proficiency, as techniques evolve with medical guidelines.
Controlling severe bleeding
Uncontrolled bleeding is a leading cause of preventable death in emergencies. Direct pressure, elevation and tourniquets can halt blood loss and prevent shock.
Critical actions:
- Apply firm pressure Use a clean cloth or gauze directly on the wound.
- Elevate the injury If possible, raise the limb above heart level.
- Use a tourniquet If bleeding persists, apply a tourniquet (or improvised belt or cloth) above the wound and tighten until bleeding stops.
Tourniquets should be at least one inch wide to avoid tissue damage. Note the time of application medical responders need this information.
Cleaning and closing a wound
Cleaning and closing a wound properly helps prevent infection and speeds up healing. Dirty wounds can get infected, causing complications like slow healing or scarring. (Related: 7 Herbs for wound care every prepper should know about.)
Important steps:
- Clean First, wash your hands and gently rinse the wound with clean water or saline to remove dirt and bacteria avoid harsh antiseptics.
- Sterilize and close Apply an antiseptic ointment to prevent infection, then close deep or gaping wounds with adhesive strips or bandages.
- Cover Use a sterile dressing or adhesive bandage when covering and change it daily. Watch for signs of infection (redness, swelling or pus) and seek medical help if needed.
If the wound is severe or heavily contaminated, get professional care. Keeping wounds clean and protected ensures better healing with less scarring.
Treating burns: degrees matter
Burns range from minor first-degree injuries to life-threatening third-degree damage. Proper treatment helps reduce pain, prevents infection and promotes healing.
Treatment by severity:
- First-degree (superficial) Cool under running water for 10-20 minutes.
- Second-degree (blistering) Cover with sterile gauze; avoid popping blisters.
- Third-degree (deep tissue damage) Seek emergency care immediatelydo not apply water or ointment.
Chemical and electrical burns require specialized care. Never use ice, butter or cotton on burns, as these can worsen the damage.
In an era of medical uncertainty, first aid skills are not just survival toolsthey are acts of community resilience. Investing time in learning and practicing first aid skills could one day save a lifeperhaps your own.
For those seeking training, organizations like the American Red Cross and local EMS agencies offer hands-on courses. In today's world, preparation starts with knowing how to act when every second matters.
Find more related stories at EmergencyMedicine.news.
Learn some basic first aid procedures by watching the video below.
This video is from the Daily Videos channel on Brighteon.com.
More related stories:
First aid basics to teach your kids.
Survival first aid: Understanding the medics priority.
Survival first aid: Tactical combat casualty care and the MARCH military doctrine.
Sources include:
Brighteon.ai
PreppersWill.com
Brighteon.com
Emergency medicine: Essential first aid skills for survival NaturalNews.com
If you're gonna fight, fight like you're the third monkey on the ramp to Noah's Ark... and brother its starting to rain. Join our efforts to Secure America's Borders and End Illegal Immigration by Joining ALIPAC's E-Mail Alerts network (CLICK HERE)
-
06-11-2025, 03:34 AM #9807Senior Member
- Join Date
- Aug 2018
- Posts
- 93,439
Prepping 101: Flameless Food Heaters New Product Review Mealspec Ration Heater
in Authors, Prepping 101
Published On: August 16, 2014Updated:vAugust 16, 2014BYGunsAmerica Actual
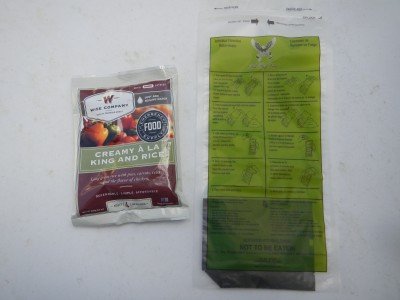 This is the Mealspec Ration Heater, in green, next to a 4 serving freeze dried rice dish from Wise foods.
Mealspec Ration Heater
Bulk Packs 12 or More: https://www.mealspec.com/buy-mre-heaters/
Individual $1.95 Each: https://www.campingsurvival.com/meflmrehe.htmlDo you have a bug out bag? Many of us do, but even if you are not planning on leaving your safe location should the Apocalypse arrive unscheduled, there is going to be a transition period between normal life, and survival life. During that time you have to be able to cook. Think about that, because if you are going to rely on freeze dried foods, as we suggested in an earlier installment, that means you should have some kind of cooking apparatus that doesnt require setting up a stove. For this article we got to look at a fairly new product that is just now finding its way into consumer retail. It is called a ration heater from Milspec. This product was developed for heating military MREs, which for home prepping are way too expensive per meal, and they dont have a 15 year shelf life like freeze dried. So we tried to use the $1.99 Mealspec Ration Heater to actually cook a 4 serving rice meal from Wise, part of a popular pack carried by many gunshops, and even Walmart.
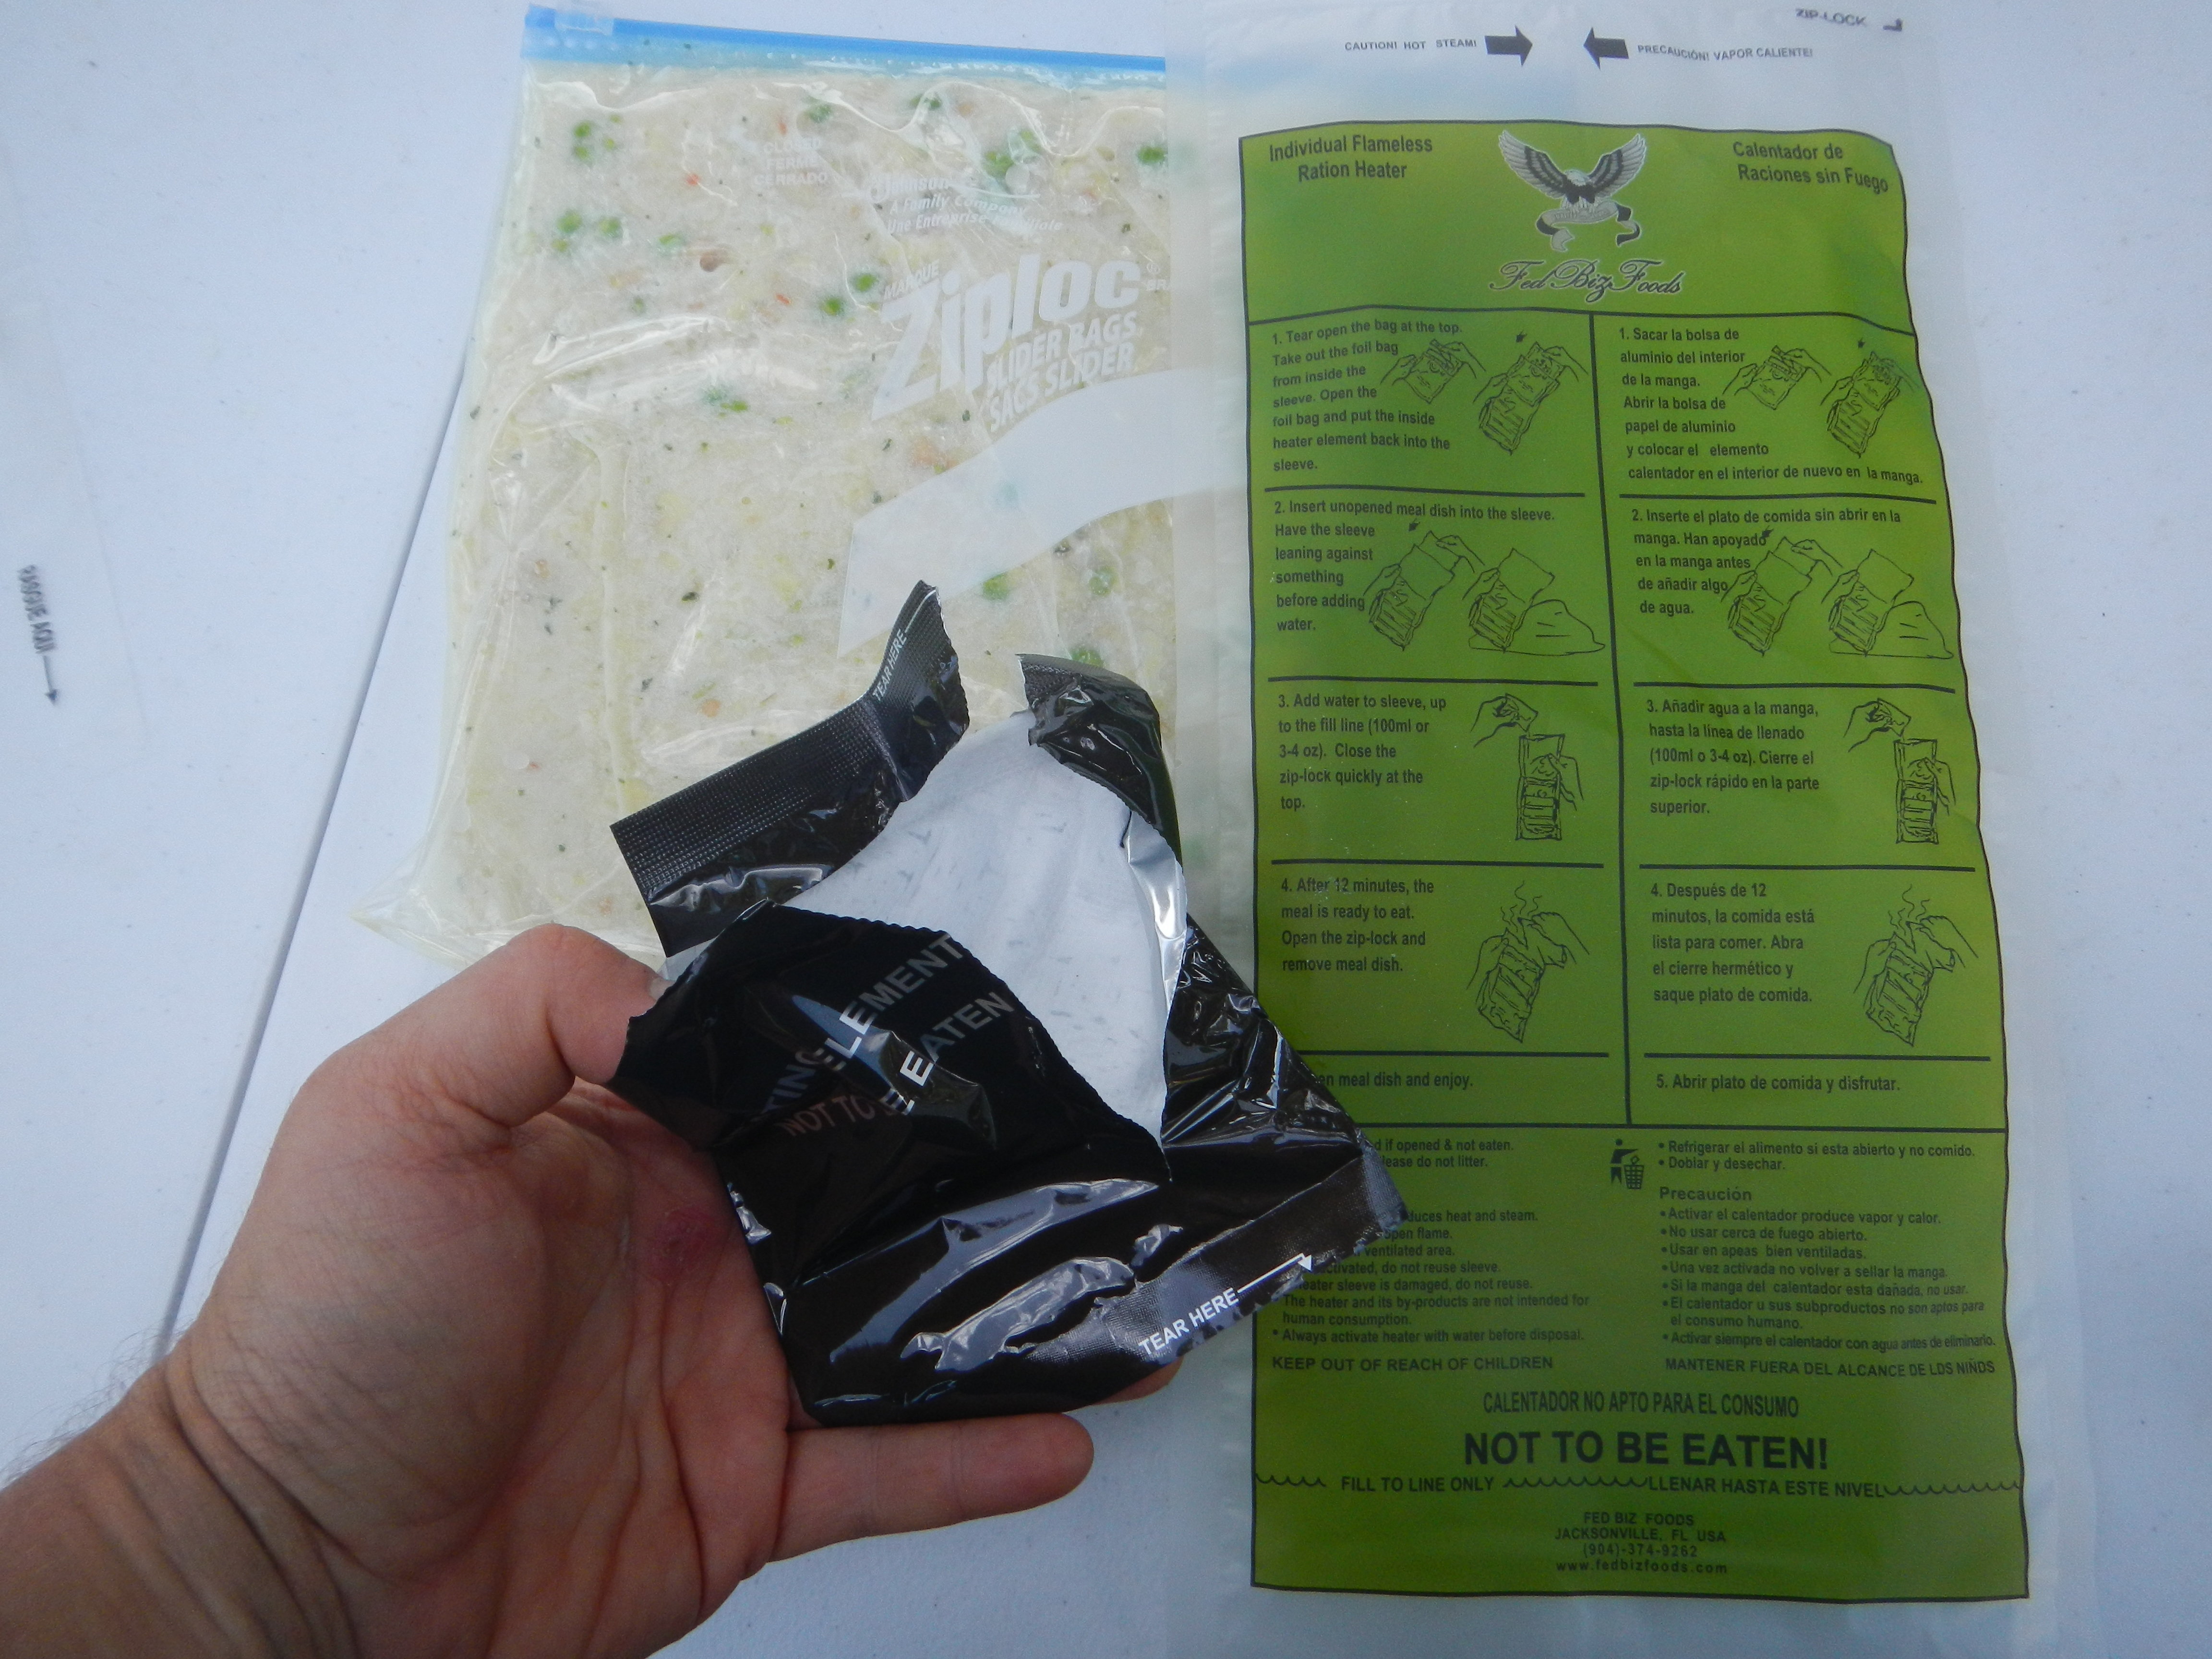
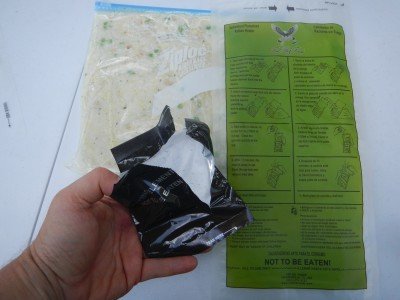 It works very simply. Open the green bag. Take out the chemical heater pack, put it back in the bag, put your food to be heated. We put the Wise dried ingredients with the measured water into a Zip-Lock, then added the water, then stuffed in the food.
The problem with most MRE heaters is that they just dont get very hot. For a fully cooked meal, warm is fine, but if you want to cook rice, pasta, or reconstitute freeze dried vegetables and other popular survival foods, you really need some heat, and you need that heat over at least 15-20 minutes. Until now I had yet to find a chemical heater that would deliver this kind of performance. Therefore, this is officially a heads up for our early readers to go buy the Mealspecs until they are sold out, which they will be shortly is my guess.
The Mealspec Ration heater works very simply. You open the out plastic bag, take out the chemical heater pack, drop that back into the bag, then add a little bit of water and whatever you want to cook. EW you say? You dont want to dump your freeze dried food in with that chemical heater? Dont worry. We didnt either, so we used a gallon sized Zip-Lock to hold the contents of the 4 serving Wise package, and added the requisite reconstitution water to that, and stuffed the whole thing into the heater bag.
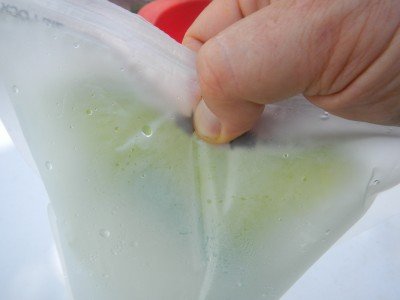
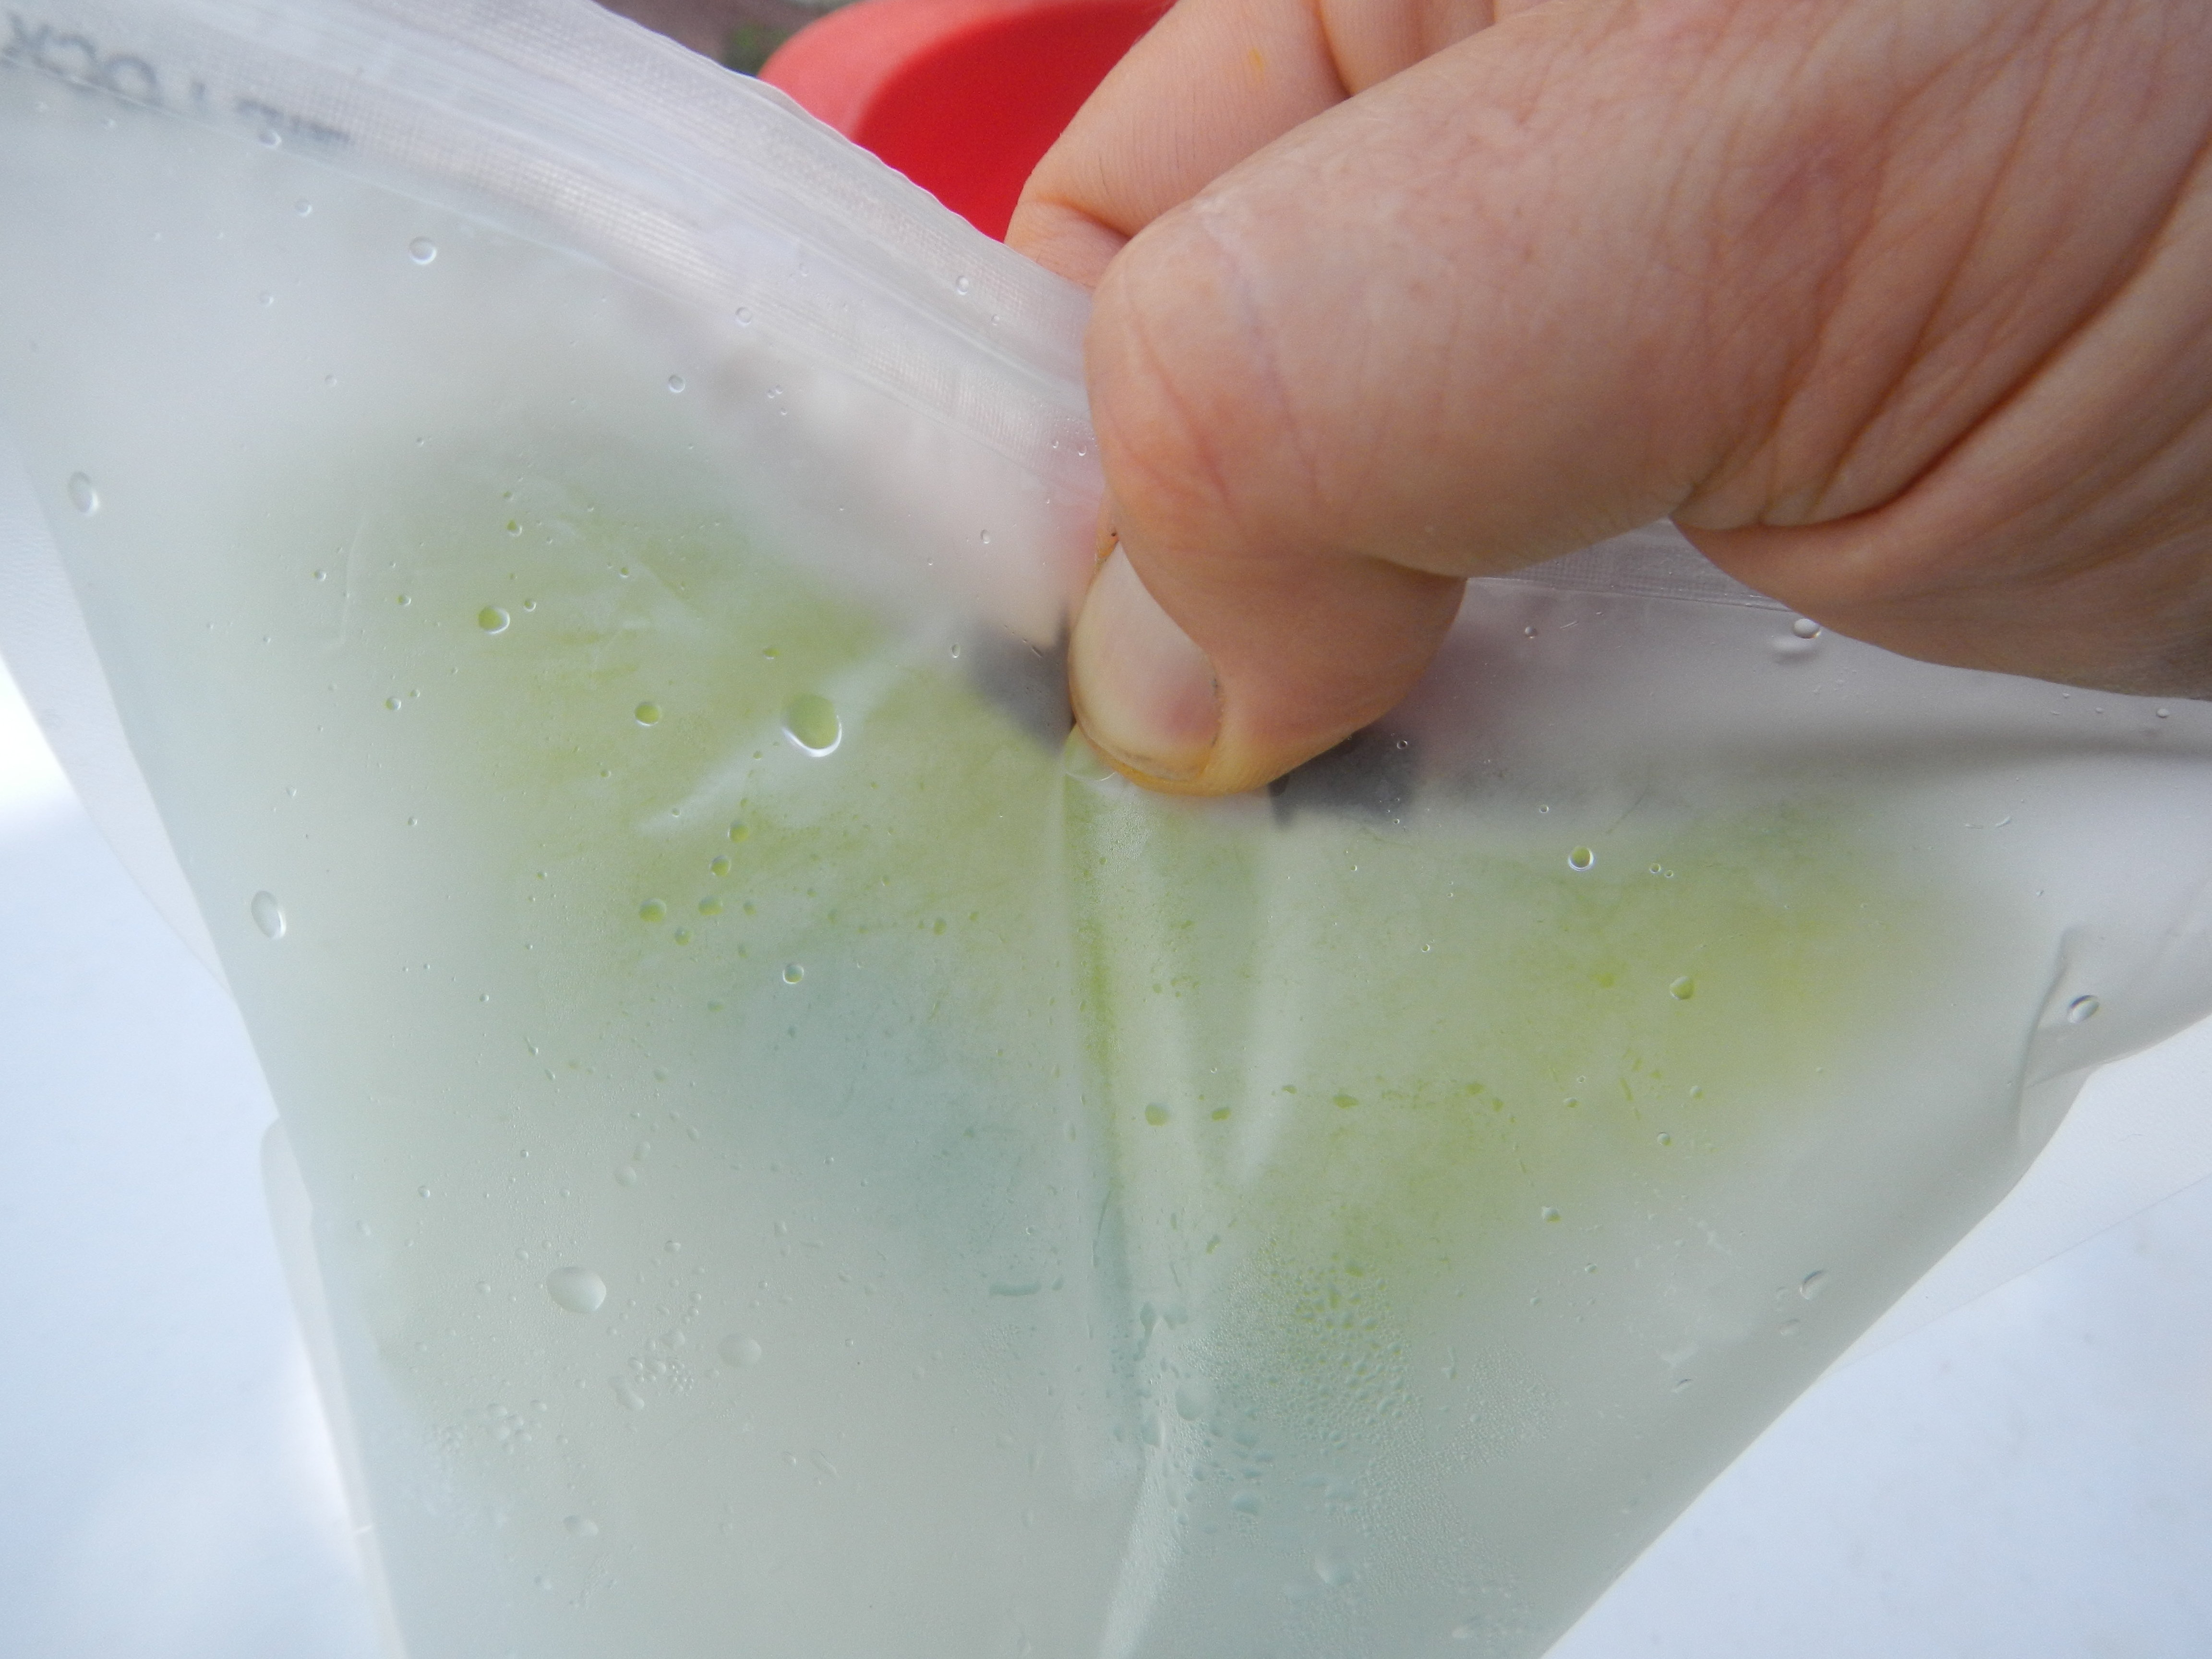
 In seconds the water in the bottom of the bag boils, and that heats the food. It boiled for over 20 minutes.
Within seconds of pouring the water into the Mealspec heater, it boils, then it continues to boil, we found, for at least 20 minutes. You wouldnt think that little packet could provide that much gumption, but it does. The heater easily cooked the rice to done, and the meal was just as good as if it had been cooked on a stove. This is an AMAZING survival product, and for a couple bucks each, you should buy a bunch of them.
Please not that there is a GEN II version of this heater coming from Mealspec, and it is called a Cooking Bag. I have not yet found them for sale, and I dont have any review product yet. It appears that the bag is much bigger, 13×11, and it stands up, which is definitely an issue with this model. Heat rises, so you want to stand the bag up and have your food on top. The GEN II also runs for upwards of an hour, so it can boil survival water. As we suggested in our first water article, you are much better off to filter than boil. But it is a nice convenience. I will buy some of the GEN II when they are available, but I bought 96 of this one, because it is good enough, and CHEAP. I didnt take the rice out to have someone try it for an hour because I got distracted, and the GEN I bag was still piping hot.
 We measured the heater under the bag on a plastic table and it held at almost 200 degrees.
This is one of the few products in this Prepping 101 series that we actually got for free as review product, but I did then go and buy a 96 pack of them myself. Ultimately, everyone should have some fuel stove and fuel put aside for long term use. You can cook three meals a day on one propane tank and burner for a family of several for a couple months. But before that new lifestyle begins, there are going to be those transitional meals where you will either be traveling or hunkering down and letting everyone else kill each other for scraps that you will not need. These meal heaters will be extremely value, and well worth their paltry purchase price.Oh, and they are great for camping to. 😛
 The steam escapes through a hole in the top of the bag. You could theoretically get the contents hotter longer by pinching the bag at the top and letting it off when the bag is in danger of exploding, but try this at your own risk as it is not advised by us or the manufacturer.
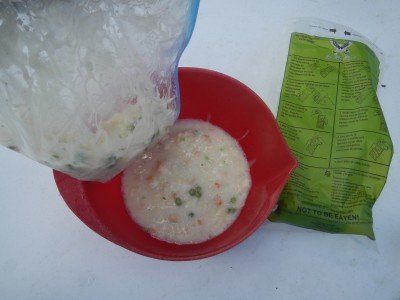 In about 20 minutes the rice was fully cooked and the vegetables fully reconstituted. An hour later it was still piping hot.
Related Posts:
- REVIEW: NOCPIX QUEST H50R Thermal Rangefinding Binoculars
- X-Vision Flex 2 Review: Reflex Style Thermal Sight
- New Bill Would Stop ATF Crackdowns on Gun Shops
- Safariland's New Gravity OWB Holster
Prepping 101: Flameless Food Heaters - New Product Review - Mealspec Ration Heater
If you're gonna fight, fight like you're the third monkey on the ramp to Noah's Ark... and brother its starting to rain. Join our efforts to Secure America's Borders and End Illegal Immigration by Joining ALIPAC's E-Mail Alerts network (CLICK HERE)
-
06-11-2025, 03:52 AM #9808Senior Member
- Join Date
- Aug 2018
- Posts
- 93,439

Home
About
SURVIVAL COURSES
Wild Edibles
BLOG
Contact
Write for us!
FREE Survival Book

WILD GOD: Finding God in the Wilderness
Have you ever felt drawn to spend time in nature? Have you wondered why being surrounded by the

How to Make Tallow from Beef Fat: A Guide to Homemade Tallow Production and Its Versatile Uses
Tallow, the rendered fat of animals, has a rich history of use for various purposes. In this comprehensive

BUSHCRAFT GLOVES REVIEW: ThunderCrow Rough Out Cowhide Leather Gloves + Glove Wax
When it comes to bushcrafting and survival, choosing the right gear is important. One piece of gear that

🍂🌿 Fall Flavor Alert: Spicebush The Appalachian Allspice 🌿🍂
Get ready for a taste of the wild with Spicebush (Lindera benzoin)! 🌾 Known as the Appalachian Allspice,

Survival Uses of Black Walnuts
Very few people realize that the Black Walnut has dozens of survival uses. Read below to learn more

How to Clean a Leather Belt (and virtually all other leather products)
This is a guest Blog Post by Kevin Luebke For those with an outdoor or wilderness survival mindset,

How to Build a Quinzee Snow Shelter For Winter Camping [FREE DOWNLOAD: Quinzee Checklist]
You can learn how to build a quinzee snow shelter in 5 easy steps. This ultimate resource on

Best Bushcraft Knife: The Great Scandi Grind Controversy
A Guest Blog Post by Brian Leggat from https://www.bushcraftsurvivalacademy.com/ As a Bushcraft and Survival skills instructor, students often

How to Build a Wilderness Survival Shelter [FREE BUSHCRAFT SKILLS: WILDERNESS SURVIVAL SHELTER CHECKLIST]
A GUEST POST BY FRANK GRINDROD In this post, Ill teach you how to build a wilderness survival

MAKE A SHEATH FOR THE OLD HICKORY BUTCHER KNIFE
ABOUT THE OLD HICKORY BUTCHER KNIFE Before we dive into making your own sheath for the Old Hickory

5 Reasons to Take an Online Survival Course
Online interest in survival teaching and courses is soaring. Taking a wilderness survival course online is not only

Fat Guys in the Woods Knife?
Whats the knife that Creek Stewart gives away on the survival television show FAT GUYS IN THE WOODS?

What is the Best Ham Radio for Preppers
There are many useful ham radios for preppers to use in both everyday life and on really bad

How to Start a Fire with the Bow Drill: 7 Expert Tips
When it comes to the question How to Start a Fire with the Bow Drill, the devil is

Best Online Survival Courses [even a FREE one]
When it comes to learning wilderness survival skills online, youve got lots of options these days. Online technology

APOCABOX: Striving to be the Best Survival Subscription Box
APOCABOX has 1 goal: To be the Best Survival Subscription Box APOCABOX is curated by wilderness survival instructor

Make a Quick and Easy Pillow While Backpacking or Camping
A Guest Blog Post by James Lantz For many of us, we enjoy backpacking because it brings us

The Best Bug Out Bag First Aid Kit
The BEST BUG OUT BAG FIRST AID KIT is Tailored to Your Needs Trying to think of everything

Dealing With Venomous Snakebites
A Guest Blog Post by Lewis Miller What is the first thing that you are going to do

Building Confidence in Your Wild Edible Foraging Skills
A Guest Post by Certified Master Naturalist, Craig Caudill Dont you wish you could go back to the

How to Make Improvised Arrowheads with Simple Tools for a Survival Bow & Arrow in Modern Times
A Guest Blog Post by Dave Meade Overview You will learn how to make what I consider to

Teaching Kids Situational Awareness with Games
A Guest Blog Post by Ashley Glinka Ashley Glinka is a former Federal Agent, mom to 3, personal

Best Wood for Bow Drill: How to choose the perfect wood for your Friction Fire Bow Drill Kit
Learn how to find and identify the best wood for Bow Drill to start a fire using a

How to Make a Bug Out Bag: Bug Out Bag Essentials
An easy to follow blueprint for how to pack your own Bug Out Bag with Bug Out Bag

Growing Marshmallow for its Soothing and Healing Properties
A Guest Blog Post by ELLE MEAGER Marshmallow is part of the Mallow (Malvaceae) family. The name Malvaceae

Hiking For Beginners: Four Tips For Your First Adventure
A Guest Blog Post by MIKE MILLER So, you want to go hiking But, youve never hiked before.

JAKE WYLDS SURVIVAL BUGS SERIES: Could You Safely Eat Cockroaches in a Survival Situation?
By Jake Wyld Im Jake Wyld, and I eat gross things, so you dont have to. Check out

Cravat Bandaging: Series Post IV
A Guest Blog Post by Jim Ausfahl Disclaimer: This material has been modified from the public domain US

Finding Your Perfect Everyday Carry (EDC) Lighter
This is a Guest Post by Jeremy Rogers If youre like me, you probably have a lighter as

Making Decisions Under Stress: The OODA Loop
This is a Guest Blog Post by Adam A. Lawrence We all know that if it can go
If you're gonna fight, fight like you're the third monkey on the ramp to Noah's Ark... and brother its starting to rain. Join our efforts to Secure America's Borders and End Illegal Immigration by Joining ALIPAC's E-Mail Alerts network (CLICK HERE)
-
06-11-2025, 03:55 AM #9809Senior Member
- Join Date
- Aug 2018
- Posts
- 93,439
If you're gonna fight, fight like you're the third monkey on the ramp to Noah's Ark... and brother its starting to rain. Join our efforts to Secure America's Borders and End Illegal Immigration by Joining ALIPAC's E-Mail Alerts network (CLICK HERE)
-
06-11-2025, 04:08 AM #9810Senior Member
- Join Date
- Aug 2018
- Posts
- 93,439
If you're gonna fight, fight like you're the third monkey on the ramp to Noah's Ark... and brother its starting to rain. Join our efforts to Secure America's Borders and End Illegal Immigration by Joining ALIPAC's E-Mail Alerts network (CLICK HERE)


 Reply With Quote


Tim Walz, Keith Ellison Referred To DOJ Over Minnesota Fraud
06-09-2026, 11:33 PM in General Discussion