

Results 9,781 to 9,790 of 11786
 226Likes
LinkBacks (?)
-
12-26-2016, 11:32 AM
-
09-02-2016, 05:39 PM
-
whole garden made with pallets!! Love it!! | Pallets | Pinterest | Pallets, Pallets Garden and Wooden Pallets
Refback This thread03-06-2016, 11:30 AM -
10-20-2015, 05:29 PM
-
06-12-2015, 08:00 PM
-
02-26-2015, 01:58 PM
-
01-05-2015, 04:13 PM
-
12-19-2014, 10:19 AM
-
EMERGENCY: HUGE FEMA PANDEMIC EXERCISE IN USA IN NOVEMBER, INTERNET SHUT DOWN PART OF EXERCISE | Prepare4Survival
Refback This thread12-03-2014, 10:39 PM -
Off Grid World ? Ugly Duckling Shipping Container Home Built by Artist Is a Beautiful Swan on the Inside
Refback This thread11-25-2014, 03:10 PM -
11-17-2014, 10:59 PM
-
11-13-2014, 11:18 AM
-
11-09-2014, 02:54 PM
-
10-28-2014, 11:38 PM
-
10-26-2014, 05:54 AM
-
10-16-2014, 11:28 AM
-
10-03-2014, 01:25 PM
-
10-02-2014, 09:16 PM
-
09-26-2014, 07:00 PM
-
09-26-2014, 01:56 PM
-
09-19-2014, 04:46 PM
-
09-13-2014, 05:49 AM
-
09-05-2014, 01:52 PM
-
09-01-2014, 09:39 AM
-
08-30-2014, 06:29 PM
-
08-10-2014, 06:29 AM
-
08-04-2014, 05:07 PM
-
07-23-2014, 11:14 AM
-
New Evidence on Expiration Dates | Medical Preparedness | Doom and Bloom (TM) | Doom and Bloom (TM)
Refback This thread07-22-2014, 10:10 AM -
07-18-2014, 08:37 PM
-
07-15-2014, 04:57 PM
-
07-11-2014, 01:40 AM
-
04-22-2014, 11:14 AM
-
04-18-2014, 12:57 PM
-
04-18-2014, 10:10 AM
-
04-14-2014, 12:18 AM
-
04-12-2014, 02:28 AM
-
03-02-2014, 11:43 PM
-
12-24-2013, 11:59 PM
-
12-07-2013, 11:04 PM
-
kitchen | Cob
Refback This thread11-25-2013, 03:24 PM -
10-22-2013, 10:25 PM
-
Apple Pie Braid | Sweets
Refback This thread09-26-2013, 07:58 AM -
09-02-2013, 04:44 PM
-
5 Reasons Why You May have to Bug Out Even Though You Don’t Want to | The Apartment Prepper's Blog
Refback This thread08-23-2013, 03:20 PM -
06-27-2013, 06:30 AM
-
06-23-2013, 08:11 PM
-
06-17-2013, 11:21 PM
-
05-24-2013, 05:06 PM
-
To Eat / BASIC LIST / SUGGESTED ITEMS FOR LONG TERM SURVIVAL - Page 275 - ALIPAC
Refback This thread05-01-2013, 03:49 AM
Thread Information
Users Browsing this Thread
There are currently 1 users browsing this thread. (0 members and 1 guests)
 LinkBack URL
 About LinkBacks
-
06-05-2025, 04:16 AM #9781Senior Member


- Join Date
- Aug 2018
- Posts
- 93,755
31 Cool Games and Crafts Using Pool Noodles
Featured, Outdoor Playpool activities
Share
Pin5K
5K Shares
This is how to play cool games and make fun summer crafts using foam pool noodles. You and your kids will have so much fun with these pool noodle activities, decorating, preschool learning tools, and all of the amazing pool noodle games you can play!
Pool noodles can be purchased at the Dollar Store and therefore are a really cheap way to entertain your kids and the neighbor kids this summer!
 Get ready for some fun adventures with pool noodle games and crafts!
In case youre new here, Hi! Im Laurie and Tip Junkie has thousands of craft and DIY tutorials, most with pictured tutorials. You can always type any word or topic into the search bar if youre looking for more ideas on what to make or sew with step-by-step instructions. {wink}
Do you have a great pool noodle activity? If so, share it on Facebook and tag @TipJunkie or Instagram using #TipJunkie so I can feature you and inspire fellow Tip Junkies with your fabulous idea. I will always give proper credit as Im all about promoting creative women! {squeal in delight}
DIY Pool Noodle Decorating Crafts
Pool noodles come in an array of colors, and can be shaped and cut into different pieces. Let your imagination run wild and create beautiful crafts.

1. How to make an adorable summer wreath out of a pool noodle, fabric, and some felt by Fox Hollow Cottage.

2. This project by Dollar Store Mom is so simple, and really adds such a bright and playful element to your outdoor decor- plus its weather-proof!

3. How to turn a pair of noodles into some nifty room decor by Makezine and make these darling pool noodle wall flower garland.

4. Cut pool noodles into flowers with a kitchen knife and then attach to some straws for a fun little table decor, preschool play group snack, or just for fun by Obsessively Stitching. Classy drinks can turn into fun activities with this craft.

5. Create a bouquet of flowers for Mothers Day, or any occasion with this tutorial by No Time for Flash Cards. Write on each leaf something your child says they like about mom.

6. This headboard by Design Dazzle was created using several of them stacked on top of one another. Check out the dollar stores during the summer and you can create this headboard for cheap.

7. A chair and ottoman by Design Milk is made entirely of foam noodle-like tubes, like the ones kids play with in a pool.

8. You can easily transform round pool noodles into mint decorations with just some fishing line and ribbon. Now you have a cute pool noodle candy cane. *Update: blog link is no longer available. Heres another tutorial from WikiHow to make the pool noodle candy canes.
Cool Pool Noodle Games & Backyard Sports
No need to go to the pool or beach! Cool pool games & backyard sports to stay cool this summer in your backyard, park, or even at school. Youll surely enjoy these minute to win it games with pool noodles!

9. How to make a target station from Parents by joining rings into colorful targets for flying disks, soccer balls, javelin throws and more. Stakes keep the target upright. More fun activities coming up!

10. Want more fun activities with pool noodles? Duct-tape six rings to one another, then tape them to thicker (3 1/2-inch-wide) hollow pool noodle posts to make this agility jump by Parents. You dont need a javelin to make this super fun activity.
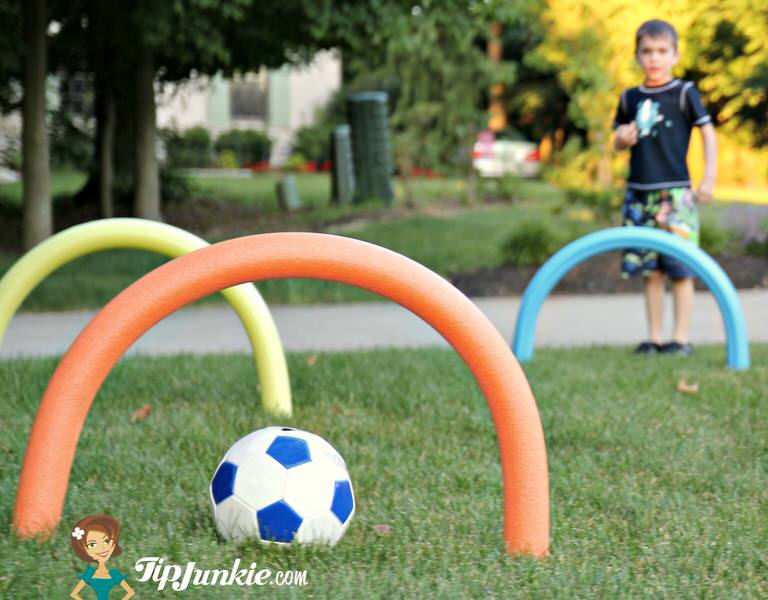
11. Here are some fun activities you can do with kids. How to make a fun outdoor game using pool noodles, like this fun noodle course hoop jump by Tip Junkie. You can use them to jump over, crawl under, or as wickets for crochet or soccer games. As we know, there are more things to make than just pool noodle candy cane.

12. Cut a few swimming noodles in two, so that you have one half for each player. Scatter 20 or so blown-up balloons on the ground around a laundry basket for a fun summer game by Parents. Such a fun minute to win it games with pool noodles! Be careful not to throw a pool noodle javelin at each other.
Pool Noodle Activities for Kids
These pool noodle activities are fun for kids and adults alike. Not to mention easy to setup and inexpensive. Use the pool noodle for these fun activities with kids.

13. How to create a number game for preschoolers by Planet of the Apels. It works on number recognition and one-to-one correspondence!

14. This is a great activity by My Little Gems thats perfect for pre-schoolers and even kindergarteners. In fact, it is going to be one of my centers in pre-school this year. It is a great way to practice patterns.

15. Depending on the skills youd like to work on with your tot, use a permanent marker to write on the pieces. Totally Tots made an ABC set and Numbers 1-20 set. You could also leave some blank and use them for patterns.
Games to play:
- Lace the giant beads on a piece of the clothesline or rope. (Motor Skills)
- Lace the beads in ABC order. (Motor skills & Literacy)
- Lace the beads in Number order. (Motor skills & Math)
- Lace the beads to spell words or names. (Motor skills & Literacy)

16. Make noodle chain links by Teach Preschool. The children made long and short chains and one little boy put his together to make a motorcycle. This looks like a colorful chain of pool noodle candy cane!

17. My kids love this activity. They will race marbles for hours. Its a perfect indoor activity for a rainy day or can be taken outside so you can enjoy some sunshine. I hope youll give it a try and have as much fun with it as we have! *Update: blog link is no longer available.

Heres another pool noodle race track tutorial from Ramblings from Utopia.
Pool Noodle Summer Fun
Even if you dont know how to swim or dont have access to a pool, you can still have fun with a pool noodle. You dont need to play minute to win it games with pool noodles with the little kids. Here are some pool noodle activities to engage your family or an activity group.

18. These are not for javelin throws. The pool noodles by Heather Sitarzewski were decorated with crepe streamers (its what I had on hand, although in hind sight I wish I had used the colored duct tape.

19. Kids can practice their placekicking and increase the challenge as their aim improves with this adjustable goalpost made with these pool noodle games. *Update: blog link is no longer available.

20. This real-life Harry Potter Quidditch tournament by Savage Earth is made with pool noodles as the broomsticks, the orange nerf ball is the quaffle, and the two small red ones are bludgers, and hula hoops for the goals.
Pool Noodle Crafts
Pool noodles are a quick and cheap way to create simple toys and games for children. Here are some ideas for making the most of your pool noodle. Find some 5-minute crafts for kids that involve pool noodles, an inexpensive and common item found at home and at the pool store.

21. Easy-to-make no sew felt cupcakes by Frugally Blonde that can be made for pennies each out of pool noodles, pom poms, and felt. Yep, 5-minute crafts are here!

22. How to make a sculpture that floats by The Chocolate Muffin Tree. This a great activity that you can bring outside or in the bathtub too. All you need is some cut up pool noodles and toothpicks.

23. How to make fun figures and sculptures out of cut up pool noodles and golf tees. More cute and easy 5-minute crafts coming up! *Update: blog link is no longer available.

24. Simply put some tempera paint in some recycled lids and put a cut noodle in each one and we were ready to print/paint. *Update: blog link is no longer available. Here is another pool noodle painting tutorial from Fun a Day.

25. How to Make Star Wars lightsabers out of pool noodles for a birthday party or just for fun by Muddy Boots. Here are more safe 5-minute crafts for kids to make.

26. Quickly craft a creepy, crawly spider costume for your little one by using old pool noodles and a bathmat to create the effect of spider legs by Womans Day.
Pool Noodle Home Tips
Plain old pool noodles can be transformed into furniture, toys, games, and more. Read our collection of pool noodle projects.

27. How to cover the metal handle of a shopping cart to protect your baby while shopping by Living My Life on Purpose.

28. Do you have a toddler who doesnt fit in a play yard anymore? Or perhaps you co sleep and cant bring all the comforts of home on your trip. Well I found a solution by Andy-Pandy, Jacky-Dandy.
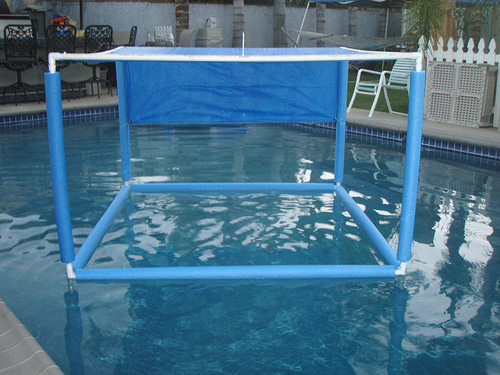
29. With some PVC pipe, some connectors, a tarp, zip ties and voila! The Made In The Shade pool shade was invented. *Update: blog link is no longer available.
30. Cool pool noodle hacks from 5 Minute Crafts that youll love.
Pool Noodle Backyard Wet & Wild Activities
Pool noodles are great for more than just floating on the water. Learn how to play with pool noodles the right way and how to enjoy more wet and wild backyard activities here.

30. How to turn one into a super squirter that can be used to launch all sorts of fun and games, such as the High Water Jump shown here. *Update: blog link is no longer available. Here is another tutorial by Make it & Love it that you may like.

31. The Kid Wash is crafted almost entirely from PVC pipe, a material we love not just for its low cost (about $30 for all the pieces shown here) and durability, but also for its ease of use (with all those interconnecting pieces its like Tinkertoys for grown-ups). Now this is not a minute to win it games with pool noodles, just some wet and wild fun time. *Update: blog link is no longer available.

More Outdoor Games and Activities from Tip Junkie:
- Looking for boredom buster games for outdoors? These fun relay races for kids is your answer.
- Here are some really fun water games to play outside with the kids and their friends!
- Check out these fab swimming pool games for kids to cool down the summer heat.
- Do you know a pool noodle craft called wreath? Here are more ideas how to make wreaths for all seasons (especially winter!).
- The kids will have a blast celebrating American Touch Tag Day outside ! Check out these ideas.
- Here are more Christmas wreath crafts you and your little one can make this Christmas season.
- Complete the holiday seasons with these wreath projects. They can work sweetly as a gift too!
- Looking for more creative crafts? These DIY pencil craft ideas are the bomb.
- Have a wonderful birthday party with these cool DIY carnival games!
Time Tip: If youre looking for something specific, type in any word in the Search Box and youll receive tons of creative DIY and how-to make tutorials.
31 Cool Games and Crafts Using Pool Noodles Tip Junkie
If you're gonna fight, fight like you're the third monkey on the ramp to Noah's Ark... and brother its starting to rain. Join our efforts to Secure America's Borders and End Illegal Immigration by Joining ALIPAC's E-Mail Alerts network (CLICK HERE)
-
06-06-2025, 03:14 AM #9782Senior Member
- Join Date
- Aug 2018
- Posts
- 93,755
Prepping 101: How ambidexterity can boost your survival skills
06/05/2025 // Zoey Sky // 10 Views
Tags: ambidexterity, ambidextrous, dominant hand, how-to, mixed-handedness, off grid, preparedness, prepper, prepping, prepping skills, survival, survival skills, Survival Tips, survivalist

- Ambidexterity means using both hands equally well, while mixed-handedness means using different hands for different tasks. True ambidexterity is rare, but training your non-dominant hand improves adaptability.
- Survival scenarios demand versatility. If your dominant hand is injured, you must still perform critical tasks like starting a fire, using tools, or shooting accurately.
- Shooting with either hand is crucial and training your off-hand for trigger control, reloading and aiming can save your life in emergencies.
- Tool and knife skills must be ambidextrous. Things like carving, chopping and food prep can become dangerous if you cansurvivalt use both hands effectively. Train by practicing daily tasks with your off-hand. Tasks like writing, carrying loads and even brushing teeth build muscle memory. Firearm and strength drills also help.
- Survival depends on adaptability. Even small improvements in off-hand skills can make a life-or-death difference. Start training now to be prepared for any situation.
In a survival situation, every skill counts, especially the ones people often take for granted. One of the most overlooked yet critical abilities is ambidexterity, or the capacity to use both hands with equal skill.
Whether you're facing an injury, navigating a crisis, or trying to improve your self-reliance, being able to function with either hand can make a life-or-death difference. (h/t to Survivopedia.com)
What it means to be ambidextrous
Most people have a dominant hand, either left or right, that they instinctively rely on for tasks like writing, throwing or using tools. Ambidexterity means being equally proficient with both hands.
While true ambidexterity is rare, mixed-handedness, or being able to use different hands for different tasks, is more common. The key difference? Skill versus preference.
A truly ambidextrous person can perform complex tasks, like writing or shooting, just as well with either hand. Individuals with mixed-handedness might switch hands based on the task, such as writing with the right hand but throwing with the left.
But why does this matter in survival scenarios?
Ambidexterity matters in survival
Imagine you're injured in the wilderness, and your dominant hand is out of commission.
Can you still:
- Start a fire?
- Use a knife?
- Shoot accurately?
- Carry heavy loads?
If not, you're at a serious disadvantage. Here's how ambidexterity, or at least mixed-handed competence, can be a game-changer.
Shooting with either hand
In a high-stress situation, gun handling is one of the most critical skills where handedness matters. If you're injured or forced into an awkward position, being able to shoot with your non-dominant hand could save your life.
Drawing and reloading one-handed is a skill practiced by tactical shooters. Trigger control can be trained using different fingers if your usual trigger finger is injured.
Training with your off-hand improves muscle memory, ensuring you're not caught off guard in an emergency.
Working with tools
From knives to hatchets, survival often depends on tool proficiency. If you can only split wood or carve efficiently with one hand, an injury could leave you struggling. (Related: Prepping 101: How to build a reliable firestarting kit for blackouts and bug-out bags.)
Woodworking and repair tasks often require ambidextrous handling. Knife skills, such as skinning game, cutting rope or crafting tools, demand precision in both hands.
Practicing with your non-dominant hand builds dexterity and strength, making you more adaptable.
Carrying heavy loads
Most people have one arm that's stronger, but what if you injure your dominant arm?
Hauling firewood, water or gear becomes much harder if you rely on one side. Uneven strength can lead to fatigue or injury in long-term survival scenarios.
Balanced strength training ensures you can manage heavy loads regardless of which arm is available.
Processing game and food prep
Cleaning and preparing game is a two-handed job. If you can't grip, cut or stabilize with both hands, butchering becomes dangerous due to the risk of slipping knives or improper cuts. Food contamination risks also increase if handling is clumsy.
Practicing ambidextrous knife skills ensures you can process meat safely, even under duress.
How to train ambidexterity for survival
The good news? You can train yourself to be more ambidextrous. Like any skill, it takes practice, but the payoff is immense.
Start with simple tasks
Brush your teeth with your off-hand. You can also try using utensils or opening jars with your non-dominant hand.
Write or draw basic shapes to improve fine motor control.
Firearm and tool training
Shoot with your off-hand at the range and practice reloading drills one-handed.
Use knives, axes and other tools with both hands.
Strength and balance exercises
Carry heavy objects such as water jugs or firewood with your weaker arm. You can also try to dig, chop, or hammer with your non-dominant side.
Do push-ups or weight training evenly on both sides.
Challenge yourself daily
Switch hands during routine tasks, such as stirring food while cooking or using a mouse while working on your computer.
Alternatively, you can learn to tie knots one-handed.
Try writing upside-down or mirrored, which can be useful for leaving secret notes when SHTF.
Survival isn't just about strength or knowledge, it's about adaptability. The more you can do with both hands, the better prepared you'll be for injuries, emergencies, or unexpected challenges.
You don't have to become perfectly ambidextrous overnight. But training your off-hand now could mean the difference between struggle and survival later.
Start small, stay consistent and soon, you'll be ready, no matter which hand life forces you to use.
Visit Health Ranger Store and Brighteon Store to find more supplies for your prepping needs. You can also check out Preparedness.news for more stories on how to get ready for different emergencies.
Watch this clip about mass riots and how you can protect your family and home when SHTF.
This video is from the Survival Prepper for Beginners channel on Brighteon.com.
More related stories:
28 Underrated prepping items that could save your life in an emergency.
Emergency kit essentials: Why instant tomato soup belongs in your survival food stockpile.
Preparedness 101: Avoiding common prepping pitfalls for survival success.
The art of dehydration: How Organic Apples become perfectly chewy, nutritious snacks.
Sources include:
Survivopedia.com
Healthline.com
Brighteon.com
Prepping 101: How ambidexterity can boost your survival skills NaturalNews.com
If you're gonna fight, fight like you're the third monkey on the ramp to Noah's Ark... and brother its starting to rain. Join our efforts to Secure America's Borders and End Illegal Immigration by Joining ALIPAC's E-Mail Alerts network (CLICK HERE)
-
06-06-2025, 02:30 PM #9783Senior Member
- Join Date
- Aug 2018
- Posts
- 93,755
Empowering survival: Preppers Natural Medicine by Cat Ellis offers a lifeline in crisis
06/06/2025 // Belle Carter // 300 Views
Tags: alternative medicine, emergency medicine, goodhealth, goodmedicine, green living, healing, herbal medicine, Herbs, homesteading, natural cures, natural health, natural medicine, natural remedies, off grid, plant medicine, preparedness, prepper, prepping, SHTF, survival, survival medicine, tips
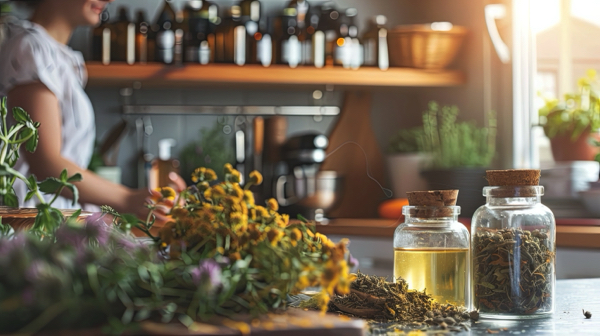
- In response to the growing challenges of antibiotic resistance, emerging viruses and political complexities in healthcare, there is a growing movement towards self-reliance. Cat Ellis' book serves as a timely guide for individuals seeking to take control of their health using natural remedies when conventional medicine is unavailable.
- Ellis' book is a detailed resource that covers the fundamentals of creating natural medicines. It includes profiles of 50 herbs and instructions for formulating remedies tailored to various health needs, emphasizing the accessibility and abundance of natural resources.
- The book explores traditional medicine systems like Traditional Chinese Medicine and Ayurveda, highlighting their effectiveness and their increasing recognition by the scientific community. Ellis draws connections between these ancient practices and Western herbalism, showcasing their relevance in modern times.
- Ellis provides practical tips on storing and preparing natural medicines, including the use of solvents like alcohol and vinegar for tinctures. She shares personal anecdotes, such as her experience with skullcap tincture for insomnia, and offers recipes for remedies like an herbal throat spray and a drawing salve.
- The book also covers essential oils, beeswax, propolis and raw honey, emphasizing their safe and effective use in remedies and personal care.
In an era where healthcare systems are increasingly strained by antibiotic resistance, emerging viruses and political complexities, a new wave of self-reliance is sweeping across communities. At the forefront of this movement is Cat Ellis, whose book "Prepper's Natural Medicine: Life-Saving Herbs, Essential Oils and Natural Remedies for When There is No Doctor" offers a comprehensive guide to harnessing the power of nature for health and survival. Published at a time when the fragility of traditional healthcare is being laid bare, Ellis' work is both timely and essential, providing readers with the knowledge to take control of their well-being when conventional medicine is unavailable.
Ellis, a passionate herbalist and prepper, wrote the book out of deep concern for the vulnerabilities within our healthcare system. "I wanted to address the growing issues of antibiotic resistance, emerging viruses and the suppression of natural medicine by regulatory agencies," she explains. Her mission is clear: to equip individuals with the skills and knowledge to use natural remedies effectively, especially in scenarios where doctors and pharmaceuticals are scarce.
The book is a treasure trove of information, starting with the basics of crafting natural medicines. Readers will find detailed profiles of 50 different herbs, each accompanied by instructions on how to create specific formulas tailored to various health needs. Ellis emphasizes that natural medicine is not just a last resort but a vital component of any preparedness plan. "It's everywhere, even in the cracks of sidewalks," she notes.
One of the book's strengths is its exploration of traditional medicine systems, such as Traditional Chinese Medicine and Ayurveda. Ellis draws parallels between these ancient practices and Western herbalism, illustrating how they are being studied and integrated with modern science. "These practices have stood the test of time," she says, "and their effectiveness is being increasingly recognized by the scientific community."
Ellis outlines five key reasons why natural medicine is valuable for preppers:
- Proven effectiveness: Natural remedies have been used successfully for thousands of years across different cultures.
- Universal access: No licensing or certification is required to use or learn natural medicine.
- Ease of learning: The methods for making natural medicines are straightforward compared to the complex processes of pharmaceutical manufacturing.
- Sustainability: Herbs can be reproduced or wildcrafted year after year, ensuring a continuous supply.
- Valuable barter items: In a crisis, skills and knowledge in natural medicine will be highly sought after.
The book also provides practical advice on storing and preparing natural medicines. Ellis advises designating a storage area that is dry, cool and out of direct sunlight, similar to a food pantry. She emphasizes the importance of rotating stock and preserving the potency of herbs. Additionally, she discusses the use of alcohol, vinegar and glycerin as solvents for tinctures, offering tips on maximizing their effectiveness.
Ellis includes a variety of recipes for natural remedies, such as an Herbal Throat Spray to relieve pain and fight infection, a drawing salve for pulling out toxins and a poultice for sprains and bruises. She also covers remedies for specific conditions like urinary tract infections, diarrhea and even heart attacks. Her approach is both practical and compassionate, reflecting her deep understanding of the human body and its needs.
Essential oils are another critical topic covered in the book. Ellis explains how to use them safely and effectively, discussing their properties, storage and shelf life. She also touches on other natural products like beeswax, propolis and raw honey, explaining how they can be used in remedies and personal care.
Ellis shares personal anecdotes and experiences that bring the information to life. She recounts her struggles with insomnia and how skullcap tincture helped her find relief. "It was a game-changer for me," she says. She also describes her experiments with different herbs and preparations, offering insights into what works and what doesn't.
"Prepper's Natural Medicine" is an invaluable resource for anyone interested in natural remedies and preparedness. Whether you're a seasoned prepper or just starting, this book provides the knowledge and tools you need to take control of your health and well-being.
Learn more about the book "Prepper's Natural Medicine" by watching the video below.
This video is from the BrightLearn channel on Brighteon.com.
Sources include:
Brighteon.ai
Brighteon.com
Empowering survival: Preppers Natural Medicine by Cat Ellis offers a lifeline in crisis NaturalNews.com
If you're gonna fight, fight like you're the third monkey on the ramp to Noah's Ark... and brother its starting to rain. Join our efforts to Secure America's Borders and End Illegal Immigration by Joining ALIPAC's E-Mail Alerts network (CLICK HERE)
-
06-06-2025, 11:05 PM #9784Senior Member
- Join Date
- Aug 2018
- Posts
- 93,755
Make a Biogas Generator to Produce Your Own Natural Gas
Transform grass clippings, food waste and livestock manure into renewable energy via a homemade biogas generator.
By Paul Scheckel
|Updated on January 3, 2022
Facebook
Pinterest
X
 by Isaac Marquez
A 200-gallon biogas generator in Oregon turns 15 pounds of food waste into cooking fuel daily. As food and yard waste decompose, methane and carbon dioxide are created, inflating the rubber bladder to create the pressure necessary to supply a gas burner.
You can use many household organic waste materials to produce your own natural gas for cooking, lighting, and space and water heating. This gas, known as biogas, can also replace fossil-based natural gas to fuel an engine or an absorption cooling system, such as a gas refrigerator or chiller. Some gasoline engines are designed for or can be modified for use with natural gas, propane or biogas. Diesel engines can accept up to 80 percent biogas.
Biogas is a mixture of primarily flammable gases mostly methane along with carbon dioxide that forms anywhere organic material decomposes anaerobically (without oxygen), such as in water, deep in a landfill, or in the guts of animals, including you.
I prefer the term generator for the system, because it conveys the intention of producing something. By constructing a home biogas generator, you can make enough fuel to at least provide your cooking energy. A family with modest daily cooking needs will at a minimum require the output of a warm, well-fed, 200-gallon (27-cubic-foot) generator. This much biogas will allow for about one hour of daily stovetop cooking. Start small to develop an understanding of biogas by making a small generator from a single 55-gallon barrel.
Home Much Homemade Biogas Energy Can You Make?

Image by Isaac Marquez
This methane-producing biogas generator is located at Maitreya Ecovillage in Oregon. The biogas generator turns 15 pounds of the communitys kitchen scraps and garden waste into a days worth of cooking fuel for the community kitchen.
A well-managed methane digester can produce approximately its own volume of biogas each day. Anywhere from 10 to 60 percent of the solids will convert into biogas during digestion, so expect between 3 and 18 cubic feet of available biogas energy for each pound of dry material.
The exact makeup of biogas depends on what you feed to the digester. The main ingredient of biogas is methane. Methane (chemically known as CH4) is the primary component of conventional natural gas, commonly used for cooking and heating, although biogas is not as energy-dense. The methane content of biogas will probably range from 50 to 80 percent, compared with about 70 to 90 percent in utility-supplied natural gas. Natural gas contains up to 20 percent other combustible gases, such as propane, butane and ethane, while biogas does not. Biogas primary noncombustible components are carbon dioxide, some water vapor, nitrogen and possibly traces of hydrogen sulphide.
A good material for producing biogas in terms of both production and availability is freshly cut grass clippings, which can produce about 1-1⁄2 cubic feet of biogas per pound. At this rate, about 20 pounds of grass clippings will generate one hour of cooking fuel (grass silage is even better, requiring only about 10 pounds to produce this same amount of biogas). Food waste can yield slightly greater amounts of biogas per pound than grass, but most people will have access to grass clippings in larger quantities. If you own a cow, fresh manure is well-suited for on-farm methane production, despite its relatively low yield per dry pound. One cow will produce about 140 pounds (18 gallons) of manure each day, which could ultimately generate, on average, 85 cubic feet of biogas, or about three hours of daily cooking fuel. (Keep in mind that manure produced during hours your cow is on pasture will be difficult to collect.)

Image by Bavarian Association for the Pro
Freshly cut grass clippings can produce about 11/2 cubic feet of biogas per pound. At this rate, about 20 pounds of grass clippings will generate one hour of cooking fuel (grass silage is even better, requiring only about 10 pounds to produce this same amount of biogas). One cow will produce about 140 pounds (18 gallons) of manure each day, which could ultimately generate, on average, 85 cubic feet of biogas, or about three hours of daily cooking fuel.
Producing Biogas in a Methane Digester
If you can compost it, you can digest it. Ideal biogas ingredients are those materials of which you have a plentiful, convenient and consistent supply, so you can make steady and useful quantities of biogas. Nearly any combination of vegetables, food scraps, grass clippings, animal manure, meat, slaughterhouse waste and fats will work as long as your recipe contains the correct ratio of carbon and nitrogen. Avoid using too many woody products, such as wood chips and straw, which contain large amounts of lignin (a part of plant cell walls resistant to microbial breakdown), which tends to clog up the digestion process.
A methane generator usually contains a feeding tube for filling the digester vessel, an effluent outlet to remove digested solids and liquids (called the digestate), a gas outlet, and a collection tank for storing the biogas.

Image by James Provost
Organic materials mixed into a slurry and put in an airtight container produce combustible gases that can be used for cooking and heating, along with nitrogen-rich liquids and compostable solids (collectively known as digestate) perfect for fertilizing a garden or farm fields.
To produce biogas at home, first mix water with your organic material, or feedstock. The range of total solids in the mix for optimal biogas generation is 2 to 10 percent, meaning that 90 to 98 percent of the material inside your generator can be water, including the water that is part of your feedstock. Chop or shred solid material into 1-inch or smaller bits. Having more surface area available to microbes will promote better digestion of organic material. Fibrous material may digest more readily if it ages for a few days (allowing fungi and bacteria to begin breaking down the fiber) before going into the generator.
After youve added the feedstock, add enough water to make a slurry, and then add a starter culture of methane-producing organisms. These microbes, known as methanogens, exist naturally in most animal dung, so if you use manure, you wont need to add them. But if you want to digest only food scraps or grass, youll need to inoculate the mix to get the biological processes going (ideally, youll need to do this only one time).
Imag e by James Provost
For food waste, chop material into 1-inch or smaller bits. The author set up a chopping station in his garden using an old sink and garbage disposal attached to an extension cord. Other options include using a blender or chipper-shredder.
Maintain a temperature within the container that is close to body temperature, 90 to 100 degrees Fahrenheit, and you should be generating biogas in about a week. To reduce the amount of external heat required, place the generator in the sun or inside a greenhouse. For extra insulation, wrap the generator with thin, flexible foam insulation or even Bubble Wrap, covered with UV-resistant, 6-mil black or clear polyethylene plastic.
As you produce biogas, pipe it into a simple holding container, such as a small barrel inverted into a larger barrel that is filled with water. Any storage container that is airtight and expandable as gas flows in and out can be used. Apply external weight to the storage container to achieve the correct pressure required by your gas appliance.
Youll determine the retention time the amount of time the generator takes to convert solids to biogas through direct observation. After your generator is loaded and operating, keep track of the rate of gas production by observing the expansion of the gas collection barrel. When expansion slows, the production rate has dropped off, and its time to feed. You may need to feed every day or once per week, depending on your material mix and the conditions inside the generator. It is best to feed according to a recipe.
Effluent is a low-odor blend of compostable solids and nutrient-rich liquid from your biogas generator. You can apply effluent directly to your garden as a soil amendment, but its wise to first compost effluent to destroy any pathogens.

Image by James Provost
Store biogas in an inverted barrel immersed in water.
Biogas Generator Temperature: The Most Critical Detail
In most cases, material you put into a well-maintained methane generator operating in a temperature range of 70 to 105 degrees will be fairly well-digested in about a month (youll continually add feedstock as material digests). The conditions youll try to mimic within the generator are similar to those inside an animals gut. Biological activity within the generator will produce some heat, but depending on your climate, you may need to supply additional heat.
To produce gas during winter in cold climates, youll need to provide an additional source of warmth. A larger generator may produce enough gas for some of it to continuously heat water, which can circulate via closed piping to act as a heat exchanger. Or, you can wrap the outside of the barrel with flexible tubing covered with insulation and pump hot water through it (learn how to build a solar batch collector). Another option is a submersible, thermostatically controlled electric water heater designed to keep livestock waterers from freezing.
Weigh the costs of providing heat against the benefits of gas production. If you live in a hot climate, provide some shade so the temperature inside the generator doesnt rise much above 105 degrees.

Image by James Provost
Start small to familiarize yourself with how to make biogas. A batch biogas generator made from two open-top barrels (left) or a continuous-flow plastic bag generator (right) are two options for small, experimental biogas digesters.
Safety Considerations
Never make biogas indoors or in enclosed spaces. Methane is a flammable gas that will burn when mixed with air and exposed to a flame. A biogas generator could explode if the pressure drops and the flame is allowed to toll back through the piping. The risks are the same as with handling and storing conventional natural gas.
Free Plans
You can find plans online to build generators up to 2,640 gallons in size at The Complete Biogas Handbook. Having a biogas generator is like having another mouth to feed, but with the right setup and a steady supply of feedstock, youll produce fossil-free natural gas for a variety of energy needs on your homestead.
Biogas Energy From Landfill Methane
Municipal solid-waste landfills make up the third-largest source of methane emissions in the United States. But rather than releasing methane into the atmosphere, where it exacerbates climate change, the gas can be captured to produce electricity. According to the U.S. Environmental Protection Agency, about 600 U.S. landfills capture methane to use in a variety of ways, including firing glass-blowing and pottery kilns, heating greenhouses, and even powering an ice rink. Other planned projects will convert landfill gas to methanol for use as an alternative fuel for vehicles. Kale Roberts

Image by Fotolia/Markus Bormann
A biogas plant in Germany captures methane from a landfill to produce electricity. According to the U.S. Environmental Protection Agency, about 600 U.S. landfills capture methane to use in a variety of ways, including firing glass-blowing and pottery kilns, heating greenhouses, and even powering an ice rink.
Paul Scheckel is a hands-on, off-grid homesteader, and he is an efficiency consultant for utilities, homeowners and businesses.
Make a Biogas Generator to Produce Your Own Natural Gas Mother Earth News
If you're gonna fight, fight like you're the third monkey on the ramp to Noah's Ark... and brother its starting to rain. Join our efforts to Secure America's Borders and End Illegal Immigration by Joining ALIPAC's E-Mail Alerts network (CLICK HERE)
-
06-06-2025, 11:13 PM #9785Senior Member
- Join Date
- Aug 2018
- Posts
- 93,755
18 Natural Sleep Aids to Get Better Sleep
 If there is one condition that has plagued me every day-or rather, every night-for years on end, its sleep. I was prescribed sleeping medication long-term (not a good idea) and suffered greatly for it. If I was having trouble sleeping before, it was now impossible to achieve, unless I took my medication. The truth is, we lose touch with sleep more and more every day. Technology, stress, energy drinks, stress, readily prescribed medications, and did I mention stress? All of those things contribute to sleeplessness, and I can almost guarantee everyone who reads this list will struggle with at least one of the above.

Save
The science of sleep
When you hear about serotonin, melatonin, 5-hydroxy L-Tryptophan (5-HTP), and tryptophan, they usually sound like they are totally different things you can try to utilize to help sleep. Really, theyre all quite related to one another. If it was a perfect world, this is what would happen when you go to sleep-
You need to consume tryptophan, and essential amino acid, to start the process, and you need to get it from an outside source. In a two- step process that tryptophan is converted to 5-HTP, which is then converted into serotonin. The serotonin then converts to melatonin, which makes our bodys biological clock run smoothly and tell us when it is time to go to sleep and when its time to haul yourself out of your cozy bed. It is the master clock, if you will, making us sleepy-or alert-at the proper times, because melatonin produced is released in higher amounts the darker it is, while the amount lessens with more light. Since tryptophan is the only amino acid that can convert to serotonin, it is also the only one that can ultimately up your melatonin.
1. Drink Tart Cherry Juice
A ½ cup to a 1 cup of tart cherry juice is a tasty way to drift off to sleep, and is a natural sleep aid that I personally think really helps. Tart cherry juice is a natural sleep aid because its full of tryptophan. Tryptophan is an essential amino acid that coverts to serotonin, which then coverts to melatonin. Melatonin helps maintain our sleep and wake cycle by causing drowsiness and lowers body temperature, working with the central nervous system to sync our biological clock. Its production is inhibited by light, but released in low light/darkness.

2. Improve the Feng Shui
Feng shui is more than just decorating youre space in a visually appealing way; its a full philosophy that instructs on how to arrange your room, furniture, office, etc. to maximize good energy flow throughout living spaces. Here are a few tips for improving the Feng shui of your bedroom to help you get the most of a good nights rest:
-Keep your bed easily accessible and approachable from all sides.
-Make the energy in the room fresh and help it flow by keeping the air pure, preferably with open windows. Also try to have several windows to allow in natural light.
-Have the bed positioned in such a way that you can see the door. Not being able to see the entrance to your bedroom can create a feeling of anxiety.
-Keep the room neat and clean with a balanced look and feel. Clutter and trash stresses you out and represents unfinished business, which can prevent you from really resting well in your room. On that note, it can also affect your sex life.
3. Valerian
Valerian is a hardy plant whose roots are used in a number of ways as a sedative and sleep aid. It is thought to work by increasing the amount of GABA (gamma aminobutryic acid) which helps regulate the action of nerve cells and has a calming effect. Because of its calming effect, it is also extremely popular as a natural anxiety remedy-prescription anxiety medication also increase GABA, albeit much more than valerian. Its easy to brew up a cup of tea, but if you find the odor too strong, it is also available in capsule form.
You will need
-1 tsp of dried valerian root
-strainer or infusion device, such as a tea ball
-8 oz. fresh water to boil
-8 oz. fresh water, hot from the tap
Directions
Fill either the mug you wish to steep your tea in with the hot tap water to get it warmed up (warming it up like this can help keep your tea toasty for longer.) Put 1 tsp of valerian root in your infusion device-if you are steeping the root loose, wait to do anything with it. Boil 8 oz. of water in your kettle, remove from heat, and empty your mug of the hot tap water. Place your infusion device or the loose root in your mug, and pour the hot water over it. Cover and steep for 15 minutes. Uncover, remove device or strain, and get ready to enjoy a peaceful night. Add milk or honey if youd like for flavor.

4. Get Acupuncture
Acupuncture is one of the main components in traditional Chinese medicine (TMC), and one of the oldest healing practices in the world. It is thought that stimulating specific points corrects the balance of energy or the life force by opening up channels called meridians, which close off when stress inflames and contracts vessels. The thin needles, upon insertion, open up these blocked channels and allow your brain to better understand that its time to go to sleep. It also signals the release of neuro-endocrine chemicals (like tryptophan/melatonin) to help you fall asleep and stay asleep.
5. Make Your Bedroom Your Bedroom
Your bedroom is a place of rest. It is your retreat to restore your mind and body by sleeping. It is not a place to watch T.V., or a second office. If you have them, the computer and T.V. have to go. They not only keep you awake, but they dont give a sense of relaxation. They carry stress into your room, and stress does not help you sleep.
6. Stick to a Schedule, Establish a Ritual, and Keep a Diary
Humans are funny creatures of habit, and our bodies usually work quite well when something is done ritualistically. For example, exercising randomly every few days wont do much, but exercising every day for 30 minutes will over time make a huge difference. The same thing goes for sleep. Establish a calming ritual that you do every night before crawling in bed, and you will probably find it easier to transition from being awake to being sleep. The ritual is also a time to relax and let go of stress and thoughts that crowd your head and keep you up.
Some ideas include
Drinking a cup of warm tea a half an hour before bed
Doing a series of gentle stretches
Reading 1 chapter exactly of a book every night
Take a warm bath: Theres nothing quite like sinking into a warm tub to wash the stress of everyday life away and it also feels great to crawl into bed nice and clean. Add a few drops of your favorite essential oil (lavender is great) to get the soothing benefits of aromatherapy as well.
Sip something: Making up a nightly drink to help you fall asleep has the double benefits of the drink itself lulling you off to dreamland, and the ritual of drinking it which tells your brain and body ok, its time to relax. Doing something like reading while you drink your night time beverage adds a nice dimension to this habit.
Meditate: Take some time before you crawl in bed to meditate and clear your mind of cluttering thoughts. Thinking too much, as we all know, can keep you awake for hours as you churn over the same thoughts again and again. Getting a good nights rest is not just about your body-with how complex our thinking process is, our minds need just as much help (if not more) to get ready for bed.
7. Get More Melatonin
This chemical is oh-so-important to sleep, but our body needs outside sources to get it. While it can be taken as a natural supplement in pill form, here are some foods that will help boost production.
Cherries: Not too hard to guess since cherry juice was one of the first things listed, but they also contain tryptophan which is metabolized into serotonin and finally melatonin

Bananas: I remember before a solo I had to do in band class, my teacher told me to eat a banana 30 minutes beforehand, because they helped calm you down. I think it must have done something because my solo got an honorable mention, and I never do well performing under pressure. Bananas contain tryptophan, and potassium and magnesium as well, which are muscle relaxants. Have one a half-an-hour before bed every night and up your magnesium levels while simultaneously relaxing your muscles.

8. Exercise
Exercise on a regular basis, and you will sleep better. Not only will you sleep better, but youll have more energy when youre awake-and not just because you slept better, but because exercise has a weird way of helping us go to sleep and giving us more energy. For this reason, dont work out right before bed, or youll likely end up more awake.
9. Drink a Cup of Chamomile
Chamomile has long been a reliable remedy for helping people doze off. It relaxes your muscles, and is thought that, potentially, a substance called apigenin can bind to GABA receptors which affect the central nervous system and sleepiness. Other studies have disagreed with apegign theory, and think other constituents in the chamomile are what act as a sedative. Either way, its tasty and it makes you tired. You can, of course, buy chamomile tea from the store, but I personally love it fresh as well.
You will need
-A rounded ¼ cup of fresh chamomile flowers OR 2 rounded tablespoons of dry flowers
-Honey (optional)
-Milk (optional)
-Freshly squeezed lemon juice (optional)
Directions
Theres nothing quite as delightful as a cup of freshly brewed chamomile on a chilly night as you settle in for bed. If possible, try to use fresh flowers (German variety, preferably) but you can use dried as well if you cannot harvest fresh.
If youre using fresh flowers, use only the flower heads and compost the stems. Place the flowers in a teapot, and in a separate pot bring 4 cups of cold water to a rolling boil. Pour the water in the pot over the flower in the tea pot. Let steep for 5-6 minutes and serve hot. Do the same process for dried as for fresh, but use 2 rounded tablespoons of dried flowers. Add a little bit of honey and milk to taste. Squeeze in the juice of a freshly sliced lemon to taste as well.

10. Make a Lavender Sleep Sachet
Aromatherapy has a number of different uses, but is perhaps used most often for relaxing or creating a sense of drowsiness. Numerous studies have resulted in science giving a nod to the validity of aromatherapy. People who were exposed to the scent of lavender in the trials experienced better moods, and one study followed brain activity with an EEG machine, which showed the subjects undergoing lavender aromatherapy did in fact show brainwaves suggesting drowsiness, while other scents increased alertness. If you find yourself having a hard time drifting off at night, try making a lavender sleep sachet to stash under your pillow or on a bedside table to help you relax and drift off.
11. Get Your Carbs
This may sound like a negative thing, but its not really. Tryptophan, in order to have any effect on sleepiness, needs to cross the blood-brain barrier. The blood-brain barrier is a filtering mechanism of the capillaries that carry blood to our brain and spinal cord tissue, and blocks the passage of certain substances. This was proven by a study done more than 100 years ago, in which scientists injected blue dye into animals bloodstreams. It was discovered that the tissues of the entire body except the brain and spinal cord turned blue, thus confirming the theory of the blood-brain barrier. It is theorized that eating carbohydrates makes it easier for tryptophan to cross the barrier, since it has to compete with other amino acids to make it through. The release of insulin in response to the carbs directs the other amino acids to muscle, leaving tryptophan a clearer passage into the cerebrospinal fluid.
You will need
-A relatively small amount of carbs e.g. some cereal or a piece of bread
Directions
About 15 minutes before bedtime, have your snack to divert those large chain amino acids to the muscles and help tryptophan do its thing.

12. Magnificent Magnesium
Magnesium is one of the most vital minerals, and yet most of us are lacking it. You can thank increasingly poor diets for this one. Magnesium plays a huge role in the functioning of GABA receptors, which is the primary neurotransmitter that calms your central nervous system, relaxes you, and can help prepare you for sleep. GABA wont necessarily make you drift off to sleep magically, but you can be pretty sure youre going to have a hard time sleeping without it. While the best way to up magnesium is to eat a balanced diet, taking supplements can greatly help.
You will need
-Magnesium supplement
Directions
Follow the Directions for dosing.

13. Utilize Lemon Balm
Lemon balm is one of those ancient herbs that people have turned to for centuries. Once thought to be an herbal-cure all, it was used to treat anything from asthma to snake bites. These days, its used primarily to lift mood and promote calmness and relaxation. Since depression is often related to insomnia, probably because of a lack of serotonin, lemon balm can help you achieve sleep by promoting mental and physical health. Several studies have confirmed its sedative effects, however it should be noted that too high of a dosage (1800 milligrams) actually increased anxiety. Here, it is made into a mild, uplifting, and relaxing tea.
You will need
-2 tablespoons of dried lemon balm, or 8-10 tablespoons of fresh lemon balm
-2 teaspoons dried chamomile
-Honey to taste (optional)
-8 ounces of fresh water
Directions
Place the loose herbs in a mug and cover with 8 ounces of boiling water. Steep for 5 minutes, strain, and drink 30-45 minutes before bed.
14. Saint Johns Wort
 Like lemon balm, Saint Johns Wort is used frequently to help with depression, and in turn helps with disrupted sleep. Its main constituent-hypercine- is thought to work by reuptake inhibition, which raises the overall level of serotonin in the brain. More serotonin = more melatonin= better sleep. You can take it in capsule form, or prepare a strong tea to use as a sleep aid.
You will need
-2 teaspoons of dried Saint Johns Wort (herb top/flowers)
-8 ounces of freshly boiled water
-honey or lemon to taste (optional)
Directions
Place the herb in a mug and cover with boiling water. Steep for 5-10 minutes, strain, and drink once daily (either morning or 30-45 minutes before bed.)
15. Hops Into Bed
The first thing that comes to mind when you hear the word hops is probably beer, but this quick growing vine is also an excellent remedy for calming nerves and promoting relaxation (not in the form of beer, sorry!) Rather, it can be made into a strong tea and drank right before bed, or made into a sleep sachet and placed under your pillow at night (just replace or add it to the lavender).
You will need
-2 tablespoons of dried hops
-4 cups of boiling water
-A quart glass jar with a tightly fitting lid
Directions
Place the hops into a glass jar with a tightly fitting lid and cover with boiling water. Allow it to steep for at least 5 hours, or overnight, and then strain. Reheat or chill and drink a cup 30-45 minutes before bedtime for an easy and restful slumber. This will keep in the refrigerator for 2 days.
16. Make Some Noise
Some people need to sleep in complete silence; while on the other hand, some need a little background noise. For many (myself included), the dripping of the faucet, the hum of electricity, the sound of themselves breathing, or the blankets rustling as they toss and turn stresses them out and keeps them awake. So whats the deal? Technically speaking, white noise is a consistent noise that comes out evenly across all hearable frequencies. When you get jarred awake or bothered by a noise at night, its not really the noise itself, but the abrupt inconsistency in the noise that you hear. The fact of the matter is you still hear when you sleep, and white noise can mask those inconsistences. The scientific aspect set aside its just plain soothing, filling out the silence that makes you feel trapped with racing thoughts or excess energy.
You will need
-Something that creates white noise
Directions
When you go to sleep, turn on the white noise. My personal favorite is a fan, but there are even white noise machines tuned specifically for the purpose of drowning out sound.
17. Sip A Glass of Warm Milk
Does milk actually make you sleepy? In short, probably not on a chemical level. While there is the sleep inducing amino acid tryptophan in milk, studies are debatable that it actually does do anything. Much like turkey, the levels arent such that they would have much of an impact. But all of that doesnt mean it wont make you sleepy at all, and there is still reasoning behind a glass of warm milk, mostly in terms of psychology. Many people find the warmth soothing and relaxing, helping them unwind both physically and mentally. The routine of a glass of warm milk is like any other routine that you need to complete before bed, getting you one step closer to falling asleep.
You will need
-1 glass of warm milk
Directions
Roughly 30 minutes before bed, start winding down. Turn off electronics, read a book, and heat up a glass of milk to a toasty warm, but still comfortable, temperature.

18. Cozy Up with Catnip
Catnip, a plant that is a member of the mint family, isnt just for cats-it works a treat when it comes to having a sedative effect on humans. The compound responsible for catnips effects across both species is called nepetalactone. While it can make cats frisky and wild, it can make people relaxed, drowsy, and ready for bed. Enjoy it in the form of a warm tea before bed with a little bit of honey.
You will need
-1-2 teaspoons of dried catnip OR 3-4 teaspoons of fresh catnip
-8 ounces of boiling water
-Honey to taste (optional)
Directions
Place catnip in a mug and cover with boiling water. Steep for 10 minutes, covered, and then add honey to taste if you like. Drink 30 minutes before bedtime.

My experience with insomnia
Ive faced a battle with insomnia for almost 4 ½ years, and I know when bedtime rolls around all you want is magic sleeping aid to make you fall asleep without having to do anything. The (painful) truth is that if you want to be healthy and get a good nights rest, you may have to re-learn how to put yourself to sleep. The things that knock you out cold are nothing more than scary medications that only cause suffering-they dont solve your sleepless nights. We need our rest, perhaps now more than ever in our crazy world, and taking the time and dedication to find natural ways to drift off is vital in making sure you get to sleep, stay asleep and wake up refreshed, rejuvenated, and ready to lead a life filled with good energy.
Tips from Personal Experience:
Practice meditation if racing thoughts keep you up at night. Meditation takes patience, but it is invaluable. Among so many other things it can teach you to simply let go of a thought and leave it powerless, which leaves you undisturbed and able to rest.
Really do try the cherry juice, its darn tasty and makes for a sounder sleep in my experience. Make sure to drink it about 30 minutes before bed so you dont have to go the bathroom in the middle of the night.
Chamomile tea with milk and honey has put me to sleep more effectively then sleeping medications at times.
Habit. Habit. Habit. Form a relaxing habit that tells your body time for bed now and it will, at some point, start to listen. This includes setting a bedtime, and wake-time, and sticking to them.
Get any form of a screen out of sight after a certain hour. It has been proven many times over that this will disrupt your sleep.
I bow down to a sleep mask. Its gentle weight over my eyes and the ensuing darkness is the only reason I am able to fall back asleep when I wake up too early in the morning-remember, levels of light determine how much melatonin you make.
Never reach for sleeping pills, especially prescription. They will cause anguish and strife and many, many, more sleepless nights.
How to Make a Love Potion
Daily Drink to "Boost" Your Immune System
Homemade Lavender Lemonade with Fresh Squeezed Lemons & Raw Honey
How to Make Homemade Muscle Rub to Relieve Headaches
Bentonite Clay Poultice for Rashes, Burns & Bug Bites
3 Natural Ways to Fight Bad Breath
We Want to Hear from You! Let us know which remedies work and do not work for you, ask a question or leave a comment:
18 Natural Sleep Aids to Get Better Sleep | Everyday Roots
If you're gonna fight, fight like you're the third monkey on the ramp to Noah's Ark... and brother its starting to rain. Join our efforts to Secure America's Borders and End Illegal Immigration by Joining ALIPAC's E-Mail Alerts network (CLICK HERE)
-
06-06-2025, 11:28 PM #9786Senior Member
- Join Date
- Aug 2018
- Posts
- 93,755

- Canning
- Jam/Jelly
- Pickling
- Dehydrating
- Freezing
- FAQ
- Canning Methods
- Choosing the right method
- Pressure Canning
- Water Bath Canning
- Steam Canning
- Canning Book
- Free Canning Quick Start
- Online Canning Classes
Pickled Carrots Recipe: A Crunchy, Fun Food
Old Fashioned Pickled Green Tomatoes Recipe
Sweet Pickle Relish Recipe
Plum Sauce Recipe for Canning / Spicy Sweet!
Bread and Butter Pickle Recipe
Crunchy Dill Pickles! Because nobody likes mushy pickles.
Home » Pickling
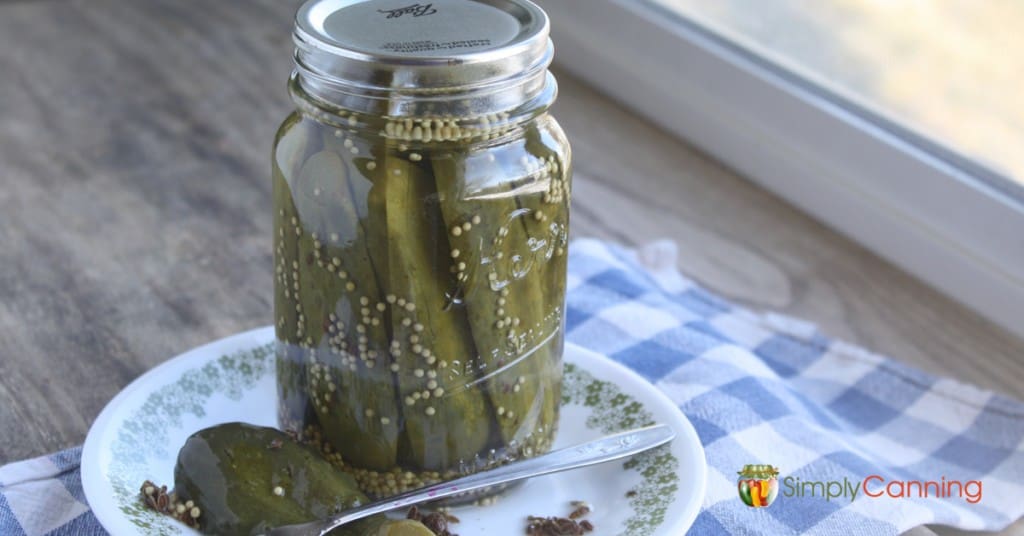
Crunchy Dill Pickle Recipe
By Sharon Peterson
March 9, 2023
This page may contain affiliate links. More Information.
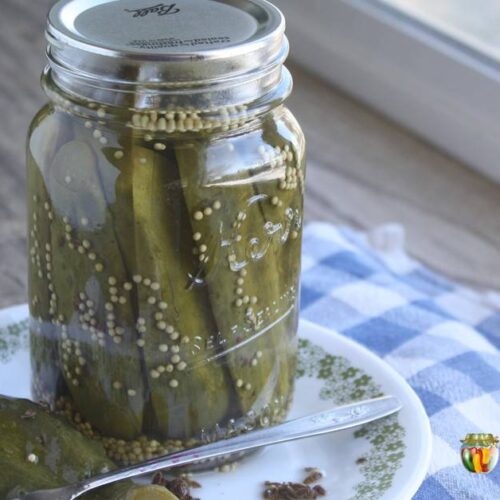
Finally, I have a crunchy dill pickle recipe!
No matter what dill pickle recipe you use, I highly recommend you use fresh-picked, small pickling cucumbers. I try for no bigger than my thumb. Anything too much bigger gets made into relish or bread and butter pickles.
I also recommend canning this dill pickle recipe in pints. Quarts must be processed longer, so they tend to get mushy (at least in my home canning pickles experience).
Jump to Recipe
Label your jars with pretty printable Canning Labels! Check them out.
Table of Contents
- Dill Pickle Recipe: Extended, Step-By-Step Directions
- Looking to Make the Best Dill Pickles? Try the Low Temperature Process
- Quick, Fresh-Pack Dill Pickles
- Dill Pickles Tips & FAQs
- How Long Do Dill Pickles Need to Cure or Set Before I Eat Them?
- How Long Will Homemade Pickles Keep Once I Open the Jar?
- Can I Reuse Brine that I Used for My Dill Pickles Previously?
- Why are My Pickles are Shriveled or Soft? Why Dont My Homemade Pickles Look Nice?
- Slices vs. Whole Cucumbers
- Too Little Brine
- Whats the White Film on the Bottom of a Jar of Pickles?
- Related Pages
- Corn Relish Recipe
- Bread & Butter Pickles
- Pickle Recipes
Dill Pickle Recipe: Extended, Step-By-Step Directions
The first part of this dill pickle recipe is done the day before you plan on canning. The pickles need to soak overnight in a brine, then the next day you will fill your jars and process.
Ingredients:
- 8 pounds of 3-4 inch pickling cucumbers
- 2 gallons water
- 1 1/4 cups canning or pickling salt
- 1 1/2 quarts vinegar (5% acidity)
- 1/4 cup sugar
- 2 quarts water
- 2 Tbsp. whole mixed pickling spice (I use a homemade recipe click here.)
- whole mustard seed (1-2 tsp per pint jar)
- fresh dill (1 to 1 1/2 heads per pint jar) or dill seed (1 to 1 1/2 tsp. per pint jar)
- 1 garlic clove per jar (optional)
Preparing Your Cucumbers the Day Before
Use these specially made canning labels to dress up your gift giving.
Dill Pickles Canning Labels
For this dill pickle recipe, on day one, wash your cucumbers and thinly slice off the blossom end. (The blossoms have an enzyme that will make your cucumber pickles soft.) The sooner you do this after picking, the better.
Add 3/4 cup salt dissolved in 2 gallons water. Soak cucumbers in water for 12 hours. Drain and get your canning supplies together.
Making & Canning Crunchy Pickles
Gather Canning Supplies for Your Dill Pickle Recipe:
- water bath canner
- canning jars
- canning seals and rings
- jar lifter
- canning funnel
- large pot
- bowls
- large spoons
- sharp knife
- towels and dish cloths
- pot or kettle for the brine
- ladle
- cheesecloth
Get the water in your canner heating while you prepare your cucumber pickles.
Combine vinegar, 1/2 cup salt, sugar, and 2 quarts of water. Place pickling spices in a cheesecloth bag and place in your vinegar brine. Heat to boiling.
Tip: I use my stainless steel teapot to make my brine, as it makes filling the jars super easy! For more tips and canning safety instructions, see Simply Canning the book.Fill jars with drained cucumbers.
Add:
- 1-2 tsp. mustard seed per pint
- 1 to 1 1/2 heads fresh dill or 1 to 1 1/2 tsp. dill seed per pint
- 1 garlic clove per jar (optional)
Fill jars with hot pickling brine, leaving a 1/2-inch headspace.
Ive included dill pickle recipe directions below for both a regular hot water bath, and the low temperature process dill pickle recipe.
The timing for the two methods is different. Be sure you are using the correct time with the correct method for making this dill pickle recipe.
Hot Water Bath Processing
The processing time for this dill pickle recipe will vary according to your elevation. See chart below for your processing time. Read why altitude adjustments matter here.
Looking to Make the Best Dill Pickles? Try the Low Temperature Process

Low Temperature Process
This dill pickle recipe comes from the NCHFP website. It is safe for low temperature processing. If you are not familiar with low temperature pasteurization, please read this article. Then come back for processing directions.
Remember to use a thermometer and monitor your time carefully.
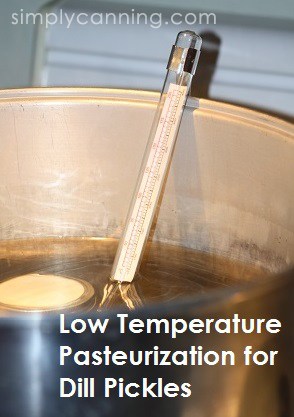 Have your canner ready and half full of warm water, about 120 to 140 degrees F. Also have a kettle or other pot of hot water ready.
Place your filled jars in the half-full canner. Now add hot water to 1 inch above the tops of the jars. Turn on your heat and warm water to 180 to 185 degrees. Use your thermometer and be sure this is maintained for 30 minutes. This is longer than the time indicated in the regular water bath processing.
When 30 minutes is complete, turn your heat off and remove your jars to a counter to cool. Check the seals after the jars are completely cooled off. I usually leave mine until the next day and check, label, and store them.
Pinnable Recipe Card
Quick, Fresh-Pack Dill Pickles
Finally, I have a crunchy dill pickle recipe! Here's how to make quick, fresh-pack dill pickles.
Print Recipe
Prep Time:13hours hrsEquipment
Processing Pints (adjust for altitude):30minutes mins
Total Time:13hours hrs 30minutes mins
- Water Bath Canner
- Canning Jars
- Canning Lids and Rings
- Large Pot
- Funnel, Jar Lifter, Lid Lifter, Bubble Tool
- Ladle
- Cheesecloth
Ingredients
- 8 pounds Pickling Cucumbers 3-4 long
- 2 gallons Water
- 1 ¼ cups Canning Salt or pickling salt
- 1 ½ quarts Vinegar 5% acidity
- ¼ cup Sugar
- 2 quarts Water
- 2 Tablespoons Mixed Pickling Spices
- 1-2 teaspoons Mustard Seed whole seeds, measurement per pint jar
- Fresh Dill 1 to 1 1/2 heads per pint, or use dill seed (1 to 1 1/2 teaspoons per pint jar)
- 1 clove Garlic per jar (optional)
Instructions
- Start by preparing jars and getting water in the canner heating. You want the canner hot, but not boiling, when the jars are ready to be processed.
See full water bath canning instructions here.
Raw Pack only
- Wash cucumbers, slicing off the blossom ends.
- Dissolve 3/4 cup salt in 2 gallons water.
- Soak cucumbers in saltwater for 12 hours.
- Drain.
- Combine vinegar, 1/2 cup salt, sugar, and 2 quarts water in pot.
- Place pickling spices in cheesecloth in pot. Add to the pot and bring brine to a boil. Lower heat and simmer.
- Drain cucumbers and pack in jars.
- Add Mustard seed, 1-2 tsp. per pint
Add Dill ,1 to 1 1/2 heads per pint or 1 to 1 1/2 tsp. seed per pint
Add Garlic 1 clove per jar (optional) - Fill jars with brine, leaving 1/2" headspace.
- Remove air bubbles, wipe rim clean, and place on seal and ring. Place the jar in the warm canner. Proceed to fill all jars. Process according to chart below.
Notes
Processing with a Water Bath Canner
Place the jar in the warm canner. Proceed to fill all jars placing them in the canner.
When all the jars are filled, bring the water in the canner to a boil. When a boil is reached that is when youll start your timing. Process for the length of time on the chart below. Adjust for your altitude.
After your time is over, turn the heat off remove the lid and allow the canner to rest for about 5 minutes. Then bring your jars up out of the water. Allow them to rest for another 5 minutes. Then remove the jars and place them a few inches apart on a thick towel to cool completely. Leave them alone for about 12 hours.
When they are cooled remove the metal bands, check the seals, label the jars and store them away!
Processing Times for Water Bath Canner (Raw Pack)
Altitude Pints
0-1,000 ft 10 minutes
1,001-6,000 ft 15 minutes
Above 6,000 ft 20 minutes
Processing Times for Water Bath Canner (Low-Temperature Process)
This recipe is safe for low-temperature processing. Remember to use a thermometer and monitor your time carefully. (This is a different method than
the water bath method above.)
Have your canner ready and half full of warm water (about 120°F to 140°F). Also, have a kettle or other pot of hot water ready. Place filled jars in the half-full canner. Now add hot water to 1 above the tops of the jars. Heat the water and maintain a temperature between 180°F to 185°F.
Use your thermometer and be sure this is maintained for 30 minutes. This is longer than the time indicated in a typical water bath processing, but it is a lower heat. When 30 minutes is up, turn off the heat and remove your jars to a counter to cool.
Adapted from: The National Center for Home Food Preservation
Servings: 7 -9 pint jars
Author: Sharon Peterson
Dill Pickle Recipe: Finally, I'm Getting the Crunch! SimplyCanning
If you're gonna fight, fight like you're the third monkey on the ramp to Noah's Ark... and brother its starting to rain. Join our efforts to Secure America's Borders and End Illegal Immigration by Joining ALIPAC's E-Mail Alerts network (CLICK HERE)
-
06-07-2025, 02:32 AM #9787Senior Member
- Join Date
- Aug 2018
- Posts
- 93,755

Home » Home Remedies » Herbal Remedies
16 Home Remedies for Arthritis Pain & Stiffness
By Laurie Neverman November 3, 2024
This post may contain affiliate links. Read my full disclosure here.
I was talking to my neighbor, and she told me about a friend who was on arthritis medication. The medication suppressed her immune system so that she couldnt kick a simple cold. Her story inspired me to assemble a list of home remedies for arthritis.

Arthritis is painful inflammation and stiffness of the joints. There are several types of arthritis, with some due to wear and tear, while others include an autoimmune condition.
Learn how home remedies for arthritis help to manage arthritis pain and stiffness, without the side effects of pharmaceuticals.
Home Remedy for Arthritis #1 Exercise
Although moving may be painful, it is critical to improve blood flow and prevent muscle atrophy. Good circulation stimulates healing. Strong muscles help you to maintain good posture and move correctly, preventing future damage.
Try low impact exercise like swimming, cycling, water aerobics, tai chi, walking, or gardening. (Get help for heavy lifting if needed.) Staying active helps with a range of conditions, reducing stress as well as healing your body.
#2 Heat and Cold
One home remedy for arthritis is to move your home. Theres more than one reason people move to warmer climates when they get older, but pain relief is a motivator for many. Cold weather can aggravate joint stiffness and muscle pain.
Interestingly, cold can also help reduce pain, when used correctly. Cold therapy has a long history of use for reducing inflammation. It can be as simple as placing an ice pack on a swollen joint for 15-20 minutes. This generally helps reduce swelling, but may not help with stiffness.
For a more systemic approach, try a 30 second cold rinse at the end of your shower. If you can tolerate it, this stimulates circulation as your body returns to normal temperature.
Heat relaxes muscles and increases blood flow. Heating options include:
- A hot tub or a sauna
- Soak in a warm pool or bath tub
- Washing your dishes in a nice sink of warm water
- Placing a heating pad on the sore parts of your body
IR saunas are great for detoxing and recommended for many auto-immune conditions.
Core Products Soft Comfort CorPak, No Frost Hot and Cold Therapy Pack - 6" x 10", Made in The USABoiron Arnicare Arthritis Cream for Minor Joint and Muscle Pain or Stiffness from Arthritis, Minor Injuries, Overexertion, or Repetitive Motions - 2.5 oz
The Keystone Approach: Healing Arthritis and Psoriasis by Restoring the Microbiome
DYNAMIC SAUNAS Andora 2-Person Low EMF FAR Infrared Sauna with Red Light & Bluetooth Speakers | Personal Indoor Spa for Home & Gym Made from Canadian Hemlock
#3 Watch Your Diet
Foods can act as arthritis triggers, contributing to inflammation. Refined sugar, gluten, foods high in oxalic acid, caffeine, alcohol, red meat, eggs, dairy, nightshades may bother sensitive individuals.
Try switching out different elements of your diet, and drinking more water to see if you feel any different. If youre ready for a bigger change, select an anti-inflammatory way of eating. Some options include the Mediterranean diet, autoimmune paleo, carnivore, and vegetarian. Fasting can also help reduce inflammation, as your body has more time to devote to repairs instead of digestion.
#4 Topical Creams or Oils
The book Healing with DMSO recommends combining a 50% DMSO solution with topical magnesium cream twice a day. Another option for joint pain is warm castor oil packs, followed by topical DMSO (dimethyl sulfoxide). The DMSO helps the magnesium and castor oil penetrate deeper into the tissue.
Capsaicin creams are another pain relieving option. These rubs may help ease pain and stiffness, but do not use them in combination with heat therapy. Homeopathic remedies like Arnicare Arthritis Cream may also help.
#5 Neodymium Magnets
Bio-magnetic therapy has been around for many years, but its now available for home use. There are back wraps, neck wraps, and knee wraps with healing magnets built in. Studies show that these may help reduce pain and inflammation.
Magnetude Jewelry Magne-Wraps adjust to fit on wrists, knees, feet, or elbows. You can learn more about these wraps and other therapeutic magnets at the Magnetude website.
#6 Tart Cherries
We live near Door County, WI, one of the biggest tart cherry producing areas in the U.S.. I have to give a shout out to tart cherries for arthritis.
Studies suggest that tart cherry juice is effective for treating gout-related arthritis and osteoarthritis. Try about an ounce of tart cherry juice concentrate or tart cherry extract twice a day.
# 7 Apple Cider Vinegar
Apple cider vinegar is a time honored folk remedy to ease arthritis pain. Use 2 teaspoons to 1/4 cup daily, mixed into a glass of water. Add a little honey for sweetening, if desired.
Drink some morning and night, but dont sip on it all day. Its acidic, like soda, and could damage your teeth.
#8 Stinging Nettle
Stinging Nettles (Urtica dioica) are another home remedy for arthritis symptoms. Studies suggest that nettle leaf extract, taken internally, reduces inflammation and helps manage arthritis pain.
Nettles are more commonly used to treat arthritis via urtication. Urtication is the practice of flailing the affected joints with fresh stinging nettle plant. It may sound crazy, but modern studies back up this natural remedy.
Nettle likes to grow in high nitrogen soils, such as the soil near barnyards. You can read more about nettles in Weekly Weeder #16 Stinging Nettles.
#9 Alfalfa
Alfalfa, Medicago sativa, is high in vitamins A, C, E and K4 and calcium, potassium, phosphorous and iron. It is used for a variety of conditions, including both osteoarthritis and rheumatoid arthritis.
To make alfalfa tea: steep a teaspoon of the dried herb in boiling water for about ten minutes. Strain and serve.
Note: Alfalfa may interact with blood thinners, birth control pills, estrogens, immunosuppressants, and medications that increase sensitivity to sunlight.
#10 Curcumin
Curcumin, the active ingredient in turmeric, acts as an anti-inflammatory and anti-arthritic. Studies suggest 500 mg of curcumin three times daily may reduce pain better than NSAIDS without the side effects. Black pepper increases absorption of curcumin.
#10 Vitamins and Minerals
Vitamin and mineral deficiencies cause or aggravate many conditions, and arthritis is no exception. Vitamins D, E, C and B6 may improve symptoms in certain individuals. Zinc, magnesium, MSM, beta carotene and other supplements may also provide relief.
#11 Fish Oil
Fish oil and fish liver oil contain omega 3 fatty acids, which reduce inflammation. Take one tablespoon of fish oil per day. Note: omega 3 fatty acids may increase the risk of bleeding, especially if you are on blood thinners.
#12 Glucosamine/Chondroitin
Glucosamine/Chondroitin supplementation may be most effective for those with moderate to severe osteoarthritis of the knees. The supplements had to be continued over several months to see results. This is another one that may interact with blood thinners, so be careful.
Honeybees provide apitherapy for pain relief
#13 Bee Sting Therapy
Beekeepers know bee venom therapy (apitherapy) may provide relief for RA sufferers. See Clinical randomized study of bee-sting therapy for rheumatoid arthritis for more information.
#14 Ginger
Regular consumption of ginger may be better for arthritic pain relief than nonsteroidal anti inflammatory drugs (NSAIDs). Try using fresh or dry ginger in cooking, or make a ginger tea.
To make tea with fresh ginger: slice or chop about a teaspoon of ginger and cover with boiling water. Steep for 3 to 10 minutes. Strain out ginger chunks and sweeten with honey if desired.
See Ginger Root Uses & Health Benefits for more ginger tips.
#15 Essential oils
Some essential oils commonly recommended for the treatment of arthritis include:
- frankincense
- rosemary
- marjoram
- eucalyptus
- peppermint
- lavender
- ginger
- Roman chamomile
- helichrysum
- wintergreen
- basil
- clove
Dilute 1-2 drops of your oil of choice into 1 tablespoon fractionated coconut oil or massage oil of choice. Rub into the affected area.
#16 Copper Bracelets
My mom wore copper bracelets for arthritis pain relief for many years. First she had a set of bangles, then a solid copper band.
The official word from the medical establishment is that copper bracelets work no better than a placebo for arthritis. Mom felt it helped her, and other people swear by copper bracelets, too. Id put diet and lifestyle changes first, but I wouldnt be afraid to give copper bracelets a try, too. Besides, copper bracelets look cool!
If you or someone you knows suffers from arthritis, I hope these home remedies for arthritis will help you relieve the pain. Dont forget to scroll through the comments to check out even more suggestions for natural arthritis treatments from our readers, and add your own tips, too.
This article is for informational purposes only and is not intended to diagnose or treat any illness. Please contact a trained healthcare provider if pain is severe or debilitating. Always check with your healthcare provider before starting new supplements, especially if you are already taking medications.
You may also be interested in the rest of our Home Remedies Series, including:

This article is written by Laurie Neverman. Laurie is a lifelong learner with a passion for natural remedies and holistic healing. Shes successfully improved her eyesight and cleared her psoriasis.
Last updated in 2024.
3907shares
Share
Pin
Reddit
16 Home Remedies for Arthritis Pain & Stiffness
If you're gonna fight, fight like you're the third monkey on the ramp to Noah's Ark... and brother its starting to rain. Join our efforts to Secure America's Borders and End Illegal Immigration by Joining ALIPAC's E-Mail Alerts network (CLICK HERE)
-
06-07-2025, 06:11 AM #9788Senior Member
- Join Date
- Aug 2018
- Posts
- 93,755

Use the links at the bottom of this page to navigate these edible weeds (listed in alphabetical order). Each weed can be identified by its flowers, leaves, height, stem and habitat.
To support our efforts please check out our wild food store (books and PDF magazines).

Common Yarrow
Corn Mint
Creeping Charlie
Crimson Clover
Crowberry
Daisy Fleabane
Dandelion
Dog Mustard
Downy Yellow Violet
Echinacea
Elecampagne
Evening Primrose
Eyebright
False Solomon Seal
Fern Leaf Yarrow
Fiddlehead
Field Pansy
Field Pennycress
Field Speedwell
Figleaved Goosefoot
<< < 1 2 3 4 5 ... > >>If you're gonna fight, fight like you're the third monkey on the ramp to Noah's Ark... and brother its starting to rain. Join our efforts to Secure America's Borders and End Illegal Immigration by Joining ALIPAC's E-Mail Alerts network (CLICK HERE)
-
06-07-2025, 06:14 AM #9789Senior Member
- Join Date
- Aug 2018
- Posts
- 93,755
Dry Your Own Herbs
Home
Food Storage & Skills
Dry Your Own Herbs
Paige Raymond
July 27, 2014
Food Dehydrating,Food Storage & Skills
Drying,herbs,methods
2 Commentson Dry Your Own Herbs
If you use a lot of herbs in cooking or in herbal remedies you can grow and dry your own herbs at home. I love drying my own herbs because I know that I never use chemicals when they are growing and I know how I dry them and that they are always clean from the time I pick them until they are dried and put up. I like the sense of accomplishment I get when I want some oregano or basil for my spaghetti sauce and can reach into the pantry and get the herbs I grew, harvested and dried and put in the pantry by myself instead of herbs from the store that I have no clue how they were grown or how long they have been sitting around in warehouses and on store shelves.
tasteofhome.comIf you would like to dry your own herbs and want to know the various methods of drying your own herbs at home check out this article from Taste Of Home. They will teach you how to dry your own herbs in many different ways so you can choose the method that suits you.
Click here to see all the methods:
http://www.tasteofhome.com/recipes/how-to-cook/how-to-dry-herbs
If you're gonna fight, fight like you're the third monkey on the ramp to Noah's Ark... and brother its starting to rain. Join our efforts to Secure America's Borders and End Illegal Immigration by Joining ALIPAC's E-Mail Alerts network (CLICK HERE)
-
06-07-2025, 06:25 AM #9790Senior Member
- Join Date
- Aug 2018
- Posts
- 93,755
 drillyourownwell.com
How to Drill Your Own Water Well
85 web pages and 52 videos entirely devoted
to helping you drill your own well
Well drilling solutions
You can drill your own shallow water well using PVC and household water hoses. It is a cheap and effective way to dig your own shallow water well. Water well drilling isnt just for the pros with huge commercial drilling rigs. Digging a water well yourself is both interesting and fun.

The water well drilling methods described here work well in digging/drilling through dirt, and clay, including really hard clay. They will not work if you need to drill through rock but, if the area you live in is flat or relatively flat, it is definitely worth a try. Many folks think they have to dig or drill their well into an aquifer. For irrigation and lawn watering, reaching an aquifer isnt necessary. You only have to drill under the standing water level. It is very likely that you can drill your own well. Many successful wells have been drilled using this well drilling method. It is cheap. You can expect the drilling portion of the project to cost about $200.
Well drilling solutions
YOU CAN DRILL YOUR OWN WELL
In these pages the do it yourself water well drilling technique is referred to as well drilling, but many call this technique washing or jetting a well. It is somewhat similar to the rotary bit method which most real water well drillers use for water bore drilling.
The DIY technique involves water pumped down the center of a PVC schedule 40 pipe used as both a drill stem and a drill bit. At the bottom end of the PVC pipe a drill bit is fashioned by cutting teeth into the end of the PVC pipe. The pipe is rotated back and forth as the PVC pipe is slowly worked into the ground while the cuttings are brought to the surface by the upward flow of water in the annular space around the pipe. If you want to dig your own well, try this technique.
Installing a well and a pump can save a lot of money, especially if you are now paying the local utility for irrigation water. You have probably noticed that just watering the lawn can get expensive. You can spend less money watering the lawn. Actually, you can spend almost no money watering the lawn. It is great for gardeners, too.
If you are a first time visitor to the site you will probably want to start out with either the Background or the Basic Well Drilling Steps pages. The bulk of the site is dedicated to drilling water wells using just two hoses for drilling fluid. Inexpensive PVC is used for the drill pipe, the drill bit, and the well screen. This DIY water well drilling technique is very cheap and many successful shallow wells have been installed using this technique.
When drilling a well by hand, it can be very helpful to at least be familiar with the techniques used by real well drillers the kind with big powerful trucks and huge water tanks. What we do is extremely similar, almost identical. We cant dig holes as wide or as deep but it is the same process. A local well drilling company was kind enough to let me video their process. Check it out at Real Well Drilling.
There are several enhancements you can make to the basic DIY well drilling technique. To make the technique even more effective you can use the techniques described on the pages, Drilling Deeper with BENTONITE and Drill 10 Feet Deeper. Additionally, converting to a metal drill bit will make your drilling more productive. These are all techniques that were sent in by users of the site and discovered as they drilled their wells.
Well drilling solutions
A gravel pack can increase a wells production so there is a section on them. I dont recommend you include a gravel pack on your first well but after you get the hang of the technique this is something you will probably want to check out the pages on gravel packs.
Dont go shopping for a pump without reading this page: Which Pump? You want a shallow well pump, also known as a suction pump. Pool pumps and other types of transfer pumps will not work.
In the Videos section, you will find videos that show techniques used world wide. Some of these techniques, like the Baptist Method, require very little drilling fluid and have been used for centuries.
Weve been fortunate enough to receive some input from Bob Tabor, a real well driller who has been drilling wells all of his life. Please be sure and check out the page Advice from a REAL Well Driller.
Bill Granade in Tampa, Florida has developed a very similar DIY water well drilling technique. He has been wildly successful. Bill has helped his neighbors drill a bunch of wells his protocols may be useful to you. Look under Another Home Driller.
Several users of this site have been kind enough to send pictures and info about wells that they have drilled. Check out Success Stories in the menu. For example, one of our recent success stories, Steve in South Jersey is interesting. Steve needed a way to water his Christmas tree farm and he successfully drilled his own well. Very impressive effort! We even got a wonderful email from Greg in Australia about his successful well.
For drillers interested in moving up to the next level: be sure and check out the page on Mud Pump Drilling. It is absolutely the way to go if you can buy or borrow a mud pump (sometimes called a trash pump). It costs more than the two hose method but is still a lot less expensive than hiring a driller.
There is a section for Questions and Answers where I have posted the most common questions I receive. I hope it helps you. There are also sections on Source of Supply, Well Drilling Manuals as well as Well Drilling Links.
Well drilling kits
Commercially drilled water wells tend to be very expensive. This DIY well drilling technique is very cheap. It will almost definitely work if you live near the coast and will likely work if you live in a flat inland area.It is great for saving money on watering your lawn and irrigating a garden.
Drill Your Own Water Well Series - Introduction
As I mentioned in the video, the most interesting things I have experienced in posting this website are the enhancements and improvements that YOU, the viewers and users of this site have submitted. I figured out a few improvements to the Brady Well Kit early on and I managed to drill a functional well after several tries and that is why I posted the site. And then users started writing me and showing me things they had discovered! At this point, I can safely say that most of the techniques presented here are not mine. They are yours! I hope they help you. I hope that if you discover an improvement or an enhancement that you will send it to me so I can post it for others to use.
Well drilling supplies
Below is a video submitted by one of the users of this site. Please take a look at the DIY water well drilled by Travis of Mobile, Alabama. Travis used a 10 foot long 1.25 inch well screen. Congratulations, Travis!
DIY Water Well Drilling
The links in the menu describe the steps in detail. You can pick and choose what subjects to review by clicking on menu items or, if you want to be sure and hit every page, simply click on the Next: link at the bottom of each page.
Next: Background
drillyourownwell.comIf you're gonna fight, fight like you're the third monkey on the ramp to Noah's Ark... and brother its starting to rain. Join our efforts to Secure America's Borders and End Illegal Immigration by Joining ALIPAC's E-Mail Alerts network (CLICK HERE)


 Reply With Quote


15 Antifa Wackos Federally Charged For Interfering With Federal...
06-17-2026, 07:20 AM in General Discussion