

Results 9,881 to 9,890 of 11944
 226Likes
LinkBacks (?)
-
12-26-2016, 11:32 AM
-
09-02-2016, 05:39 PM
-
whole garden made with pallets!! Love it!! | Pallets | Pinterest | Pallets, Pallets Garden and Wooden Pallets
Refback This thread03-06-2016, 11:30 AM -
10-20-2015, 05:29 PM
-
06-12-2015, 08:00 PM
-
02-26-2015, 01:58 PM
-
01-05-2015, 04:13 PM
-
12-19-2014, 10:19 AM
-
EMERGENCY: HUGE FEMA PANDEMIC EXERCISE IN USA IN NOVEMBER, INTERNET SHUT DOWN PART OF EXERCISE | Prepare4Survival
Refback This thread12-03-2014, 10:39 PM -
Off Grid World ? Ugly Duckling Shipping Container Home Built by Artist Is a Beautiful Swan on the Inside
Refback This thread11-25-2014, 03:10 PM -
11-17-2014, 10:59 PM
-
11-13-2014, 11:18 AM
-
11-09-2014, 02:54 PM
-
10-28-2014, 11:38 PM
-
10-26-2014, 05:54 AM
-
10-16-2014, 11:28 AM
-
10-03-2014, 01:25 PM
-
10-02-2014, 09:16 PM
-
09-26-2014, 07:00 PM
-
09-26-2014, 01:56 PM
-
09-19-2014, 04:46 PM
-
09-13-2014, 05:49 AM
-
09-05-2014, 01:52 PM
-
09-01-2014, 09:39 AM
-
08-30-2014, 06:29 PM
-
08-10-2014, 06:29 AM
-
08-04-2014, 05:07 PM
-
07-23-2014, 11:14 AM
-
New Evidence on Expiration Dates | Medical Preparedness | Doom and Bloom (TM) | Doom and Bloom (TM)
Refback This thread07-22-2014, 10:10 AM -
07-18-2014, 08:37 PM
-
07-15-2014, 04:57 PM
-
07-11-2014, 01:40 AM
-
04-22-2014, 11:14 AM
-
04-18-2014, 12:57 PM
-
04-18-2014, 10:10 AM
-
04-14-2014, 12:18 AM
-
04-12-2014, 02:28 AM
-
03-02-2014, 11:43 PM
-
12-24-2013, 11:59 PM
-
12-07-2013, 11:04 PM
-
kitchen | Cob
Refback This thread11-25-2013, 03:24 PM -
10-22-2013, 10:25 PM
-
Apple Pie Braid | Sweets
Refback This thread09-26-2013, 07:58 AM -
09-02-2013, 04:44 PM
-
5 Reasons Why You May have to Bug Out Even Though You Don’t Want to | The Apartment Prepper's Blog
Refback This thread08-23-2013, 03:20 PM -
06-27-2013, 06:30 AM
-
06-23-2013, 08:11 PM
-
06-17-2013, 11:21 PM
-
05-24-2013, 05:06 PM
-
To Eat / BASIC LIST / SUGGESTED ITEMS FOR LONG TERM SURVIVAL - Page 275 - ALIPAC
Refback This thread05-01-2013, 03:49 AM
Thread Information
Users Browsing this Thread
There are currently 2 users browsing this thread. (0 members and 2 guests)
 LinkBack URL
 About LinkBacks
-
06-18-2025, 01:34 PM #9881Senior Member


- Join Date
- Aug 2018
- Posts
- 97,635
80+ Recipes For Home Canning: {Fruits & Vegetables}
Food Preservation
26 comments
This collection highlights garden fresh produce that is pickled, packed in syrups or just in water and I’ve sorted them alphabetically (by vegetable or fruit item) so it will be easy to find what you’re looking for.
This handy reference sheet lists dozens of different tutorials and recipes for canning assorted fruits and vegetables. I’ve handpicked these from around the net and focused on featuring those that are for long term storage (though there are a small number that go straight to the refrigerator, these are noted).
 It's Satisfying To Stock Up The PantryIf you’re more interested in jams, jellies and spreads, many have been already organized on this page: 100 Jams, Jellies & Marmalades.
Note: As with all the tips and lists here on Tipnut, this page will be updated as I come across new goodies so you may want to bookmark this page for reference.
Freebie Alert: Label your freshly packed and sealed jars with these free printables.
*Some recipes are similar to each other but still included because of the tips, slight ingredient tweaks or quality of tutorial each has to offer. Have fun!
Apples:
- Spiced Apples: Apples are grated (including peels), ingredients include sugar, Ceylon cinnamon, ground ginger, freshly grated nutmeg, ground cloves, Citric Acid. From Mrs. Wheelbarrow’s Kitchen.
Asparagus:
- Herbed Pickled Asparagus: Yields 4 pints, ingredients include white wine vinegar, water, granulated sugar, pickling or Kosher salt, fresh oregano and fresh marjoram. From Small Measure.
- Pickled Asparagus & Fiddleheads: Ingredients include thinly sliced onion, fresh asparagus, fresh fiddleheads, white wine vinegar, water, sugar, mustard seeds, coriander seeds, black peppercorns, whole allspice, dried chilies, pickling or Kosher salt. From Backyard Farms.
- Pickled Asparagus With Lemon: Yields 6 – 12 oz jars. Ingredients include white vinegar, water, pickling salt, mustard seeds, peeled garlic cloves, sliced & seeded lemon. From My Pantry Shelf.
- Pickling Asparagus: Made with asparagus spears, white wine vinegar, water, dill seed, chili flakes, sea salt, sliced shallot, sliced garlic and wild garlic flowers (optional). From Laundry Etc.
- Pickled Asparagus: Yields 3 or 4 pint jars. Ingredients include distilled white or white wine vinegar (5% acidity), salt, slivered garlic, dill seed (optional), hot pepper flakes, whole allspice (optional), cumin seed (optional), coriander seed (optional). From The New York Times.
- Pickled Asparagus: Yields approximately 2 pints, ingredients include thick asparagus tips (4″ long), rice vinegar (4% acidity), water, Kosher salt, sugar, pickling spice and peeled garlic cloves. From Piccante Dolce.
- Spicy Pickled Asparagus: Yields 1 – 12 oz jar, ingredients include white vinegar, pickling salt, red pepper flakes, coriander seeds, mustard seeds, garlic cloves. From Sustainable Pantry.
Beets:
- How To Pickle Beets: Packed with a hot brine made of apple cider vinegar, sugar, whole cloves, whole anise berries and cinnamon sticks. From The Bower Family Happenings.
- Pickled Beets: Yields 4 pints. Made with small beets, cider vinegar, sugar, water, small whole onions (peeled), pickling salt, caraway seeds and mustard seeds. From Planet Green.
- Pickled Beets: Made with cider vinegar, brown sugar and beet juice (cooking water). From Brooke’s Food Blog.
- Red or Golden Pickled Beets: (for refrigeration) Makes 2 quarts. Ingredients include coriander seeds, yellow mustard seeds, dill seed, whole allspice, fenugreek seeds, whole cloves, crushed red pepper flakes, fresh bay leaves, white wine vinegar, dry white wine, sugar and coarse salt. From Martha Stewart.
- Pickled Beets: Beets are cooked until fork tender then packed with a boiling sugar and vinegar mix. From Sense and Simplicity.
- How To Make Pickled Beets: Beets are cooked, drained and skins are rubbed off before packing with brine (white vinegar, water, granulated sugar and pickling spice). From Playing In The Dirt.
Cabbage:
- Traditional Method For Making Sauerkraut: {Plus Tips}: Can be canned, frozen or refrigerated. From Tipnut.
- Turkish Fermented Cabbage: (refrigerate) Yields approximately 2 & 1/2 quarts. Ingredients include shredded white head cabbage, sea salt, minced garlic, minced ginger, aleppo pepper (or Korean, or Hungarian paprika & cayenne powder), sugar, water. From Tigress In A Pickle.
Carrots:
- Vietnamese Carrot & Radish Pickle: Ingredients include white vinegar, filtered water, sugar, grated ginger, julienned carrots, julienned dense radish (daikon or watermelon), whole star anise. From Married…with Dinner.
- Pickled Dill Carrots: Yields 5 pints, made with dill seeds, garlic cloves, water, vinegar and pickling salt. From Craving Greens.
- Spicy Pickled Carrots: Yields 5 pints. Made with 4 lbs. of carrots, water, white vinegar (5% acidity), apple cider vinegar (5% acidity), kosher salt, garlic clovers, sliced jalapeno (1 slice per jar), brown mustard seeds, celery seeds, coriander seeds, allspice berries, ground allspice, turmeric. From Hitchhiking to Heaven.
- Canning Carrots: Yields 7 pints. Ingredients include white vinegar, filtered water, pickling or canning salt, garlic cloves, fresh dill heads (or dried dill seeds), hot pepper flakes (optional) and 1-inch sticks of peeled carrots. From Local Kitchen.
- Spicy Pickled Carrots: Made with fresh, peeled carrots, distilled white vinegar, water, sugar, canning salt, dill seed, garlic cloves and hot pepper flakes. From Well Preserved.
- Pickled Carrots With Habanero: Yields 12 pints. Ingredients include 10 pounds of multi-colored carrots (cleaned and quartered), cider vinegar, water, salt, honey, coriander seeds, black pepper, sprigs of thyme and habanero slices. From Winebook Girl.
Cauliflower:
- Pickled Cauliflower, Carrots & Red Bell Pepper: Yields approximately 3 pints, ingredients include coriander seeds, black or brown mustard seeds, cumin seeds, cider vinegar, crushed & peeled garlic, fresh ginger, yellow onion, sugar, Kosher salt, black peppercorns, ground turmeric, crushed red pepper flakes, cauliflower florets, sliced carrots and diced red bell pepper. From Fine Cooking.
- Pickled Cauliflower: Makes 4 quarts, ingredients include coriander seeds, fennel seeds, mustard seeds, dried hot chilies, dried thyme, white vinegar, water and pickling or Kosher salt. From Hunter Angler Gardener Cook.
- Pickled Cauliflower: Ingredients include coriander seeds, turmeric, cumin seeds, black mustard seeds, bay leaves, dried chile de arbols (split), carrot, red onion, white wine vinegar (at least 5% acidity), sugar and Kosher salt. From Saveur.
Cherries:
- Preserved Cherries: Ingredients include pitted Bing cherries, water, salt, sugar, lemon juice, almond extract. Process in a water-bath canner for long term storage. From The Washington Post.
- Cherries In Wine: Yields 4 pints, ingredients include red wine, sugar, orange juice, whole cloves, orange zest and pitted Bing cherries. From Orange County Register.
- Pickled Sour Cherries: (refrigerate for up to one year) Ingredients include white vinegar, water, sugar, peppercorns, bay leaves, sour cherries. from David Lebovitz.
- Pickled Cherries with 5 Spice Blend: (refrigerate) Yields 2 quarts, ingredients include sweet or sour cherries (stems and pits intact), cherry vinegar or red wine vinegar, sugar, salt, Szechuan peppercorns, cinnamon sticks, bay leaves, star anise, whole cloves and whole fennel seeds. From She Simmers.
Cucumbers:
- See this list of homemade pickles and this tip sheet for troubleshooting tips.
Figs:
- Fig Pickles: Yields about 8 pints. Ingredients include sugar, water, vinegar, cinnamon, whole allspice and whole cloves. From National Center for Home Food Preservation.
Green Beans: (Plus a couple for yellow or wax beans)
- Hot Dilly Beans: Ingredients include cayenne pepper, whole garlic cloves, heads of dill, distilled vinegar, pickling or Kosher salt and water. From Lori’s Lipsmacking Goodness.
- Lemon Spiced Bean Pickle: Makes 3 pints, ingredients include green beans (or a 50/50 mix of green and yellow beans), cider vinegar, water, pickling salt, granulated sugar, pickling spice, lemon rind. From Sidewalk Shoes.
- Canning Green Beans: Pressure canning: tightly packed jars of fresh green beans are topped with salt then boiling water poured over to fill jars (cold pack method), sealed then processed in a pressure canner. From Krista’s Kitchen.
- Lemon Rosemary Pickled Green Beans: Makes 6 half-pints, ingredients include water, white wine vinegar, kosher or pickling salt, sugar, garlic cloves, rosemary sprigs and strips of lemon zest. From The Washington Post.
- Pickled Green Beans: Makes 10 pints, ingredients include crushed red pepper flakes, mustard seeds, dill seed, garlic cloves, vinegar, water and salt. From Homestead Revival.
- Dilly Beans: Ingredients include trimmed green beans, cayenne pepper, dill seed, garlic cloves, white vinegar, water and pickling salt. From Food in Jars.
Yellow String Beans or Wax Beans:
- Sweet & Sour Wax Beans: Makes 4 pints. Ingredients include 1-inch pieces of wax beans, white vinegar, sugar, celery seed, ground ginger, dried summer savory or basil, bay leaves. From The Crispy Cook.
- Pickled Yellow Wax Beans: (single jar, store in refrigerator) Ingredients include garlic cloves, coriander seed, small hot chili, black peppercorns, bay leaf, white wine vinegar or apple cider vinegar, dry white wine, water, Kosher salt and sugar. From The Amateur Gourmet.
Onions:
- Golden Crunchy Pickled Onions: Yields 12 pints. Onions are sliced into 1/4″ thick rings and packed with cloves, peppercorns, mustard seed and celery seed. Syrup ingredients include vinegar, water, sugar, salt, turmeric and cinnamon. From Foodie With Family.
- Sweet Onion Pickles: Ingredients include thinly sliced red onions, apple cider vinegar, water, Kosher salt, sugar, white mustard seed, peppercorns and coriander seed, celery seed, caraway seed, cloves and a bay leaf. From Voodoo & Sauce.
Peaches:
- Brandied Peaches: Makes 2 pints, peaches are packed with syrup (water and sugar) then topped with brandy. From The New York Times.
- Peaches In Lavender Syrup: Yields 6 quarts and made with white peaches, water, sugar (to make a light syrup) and dried lavender flowers. From Saving The Season.
- Spicy Bourbon White Peach Pickles: Makes between 2 and 3 half pint jars. Ingredients include granulated sugar, brown sugar, white vinegar, apple cider vinegar, bourbon, water, cinnamon sticks, fresh ginger root, red pepper flakes, yellow mustard seeds and cloves. From Leena Eats.
- Georgia Pickled Ginger Peaches: Makes approximately 2 quarts, ingredients include vitamin C tablets (crushed), distilled white vinegar, sugar, knot of ginger (sliced into coins), cinnamon sticks, ground allspice and whole cloves. From Tigress Can Jam.
- Niagara Peaches in Cardamom Vanilla Bean Syrup: Made with Niagara or medium-sized southern peaches, water, granulated sugar, vanilla bean and cardamom pods. From Piccante Dolce.
- Texas Peach Pickles: Makes 6 to 7 pints, ingredients include small texas peaches (peeled, pitted and halved), lemon juice or crushed vitamin ca tablets, distilled white vinegar, organic cane sugar, knob of ginger (peeled and left whole), whole cloves, whole allspice and cinnamon sticks. From The Cosmic Cowgirl.
- Rum & Syrup Packed Peaches: Ingredients include white sugar and water for a light syrup and a tablespoon of rum per 1 litre jar. From Putting Up With The Turnbulls.
- How To Can Peaches: Yields about 32 pints and made with a bushel of peaches, sugar and water (for syrup). From Shiny Cooking.
Pears:
- Vanilla Pears: Ingredients include sugar, water, cinnamon sticks, whole vanilla beans and whole cloves. From Stitch and Boots.
- Canned Pears With Star Anise: Ingredients include syrup (1:2 sugar, water), lemon juice and star anise. From Doris and Jilly Cook.
- Spiced Canned Pears: Made with a bushel of firm, ripe pears, sugar, water, cinnamon sticks, ground cinnamon, freshly grated nutmeg, whole star anise. Makes about 14 quarts or 28 pints. From Straight from the Farm.
- Belgian Pears: Pears are simmered several hours with white granulated sugar and white wine vinegar before packing in jars. From The Cottage Smallholder.
- Canned In Vanilla Syrup: Yields 4 quarts, made with citric acid (or lemon juice), firm Bartlett pears, sugar, water, vanilla bean, peppercorns and brandy (optional). From Put Up or Shut Up.
- Canned Pears: Gives tips for canning firm pears vs. ripe, soft pears. Made with lemon juice, medium syrup (water and sugar). From Mostly Foodstuffs.
- Mulled In Red Wine: Yields 2 (32 ounce) jars. Granulated sugar, dry red wine, lemon juice, handful of cloves, cinnamon stick and star anise. From Creating Nirvana Today.
Peas:
- Sugar Snap Pea Pickles: (refrigerate) Yields 1 pint, ingredients include distilled white vinegar, cold water, canning salt, turbinado or raw sugar, sliced garlic cloves, red pepper flakes, white peppercorns, mustard seeds, coriander seeds and sugar snap peas with strings removed. From eat.repeat.
- Pressure Canning Peas: Fresh garden peas are shelled, packed in jars and topped with salt and boiling water. Processed in a pressure canner (basic instructions plus video tutorials). From Homestead Acres.
Peppers:
- Savory Pickled Peppers: Ingredients include white vinegar, water, sugar, olive oil, diced onion, diced carrots, peppers, dried oregano, bay leaves. From The Kitchn.
- Fire Roasted Peppers In Red Wine Vinegar: Yields 3 pints. Made with sweet peppers (first charred on a hot woodfire or beneath the broiler), red wine vinegar, water, sugar, non-iodized salt, whole garlic cloves and good olive oil. From Saving the Season.
- Pickled Hot Cherry Peppers: Yields 2 quarts and 1 pint, ingredients include hot cherry peppers, garlic cloves, bay leaves, whole black peppercorns, white-wine vinegar, water, sugar and coarse salt. From Martha Stewart.
- Pound of Pickled Peppers: Ingredients include both sweet and hot peppers (such as banana, fresno and jalapeno), an onion, cider vinegar, water, sugar, salt, bay leaf, coriander, cumin seeds, dried oregano, garlic cloves and black peppercorns. From Sippity Sup.
Plums:
- Whole Plums In Honey Syrup: Made with honey, water, cinnamon sticks, a vanilla bean and star anise. From Food In Jars.
- Canned In Syrup: Whole plums are packed in a medium syrup (2:1 water, sugar) and processed in a hot water bath. From Mostly Foodstuffs.
Potatoes:
These must be pressure canned (for safety) and there’s not much variation in prepping (wash potatoes, cube, pack in jars, top with salt and hot water then process). Here are a couple tutorials to get you started:
- How To Can Potatoes: From No Ordinary Homestead.
- Canning Potatoes: From Becky’s Farm Life.
Pumpkin, Squash & Zucchini:
- Chunky Zucchini Pickles: Yields 6 (500mL) jars. Ingredients include finely chopped onions, pickling or canning salt, granulated sugar, Clearjel (or cornstarch), dry mustard, ground ginger, ground turmeric, water, white vinegar, red bell pepper. From Putting Up With The Turnbulls.
- Pattypan Pickles: Yields 2 pints. Made with pattypan squash or a mix of yellow & green zucchini, pickling salt, garlic cloves, fresh ginger, lemon zest, black peppercorns, coriander seeds, chile flakes, dried Thai pepper. Brine: water, white vinegar, cider vinegar, pickling salt and raw sugar. Processed in a boiling water bath. From Local Kitchen.
- Canned Squash or Pumpkin: (pressure canning) Squash or pumpkin is cubed then blanched, packed in jars then topped with boiling water before processing. From Your Home Kitchen Garden.
- Pumpkin Pickles: Made with lemon, sugar, cider vinegar, fresh ginger (peeled and finely chopped), cinnamon sticks, black peppercorns, salt, sugar pumpkin. From Reader’s Digest.
Radishes:
- Radish Relish: (can be stored for up to one year) Ingredients include distilled white vinegar, sugar, Kosher salt, whole coriander, cumin seed, yellow mustard seed, shredded radishes (2 pounds), diced onion, a knob of ginger (peeled and grated), minced garlic cloves. From Baking with Lisa.
- Pickled Radishes: (refrigerate) Yields 1 pint, ingredients include red wine vinegar, granulated sugar, water, salt, yellow mustard seed (or brown), dash of coriander, whole black peppercorns and a dried bay leaf. From Canning with Kids.
Tomatoes:
 To remove skins, see this tip sheet: How To Skin Tomatoes: {Step By Step}
- Tomatoes Packed In Water: Instructions for both raw-pack and hot-pack methods, canned with bottled lemon juice or citric acid and salt (optional). From The Bitten Word.
- Canning Crushed Tomatoes: Makes about 4 quarts, tomatoes are peeled first, cut in quarters, mashed and heated before canning (with either citric acid, bottled lemon juice or 5% acidity vinegar). From Hippo Flambe.
- Canning Roasted Tomatoes: First roasted (tomatoes, garlic, rosemary, thyme, olive oil) then canned (lemon juice or balsamic vinegar).
- Grandma’s Canned Tomatoes: Yield is 4 quarts, made with tomatoes (3 lbs for each quart you want to make), Kosher salt and lemon juice. From food52.
- Canning Tomatoes: This recipe includes packing tomatoes with herbs, chiles, spices (optional). From Chow Times.
- Canned Tomatoes: Makes 4 quarts or 8 pints, use plum or small Jersey tomatoes, coarse salt and citric acid. From Whole Living.
- Pickled Green Tomatoes: Try Romas, grape or cherry tomatoes, canned with garlic, olive oil (optional), pickling spice, spicy peppers, fresh dill and powdered alum. From Andrea Meyers.
- Pickled Green Tomatoes: Ingredients include jalapeno chile, cumin seeds, peppercorns, celery seed, dill seed, minced garlic, white vinegar and sea salt. Makes 2 pints or 1 quart. From Homesick Texan.
- You’ll find a few recipes for canning salsa here.
- Looking for ways to use up a bounty of green tomatoes? See this list here.
Related Posts


Comments
80+ Recipes For Home Canning: {Fruits & Vegetables}
If you're gonna fight, fight like you're the third monkey on the ramp to Noah's Ark... and brother its starting to rain. Join our efforts to Secure America's Borders and End Illegal Immigration by Joining ALIPAC's E-Mail Alerts network (CLICK HERE)
-
06-18-2025, 01:35 PM #9882Senior Member
- Join Date
- Aug 2018
- Posts
- 97,635
80+ Recipes For Home Canning: {Fruits & Vegetables}
Food Preservation
26 comments
This collection highlights garden fresh produce that is pickled, packed in syrups or just in water and I’ve sorted them alphabetically (by vegetable or fruit item) so it will be easy to find what you’re looking for.
This handy reference sheet lists dozens of different tutorials and recipes for canning assorted fruits and vegetables. I’ve handpicked these from around the net and focused on featuring those that are for long term storage (though there are a small number that go straight to the refrigerator, these are noted).
It's Satisfying To Stock Up The PantryIf you’re more interested in jams, jellies and spreads, many have been already organized on this page: 100 Jams, Jellies & Marmalades.
Note: As with all the tips and lists here on Tipnut, this page will be updated as I come across new goodies so you may want to bookmark this page for reference.
Freebie Alert: Label your freshly packed and sealed jars with these free printables.
*Some recipes are similar to each other but still included because of the tips, slight ingredient tweaks or quality of tutorial each has to offer. Have fun!
Apples:
- Spiced Apples: Apples are grated (including peels), ingredients include sugar, Ceylon cinnamon, ground ginger, freshly grated nutmeg, ground cloves, Citric Acid. From Mrs. Wheelbarrow’s Kitchen.
Asparagus:
- Herbed Pickled Asparagus: Yields 4 pints, ingredients include white wine vinegar, water, granulated sugar, pickling or Kosher salt, fresh oregano and fresh marjoram. From Small Measure.
- Pickled Asparagus & Fiddleheads: Ingredients include thinly sliced onion, fresh asparagus, fresh fiddleheads, white wine vinegar, water, sugar, mustard seeds, coriander seeds, black peppercorns, whole allspice, dried chilies, pickling or Kosher salt. From Backyard Farms.
- Pickled Asparagus With Lemon: Yields 6 – 12 oz jars. Ingredients include white vinegar, water, pickling salt, mustard seeds, peeled garlic cloves, sliced & seeded lemon. From My Pantry Shelf.
- Pickling Asparagus: Made with asparagus spears, white wine vinegar, water, dill seed, chili flakes, sea salt, sliced shallot, sliced garlic and wild garlic flowers (optional). From Laundry Etc.
- Pickled Asparagus: Yields 3 or 4 pint jars. Ingredients include distilled white or white wine vinegar (5% acidity), salt, slivered garlic, dill seed (optional), hot pepper flakes, whole allspice (optional), cumin seed (optional), coriander seed (optional). From The New York Times.
- Pickled Asparagus: Yields approximately 2 pints, ingredients include thick asparagus tips (4″ long), rice vinegar (4% acidity), water, Kosher salt, sugar, pickling spice and peeled garlic cloves. From Piccante Dolce.
- Spicy Pickled Asparagus: Yields 1 – 12 oz jar, ingredients include white vinegar, pickling salt, red pepper flakes, coriander seeds, mustard seeds, garlic cloves. From Sustainable Pantry.
Beets:
- How To Pickle Beets: Packed with a hot brine made of apple cider vinegar, sugar, whole cloves, whole anise berries and cinnamon sticks. From The Bower Family Happenings.
- Pickled Beets: Yields 4 pints. Made with small beets, cider vinegar, sugar, water, small whole onions (peeled), pickling salt, caraway seeds and mustard seeds. From Planet Green.
- Pickled Beets: Made with cider vinegar, brown sugar and beet juice (cooking water). From Brooke’s Food Blog.
- Red or Golden Pickled Beets: (for refrigeration) Makes 2 quarts. Ingredients include coriander seeds, yellow mustard seeds, dill seed, whole allspice, fenugreek seeds, whole cloves, crushed red pepper flakes, fresh bay leaves, white wine vinegar, dry white wine, sugar and coarse salt. From Martha Stewart.
- Pickled Beets: Beets are cooked until fork tender then packed with a boiling sugar and vinegar mix. From Sense and Simplicity.
- How To Make Pickled Beets: Beets are cooked, drained and skins are rubbed off before packing with brine (white vinegar, water, granulated sugar and pickling spice). From Playing In The Dirt.
Cabbage:
- Traditional Method For Making Sauerkraut: {Plus Tips}: Can be canned, frozen or refrigerated. From Tipnut.
- Turkish Fermented Cabbage: (refrigerate) Yields approximately 2 & 1/2 quarts. Ingredients include shredded white head cabbage, sea salt, minced garlic, minced ginger, aleppo pepper (or Korean, or Hungarian paprika & cayenne powder), sugar, water. From Tigress In A Pickle.
Carrots:
- Vietnamese Carrot & Radish Pickle: Ingredients include white vinegar, filtered water, sugar, grated ginger, julienned carrots, julienned dense radish (daikon or watermelon), whole star anise. From Married…with Dinner.
- Pickled Dill Carrots: Yields 5 pints, made with dill seeds, garlic cloves, water, vinegar and pickling salt. From Craving Greens.
- Spicy Pickled Carrots: Yields 5 pints. Made with 4 lbs. of carrots, water, white vinegar (5% acidity), apple cider vinegar (5% acidity), kosher salt, garlic clovers, sliced jalapeno (1 slice per jar), brown mustard seeds, celery seeds, coriander seeds, allspice berries, ground allspice, turmeric. From Hitchhiking to Heaven.
- Canning Carrots: Yields 7 pints. Ingredients include white vinegar, filtered water, pickling or canning salt, garlic cloves, fresh dill heads (or dried dill seeds), hot pepper flakes (optional) and 1-inch sticks of peeled carrots. From Local Kitchen.
- Spicy Pickled Carrots: Made with fresh, peeled carrots, distilled white vinegar, water, sugar, canning salt, dill seed, garlic cloves and hot pepper flakes. From Well Preserved.
- Pickled Carrots With Habanero: Yields 12 pints. Ingredients include 10 pounds of multi-colored carrots (cleaned and quartered), cider vinegar, water, salt, honey, coriander seeds, black pepper, sprigs of thyme and habanero slices. From Winebook Girl.
Cauliflower:
- Pickled Cauliflower, Carrots & Red Bell Pepper: Yields approximately 3 pints, ingredients include coriander seeds, black or brown mustard seeds, cumin seeds, cider vinegar, crushed & peeled garlic, fresh ginger, yellow onion, sugar, Kosher salt, black peppercorns, ground turmeric, crushed red pepper flakes, cauliflower florets, sliced carrots and diced red bell pepper. From Fine Cooking.
- Pickled Cauliflower: Makes 4 quarts, ingredients include coriander seeds, fennel seeds, mustard seeds, dried hot chilies, dried thyme, white vinegar, water and pickling or Kosher salt. From Hunter Angler Gardener Cook.
- Pickled Cauliflower: Ingredients include coriander seeds, turmeric, cumin seeds, black mustard seeds, bay leaves, dried chile de arbols (split), carrot, red onion, white wine vinegar (at least 5% acidity), sugar and Kosher salt. From Saveur.
Cherries:
- Preserved Cherries: Ingredients include pitted Bing cherries, water, salt, sugar, lemon juice, almond extract. Process in a water-bath canner for long term storage. From The Washington Post.
- Cherries In Wine: Yields 4 pints, ingredients include red wine, sugar, orange juice, whole cloves, orange zest and pitted Bing cherries. From Orange County Register.
- Pickled Sour Cherries: (refrigerate for up to one year) Ingredients include white vinegar, water, sugar, peppercorns, bay leaves, sour cherries. from David Lebovitz.
- Pickled Cherries with 5 Spice Blend: (refrigerate) Yields 2 quarts, ingredients include sweet or sour cherries (stems and pits intact), cherry vinegar or red wine vinegar, sugar, salt, Szechuan peppercorns, cinnamon sticks, bay leaves, star anise, whole cloves and whole fennel seeds. From She Simmers.
Cucumbers:
- See this list of homemade pickles and this tip sheet for troubleshooting tips.
Figs:
- Fig Pickles: Yields about 8 pints. Ingredients include sugar, water, vinegar, cinnamon, whole allspice and whole cloves. From National Center for Home Food Preservation.
Green Beans: (Plus a couple for yellow or wax beans)
- Hot Dilly Beans: Ingredients include cayenne pepper, whole garlic cloves, heads of dill, distilled vinegar, pickling or Kosher salt and water. From Lori’s Lipsmacking Goodness.
- Lemon Spiced Bean Pickle: Makes 3 pints, ingredients include green beans (or a 50/50 mix of green and yellow beans), cider vinegar, water, pickling salt, granulated sugar, pickling spice, lemon rind. From Sidewalk Shoes.
- Canning Green Beans: Pressure canning: tightly packed jars of fresh green beans are topped with salt then boiling water poured over to fill jars (cold pack method), sealed then processed in a pressure canner. From Krista’s Kitchen.
- Lemon Rosemary Pickled Green Beans: Makes 6 half-pints, ingredients include water, white wine vinegar, kosher or pickling salt, sugar, garlic cloves, rosemary sprigs and strips of lemon zest. From The Washington Post.
- Pickled Green Beans: Makes 10 pints, ingredients include crushed red pepper flakes, mustard seeds, dill seed, garlic cloves, vinegar, water and salt. From Homestead Revival.
- Dilly Beans: Ingredients include trimmed green beans, cayenne pepper, dill seed, garlic cloves, white vinegar, water and pickling salt. From Food in Jars.
Yellow String Beans or Wax Beans:
- Sweet & Sour Wax Beans: Makes 4 pints. Ingredients include 1-inch pieces of wax beans, white vinegar, sugar, celery seed, ground ginger, dried summer savory or basil, bay leaves. From The Crispy Cook.
- Pickled Yellow Wax Beans: (single jar, store in refrigerator) Ingredients include garlic cloves, coriander seed, small hot chili, black peppercorns, bay leaf, white wine vinegar or apple cider vinegar, dry white wine, water, Kosher salt and sugar. From The Amateur Gourmet.
Onions:
- Golden Crunchy Pickled Onions: Yields 12 pints. Onions are sliced into 1/4″ thick rings and packed with cloves, peppercorns, mustard seed and celery seed. Syrup ingredients include vinegar, water, sugar, salt, turmeric and cinnamon. From Foodie With Family.
- Sweet Onion Pickles: Ingredients include thinly sliced red onions, apple cider vinegar, water, Kosher salt, sugar, white mustard seed, peppercorns and coriander seed, celery seed, caraway seed, cloves and a bay leaf. From Voodoo & Sauce.
Peaches:
- Brandied Peaches: Makes 2 pints, peaches are packed with syrup (water and sugar) then topped with brandy. From The New York Times.
- Peaches In Lavender Syrup: Yields 6 quarts and made with white peaches, water, sugar (to make a light syrup) and dried lavender flowers. From Saving The Season.
- Spicy Bourbon White Peach Pickles: Makes between 2 and 3 half pint jars. Ingredients include granulated sugar, brown sugar, white vinegar, apple cider vinegar, bourbon, water, cinnamon sticks, fresh ginger root, red pepper flakes, yellow mustard seeds and cloves. From Leena Eats.
- Georgia Pickled Ginger Peaches: Makes approximately 2 quarts, ingredients include vitamin C tablets (crushed), distilled white vinegar, sugar, knot of ginger (sliced into coins), cinnamon sticks, ground allspice and whole cloves. From Tigress Can Jam.
- Niagara Peaches in Cardamom Vanilla Bean Syrup: Made with Niagara or medium-sized southern peaches, water, granulated sugar, vanilla bean and cardamom pods. From Piccante Dolce.
- Texas Peach Pickles: Makes 6 to 7 pints, ingredients include small texas peaches (peeled, pitted and halved), lemon juice or crushed vitamin ca tablets, distilled white vinegar, organic cane sugar, knob of ginger (peeled and left whole), whole cloves, whole allspice and cinnamon sticks. From The Cosmic Cowgirl.
- Rum & Syrup Packed Peaches: Ingredients include white sugar and water for a light syrup and a tablespoon of rum per 1 litre jar. From Putting Up With The Turnbulls.
- How To Can Peaches: Yields about 32 pints and made with a bushel of peaches, sugar and water (for syrup). From Shiny Cooking.
Pears:
- Vanilla Pears: Ingredients include sugar, water, cinnamon sticks, whole vanilla beans and whole cloves. From Stitch and Boots.
- Canned Pears With Star Anise: Ingredients include syrup (1:2 sugar, water), lemon juice and star anise. From Doris and Jilly Cook.
- Spiced Canned Pears: Made with a bushel of firm, ripe pears, sugar, water, cinnamon sticks, ground cinnamon, freshly grated nutmeg, whole star anise. Makes about 14 quarts or 28 pints. From Straight from the Farm.
- Belgian Pears: Pears are simmered several hours with white granulated sugar and white wine vinegar before packing in jars. From The Cottage Smallholder.
- Canned In Vanilla Syrup: Yields 4 quarts, made with citric acid (or lemon juice), firm Bartlett pears, sugar, water, vanilla bean, peppercorns and brandy (optional). From Put Up or Shut Up.
- Canned Pears: Gives tips for canning firm pears vs. ripe, soft pears. Made with lemon juice, medium syrup (water and sugar). From Mostly Foodstuffs.
- Mulled In Red Wine: Yields 2 (32 ounce) jars. Granulated sugar, dry red wine, lemon juice, handful of cloves, cinnamon stick and star anise. From Creating Nirvana Today.
Peas:
- Sugar Snap Pea Pickles: (refrigerate) Yields 1 pint, ingredients include distilled white vinegar, cold water, canning salt, turbinado or raw sugar, sliced garlic cloves, red pepper flakes, white peppercorns, mustard seeds, coriander seeds and sugar snap peas with strings removed. From eat.repeat.
- Pressure Canning Peas: Fresh garden peas are shelled, packed in jars and topped with salt and boiling water. Processed in a pressure canner (basic instructions plus video tutorials). From Homestead Acres.
Peppers:
- Savory Pickled Peppers: Ingredients include white vinegar, water, sugar, olive oil, diced onion, diced carrots, peppers, dried oregano, bay leaves. From The Kitchn.
- Fire Roasted Peppers In Red Wine Vinegar: Yields 3 pints. Made with sweet peppers (first charred on a hot woodfire or beneath the broiler), red wine vinegar, water, sugar, non-iodized salt, whole garlic cloves and good olive oil. From Saving the Season.
- Pickled Hot Cherry Peppers: Yields 2 quarts and 1 pint, ingredients include hot cherry peppers, garlic cloves, bay leaves, whole black peppercorns, white-wine vinegar, water, sugar and coarse salt. From Martha Stewart.
- Pound of Pickled Peppers: Ingredients include both sweet and hot peppers (such as banana, fresno and jalapeno), an onion, cider vinegar, water, sugar, salt, bay leaf, coriander, cumin seeds, dried oregano, garlic cloves and black peppercorns. From Sippity Sup.
Plums:
- Whole Plums In Honey Syrup: Made with honey, water, cinnamon sticks, a vanilla bean and star anise. From Food In Jars.
- Canned In Syrup: Whole plums are packed in a medium syrup (2:1 water, sugar) and processed in a hot water bath. From Mostly Foodstuffs.
Potatoes:
These must be pressure canned (for safety) and there’s not much variation in prepping (wash potatoes, cube, pack in jars, top with salt and hot water then process). Here are a couple tutorials to get you started:
- How To Can Potatoes: From No Ordinary Homestead.
- Canning Potatoes: From Becky’s Farm Life.
Pumpkin, Squash & Zucchini:
- Chunky Zucchini Pickles: Yields 6 (500mL) jars. Ingredients include finely chopped onions, pickling or canning salt, granulated sugar, Clearjel (or cornstarch), dry mustard, ground ginger, ground turmeric, water, white vinegar, red bell pepper. From Putting Up With The Turnbulls.
- Pattypan Pickles: Yields 2 pints. Made with pattypan squash or a mix of yellow & green zucchini, pickling salt, garlic cloves, fresh ginger, lemon zest, black peppercorns, coriander seeds, chile flakes, dried Thai pepper. Brine: water, white vinegar, cider vinegar, pickling salt and raw sugar. Processed in a boiling water bath. From Local Kitchen.
- Canned Squash or Pumpkin: (pressure canning) Squash or pumpkin is cubed then blanched, packed in jars then topped with boiling water before processing. From Your Home Kitchen Garden.
- Pumpkin Pickles: Made with lemon, sugar, cider vinegar, fresh ginger (peeled and finely chopped), cinnamon sticks, black peppercorns, salt, sugar pumpkin. From Reader’s Digest.
Radishes:
- Radish Relish: (can be stored for up to one year) Ingredients include distilled white vinegar, sugar, Kosher salt, whole coriander, cumin seed, yellow mustard seed, shredded radishes (2 pounds), diced onion, a knob of ginger (peeled and grated), minced garlic cloves. From Baking with Lisa.
- Pickled Radishes: (refrigerate) Yields 1 pint, ingredients include red wine vinegar, granulated sugar, water, salt, yellow mustard seed (or brown), dash of coriander, whole black peppercorns and a dried bay leaf. From Canning with Kids.
Tomatoes:
To remove skins, see this tip sheet: How To Skin Tomatoes: {Step By Step}
- Tomatoes Packed In Water: Instructions for both raw-pack and hot-pack methods, canned with bottled lemon juice or citric acid and salt (optional). From The Bitten Word.
- Canning Crushed Tomatoes: Makes about 4 quarts, tomatoes are peeled first, cut in quarters, mashed and heated before canning (with either citric acid, bottled lemon juice or 5% acidity vinegar). From Hippo Flambe.
- Canning Roasted Tomatoes: First roasted (tomatoes, garlic, rosemary, thyme, olive oil) then canned (lemon juice or balsamic vinegar).
- Grandma’s Canned Tomatoes: Yield is 4 quarts, made with tomatoes (3 lbs for each quart you want to make), Kosher salt and lemon juice. From food52.
- Canning Tomatoes: This recipe includes packing tomatoes with herbs, chiles, spices (optional). From Chow Times.
- Canned Tomatoes: Makes 4 quarts or 8 pints, use plum or small Jersey tomatoes, coarse salt and citric acid. From Whole Living.
- Pickled Green Tomatoes: Try Romas, grape or cherry tomatoes, canned with garlic, olive oil (optional), pickling spice, spicy peppers, fresh dill and powdered alum. From Andrea Meyers.
- Pickled Green Tomatoes: Ingredients include jalapeno chile, cumin seeds, peppercorns, celery seed, dill seed, minced garlic, white vinegar and sea salt. Makes 2 pints or 1 quart. From Homesick Texan.
- You’ll find a few recipes for canning salsa here.
- Looking for ways to use up a bounty of green tomatoes? See this list here.
Related Posts
Healthy Snack Option: Here’s How To Dry Apples (Chips)
How To Skin Tomatoes – Works For Peaches Too!
Old-Timers Practical Advice for Home Preserving
Comments
80+ Recipes For Home Canning: {Fruits & Vegetables}
If you're gonna fight, fight like you're the third monkey on the ramp to Noah's Ark... and brother its starting to rain. Join our efforts to Secure America's Borders and End Illegal Immigration by Joining ALIPAC's E-Mail Alerts network (CLICK HERE)
-
06-18-2025, 02:11 PM #9883Senior Member
- Join Date
- Aug 2018
- Posts
- 97,635

How To Make a Wattle Fence With Branches

Written by Author Elizabeth Waddington Published on May 18, 2022
57145shares

Close up of small wattle fence.
There are many fence ideas to consider for your garden. Making a wattle fence with branches is one interesting and attractive choice to consider.
One of the most eco-friendly choices is to use materials that are free and readily available where you live. Making use of natural materials makes sense because it allows you to avoid the cost (both in terms of finances and the environment) of buying new materials.
Where I live, we have plenty of pruned branches from our trees, so it makes sense to make use of these where we need new fences on the property.
Of course, there are plenty of ways to turn branches into a fence. You could build a brush boundary, for example, or make some sort of picket fence, but a wattle fence is one of the best options.
What Is a Wattle Fence?
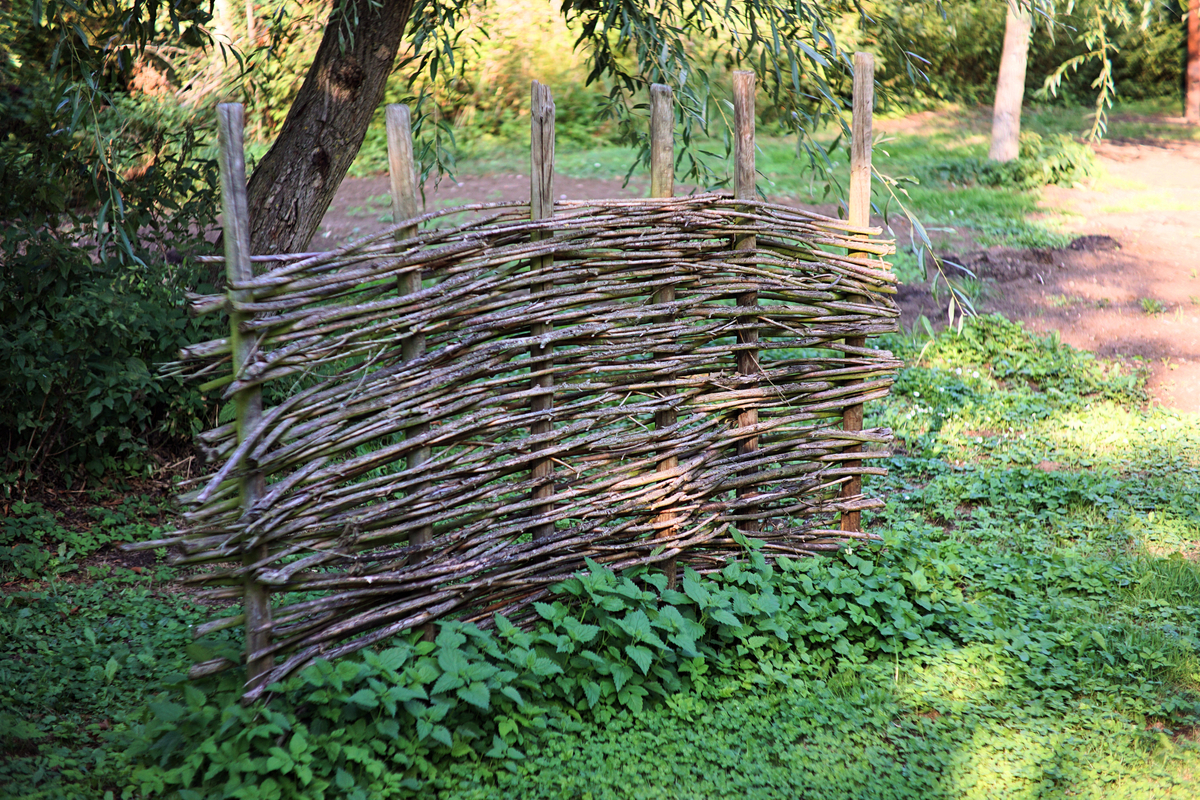
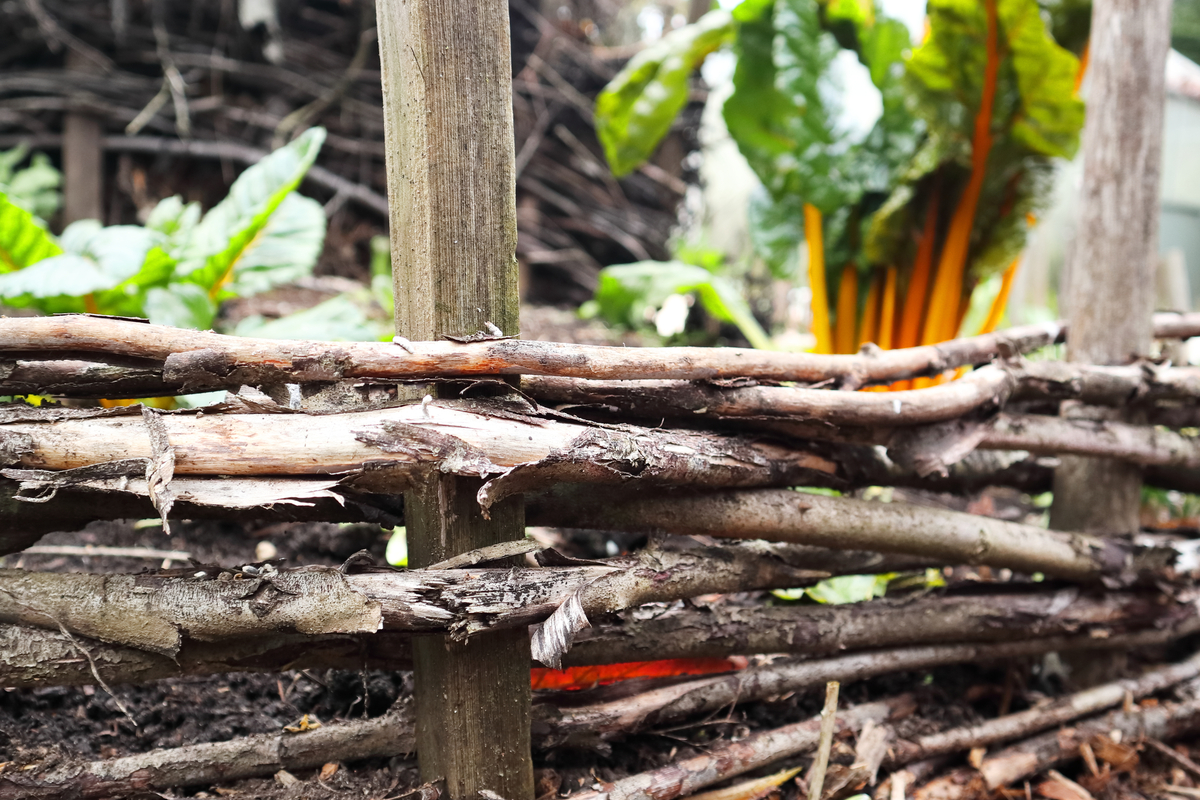
A wattle fence is a lightweight construction. It is made by weaving thin branches (or strips of wood) in between upright stakes to form a woven lattice. This is an old form of building that is traditional in the British Isles, Ireland and other parts of Europe. This traditional technique dates back to Neolithic times. It has commonly been used to make a wide range of hurdles or fencing enclosures.
A hurdle is the name given to movable sections of fencing, that are often used in livestock handling. These loose panels of wattle are placed within timber framing. In this article, however, we’ll focus on wattle fencing – which is made in situ as a construction affixed to stakes placed in the ground.
Wattle fencing is also the internal structure of an old composite building material called wattle and daub. The wattle skeleton forms a framework for walls that are daubed with a thick mix of soil or clay, sand, sometimes animal dung, and straw. This is a building technique that is at least 6,000 years old. It is also still an important construction material in many parts of the world.
There is also a resurgence of interest in this method of construction in sustainable building in the developed world. Many eco-builders are seeking to return towards this natural and low-impact technique to construct their homes – not only their garden or livestock fences.
Why Build a Wattle Fence?
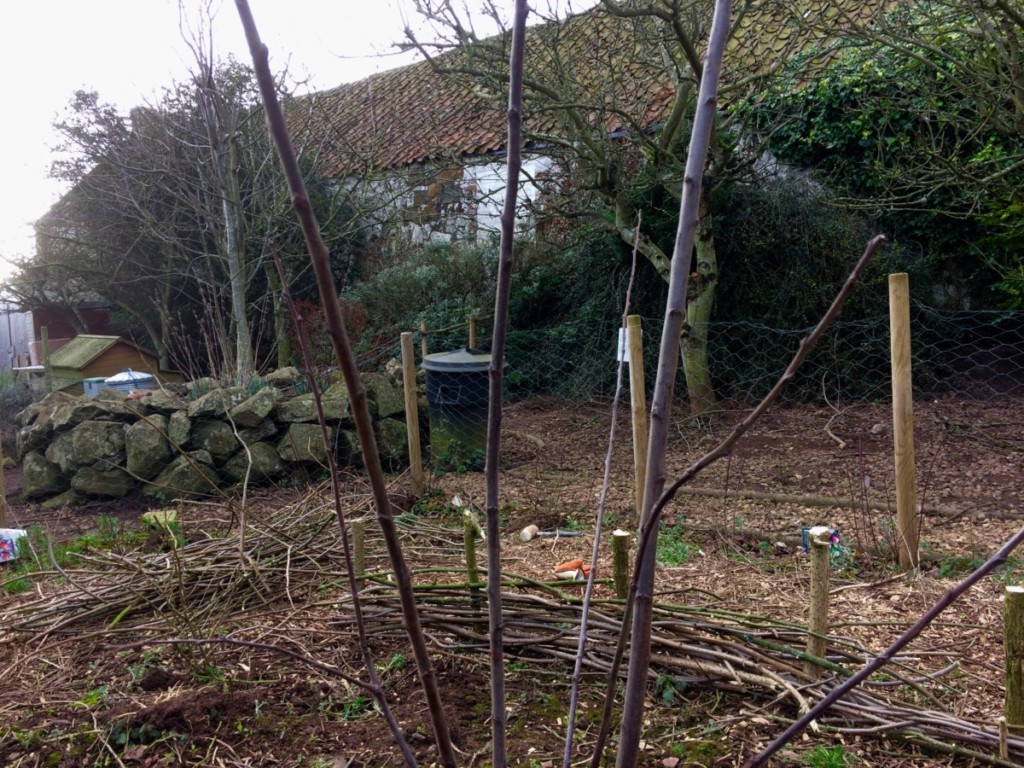
Mine is a low, decorative fence that will curve round a plum tree guild in the new forest garden area.
A wattle fence can find a wide range of uses. For example, you might build such a fence:
- To mark the boundary of your property.
- For creating attractive division between different areas of your garden.
- To provide some shelter or wind-breaking for a vegetable plot or other growing area.
- As wind-breaking or a privacy screen for an outdoors seating area.
- As a low decorative fence to surround raised beds or other growing areas.
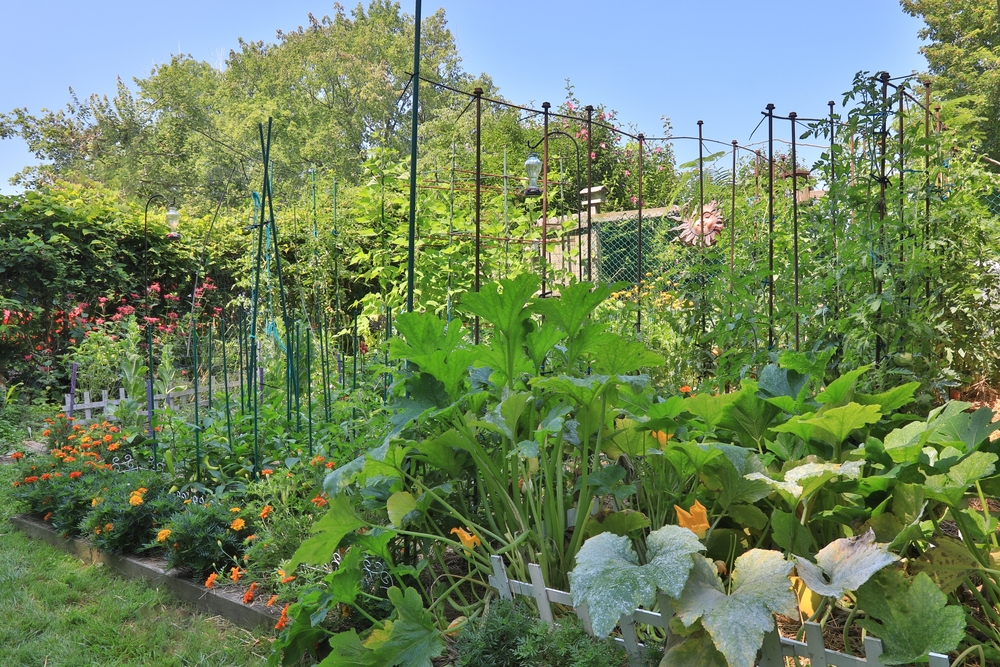
- To make a higher fence to keep out pests or keep in pets.
- As a safety feature to keep children or pets away from a pond, for example.
- As a sturdy fence to contain livestock.

As you can see from the above, these are very useful and versatile structures. You might choose to construct them for a range of reasons around your homestead.
Which Wood To Choose
Of course, one of the first steps in making a wattle fence is choosing your wood. The wood you choose to use will have an impact on how strong and sturdy your fencing will be.
Traditional woods used in hurdle construction include hazel, willow and alder. However, you can make use of a wide range of different woods from your property or the surrounding area.
My wattle fence utilises a wide range of woods from our property, including elder, ash, apple and plum branches.
Whichever wood you choose, the stakes (sometimes called sales), or uprights, should be strong. Hard wood is usually a better choice. Note that if you choose to use willow for the uprights, the cut stakes will live on, re-root and grow. You will need to trim them each year to keep your ‘fedge’ in shape.
The weavers, which are woven between these uprights, must be pliable enough to bend back and forth through the structure. You can use whole, thin branches, or split sections. Splitting the branches will be far more time-consuming. But it might allow you to create a closer weave and a lighter weight construction.
It is best to choose green, freshly cut wood, which will be pliable and more easy to weave through your structure.
Making Design Decisions
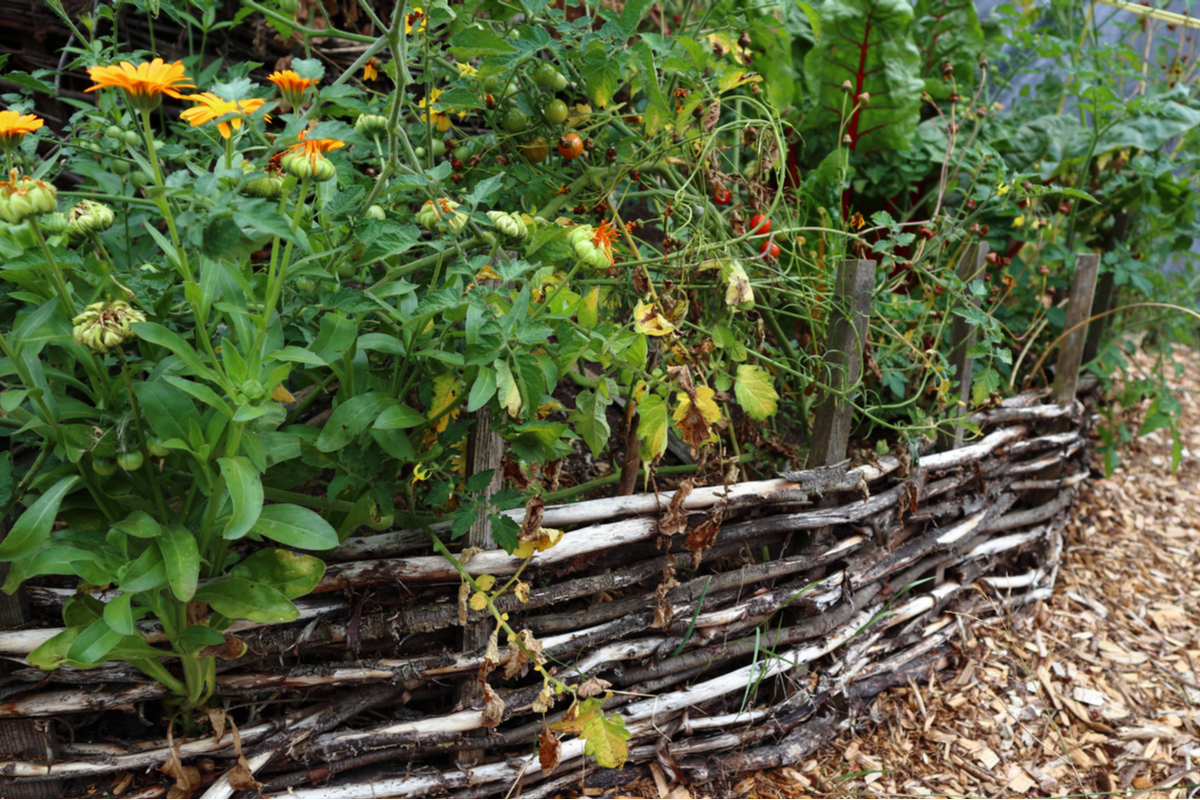
As well as deciding which type of wood or woods to use, you will also have to make a number of other decisions. Before you even start preparing to build your fence, it will be crucial for you to make a number of design decisions.
Of course, one important consideration will be where exactly your fence will be positioned and how far it will run. Think about the primary purpose or functions of the fence. The way in which you are using your fence will determine how tall it must be, and how sturdy and thick a construction it will have to be.
If the fence is purely decorative, thinner branches can be used. Thicker branches will be required for a fence that must withstand larger livestock, for example. The required height will also often be dictated by the purpose and position of the fencing.
As well as thinking about the practicalities, you may also wish to think about the aesthetics. For example, consider whether you want straight fencing, or would prefer a curving and organic design.
You should also consider how ‘rustic’ you would like your fencing to look. Personally, I like the rustic look. I therefore decided to keep the bark on, and use a range of different wood types. If you prefer a neater and more streamline look, you may prefer to remove the bark and/or opt for just one or two wood types. You may also look for greater uniformity in the branches that you choose.
A Step By Step Guide To Building Your Wattle Fence
Once you have a good idea in mind of what exactly you would like to construct, and where, it is time to get started. Make sure that you have set aside enough time for the project. While it is a relatively easy project, it can be quite time consuming. Ideally, have some helpers on hand.
To make your fence, you may need:
- A wood saw or pruning saw (to cut thicker branches for stakes).
- Some loppers (to cut larger branches).
- Some secateurs or pruning shears (for smaller branches)
- A mallet or post-driver (to drive uprights into the ground)
Unless you already own them, power tools will not usually be required for this simple garden project.
1. Mark Out the Position of Your Fence
First, mark out exactly where you would like your fence to go. Remember to think about factors like sunlight, wind and views. You should also be sure to think about the needs of you, your family, and any pets, livestock or wildlife involved.
To mark out the fence, use natural twine and sticks, or create a line to mark the line of your new fencing. One idea is to mark out the fence line using flour, so you can clearly see where the fence should go. This can be easier than using string if you are creating curved or wave-like shapes. Another idea for creating sinuous forms is to lay out a garden hose to mark where the fencing should go.
2. Gather Your Materials
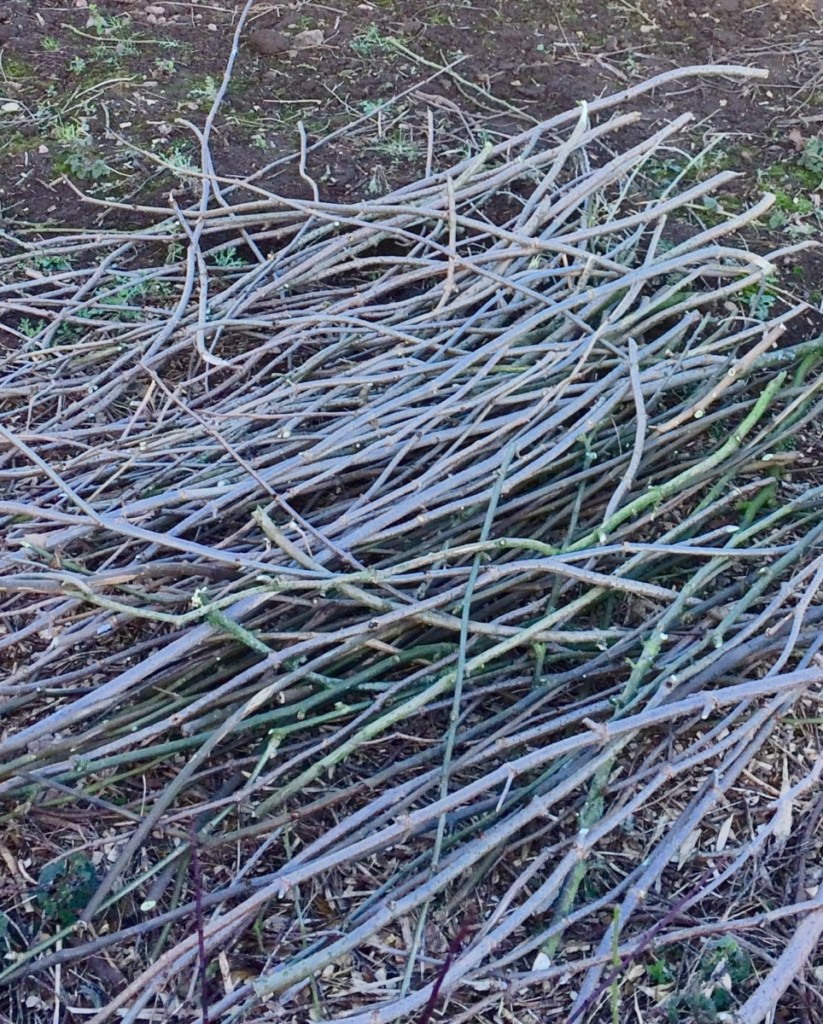
A selection of branches pruned from the garden.
Next, gather your materials. How many stakes and weavers you will need will, of course, depend on how long and how tall your fence will be. Think first about how many stakes you will need, planning how far apart these should be placed.
Collect the requisite number of sturdy uprights for your fence and cut them to the required height. (Remember that a certain proportion of their length will be buried in the ground.)
Next, collect long and bendy branches that can be woven between these stakes. Gather as many as you can, and keep them as long as possible to make the work easier. How many you will need will depend on their thickness, and the required height of your fence. It will also depend on how tight a lattice you would like to weave.
You might not currently have enough branches to make a fence of the desired height. But you could still start construction, and as long as the stakes are long enough, you will be able to build up your fence as you are able to gather more branches over time.
3. Create and Position Your Stakes
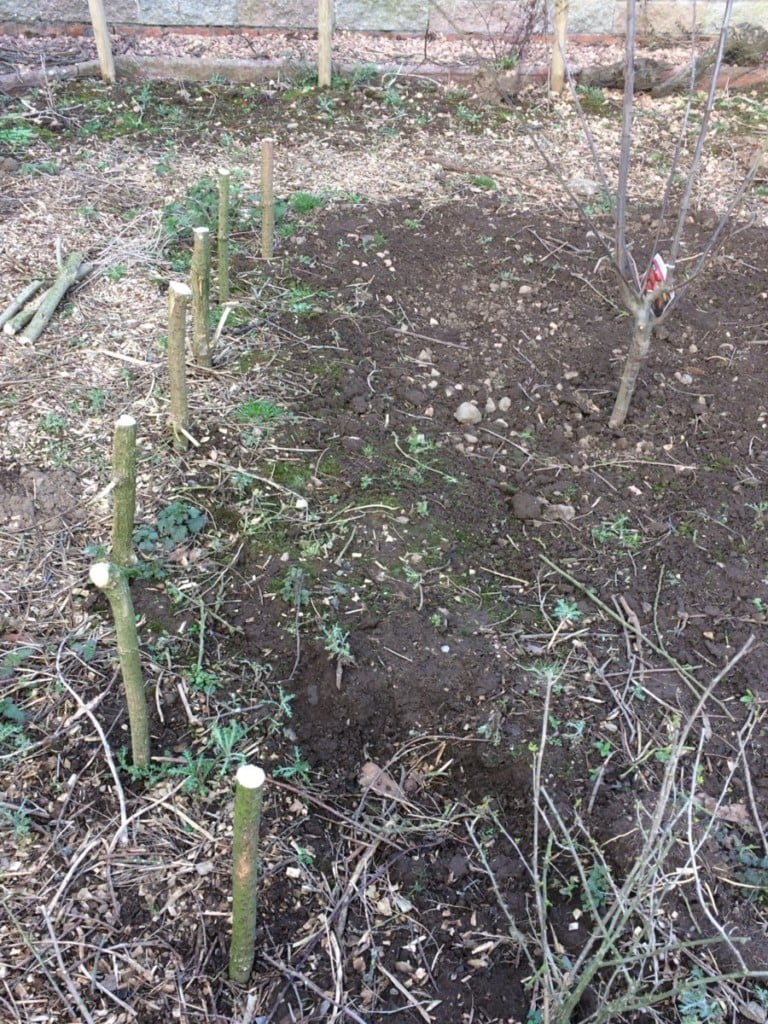
Short stakes in place for short, decorative wattle fence.
Once you have your stakes and have cut them to the length required, it is time to ready them for placement. Cutting the bases of your uprights to form points will make it easier to drive them into the ground. However, this may not be necessary if you are creating your fence where the ground is relatively soft and easy to work.
Next, take your stakes and insert them along your fence line. Use a post driver or mallet to insert them firmly into the ground. Try to make sure that each stake is as vertical as possible.
Optional: Remove Bark from Some or All Branches
At this point, you may wish to remove the bark from some or all of your weavers. Removing the bark from some and leaving it on others would allow you to create a range of interesting decorative effects. If you are splitting your branches, this is also a good time to undertake this work.
4. Begin Weaving Your Branches Between The Stakes
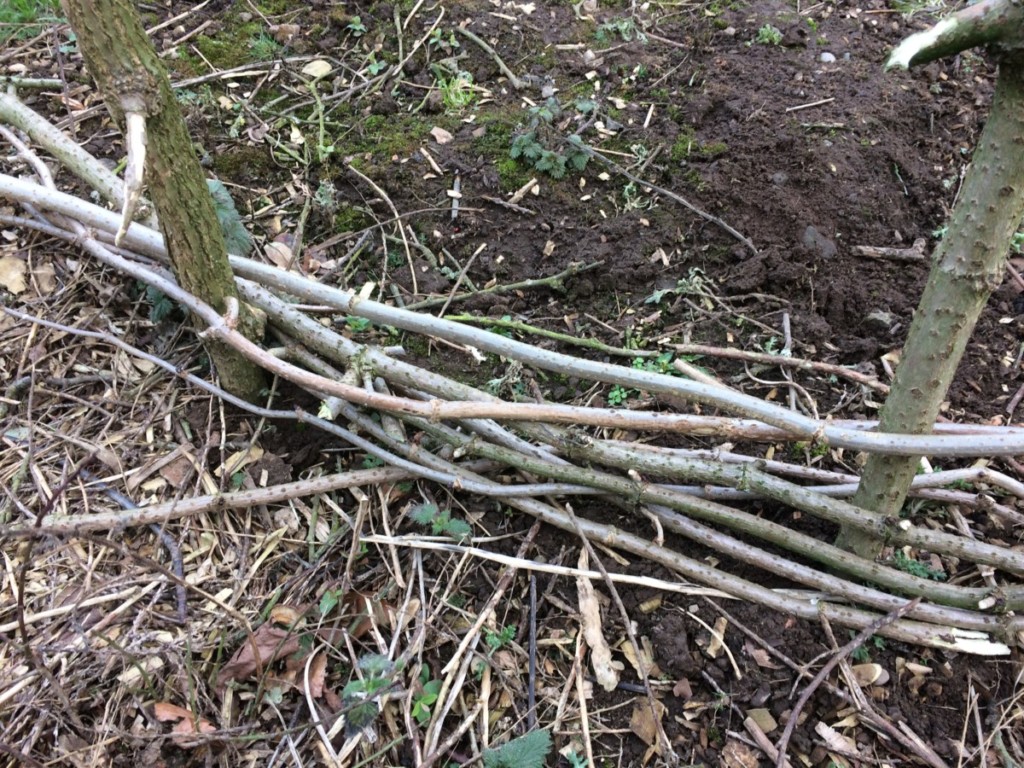
Weaving the first few branches.
Next, take the first of your weaver branches and begin to weave it in and out between your stakes. Then take a second branch and weave it in and out. Make sure that you go on the opposite side of each stake. So if the first branch went on the outside of the first and third stake, and the inside of the second, then the second weaver should go to the inside of the first and third stakes, and the outside of the second.
If your fence run is longer than the weavers you are using, stagger the start point of each row. This will ensure that there is not a break line in the fencing and the weave continues over the whole structure. Since branches are naturally thicker at one end than the other, be sure to alternate their direction so your fence is not higher at one side than the other.
5. Continue Weaving Until Your Fence Reaches The Required Height
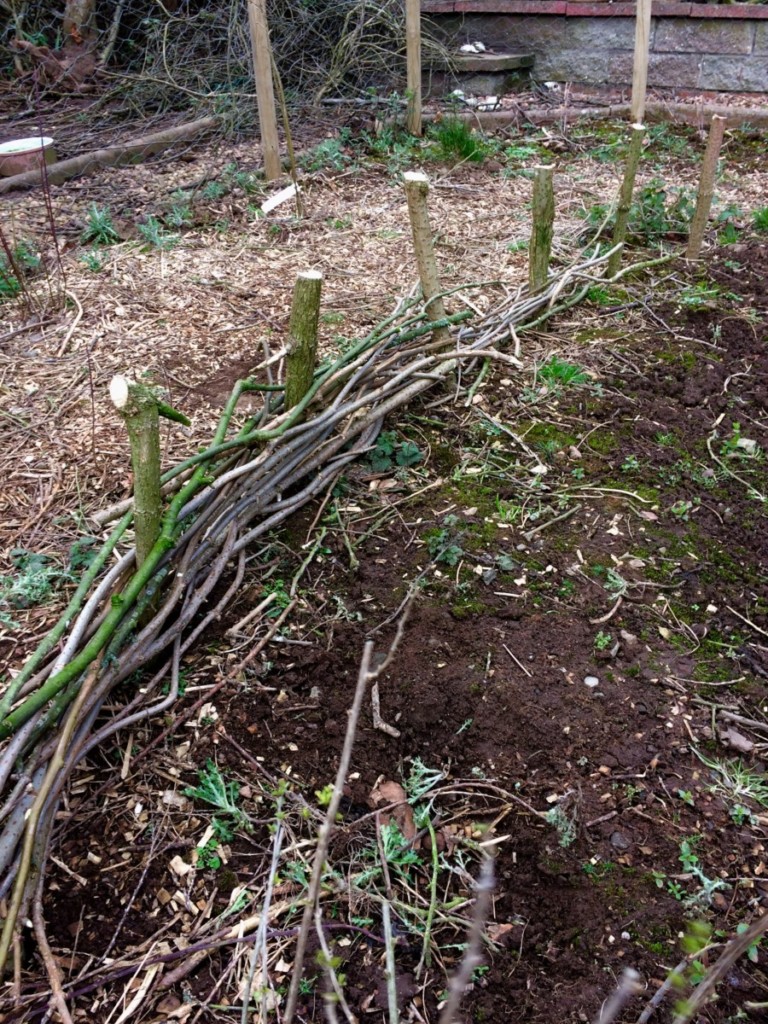
Fence in progress.
Simply continue to weave the branches between the stakes until your fence is as tall as you want it to be, or you have run out of materials. Push the weavers down as you go, to create a lattice of the required spacing. The more firmly you push down the weavers, the more sturdy and solid your fencing will be.
Finally, neaten off your fencing by cutting off any branch ends that are sticking out and stand back to admire the result of your hard work.
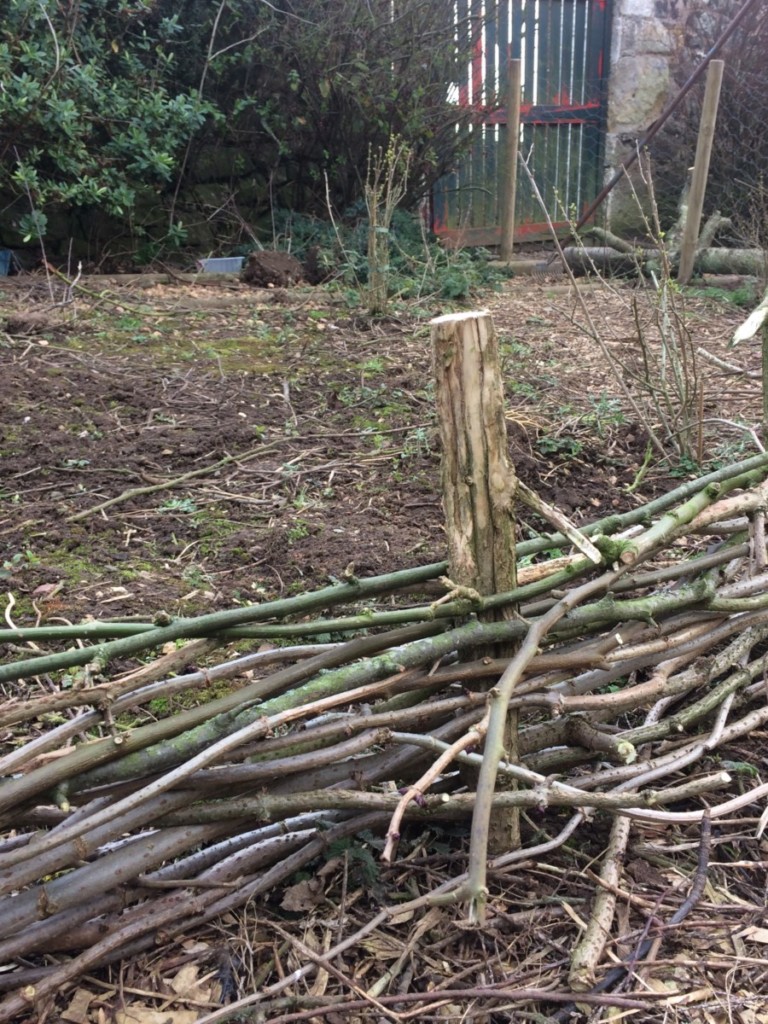
Branch ends sticking out can be cut off if required.
A well-built wattle fence can last for a long time. No matter how large or small a fence you create, you can rest assured that it will continue to do its job for many years to come.
Read Next: How To Make A Rustic Trellis With Branches
How To Make a Wattle Fence With BranchesIf you're gonna fight, fight like you're the third monkey on the ramp to Noah's Ark... and brother its starting to rain. Join our efforts to Secure America's Borders and End Illegal Immigration by Joining ALIPAC's E-Mail Alerts network (CLICK HERE)
-
06-18-2025, 02:26 PM #9884Senior Member
- Join Date
- Aug 2018
- Posts
- 97,635
DIY Pine Wattle Fencing
DIY Pine Wattle Fencing - Search ImagesIf you're gonna fight, fight like you're the third monkey on the ramp to Noah's Ark... and brother its starting to rain. Join our efforts to Secure America's Borders and End Illegal Immigration by Joining ALIPAC's E-Mail Alerts network (CLICK HERE)
-
06-18-2025, 02:29 PM #9885Senior Member
- Join Date
- Aug 2018
- Posts
- 97,635
DIY Ultimate Compost Bin
By Survivor 002 in DIY, Frugal, Gardening, Homesteading, Hunker Down Prepping, Off Grid, Prepping, Recycle, SHTF, Tutorials
DIY Ultimate Compost Bin
Share the knowledge!
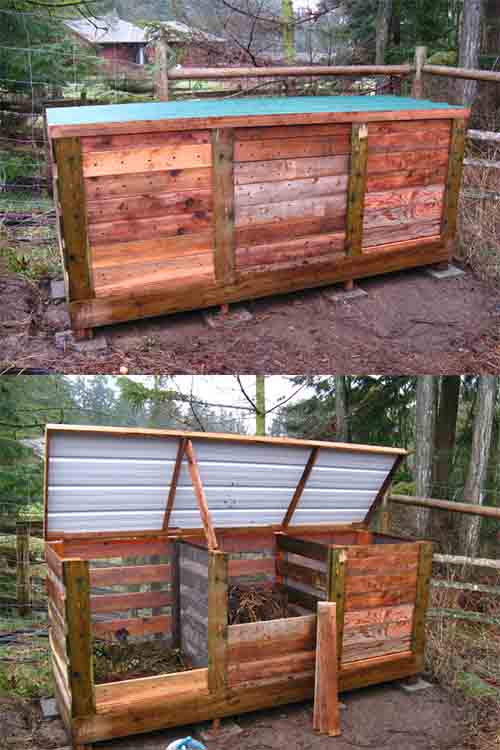 Image Credit: backyardfeast.wordpress.comIt is already time to begin preparing for next year’s garden! If you compost year around you always have good rich soil come planting season. Composting is not only good for your garden, your pocket book, but also for our environment.
Instead of trashing or your food scraps and yard waste, make them into usable rich new soil to use in your own garden and to increase your yield. Using what you have naturally is part of being self sustaining and self sufficient. Soil from composting doesn’t require as much fertilizer natural or commercial as does other soil as it was created from the very organic materials we often use to fertilize our gardens.
It’s easy to do and costs nothing once the bin is in place. You can purchase a number of different types of composters but this one is simple and easy to build yourself. Less expensive and if you use recycled wood even less cost is involved. See the tutorial by clicking the link below to learn how to build this composter yourself.
 This is an aggregated site. Please be aware some of the sites we link you to could have pop ups. We have no control over them. However, we will never link you to a site that requires you to make any purchase to view the blog.
DIY Ultimate Compost Bin - The Prepared Page
If you're gonna fight, fight like you're the third monkey on the ramp to Noah's Ark... and brother its starting to rain. Join our efforts to Secure America's Borders and End Illegal Immigration by Joining ALIPAC's E-Mail Alerts network (CLICK HERE)
-
06-18-2025, 02:32 PM #9886Senior Member
- Join Date
- Aug 2018
- Posts
- 97,635

How To Build The Ultimate Compost Bin
February 15, 2011 ~ backyardfeast
Step 1: Beg Explain patiently to professional carpenter husband over several months that current compost bins are old and too small and in the wrong place. Paint dazzling word pictures of abundant food and rich soil that would result from beautiful new compost bins.
Step 2: Research. Turns out it’s not easy to find a good set of plans! Most of the compost bin instructions out there are for recycled pallet bins or a couple of other common designs that were dismissed by said husband as either too ugly, too expensive to build on our budget, or lacking in lateral or other significant supports. We did end up finding these useful plans from the City of Vancouver, and this became our base idea. I figured that if these plans would keep Vancouver compost dry in the winter monsoons and safe from raccoons and other city critters, they were good enough for us.
Step 3: Take stock of existing supplies and recycle as much as possible. Can you believe the fr#@%!*g price of wood these days?! Skipper recycled our previous deck stairs and some cedar posts that he rescued from a job site a year or so ago. He salvaged as much of the old bin’s cedar as he could. We bought a small amount of pressure-treated wood for the base, a small amount of cedar for the front pieces, some hardware cloth to rodent-proof the bins, and a small number of assorted screws and other bits and bobs, and we’re still into this for almost $300. Hence the large number of online plans for recycled pallet compost bins!
Step 4: When the good weather arrives—start building!
Before:
Old 2-bin system falling apart. Note loose plywood top--hinges are rusted out and old lid is long gone...Preparing the new site perpendicular to the old one. New footprint: 10' x 4'.The frame of recycled cedar posts stacked on concrete pavers to keep the wood off the ground.
We decided to raise the bins off the ground for both rodent-proofing and to make shoveling a little easier on the back.
Coming together: more salvaged and recycled cedar. Former deck stairs create the base. We could have parked our deck chairs right there, it's so sturdy!
Hardware cloth on; first bin complete!
Complete! New metal roof, and compost curing in its new home.
The details…
Each of the front (removable) panels has 2 screws in place at the bottom and has holes drilled in it for air circulation
The metal roof on its cedar frame. Light for me to lift!
The finished product!
It’s our equivalent of Rob at OneStraw‘s Compost Bin of Dreams. It’s hard to convey through these photos just how sturdy and stable the whole thing is–ready for many tons of compost to be produced in the years to come. The Skipper is pretty psyched; he’s even taken to pilfering all the fruit peels shed by his crew at work each day and bringing them home in a bucket “for me”. 🙂 Most importantly, the bin’s new location clears the way for the chicken coop, and the bigger size anticipates the fabulous chicken manure and litter that will be piling up in the not-so-distant future.
Apologies for the long hiatus between posts recently. As you can see, we are now Making Progress in a big way on our spring plans. I have lots more to report on, so will be trying to post more often. Stay tuned!
How To Build The Ultimate Compost Bin | Backyard Feast
If you're gonna fight, fight like you're the third monkey on the ramp to Noah's Ark... and brother its starting to rain. Join our efforts to Secure America's Borders and End Illegal Immigration by Joining ALIPAC's E-Mail Alerts network (CLICK HERE)
-
06-18-2025, 02:37 PM #9887Senior Member
- Join Date
- Aug 2018
- Posts
- 97,635

- Home
- Homesteading
- Gardening
- Canning
- Chickens
- Recipes
- Food Storage
- Health
- Emergency Preparedness
- Natural Remedies
Dehydrated Food Storage Conversion Chart
- Home
- Food Storage & Skills
- Dehydrated Food Storage Conversion Chart
Melissa Francis
January 6, 2014
Food Dehydrating,Food Storage & Skills
chart,Conversion Chart,printable
Cooking With My Food Storage website shares a food storage conversion chart that can be printed out and added to the inside of your kitchen cabinet door or inserted into your cookbook.
We often get questions from our readers about how to use dehydrated foods in recipes and the amounts they should use…. this chart is very helpful.

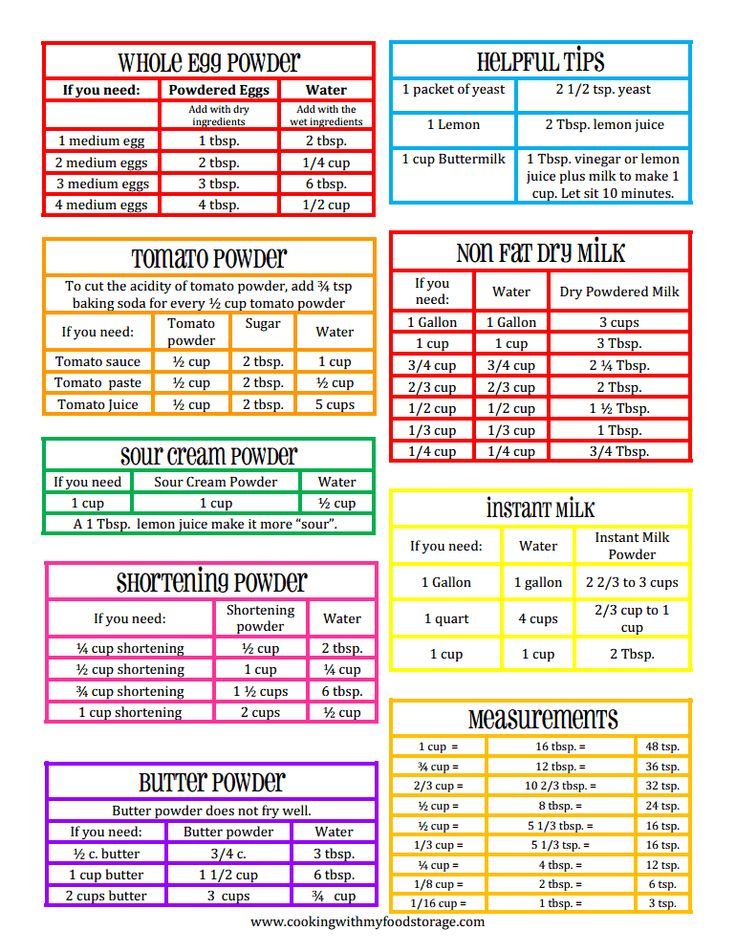
Click here to view and print out the colorful chart:
http://www.cookingwithmyfoodstorage....rintables.html
If you're gonna fight, fight like you're the third monkey on the ramp to Noah's Ark... and brother its starting to rain. Join our efforts to Secure America's Borders and End Illegal Immigration by Joining ALIPAC's E-Mail Alerts network (CLICK HERE)
-
06-18-2025, 02:44 PM #9888Senior Member
- Join Date
- Aug 2018
- Posts
- 97,635

By Ingredient
By Course
Campfire Hobo Stew
Campfire Paella Foil Packet
Bacon-wrapped Chicken Medallions
Mom's Bacon Corn Chowder
Bacon-wrapped dates with lemon thyme vinaigrette
Chicken Carbonara with Bacon and Spaghetti
Maple Bacon Pork Loin
Bacon Wrapped Cinnamon Rolls
Campfire Bacon
SAVE TO FAVORITES
This post may contain affiliate links which help support Zestuous.
132.1K SHARES
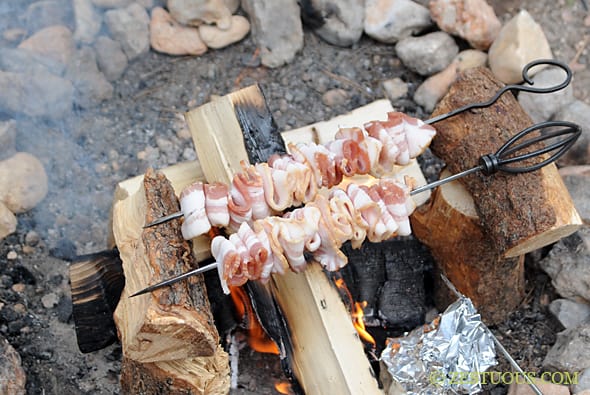
This is a recipe (or really more of a technique) that I discovered while camping a few weeks ago.
I vowed to make recipes using only foil and skewers, and no way was I going to give up bacon in the process. If you can put a marshmallow on a stick, by God, you can put bacon on a stick.
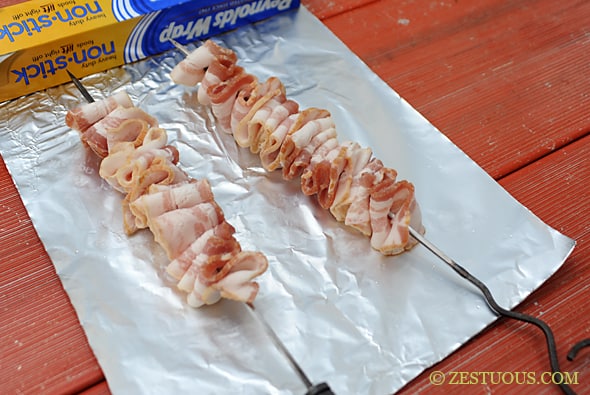
The secret to getting your bacon evenly crispy is to weave each strip onto a skewer, leaving a gap between weaves. Then, continue weaving more strips on the skewer, leaving a few inches empty at the end.
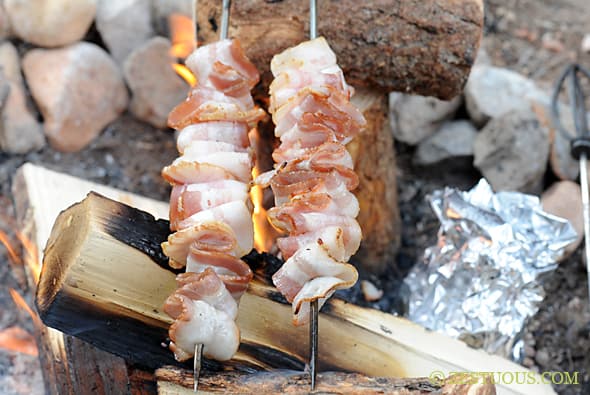
Prepare a campfire and set two logs or rocks on each side of the flames so you can rest the skewers on the logs/stones over the flames.
Rotate the skewers every 5 or so minutes to ensure even cooking and browning. You might get a few flare-ups…that’s just a bacon grease fireworks celebration. If it gets too out-of-hand, have a squirt bottle with water near by to put out some hot spots.

Your bacon should be crispy, ready and extra smoky in about 30 minutes.
What a happy campfire breakfast!
Campfire Bacon | Zestuous
If you're gonna fight, fight like you're the third monkey on the ramp to Noah's Ark... and brother its starting to rain. Join our efforts to Secure America's Borders and End Illegal Immigration by Joining ALIPAC's E-Mail Alerts network (CLICK HERE)
-
06-18-2025, 02:52 PM #9889Senior Member
- Join Date
- Aug 2018
- Posts
- 97,635
 Backwoods Home Magazine

Build a cistern out of corrugated road culvert
By Joe Mooney
Issue #146 • March/April, 2014

Using a corrugated road culvert as a cistern is an economical way to add to your water storage. Here is the finished tank with PVC pipe directing water from a gutter into the tank inlet.
.
No matter where you live, the most important resource that a prepared homestead can have is access to stored water. It may be abundant or scarce, but you still have to be able to collect and store it somewhere. That’s where tanks and cisterns come in. Wells are fantastic, but if you have no holding capacity, your access to water is 100% dependent on the pump and the electricity to run it. Whether you’re in a wet or dry environment, being able to collect rain or just hold a reserve of water is essential.
We happen to live in the Arizona desert and water is a huge issue with us. We have no well on our property, so the storage of our summer and winter rains is crucial. Unfortunately though, storing water isn’t as cheap as it once was. It used to be that you could get a plastic tank or some used IBC (intermediate bulk container) totes for cheap or build an inexpensive concrete cistern. Large-capacity poly tanks have become very popular as well as pricey, and building a concrete cistern isn’t exactly cheap either. Not to mention very labor- and maintenance-intensive.

Frame was set and leveled with PVC pre-plumbed, rebar and remesh tied, and filler rocks added to save on concrete.

Author using a boom hoist to lower the culvert into the “soupy” concrete mix

Detail view of water spigot and valve. Note that the assembly is threaded to aid in cleaning in the event of a blockage

Inside of the tank was coated with Ames’ Blue Max Liquid Rubber along the culvert seams and tank floor to prevent leakage
Recently, my wife and I were considering the option of adding more capacity to our rain system. We currently have three tanks totalling about 10,500 gallons but we wanted to up our capacity just a bit due to the overflow loss we sometimes had at the end of our monsoon season when our tanks were full. I had wanted another polytank but she wasn’t keen on another piece of plastic sitting next to the house or spending another $1,200+ on a 2,500-gallon poly tank, so I suggested that we build a cistern out of road culvert. I had seen a couple around the Tucson area and after showing her pictures and giving her estimates in the $300-400 range, she was interested. We could get a 1,100-gallon cistern out of an 8×5-foot diameter road culvert. And if we wanted to go to an even larger diameter, the cistern capacity would exponentially increase versus the smaller increase in price.
In my research, I found some general plan diagrams out of the Texas and Arizona Rainwater harvesting manuals through each state’s extension service. They gave me a good starting point for the general layouts and dimensions. Then I went ahead and sketched out my own rendition (see diagram). Once I was confident in my plans, we started the groundwork. After selecting the location, I leveled the ground, compacted it well with a hand tamper, and built a 6×6-foot frame out of scrap pieces of 2×6 lumber. I fitted some 45 degree angles in the corners to save on concrete and give it a better look as well. To get the proper thickness out of our undersized 2x6s, we had to dig the ground inside the framed area to ensure that we were adding an additional 2½- to 3-inch slab thickness overall. It is hard to see in the picture, but almost all of the interior area is at 8-inch thickness from the ground to the top level of the slab frame.
After ensuring the frame was level and anchored, I placed the PVC overflow and hose spigot pipes prior to adding rebar and concrete remesh. The PVC overflow pipe runs through a hole in the frame so that water exits out the side of the slab but still above ground level and the hose spigot makes a “U” shape and will be located on the top of the finished slab for easy access. When adding the rebar/remesh, I made sure that spacing was even near the edges as well as the top and bottom of the slab area. And while most of the rebar grid was to be 3/8 inch, the main grid that would hold the weight of the culvert was to be ¾-inch rebar. This bar needed to be dead level, as that would be a huge factor in the finished cistern being level. Note: In addition to the commercial concrete spacer blocks, I added washed riprap rock to the slab area to help hold up the rebar and to help save on concrete (see picture).
Once the groundwork was done, it was time for the pouring. We used a small concrete mixer and mixed the bags to just slightly “soupy” so as to allow the culvert to sink freely into the mix and onto the rebar grid. Just make sure it isn’t too “soupy” as it can result in a weaker final slab if the mix is too moist. Once the slab was poured, leveled, and worked a bit, we set the culvert into the mix. Luckily, my father-in-law has access to a boom truck that we used to lower the culvert into the mix. But if you don’t have access to a hoisting device, then two galvanized fence pipes strapped to the sides with four adults on the corners will work just as well. The lowering of the culvert required a bit of jiggling to sink it down to the rebar but after a couple minutes it was set. After making sure that the tank was vertically level on two sides, we added a couple braces to ensure no shifting would occur before the final setup. One aspect to remember when placing the culvert in the mix is to make sure that you have at least 4-5 inches of space between the edge of the culvert and the edge of the slab to ensure adequate strength in the thinner areas of the slab.
After edging and working the concrete for the next couple hours (times will vary based on temps, humidity, and concrete mix) we covered the exposed areas with plastic and let it sit for 24 hours to cure. This is crucial to keep cracking down to a minimum as a slow cure is usually better than a fast one. Once your concrete has cured, you can remove the plastic and the forms, doing any touch-up work as needed. The next step will be to let the slab totally dry (we waited two weeks) before applying Ames’ Blue Max liquid rubber sealant. We applied two coats to the bottom of the tank and along the interior seams. This product was expensive but is 100% waterproof, non-toxic, and we only required about ¼ of the gallon to finish the tank.
Once this is done, you should attach a valve to your spigot stub and add a section of pipe to your interior overflow pipe. Remember, this overflow pipe should be a couple inches below the highest level of your tank (see diagram). After these are done it will be time to add a tank lid or covering. We opted to have a local HVAC guy fabricate one for us for about $100, but I’ve seen people use scrap lumber, tarps, etc., to make their own tank lids.
All in all, the project costs were $275 for the culvert, $88 for the concrete and rebar, $15 for the PVC, and $54 for the Ames’ Blue Max. In total, you could do this project with all new materials for $432 (add a $100 for the fancy galvanized lid). But, if you are resourceful like most BHM readers are, you can possibly get a culvert section for much less off Craigslist or from a local contractor, further lowering your costs. This project turned out great for us and I hope it gives you at least an idea of another option when it comes to storing water for your homestead.

Build a cistern out of corrugated road culvert - Backwoods Home Magazine
If you're gonna fight, fight like you're the third monkey on the ramp to Noah's Ark... and brother its starting to rain. Join our efforts to Secure America's Borders and End Illegal Immigration by Joining ALIPAC's E-Mail Alerts network (CLICK HERE)
-
06-18-2025, 05:36 PM #9890Senior Member
- Join Date
- Aug 2018
- Posts
- 97,635

DIY
How to Wax Cheese Step by Step
June 16, 2025 by Kendra Lynne
Several weeks ago I had a chance to experiment with waxing cheese. I really had no idea what I was doing, but I’ll show you how it went anyway. Just for fun. And it was fun. Probably too much fun.
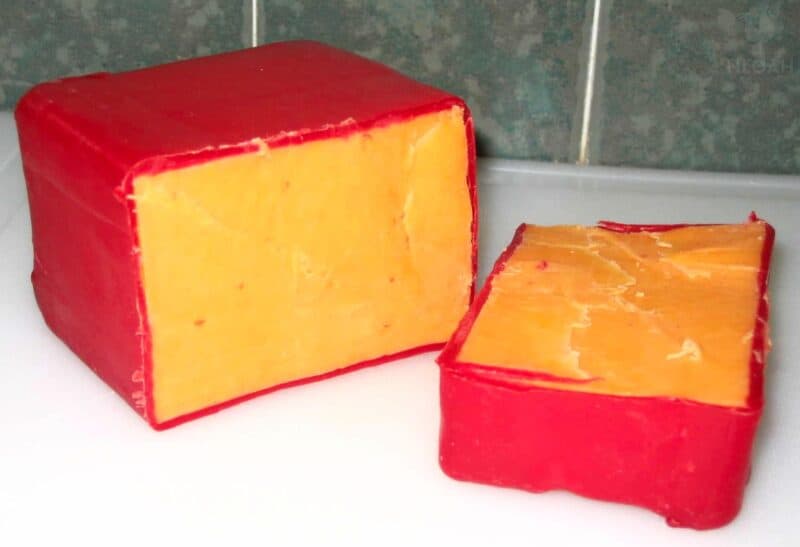 DIY waxed cheese
Why Wax Cheese?
The biggest benefit to waxing cheese is that when done properly it can be stored unrefrigerated for many years. Some places I’ve read have stated it will last up to 25 years. Some sources have said indefinitely.
The flavor of the cheese will sharpen as it ages, and it may get some mold on it, but it will still be edible even after long periods of storage. The trick is to keep it cool.
MY LATEST VIDEOS
Yes, you can cheese. And you can dehydrate it. But waxing cheese will keep it in a fresher, more natural state.
Does Waxing Cheese Preserve It?
The short answer – yes!
Waxing cheese is a practice that has been around for centuries. Cheese makers will coat their cheeses in a thin layer of wax to preserve them and prevent mold growth. The benefit of waxing cheese is that it allows the cheese to age without drying out or becoming mushy.
Waxing also protects the flavor of the cheese by preventing unwanted flavors from permeating the cheese. In addition, waxing prevents the loss of moisture, which can cause the cheese to become crumbly.
What Kind of Cheese Can Be Waxed?
Hard cheese is typically the best for waxing. In particular, Parmigiano-Reggiano, Cheddar, Swiss, Romano, Gruyere, and Colby.
Homemade cheese or artisan cheese will be better to wax than already refrigerated store-bought cheese. Also, you want to watch that the cheese you will be working with isn’t more than 40% moisture.
Here’s an interesting excerpt from cheesemaking.com:Usually cheese bought in the grocery store is an already aged to perfection finished product. Waxing it in small pieces may cause some problems. If a cheese is not turned on a regular basis gravity will cause all the moisture to fall to the bottom causing a mushy mess under the wax. We would suggest you buy whole wheels or make your own cheeses and after waxing them, turn over at least once a week to prevent problems. We also suggest you air dry your cheese for 2-3 days prior to waxing.
Can You Use Any Wax on Cheese?
So what kind of wax should you use? Here are a few popular options.
Carnauba Wax
Carnauba wax comes from the leaves of the copernicia prunifera, a fan palm tree that is native to Brazil. It’s the hardest natural wax available, which makes it ideal for use on cheese. Carnauba wax is also moisture-resistant, meaning it will help keep your cheese from drying out.
Finally, carnauba wax has a high melting point, so it won’t melt when exposed to heat (which makes it great for grating over pasta!).
Beeswax
Beeswax is another popular choice for waxing cheese. It’s made by bees from tree resins, flower nectar, and pollen – making it a completely natural product.
Beeswax is also moisture-resistant and has a high melting point, making it ideal for use on cheese. One downside of beeswax is that it’s not as hard as carnauba wax, so it may need to be reapplied more often.
Paraffin Wax
Paraffin wax is made from petroleum and coal tar – making it a completely synthetic product. Paraffin wax is very hard and has a high melting point, making it ideal for use on cheese.
One downside of paraffin wax is that it’s not as moisture-resistant as carnauba or beeswax, so your cheese may dry out more quickly if you use it.
How to Wax Cheese: Step by Step
I’ve been wanting to learn how to wax cheese for a while now. Every homesteader needs to know how to preserve cheese, right?
So when I recently lucked up a really good deal for a 5 pound block of Colby, I thought I’d take an afternoon to try something new and wax it!
This was my beautiful block of Colby. I think it was locally made. Who really knows. It was a good deal though, so I grabbed it up from a friend’s co-op:
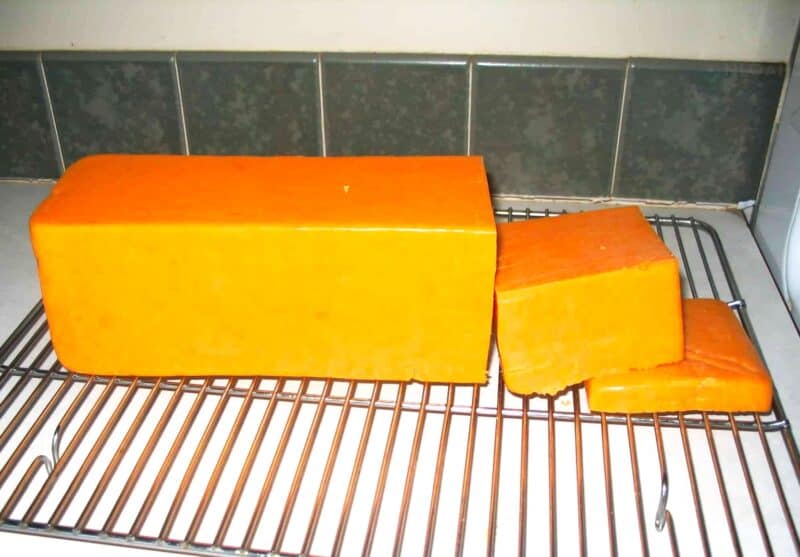 Colby cheese
I thought about freezing it. But what fun is that? I’ve had a block of cheese wax sitting in my cupboard for a couple of years now, so this was the perfect excuse to get it out and play a little.
Instead, I decided to give waxing a try. Here’s what to do…
Cut the Cheese Up and Let it Dry
The first thing I did was cut the block into large cubes, and allowed them to air dry for a couple of days:
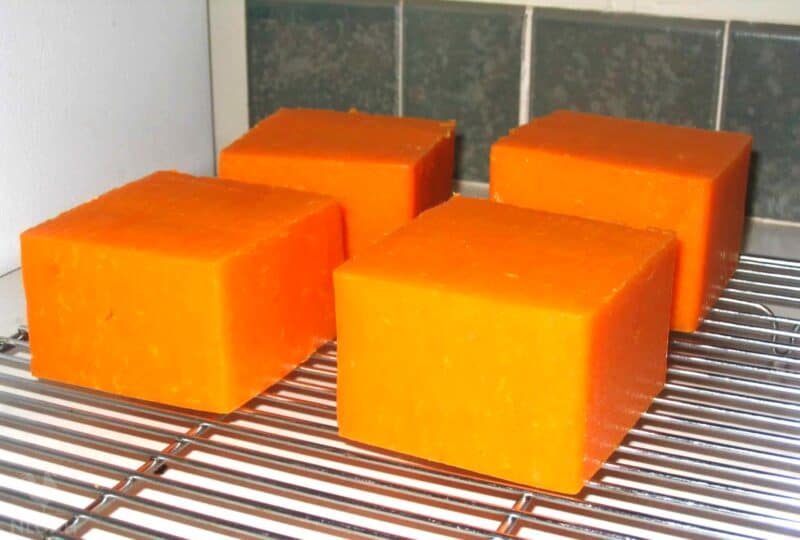 four blocks of air-dried Colby cheese
You want to let the outside of the cheese harden, so there isn’t moisture trapped underneath the wax.
Moisture can lead to a variety of problems, including mold growth (mold spores proliferate when there’s moisture) as well as bacteria development.
Figure Out What Wax to Use
I received a 1 lb. block of red cheese wax for my birthday a couple of years ago, so this is what I used:
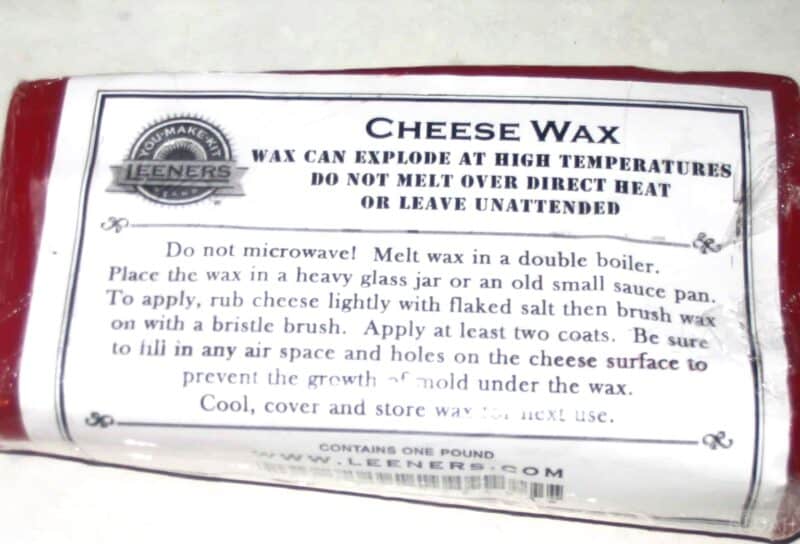 cheese wax in packaging
Cheese wax is reusable, which is great. I’ve read other people say they wax their cheese with beeswax.
You could also use paraffin wax. I’ll address the many other types of wax you can use in greater detail a bit later in the article.
Melt the Wax
When you melt the wax, you must do it in a double-boiler:
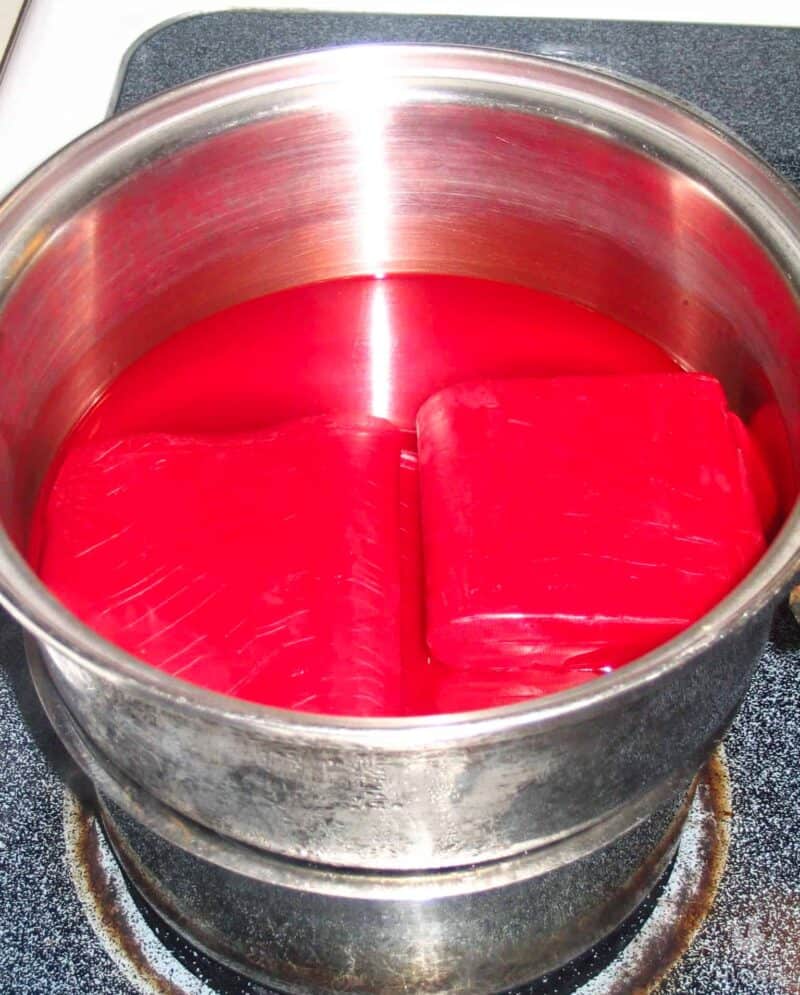 melted cheese wax in double boiler
I put a pot with the wax in it over a pot or bowl of boiling water. This prevents the wax from getting scorched as it melts.
When the wax was melted, I simply dipped each chunk of cheese in to coat:
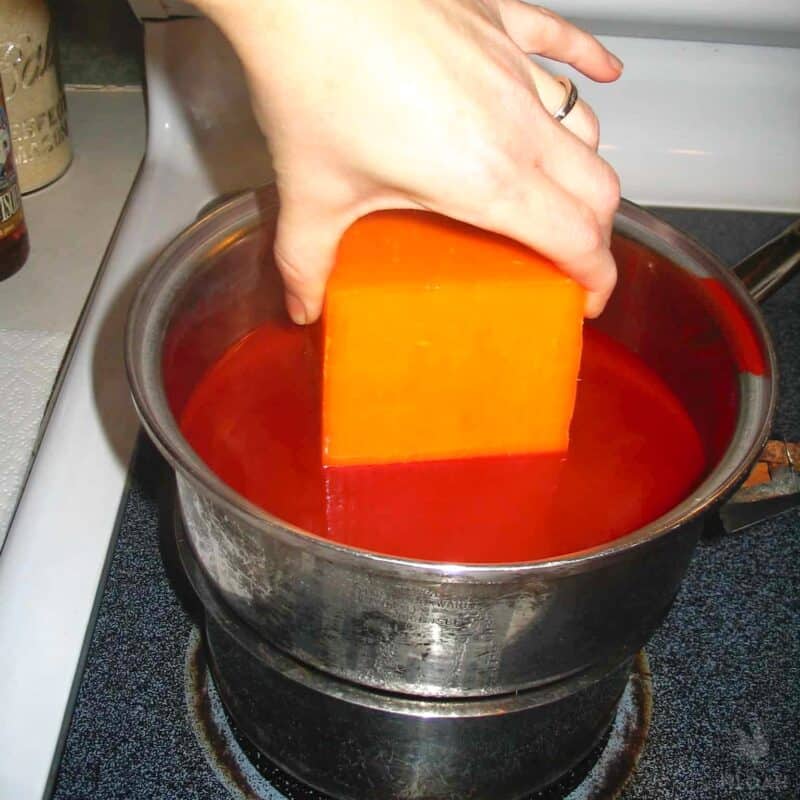 dipping cheese in wax by hand
Some places I read said to brush a vinegar wash over the cheese to inhibit the growth of mold. Some sources recommended rubbing it with salt. Some experts didn’t recommend doing anything in particular, so I opted not to do anything extra.
Dip the Wax and Allow the Cheese to Harden
One dip, and then I set the cheese on a paper towel to allow the wax to harden.
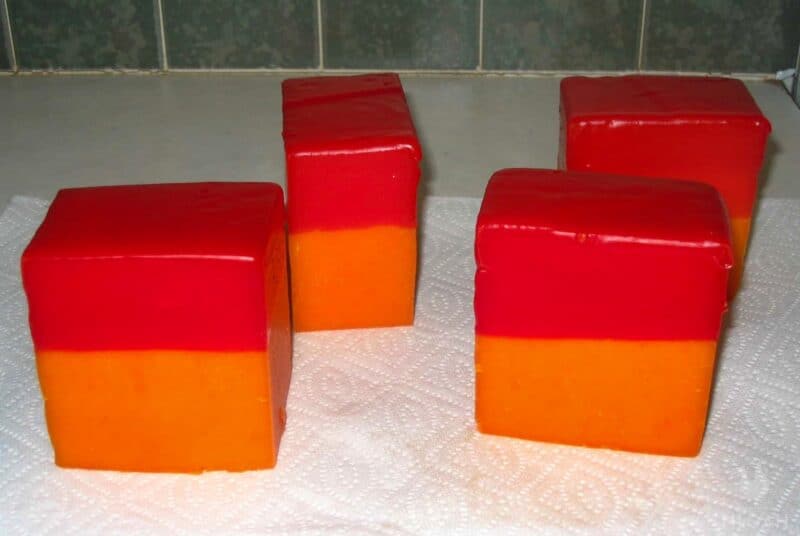 top halves of pieces of cheese covered in wax
It only took a minute or so for the wax to cool and harden. Not long.
Next, I dipped the other side in the wax. You will likely only be able to get half of the cheese in the pans of wax at a time, and that’s fine – just make sure you get the entire block of cheese covered in wax.
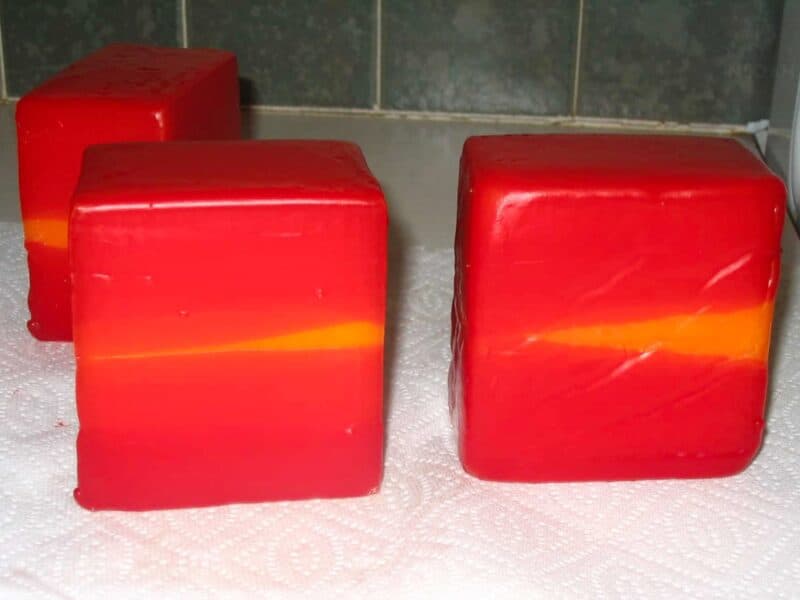 cheese that was just waxed
After dipping the first time, I quickly realized that my chunks of cheese were too big for the wax to coat completely with a dip on either side. Should’ve thought that out a little better.
I tried to paint the wax over the exposed cheese. Not such a brilliant idea:
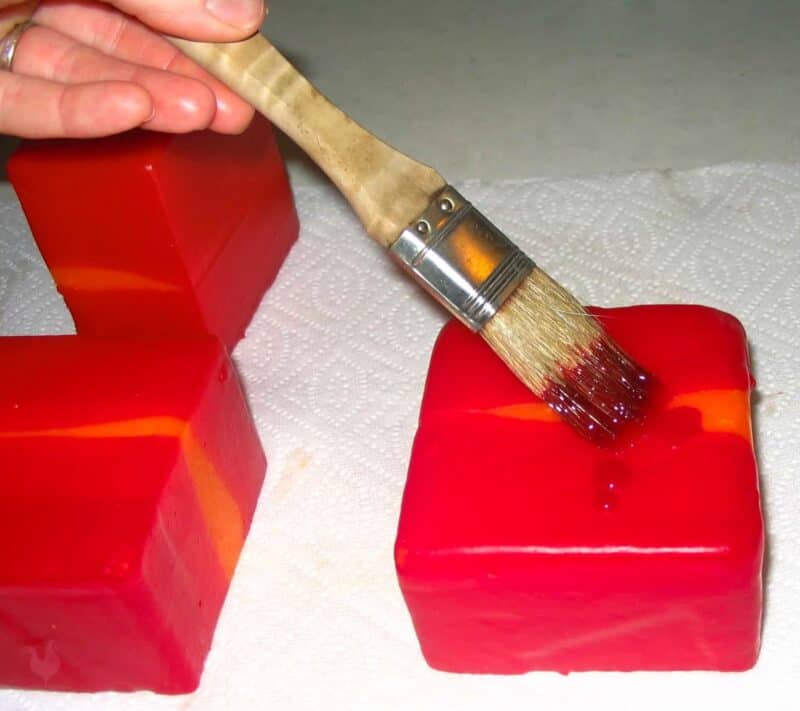 painting cheese with wax
Dip Again Until Coated
I ended up just dipping all sides of the cheese in the wax, until everything was coated. It wasn’t evenly coated, but it was good enough to preserve the cheese.
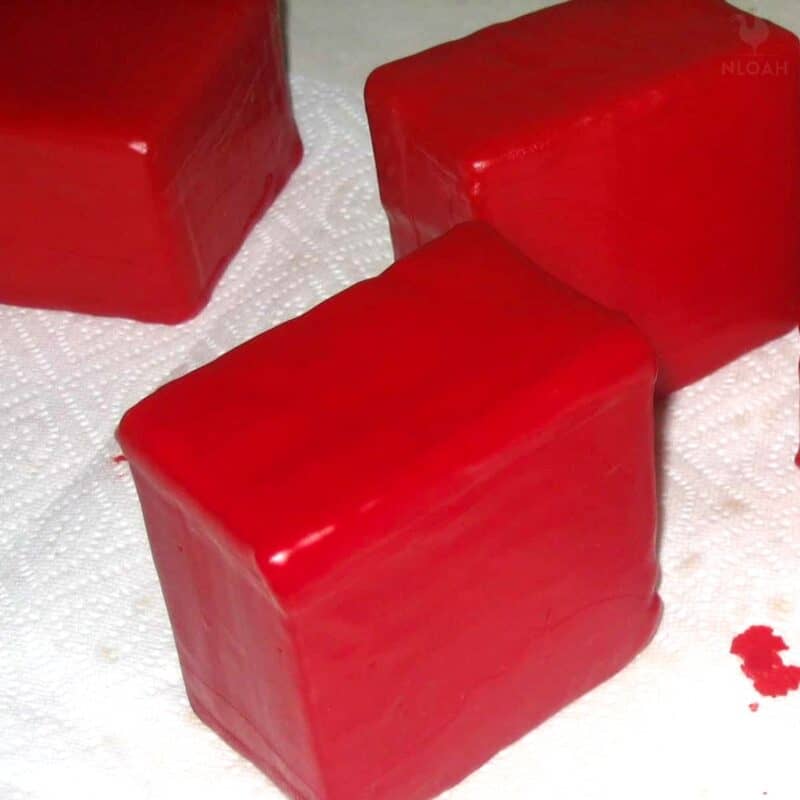 waxed cheese finished
I probably dipped each side about 5 times. They weren’t perfect, but they were so much fun to make!
In most cases, you can smooth the bumps out later on or remove excess wax with a knife after dipping, if you need to. It won’t hurt anything to leave it there, but if it bothers you for the purpose of aesthetics, go ahead and fix it later on.
Save the Leftover Wax
I poured the leftover wax into a glass jar for future use. When I’m ready to use it, I’ll just heat the jar of wax in a pot of hot water, and pour it into the now-designated-cheese-waxing-pot. As for the brush – forget about it.
Other Tips for Waxing Cheese
Waxing cheese is a bit of an art form, but with a little practice, anyone can do it. Here are a few tips to help you get started.
Be Careful With the Vapors from the Wax
One thing to keep in mind when waxing cheese is that the vapors from the melted wax can be dangerous if inhaled. That’s why it’s important to work in a well-ventilated area and to avoid breathing in the fumes directly. If you can’t do either of those things, then be sure to wear a mask while you’re working.
Wax can also easily catch fire and a wax fire can’t be put out with water. Be super careful heating up the wax, both so you don’t burn yourself and so it doesn’t catch on fire.
Heat the Wax to 225-240 Degrees
Another tip is to make sure that you heat the wax to the correct temperature. If it’s too hot, then it can damage the cheese. If it’s too cold, then it won’t adhere properly and will just end up being a waste of time and effort. The ideal temperature range for melting wax is between 225 and 240 degrees Fahrenheit.
Make Sure You Dip the Cheese For at Least 6 Seconds
When dipping the cheese into the melted wax, be sure to do so for at least six seconds. This will ensure that enough wax gets onto the surface of the cheese and that it adheres properly.
How to Deal With Mold Beneath the Wax
Here’s what to do if you find mold on a waxed cheese.
If there is a small amount of mold on the surface, the cheese may not have been heated hot enough during the waxing process. In this case, the wax can be removed and the cheese can be rewaxed.
If there is a lot of mold or it is growing underneath the wax, then the cheese should be removed from the wax, brushed or scraped off, and given a good wiping/scrubbing with a cloth soaked in saturated brine. The cheese should then be allowed to dry and re-waxed.
How to Clean Up Cheese Wax
If you’ve recently waxed your cheese, you may be wondering how to clean the wax off of surfaces. Here are a few simple tips to help you remove cheese wax from surfaces quickly and easily.
Use a soft, dry cloth to wipe away any excess wax .If there is remaining wax, fill a bowl with boiling water and hold the affected area over the steam for a few minutes to soften the wax.
Use a dull knife or putty knife to scrape away the softened wax. Wipe the area clean with a damp cloth.
To prevent future wax buildup, avoid using abrasive cleaners or scrubbers on surfaces that will come into contact with cheese wax. Instead, use a mild dish soap and warm water to clean these surfaces regularly.
How Do You Store Cheese After Waxing?
Once the wax cooled completely, I put the blocks of cheese into a ziploc bag and stuck them in the bottom of my fridge. It was the coolest place I had. A “cheese cave” is the preferred place to store cheese. Cheese will last longer when stored in a cool place, out of direct sunlight.
As a general rule of thumb, waxed cheese should always be stored in a cool, dry place, but where exactly that place might be is totally up to you.
The best way to store waxed cheese is in a special waxed cheese paper. This type of paper is breathable and will allow the cheese to breathe while still preventing mold growth.
Waxed cheese paper can be found at most specialty food stores. If you cannot find waxed cheese paper, you can wrap the cheese in parchment paper or beeswax wrap.
Waxed cheese should not be stored in the fridge for more than a few days, as the cold temperature will cause the flavor of the cheese to deteriorate. If you are planning on storing the waxed cheese for an extended period of time, it is best to keep it in a cool cellar or root cellar.
The Results
Okay, so it’s only been several weeks since I waxed the cheese. But one of the blocks got dented in the fridge, so I needed to use it anyway (since a corner of the cheese was now exposed). I was curious to see how it had held up so far.
It cut easily, and I was happy to find that there was no mold or liquid dripping from the cheese (as others have complained of having trouble with).
The wax peeled right off, and the outside of the cheese which had been allowed to harden was no longer hard, but was just as soft as the rest of the block. The flavor hadn’t changed, since it hadn’t been in storage for very long.
I re-covered the exposed end of the block of cheese with the wax I had cut off, and put it in a ziploc bag to keep fresh until we’d used it all up. When the cheese was gone, I saved the wax to use again. Just wash it off, dry it, and store.
I really enjoyed the waxing process, and look forward to doing another batch.
Final Thoughts
There is a lot of really good information on the internet about waxing cheese, so I’d encourage you to do some more research into why and how to wax cheese.
You may not realize it, but this can be a controversial subject.
If you’ve been waxing cheese for a while now, and have any advice to offer, I’d love to hear what you have to share! What kind of cheese do you wax? Which kind of wax do you prefer? Where do you store your cheese?
FAQ
Can any cheese be waxed?The answer to this question depends on the type of cheese in question. Hard cheeses, such as cheddar or Parmesan, can be stored at room temperature for two to four weeks. This is because the high acidity and low moisture content of hard cheeses make them resistant to spoilage.
However, softer cheeses, such as Brie or Camembert, must be stored in the refrigerator. This is because their higher moisture content makes them more susceptible to bacteria growth.
How long will waxed cheese last?
Waxed cheese can last for several months, or even years, if stored properly. However, once the cheese has been cut, the exposed surface will begin to oxidize and the quality of the cheese will decline.
What kind of wax is used on cheese?
The type of wax used depends on the variety of cheese. For example, cheddar cheese is typically covered in paraffin wax, while Gouda is best dipped in beeswax.
Does cheese coated in wax need to be refrigerated?
In most cases, no. Waxed cheese does not need additional refrigeration to prevent spoilage.


Kendra Lynne
A city girl learning to homestead on an acre of land in the country. Wife and homeschooling mother of four. Enjoying life, and everything that has to do with self sufficient living.
How to Wax Cheese Step by Step
If you're gonna fight, fight like you're the third monkey on the ramp to Noah's Ark... and brother its starting to rain. Join our efforts to Secure America's Borders and End Illegal Immigration by Joining ALIPAC's E-Mail Alerts network (CLICK HERE)


 Reply With Quote





Email List Changeover & 38 days from disaster
09-27-2026, 11:26 AM in illegal immigration Announcements